TQC AB5000 User manual
1
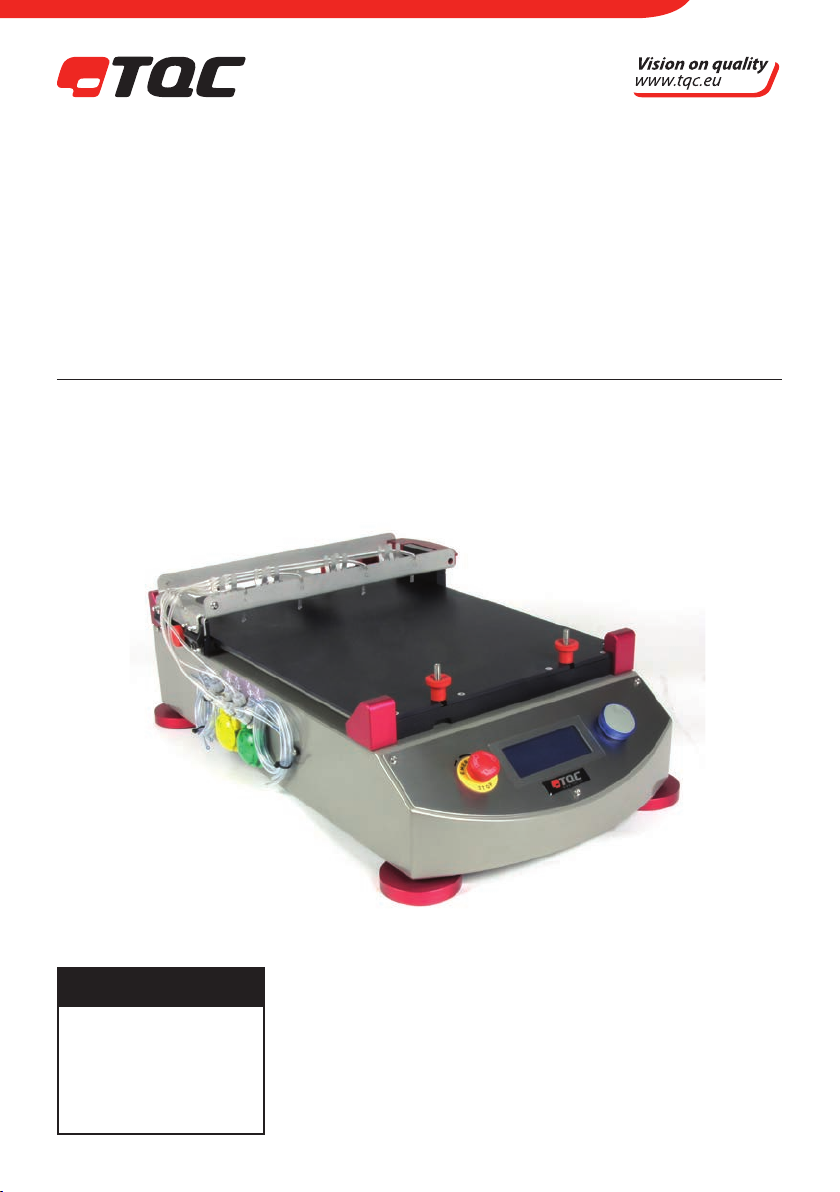
TQC SCRUB, ABRASION AND WASHABILITY TEST
AB5000
User Guide
V3.1 1216
rmware 2.0.0*
IMPORTANT!
Before taking this
instrument in use we
strongly advise you
to read this manual
carefully.

2
This product complies to
- Machinery Directive 2006/42 / EC
- Low Voltage Directive 2006/95 / EC
- EMC Directive 2004/108 / EC
This product is RoHS 2 compliant (2011/65/EU)
TQC will grant a warranty for a period of 12 months for Scrub, Abrasion and Washability Test
and 12 months for all related equipment from the date of delivery in respect of any evidence of
faulty workmanship and materials.
Should a delivered consignment prove to be contrary to contract upon inspection, the
customer shall grant TQC the opportunity hereunder of removing the fault, or else the
customer may demand replacement. Because of size and weight of the instrument TQC will
strive to give remote support.
Should the supply or delivery of any improvement or replacement not prove possible, the
customer may choose between having the purchase price reduced or in demanding the
contract of sale to be rescinded (conversion). Damage resulting from natural wear and tear,
mechanical or chemical damage, an act of God or non compliance with the operating
instructions shall be excluded from the warranty as well as mechanical interference by the
customer or by third parties with Scrub, Abrasion and Washability Test and related equipment
without TQC’s written permission. No liability will be accepted for defects, damage or injury
caused due to use not carried out in accordance with the manufacturer’s user instructions.
To claim warranty, the rejected product has to be sent to TQC together with the original
invoice, any exchange before the product has been returned to TQC is not possible. TQC
reserve the right to repair, exchange or supply an equivalent substitute. TQC is not liable for
handling or transport costs. Warranty on the purchase price is limited, all liability for
consequential damages or changes in technology is expelled.
*This manual describes the functionality on systems with rmware version 2.0.0.
The rmware version is indicated in the startup screen immediately after the system is switched on.

3

4
CONTENT
1 GENERAL 7
1.1 Importance of operating manual 7
1.2 User-responsibility 7
1.3 Responsibility of personnel 7
1.3.1 Dangers 7
1.4 Designated purpose 7
1.5 Copyright 8
1.6 Manufacturer’s/Supplier’s address 8
2 SAFETY INSTRUCTIONS 8
2.1 Meaning of Symbols 8
2.2 Availability of Safety Information 8
2.3 Training of Personnel 9
2.4 Dangers from Electrical Energy 9
2.5 Points of Special Danger 9
2.6 Care, Maintenance, Repairs 9
2.7 Modications to the Equipment 9
2.8 Cleaning of the Instrument and Disposal of Materials 10
3 TRANSPORT AND STORAGE 10
3.1 Packing 10
3.2 User: Check on Receipt 10
3.3 Reporting Transport Damage and Documentation 10
3.4 Storage and Protective Measures when not in use 10
4 INSTRUMENT DATA 10
4.1 Name / Article 10
4.2 Scope of Supply 11
4.3 Technical Data 11
4.4 Dimensions and Weight 11
4.5 Basic Unit 11
4.6 Accuracy 11
4.7 Noise Level 11
5 INSTALLATION AND ASSEMBLY 12
5.1 Installation and Operation 12
5.2 Preparation of Energy Connections 12
5.3 Mains Connection 12
EN

5
6 INSTRUMENT CONTROLS AND FUNCTIONS 13
6.1 General instruments settings 13
6.2 Models 13
7 MENU BASIC MODEL 14
7.1 Tqc Start Screens After Switched On 14
7.2 Main Menu 14
7.3 Run Setup 14
7.4 Run Setup – Test Edit 15
7.5 Instrument Setup 15
7.6 Run 16
8 MENU STANDARD MODEL 18
8.1 Tqc Start Screens After Switched On 18
8.2 Main Menu 18
8.3 Run Setup 18
8.4 Run Setup – Test Edit 18
8.5 Instrument Setup 19
8.6 Instrument Setup – Language 20
9 MECHANICAL 22
9.1 Test beds 22
9.2 Sample clamp frames 22
9.3 Tool holders 23
9.4 Tools 24
10 INSTRUMENT PREPARATIONS 31
10.1 Test bed 31
10.2 Test Panels 31
10.3 Test Fluid 31
10.4 Waste uid container 32
10.5 Tool carrier 32
10.6 Tools 32
11 OPERATION 32
11.1 Preparatory Work 32
11.2 Performing a Washability test 32
11.3 Start the instrument 33
EN

6
EN
12 CARE AND MAINTENANCE 33
12.1 Inspection and Maintenance 33
12.2 Disposal of Materials 33
12.3 Customer Service 33
13 DISCLAIMER 33
ANNEX A | STANDARDS CONFIGURATION TABLE 34
ANNEX B | ORDERING MATRIX 36
ANNEX C | CHEMICAL RESISTANCE OF WASHABILITY TEST COMPONENTS 37
DECLARATION OF CONFORMITY TQC BASIC SCRUB & WASHABILITY TEST 52
DECLARATION OF CONFORMITY TQC SCRUB & WASHABILITY TEST 53

7
1 GENERAL
1.1 Importance of operating manual
This manual is written in order to become familiar with all the functions and possible applicati-
ons of the instrument. It contains important instructions about how to use the instrument safely
and economically; according to the purpose designated. Following these instructions is not only
essential to avoid risks. It also reduces repair costs and down-time and increases the products
reliability and service-life.
Anyone who works with the instrument should follow the instructions in this manual, particu-
larly the safety related instructions. Additionally local rules and regulations relating to environ-
mental safety and accident prevention should be observed.
1.2 User-responsibility
The user should;
• onlyallowpersonstoworkwiththeinstrumentwhoarefamiliarwiththegeneralinstructions
on how to work safely and to prevent accidents. The use of the instrument should have been
instructed duly The safety chapter and the warnings in this manual should have been read and
understood; acknowledged as evidenced by their signature.
• regularlycheckthesafety-awarenessofpersonnelatwork.
1.3 Responsibility of personnel
Before commencing work anyone appointed to work with the instrument should pay attention
to the general regulations relating to working safety and accident prevention. The safety chapter
and the warnings in this manual should have been read and understood; acknowledged as
evidenced by their signature.
1.3.1 Dangers
This instrument has been designed and constructed in accordance with state-of-the-art techno-
logy and the acknowledged safety regulations. Nevertheless, working with the instrument may
cause danger to the life and health of the operator or to others, or damage to the instrument or
other property. Therefore the instrument should only be used for its designated purpose, and in
a perfect technical condition. Any defect that could have a negative eect on safety should be
repaired immediately.
1.4 Designated purpose
The Scrub, Abrasion and Washability Test is exclusively designed to perform washability tests of
painted and coated test panels as described within the specications.
Other applications constitute improper use. TQC will not be held liable for damage resulting
from improper use. Designated purpose also includes properly observing all instructions in the
operation manual, and adherence to inspection and maintenance schedules.
EN

8
1.5 Copyright
The copyright of this operating manual remains with TQC.
This operating manual is intended solely for the user and his personnel. Its instructions and
guidelines may not be duplicated, circulated or otherwise passed on to others, neither fully, nor
partly. Infringement of these restrictions may lead to legal action may be taken if this restrictions
are infringed upon.
1.6 Manufacturer’s/Supplier’s address
TQC The Netherlands,
Molenbaan 19 T +31(0)10-7900100,
2908 LL Capelle aan den IJssel F +31 (0)10-7900129
2 SAFETY INSTRUCTIONS
2.1 Meaning of Symbols
The following symbols for dangers are used in this instruction manual.
Symbol Explanation Warning
Possible immediate danger to If this guideline is not noted it can
the life or health of personnel. lead to severe danger to health,
up to fatal injury.
A dangerous situation could Non observance of this guideline
be caused. can lead to injury or to
damage to equipment.
Special tips and particular Guidelines to make optimal use of
information. the instrument.
2.2 Availability of Safety Information
The instruction manual should be kept at the place where the instrument operates. In addition to
the information contained in the instruction manual, general and local regulations for accident
prevention and environmental protection shall be kept available and observed. Always ensure all
guidelines in respect of safety and dangers on the instrument are in readable condition. In case
of danger the instrument has to be switched o by means of the emergency- button on the front
of the instrument. Then eliminate danger.
Danger
Warning
EN

9
2.3 Training of Personnel
• Anyonewhooperatestheinstrumentshouldbetrainedproperly.
• Ithastobeclearwhohaswhichresponsibilityregardingcommissioning,set-upof
maintenance and repairs, installation, and operation.
• Anyonewhohasn’tnishedtrainingshouldbesupervisedbyanexperiencedpersonwhile
working with the instrument.
2.4 Dangers from Electrical Energy
• Workontheelectricalsupplymayonlybedonebyaqualiedelectrician.
• Theelectricalequipmentoftheinstrumentmustbecheckedregularly.Looseconnectionsand
cable damaged by heat must be corrected immediately.
• Alwaysmakesuretheinstrument’spoweristurnedowhileadjustinganyelectric
component.
2.5 Points of Special Danger
There are two special point of danger in the moving zone of the tool carriers:
Always have the tool carrier locked into place prior to testing.
Keep your hands away from the working area after the instrument has started!
2.6 Care, Maintenance, Repairs
• Alwaysmakesuretheinstrumentisconnectedtoanearthedsocket.
• Maintenanceandinspectionshouldbecarriedoutatthecorrectintervals
• Operatingpersonnelshouldbeinformedbeforestartingwithmaintenanceorrepairwork
• Alwaysmakesuretheinstrumentspoweristurnedoandtheinstrumentisnotconnectedto
a socket while adjusting any electrical component whenever maintenance, inspection or
repair work is done.
• Donotopentheinstrument.Incaseofmalfunctionalwaysconsultthemanufacturer.
2.7 Modications to the Equipment
• Anymodicationsoradditionsoralterationstotheinstrumentmaysolelybemadewith
permission from the manufacturer.
• AllmeasuresinvolvingmodicationsrequirewrittenconrmationofapprovalfromTQC
• Instrumentswhicharenotinfault-freeconditionmustimmediatelybeswitchedo
• Onlyusereplacementpartsfromtheoriginalsupplier.Partsusedfromothersourcesaren’t
guaranteed to take the loading and meet the safety requirements.
Danger
EN

10
2.8 Cleaning of the instrument and disposal of materials
• Wheninuseitisnotalwayspossibletoavoidsomespillofpaintontheworksurface.
• Trytokeeptheinstrumentascleanaspossibletopreventdistortionsoffunctions.
• Tocleantheinstrumentproperlyuseasuitablesolventtodisposeremainsofpaintorink.
• Wearglovesduringcleaning;Don’tspillanoverdoseofsolventduringcleaning.
• Cleaningmaterialsmustalwaysbeusedanddisposedofcorrectly.
3 TRANSPORT AND STORAGE
3.1 Packing
Please take note of pictorial symbols on the packing.
3.2 User: Check on Receipt
Check packing for damage
After unpacking check complete supply.
3.3 Reporting Transport Damage and Documentation
Any damage to the package or instrument should be documented as accurately as possible (pos-
sibly photographed) and reported to the relevant insurers or, in the case of sales “delivered to
customers works”, to the supplier. Always have damages to the package reported on the receipt
note and registered to the deliverer.
3.4 Storage and Protective Measures when not in use
• Theinstrumentmustbestoredinadryplaceatatemperaturebetween10-40°C.
• Thestorageperiodshouldnotbelongerthan3months.
• Storeinstrumentintheoriginalpackingifpossible.
4 INSTRUMENT DATA
4.1 Name / Article
TQC Scrub, Abrasion and Washability Test – Microprocessor controlled scrub, abrasion and
washability test.
EN

11
4.2 Scope of Supply
• TQCScrub,AbrasionandWashabilityTest
• Powercord
• FlexibleLEDlight
• Tubing(onlyAB5000,AB5005)
• Fluidcontainers(onlyAB5000,AB5005)
• Optionalaccessories
4.3 Technical Data
Stroke speed : 1 – 60 cycles per minute
Stroke length : 20 - 300 mm
Max panel width : max 70 mm
Max panel length : max 350 mm
Max panel height : max. 35 mm
Pump speed : 0,0 - 3,0 ml (only AB5000, AB5005)
4.4 Dimensions and Weight
Depth : 650 mm *
Width : 350 mm *
Height : 350 mm *
Net weight : approx. 35 kg
* without uid containers
4.5 Basic Unit
Power supply : 115 – 230 V, 50 - 60 Hz
Power consumption : max. 80 Watt
Display : Blue illuminated, graphic 100 x 35 mm, 193x64 pixels
Safety : Emergency button, integrated acoustic alarm
Function : Jog shuttle knob by rotation / pushing
4.6 Accuracy
Tool carrier speed accuracy : +/- 1% of set speed
Stroke length accuracy : +/- 0.01 mm (with empty carrier)
4.7 Noise Level
The continuous noise level from the instrument does not exceed 70 dB.
EN
12
5 INSTALLATION AND ASSEMBLY
5.1 Installation and Operation
The instrument has to be installed in a suitable place, preferably on a sturdy table or work area,
with normal ambient temperature. Special xings are not required.
Carefully unpack the apparatus and the accessories and check complete supply. Place, if neces-
sary, a spirit level on the work surface and adjust the height of the feet.
5.2 Preparation of Energy Connections
The instrument is equipped with a safety tested mains supply cable and may only be connected
to plug sockets with earth connection complying with the safety regulations.
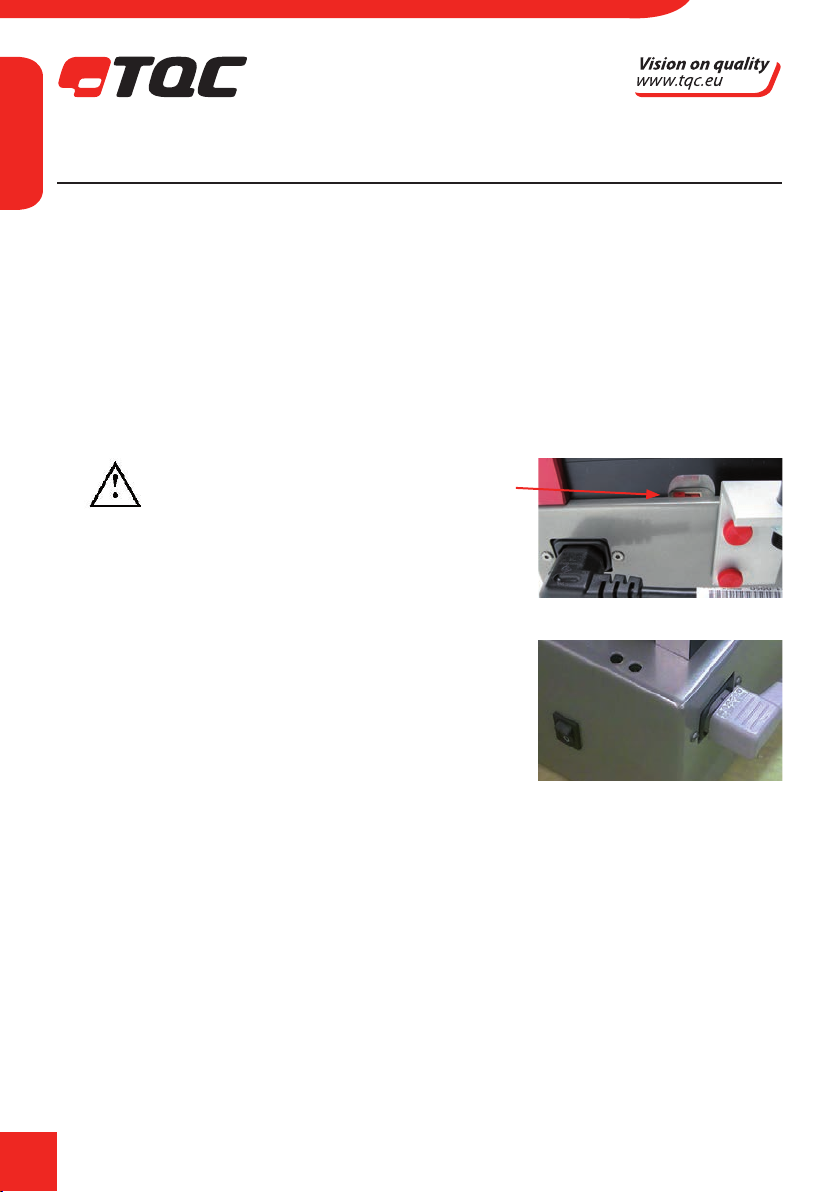
5.3 Mains Connection
The mains connection is located at the rear of the instrument.
Plug in the female plug in the socket on the rear of the housing.
The ON/OFF Switch is located at the right hand site near the
end of the instrument.
Warning
Before connecting the instrument, check
whether the supply voltage specied in the
indication window corresponds to the local
supply voltage. If it does not, the instrument
shall not be connected under any circums-
tances. This switch is located at the rear of
the instrument.
EN
13
1
2
3
5
10
7
8
6
9
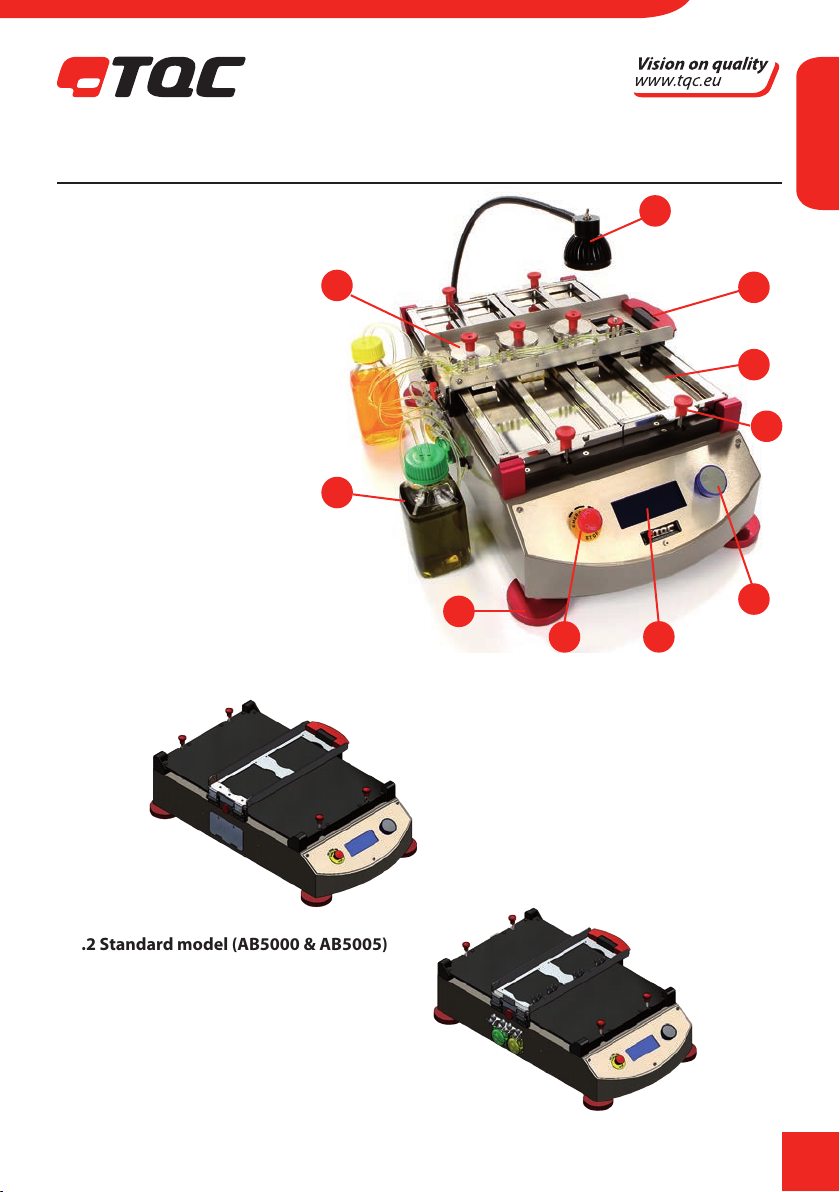
6 INSTRUMENT CONTROLS AND FUNCTIONS
6.1 General instruments settings
1. Display with process information
2. Jog Shuttle
3. Emergency button
4. Acoustic alarm / Buzzer
5. Levelling supports
6. Traverse / tool carrier
7. Drippers
8. Lamp
9. Panel Clamp on test bed
10. Fluid bottles
11. Fixture screws
6.2 Models
6.2.1 Basic model (AB5210 & AB5215)
6.2.2 Standard model (AB5000 & AB5005)
11
EN
14
7 MENU BASIC MODEL
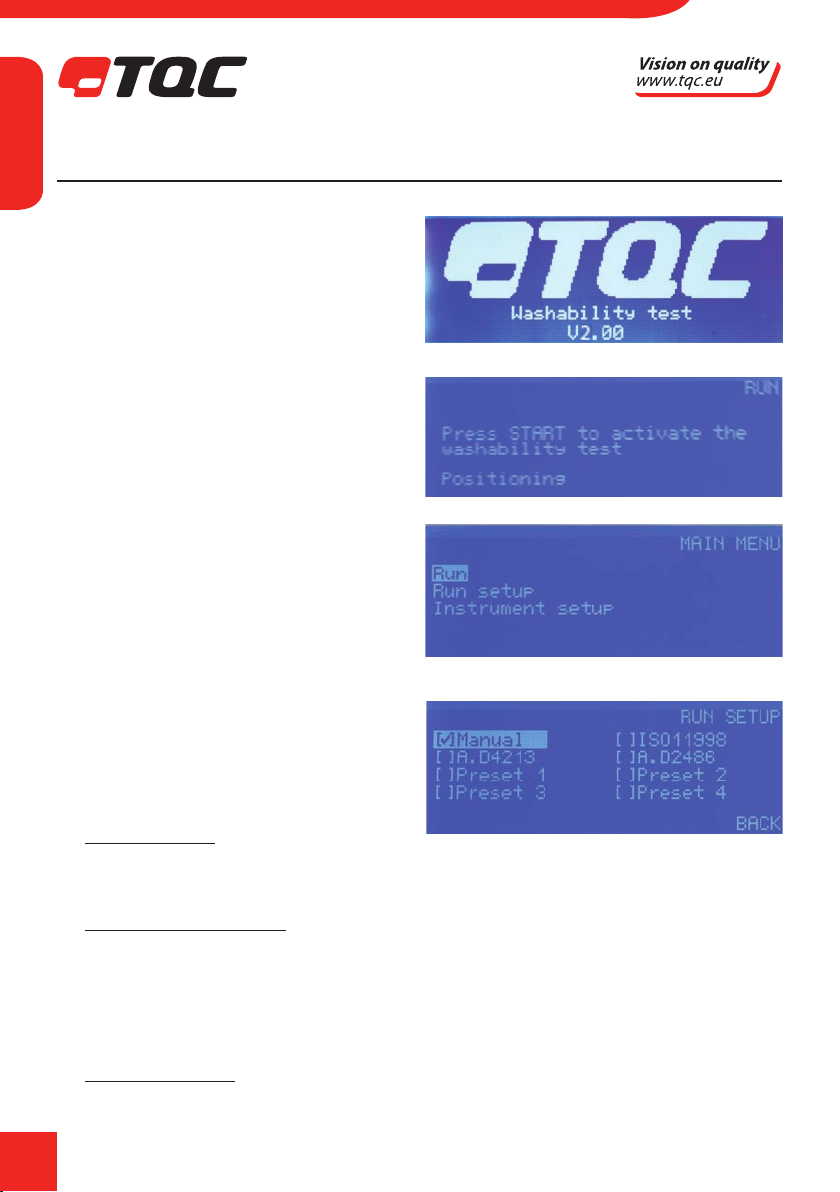
7.1 TQC Start screens after switched on
Switch on instrument by mains switch at the
right side on the housing. This is the rst screen
shown after switching on the instrument.
Every time the TQC Basic Washability Test is
turned on. The indenter needs to nd its
reference positions. Press the jog shuttle to
activate the reference procedure.
7.2 MAIN MENU
The TQC Basic Washability Test has an advanced
menu structure. The Main Menu allows the user
to access all the features, available. To select a
function turn the Jog shuttle till the white
selector is on the item and push the Jog shuttle.
7.3 RUN SETUP
The TQC Basic Washability Test is able to operate
in eight programs. The programs are dened in
three groups. *
1. Manual program: This program allows for
free editing of all the parameters except
name.
2. Standard dened programs: TQC prepro-
grammed 3 standards into the Basic
washability test. ISO 11998, ASTM D4213
and ASTM D2486 are the selected standards,
when selected all the normative parameters
can not be edited.
3. User dened presets: These 4 presets can be
programmed by the user. All parameters
and name can be edited and stored.
*Preset test: maximum count is 99999 cycles
It is not possible to set any value larger than
99999.
Manual / user dened test: stops counting on
the display at 999999. It will show up to 999999
on the display but will not stop and count until
the machine is broken, overow at 4294967296
cycles.
EN

15
7.4 RUN SETUP – Test Edit
After selecting a test by and pressing the jog
shuttle for a second time the Test-Edit menu
appears. The elds in this menu that can be
edited depending on the selected program type.
Within this menu speeds and stroke length can
be edited. The alarm settings are divided in 2 categories. The rst number is for an intermediate
alarm. In this example every 100 cycles the TQC Basic Washability tester gives an alarm. This alarm
will not stop the test but just mark regular intervals as reminders for analysts to check if any wear
occurred. The number 200 in this example marks the end of the test and will sound a long alarm.
After the values have been set, choosing the back button will automatically store the settings.
7.5 INSTRUMENT SETUP
The instrument setup menu gives the user access
to more advanced settings allowing him or her to
ne tune the instrument to their specications.
7.5.1 INSTRUMENT SETUP – LANGUAGE
The TQC Basic Washability Test is equipped with
a multi.language menu. In this part of the menu
you can select the desired language. by setting
the tick mark in front it.
7.5.2 INTRUMENT SETUP – UNITS
The units used in the display can be set to one of
the three available units. The selected unit will be
displayed in all other menus.
7.5.3 INSTRUMENT SETUP – ACOUSTICS
The audible alarm levels can be set in this menu.
The three available options are no sound, low
volume or high volume. When Signals o is
selected the audible alarm for depth indication
will also not be heard.
EN

16
7.5.4 INSTRUMENT SETUP – ALARMS
During a run with set alarm intervals as in
RUN SETUP -Test Edit. The alarm is sounded
during the test to remind the operator to check
the status.
This alarm can either be a single alarm or be repeated every minute. When the repeated alarm
option is selected the alarm can be acknowledged during the run. The alarm will then remain
silent till the next time the set interval is reached. Otherwise it will sound every minute. When
“pause at“ALARM EACH”is selected the TQC Wash, scrub and abrasion tester pauzes at each
alarm, and continues after conformation on the alarm.
NOTE: The pause at alarm each function is only available on rmware versions 2 or higher.
7.6 RUN
• Connecttheinstrumenttothemainsattherearsideofthehousing.
• Insertthecorrecttoolsinthetoolcarrierandmakesuretheyaresettothecorrectweight.
• Setthestrokelengthtothecorrectlength.
For performing a Basic Washability test a suitable panel is required. Please see the specications
and required standards for further specications.
7.6.1 RUN (1)
After selecting RUN in the main menu the TQC
Basic Washability Tester will show the main
setting of the selected program. In this case the
cycles per minute and stroke length. A warning
is shown to check if the tool carrier and sample
holders are locked into place. When the check has been done select conrm to continue.
7.6.2 RUN (2)
After conrmation the last safety warning appears. If all safety precautions have been taken
please select conrm to start the test. The half stroke made prior to the beginning of the test is an
addition to the rmware as of version 2.0. In earlier version the 2 screens displayed, are combined
in one.
7.6.3 RUN (3)
During the test the following screen appears.
The screen again shows the setting that are in
use above the line. In the middle it shows the
number of counts that have been made and the
time. When running manual mode the elapsed
time is shown. In the other presets the remaining
time will be shown.
EN

17
The view tags option brings you to the 4 screens
where per track the selected markers are display-
ed. Selecting the letter of the track will show the
5 markers per track. Selecting back will bring you
again back to the former screen.
After the RUN has been ended and the traverse
has come to a halt. The screen shows three
options. View tags to view the set markers during
the run and resume to continue the test. The back
option gets you back to the main menu. When
resume is selected the timer will not countdown
any more but will mark the elapsed time after the
test has been continued.
The view tags option brings you to the 4 screens
where per track the selected markers are display-
ed. Selecting the letter of the track will show the
5 markers per track. Selecting back will bring you
back to the former screen.
EN

18
8 MENU STANDARD MODEL
8.1 TQC Start screens after switched on
Switch on instrument by mains switch at the right
side on the housing. This is the rst screen shown
after switching on the instrument.
Every time the TQC Washability Test is turned on, it
needs to nd its reference positions. Press the jog shuttle to activate the reference procedure.
8.2 MAIN MENU
The TQC Washability Test has an advanced menu
structure. The Main Menu allows the user to access
all the features available. To select a function turn
the Jog shuttle until the white selector is on the
item. Push the Jog shuttle to conrm.
8.3 RUN SETUP
The TQC Washability Test is able to operate in
eight programs. The programs are dened in three
groups.*
1. Manual program: This program allows for free
editing of all the parameters except name.
2. Standard dened programs: TQC prepro-
grammed 3 standards into the Washability
test : ISO 11998, ASTM D4213 and
ASTM D2486. When a standard is selected all
the normative parameters can not be edited.
3. User dened presets: These 4 presets can be
programmed by the user. All parameters and
name can be edited and stored.
8.4 RUN SETUP – Test Edit
After selecting a test, pressing the jog shuttle for
a second time activates the Test-Edit menu. The
editable elds in this menu depend on the
selected program type. Within this menu speeds,
stroke length and pump speeds can be edited.
*Preset test: maximum count is 99999 cycles
It is not possible to set any value larger than
99999.
Manual / user dened test: stops counting on
the display at 999999. It will show up to 999999
on the display but will not stop and count until
the machine is broken, overow at 4294967296
cycles.
EN

19
The alarm setting is divided in 2 categories.
The rst number corresponds to the intermediate alarm. In this example every 100 cycles the
TQC Washability tester gives an alarm. This alarm will not stop the test but just mark regular inter-
vals as reminders for analysts to check if any wear occurred. The number 10000 in this example
marks the end of the test and a long alarm will sound. After the values have been set, using the
back button will automatically store the settings.
8.5 INSTRUMENT SETUP
The instrument setup menu gives the user access
to more advanced settings allowing him or her to
ne-tune the instrument to their specications.
8.5.1 INSTRUMENT SETUP – LANGUAGE
The TQC Washability Test is equipped with a multi.
language menu. In this part of the menu you can
select the desired language. Set the tick mark in
front of the desired language.
8.5.2 INTRUMENT SETUP – UNITS
The units used in the display can be set to one of
the three available units. The selected unit will be
displayed in all other menus. The unit GPH stands
for Gallons per Hour.
8.5.3 INSTRUMENT SETUP – ACOUSTICS
The audible alarm levels can be set in this menu.
The three available options are no sound, low
volume or high volume. When Signals o is
selected the audible alarm for depth indication
will also not be heard.
EN

20
8.5.4 INSTRUMENT SETUP – ALARMS
During a run with set alarm intervals as in RUN
SETUP -Test Edit. The alarm is sounded
during the test to remind the operator to check
the status.
This alarm can either be a single alarm or be repea-
ted every minute. When the repeated alarm
option is selected the alarm can be acknowledged during the run. The alarm will then remain
silent till the next time the set interval is reached. Otherwise it will sound every minute.
When“pause at“ALARM EACH” is selected the TQC Wash, scrub and abrasion tester pauzes at
each alarm, and continues after conformation on the alarm.
NOTE: The pause at alarm each function is only available on rmware versions 2 or higher.
8.5.5 INSTRUMENT SETUP – FLUSH SYSTEM
The TQC Washability Test has two pumps that can
be ushed in order to clean them or to prepare
for a test. When pressing the jog shuttle shortly
the pump will remain on until pressed again.
When holding the button down, the pump will
stop when the button is released.
8.6 RUN
8.6.1 RUN (1)
After selecting RUN in the main menu the TQC
Washability Tester will show the main setting of
the selected program. In this case
the cycles per minute, stroke length, and both
pump speeds. A warning is shown to check if
the tool carrier and sample holders are locked
into place. When the check has been done select
conrm to continue.
8.6.2 RUN (2)
After the rst screen has been conrmed, a check
should be performed that the test uid is at the
tips of the tubing. If the uid is present
this can be conrmed. Selecting ush will bring
the user to the screen as described in 8.5.5
Selecting back after ushing will take the user
back to the Run (2) screen.
EN
This manual suits for next models
3
Table of contents
Other TQC Test Equipment manuals


