Trace2O HydroLite HL101 User manual

HydroLite®
HL101
Pocket pH Tester
Instruction Manual
Introduction:
The HydroLite® HL101 is a pocket-sized pH and temperature tester. This manual provides
instructions on use, with a step-by-step operating guide, as well as care and maintenance
instructions.
Components:
● HydroLite® HL101 pocket pH/temperature tester
● pH Buffer Solutions (pH4.01/7.00)
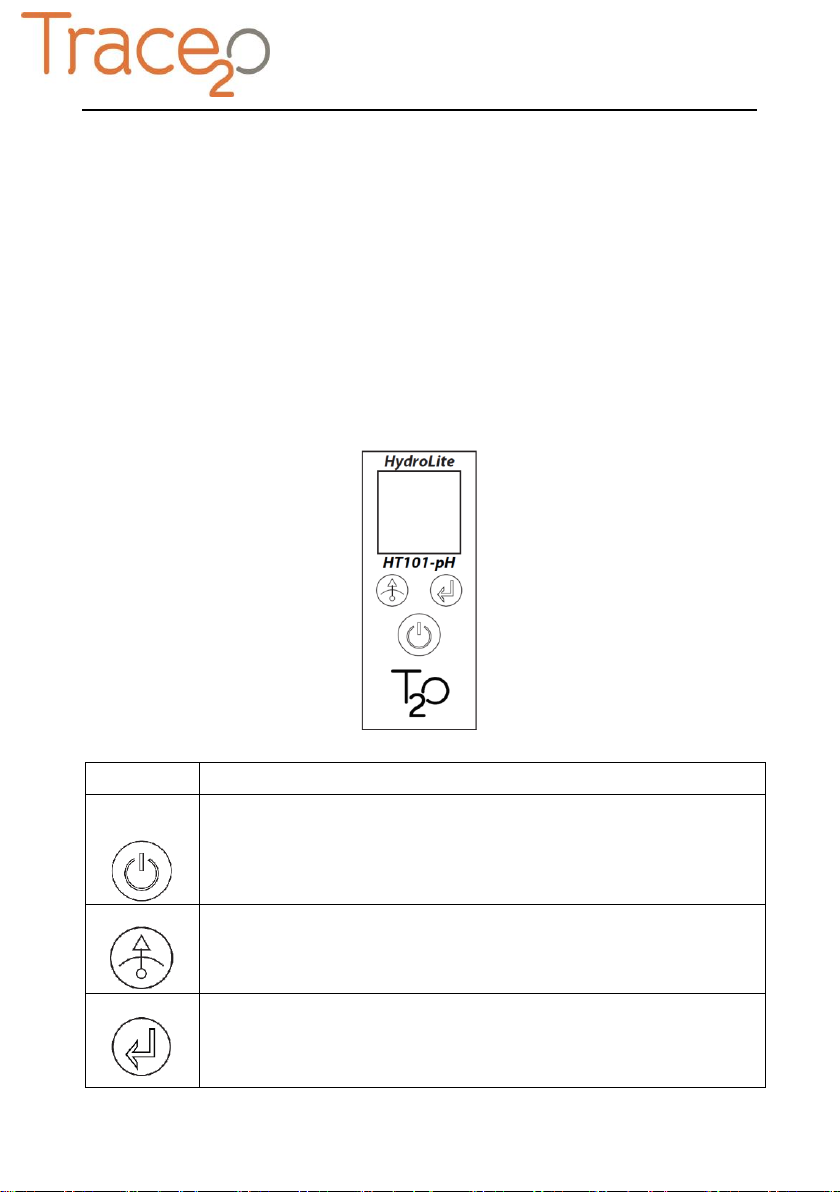
Keypad:
The HL101 pocket pH/temperature tester uses a simple three-button membrane keypad, with
graphical symbols to describe the function of each key.
Map of keys and functions:
KEY
FUNCTION
On/Off
Hold
● Power the unit ON/OFF
● Freezes the currently displayed value for recording; press the key again
to resume measuring.
● When in calibration mode, exits calibration and returns to measurement
mode.
Cal
● Press the key to enter the calibration mode.
● Press and hold the key to enter the setup menu.
● In the setup mode, press the key to select default options.
Enter
● Confirms the calibration or selected option.

Display:
The unit is equipped with a clear LCD display that is used to show measured value, units, mode
indicators and function indicators.
Map of mode indicators and descriptions:
Mode indicator
Description
MEAS
Indicates unit is in the measurement mode
CAL
Indicates unit is in the calibration mode
SETUP
Indicates unit is in SETUP mode
HOLD
Indicates the measured value has been frozen
ATC
Indicates temperature compensation is enabled
Prior to Use:
● Remove the electrode protective cap from the unit.
● If the membrane on the electrode dries out, soak the electrode in 3M KCL solution or tap
water for at least 15 minutes. DO NOT use distilled or deionised water, as this will shorten the
life of sensor.

Power On/Off:
● Press ON/OFF key to turn on the unit, the display shows measured value.
● Press and hold the ON/OFF key for 5 seconds, the unit will turn off.
● If no key is pressed for 8 minutes, the unit will automatically turn off to conserve power.
Note: The auto-off function can be disabled if required –see below for further details
Setup Menu:
The HL101 pocket pH/temperature tester includes a comprehensive setup menu with
customisable options to suit user measurement requirements.
Menu item
Description
Available
options
Details
DEFAULT?
pH Buffer
USA Standard
(pH4.01/7.00/10.01)
●
NIST Standard
(pH4.01/6.86/9.18)
Calibration Points
1 point
2 points
●
3 points
Temperature Unit
Degrees Celsius
●
Degrees Fahrenheit
Temperature
Calibration
Enters the temperature
calibration mode
Auto-Hold
Automatically freezes a
stable reading
Disable
●
Auto-Off
Automatically turn off the
unit
●
Disable
Reset
Restore factory settings
Disable
●
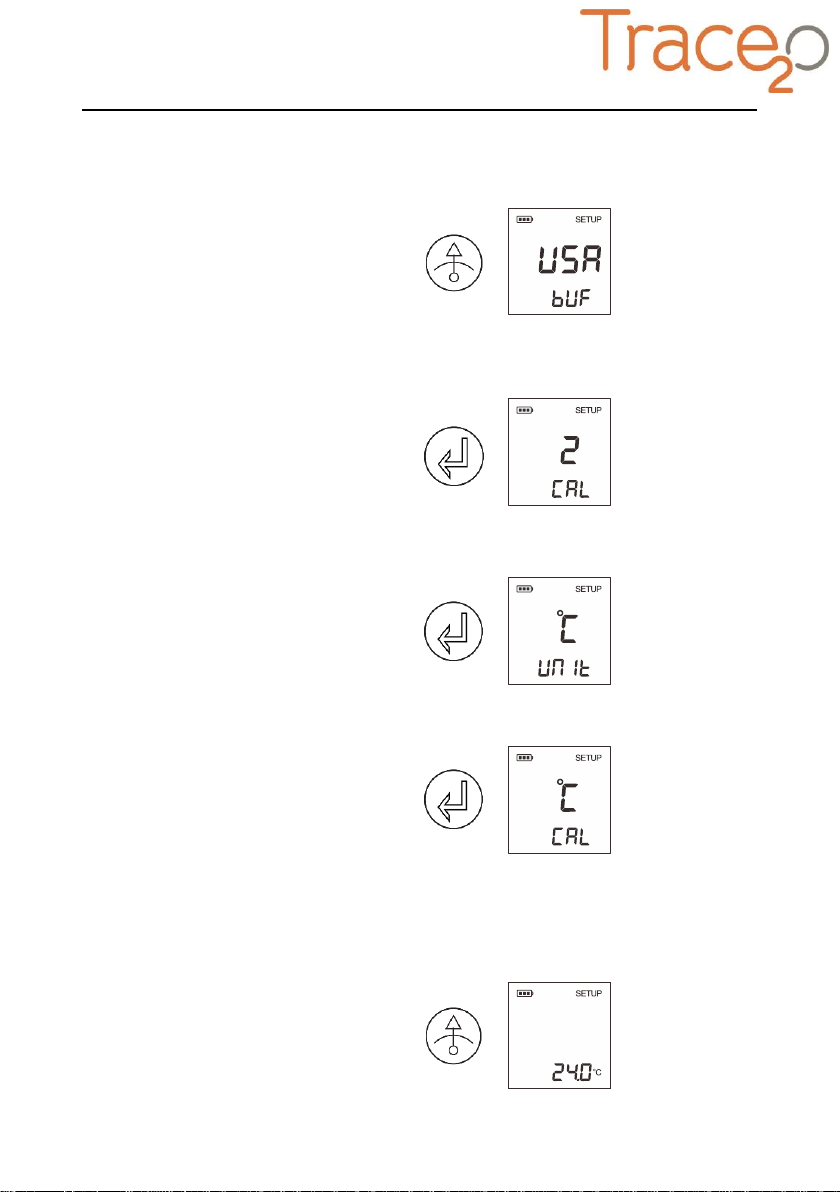
Changing the default parameters:
1. Press and hold the CAL key for 3 seconds to enter the setup menu; the unit goes to buffer
standard selection mode, the display shows “USA/BUF” (USA standard).
2. Press CAL key to select the USA or NIST standard for pH buffers. Press ENTER key to
confirm; the unit goes into calibration point selection mode, the display shows “2/CAL” (2
points calibration).
3. Press CAL key to select the number of calibration points (1, 2 or 3 points). Press ENTER key
to confirm; the unit goes into temperature unit selection mode, the display shows “oC/UNIT”.
4. Press CAL key to select the temperature units (oC or oF). Press ENTER key to confirm, the
unit goes into temperature calibration mode, the display shows “oC/CAL”.
5. If you do not want to perform temperature calibration, press ENTER key; the unit goes to
next option.
6. To perform temperature calibration, press CAL key to enter the temperature calibration mode,
the display shows current temperature reading.
Cal
Enter
Enter
Enter

7. Press CAL key to set temperature value. Press ENTER key to confirm; the display shows
“YES/HOLD” indicating that the auto-hold function is enabled.
If the auto-hold function is enabled, the unit will automatically sense a stable endpoint
reading and freeze the reading in the display. If you disable this function, the unit allows user
to freeze the reading in the display manually by pressing the HOLD key.
8. Press CAL key to enable or disable the auto-hold function. Press ENTER key to confirm; the
display shows “YES/OFF” indicating that the auto-off function is enabled.
When the auto-off function is enabled, if no key is pressed for 8 minutes, the unit will
automatically turn off to conserve power.
9. Press CAL key to enable or disable the auto-off function. Press ENTER key to confirm; the
display shows “NO/RST” indicating the current status of the reset function.
WARNING:
The Reset function will restore the unit back to factory default settings; all calibration values
and selected parameters will be reset.
10. Press CAL key to enable or disable the reset function. Press ENTER key to confirm; the
unit returns to measurement mode.
EXIT THE SETUP MENU:
During the setup mode, to exit the setup menu, press ON/OFF key; the unit will return to
measurement mode immediately.
Enter
Enter
Enter

pH Calibration:
The HL101 pocket pH/temperature tester allows up to 3 point calibration. We recommend that
you perform at least a 2 point calibration for best accuracy. The unit automatically recognises
and calibrates to the following standard buffer values.
●USAStandard Buffer Options: pH 4.01, 7.00, 10.01
●NIST Standard Buffer Options: pH 4.01, 6.86, 9.18
Single point calibration should only be carried out with pH 7.00 or pH 6.86, otherwise the
calibration will not be accepted by the unit.
The unit must be calibrated prior to first use or whenever the electrode is replaced. To ensure
optimum accuracy, regular calibration is recommended. Do not reuse calibration solution after
calibration, contaminants in solution will affect the calibration and eventually the accuracy of
the measurement.
SINGLE POINTCALIBRATION:
1.1 Ensure that 1 point calibration is selected in the setup menu.
1.2 Rinse the pH electrode with distilled water. Press CALkey; the unit shows “pH7.00/CAL1”
or “pH6.86/CAL1”.
1.3 Immerse the pH electrode in the pH7.00 buffer solution; the end of the sensor must be
completely submerged in the calibration solution. Stir the solution gently.
1.4 Press ENTER key to confirm. Wait for the measured value to stabilise; the display shows
“END”. Single point calibration is completed.
2 POINT CALIBRATION:
2.1 Ensure that 2 point calibration is selected in the setup menu.
2.2 Repeat steps 1.2 to 1.4 above. When the first calibration point is completed, the display
will show “CAL2”. The unit prompts you to continue with second point calibration.
Cal
Enter
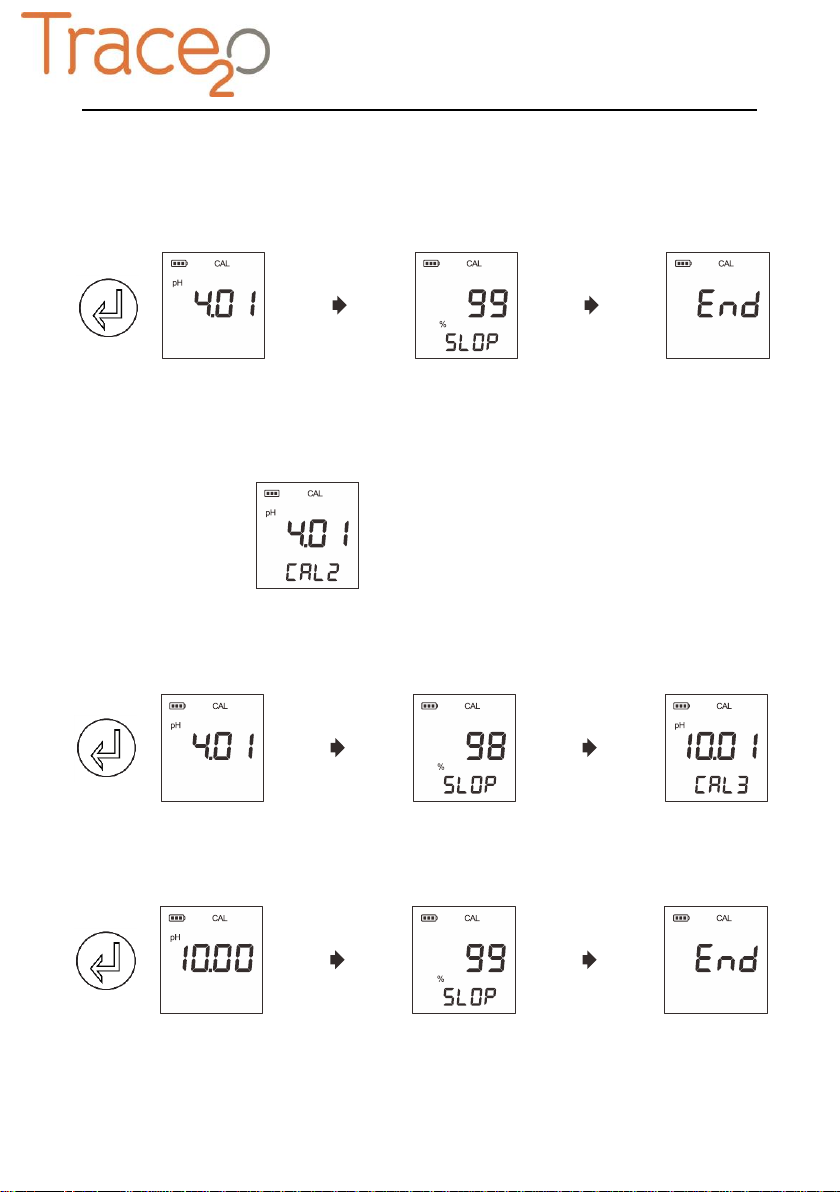
2.3 Rinse the pH electrode with distilled water. Immerse the electrode in the pH 4.01 buffer
solution. Stir the solution gently.
2.4 Press ENTER key to confirm. Wait for the measured value to stabilize; the display shows
electrode slope and “END”. 2 point calibration is completed.
3 POINT CALIBRATION (not required for normal operation):
3.1 Ensure that 3 point calibration is selected in the setup menu.
3.2 Repeat steps 1.2 to 1.4 above. When the first calibration point is completed, the display
will show “pH4.01/CAL2”. The unit prompts you to continue with second point calibration.
3.3 Rinse the pH electrode with distilled water. Immerse the electrode in the pH 4.01 buffer
solution. Stir the solution gently.
3.4 Press ENTER key to confirm. Wait for the measured value to stabilise; the display shows
electrode slope and “pH10.01/CAL3”.
3.5 Rinse the pH electrode with distilled water again. Immerse the electrode into the pH10.01
(or pH9.18) buffer solution. Stir the solution gently.
3.6 Press ENTER key to confirm. Wait for the measured value to stabilise; the display shows
electrode slope and “END”. Calibration is completed.
EXIT THE CALIBRATION:
During the calibration process, if you want to exit calibration, press ON/OFF key, the unit will
return to measurement mode immediately.
Enter
Enter
Enter

Temperature Calibration:
During the measurement, if the temperature reading displayed differs from that of an accurate
thermometer, you need to calibrate the unit.
1. Press and hold the CAL key for 3 seconds to enter setup menu.
2. Press ENTER key until unit shows the “oC/CAL” or “oF/CAL”.
3. Press CAL key to enter the temperature calibration mode.
4. Press CAL key again to set temperature value (Resolution: 0.5oC).
5. Press ENTER key to confirm, the display shows next option.
6. Press ON/OFF key, the unit returns to measurement mode. Calibration is completed.
pH Measurement:
Rinse the pH electrode thoroughly with distilled water. Immerse the electrode into the sample
solution, stir the solution gently. Wait for the reading to stabilise; record the measured value as
displayed.
Hold Function:
The HL101 pocket pH/temperature tester contains two data hold modes. When theAuto-Hold
function is enabled, the unit will automatically sense a stable endpoint reading and freeze it; the
“HOLD” indicator appears on the display. If the Auto-Hold function is disabled, press HOLD key,
the unit will immediately freeze the currently displayed value. Press the HOLD key again to
resume measuring.
Enter
Hold
Meas
Electrode Care and Maintenance:
● For best results, always keep the pH electrode membrane wet.
● Ensure that the electrode is thoroughly washed with distilled water after each use.
● During extended periods of disuse, store the sensor with electrode storage solution. DO
NOT use deionised or distilled water.
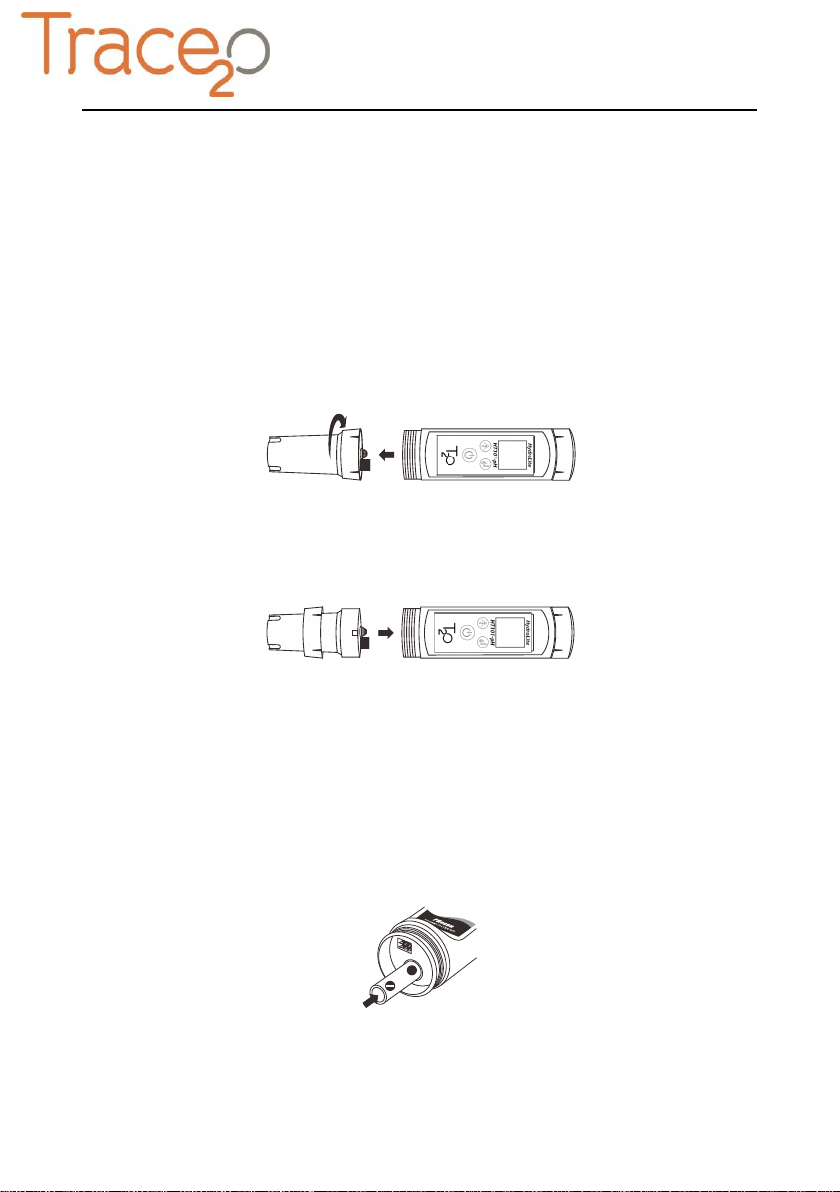
Electrode Replacement:
When the unit fails to calibrate or gives fluctuating readings for calibration standards, you need
to replace the electrode module.
1. Twist the electrode collar counter clockwise, pull the old electrode module away from the
unit.
2. Align the slot on the new electrode module, gently push the module into the unit.
3. Twist the electrode collar clockwise until it is tight. Installation is completed.
Replacing the Batteries:
If the battery indicator disappears during the use, the batteries require replacing.
1. Twist the electrode collar counter clockwise, pull the electrode module out from the unit.
2. Insert two “AAA” batteries into the battery compartment (note polarity).
3. Align the slot on the electrode module, push the electrode into the unit.
4. Twist the electrode collar clockwise until it is tight.
+

Troubleshooting
LCD DISPLAY
CAUSE
CORRECTIVE ACTION
Electrode dried out
Soak the electrode in 3M KCL solution or tap
water for 10 minutes
Measured value is out
of range
Check whether the electrode membrane is
clogged, dirty or broken
Incorrect pH buffer
solutions
Use fresh pH buffer solutions for calibration
Electrode is broken
Replace the pH electrode module
Specifications
pH
Model
HL101
Range
-1.00~15.00pH
Accuracy
±0.01pH
Resolution
0.01pH
Calibration Points
1 to 3 points, USA (pH4.01/7.00/10.01) or
NIST (pH4.01/6.86/9.18)
Temperature
Compensation
0~60°C, 32~140°F, Automatic
Temperature
Range
0~60°C, 32~140°F
Accuracy
±1°C
Resolution
0.1°C
Calibration Range
Measured value ±10°C
Others
Hold Function
Manual or Automatic
Power Off
Manual or Automatic (8 minutes after last
key pressed)
Sensor Type
Standard pH Electrode
(Order Code: HL101ELEC)
Power Requirements
2×1.5V "AAA" Batteries
Dimensions
185(L)×40(Dia.)mm
Weight
100g

Trace2o®Limited
The Technology Centre
Wagtech Court
Station Road
Thatcham, Berkshire, RG19 4HZ
Tel.: +44 (0)1635 566772
Fax: +44 (0)1635 873509
sales@Trace2o.com
www.Trace2o.com
The information in this document is subject to change without notice. Copyright © Trace2o®
Limited, 2016.All rights reserved. Trace2o® and HydroLite® are registered trademarks of
Trace2o® Ltd.
Table of contents
Other Trace2O Test Equipment manuals


Popular Test Equipment manuals by other brands

SIGLENT
SIGLENT SDS2000X-E Series user manual

Agilent Technologies
Agilent Technologies E7495A RF Manual operation

National Instruments
National Instruments PXIe-5672 Getting started guide

Tektronix
Tektronix TDS3000C Series Technical reference

Time Electronics
Time Electronics 7115 user manual

Northmeter
Northmeter PowerBay-SSM user manual


