Trace2O HydroCheck HC1000 User manual

HydroCheck®
HC1000
Multi-Parameter
Electrochemical
Water Tester
Instruction Manual

2
Contents
1.1 Introduction.........................................................................................................4
1.2 Unpacking the Meter...........................................................................................4
1.3 List of Accessories..............................................................................................4
2.1 Display................................................................................................................5
2.2 Keypad................................................................................................................6
2.3 Connectors .........................................................................................................7
2.4 Connecting the Sensors......................................................................................7
2.5 Inserting/Replacing the Batteries........................................................................9
2.6 Refilling Electrolyte Solution for DO Probe .......................................................10
3.1 Power On/Off.................................................................................................... 11
3.2 pH Measurement ..............................................................................................11
3.3 ORP Measurement...........................................................................................11
3.4 Conductivity/TDS/Resistivity Measurement......................................................12
3.5 Salinity Measurement .......................................................................................12
3.6 Dissolved Oxygen Measurement......................................................................12
3.6 Hold Function....................................................................................................14
3.7 Storing and Recalling Data from Memory.........................................................14
4.1 Setup Menu ......................................................................................................15
4.2 Adjusting the settings:.......................................................................................20
4.3 Exiting setup mode: ..........................................................................................20
4.4 Setting the Date and Time ................................................................................21
4.5 Temperature Compensation..............................................................................22
4.6 Automatic Temperature Compensation:............................................................22
4.7 Manual Temperature Compensation:................................................................22
5.1 pH Calibration...................................................................................................23
5.2 Single Point Calibration:....................................................................................23
5.3 Multi-Point Calibration:......................................................................................24
5.4 pH Calibration with User-Defined Buffers: ........................................................24
5.5 pH Calibration Report .......................................................................................25
6.1 ORP Calibration................................................................................................26
6.2 ORP Calibration Report....................................................................................26

3
7.1 Conductivity Calibration....................................................................................28
7.2 Single Point Calibration:....................................................................................28
7.3 Multi-Point Calibration:......................................................................................29
7.4 Manual Calibration:...........................................................................................30
7.5 Conductivity Calibration Report ........................................................................31
8.1 DO Calibration in % Saturation Mode...............................................................32
8.2 100% saturation calibration:..............................................................................32
8.3 2 Point Calibration: ...........................................................................................32
9.1 DO Calibration in mg/L or ppm Mode................................................................34
9.2 2 Point Calibration: ...........................................................................................34
10.1 Temperature Calibration..................................................................................36
11.1 pH Electrode Care and Maintenance..............................................................37
11.2 ORP Electrode Care and Maintenance...........................................................38
11.3 Conductivity Electrode Care and Maintenance ...............................................39
11.4 DO Probe Care and Maintenance...................................................................39
12.1Troubleshooting...............................................................................................40
13.1 Appendix 1: How to calculate the temperature coefficient...............................41
13.2 Appendix 2: How to calculate the TDS conversion factor................................42
13.3 Appendix 3: Pressure vsAltitude Table...........................................................43
14.1 Warranty .........................................................................................................44

4
1.1 Introduction
Thank you for selecting the Trace2o® HydroCheck HC1000 portable multiparameter water
quality meter. This manual provides instructions to guide the user in normal operation,
diagnostics and maintenance of the instrument. Please read the instructions carefully before
use.
1.2 Unpacking the Meter
Before unpacking, ensure that the current work environment meet following conditions.
● Relative humidity is less than 80%.
● Ambient temperature is greater than 0oC and less than 60oC.
● No potential electromagnetic interference.
The following list describes the standard accessories of the meter.After the unpacking, please
check all accessories are complete. If any are damaged or missing, please contact nearest
distributor.
1.3 List of Accessories
● pH Electrode
● Conductivity Electrode
● Dissolved Oxygen Electrode
● pH Buffer Solutions (pH4.01, 7.00)
● Conductivity Calibration Solution (1413µS/cm)
● Batteries

5
2.1 Display
The Trace2o® HydroCheck® HC1000 is equipped with a backlit LCD display that shows
measured values, as well as mode and status indicator graphics.
INDEX:
Measurement
mode
Battery indicator
Calibration mode
Stable indicator
Setup mode
Hold indicator
Memory mode
Calibration Due Reminder
Electrode slope
indicator
Automatic Temperature
Compensation:

6
2.2 Keypad
The Trace2o® HydroCheck® HC1000 has a tactile membrane keypad. Words and symbols
describe functions of each key. The direction keys are multi-function left/right and up/down
keys.
INDEX:
KEY
DESCRIPTION
● Power the meter ON/OFF.
● Holds the current measured value; press the key again to resume
measuring.
● In the calibration or setting mode, returns to measurement mode.
mode
● Toggles between available measurement modes (pH, mV, ORP,
Ion, Conductivity, TDS, Salinity, Resistivity, DO).
● Press and hold to enter temperature setting mode.
cal
● Press to enter the calibration mode.
● Press and hold to enter the setup menu.
m+ / ▲
● Press to store current measured value.
● Press in setup mode to scroll up through menu.
● Press in temperature setting mode to increase the setting value.
mR / ▼
● Press to view calibration report or stored data.
● Press in setup mode to scroll down through menu.
● Press in temperature setting mode to decrease the setting value.
enter
● Confirms the calibration, setting value or displayed option.
● Press and hold to turn On/Off the backlight.

7
2.3 Connectors
The Trace2o® HydroCheck® HC1000 has three connectors for connecting the various types of
sensors.
CONNECTOR
FUNCTION
Waterproof BNC
Connector
pH electrode (or optional ORP or Ion Selective Electrodes)
Waterproof 6-pin
connector
Dissolved oxygen electrode
Waterproof 3-pin
connector
Conductivity electrode
2.4 Connecting the Sensors
Take out the sensor from the carrying case. Ensure the connectors are clean and dry before
connecting.
pH ELECTRODE
● Insert the BNC connector on the pH electrode into corresponding connector on the
instrument. Once pushed firmly into place, tighten the waterproof locking collar.

8
CONDUCTIVITY ELECTRODE
● Insert the 3-pin connector on the conductivity electrode into the corresponding connector on
the instrument, ensuring that the lugs are aligned. Once pushed firmly into place, tighten the
waterproof locking collar.
DISSOLVED OXYGEN ELECTRODE
● Insert the 6-pin connector on the temperature probe into the corresponding connector on
the instrument, ensuring that the lugs are aligned. Once pushed firmly into place, tighten the
waterproof locking collar.
● Once connected, DO NOT pull on the cables.

9
2.5 Inserting/Replacing the Batteries
The HC1000 is supplied pre-installed with the requisite battery.
The HC1000 requires 1 x 9V (PP3) battery.
To replace the battery, follow the below procedure:
1. Remove the battery cover from the rear of the meter.
2. Disconnect the snap connector and remove the battery.
3. Note the polarity and attach the snap connector to the appropriate terminals on the new
battery.
4. Ensure that the white waterproofing seal is correctly located, and replace the battery cover.
When batteries are depleted, the meter allows you to use the USB cable connected to
computer as a temporarily power supply.
10
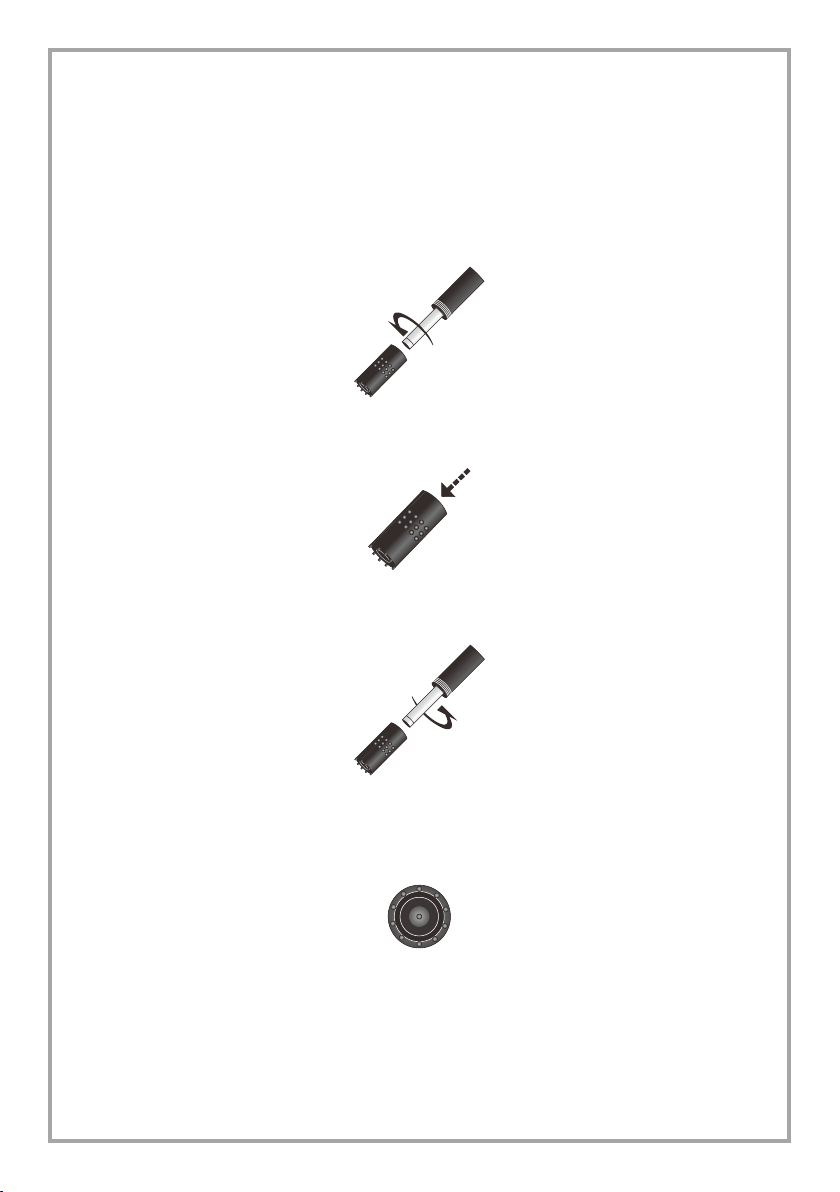
2.6 Refilling Electrolyte Solution for DO Probe
The Dissolved Oxygen electrode requires an electrolyte solution which must be kept topped up
during normal use. To refill, follow the below procedure:
1. Unscrew the membrane cap from the bottom of the dissolved oxygen probe.
2. Fill the membrane cap halfway with electrolyte solution.
3. Screw the membrane cap onto the probe, excess electrolyte will drain out.
4. Be sure the cathode of probe makes contact with membrane cap, the electrolyte solution in
membrane cap should be without an air bubble.
Prior to Use
Remove the protective cap from the bottom of the sensor.
…………Cathode

11
3.1 Power On/Off
● To turn the meter on, press the ON/OFF key.
● To turn the meter off, press and hold the ON/OFF key for 3 seconds,
● The meter will turn off automatically if there are no key presses within a specified time
period. To disable the auto-off function, go to the Setup Menu section.
3.2 pH Measurement
1. Press the MODE key until the display shows the indicator.
2. Rinse the pH electrode with distilled water to clean.
3. Immerse the electrode in the sample solution, and stir the solution gently.
4. Wait for the reading to stabilise, and record the value shown on the display.
3.3 ORP Measurement
The HC1000 has two millivolt measurement modes.
ABSOLUTE MILLIVOLT MODE:
● Press the MODE key until the display shows the measurement unit “mV”; the meter enters
absolute millivolt measurement mode.
RELATIVE MILLIVOLT MODE:
● Press the MODE key until the display shows the indicator; the meter enters relative
millivolt measurement mode.
Select one of the above modes. Immerse the electrode in the sample solution, and stir the
solution gently. Wait for the reading to stabilise, and record the value shown on the display.
mV

12
3.4 Conductivity/TDS/Resistivity Measurement
1. Press the MODE key until the display shows the (Conductivity) or (TDS) or
(Resistivity) indicator.
2. Rinse the conductivity electrode thoroughly with distilled water.
3. Immerse the electrode in the sample solution, and stir the solution gently.
4. Wait for the reading to stabilise, and record the value shown on the display.
3.5 Salinity Measurement
The HC1000 has two salinity measurement modes: practical salinity (unit: PSU) and natural
seawater (unit: ppt).
1. Press the MODE key until the display shows the indicator and measurement unit
“PSU”, the meter enters practical salinity measurement mode.
2. If necessary, press the MODE key again, the display shows the indicator and
measurement unit “ppt”, the meter enters seawater measurement mode.
3. Select the desired measurement mode. Immerse the electrode in the sample solution. Stir
the solution gently.
4. Wait for the reading to stabilise, and record the value shown on the display.
3.6 Dissolved Oxygen Measurement
The HC1000 is suitable for measuring dissolved oxygen in water, wastewater, brine and other
liquids. If the intended application is to measure seawater or other water containing large
amounts of salt, please set the salinity coefficient before use.
Some gases and vapours such as chloride, sulfur dioxide, hydrogen sulfide, ammonia, carbon
dioxide and iodine can permeate the membrane via diffusion, and as such their presence will
influence the measurement of dissolved oxygen.
Clean samples are preferred. If the sample contains solvent, grease, sulfide and algae, the
membrane on the probe may be blocked, damaged or eroded.

13
1. Press MODE key until the meter shows indicator.
2. Connecting the dissolved oxygen probe to meter, wait for 15 minutes to polarise the sensor.
3. If necessary, to set the atmospheric pressure and salinity coefficient in the setup menu
(Refer to “SETUP MENU” section).
4. Submerse probe in the sample solution, make sure the temperature sensor on the probe is
fully immersed.
5. Stir the solution gently, wait for the reading to stabilise, record the measured value on the
display.
Temperature
Sensor
14
3.6 Hold Function
The meter contains two data hold modes.
When the Auto-Hold function is enabled, the meter will automatically sense a stable endpoint
reading and hold. The ‘Hold’ indicator appears on the display.
If the Auto-Hold function is disabled, press the ON/OFF key, the meter will immediately hold
currently displayed value. Press the ON/OFF key again to resume measuring.
3.7 Storing and Recalling Data from Memory
The HC1000 allows up to 500 data sets to be stored and recalled.
MEMORY INPUT:
During the measurement process, press the M+ key to store the measured value to the
memory, The ‘Memory’ indicator appears on the display.
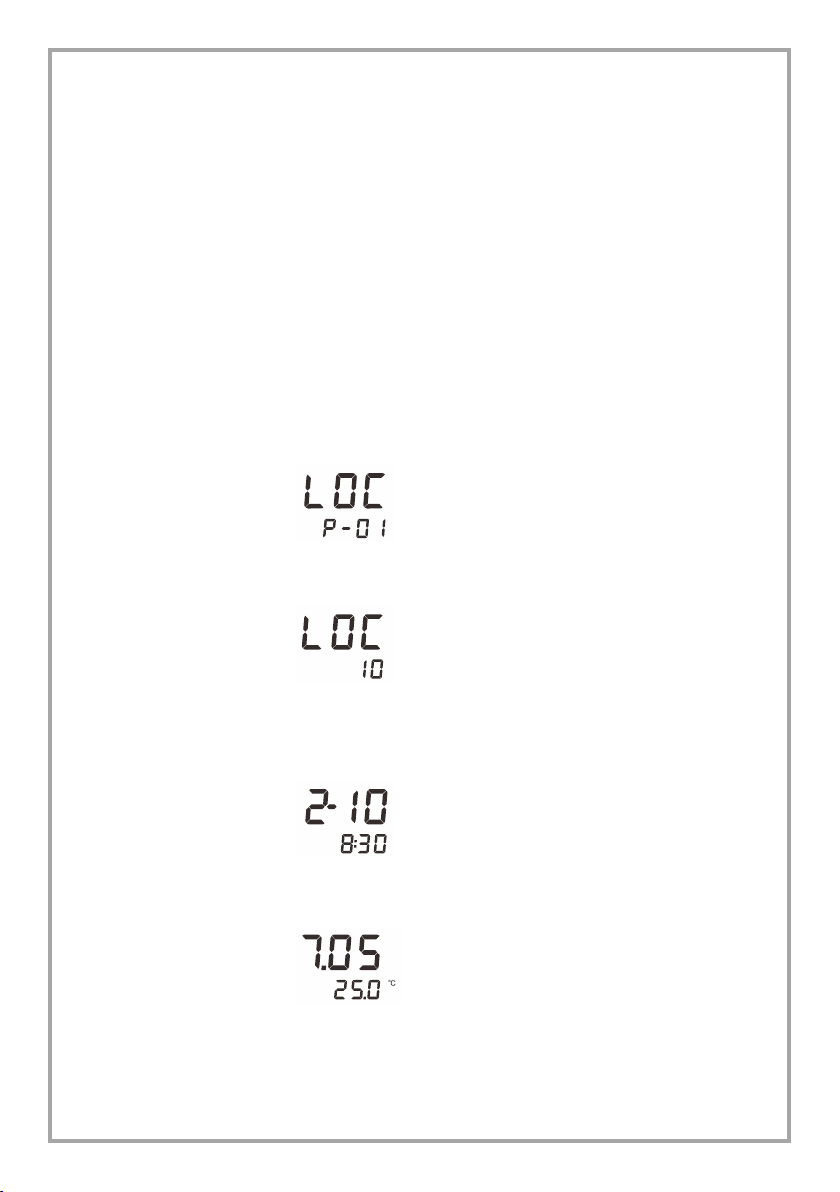
MEMORY RECALL:
1. Press MR key in the measurement mode, the meter shows “LOC/P-01” (Data Log).
2. Press ENTER key to confirm; the meter shows page number of the stored data.
3. Press the ▼ key, the meter shows the date and time of the reading (Format: mm-dd,
hh-mm).
4. Press the ▼ key again, the display shows the stored data.
5. After viewing the memory, press the ON/OFF key to return to measurement mode.
MR
Enter
MR
MR
..…..….Page number

15
4.1 Setup Menu
When in setup mode, the HC1000 displays an integrated setup menu that allows you
customise to the operation of the meter to meet your measurement requirements. In the
different modes, the meter will show the corresponding options. For general options, the
change will be applied to all modes.
pH MODE:
DISPLAY
DESCRIPTION
OPTIONS
DESCRIPTION
DEFAULT
Select from common
pH buffer standard
groups for
calibration.
USA (1.68, 4.01,
7.00, 10.01, 12.45)
●
NIST (1.68, 4.01,
6.96, 9.18, 12.45)
DIN (1.09, 4.65,
6.79, 9.23, 12.75)
User-Defined Buffer
Select the number of
calibration points to
use when calibrating
the meter
1 point
2 points
3 points
●
4 points
5 points
Set the resolution for
pH measurement.
0.001pH
●
0.01pH
0.1pH
Set the temperature
unit.
Degrees Celsius
●
Degrees Fahrenheit
ORP MODE:
DISPLAY
DESCRIPTION
OPTIONS
DESCRIPTION
DEFAULT
Set the resolution for
ORP measurement.
0.1mV
●
1mV

16
CONDUCTIVITY/TDS/SALINITY/RESISTIVITY MODES:
DISPLAY
DESCRIPTION
OPTIONS
DESCRIPTION
DEFAULT
Select the cell
constant of
conductivity
electrode.
K=0.1
K=1
●
K=10
User-Defined
Select the
temperature
coefficient of
sample.
Setting Range: 0.0
to 10.0%/oC
2.10
Select the number of
calibration points to
use when calibrating
the meter
1 point
●
2 points
3 points
4 points
5 points
Pure water
coefficient will be
calculated and
applied
automatically for
ultra-pure water
measurement if
enabled.
Enable
Disable
●
Set the
normalization
temperature for
conductivity
measurement and
calibration.
25oC
●
20oC
Set the default TDS
conversion factor.
Setting Range: 0.40
to 1.00
0.5
Set the default
temperature unit.
Degrees Celsius
●
Degrees Fahrenheit

17
DISSOLVED OXYGEN MODE:
DISPLAY
DESCRIPTION
OPTIONS
DESCRIPTION
DEFAULT
Select the number of
calibration points.
1 point
●
2 points
Select the default
atmospheric
pressure coefficient.
Setting Range: 450
to 850mmHg
760
Select the salinity
coefficient of sample
solution.
Setting Range: 0.0
to 50.0ppt
0.0
Set the resolution for
DO measurement.
0.01mg/L (0.1%)
●
0.1mg/L (1%)
Set the default
measurement units.
Degrees Celsius
●
Degrees Fahrenheit
mg/L
Milligrams per liter
●
ppm
Parts per million
mmHg
Pressure unit
●
kPa
Pressure unit

18
GENERAL OPTIONS:
DISPLAY
DESCRIPTION
OPTIONS
DESCRIPTION
DEFAULT
Sets the stability
criteria for
measurement.
When the “LO”
option is enabled,
measuring value
will stabilize quickly,
but reading is less
accurate.
When the “HI” option
is enabled,
measuring value
will stabilize slowly,
but improves
accuracy.
Low
●
High
When the auto-hold
function is enabled,
the meter
will automatically
sense a stable
end-point reading
and hold.
Enable
Disable
●
When the auto-off
power is enabled,
the meter will turn off
automatically if there
are no key presses
within the specified
time period
10 minutes
20 minutes
30 minutes
Disable
●

19
When the calibration
due reminder is
enabled, if you do
not recalibrate meter
within a specified
time period,
the meter will
automatically show
indicator.
…
1 to 31 days
Disable
●
Sets the date and
time of the meter.
---
---
Clear all stored data.
Enable
Disable
●
Reset function
allows user to
restore the meter
to factory default
settings. When this
function is used, all
calibration values
and settings will be
lost or reset.
Enable
Disable
●

20
4.2 Adjusting the settings:
1. If necessary, press MODE key until the display shows corresponding mode indicator (e.g.,
pH mode).
2. Press and hold the CAL key for 3 seconds, the meter enters setup mode, the display shows
adjustable setting, and parameter number.
3. Press ▲or ▼ key to scroll through the menu and select the parameter to amend (Refer to
Setup Menu section).
4. Press ENTER key to confirm, the display shows the currently selected option.
5. Press ▲or ▼key to select the desired option.
6. Press ENTER key to confirm, the meter returns to measurement mode. Setting is completed.
4.3 Exiting setup mode:
During the setup mode, if you want to exit setup menu, press MEAS key, the meter will return to
measurement mode immediately.
MI
Enter
…………Setting
…………Parameter number
…………Setting
…………Current Option
Table of contents
Other Trace2O Test Equipment manuals


Popular Test Equipment manuals by other brands

EL-CELL
EL-CELL ECC Series user manual

Beamz
Beamz PLS15 instruction manual

Kyoritsu Electrical Instruments Works, Ltd.
Kyoritsu Electrical Instruments Works, Ltd. KEW 3126 instruction manual

EXFO
EXFO EX1 user guide

Agilent Technologies
Agilent Technologies 2000 X manual

Kleinwächter
Kleinwächter EFM 023 BGT manual

TSI Incorporated
TSI Incorporated PortaCount Plus 8020 Operator's manual

BEHA
BEHA UNITEST M-Indicator 9062 instruction manual

Tektronix
Tektronix 7904 instruction manual

RS MIZAR
RS MIZAR Diamond Detective quick start guide

RHEINTACHO
RHEINTACHO RT STROBE pocketLED LASER operating instructions

VeEX
VeEX VePAL TX300 Quick reference guide


