Trace2O HydroLite HL103 User manual

HydroLite®
HL103
Pocket DO Tester
Instruction Manual

Introduction:
The HydroLite® HL103 is a pocket-sized dissolved oxygen (DO) and temperature tester. This
manual provides instructions on use, with a step-by-step operating guide, as well as care and
maintenance instructions.
ACCESSORIES:
HydroLite® HL103 pocket DO tester
●Dissolved Oxygen Probe
●DO Electrolyte Solution
●DO Membrane Cap
●AAA Batteries
DO 0% Calibration Solution (60mL)
Keypad:
The HL103 pocket DO/temperature tester uses a simple three-button membrane keypad, with
graphical symbols to describe the function of each key.
INDEX:
KEY
FUNCTION
On/Off
Hold
● Powers the unit ON/OFF
● Freezes the currently displayed value for recording; press the key
again to resume measuring.
● When in calibration mode, exits calibration and returns to
measurement mode.
Cal
● Press the key to enter the calibration mode.
● Press and hold the key to enter setup menu.
● In the calibration mode, press the key to set calibration values.
● In the setup mode, press the key to select default option.
Enter
● Confirms the calibration or selected option.
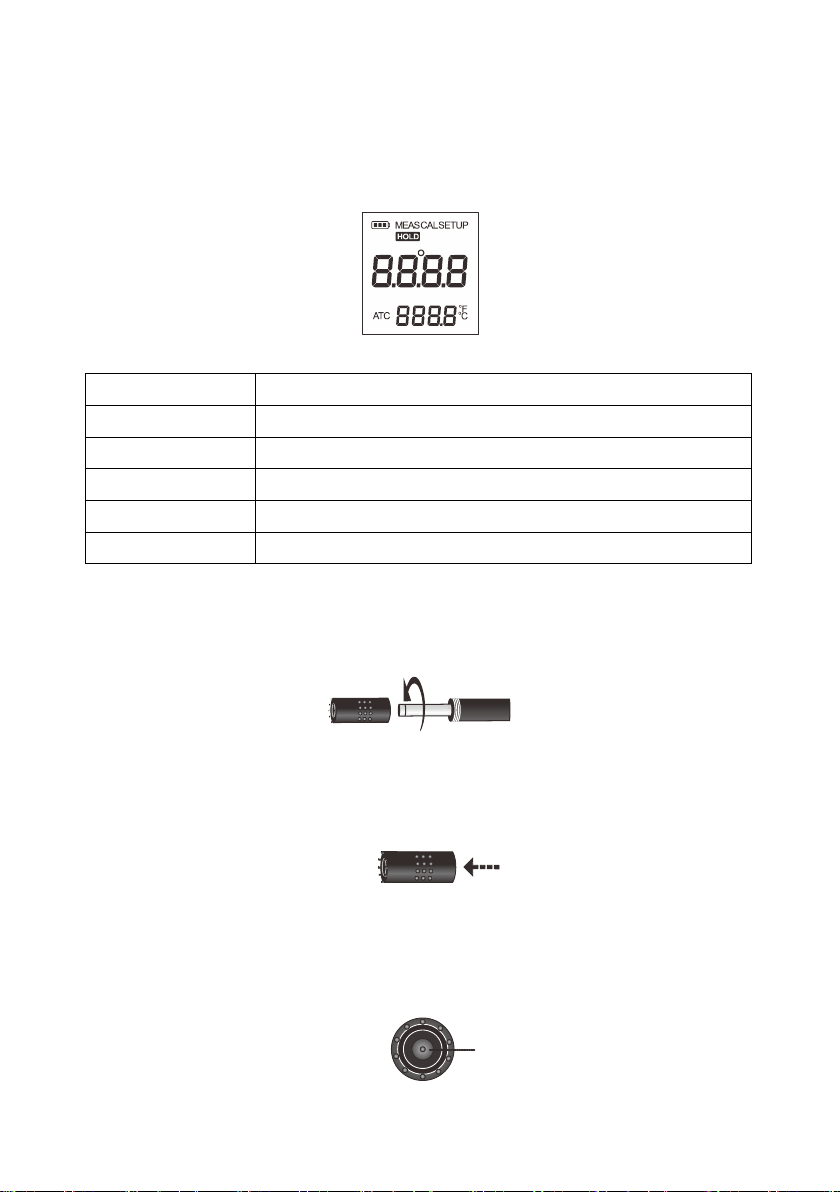
Display:
The unit is equipped with a clear LCD display that is used to show measured value, mode
indicators and function indicators.
Map of mode indicators and descriptions:
Mode indicator
Description
MEAS
Indicates unit is in the measurement mode
CAL
Indicates unit is in the calibration mode
SETUP
Indicates unit is in SETUP mode
HOLD
Indicates the measured value has been frozen
ATC
Indicates temperature compensation is enabled
Refilling Electrolyte Solution for DO Probe
1. Take out the DO probe from the packaging. Unscrew the membrane cap from the probe.
2. Fill the membrane cap halfway with electrolyte solution.
3. Screw the membrane cap onto the probe, excess electrolyte will drain out.
4. Be sure the cathode of the probe makes contact with membrane cap, and that there are no
air bubbles in the electrolyte solution.
uS
mppm ppt
Cathode
Power On/Off:
● Press ON/OFF key to turn on the unit, the display shows measured value.
● Press and hold the ON/OFF key for 5 seconds, the unit will turn off.
● If no key is pressed for 8 minutes, the unit will automatically turn off to conserve power.
Note: The auto-off function can be disabled if required –see below for further details
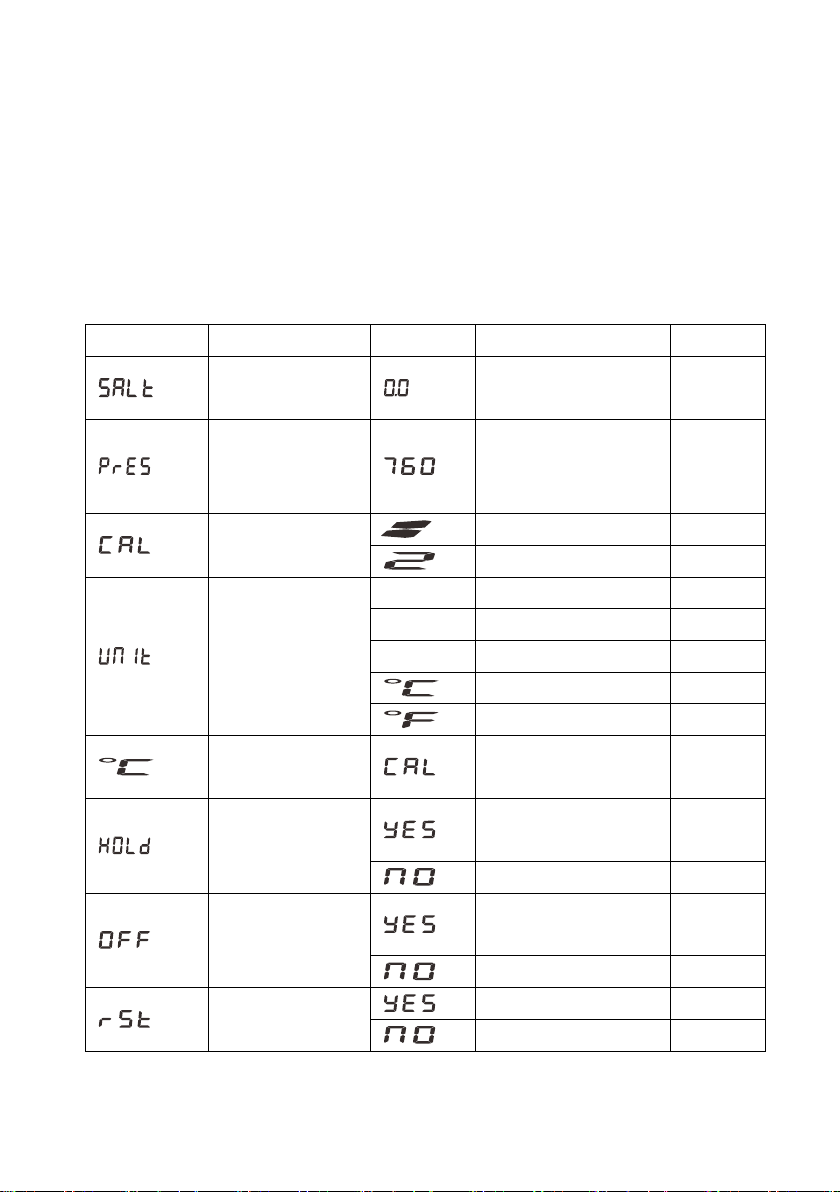
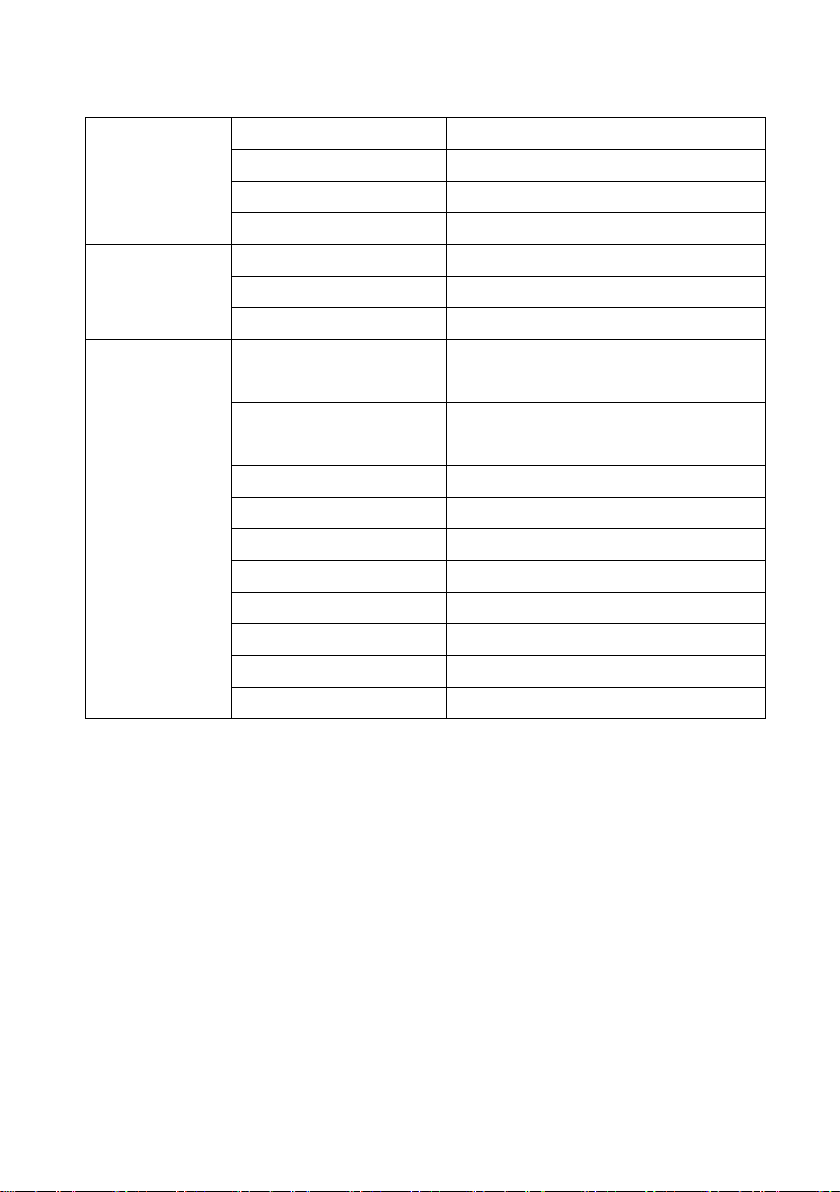
Setup Menu
The HL103 pocket DO/temperature tester includes a comprehensive setup menu with
customisable options to suit user measurement requirements.
PARAMETER
DESCRIPTION
OPTIONS
DESCRIPTION
DEFAULT
Salinity Coefficient
Setting Range: 0 to
35ppt
0.0
Atmospheric
Pressure
Coefficient
Setting Range: 450 to
850mmHg
760
Calibration Point
1 point
●
2 points
Measurement Unit
mg/L
Concentration Unit
●
ppm
Concentration Unit
%
% saturation
Degrees Celsius
●
Degrees Fahrenheit
Temperature
Calibration
Enters the temperature
calibration mode
Auto-Hold
Automatically freezes a
stable reading
Disable
●
Auto-Off
Automatically turn off
the tester
●
Disable
Reset
Restore factory settings
Disable
●
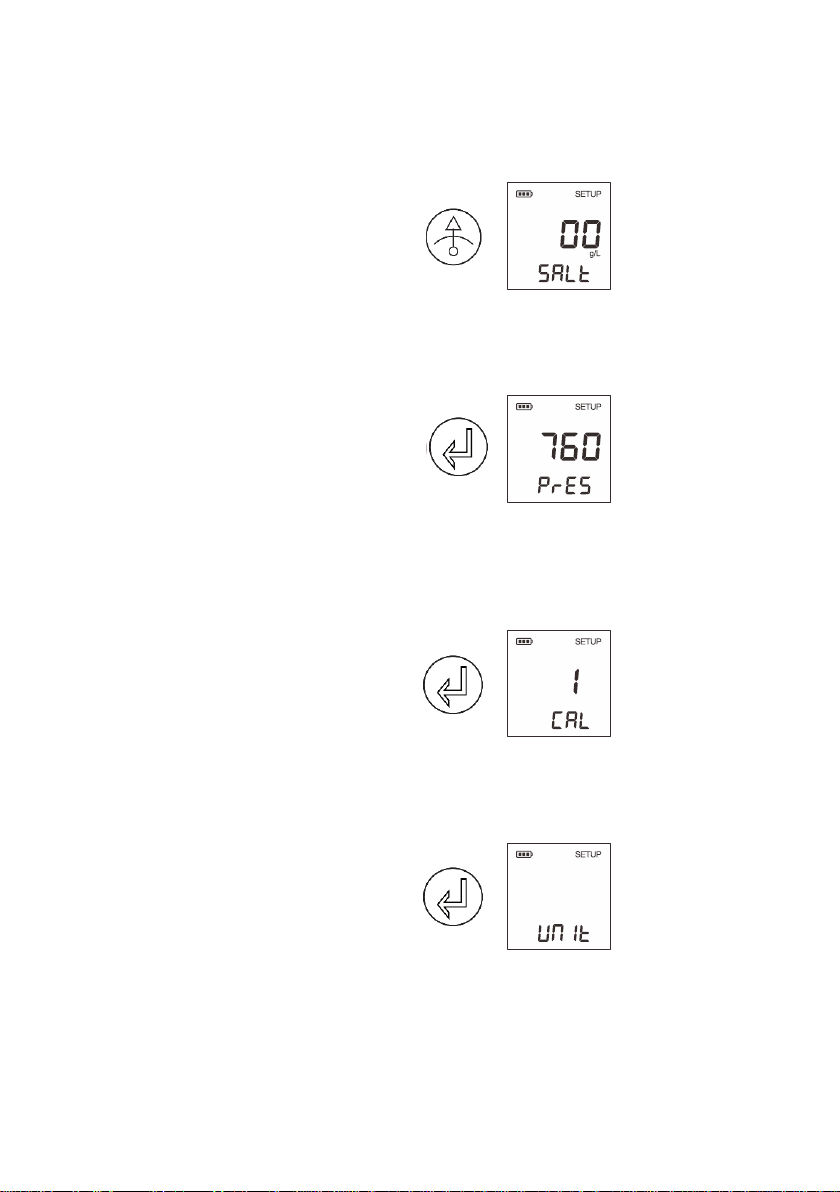
SETTING THE DEFAULT PARAMETERS:
1. Press and hold the CALkey for 3 seconds to enter setup menu, the display shows currently
selected salinity coefficient.
2. Press CAL key again to set the parameter, press ENTER key to confirm. The tester goes to
atmospheric pressure setting mode, the display shows
“760mmHg”.
3. Press CAL key to set atmospheric pressure coefficient, press ENTER key to confirm.
The tester then goes to calibration point selection mode, the display shows single point
calibration.
4. Press CAL key to select the number of calibration points, press ENTER key to confirm.
The tester goes to measurement unit selection mode, the display shows concentration unit
“mg/L”.
Cal
Enter
Enter
Enter
mg/L

5. Press CAL key to select the measurement unit you required, press ENTER key to confirm.
The tester goes to temperature calibration mode, the display shows “oC/CAL”.
6. If you do not want to perform temperature calibration, press ENTER key, the tester goes to
next option.
If needed, press CAL key to enter the temperature calibration mode, the display shows current
temperature reading.
7. Press CAL key to set temperature value, press ENTER key to confirm.
The tester shows “YES/HOLD” indicating that the auto-hold function is enabled.
If the auto-hold function is enabled, the tester will automatically sense a stable endpoint
reading and freeze it. If you disable this function, the tester allows user to freeze the reading by
pressing the HOLD key.
8. Press CAL key to enable or disable the auto-hold function, press ENTER key to confirm, the
tester shows “YES/OFF” indicating that the auto-off function is enabled.
When the auto-off function is enabled, if no key is pressed for 8 minutes, the unit will
automatically turn off to conserve power.
Enter
Cal
Enter
Enter

9. Press CAL key to enable or disable the auto-off function, press ENTER key to confirm.
The tester shows “NO/RST” indicating the current status of the reset function
WARNING:
The Reset function will restore the unit back to factory default settings, all calibration values
and selected parameters will be reset.
10. Press CAL key to enable or disable the reset function. Press ENTER key to confirm, the
unit returns to measurement mode. Setting is completed.
EXIT THE SETUP MENU:
During the setup mode, to exit the setup menu, press ON/OFF key; the unit will return to
measurement mode immediately.
Enter
DO Calibration in % Saturation Mode
The HL103 pocket DO/temperature tester can be calibrated quickly in air. In the percentage
saturation mode, the tester is able to perform either 1 or 2 points calibration. For single point
calibration, we recommend that you perform 100% saturation calibration in the air. For the 2
points calibration, zero oxygen solution is required.
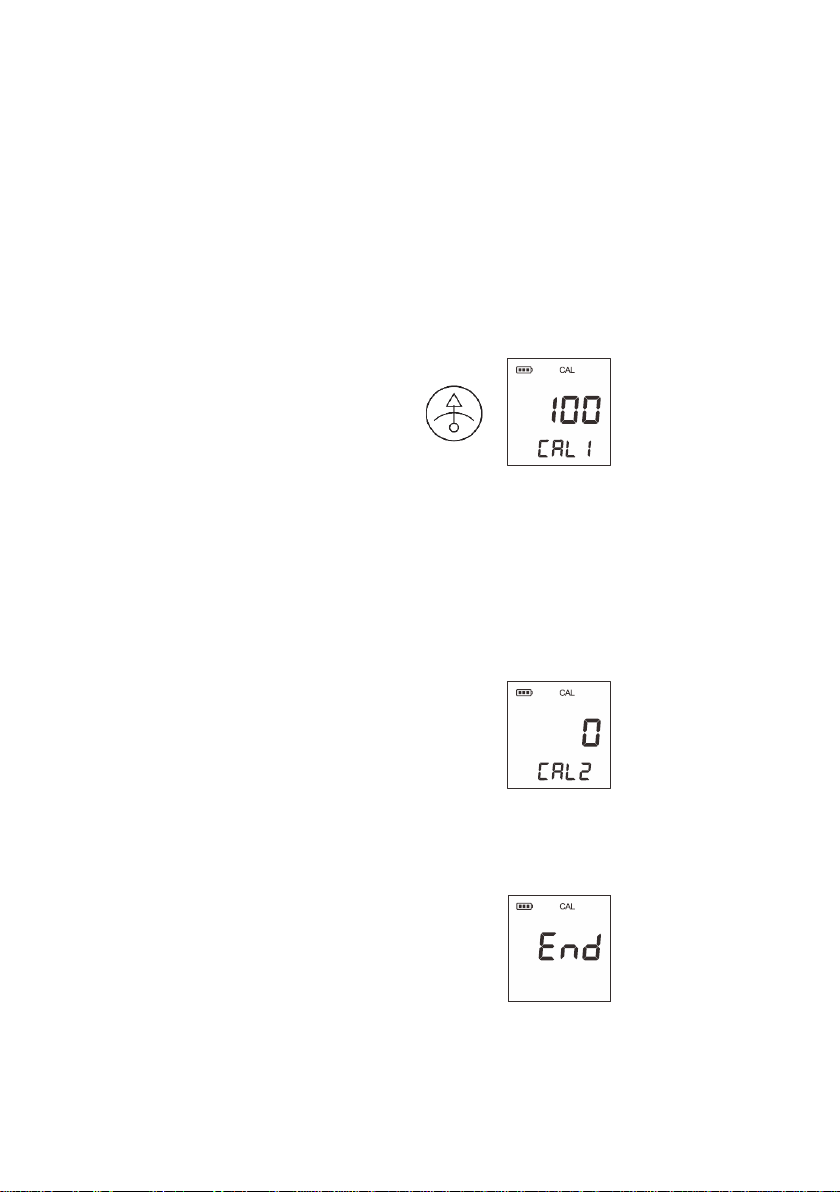
100% SATURATION CALIBRATION:
1.1 Ensure that 1 point calibration is selected in the setup menu.
1.2 Once the dissolved oxygen probe is connected with the tester, turn the meter on and wait
for 10 to 15 minutes to polarise the sensor.
1.3 Press CAL key, the tester shows “CAL1/100%”.
1.4 Hold the DO probe in the air or place the sensor into air-saturated water for 3 to 5 minutes.
Press ENTER key to start the calibration. Wait for the reading to stabilise; the display
shows “END”. The unit returns to measurement mode automatically. Single point
calibration is completed.
2 POINTS CALIBRATION:
2.1 Ensure that 2 point calibration is selected in the setup menu.
2.2 Repeat steps 1.2 to 1.4 above. When the first calibration point is complete, the display
will show “CAL2/0%”. The unit prompts you to continue with second point calibration.
2.3 Immerse the probe in the zero oxygen solution, stir the solution gently.
2.4 Press ENTER key to confirm. Wait for the reading to stabilise (this can often take more
than 10 minutes), the display shows “END”. The tester returns to measurement mode
automatically. Calibration is completed.
N.B. Performing a percentage saturation calibration will simultaneously calibrate the
corresponding mg/L (or ppm) concentration value. Therefore, additional mg/L calibration isn’t
required in most circumstances.
Cal
%
%
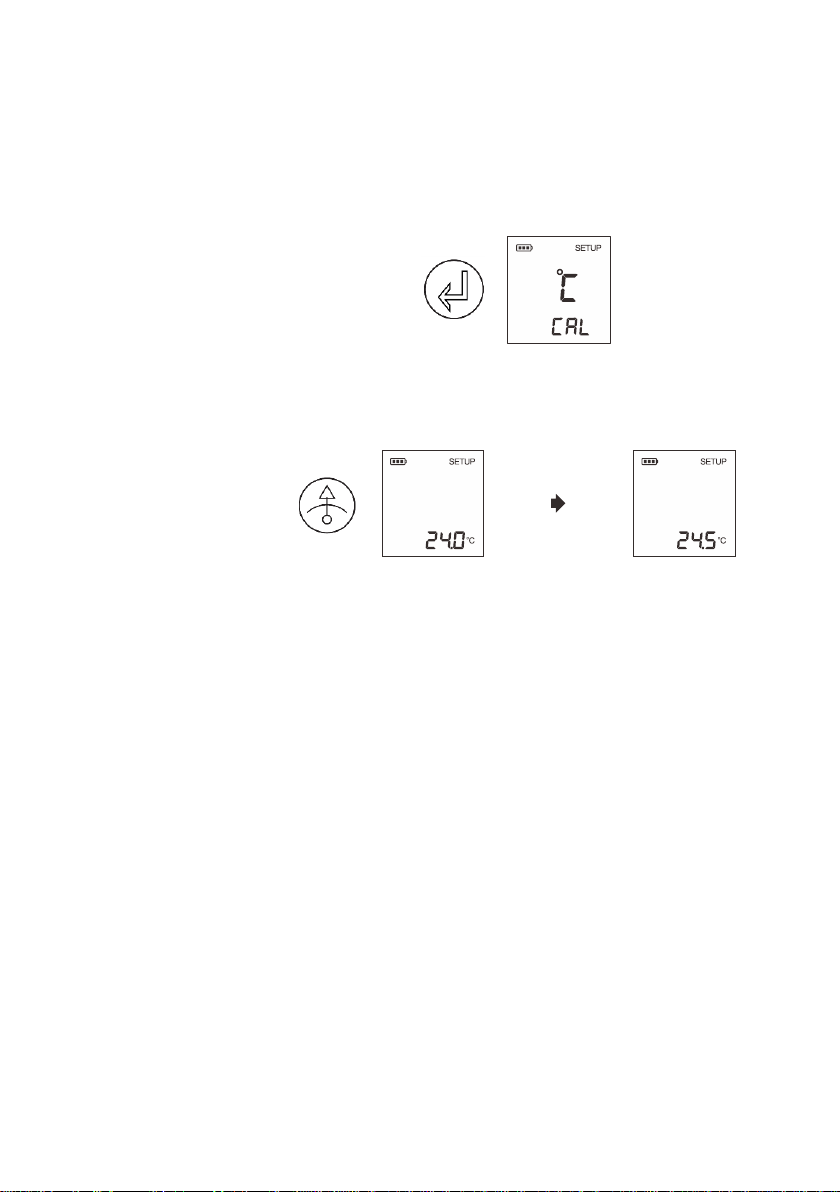
Temperature Calibration
During the measurement, if the temperature reading displayed differs from that of an accurate
thermometer, you need to calibrate the tester.
1. Press and hold the CALkey for 3 seconds to enter setup menu.
2. Press ENTER key until tester shows “oC/CAL” or “oF/CAL dependent on selected
measurement units.
3. Press CAL key to enter the temperature calibration mode.
4. Press CAL key again to set temperature value (Resolution: 0.5oC).
5. Press ENTER key to confirm, the display shows next option.
6. Press ON/OFF key, the tester returns to measurement mode. Calibration is completed.
EXIT THE CALIBRATION:
During the calibration process, if you want to exit the calibration, press ON/OFF key, the tester
will return to measurement mode.
Enter

Dissolved Oxygen Measurement
The HL103 pocket DO/temperature tester is suitable for measuring the dissolved oxygen
content of water, wastewater, brine and other liquids.
If the meter is used to measure seawater or other water containing large amounts of salt,
please set the salinity coefficient before use.
Some gases and vapours such as chlorine, sulfur dioxide, hydrogen sulfide, ammonium,
carbon dioxide and iodine can permeate the membrane via diffusion.
The presence of the above gases will interfere with the measurement of dissolved oxygen.
If the sample contains solvent, grease, sulfide and algae, the membrane on the probe will be
blocked, damaged or eroded.
1. Press ON/OFF key to turn on the tester, wait for 15 minutes to polarise the probe.
2. If necessary, to set the atmospheric pressure and salinity coefficient in the setup menu
(Refer to “SETUP MENU” section).
3. Immerse the probe in the sample solution, ensure the temperature sensor on the probe is
fully immersed.
4. Stir the solution gently, wait for the reading to stabilise, record the measured value on the
display.
Hold Function
The tester contains two data hold modes. When the Auto-Hold function is enabled, the tester
will automatically sense a stable endpoint reading and freeze it, “HOLD” indicator appears on
the display. If the Auto-Hold function is disabled, press HOLD key, the tester will immediately
freeze currently displayed value. Press the key again to resume measuring.
mg/L
Temperature
Sensor

Electrode Care and Maintenance
●Always keep the probe’s membrane moist.
●If the DO probe is out of use for long periods, screw off the membrane cap and rinse the
probe's cathode, anode and the membrane with distilled water, then soak up residual water
on them with filter paper, and re-install the probe.
Replacing the Batteries:
If the battery indicator disappears during the use, the batteries require replacing.
1. Twist the electrode collar counter clockwise, pull the electrode module out from the unit.
2. Insert two “AAA” batteries into the battery compartment (note polarity).
3. Align the slot on the electrode module, push the electrode into the unit.
4. Twist the electrode collar clockwise until it is tight.
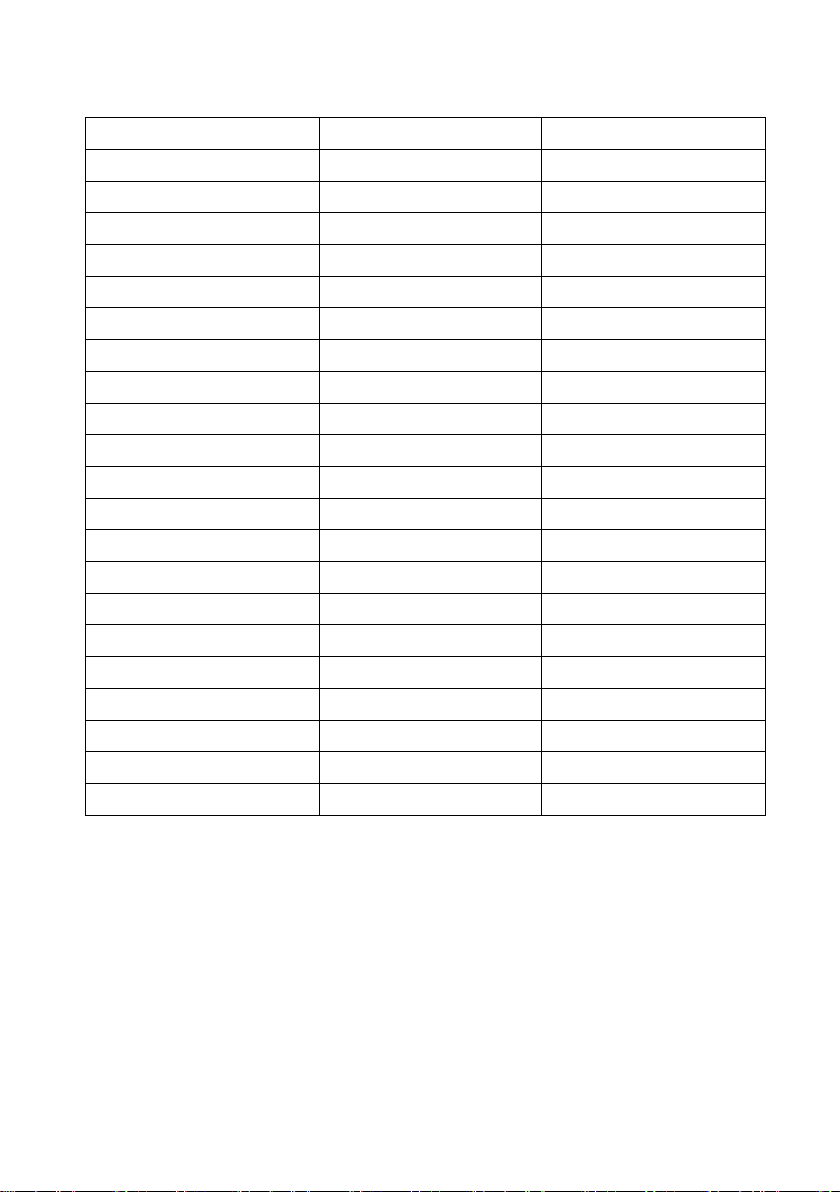
Troubleshooting
LCD DISPLAY
CAUSE
CORRECTIVE ACTION
DO probe does not connect
to tester
Check the connector of sensor
Measured value is out of
range
Check if the DO membrane is clogged,
dirty or broken
Electrolyte solution is
depleted
Refill electrolyte solution
Zero oxygen solution is
contaminated
Replace the calibration solution
+
Cathode and Anode
Membrane cap
Specifications
Dissolved
Oxygen
Model
HL103
Range
0.0~20.0mg/L (or ppm)
Accuracy
±0.5mg/L
Resolution
0.1mg/L
% Saturation of
Oxygen
Range
0.0~200.0%
Accuracy
±10% F.S
Resolution
0.1%
Others
Temperature
Compensation
0~40°C, 32~104°F
Barometric Pressure
Correction
60.0~112.5kPa, 450~850mmHg
Salinity Correction
0~35g/L
Hold Function
Manual or Automatic
Power Off
Manual or Automatic
Reset Function
Yes
Sensor Type
Order Code: HL103DOEC
Power Requirements
2×1.5V "AAA" Batteries
Dimensions
175(L)×40(Dia.)mm
Weight
100g
Pressure VS Altitude Table
ALTITUDE (m)
kPa
mmHg
0
101.3
760
100
100.1
750
200
98.8
741
300
97.6
732
400
96.4
723
500
95.2
714
600
94.0
705
700
92.8
696
800
91.7
688
900
90.5
679
1000
89.4
671
1100
88.3
662
1200
87.2
654
1300
86.1
646
1400
85.0
638
1500
84.0
630
1600
82.9
622
1700
81.9
614
1800
80.9
607
1900
79.9
599
2000
78.9
592

Trace2o®Limited
The Technology Centre
Wagtech Court
Station Road
Thatcham, Berkshire, RG19 4HZ
Tel.: +44 (0)1635 566772
Fax: +44 (0)1635 873509
sales@Trace2o.com
www.Trace2o.com
The information in this document is subject to change without notice. Copyright © Trace2o®
Limited, 2017.All rights reserved. Trace2o® and HydroLite® are registered trademarks of
Trace2o® Ltd.
Table of contents
Other Trace2O Test Equipment manuals


Popular Test Equipment manuals by other brands

Agilent Technologies
Agilent Technologies E4406A VSA Series Programmer's guide

High Voltage
High Voltage DTS-60A Operator's manual

KYORITSU
KYORITSU 4116A Instruction manual and users guide

Vitalograph
Vitalograph BreathCO Quick Start User Training Manual

Lovibond
Lovibond Pooltester pH-Br manual

Overmax
Overmax AD 03 Operation manual


