Swema 3000md User manual

DUCT LEAKAGE TESTER
Manual –V5.31-ES20160714
1
SWEMA AB
Pepparvägen 27
SE-123 56 Farsta, SWEDEN
Tel: +46 (0)8 940090
www.swema.se
www.swema.com
1
.
Leakage tester and accessories
2. Connecting for measuring overpressure and underpressure
3. Settings
4. Measurement
5. Instrumentation and Technical data
2
3
4
5
6

DUCT LEAKAGE TESTER
Manual –V5.31-ES20160714
2
SWEMA AB
Pepparvägen 27
SE-123 56 Farsta, SWEDEN
Tel: +46 (0)8 940090
www.swema.se
www.swema.com
The universal instrument Swema 3000md with SWA 10, controls the leakage tester for duct, at
selected pressure levels up to 1900Pa. A leakage level is saved together with the pressure level.
Swema 3000md inbuilt differential pressure sensor measures the over pressure in duct and the
differential pressure probe, SWA 10 measures the leakage flow over a throttle device (flange) with
a certain k-factor. A radial fan is used to be able to provide highest possible pressure at these
moderate air flows.
The supply and the exhaust of the ventilation are tighten with tightness bladders.
The duct leakage tester is used according to European standard EN 12237 and EN 1507.
LEAKAGE TESTER AND ACCESSORIES

DUCT LEAKAGE TESTER
Manual –V5.31-ES20160714
3
SWEMA AB
Pepparvägen 27
SE-123 56 Farsta, SWEDEN
Tel: +46 (0)8 940090
www.swema.se
www.swema.com
CONNECTING FOR MEASURING OVER PRESSURE AND UNDER PRESSURE
For OVERPRESSURE measurements the nozzle of the blue hose is connected to
the OUTLET of the leakage tester.
For UNDER PRESSURE measurements the nozzle of the blue hose is connected to
the INLET of the leakage tester (the flange).
Notes:
1. For the measurements be aware that the right and corresponding K-factor must be used.
Refer to the calibration certificate to see the 4 different k-factors.
2. The diameter of the Inlet and the Outlet are the same, therefore it is possible to assemble
the nozzle of the hose (in the picture connected to the outlet) to the Inlet to measure under
pressure.

DUCT LEAKAGE TESTER
Manual –V5.31-ES20160714
4
SWEMA AB
Pepparvägen 27
SE-123 56 Farsta, SWEDEN
Tel: +46 (0)8 940090
www.swema.se
www.swema.com
SETTINGS
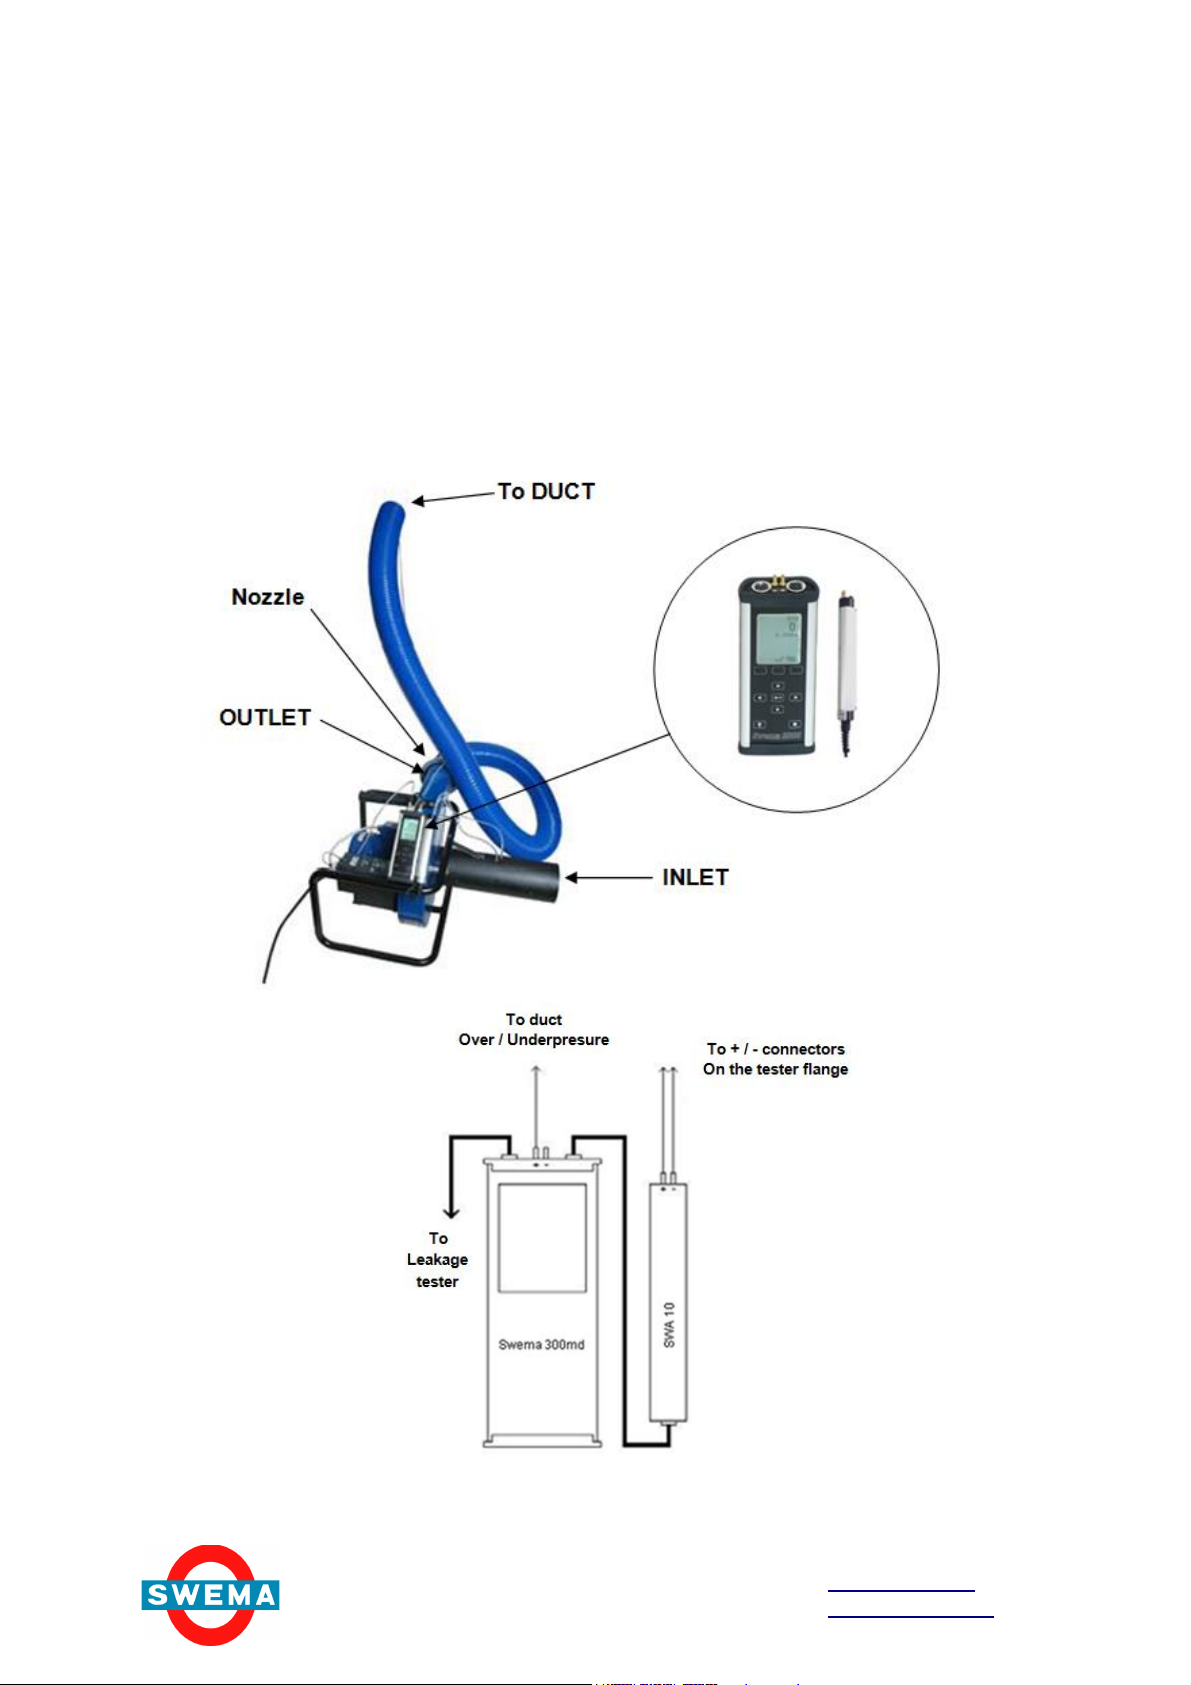
1. Control the leakage tester automatically with Swema 3000md and the sensor SWA 10.
2. The built-in differential pressure sensor in Swema 3000md measures over pressure and under
pressure in the duct. Connect the pressure hose (silicone hose) on the positive pressure
connector (marked with +).
3. Connect the valves of the probe SWA 10 to the valves on each side of the orifice plate in the
flange with the pressure hoses (silicone hoses) to measure the leakage flow. Follow the
convention + to + and –to -.
4. Connect the cable from the leakage tester to the RS232 contact on Swema 3000md.
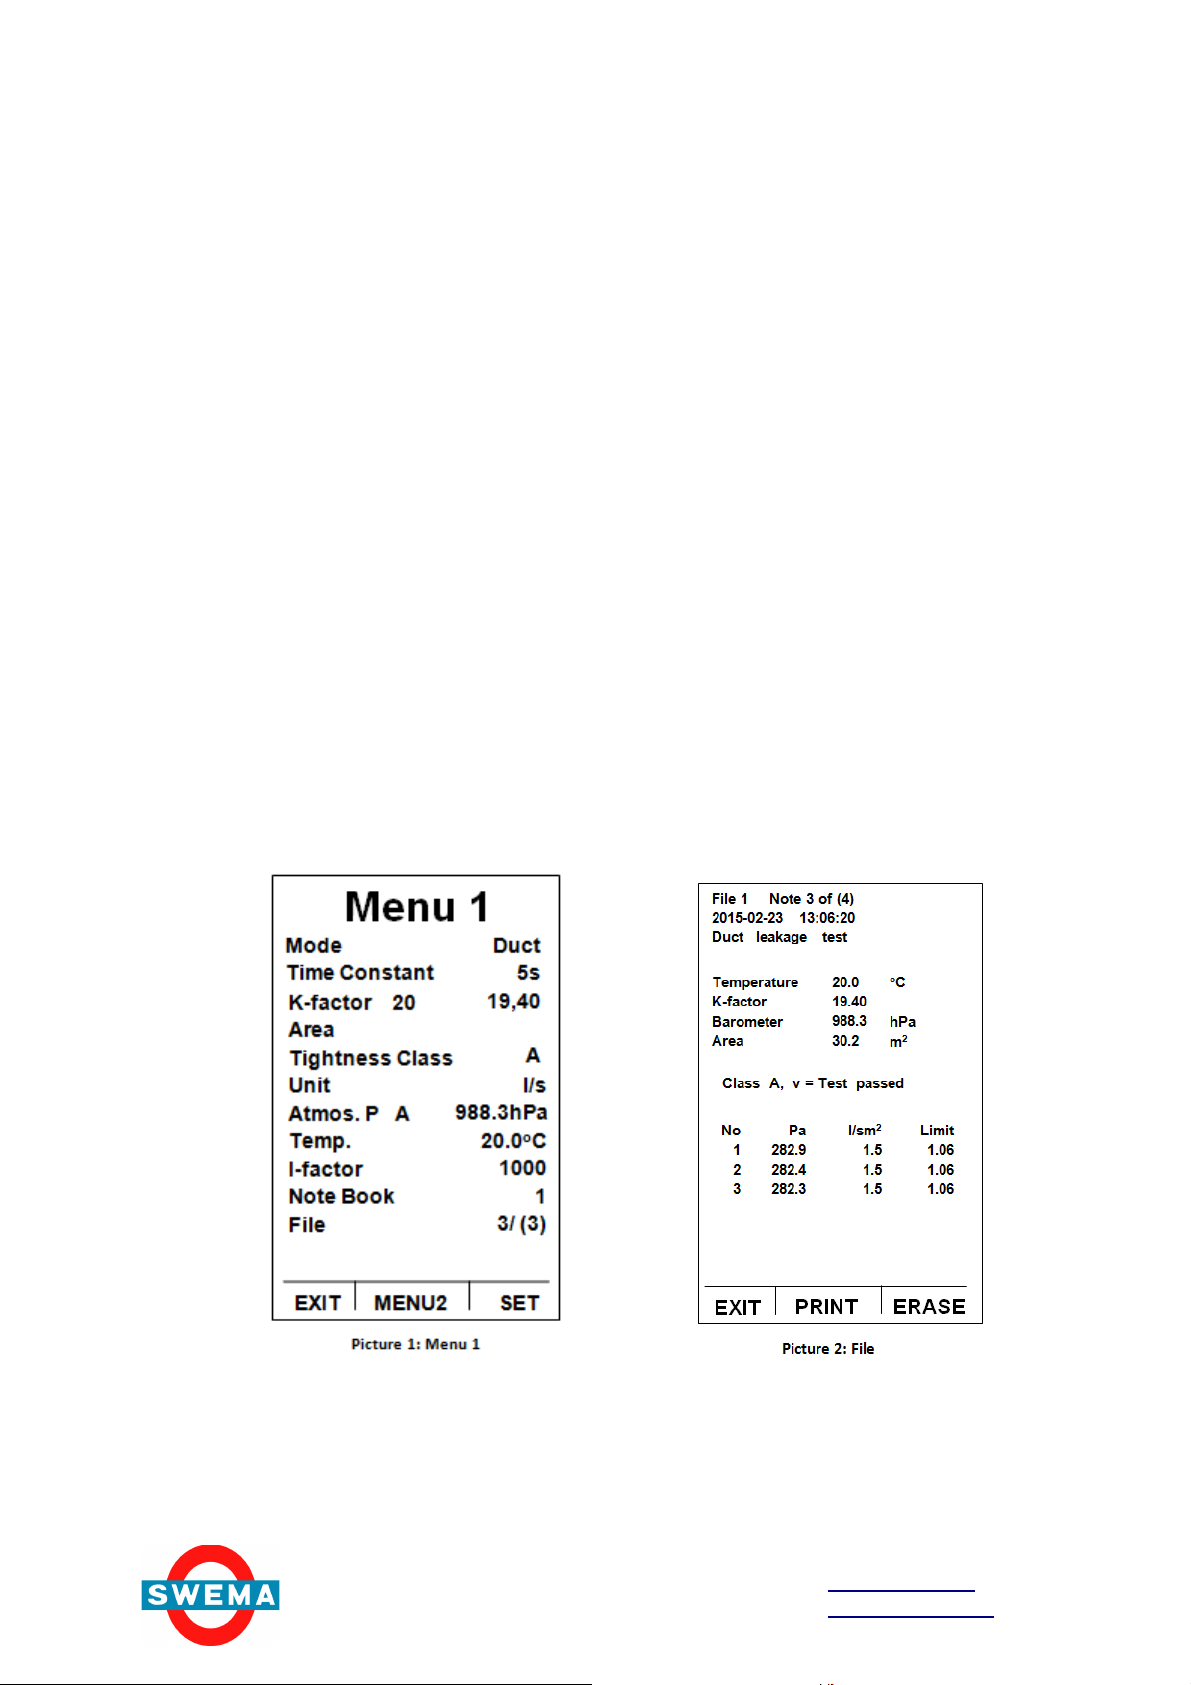
5. Turn Swema 3000md on and select measuring mode DUCT in MENU1 (See picture 1).
6. Set the K-factors on the label of the flange (See picture 1)..
7. Set the surface area of the duct to be tested. The selected area is used to calculate l/sm2and
m3/hm2if these units are selected (See picture 1).
8. Set the tightness (density) class to be used for the measurement of the leakage in the duct.
Select between classes A, B, C or D. In the saved protocol the selected class, used for
calculations, and the limit for the leakage on the test are shown. The limit depends on the
selected class and the pressure during the test (See picture 2).
9. Set the unit for the measurement, select between l/s, m3/h, l/sm2or m3/hm2. The unit l/sm2or
m3/hm2are calculated with the selected area of the duct (See picture 1).
10. Set the I-factor for duct leakage tester. 1000 is the standard factor for Swema 3000md to
control the fan with PID-regulation, however any other factor can be selected (See picture 1).
11. Set the actual ambient temperature. Swema 3000md compensates for air density calculating
with the selected temperature and the measured barometric pressure. The temperature can be
measured also with a thermocouple type-k connected to Swema 3000md (See picture 1).

DUCT LEAKAGE TESTER
Manual –V5.31-ES20160714
5
SWEMA AB
Pepparvägen 27
SE-123 56 Farsta, SWEDEN
Tel: +46 (0)8 940090
www.swema.se
www.swema.com
MEASUREMENT
1. Select in Swema 3000md, the external pressure sensor. The letters “INT.”are shown on the
left at the lower part of the display. It is also possible to measure with the internal pressure
sensor, but then the pressure hoses (silicone hoses) must be changed, and the letters “EXT.”
are shown instead.
2. Before measuring starts, both differential pressure sensors must be zeroed. Press “INT.”to
access the built-in pressure sensor in Swema 3000md, and press ZERO. Afterwards, press
“EXT.”to return to the externally connected pressure sensor and ZERO it.
3. In measuring mode the display shows 4 measuring parameters. The largest digits at the top
show the leakage flow (l/s, m
3/h, l/sm2or m3/hm2), below the leakage flow, the pressure drop
over the orifice plate in the flange used to calculate the leakage flow. The two pressures
shown below the pressure drop, and with small digits, are the expected pressure value at the
left and the read value (actual value) of the measured pressure to the right (See picture 3).
4. Press the arrow keys UP/DOWN to adjust the value of the pressure to be measured, wait until
Swema 3000md is stabilized at the read value (true value) of the pressure. (See picture 3).
5. Measure by pressing the ENTER button.

DUCT LEAKAGE TESTER
Manual –V5.31-ES20160714
6
SWEMA AB
Pepparvägen 27
SE-123 56 Farsta, SWEDEN
Tel: +46 (0)8 940090
www.swema.se
www.swema.com
Instrumentation:
Duct leakage tester (765900) with measuring flange for 10…140l/s (766430)
Swema 3000md (764202)
SWA 10(761430)
Holder(764760) 2pcs, to attach SWA 10 to Swema3000md
Stop (764870) 1pc, to prevent SWA 10 from sliding on Swema3000md
Silicon hose (762470) 8m, between tester and Swema 3000md and duct
Accessories:
With the bladders below, tighten the ventilation supply and exhaust.
Bladder Ø 250mm (765080) To seal duct, as many as needed
Bladder Ø 400mm (765090) To seal duct, as many as needed
Bladder Ø 600mm (765100) To seal duct, as many as needed
Pump (766620) Pump with connector to pump up bladders by hand
TECHNICAL DATA
Max flow (without hose): 144 l/s
Max Flow (leakage tester with hose Ø 100mm):
Overpressure Underpressure
Min Flow: 10 l/s
Uncertainty: ±4.5% read value (when used together with Swema 3000md and SWA10
95% coverage probability for non-condensing, non-moist air
<80% RH for non-aggressive gases)
Spare part: Measuring flange for 10…140l/s (766430)
Measuring flange for 3…30l/s (767890)
Weight: 18 kg
Power supply: 220 VAC (0.37 KW)
128 l/s at -500 Pa
120 l/s at -750 Pa
16 l/s at 1900 Pa
50 l/s at 1500 Pa
73 l/s at 1200 Pa
85 l/s at 1000 Pa
110 i/s at 500 Pa
114 l/s at 400 Pa
122 l/s at 200 Pa
This manual suits for next models
1
Table of contents
Other Swema Test Equipment manuals
Popular Test Equipment manuals by other brands

IET Labs, Inc.
IET Labs, Inc. RLC Digibridge 1693 User and service manual

Agilent Technologies
Agilent Technologies 85052D User's and service guide

Würth
Würth 0715 53 07 Translation of the original operating instructions

Joycare
Joycare JC-224 manual

Sumake
Sumake TT-C Series instruction manual

Trio
Trio CS-1060 instruction manual