Track Technologies TARGET BLU EYE 2 User manual

Know what’s out there...
MANUAL | TARGET BLU EYE 2

2
CONTENTS
THE INTRODUCTION TO TARGET BLU EYE 2 3
LED DISPLAY FUNCTIONS 4
MEMORY FUNCTION FOR SWITCHING ON/OFF 4
VOLUME AND BRIGHTNESS 4
MUTE 5
CITY / HIGHWAY MODE 5
VISUAL AND ACOUSTIC ALERT FOR APPROACHING EMERGENCY SERVICES 5
VISUAL AND ACOUSTIC ALERT LASERTRACK FLARE 6
PAUSE LASER PROTECTION / DELETE LASER PROTECTION SOFTWARE 7

3
INTRODUCTION
Thank you for choosingTarget Blu Eye 2.With Target Blu Eye, you will always be alerted in plenty of time for
approaching emergency services such as ambulances, re brigades, police and unmarked surveillance vehicles.
Even when they are travelling at high speed and without siren and ashing lights.
The emergency services use what is known asTetra radio systems. As soon as the radio in an emergency vehicle is
switched on, it periodically transmits ultra-short pulses to antenna masts in the network.These pulses are detected
byTarget Blu Eye and converted into an alert signal.
As a result,Target Blu Eye makes an important contribution to your safety, the safety of the emergency services and
the safety of your fellow road users.
4
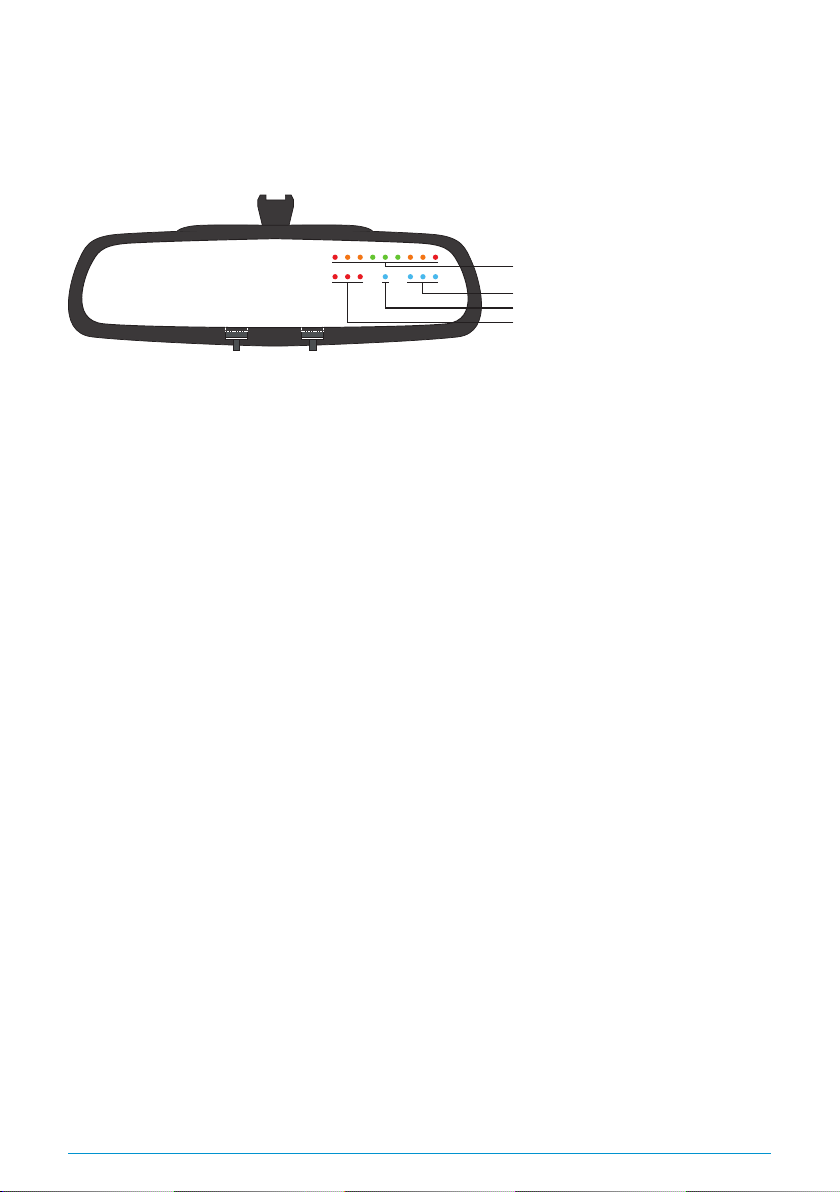
LED DISPLAY FUNCTIONS
The LED display is installed by the technician behind the glass of the rear-view mirror.The display can be operated
using buttons 1 and 2 located on the bottom edge of the mirror.
MEMORY FUNCTION FOR SWITCHING ON/OFF
Target Blu Eye features an on/o memory function. Don’t want your system to turn on automatically when the
ignition is switched on?
• Then, before turning o the car ignition, press button 1 for 2 seconds;
a short beep sounds and the status LED goes out.
• The system is now o and remains o even when the ignition is switched on again.
• To switch on the system, press button 1 for 2 seconds;
the system boots up and the status LED lights green.
VOLUME AND BRIGHTNESS
Activate the settings menu to adjust the volume of the signal generator and the brightness of the display to your
personal requirements.
• Press and hold both buttons simultaneously for at least 2 seconds;
a short acoustic signal sounds and the status LED lights up yellow.
• Volume: press button 1 as many times as necessary until the desired volume is reached.The left side of the
signal strength meter indicates minimum volume (green) and maximum volume (red).There are 5 dierent
levels to choose from.
• Brightness: press button 2 as many times until the desired brightness is reached. The right side of the
signalstrength meter indicates minimum brightness (green) and maximum brightness (red). 5 dierent
levels can be selected.
The settings menu exits automatically after 30 seconds. You can also exit the menu by pressing and holding both
buttons simultaneously for 2 seconds. The changed settings are saved.
Signal strength meter
Display number of emergency services / laser measurement in front
Status LED
Laser measurement behind
1 2

5
MUTE
Suppresses acoustic alarms temporarily
• Press button 1 once briey to activate the MUTE function;
a short acoustic signal sounds and the status LED ashes blue.
• The MUTE status remains activated 30 seconds after the last notication.When a new announcement is
made, you are automatically alerted again by the acoustic signal.You can deactivate MUTE manually by
briey pressing button 1 again.
CITY / HIGHWAY MODE
In CITY MODE, a threshold value for alarms is set.This setting is recommended within built-up areas when there are
many and strong emergency service signals.
In HIGHWAY MODE, there is no threshold for alarms.This setting is recommended on country roads.
CITY MODE has 3 levels:
• Level 1: 1st green LED.
• Level 2: 2nd green LED.
• Level 3: 1st orange LED.
• Press button 2 once briey and press it again each time within 5 seconds until the desired level is selected.
After 5 seconds, the LEDs of the selected CITY MODE level light up constantly and the setting is saved.
HIGHWAY MODE
• Press button 2 once briey and press it again each time within 5 seconds until both red LEDs light
up. After 5 seconds, the LEDs go out and the setting is saved.
VISUAL AND ACOUSTIC ALARMS FOR APPROACHING EMERGENCY SERVICES
If an emergency service approaches you, you will receive the following notications:
• The LEDs of the signal strength meter light up from green to red. Green indicates a greater distance to an
emergency service. When red, the emergency service is in your immediate vicinity.
• An acoustic warning signal can be heard.

6
VISUAL AND ACOUSTIC ALARM LASERTRACK FLARE
If your Blu Eye is paired with LaserTrack Flare, these notications will also be shown via the display in the rearview
mirror.
When approaching memory-programmed automatic gates and/or doors, you will receive the
following notications:
Visual:
• 3 white LEDs (headlights) in the display light up :contact with remote transponder front.
• 3 red LEDs (rear lights) in the display light up :contact with remote transponder rear side.
Acoustic: two short sound signals
If laser detection is activated and a laser gun is aimed at your car, you will receive the following
notications:
Visual:
• 3 white LEDs (headlights) ash in the display :laser measurement at the front.
• 3 red LEDs (rear lights) ash in the display :laser measurement at the rear
Acoustic: alarm tone
If laser protection is activated* and a laser gun is aimed at your car, you will receive the
following notications:
Visual:
• All signal strength meter LEDs ash rapidly.
• 3 white LEDs (headlights) in the display light up :laser measurement at the front.
• 3 red LEDs (rear lights) in the display light up :laser measurement at the rear.
Acoustic: alarm tone
When laser protection ends, LaserTrack automatically goes into Cooldown.The status LED lights up red and turns on
and o smoothly; laser protection is inactive.
At the end of Cooldown, a short acoustic signal sounds.The status LED lights up green; laser protection is
active again.
The laser protection and cooldown times are set by the technician and can be adjusted if necessary.

7
PAUSE LASER PROTECTION / DELETE LASER PROTECTION SOFTWARE
Interrupt laser protection during laser alarm:
• Press 1 x briey on either button.
• The status LED lights up red and goes on and o smoothly; laser protection is now inactive.
Delete laser protection software (note: this can only be done during Cooldown)
• Press and hold both buttons for 3 seconds.
• The status LED lights up blue; Laser protection and Laser detection are now deleted.
• The remote control function for automatic gates and/or doors remains active.
To reset the laser protection function, LaserTrack’s rmware must be reinstalled.
*The remote control and laser detection function of LaserTrack may be used everywhere in Europe.
However, as laser protection, LaserTrack is not allowed everywhere. Make sure you always act in accordance with
local laws.

Zuidergracht 21 | 3763 LS Soest | the Netherlands
www.tracktechnologies.nl | www.blu-eye.eu
Table of contents
Popular Automobile Accessories manuals by other brands

Bestop
Bestop 52821 installation instructions

Sealey
Sealey RS131.V2 instructions

Dakota Digital
Dakota Digital VHX-1200 Instrument Installation

Free2Move eSolutions
Free2Move eSolutions ePublic user manual

AddSecure
AddSecure Asset Series installation guide

Grabars
Grabars Front JK GraBars Handle installation instructions


