manuals.online logo
Brands
  1. Home
  2. •
  3. Brands
  4. •
  5. Tradinco
  6. •
  7. Control Unit
  8. •
  9. Tradinco 43 Series User manual

Tradinco 43 Series User manual

User Guide
43XX/X
43XX/X
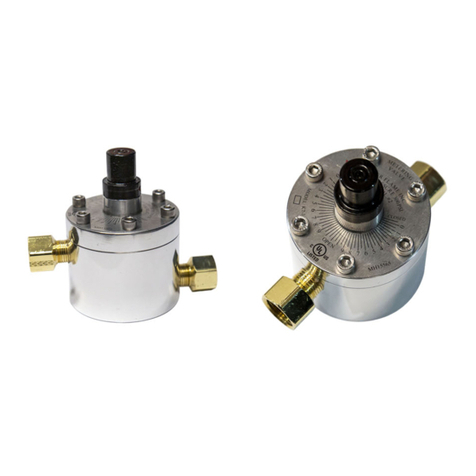
Pressure Limiting Valve
The Tradinco Instruments 43XX/X Pressure limiting valves are automatically closing valves
which close at a preset pressure.
The 43XX/X series pressure limiting valves available in brass and stainless steel and can be
e uipped with Buna, EPDM or Viton seals to be used with different gases or li uids
substances.
Both the pressure inlet and outlet of the pressure limiting valve have a 1/4 NPT female
connection.
The PLV can be mounted with a M5 screw onto a panel, etc
User Guide
43XX/X
Tradinco Instrumenten-Apparaten B.V. | PO box 37 | 2650 AA Berkel en Rodenrijs, The Netherlands.
 +31 105112911 | +31 105115114 | ִinfo@tradinco.com | www.tradinco.com
43XX/X 02/2014 E Revision 1
Installation
The instrument can only be installed by trained personal.
Check tread of the pressure ports and fittings before installation and make sure they
are clean and not damaged.
Tapered NPT treads usually are screwed in together with Teflon tape to protect against
galling and to improve sealing. It is important that no remains of the tape are able to
get into the interior of the pressure limiting valve.
• If the pressure limiting valve is used is a pressure system and is attached to tubing,
attach the pressre limiting with a M5 screw to a frame, bracket, etc to relief the weight
of the pressure relief valve on the tubing.
• Connect the supply port with 1/4 NPT male coupling.
• Connect the outlet port with 1/4 NPT male coupling or manometer.
Be careful when you are working with high pressure.
Adjustment 4360/X series
Set Point
• Connect the inlet side to an adjustable pressure source; connect a pressure indicator to
the outlet side.
• Unscrew the “locking nut”
• Slowly increase the supply pressure until the pressure on the pressure indicator stops
increasing.
• To decrease the set point turn the “adjustment screw” anticlockwise
• To increase the set point turn the “adjustment screw” clockwise
• When the desired set point is reached lock the “adjustment screw” with the “locking nut”
Adjustment 4350/X series
For different pressure settings a different spring arrangement may be re uired. (Figure 1)
• Unscrew the “locking nut”
• Unscrew and remove the “adjustment screw”
• Remove the plunger with the spring washers
• Re arrange the spring washers to the desired range
• Replace the plunger
• Place the “adjustment screw”
• Lock the “locking nut”
Set point
• Connect the inlet side to an adjustable pressure source; connect a pressure indicator to
the outlet side.
• Unscrew the “locking nut”
• Slowly increase the supply pressure until the pressure on the pressure indicator stops
increasing.
• To decrease the set point turn the “adjustment screw” anticlockwise
• To increase the set point turn the “adjustment screw” clockwise
• When the set point is reached lock the “adjustment screw” with the “locking nut”
User Guide
43XX/X
Tradinco Instrumenten-Apparaten B.V. | PO box 37 | 2650 AA Berkel en Rodenrijs, The Netherlands.
 +31 105112911 | +31 105115114 | ִinfo@tradinco.com | www.tradinco.com
43XX/X 02/2014 E Revision 1
Pressure Ranges
ORDERI G CODE RA GE
4360/LD : 50 ÷ 300 mbar max. inlet pressure 100 bar
4360/1 : 0.2 ÷ 2.5 bar max. inlet pressure 100 bar
4360/2 : 2.0 ÷ 8.0 bar max. inlet pressure 100 bar
4350/1 : 7 ÷ 56 bar max. inlet pressure 700 bar
4350/2 : 55 ÷ 175 bar max. inlet pressure 700 bar
4350/3 : 176 ÷ 560 bar max. inlet pressure 700 bar
Specifications
Media : All gasses / li uids compatible with the materials of
construction
Materials of construction Body:
• Brass (standard)
• Stainless steel AISI 316 (optional)
Plunger: Stainless steel AISI 316
Seals:
• Buna and Teflon (standard)
• EPDM and Teflon (optional)
• Viton and Teflon (optional)
Operating temperature : -20° C to +75° C
Pressure : 1/4" NPT female
Dimensions Diameter: 4360 Ø 32mm
Diameter: 4350 Ø 36mm
Length: ±80 to ±90mm depending on pressure setting
Weight : ±0.4 kg
Application : Pressure limiting valve
Figure 1
User Guide
43XX/X
Tradinco Instrumenten-Apparaten B.V. | PO box 37 | 2650 AA Berkel en Rodenrijs, The Netherlands.
 +31 105112911 | +31 105115114 | ִinfo@tradinco.com | www.tradinco.com
43XX/X 02/2014 E Revision 1
Warranty
During the design and manufacturing of this instrument the at most attention has been given to uality
and durability.
This User Guide contains information needed for the safe and effective use of the
capabilities of the instrument.
Please read the User Guide carefully before operating the instrument. By doing so possible
damage to the instrument or damage caused by the incorrect use of the instrument can be
avoided.
TRADINCO INSTRUMENTS warrantees the instrument in accordance with the Standard Terms and
Conditions of the Instrument Trade as issued by the Association bearing the name "Federation Het
Instrument" (The Instrument Federation, (filed with the Clerk of Utrecht District Court on 13 January
1993 under number 16/93 and with the Chamber of Commerce and Industry in Amersfoort on 18
January 1993. A copy is available on re uest.
TRADINCO INSTRUMENTS warrantees that this product will be free from defects in materials and
workmanship for a period of 12 months from the date of shipment. If any such product proves
defective during this warranty period, TRADINCO INSTRUMENTS, at its option, will either repair the
defective product without charge for parts or labour, or will provide a replacement in exchange for the
defective product.
In order to obtain service under this warranty, Customer must notify TRADINCO INSTRUMENTS of the
defect before the expiration of the warranty period and make suitable arrangements for the
performance of the service.
Customer shall be responsible for packaging and shipping of the defective product to the service centre
designated by TRADINCO INSTRUMENTS, with shipping charges prepaid.
If no defect can be found Customer may be charged for costs of the investigation.
This warranty does not apply to any defect, failure or damage caused by:
• Improper use of the instrument.
• Normal wear of the product.
• Modification or repair carried out by or on behalf of the owner or by a third party.
• Implementation of modifications to the product that are not supplied or implemented by
TRADINCO INSTRUMENTS.
TRADINCO INSTRUMENTS and its vendors will not be liable for any indirect, special, incidental or
conse uential damages irrespective of whether TRADINCO INSTRUMENTS or the vendor has advance
notice of the possibility of such damages.
The type number of the product, as listed on the instrument tag plate, should always be mentioned in
any correspondence concerning the product.
TRADINCO INSTRUMENTS
Industrieweg 74
Postbus 37
2650 AA Berkel en Rodenrijs
The Netherlands
+31 (0)10 5112911
www.tradinco.com
info@tradinco.com

Popular Control Unit manuals by other brands

Velleman ARDUINO VMA308 user manual

Velleman

Velleman ARDUINO VMA308 user manual

Bandini Industrie GBD BA230 Instructions for installations

Bandini Industrie

Bandini Industrie GBD BA230 Instructions for installations

Richter PA/F Series Installation and operating manual

Richter

Richter PA/F Series Installation and operating manual

GFA TS 971 operating instructions

GFA

GFA TS 971 operating instructions

Studio Technologies 5130 user guide

Studio Technologies

Studio Technologies 5130 user guide

SimCom SIM5360A EVB user guide

SimCom

SimCom SIM5360A EVB user guide

DMX4ALL DMX-Relais 2 INRUSH user manual

DMX4ALL

DMX4ALL DMX-Relais 2 INRUSH user manual

Detection Systems DS7436 Installation instructions manual

Detection Systems

Detection Systems DS7436 Installation instructions manual

SCHUNK GSM-P 32 Repair instructions

SCHUNK

SCHUNK GSM-P 32 Repair instructions

Ei Electronics RadioLINK Ei170RF instruction manual

Ei Electronics

Ei Electronics RadioLINK Ei170RF instruction manual

RADWAG MW-01 Series user manual

RADWAG

RADWAG MW-01 Series user manual

M-system M8CD1 instruction manual

M-system

M-system M8CD1 instruction manual

Viessmann Vitotronic 100 KW10B Operating instructions and user's information manual

Viessmann

Viessmann Vitotronic 100 KW10B Operating instructions and user's information manual

Nederman TAV 50 Series instruction manual

Nederman

Nederman TAV 50 Series instruction manual

Volvo AEM installation instructions

Volvo

Volvo AEM installation instructions

AJAX ocBridge Plus user manual

AJAX

AJAX ocBridge Plus user manual

Graco 26A231 Instructions - parts

Graco

Graco 26A231 Instructions - parts

Power Flame K7 Installation and operation manual

Power Flame

Power Flame K7 Installation and operation manual

manuals.online logo
manuals.online logoBrands
  • About & Mission
  • Contact us
  • Privacy Policy
  • Terms and Conditions

Copyright 2025 Manuals.Online. All Rights Reserved.