Transcat CheckMate 400 User manual

Thermocouple Calibrator
CheckMate™ 400
• Calibrate thermocouple
instruments
Check transmitter inputs
Simulate sensors into controllers and
indicators
Read thermocouple probes
• Four built-in T/C types
Types J, K, T, E and millivolt
Built-in cold junction compensation
• Compact and low cost
The CheckMate 400 fits easily into your
pocket and budget.
• Easy to use
One touch to set the output & function
• Accuracy to ±0.025%
Within ±1°C
• Long lasting alkaline batteries
Four “AA” Alkaline cells can provide months
of typical use
• Settable “Quik-Chek®”
pushbuttons
Set any HI and LO output in each range
Easy to use
The Transmation CheckMate 400 checks, calibrates and
measures all the thermocouple devices in your plant.
Toggle the display between °C and °F or lock it for full
time use of either temperature scale.
Simulate temperature and measure thermocouples
directly with the pocket sized CheckMate 400.
The CheckMate 400 is easy to use. Select a
thermocouple type and use the decade push-buttons for
the precise output you need.
Source thermocouple
Calibrate recorders, digital indicators, computer inputs or
any other instruments that measure thermocouples.
Easily set any value to 1° C or F with the intuitive UP
and DOWN pushbuttons. Separate buttons for each digit
make adjustments fast and easy.
Recall output settings
The “Quik-Chek” pushbuttons provide rapid checking of
any three points in each range. Quik-Chek settings
remain in memory even when the CheckMate 400 is
powered off.
Measure thermocouple probes
Verify proper sensor function and measure temperatures
by attaching a thermocouple to the CheckMate 400.
Toggle the display between °C and °F or configure it for
full time use of either temperature scale.
Display the present reading, maximum or minimum by
pressing the READ, MAX or MIN pushbuttons to quickly
check how much the temperature has varied or the
stability of control.

Turn-on
Each time you turn on the CheckMate 400 the
LCD will display all segments for about 1 second.
It then displays the most recently selected source
or read setting.
Source
The three Quik-Chek outputs will be the same as
previously stored. Each time a different type is
selected, the three Quik-Chek outputs will be recalled.
Read
The CheckMate 400 is ready to measure the
same signal as the last time it was turned on and
will automatically update the MAX & MIN readings
for recall at any time.
Selecting ranges
For some functions there are two or more ranges
or scales. Press the RANGE/TYPE pushbutton to
scroll through the ranges and scales.
Turn-off
Press the POWER push-button to turn the
CheckMate 400 off. If AUTO-OFF is enabled, the
Checkmate 400 will turn itself off after 30 minutes
of inactivity.
Autocal
To maintain accuracy, the CheckMate 400
periodically recalibrates its measuring circuitry
against internal references. The word CAL will
appear on the display for less than 2 seconds.
Changing batteries
Low battery is indicated by BAT on the display.
Approximately four hours of operation remain
before the LCD blanks and CheckMate 400 shuts
itself down. Turn the CheckMate 400 off, loosen
the captive screw securing the battery
compartment and lift off the cover from the bottom
of the case. The four “AA” batteries are easily
removed and replaced (alkaline supplied and
recommended). Replace the battery compartment
cover and tighten the screws.
Auto-off
CheckMate 400 can be set up to turn itself off
after 30 minutes of inactivity. The internal timer is
reset to 30 minutes each time a pushbutton is
pressed.
Default settings – Auto-off
CheckMate 400 may be restored to the factory
settings. This will reset the HI and LO “Quik-Chek”
memories. Prompts also guide you for selection of
Auto-Off and temperature scales.
1) Press and hold the STORE/RESET push-
button while turning the CheckMate 400 on.
2) Keep pressing the push-button until the display
flashes (about 5 seconds) then release.
3) The words BAT and ON will appear on the
display indicating that AUTO-OFF is selected.
4) To toggle the AUTO-OFF function on and off
press the RANGE/TYPE push-button and the
words oN and oFF will display.
5) After five seconds the CheckMate 400 will
automatically store your choice and the °C &°F
symbols will flash on the display.
6) Press the RANGE/TYPE push-button to make
your selection. With °C flashing the unit will
display only in °C, with °F flashing the unit will
display only in °F and with both flashing you
can select °C and °F for each RTD type. °C/°F
is selected if no push-buttons are pressed.
7) After five seconds the CheckMate 400 will
begin normal operation. Or you may press the
STORE/RESET button to accept your choice
and begin operation.
CAL
RANGE/TYPE
POWER
POWER
Source thermocouple
Select source by pressing the SOURCE/READ
pushbutton until the word SOURCE appears on the
LCD display. To change the output value press the
UP or DOWN pushbutton corresponding to the digit
being displayed. To ramp the output press and hold
any UP or DOWN pushbutton. The display will
continue to change in increments corresponding to
the digit being changed and will automatically carry
up and down until the limits of the range are
reached. This function operates in all three output
positions (HI, SET & LO).
Storing Quik-Chek outputs
1) Press HI or LO
2) Press the UP/DOWN keys to desired value
3) Press the STORE push-button
The LCD will flash once to show that the value
was saved
If a value is in the SET position and you want that
value stored in HI or LO, press and hold the STORE
push-button, then press the HI or LO pushbutton.
The display will flash once to indicate the value has
been stored. Then release both pushbuttons.
Recall Quik-Chek outputs
When you need a stored value just press the HI or
LOW Quik-Chek pushbutton. Any value for the
selected range may be stored in HI & LO. The
CheckMate 400 remembers the HI, LO and SET
values for each function with the power on or off.
Each time a different function is selected, the last
three Quik-Chek values for that function will be
recalled.
Open thermocouple
Five dashes (-----) will appear on the LCD if there is
an open sensor or if the sensor has a high
resistance which indicates that the sensor is burning
out.
Read thermocouples
Select read by pressing the SOURCE/READ
pushbutton until the word READ appears on the
LCD display. The READ functions measure the
desired signal.
Min/Max
To read the maximum or minimum input since read
mode was entered, simply press the MAX or MIN
pushbutton. The value will appear on the LCD along
with the word MAX or MIN. The MAX/MIN values
are automatically updated and may be viewed at
any time without disturbing the other values.
Restarting Min/Max
Pressing the STORE/RESET push-button will cause
the CheckMate 400 to store the present reading
into the MAX and MIN memories. Upon releasing
the STORE/RESET push-button the CheckMate
400 will resume reading the input and update the
MAX & MIN values as the measured signal
changes.
Out of range signals
Signals above or below those available for the
currently selected range will be indicated by Or and
Ur on the display.
HI / MAX
SET / READ
LO / MIN
STORE/RESET
HI / MAX
SET / READ
LO / MIN
HI / MAX
SET / READ
LO / MIN
STORE/RESET
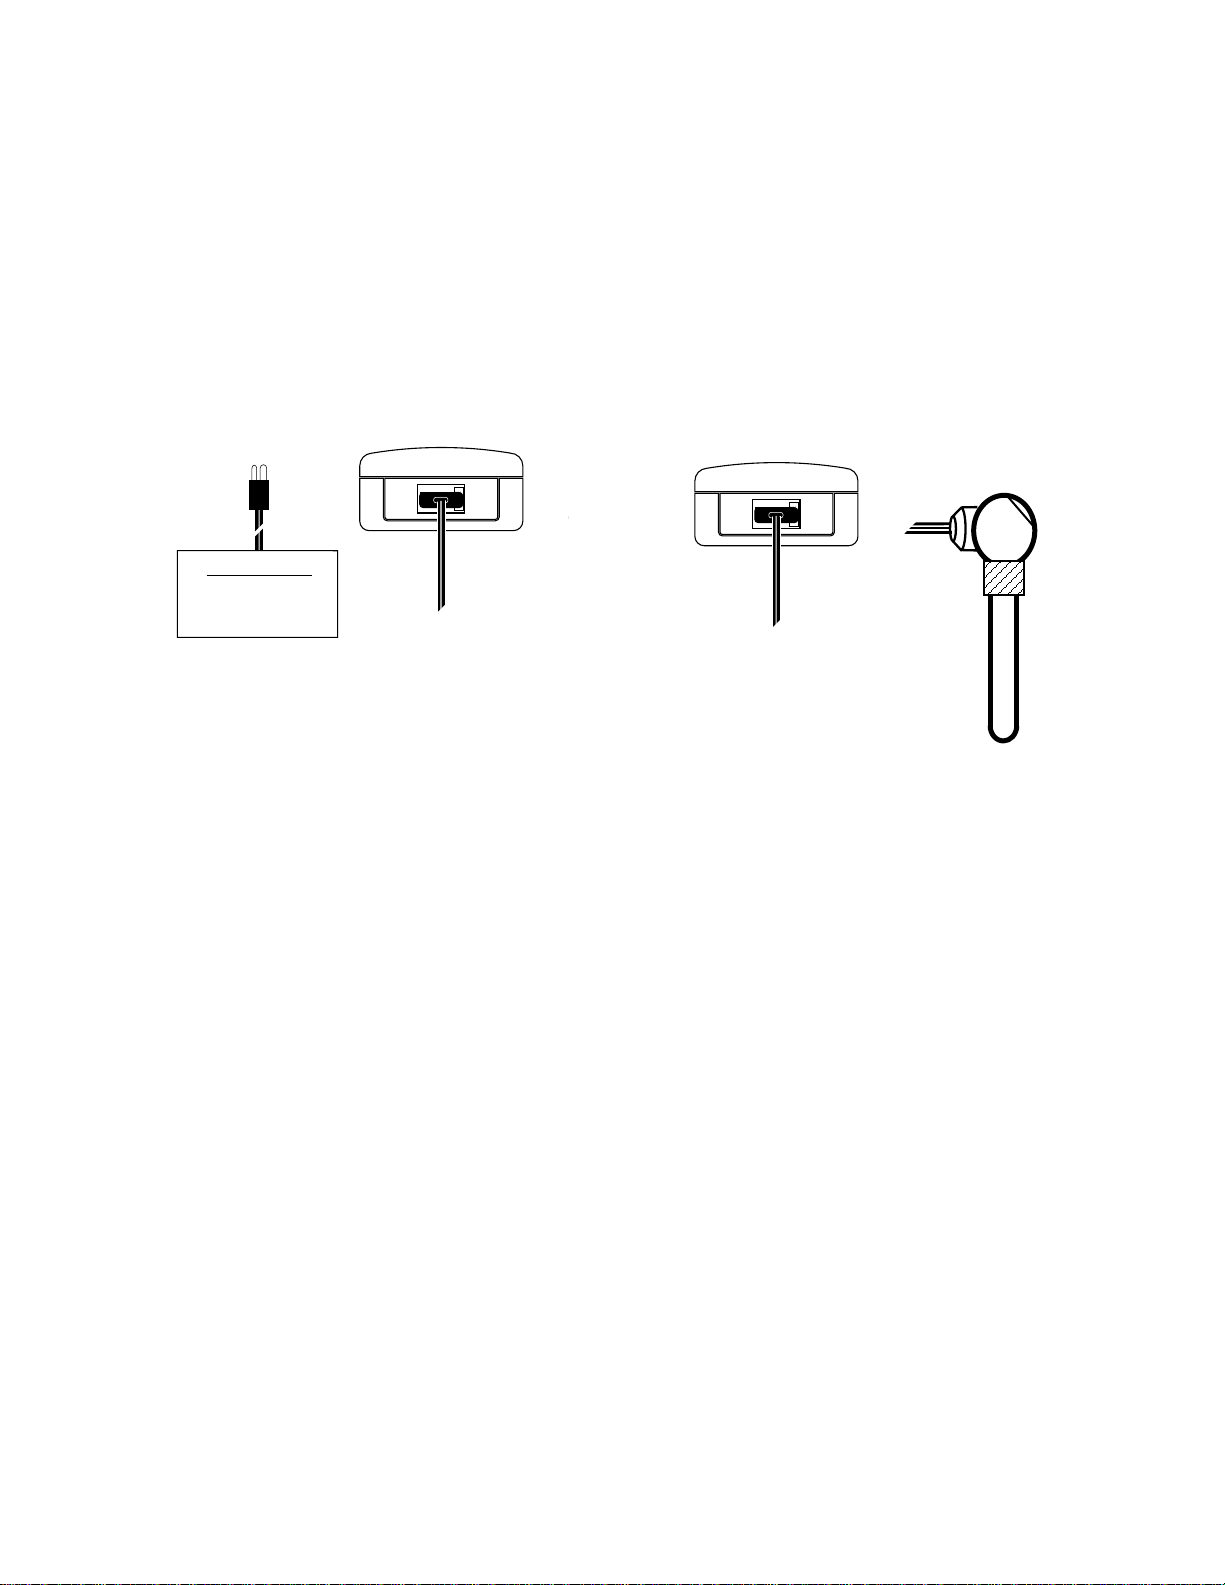
Calibrate thermocouple instruments
Choose this function to simulate a thermocouple signal into any
instrument requiring a thermocouple input. The output of the
CheckMate 400 is automatically cold junction compensated.
1) Disconnect the thermocouple from the instrument being calibrated.
2) Press the POWER push-button, then press the SOURCE/READ
pushbutton until SOURCE is displayed.
3) Press the RANGE/TYPE push-button until the desired T/C type and
temperature scale appear.
4) Use a thermocouple wire and corresponding miniature
thermocouple connector to connect the CheckMate 400 to the
instrument.
Output temperature is adjustable with the UP and DOWN push-
buttons. Span and zero outputs are available by using the HI and LO
Quik-Chek push-buttons to recall your stored settings.
Measure thermocouple sensors
Choose this function to read a thermocouple. The input of the
CheckMate 400 is automatically cold junction compensated.
1) Disconnect the thermocouple from any instrument.
2) Press the POWER push-button, then press the SOURCE/READ
pushbutton until READ is displayed.
3) Press the RANGE/TYPE push-button until the desired T/C type and
temperature scale appear.
4) Use the proper thermocouple wire and corresponding miniature
thermocouple connector to connect the CheckMate 400 to the
thermocouple.
Display the present reading, maximum or minimum by pressing the
READ, MAX or MIN pushbuttons.
Signals above or below those available for the currently selected range
will be indicated by Or and Ur (Overrange and Underrange) on the
display.
+-
Instrument with
Thermocouple Input
Controller
Temperature Indicator
Temperature Trip or Alarm
Temperature Transmitter
Cu
CP+
CP-
Cu
CP+
CP-

PN 1887113 Rev AApril 2002
©2002 Transmation, Inc. Specifications subject to change without notice.
All rights reserved. Printed in U.S.A.
Product Specifications
90 day accuracy
1 year accuracy
Warm up time
Temperature effect
Batteries
Battery life
Low battery indication
Overvoltage protection
Operating temperature range
Storage temperature range
Relative humidity
Overall size
Weight
Ranges
Thermocouple accuracy
Cold junction accuracy
Cold junction effect
Output impedance
Source current
Ranges and accuracy
Input impedance
Open thermocouple detection
General
±(0.025% of Full Scale + 1 LSD)*
±(0.05% of Full Scale + 1 LSD)
10 seconds to specified accuracy,
2 minutes to maximum accuracy
±0.01%/°C based on 23°
Four “AA”, (R6) batteries (Alkaline supplied and recommended)
Nominal 40 hours
“BAT” indication on the display at approximately 4 hours left
Protected to 120V AC/DC for 30 seconds
-5 to +130 °F (-20 to +55°C)
-13 to +130°F (-25 to +55°C)
10 to 90%, non-condensing for 24 hours from 0 to 35°C
158.1 x 83.1 x 49.3 mm (6.23 x 3.27 x 1.94 inches)
0.34 kg (12 oz)
Thermocouple source
Type J -100 to 1200°C; -148 to 2192°F
Type K -100 to 1371°C; -148 to 2500°F
Type T -100 to 400°C; -148 to 752°F
Type E -100 to 1000°C; -148 to 1832°F
±1°C for termperatures above 0°C
±2°C for termperatures below 0°C
±1°C
within 0.05°C per °C change
<0.3 ohms
>8.0 mA
Read thermocouple
Same as for Thermocouple source
> 1Meg ohm
450 millisecond pulse. Nominal threshold 10K ohms
Ordering information Part No.
CheckMate 400 Thermocouple Calibrator 23409T
Included with each CheckMate 400 are:
T/C wires for types J, K, T and E, 1 meter long, terminated at one end
with a miniature thermocouple connector
Carrying Case
Warranty
Transmation products are warranted to be free from
defects in material and workmanship (excluding fuses,
batteries and leads) for a period of one year from the
date of shipment. Warranty repairs can be obtained by
returning the equipment prepaid to our factory. Products
will be replaced, repaired, or adjusted at our option.
Transmation gives no other warranties, including any
implied warranty of fitness for a particular purpose. Also,
Transmation shall not be liable for any special, indirect,
incidental or consequential damages or losses arising
from the sale or use of its products.
*Typical 90 day accuracy can be estimated by dividing
the 1 year % of full scale accuracy by 2. Additions to
the specification, such as + 1 LSD, remain constant.
Other Transcat Test Equipment manuals


Popular Test Equipment manuals by other brands

2B Technologies
2B Technologies 306 Operation manual

Tektronix
Tektronix MSO46B Declassification and security instructions

Ace
Ace AQUIKO APS-PE PENSTOCK Operation & maintenance manual

Bante Instruments
Bante Instruments ORPscan10 instruction manual

Obdstar
Obdstar H100 user manual

General
General CT102 user manual


