Transcend DrivePro User manual

User’s Manual
Body Camera
DrivePro™ Body
Control Center
(Version 1.1)

1
Table of Contents
1. Introduction.................................................................................................................................2
1-1 Features............................................................................................................................... 2
1-2 System Requirements .......................................................................................................2
2. Getting Started...........................................................................................................................3
2-1 Hard Drive Installation (for Diskless DBN1 only)...........................................................3
2-2 Connection Diagram..........................................................................................................6
2-3 Downloading and Installing the Control Center client...................................................7
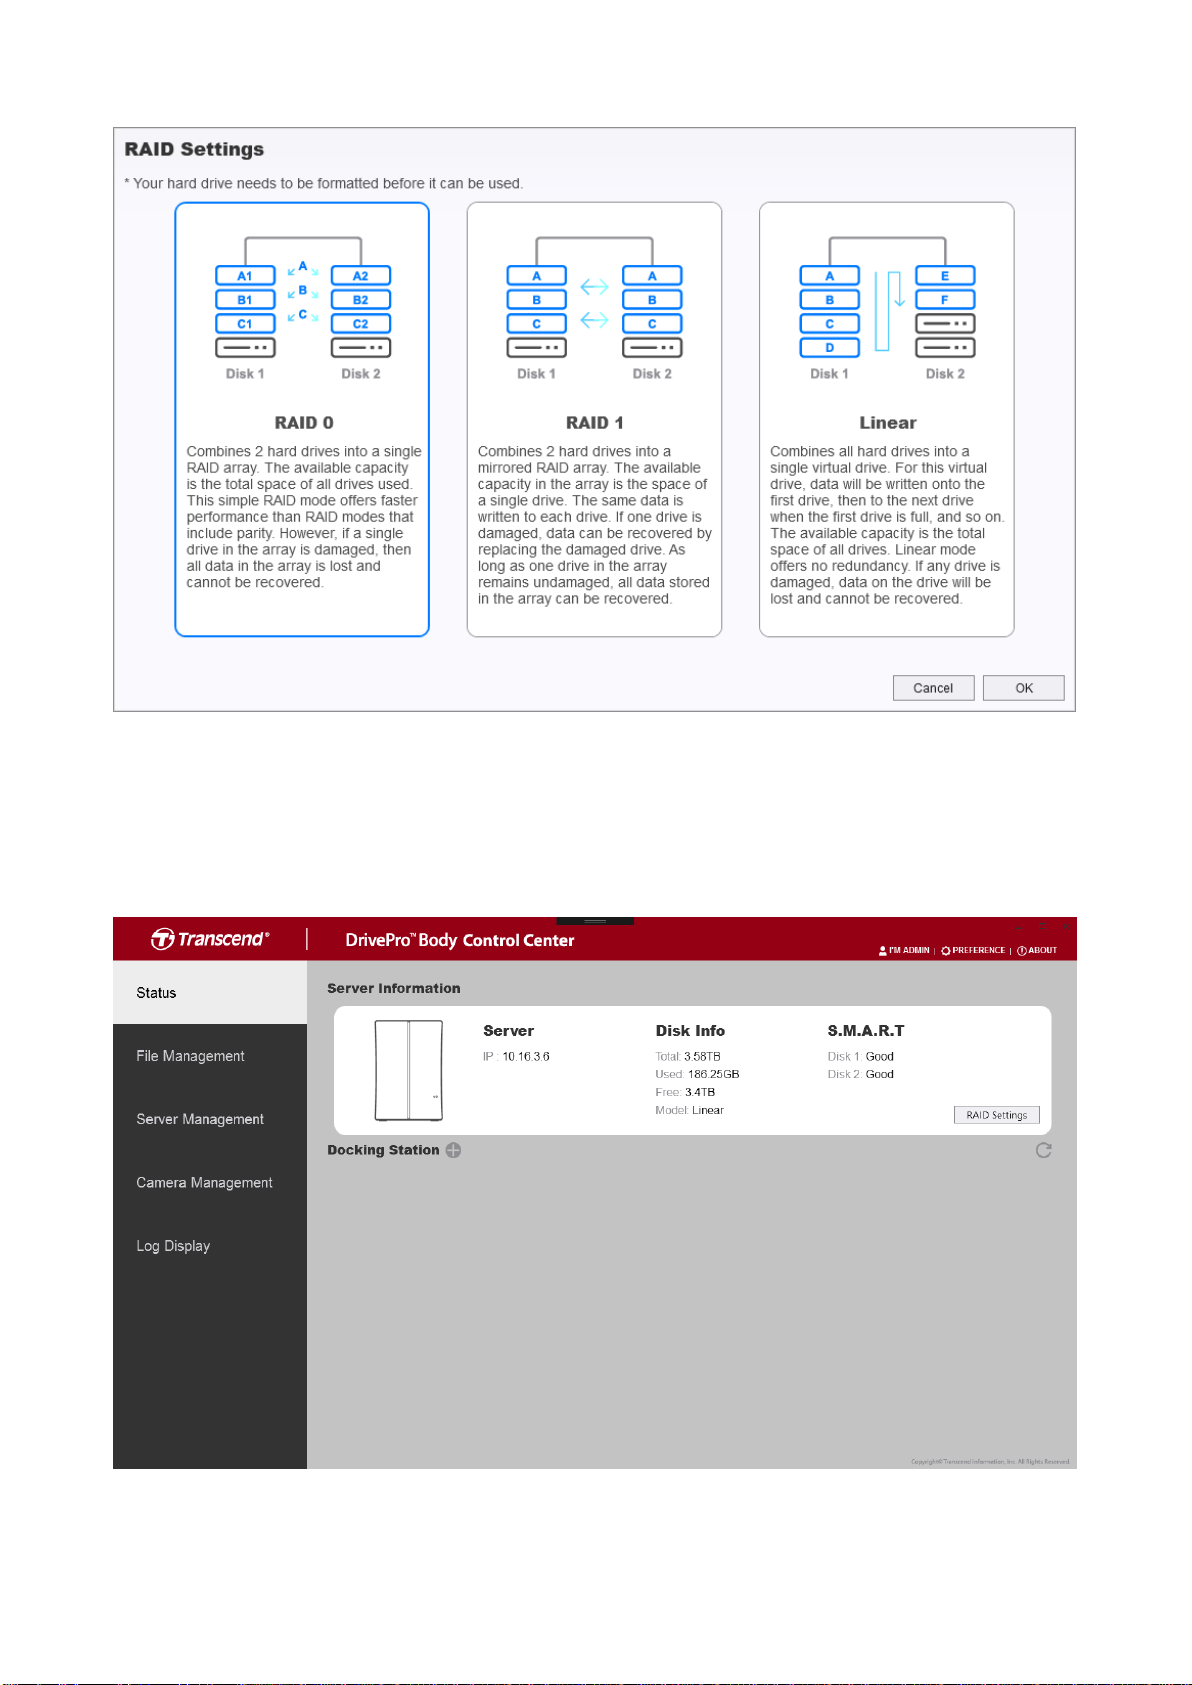
2-4 Setting/Changing RAID Modes........................................................................................ 8
3. Using the DrivePro™ Body Control Center Software ........................................................ 10
3-1 Status ................................................................................................................................. 11
3-2 File Management..............................................................................................................14
3-3 Server Management.........................................................................................................17
3-4 Camera Management......................................................................................................21
3-5 Log Display........................................................................................................................ 26
3-6 Preference......................................................................................................................... 27
5. End-User License Agreement (EULA)................................................................................. 28
6. GPL Disclosure........................................................................................................................ 30
7. Federal Communications Commission (FCC) Statement................................................. 31

2
1. Introduction
This User's Manual covers the features and functions of the DriveProTM Body Control
Center, a network-based body camera management and video storage system which
simplifies deployment of a complete body camera solution. Control Center is designed to
operate seamlessly with Transcend DrivePro Body cameras and DPD6N docking stations.
The DrivePro Body Control Center software supports centralized file management, account
management, and device management.
1-1 Features
Allows multiple users to connect via a local Gigabit network
Allows for searching files, sorting files into categories, adding descriptions,
exporting files to local storage, and burning files to optical media
Simple account management and permissions management
Supports simultaneous connection of up to 3 docking stations or 18 devices in
total
Allows up to 40 simultaneous users via Gigabit connection
Convenient one-click update of DrivePro Body Firmware
1-2 System Requirements
Windows 7 / Windows 8.1 / Windows Server 2008 R2 SP1 / Windows 10
.NET 4.0 is required.

3
2. Getting Started
2-1 Hard Drive Installation (for Diskless DBN1 only)
*Please only use NAS-grade HDDs
Notes:
To avoid damaging the DBN1 Control Center with static electricity, ground yourself by
touching something made of metal before handling any sensitive electronic parts.
When replacing hard drives, do not change the order of the hard drives in the Control
Center unit. For example, removing Drive 1 and replacing it with Drive 2 may cause
data to be corrupted or lost.
1-1 Remove the front panel by pulling it forward from both sides.
1-2 Pull out the two drive trays.
Note: Do not apply excessive pressure to the top of the unit.

4
2. Install NAS-grade hard drives (same capacity recommended) into the drive trays.
3-1. Affix the two front screws.
3-2. Insert the steel plate in the correct direction.
3-3. Affix the rear screw.

5
4-1. Reinsert the drive trays back into the empty drive slots.
4-2. Replace the front panel.

6
2-2 Connection Diagram
The DBN1 Control Center connection diagram is illustrated below. Connect an Ethernet
cable from the DBN1 Control Center’s LAN port to your network switch or router. Connect
your client PCs and DPD6N Network Docking Stations to the same local area network. As
shown in the diagram below, connect your network switch or router to the WAN port of the
DPD6N Network Docking Station.
The DBN1 Control Center allows up to twelve DrivePro Body cameras to upload
simultaneously, and up to forty users to access and manage files at the same time.

7
2-3 Downloading and Installing the Control Center Client
1. Download the Control Center Client from the provided download link. On any Client PC,
click and run “Installer.exe”, press “Install”, and wait for the installation progress to
complete.
1. When installation is completed, the software will open automatically.
2. Fill in your DBN1 Control Center’s IP address and click “Connect”, or just click on “Find
Control Center”to search for any connected DBN1 units.

8
2-4 Setting/Changing RAID modes
You may set or change RAID modes in the two situations below:
1. For diskless DBN1 Control Center setup:
After installing the hard drives (See 2-1 Hard Drive Installation (for Diskless DBN1 only)),
use the Control Center Client to connect to the DBN1 Control Center unit. You will be asked
to select one of the RAID types.

9
2. When users want to change RAID modes:
Click on the “RAID Settings”button on the Status page.
Note: If you change RAID modes, all data on the unit will be permanently deleted! Please
make sure you have backed up your data beforehand.

10
2. Using the DrivePro™ Body Control Center Client
Transcend’s exclusive DrivePro Body Control Center software is a centralized
management system developed for DrivePro Body 30 and DrivePro Body 60 body cameras.
The system supports simple file management, account management, and device
management to facilitate deployment of a complete body camera solution.
1. Open the Control Center Client.
2. Log in as Administrator, Manager, or User, or enter the application as an anonymous
user. (The Administrator’s account ID is “admin”, with the default password being
“12345678”.)
Note: The Control Center Client requires a DBN1 Control Center to be on the same
local network to function.
If you enter the system as an anonymous user, you can log in later by clicking .
3. To log out, click .

11
3-1 Status
On the Status page, you can view the basic information of connected DrivePro Body
cameras and DPD6N Network Docking Stations, including device serial number, agent ID,
battery status, backup status. In addition, you can view the current status of your DBN1
Control Center unit, such as the current IP address and disk status. Depending on your
account permissions, you can also edit RAID settings on this page.
To add a new docking station, click the button next to “Docking Station”(permissions
required).

12
Select the docking station you want to add and click on “Add”. If the docking station is
successfully added, you will see the screen below.
To assign an account to a specific body camera, click on the camera that you want to
assign. Then select an account to assign the camera to.

13
Once an account has been assigned to a camera, the account name will be shown in the
camera’s status field.
To enable Team Sync, select a team number and press the “Set” button. If one camera
enters recording mode from buffering mode, other cameras in the same team will
automatically enter recording mode as well.
To set a camera as a leader, check the “Leader”checkbox. When a leader camera enters
recording mode from buffering mode, it will wake other cameras in the same team up to
start recording as well even if the cameras were powered off) (For DPB60 only)
To set a password for the device, press the “Set” button, and enter a password.
To disable password protection or change the password, press the “Disable” button or

14
“Change” button.
3-2 File Management
On the File Management page, you can manage and edit videos or photos. You can also
search for media in the Search bar, export, or burn files to a CD/DVD.
To modify a category, an agent ID, or a description, click on the icon.

15
To download a video, click on the icon, and click on “Save to” to export the video to a
desired destination.
You can also select and burn videos to a CD/DVD by clicking on the icon.
To delete files, select the files and click on the icon.
If a video has GPS data embedded, a GPS map will be displayed as shown below.

16
To view the video in a larger player view, click the icon on the lower right corner of the
media player.

17
To hide the Map and enlarge the video frame, click .
3-3 Server Management
On the Server Management page, you can manage key settings under Archive,
Permissions, and Account.
Archive
Edit the data retention period, log retention period, and list of categories.

18
Data Retention
Add a new data retention description.
Delete a selected description.
Edit a selected description.
Log Retention
Edit the log retention period.
Category
Add a new file category.
Delete a selected category.
Edit a selected category.
Permission
Manage the permission settings for different levels of users.

19
Manage the access levels for users of the DrivePro Body Control Center. When checked,
the following functions will be made available to users at that level.
Main Menu
File Management
Show or hide this page to users of a certain level.
Sever Management
Show or hide this page to users of a certain level.
Camera Management
Show or hide this page to users of a certain level.
Log Display
Show or hide this page to users of a certain level.
Status
Assign Camera
Allow assigning a camera with a specific number for
identification.
File Management
Play Video
Enable to allow users to play videos or disable to show them
previews only.
Change Category /
Enable to allow users to change the category or retention of a
Other manuals for DrivePro
1
Table of contents