Transvideo Titan HD User manual

Rev 2.0
December 2011 751TS0029
TitanHD
Operator Manual

Page 2 TitanHD
ABOUT
This Operator Manual describes the use of the Transvideo TitanHD.
The first Titan has been introduced to the Film Industry during year 2000.
The TitanHD is our latest contribution to the Digital Cinematography world, offering wireless digital
transmission for HDMI, HD/SD-SDI and Composite video without latency or compression.
This manual describes TitanHD with Software 2.00 or upper.
The products described in this book are professional equipments; they are not designed for
consumer use. Utilization of these products implies knowledge of basics in video signal management,
HDTV, film making concept and wireless transmission.
FOR THE CUSTOMERS IN THE USA AND IN CANADA
This equipment has been tested and found to comply with part 15C of the FCC Rules and with
requirements and procedures issued by Industry Canada.
This product cannot be installed in host where co-located or operating in conjunction with any
other antenna or transmitter.
This product must be restricted to install in host that is intended for indoor use only for 5150 -
5250 MHz band.
Changes or modifications not expressly approved by Transvideo S.A could void the user's
authority to operate this equipment.

Operator Manual Rev 2.0 Page 3
WARNING & CAUTION
WARNING:
This product must be used in a correct grounded electrical environment; ground defects can create
severe problems to the equipment, the picture quality and even cause danger for the user.
WARNING:
Copyright law and international treaties protect this product, its design and its software. One or
several international patents apply to the TitanHD.
Unauthorized reproduction or distribution of this product or its design or its software or any portion of
them, may result in severe civil and criminal penalties, and will be prosecuted to the maximum extent
possible under the law.
CAUTION:
Warranty is void is the product is opened. The unit contains electrostatic sensitive devices, which can
be damaged or destroyed if you touch them. Very high voltage is present in the product and there is
some risk of electric shock if opened by a non-accredited technician. Standard ESD procedures must
be strictly followed during disassembly/re-assembly of the unit.
The user and/or technician assume full responsibility or any risk of bodily injury, death or property
damage arising out of the use or disassembly or repair of this equipment. In no event shall Transvideo
S.A. or its local representatives be liable to a user, technician or third party for any loss of income or
any damage of any kind resulting from the use of or work on the said equipment.

Page 4 TitanHD
TABLE OF CONTENT
ABOUT .......................................................................................................................................................... 2
WARNING & CAUTION ................................................................................................................................... 3
TABLE OF CONTENT ...................................................................................................................................... 4
INTRODUCTION............................................................................................................................................. 6
Condensed Operating Instructions ................................................................................................... 6
Unpacking and Inspection .................................................................................................................. 6
Safety Inspection.................................................................................................................................. 6
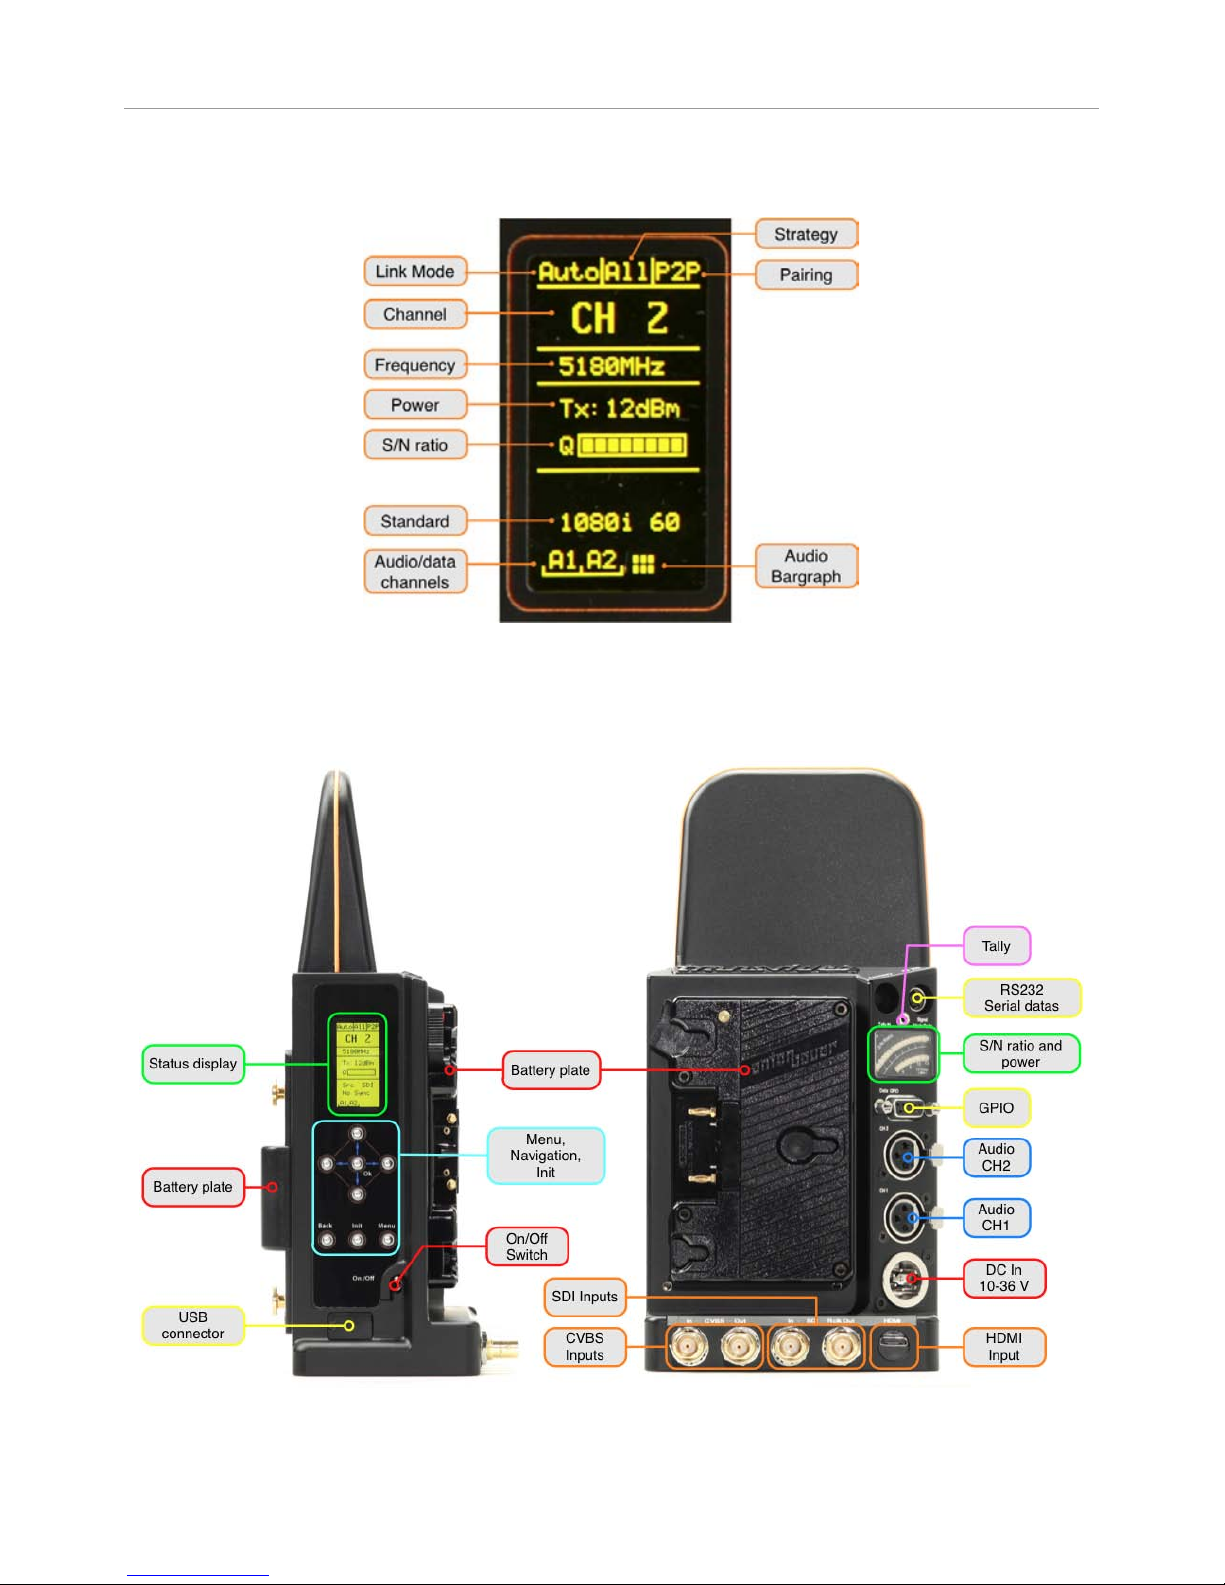
Product Overview ................................................................................................................................. 7
Installation............................................................................................................................................. 8
Power Requirements ........................................................................................................................... 9
OPERATION................................................................................................................................................. 10
Sart-Up & Power.................................................................................................................................10
Direct Functions & Navigation.......................................................................................................... 10
Module Association............................................................................................................................ 11
THUMBNAILS............................................................................................................................................... 12
LINK...................................................................................................................................................... 12
Channel ............................................................................................................................................ 12
Strategy ............................................................................................................................................ 12
Link ................................................................................................................................................... 13
Power (Tx only) ................................................................................................................................ 13
SNRTrdoff (Tx only) ......................................................................................................................... 13
Region .............................................................................................................................................. 14
AUDIO on TitanHD Tx ........................................................................................................................ 15
AUDIO on TitanHD Rx........................................................................................................................ 15
VIDEO................................................................................................................................................... 15
Video Src.......................................................................................................................................... 15
TOOLS.................................................................................................................................................. 16
Metadata Setting (Tx only) .............................................................................................................. 16
GPI State .......................................................................................................................................... 16
GPO State ........................................................................................................................................ 16
Tally State ........................................................................................................................................ 16
Antenna Power (Rx only) ................................................................................................................. 16

TABLE OF CONTENT
Operator Manual Rev 2.0 Page 5
SERVICE & MAINTENANCE .......................................................................................................................... 17
General ................................................................................................................................................ 17
Useful tips ........................................................................................................................................... 17
Cleaning ........................................................................................................................................... 17
Full reset........................................................................................................................................... 17
Software and Firmware ..................................................................................................................... 17
Updating your TitanHD...................................................................................................................... 17
Firmware update.............................................................................................................................. 18
Software update .............................................................................................................................. 18
Product Return ................................................................................................................................... 19
SPECIFICATIONS ......................................................................................................................................... 20
Common Characteristics .................................................................................................................. 20
Connections ........................................................................................................................................ 21
List of Standards per Input/Output .................................................................................................21
TRANSVIDEO EQUIPMENT LIMITED WARRANTY ........................................................................................... 22

Page 6 TitanHD
INTRODUCTION
Condensed Operating Instructions
①Connect an adapted power supply to the XLR connector or a battery if any socket available to the
TitanHD Tx (transmitter) and to the TitanHD Rx (receiver).
②Connect a video source to the Tx video input (HD or SD)
③Connect a system to the Rx video output (HD or SD)
④Switch on the TitanHD Tx and Rx
For more information, please read next chapters.
Unpacking and Inspection
The TitanHD is delivered in a rugged waterproof case. Use this case for storage and transportation.
Control the content of the package accordingly to the packing list.
Visit our website http://www.transvideo.eu. Login or
Create a new account to register your product by using
"My Products" menu
Or fill up the warranty card and send it by
mail or by fax to your distributor or to the
factory.
Safety Inspection
Before using the transmission system be sure that the product is not damaged and that the
connector do not have missing pins or foreign objects inside the housing.
The cables must be in good condition and adapted to the environment where you are working. A bad
quality or wrong-wired cable may damage this equipment or other equipment attached to it and/or
create interferences. Transvideo offers high quality cables for cameras, power supplies and other
equipment. Contact Transvideo S.A. or its local representative in case of need.
This product must be used in a properly grounded electrical environment. Ground defects can create
severe problems to the equipment and/or picture quality and may even cause danger for the user.
The video cable must be adapted for carrying HD SDI signals. Proper 75 Ωconnectors must be used.
Always check the connector before plugging a cable to your monitor.
The TitanHD needs to be in a ventilated area for a proper cooling. Prolonged use in confined
environment without ventilation can damage the monitor.
IMPORTANT:
Do not use damaged cables with this equipment.
Damaged connectors may seriously damage your equipment.
Never seal the TitanHD in a plastic bag.

INTRODUCTION
Operator Manual Rev 2.0 Page 7
Product Overview
Figure 1: TitanHD Rx/Tx -Status Display
Figure 2: TitanHD Tx –panel

INTRODUCTION
Page 8 TitanHD
Figure 3: TitanHD Rx -Connector panel
Figure 4: TitanHD Rx -Front panel
Installation
The TitanHD must be securely fixed on the camera or on its location of use. The TitanHD Tx can be
attached to a battery socket on the back of the camera (V-Mount or Anton Bauer).
Transvideo manufactures high quality brackets and accessories for the comfort of use and security
for the equipment and user. Please contact Transvideo S.A. or its local representative in case of need
or visit www.transvideo.eu.
Do not use the wireless system with loose fixation or damaged brackets for your own safety and that
of others working with you.
Several mounting points are present on this equipment for a secured professional use.

INTRODUCTION
Operator Manual Rev 2.0 Page 9
Power Requirements
Only DC Voltage powers this product.
AC voltage can be used with an appropriate AC/DC converter
Recommended power adaptor for this equipment is the Transvideo AL30
The input power voltage range is extremely wide from 10 to 36 V DC (except specified differently).
The power consumption slightly varies with the input voltage, the operating temperature and the
equipment configuration.
The internal power supply is protected against reverse polarity.
Over voltage may cause severe damages to the equipment and/or to other equipment connected to
it.
IMPORTANT NOTE FOR STEADICAM
®
OPERATORS:
To reduce the mass above the Steadicam® gimbal, mount the Titan HD Tx to the lower stage of
the Steadicam® sled. If it is a 12V sled, the TitanHD Tx will work fine on any battery plate.
However, if the sled generates 24V by switching a pair of batteries from parallel to series, you
must mount the Tx only on the 'A' battery plate (the 1st of the series to generate 24V). Mounting it
on the 'B' plate may cause serious equipment damage due to a floating ground issue.
To determine which battery plate is #1 or #2: switch the rig to the 24V mode and mount a single
battery on the sled. If the battery is mounted on the 'A' plate, the sled will power up. One single
battery will not power the sled when mounted on the 'B' plate. Never mount any accessory that
draws power AND connects to the video signal on the 'B' plate.

Page 10 TitanHD
OPERATION
Sart-Up & Power
The ON/OFF Switch are on the transmitter's side and on the receiver's front
In OFF position, the power consumption is null.
Direct Functions & Navigation
MENU
Toggles between the Thumbnails
BACK
Returns to the previous screen
Thumbnail navigation (up/down)
Adjustment of an option (immediate effect if no confirmation requested)
OK
Activates the option setting within the thumbnail (if requested)
On the home page, displays a simplified spectrum analyzer showing the available channels
depending of the strategy choice
INIT
A long press re-initializes the HF link
A long press in Search&Lock mode (Menu / Link / Channel), re-initializes the HF link and searches for
a new channel

OPERATION
Operator Manual Rev 2.0 Page 11
Module Association
IMPORTANT:
Both the transmitter and receiver need to be associated (or paired).
The operation can be performed in P2P mode or BROAD mode (read chapter "Thumbnails"
section "Link")
There is no need to perform the modules association in both modes.
Step 1
Turn on the TitanHD Tx. During the startup, keep on pressing Back key until the message "Push OK
to register" is displayed. Do the same for TitanHD Rx
Step 2
Press OK on the Tx then on the Rx. "Linking…" appears on both modules
Step 3
"Link OK" appears, then the system starts up.

Page 12 TitanHD
THUMBNAILS
LINK
Channel
CH. 1 … X
Selection of a channel from 1 to X (varies with selected region)
Auto
TitanHD selects itself the best free channel
S&L Mode (Tx only, Rx must be set on "Auto")
Activates Search & Lock mode
In Search & Lock mode, TitanHD scans for the best available channel, then locks on the said channel.
Search and Lock helps to re-link faster in case of signal loss during long distance transmission.
To search for a channel push INIT.
To search for a new channel push INIT again.
It is recommended to place the transmitter and receiver in their operating position location and
location before searching for a channel. Changing the location or position of the equipment may
result in a different best available channel.
Strategy
All Ch
Sets all channels (default setting)
Upper Ch
Selects the upper part of the band only
Lower Ch
Selects the lower part of the band only
The same strategy must be selected on both the transmitter and receiver.
Example using a 10 channels band:
Upper Ch mode7,8,9,10 are available
Lower Ch mode1,2,3,4,5 are available

THUMBNAILS
Operator Manual Rev 2.0 Page 13
Link
Selection of P2P or Broadcast mode
P2P
In P2P (Point To Point) mode the link is possible only between the paired Tx and Rx.
For more information, see the chapter "Modules Association"
Broad (Broadcast) *
Allows connecting up to 6 Rx modules to one Tx.
Each Rx must be individually paired to the Tx.
When operating in Broadcast mode, the S/N ratio bargraph is not available.
IMPORTANT NOTE FOR BROADCAST MODE:
A maximum of 6 Rx can be paired with one Tx
Switch off the newly paired modules before pairing another one
The latest paired Rx works also in P2P with the Tx
Power (Tx only)
Allows adjusting the emitted power to 6dBm or 12dBm
Low 6 dBm / 4.0 mW
High 12 dBm / 16.0 mW
SNRTrdoff (Tx only)
Allows modifying the compromise between smoothness and noise
Level 0 Low noise & Lower smoothness
Level 1 Default, average setting
Level 2 Higher noise & Better smoothness
Explanation:
Let us imagine that the center of the target is the actual value of the pixel and the black dots the
values received by the receiver
On this image the smoothness of the image is good because the received value is
always close to the actual value, on the other hand dispersion around the actual
value is large, one thus has more noise in the image.
Here, the smoothness of the image is bad because the received value is always
far away from the actual value, on the other hand dispersion around this value is
low, one thus has little noise.

THUMBNAILS
Page 14 TitanHD
Region
IMPORTANT:
Only accessible by pressing arrows left and right during the startup
It is illegal to use frequencies other than allowed in the territory where you are. This function is
accessible only for operators traveling to different countries and wishing to fulfill the local
regulation.
Allows choosing the localization USA / Europe / Japan in conformity with the following tables and
local regulations.
USA / CANADA (complies with the FCC standard)
CH.1 5160
CH.4 5220
CH.7 5765
CH.10 5825
CH.2 5180
CH.5 5240
CH.8 5785
CH.3 5200
CH.6 5745
CH.9 5805
EUROPE / JAPAN (complies with the ETSI MIC standards)
CH.1 5160
CH.4 5220
CH.2 5180
CH.5 5240
CH.3 5200
FREE
CH.1 5160
CH.9 5320
CH.17 5560
CH.25 5720
CH.2 5180
CH.10 5340
CH.18 5580
CH.26 5745
CH.3 5200
CH.11 5360
CH.19 5600
CH.27 5765
CH.4 5220
CH.12 5460
CH.20 5620
CH.28 5785
CH.5 5240
CH.13 5480
CH.21 5640
CH.29 5805
CH.6 5260
CH.14 5500
CH.22 5660
CH.30 5825
CH.7 5280
CH.15 5520
CH.23 5680
CH.31 5845
CH.8 5300
CH.16 5540
CH.24 5700
CH.32 5862,5
Frequencies in MHz

THUMBNAILS
Operator Manual Rev 2.0 Page 15
AUDIO on TitanHD Tx
Audio Mode
Activates or deactivates the audio transmission
CH1 / Left Src
Selects SDI or Analog balanced for the left audio channel
CH2 / Right Src
Selects SDI or Analog balanced for the right audio channel
AUDIO on TitanHD Rx
Analog Out
Activates or deactivates the analog audio output
Monitoring
Activates or deactivates the monitoring of the audio output
Monitoring Vol
Adjusts the monitoring level of the audio from -14dB to +14dB
VIDEO
Video Src
On TitanHD Tx only
SDI
Selects the SDI input
CVBS
Selects the CVBS input
HDMI
Selects the HDMI input

THUMBNAILS
Page 16 TitanHD
TOOLS
Metadata Setting (Tx only)
Data Ch.
Activates or deactivates the data transmission in place of one audio channel.
Off No data transmission
CH1/L. Left audio channel is used for data transmission.
CH2/R. Right audio channel is used to data transmission.
Timecode
Activates or deactivates Time-code transmission (if any embedded in the SDI datas LTC, VITC1,
VITC2)
GPI State
Displays GPI (General Purpose Input) functions and states (high/low/inactive).
2 channels: GPI1 & GPI2
GPO State
Displays GPO (General Purpose Output) functions and states (high/low/inactive).
2 channels: GPO1 & GPO2
IMPORTANT NOTE REGARDING GPIO:
GPIOs work in channels: GPI1 with GPO1 and GPI2 with GPO2.
2 remote controls can be sent by the Tx to the Rx, 2 others can be sent by the Rx to the Tx.
When working in Broadcast mode, GPIO from the Rx to the Tx are not available.
Tally State
Tally SRC (TitanHD Tx)
Selection of the Tally source: "Volt. In" (max 18v DC) or photo-detect.
Tally SRC (TitanHD Rx)
Displays the Tally source from the Tx.
State
Displays the Tally state (On/Inactive) depending of the Tally source.
When Tally is On, the Tally Led on the Rx comes on. To feed Tally Out of the Rx to another
equipment, wire taly cable to the 2 banana connectors.
Mute Audio
Activates or deactivates the Mute Audio through the Tally remote control.
Antenna Power (Rx only)
Displays the received power (dBm) per antenna.

Operator Manual Rev 2.0 Page 17
SERVICE & MAINTENANCE
General
Please read carefully the chapter TRANSVIDEO EQUIPMENT LIMITED WARRANTY about the Transvideo S.A.
warranty on the equipment described in this manual.
For repairs contact Transvideo S.A. or its local representative or use the RAN procedure in section
"Product Return"
Useful tips
Cleaning
The painting of the TitanHD is resistant to general cleaners and solvents. Do not use abrasive
products to clean your product.
Full reset
In needed, a full reset of the Tx and Rx may be performed as follows.
①Connect the modules to their power source (module off).
②Press the "Init" key
③Switch on the module while keeping pressed the “Init” key until the display shows “FULL RESET”
The equipment is back to its factory default settings. This procedure totally erases all user setup in
the memories.
Software and Firmware
The software and firmware versions are indicated during the startup on the display.
This information is useful to write down if trouble-shooting becomes necessary.
Updating your TitanHD
Firmware and software updates are possible by the user with a USB key and a USB cable.
Get the last update package for your TitanHD. An update package is a zip file, it can be downloaded
on www.transvideo.eu/software_updates. You can also ask for it directly to your local Transvideo
representative.

SERVICE & MAINTENANCE
Page 18 TitanHD
Uncompress the .zip file using your archive utility applcation.
To perform the update, you must have the Atmel Flip 3.4.1 application on your computer. This is
a freeware that you can download by visiting www.transvideo.eu/software_updates
Firmware update
Step 1
Copy the firmware file on a USB key. The files must be renamed on the key:
FTHD.bit for the TitanHD Tx firmware
FRHD.bit for the TitanHD Rx firmware
Step 2
Connect the USB key on the module with a USB adapter (included with the equipment).
Step 3
Switch on the module pressing the OK key.
The update starts automatically. The following messages appear:
Firmware update > USB Key detected > Clear Flash >
Program. Flash > Verify Flash > Flash OK
Step 4
Restart the module
Software update
Step 1
Switch on the module pressing the MENU key until "Software update" prompts on the screen
Then connect the module to the PC with a USB cable
Step 2
Double click on the appropriated .bat file:
batch-isp-TitanHD32_TX.bat for the TitanHD Tx software
batch-isp-TitanHD32_RX.bat for the TitanHD Rx software
If you receive the files by email, the .bat files have a .trsv extension for security reasons. Please
change their extension to .bat.
Step 3
The following window appears and the software update starts. When you are prompted to "press a
key to continue", check that all actions have the "PASS" mention.
Step 4
Unplug the USB cable and restart the module. The module performs a full reset before reaching its
normal operation.

SERVICE & MAINTENANCE
Operator Manual Rev 2.0 Page 19
Product Return
For repairs and technical operation you may return the product to the factory. Please use the
following procedure:
➀Ask for a RAN (Return Authorization Number)
Log in to our website using your user account
and visit the Support section
www.transvideo.eu/support
Or contact us by:
Email service@transvideo.eu
Fax +33 2 3260 1479
Tel +33 2 3232 2761
You will need to provide part number & serial number (found on the back of your product) and to
briefly describe the reason for the return.
②Then send the product to the following address:
TRANSVIDEO
RAN # _ _ _ _ _ _ _
ZI -Rue Francois Arago
27130 Verneuil sur Avre
France
User is responsible for shipping and insurance of the equipment as well as for any damage that may
occur during transit.
It is strongly recommended to inform us of the Tracking Number of your shipment and the RAN so we
may track your return while in transit.

Page 20 TitanHD
SPECIFICATIONS
Common Characteristics
Supported HD standards *
720p
1080p, 1080i, 1080psf
Supported SD standards *
NTSC-M / NTSC-J / NTSC-443
PAL-M / PAL-BG / PAL-N
SECAM
SD SDI 525 / 625
Modulation
OFDM MiMo
Compression
None
Latency
2 ms
Weight
Tx: 1100g / 2.42lbs
Rx: 1450g / 3.19lbs (without antennas)
Power
10 –36 VDC
Tx: 22W max, Rx: 18W max
Storage temperature
Operating temperature
-40°C +80°C
-20°C + 55°C
* HD and SD standards may vary with video input/output. Please refer to the following complete list
of standards per input
Table of contents