Trapeze RingMaster Appliance RM-200 User manual

RM-200 Quick Start
2
Trapeze Networks
RingMaster Appliance RM-200™
Quick Start
Contents
This guide provides a description of prerequisite procedures required to install and begin using
Trapeze RM-200 RingMaster ApplianceTM hardware and software. The RingMaster Appliance
provides a server having pre-installed RingMaster software. This appliance provides a server
platform having a suitable configuration and capability to efficently run the included RingMaster
Services software..
Verify Appliance Package
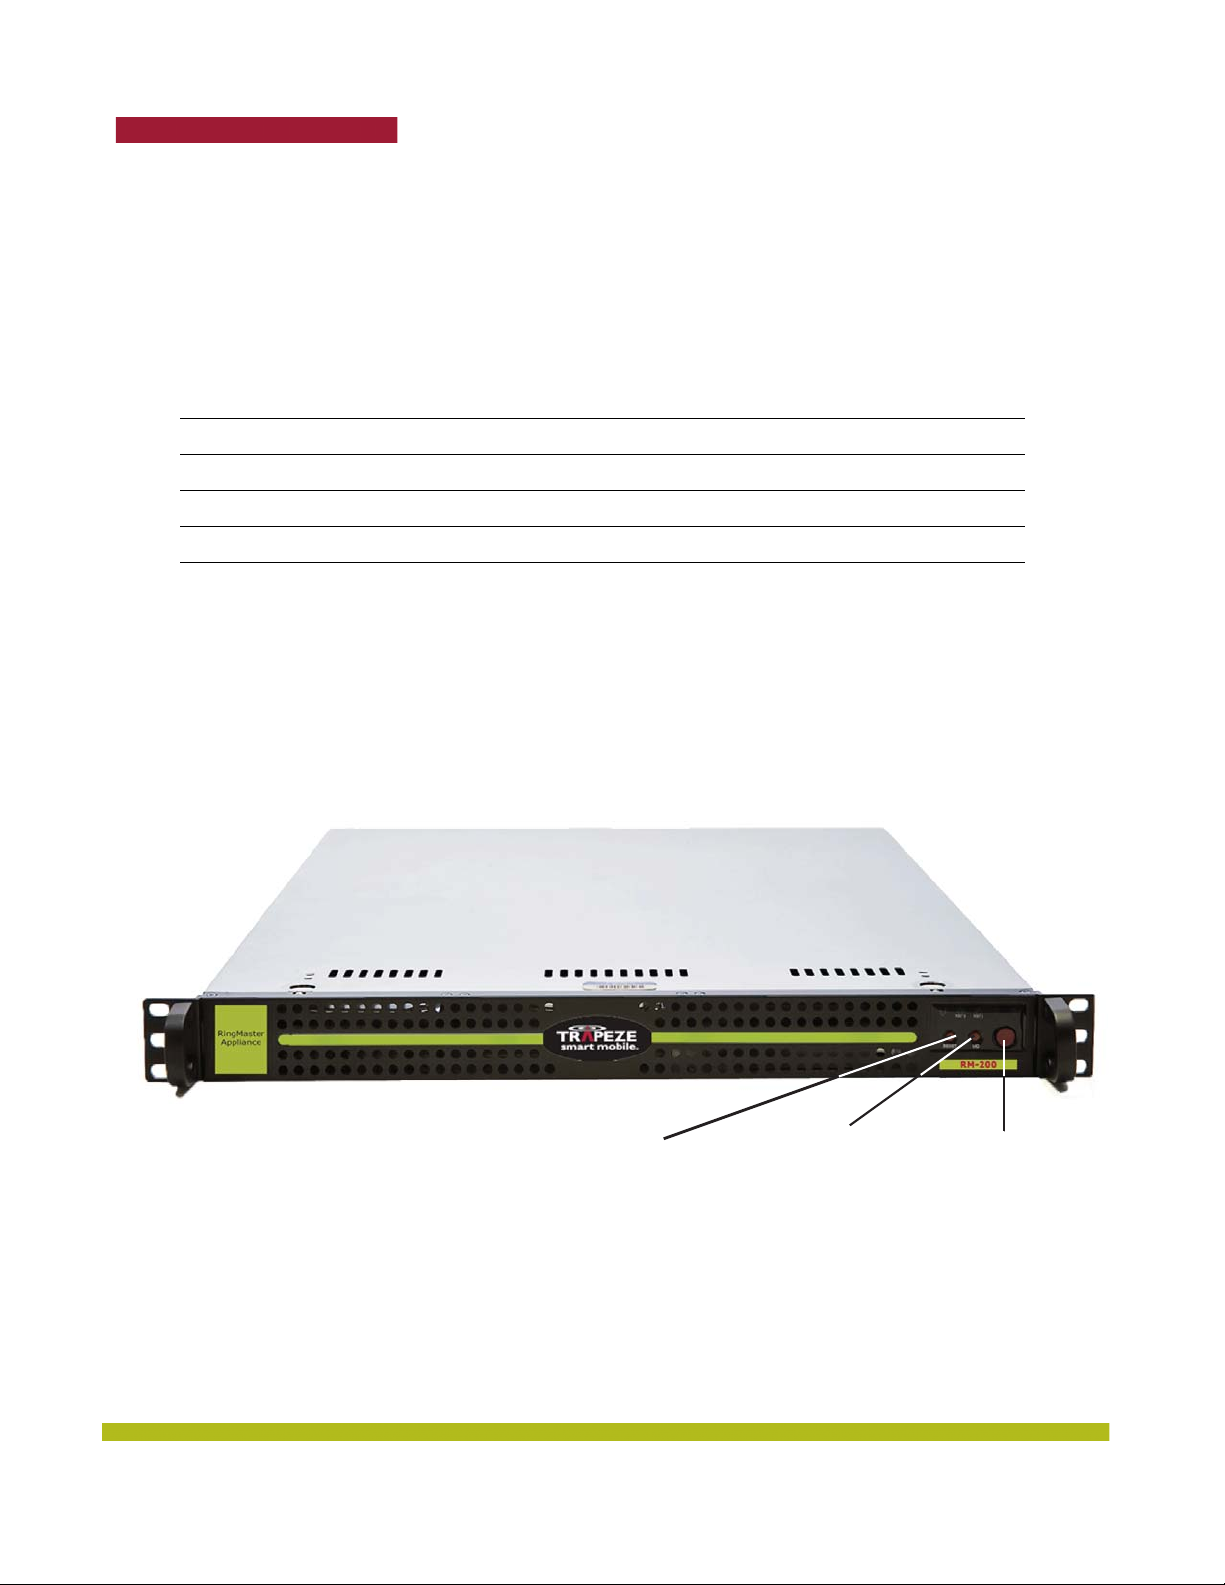
Figure 1–1. RM-200 Front Panel
Verify that the appliance kit includes:
❑Two-page hardware setup guide with illustrated rack installation instructions.
❑A power cord.
❑Fasteners to install the appliance into a rack.
❑The appropriate rack assembly — a 19-inch rack rail bracket assembly or telco style rack assembly
Verify Appliance Package . . . . . . . . . . . . . . . . . . . . . . . . . . . . . . . . . . . . . . . . . . . . . . . 2
Setup Location Requirements . . . . . . . . . . . . . . . . . . . . . . . . . . . . . . . . . . . . . . . . . . . . 3
RM-200 Appliance Setup . . . . . . . . . . . . . . . . . . . . . . . . . . . . . . . . . . . . . . . . . . . . . . . . 3
Forgotten Password Recovery . . . . . . . . . . . . . . . . . . . . . . . . . . . . . . . . . . . . . . . . . . . . 6
Reset Button UID Button Power Button

RM-200 Quick Start 3
Trapeze Networks
Setup Location Requirements
The appliance is rated for 100-240V, 5A max, at 50/60 Hz.
Select a setup location with proper temperature control and adequate floor loading capacity for the
current installation and for future growth.
Install near appropriate AC outlets and Ethernet hubs or individual jacks.
Leave enough clearance (25 inches in the front and 30 inches in the back of the rack) to allow access to
appliance components and to allow for sufficient airflow.
RM-200 Appliance Setup
Figure 1–2. RM-200 Rear Panel
Hardware Setup
1. Connect Ethernet cable(s) to the network interface port(s) on the rear of the appliance to your
network.
2. Connect the power cable and turn the appliance on with the front panel power button.
3. Connect the provided Serial Cable to the appliance and a computer running appropriate terminal
emulation software (like Hyperterm or Minicom).
Software Setup
Initial configuration of the platform from its seral port is performed as follows:
1. Connect a serial terminal (or terminal emulator on a PC to the Serial Interface connector on the
rear panel of the appliance.
2. Wait (pressing no keys) while the appliance boots up and then presents the following message:
Trapeze Networks RM-200 Platform
amnesiac-nnnnnn login:
where nnnnnn is a number sequence such as 3343e6
3. Type the username admin
4. The response message is:
Last login: (Date) on tty1
Trapeze Networks RM-200 Platform
RingMaster configuration wizard
Do you want to use the wizard for initial configuration?
Serial Interface Ethernet Connectors

RM-200 Quick Start
4
Trapeze Networks
5. Type: y and <Enter>.
6. The response message is:
Step 1: Hostname? [amnesiac-nnnnnn]
7. Type a name for this platform, such as: rm200a1
8. The response message is:
Step 2: Use DHCP on eth0 interface?
9. If you wish to use DHCP, type: y and <Enter>. If not, type n and Enter and go to
step 11.
10.The response message (for y and <Enter>) is:
Step 3: Admin password (Enter to leave unchanged)?
Go to step 15.
11.If you do NOT wish to use DHCP, type: n and <Enter>.
12.The response message (for n and <Enter>) is:
Step 3: Use zeroconf on eth0 interface? [no]
13.Type: <Enter>.
14.The response message (for <Enter>) is a series of steps where you to enter values, including:
Step 4: Primary IP address? (enter a value)
Step 5: Netmask? (enter a value)
Step 6: Defult gateway? (enter a value)
Step 7: Primary DNS server? (enter a value)
Step 8: domain name? (enter a value)
Step 9: Admin password (Enter to leave unchanged)? (<Enter>)
Step 9: Confirm admin password? (<Enter>)
Go to step 21.
15.Type Enter to leave unchanged or type a new password and go to step xx.
16.The response message (for <Enter>) is:
Step 3: Confirm admin password?
17.Type:
Enter
18.The response message (for <Enter>) is:
You have entered the following information:
1. HostnameL rm200a1
2. Use DHCP on eth0 interface: yes
3. Admin password (enter to leave unchanged): (unchanged)
To change an answer, enter the step number to return to.
Otherwise hit <enter> to save changes and exit.
Choice:
19.Type:
Enter

RM-200 Quick Start 5
Trapeze Networks
20.The response message (for <Enter>) is:
Configuration changes saved.
To return to the wizard from the CLI, enter the “configuration jump-start”
command from configure mode. Launching CLI...
rm200a1 >
21.The response message (for <Enter>) is:
You have entered the following information:
1. HostnameL rm200a1
2. Use DHCP on eth0 interface: no
3. Admin password (enter to leave unchanged): (unchanged)
4: Primary IP address: (value entered)
5: Netmask: (value entered)
6: Defult gateway: (value entered)
7: Primary DNS server: (value entered)
8: Domain name: (value entered)
9: Admin password (Enter to leave unchanged): (unchanged)
To change an answer, enter the step number to return to.
Otherwise hit <enter> to save changes and exit.
Choice:
22.Type: <Enter>
23.The response message (for <Enter>) is:
Configuration changes saved.
To return to the wizard from the CLI, enter the “configuration jump-start”
command from configure mode. Launching CLI...
rm200a1 >
After you enter this information, the appliance begins operation in its normal mode. The serial
port interface transitions to standard CLI, presents a login prompt, and Web interfaces become
available.

RM-200 Quick Start
6
Trapeze Networks
Forgotten Password Recovery
If the administrator of a system forgets the password of the user admin, the following method can be
used to reset the password to the empty password so that the system can be accessed as admin with
no password required. The password can then reset to a secure one via the CLI.
The procedure is:
1. Boot the system to single user and execute a script to reset the admin password in the active
database. If any database corruption is suspected, the script resets the system database to its
initialized default. The admin password is not set in such a database. A system booted to single
user mode does not require a privileged user password. The system can be rebooted by power
cycling. It is assumed the person using this procedure is able to access the system’s console and
can see the entire boot process (this is either over a serial console or the system’s direct console).
2. Once the system is starting to boot, the following GRUB message should be seen (GRUB is the
boot loader for the system):
Grub Loading stage 2...
Press any key to continue.
[This message repeats (once a second) on a new line several times, and if no key is pressed the
system will boot as normal. You should press a key to enter the GRUB command line]
.
.
.
Press any key to continue.
[Assume the user presses the space key (for example)]
3. Next, you should see the following GRUB text which allows you to select one of the 2 images to be
booted. Choose the desired image by using the arrow keys so that GRUB indicates that the
desired entry will be booted.
GRUB version 0.93 (640K lower / 259536K upper memory)
-------------------------------------------------------------------
0: genericamp/linux demo #1-dev 2004-02-29 23:16:14 root@saturn5:CVS_TMS/HEAD
1: genericamp/linux demo #1-dev 2004-02-29 23:16:14 root@saturn5:CVS_TMS/HEAD
-------------------------------------------------------------------
Use the ^ and v keys to select which entry is highlighted.
Press enter to boot the selected OS, 'e' to edit the
commands before booting, 'a' to modify the kernel arguments
before booting, or 'c' for a command-line.
Highlighted entry is 1:
If a selection is not made within a few seconds, the system will automatically boot the image that
is highlighted. You should press the ekey to enter the edit command mode. This will give you the
ability to change command options that are part of the boot process. Specifically, you will add the
option single to force the system into single user mode.
When the ekey is pressed, the GRUB text shown below will be seen. (Note the 0and 1entries now
refer to the selected image that is booting). You should now edit the kernel line. This is done
using the arrow keys on your keyboard to select the 1: line — press the down arrow key one time.
The message at the bottom should now indicate Highlighted entry is 1:

RM-200 Quick Start 7
Trapeze Networks
GRUB version 0.93 (640K lower / 259536K upper memory)
-------------------------------------------------------------------
0: root (hd0,1)
1: kernel /vmlinuz ro root=/dev/hda5 console=tty0 console=ttyS0,9600n8
-------------------------------------------------------------------
Use the ^ and v keys to select which entry is highlighted.
Press 'b' to boot, 'e' to edit the selected command in the
boot sequence, 'c' for a command-line, 'o' to open a new line
after ('O' for before) the selected line, 'd' to remove the
selected line, or escape to go back to the main menu.
Highlighted entry is 1:
4. After selecting the 1: kernel command line, press the ekey to edit this line.
5. After e is pressed, you should see the grub edit> prompt. If the line is long enough, you may only
see a portion of the end of the text. For example, in the above when the 1: kernel line is:
kernel /vmlinuz ro root=/dev/hda5 console=tty0 console=ttyS0,9600n8
after 'e' is pressed, the user may see the following
<yS0,9600n8
The <indicates the a portion of the command line is not seen. The arrow keys allow you to
navigate the command line.
The option single should be appended to the end of this line. For example:
<yS0,9600n8 single
GRUB version 0.93 (640K lower / 259536K upper memory)
-------------------------------------------------------------------
0: root (hd0,1)
1: kernel /vmlinuz ro root=/dev/hda5 console=tty0 console=ttyS0,9600n8 single
-------------------------------------------------------------------
Use the ^ and v keys to select which entry is highlighted.
Press 'b' to boot, 'e' to edit the selected command in the
boot sequence, 'c' for a command-line, 'o' to open a new line
after ('O' for before) the selected line, 'd' to remove the
selected line, or escape to go back to the main menu.
Highlighted entry is 1:
It should be noted that two 'console' options appear on the kernel line. In this example, the latter
is the serial console and the former is the direct console. The console option that appears last is
used. If the procedure is used on the direct console, the order of the two console options should be
changed or the serial one (console=ttyS0,9600n8) should be deleted.
6. When done editing the kernel line, press the <enter> key followed by the bkey to resume booting
the selected image. After more boot messages a root user prompt will be displayed:
sh-2.05b#

Trapeze Networks
© 2008 Trapeze Networks, Inc. All rights reserved. Trapeze Networks, the Trapeze Networks logo
design, Trapeze Smart Mobile, Trapeze Networks Mobility System Software, RingMaster,
Mobility System, Mobility Exchange, Mobility Point, SafetyNet, MX, and MP are registered
trademarks and/or registered service marks of Trapeze Networks, Inc. Trapeze, Smart Mobile,
Mobility System Software, Mobility Domain, SmartPass, NonStop Wireless, Medical Grade
Mobility and Wireless Without Limits are trademarks and/or service marks of Trapeze
Networks, Inc. All other products and services are trademarks, registered trademarks, service
marks, or registered service marks of their respective owners.
All statements, specifications, recommendations, and technical information are current or
planned as of the publication of this document. They are reliable as of the time of this writing
and are presented without warranty of any kind, expressed or implied. In an effort to
continuously improve the product and add features, Trapeze Networks reserves the right to
change any specifications contained in this document without prior notice of any kind.
8
7. At this prompt, run the following command:
/sbin/resetpw.sh
If successful, the admin password is now reset to an empty password. If any corruption of
configuration state is detected, an attempt to save existing configuration databases is made and
the system’s configuration state is reset to initial values — i.e. the same state as when the system
was manufactured. In this case, the admin password will be set to the 'empty' password. The
command will notify you of any locations of saved configuration state.
sh-2.05b# /sbin/resetpw.sh
Admin password reset successful.
sh-2.05b#
8. The system can now be restarted by issuing the command reboot at the command prompt.
sh-2.05b# reboot
Table of contents


