Travel Buggy CITY 2 PLUS User manual

Foldable Power Chair
CITY 2 PLUS
by Travel Buggy

TABLE OF CONTENTS
CAUTION: Read all precautions and instructions in this manual before using this equipment.
Improper use or maintenance can void the warranty. Keep this manual for future reference.
2
NOTICES 3
SAFETY INFORMATION 4
BATTERY SAFETY INFORMATION 5
SPECIFICATIONS 7
UNBOXING 9
UNFOLDING 10
FOLDING 11
SET UP 12
CONTROLLER 14
HOW-TO FEATURES
• SEATING ADJUSTMENT 15
• WIDTH ADJUSTMENT 15
• REMOVABLE MOTORS 16
• FREEWHEEL 16
TRANSPORTING 17
BATTERY MAINTENANCE 18
CHARGING 20
MAINTENANCE, CARE,
TROUBLESHOOTING 22
LIMITED WARRANTY 23
CONTACT & SUPPORT 24

NOTICES
Thank you for choosing CITY 2 PLUS by
Travel Buggy, a convenient to use and
portable powerchair.
It is important to read through this manual
before operating your CITY 2 PLUS to
become familiar with its features as well as
its limitations and safety information.
You will find the operation and care of
your CITY 2 PLUS very simple and easy, but
should you have any questions please
contact Travel Buggy.
OUR CUSTOMER HOTLINE
Canada: 1.888.56.BUGGY (28449)
USA: 1.855.56.BUGGY (28449)
EMAIL
DISCLAIMER:
The notes, warnings, and cautions contained within the manual and marked by the
triangular Caution Symbol should be given special care. Users should also pay
special attention to information marked in this manual beginning with NOTICE.
Travel Buggy, its affiliates and partners cannot be held responsible for personal injury
or property damage resulting from the unsafe or improper operation or maintenance
of the CITY 2 PLUS Power Wheelchair.
As part of our ongoing product improvement initiative, Travel Buggy reserves the right
to change specifications and design without notice. As a result, there may be minor
differences between your CITY 2 PLUS and the photos, illustrations and instructions in
this manual.
3

SAFETY INFORMATION
• DO make certain that the seat is in a
locked position when you are operating
your CITY 2 PLUS
• DO reduce your CITY 2 PLUS’s speed
when you are driving around a corner
• DO proceed with caution as you
approach the downgrade of a ramp or
other incline and when driving near a
raised surface or unprotected ledges
and drop offs (curbs, porches, stairs,
etc.)
• DO avoid exposure to rain, snow, ice,
salt, or standing water whenever
possible
• DO maintain and store in a clean and
dry condition
• DO keep your hands away from the
tires when driving. Be aware that loose
fitting clothing can become caught in
drive tires
• DO keep tools and other metal objects
away from battery terminals. Contact
with tools can cause electrical shock
• DO follow the recommended weight
capacity (395 lbs / 180 kg)
• DO follow the recommended incline
slope rating (12 degrees / 21.3% slope)
• DO check the battery charge to ensure
there is enough charge to get to your
destination before using.
• DO ensure your CITY 2 PLUS’s power
is OFF when entering and exiting the
power wheelchair
• DO NOT drive your CITY 2 PLUS across
the side of a hill or diagonally up or
down a hill, and do not stop (if possible)
while driving up or down an incline
• DO NOT operate your new CITY 2 PLUS
for the first time without completely
reading and understanding the owner’s
manual
• DO NOT carry additional passengers on
your CITY 2 PLUS
• DO NOT use your CITY 2 PLUS as a seat
in a moving vehicle
• DO NOT allow unsupervised children to
play near the power wheelchair
• DO NOT operate your CITY 2 PLUS while
under the influence of alcohol, as this
may impair your ability to drive safely
• DO NOT sit in the CITY 2 PLUS while in a
moving vehicle, an accident or sudden
stop may cause you to be thrown from
the power wheelchair
• ALL servicing must be performed by
qualified personnel only. Unauthorized
modifications to power wheelchair,
its power system or its control system
may compromise the performance
and safety of the system. UNDER NO
CIRCUMSTANCES should you attempt
any repair or service that is not covered
in this manual.
• ALWAYS ensure all safety warning labels
are in place and legible.
4
WARNING:The operator should read all of the warnings signs and instructions here and on the power wheelchair before use.
WARNING: You should not operate your power wheelchair on public streets and roadways. Be aware that it may be difficult for
traffic to see you when you are seated on your power wheelchair. Obey all local pedestrian traffic rules. Wait until your path is
clear of traffic, and then proceed with extreme caution.

BATTERY SAFETY INFORMATION
WHEN USING THE BATTERY
1. Lithium-ion battery packs may get hot,
explode or ignite and cause serious
injury if exposed to abuse conditions. Be
sure to follow the safety warnings listed
below:
• DO NOT place the battery near fire
or heat the battery
• DO NOT install the battery
backwards so the polarity is
reversed
• DO NOT connect the positive and
negative terminals of the battery to
each other with any metal object
(such as a wire)
• DO NOT carry or store the battery
together with necklaces, hairpins, or
other metal objects
• DO NOT pierce the battery with nails
strike the battery with a hammer,
step on the battery or otherwise
subject it to strong impacts or
shocks
• DO NOT solder directly onto the
battery
• DO NOT expose battery to water or
salt water, or allow the battery to
get wet
2. DO NOT disassemble or modify the
battery. The battery contains safety
and protection devices, which if
damaged, may cause the battery to
generate heat, explode or ignite
3. DO NOT place the battery in or near fire,
on stoves or other high temperature
locations. Do not place the battery
in direct sunlight, or use or store
batteries inside cars in hot weather.
Doing so may cause the battery to
generate heat, explode or ignite. Using
the battery in this manner may also
result in a loss of performance and a
shortened life expectancy.
4. If the device is to be used by children,
the caregiver should explain the
contents of this document to the
children and provide adequate
supervision to ensure the device is
being used appropriately
5. When the battery is worn out, insulate
the terminals with adhesive tape or
similar materials before disposal
6. Immediately discontinue use of the
battery if, while using, charging or
storing the battery, the battery emits
an unusual smell, feels hot, changes
color, or shape, or appears abnormal in
any way. Contact Travel Buggy if any of
these problems are observed
7. DO NOT place battery in microwave
oven, high pressure containers or on
induction cookware
5

6
BATTERY SAFETY INFORMATION
CHARGING PRECAUTIONS
1. BE SURE to follow the warnings listed
below while charging the battery.
Failure to do so may cause the battery
to become hot, explode or ignite and
cause serious injury.
• When charging the battery,
ONLY USE THE SPECIFIED CHARGER
PROVIDED WITH THE PRODUCT
• DO NOT attach the battery to a
power supply plug or directly to a
car’s cigarette lighter
• DO NOT place the battery in or near
fire, or in direct sunlight. Heating
the battery can damage the
safety circuitry, which can cause
additional heating, rupture or
ignition of the battery
2. DO NOT continue charging the battery
if it does not recharge in the timelines
specified in the operating manual
3. THE TEMPERATURE range over which
a battery can be charged is 0°C to
45°C (32°F to 113°F). Charging the
battery at temperatures outside of
that range may cause severe damage
to the battery or reduce battery life
expectancy
WHEN DISCHARGING THE
BATTERY
1. DO NOT discharge the battery using
any other device except for the
specified device. When the battery is
used in devices other than the specified
device, it may damage the battery or
reduce its life expectancy. If the device
causes abnormal current flow, it may
cause the battery to become hot,
explode or ignite and cause serious
injury.
2. THE TEMPERATURE range over which
the battery can be discharged is
-20°C to 60°C (-4°F to 140°F). Use of
the battery outside this temperature
range may damage the performance
of the battery or may reduce its life
expectancy.

SPECIFICATIONS
RECLINE LEVER
RAISING ARM RESTS
EASY TO USE CONTROLLER
CUSHION
BACKREST CUSHION
WITH STORAGE BAG
ADJUSTABLE
FOOT REST
STORAGE BAG
LITHIUM-ION
BATTERY (2)
12” NON-PUNCTURE
REAR WHEEL
ANTI-TIP WHEELS
250 WATT
BRUSHLESS MOTORS
8” NON-PUNCTURE
FRONT WHEEL
WASHABLE SEAT CUSHION
OVERALL HEIGHT 40”
OVERALL LENGTH 44” OVERALL WIDTH 23”
BACK REST 20.5” FLOOR TO SEAT 19.5”
SEAT DEPTH 17.5”
SEATING WIDTH 19.5” / 23”
7

PERFORMANCE SPECIFICATIONS
DRIVING RANGE: 15.5 MI / 25 KM
MAXIMUM SPEED: 4.5 MPH / 7 KPH
DRIVE SYSTEM: TWO MOTOR DRIVE
SYSTEM
MOTOR TYPE: 250 WATT BRUSHLESS
INCLINE CAPABILITY: 12° / 21.3%
TURNING RADIUS: 26"
STOPPING DISTANCE: 5 FT (AT FULL SPEED)
OBSTACLE CLEARANCE: 2”
BRAKING SYSTEM: ELECTROMAGNETIC
MAX WEIGHT CAPACITY: 395 LBS
DIMENSIONAL SPECIFICATIONS
UNFOLDED DIMENSIONS:
44”L X 23”W X 40”H
CHAIR GROSS WEIGHT: 65 LBS
CHAIR NET WEIGHT: 58 LBS (NO
BATTERIES)
3PCS SUBASSEMBLY WEIGHT: 40 LBS
(FRAME), 12.5 LBS X 2 (MOTOR/WHEEL)
SEAT CUSHION SIZE: 17” (W) X 17.5” (D)
FOLDED DIMENSIONS: 33”L X 23”W X 13”H
SEATING WIDTH: 19.5” / 23”
FRONT WHEEL DIAMETER: 8”
REAR WHEEL DIAMETER: 12”
FLOOR TO SEAT HEIGHT: 19.5”
BACK SUPPORT HEIGHT: 20.5”
OTHER SPECIFICATIONS
BATTERY TYPE: LITHIUM-ION (24V X 6AH)
BATTERIES PROVIDED: TWO (2)
BATTERY WATT HOUR: 144 WH (AIRLINE
APPROVED)
BATTERY CHARGE CYCLES: ~1,000
TIRES: NON-PUNCTURE
CHARGING TIME: 5 TO 7 HOURS
CHARGER INPUT: 100-240V, 50/60HZ
(INTERNATIONAL)
CHARGER OUTPUT: 29.4V 2.0A
LAP BELT: PROVIDED
HORN: BUILT-IN
SPECIFICATIONS
8
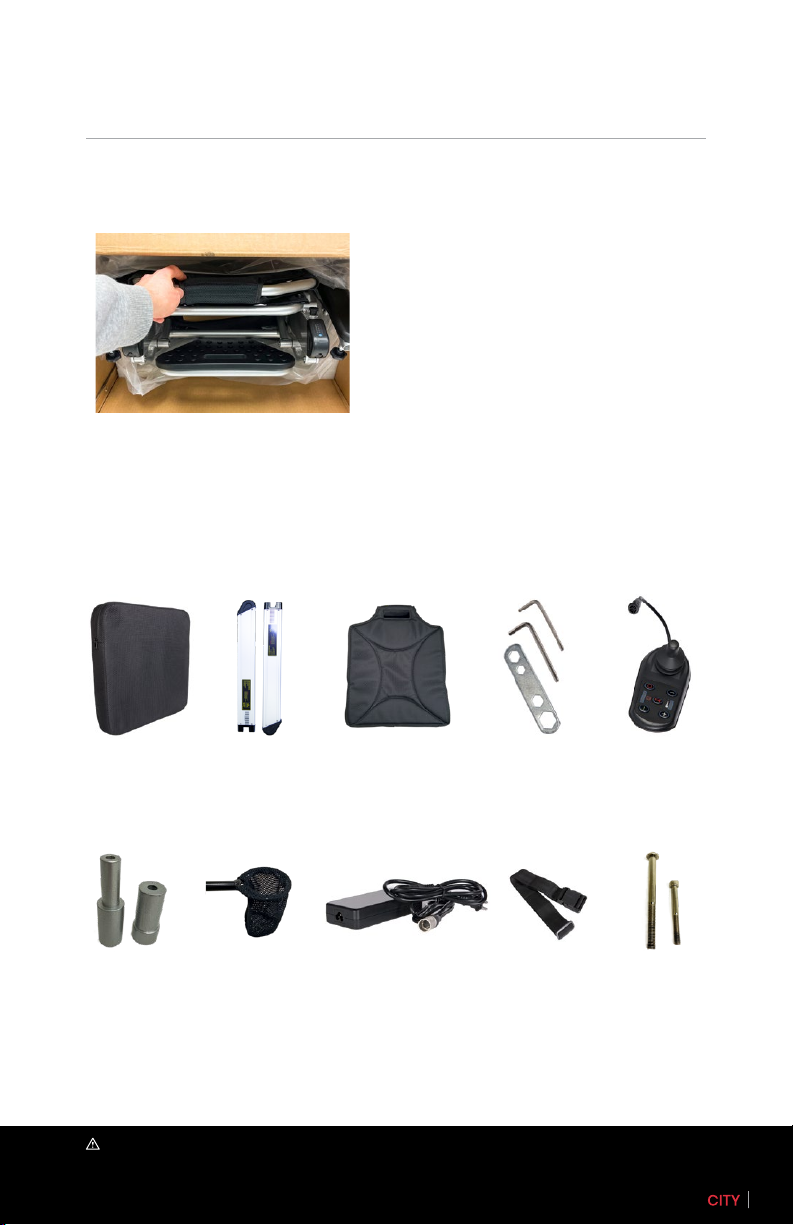
UNBOXING
• To remove the powerchair, orientate
the box such that when it is laid down
on the ground the footplate is at the
bottom
• Grab the top bar and begin to pull your
Travel Buggy out horizontally parallel
with the ground.
BOTTOM
TOP
9
• Locate the components provided with your power wheelchair
SEAT CUSHION BACK REST
CUSHION
JOYSTICK
CONTROLLER
LITHIUM
BATTERY (2)*
TOOLS
NOTICE: Lithium Batteries are already installed and charged on the power chair when shipped.
BATTERY CHARGER LAP BELT BOLTS X4
CUP HOLDERSEAT WIDTH
SPACERS X2

• Lay CITY 2 PLUS flat on the ground as
illustrated above
• Hold the top bar and pull up the chair
while pressing the edge of the seat to
open similar to a lawn chair.
UNFOLDING
• Continue to unfold the power chair until
it is in fully expanded seating position.
• Ensure the chair is fully extended and
locked into the seating position.
10
NOTICE: Failure to fully extend the power chair into its locked position may result in injury while driving.

FOLDING
• Press the red seat frame lock button
down to release the chair for folding
• Continue the folding process by
holding one hand beneath the seat
frame and another on the top bar
similar to a lawn chair
• Fold the footrest into the power chair
before continuing the folding process
• The power chair is now completely
folded. CITY 2 PLUS can also be folded
on to its rear wheels and stands on its
own for greater convenience.
11

SET UP
• Locate the joystick controller in the storage pouch below the power chair.
• Slide the joystick controller into the armrest tube until a comfortable arm length is achieved
for the user (image 1).
• Tighten the corkscrew to secure the joystick
• Align the arrows of the joystick connection cables and press them together to plug the joy-
stick controller in (image 2)
• Rotate the coupling over the connection point to secure the connection point
1 2
12
• Locate the cup holder provided with your new CITY 2 PLUS Power Chair
• Insert the cup holder into the opposite arm rest tube from joystick, fasten securely with the
corkscrew

SET UP
13
2
• Before sitting in the electric wheelchair, be sure the
power button is OFF and the rear brake levers are in the
DOWN (locked) position
• CITY 2 PLUS offers the user 2 optional entry alternatives,
direct front entry or side entry
• If you prefer a front entry, we recommend flipping up the
foot plate to create an easier sitting experience
• DO NOT step on the footplate when entering or exiting
the CITY 2 PLUS as it may cause the power chair to move
in an unsafe manner
• Joystick can be positioned on left or right arm rest
• To change joystick position, first remove the joystick by performing the opposite sequence
of the steps above
• Unscrew the wire harness under the armrest (1) cut the plastic ties on the frame of the
chair (2) to create slack in the joystick power cable
• Move the power cable to the opposite side and re-fasten using the wire harness and
plastic ties, be sure the cable is not interfering with the folding or movement of the electric
wheelchair and connect the joystick
LEFT JOYSTICK
RIGHT JOYSTICK
1
• To enter on the side, pull
the arm release knob and
lift the arm rest vertical
to provide the required
clearance
• To enter on the side, pull
the arm release knob and
lift the arm rest vertical
to provide the required
clearance
13
2

CONTROLLER
• CITY 2 PLUS electric wheelchair has an easy to use 360 degree joystick controller featuring
multiple speeds and a battery life indicator
• Take some time in a safe, controlled environment to learn the operation of the controller, the
speed and the maneuverability of the CITY 2 PLUS
• Be sure to adjust the speed depending on your environment and while turning
• To slow down, slowly bring the joystick back toward the initial position.
• To stop, just bring the joystick back to the initial position
• Use extra care when you drive the CITY 2 PLUS in reverse
14
Speed Control Power ON/OFF
Press the PLUS + button to
increase the speed
INCREASE SPEED
Press the MINUS - button to
decrease the speed
DECREASE SPEED
1-Light On 1.5 MPH
2-Lights On 2.25 MPH
3-Lights On 3 MPH
4-Lights On 3.75 MPH
All 5-Lights On 4.5 MPH
SPEED CONTROL LIMITS
5-Speed
Control Lights
Press the GREEN button to turn ON the
power chair
POWER ON
Press the button to sound the
horn
Horn
There are a total of 7 battery power
indicator lights: 3 Green, 3 Yellow
and 1 Red. From top down the lights
will disappear as the battery drains
indicating the amount of charge
remaining. Recharge at any point before
the last Red light disappears, indicating
a fully depleted battery.
Battery Indicator Lights
Press the RED button to turn OFF the
power chair
POWER OFF

15
HOW-TO FEATURES
• Provided with your CITY 2 PLUS electric
wheelchair are optional Seat Width Spacers to
increase the seating area width an additional
3.5”
• To adjust the width of your Travel Buggy, first
remove the arm rests by removing the bolts on
the top and bottom of the arm rest (image 1)
• Locate the Seat Width Spacers and place the
shorter cylinder at the bottom, longer cylinder at
the top (image 2)
• Reattach the arm rests by securing the larger
bolt on the bottom spacer and the smaller bolt
on the top spacer (images 3 & 4). Repeat on
each side
Video Tutorial Link:
www.vimeo.com/729278354
LONG + SMALL
BOLTS
SHORT + LARGE
BOLTS
+
+
• The adjustable foot rest has 3 extension positions
• To adjust the foot rest to a comfortable length, pull
both side pins to release the foot rest, then pull it
forward to the subsequent position
• Ensure the pins are both locked into the new
position
• Your CITY 2 PLUS model comes with a reclining
backrest. This allows the user to recline the back
rest into multiple positions for comfort
• To release the back rest, push UP on the lever at
the back of the back rest (1) while simultaneously
pulling down from the top bar of the back rest
frame Release the lever to lock the back rest into
the desired position
ADJUST SEATING
ADJUST WIDTH
WARNING: DO NOT attempt to recline the chair while seated in the CITY 2 PLUS power wheelchair.
1 2
3
4

• In order to have a care giver push the CITY
2 PLUS, it must be put in Free Wheel mode
• This mode disengages the drive
mechanism to the wheels, making them
free to push manually
• To put the CITY 2 PLUS in Free Wheel Mode,
come to a full stop and turn OFF the power
on the controller.
• Push UP on the two red levers located on
each rear wheel as shown
FREE WHEEL/
MANUAL MODE (UP)
LOCKED/ POWER
MODE (DOWN)
16
HOW-TO FEATURES
WARNING: Always make certain the wheels are properly inserted back into position and that both the teeth of the locking plate
and the locking pin are in place before using your Travel Buggy.
• Your CITY 2 PLUS model comes with Quick
Release Wheels to reduce the overall weight
of your Travel Buggy
• To release the rear wheels, first unplug the
quick connect cables at the back of the unit
(image 1)
• Remove the locking pin (image 2) and slide
the wheels horizontally off the locking plate
(image 3)
• Reverse these steps to connect the wheels
again before using your CITY 2 PLUS model
1
3
2
FREEWHEEL MODE
REMOVABLE WHEELS

WARNING: Never transport the CITY 2 PLUS in a tie down system, as the CITY 2 PLUS is not compatible with them. Never sit in the
CITY 2 PLUS and be transported in a moving vehicle. Do not place the folded CITY 2 PLUS in the front seat with the driver where it
could move or slide.
TRANSPORTING
• It is recommended to turn OFF your CITY 2 PLUS power wheelchair. Make sure that the power
chair is in freewheel mode to allow it to roll freely when pulling or loading
• Unlock the frame latch by pressing down (1) while simultaneously beginning the folding
process
• Continue the folding process by holding one hand beneath the seat frame and another on
the top bar (2), similar to a lawn chair
• Once folded, the power chair can balance on its rear wheels (3)
• Finally, the footrest can be used to pull the CITY 2 PLUS (5). We recommend fully extending
the foot rest in order to pull more easily
13
2
17
1-PIECE LOAD 3-PIECE LOAD
• To load the CITY 2 PLUS power chair into
the back of a vehicle for transport we
recommend utilizing the back of the
vehicle as leverage
• Position the power chair against the
car as indicated in Image above (Note:
we recommend a blanket to reduce
scratching of the vehicle)
• Grasp the rear wheels and push it into
the trunk
• To load the disassembled CITY 2 PLUS
power chair into the back of a vehicle
follow steps outlined on page 16 to remove
rear wheels
• Load into vehicle as 3 seperate pieces with
ease
4

18
BATTERY MAINTENANCE
Lithium-Ion rechargeable batteries require
routine maintenance and care in their use and
handling. Read and follow the guidelines in this
document to safely use Lithium-Ion batteries
and achieve the maximum battery life span.
OVERVIEW
Do not leave batteries unused for extended
periods of time, either in the product or in
storage. When a battery has been unused for 6
months, check the charge status and charge or
dispose of the battery as appropriate.
The typical estimated life of a Lithium-Ion
battery is about three years or ~500 charge
cycles, whichever occurs first. One charge cycle
is a period of use from fully charged, to fully
discharged, and fully recharged again. Use a
three-year life expectancy for batteries that do
not run through complete charge cycles.
Rechargeable Lithium-Ion batteries have a
limited life and will gradually lose their capacity
to hold a charge. This loss of capacity (aging)
is irreversible. As the battery loses capacity,
the length of time it will power the product (run
time) decreases.
Lithium-Ion batteries continue to slowly
discharge (self-discharge) when not in use or
while in storage. Routinely check the battery’s
charge status.
Use only the provided battery(s) in your
product.
BATTERY MAINTENANCE
Observe and note the run time that a new
fully-charged battery provides for powering
your product. Use this new battery run time
as a basis to compare run times for older
batteries. The run time of your battery will vary
depending on the product’s configuration and
the applications that you run.
Routinely check the battery’s charge status.
Carefully monitor batteries that are
approaching the end of their estimated life.
Consider replacing the battery with a new one if
you note either of the following conditions:
• The battery run time drops below about 80%
of the original run time.
• The battery charge time increases
significantly.
If a battery is stored or otherwise unused for an
extended period, be sure to follow the storage
instructions in this document. If you do not
follow the instructions, and the battery has no
charge remaining when you check it, consider
it to be damaged. Do not attempt to recharge it
or to use it. Replace it with a new battery.
CHARGING
Always follow the charging instructions provided
with your product. Refer to your product’s
user manual and/or online help for detailed
information about charging its battery.
Use only the provided charger to charge your
battery(s).

19
BATTERY MAINTENANCE
STORAGE
• Charge or discharge the battery to
approximately 50% of capacity before
storage.
• Charge the battery to approximately 50% of
capacity at least once every six months.
• Remove the battery and store it separately
from the product.
• Store the battery at temperatures between
5 °C and 20 °C (41 °F and 68 °F).
HANDLING PRECAUTIONS
• Do not disassemble, crush, or puncture a
battery.
• Do not short the external contacts on a
battery.
• Do not expose a battery to fire or water.
• Do not expose a battery to temperatures
above 60 °C (140 °F).
• Keep the battery away from children.
• Avoid exposing the battery to excessive
shock or vibration.
• Do not use a damaged battery.
• If a battery pack has leaking fluids, do not
touch any fluids.
• Dispose of a leaking battery pack (see
Disposal and Recycling in this document).
• In case of eye contact with fluid, do not rub
eyes. Immediately flush eyes thoroughly
with water for at least 15 minutes, lifting
upper and lower lids, until no evidence of
the fluid remains. Seek medical attention.
• Immediately discontinue use of the
battery if, while using, charging or storing
the battery, the battery emits an unusual
smell, feels hot, changes color, or shape,
or appears abnormal in any way. Contact
Travel Buggy if any of these problems are
observed
TRANSPORTATION
• Always check all applicable local, national,
and international regulations before
transporting a Lithium-Ion battery.
• Transporting an end-of-life, damaged, or
recalled battery may, in certain cases, be
specifically limited or prohibited.
DISPOSAL AND RECYCLING
• Lithium-Ion batteries are subject to
disposal and recycling regulations that
vary by country and region. Always check
and follow your applicable regulations
before disposing of any battery. Contact
Rechargeable Battery Recycling
Corporation (www.rbrc.org) for U.S.A. and
Canada, or your local battery recycling
organization.
• Many countries prohibit the disposal of
waste electronic equipment in standard
waste receptacles.
• Place only discharged batteries in a battery
collection container. Use electrical tape or
other approved covering over the battery
connection points to prevent short circuits.
NOTE: The battery self-discharges during storage. Higher temperatures (above 20 °C or 68 °F) reduce the battery storage life.

20
CHARGING
• THERE IS NO NEED TO CHARGE THE
BATTERIES UPON ARRIVAL
• Your CITY 2 PLUS will arrive with fully
charged batteries
• The preferred charging method
(onboard charging) detailed below
charges both batteries at the same
time; the secondary charging method
(offboard charging) described further
down only charges one battery at a time
ONBOARD CHARGING (PREFERRED METHOD)
• Turn OFF the power to the CITY 2 PLUS
• Plug in the charger to the joystick
controller (front of joystick) as in image 1
• This process will charge BOTH batteries
simultaneously
OFFBOARD CHARGING
• Turn OFF the power to the CITY 2 PLUS
• Remove the battery(s) from the side of
the chair by pulling up on the release
knob as indicated in image 2
• Insert the charger end (DC) into the
power socket of the battery as indicated
in image 3. Second, connect the input
plug of charger with your local power
source.
• Connect the input
• Please ensure the charger and battery
are on a flat surface and keep in a well
ventilated area
• Ensure that the batteries are re-inserted
correctly prior to driving
2
1
3
WARNING: TO REDUCE THE RISK OF INJURY, CHARGE LITHIUM-ION PROVIDED BATTERIES ONLY WITH PROVIDED LITHIUM-ION BATTERY CHARGER.
Other types of chargers may cause the battery to generate heat, explode or ignite potentially causing personal injury or damage.
NOTE: When you troubleshoot battery issues for dual battery configurations, test one battery and one battery slot at a time. A defective
battery can prevent the battery in the opposite slot from charging, leaving you with two uncharged batteries.
Other manuals for CITY 2 PLUS
1
Table of contents
Languages:
Other Travel Buggy Wheelchair manuals

Travel Buggy
Travel Buggy DASH Ultra Lite Power User manual

Travel Buggy
Travel Buggy CITY 2 PLUS User manual

Travel Buggy
Travel Buggy CITY User manual

Travel Buggy
Travel Buggy VISTA User manual

Travel Buggy
Travel Buggy DASH User manual

Travel Buggy
Travel Buggy DASH Ultra Lite Power User manual

Travel Buggy
Travel Buggy CITY PLUS User manual
Popular Wheelchair manuals by other brands


NYMAS
NYMAS 343010 Installation and operating instructions

Pride Mobility
Pride Mobility GT owner's manual

B+B
B+B Pyrostart instruction manual

Golden Technologies
Golden Technologies Compass TRO GP615 SS owner's manual

R82
R82 Stingray Mounting instruction

Sunrise Medical
Sunrise Medical SOPUR Xenon2 FF Directions for use