Travel Chef PRI5590DP Installation instructions

Part No. PRI5590DP
USER MANUAL AND PRODUCT SPECIFICATIONS
VACUUM SEALER 12V 240V
DUAL POWER

2
GENERAL INFORMATION AND SAFETY INSTRUCTIONS
When using this electrical appliance, safety
precautions should always be observed, including
the following:
• Store the appliance in a cool and dry place,
away from children when not in use.
• Do not use this appliance for any other purpose
other than for its intended use.
• Keep hands away from moving parts.
• Ensure power cords are not hanging over the
edge of a table or bench.
• Regularly check appliance, power cords and
plug for any damage before use.
• Ensure your hands are dry before operating
the appliance.
WARNINGS
CAREFULLY READ ALL INSTRUCTIONS BEFORE
USING THIS APPLIANCE AND KEEP THIS
INSTRUCTION MANUAL FOR FUTURE REFERENCE.
• Before connecting or disconnecting the power
cords from power outlet, ensure the cover of the
machine is unlocked.
• Switch off and disconnect the appliance from the
power outlet when not in use or before cleaning.
• If the power cords or plug becomes damaged,
stop using the appliance immediately and have
it repaired by a professional repairer only.
• Keep bags away from children.
• Any repairs required to this appliance are to be
completed by a professional repairer only. DO NOT
attempt to repair this appliance yourself.
• Do not drop or hit the appliance against hard
surfaces. If the appliance appears to be
externally or internally damaged, do not use it.
• Do not pull or carry the appliance by its power
cords or use cords as a handle, close a door
on the cords or pull cords around sharp edges
or corners.
• Do not operate the appliance near water, wet
surfaces or if the power cords or plug are wet.
• Do not operate this appliance on or near
hot surfaces or near a heat source.
• Keep appliance away from hot surfaces
or heat generating appliances (e.g. stove).
• Do not place the appliance on top of
another appliance.
• Do not use an extension cord with this
appliance.
• Ensure appliance is on a stable, at surface
such as a table or bench top before use. Avoid
using on metal surfaces (e.g. sink).
• Do not immerse any part of this appliance,
power cords or plug in water or any other liquid.
• This appliance is for indoor use only, do not
allow to be exposed to outdoor conditions.
• This appliance is not intended for use by
persons (including children) with reduced
physical, sensory or mental capabilities, or
lack of experience and knowledge, unless they
have been given supervision or instruction
concerning use of the appliance by a person
responsible for their safety.
• Children should be supervised to ensure that
they do not play with the appliance or vacuum
bags.
• Do not use the appliance for a long continuous
period as this may cause over-heating and
potential damage to it. Allow appliance to
cool before continuing.
• Ensure power outlet or power source is
switched off before connecting this appliance.
• Store 240V power cord in compartment in base
of appliance and hook power plug into place to
avoid any damage to cord or plug.
• Regularly check appliance, power cords and
plug for any damage before use.

3
BENEFITS OF VACUUM SEALING
• Less food spoilage.
• Prepare food or meals in advance and use as
required - ideal for camping or picnics.
• Eliminate freezer burn.
• Portion food according to required size.
• Saves on fridge and freezer space.
SELECT YOUR POWER SOURCE
AC 240V
The power cord is tucked away in a compartment
at the base of your unit. Simply plug into a
household socket.
DC 12V
Simply attach the 12V plug into the socket located
on the side of the unit as shown. Insert the 12V
plug into a 12V DC power outlet.
Sealing Element
CAUTION HOT
DO NOT touch the sealing element located
on edge of top cover of the appliance when
in use. This may get hot which could cause
burns to skin.
*Images for illustrative purposes only
12V socket
240V compartment
*Images for illustrative purposes only
USER MANUAL AND PRODUCT SPECIFICATIONS

4
C
M
Y
CM
MY
CY
CMY
K
PRI6637_Primus_Vacuum Sealer_control_panel(red).pdf 1 4/06/13 4:37 PM
Positional only
Control Panel
1. Vacuum + Seal/Cancel
This button performs two functions:
• Vacuuming and sealing bags - press this
button to begin operation.
• Cancelling current operation
of the appliance.
2. Pressure
This button offers the choice of two different
vacuum pressures:
• Normal: for items that will not crush or
damage easily such as meat, coffee
beans, nuts and hard vegetables.
• Gentle: for delicate items such as
strawberries, soft cheese, pastries
and cakes.
NOTE: Default setting is NORMAL. Check
settings are suitable for bag contents before
vacuum sealing. Once settings are changed,
appliance will NOT revert back to default
settings during use.
3. Food
This button is used for adjusting the heat
sealing timing.
Setting options:
• Dry: suitable for dry contents and items
without moisture (e.g. coffee beans, nuts).
This setting has a shorter sealing time.
• Moist: suitable for moist foods
(e.g. cheese, pastries) This setting has
a longer sealing time.
Below is an indication of vacuum pressures
applied based on settings selected:
• normal (pressure) and dry (food) settings:
-80kPa (maximum).
• gentle (pressure) and dry (food) settings:
-41kPa (maximum).
• normal (pressure) and moist (food) settings:
-82kPa (maximum).
• gentle (pressure) and moist (food) settings:
-44kPa (maximum).
NOTE: Default setting is DRY setting with
shorter seal time.
4. Canister
This function allows the vacuuming of canisters
using a hose attachment (canisters and hose
attachment sold separately).
5. Marinate
This function provides a pre-determined sequence
of vacuuming pulses that create optimum avour
infusion in a quick and efcient manner - for use
with canisters only.
6. Seal Only
This button performs two functions:
• Manually seals the open end of a bag
without vacuuming; use this button when
making a bag.
• Allows the operator to control the vacuum
pressure to avoid crushing delicate items
during vacuuming.
NOTE: When the automatic “Vacuum + Seal”
function is in use, pressing the “Seal Only”
button stops the motor pump and immediately
starts to seal the bag.
7. LED Indicators
Indicates the status of vacuum or seal process
and the current appliance settings selected.
PRODUCT OVERVIEW AND PARTS LIST
4
3 5
2
176

5
1. Release Buttons: There are two buttons found
on opposite sides of the appliance. Press both
buttons at same time to release the lid.
2. Air Intake: Air intake vacuum chamber and
pump. Do not place bag over this area or it will
not seal.
3. Vacuum Chamber: Position the open end of the
bag inside the chamber. This draws air out of bag
and catches any liquid overow from the bag.
Clean any excess liquid before continuing use.
4. Sealing Strip: Place the bag to be sealed over
this strip, it is removable for easy cleaning.
5. Lower Gaskets: When cover is locked in place,
the lower and upper gaskets join to create an
airtight vacuum chamber. The lower gasket must
be free of any damage in order for the appliance
to operate correctly.
6. Upper Gaskets: When cover is locked in place,
the lower and upper gaskets join to create an
airtight vacuum chamber. The upper gasket
must be free of any damage in order for the
appliance to operate correctly.
7. Sealing Element: Teon-coated heating
element may become hot during use - avoid
contact during use.
8. Slide Cutter: Feed roll under the slide cutter
to cut bag to required length. The cutter can
also be used to open vacuum sealed bags.
9. Roll Storage Compartment: Holds roll in place
for the slide cutter.
10. 240V Power Cord Storage Compartment:
Power cord folds neatly away into its
compartment.
11. 12V Power Port: For 12V DC operation.
12. 12V Power Cord: For 12V DC operation.
13. Hose Port: For canister vacuuming (canisters
and hose attachment sold separately).
14. Carry Bag: Compartment for storing your rolls
and sealing unit. Padded and heavy duty.
15. Small Roll: 1 x 22Wcm x 3Lm.
16. Large Roll: 1 x 28Wcm x 3Lm.
1
5
9
13
7
10
Underside of
vacuum sealer
6
342 1
11 12 161514
8
USER MANUAL AND PRODUCT SPECIFICATIONS

6
Operating Instructions
TO MAKE A BAG
1. Open the lid by pressing the Lid Release
Buttons on each side of the unit. Using
scissors, cut a bag to the required length.
2. Slide end of roll towards the Sealing Strip.
NOTE: Ensure it is placed at least 1cm below
the Sealing Strip edge to ensure a secure seal.
3. Close the lid and press down until both sides
click into place.
4. Press “Seal Only” button on appliance to seal
the bottom of the bag; the button will illuminate
during process.
5. Once complete, press side release buttons to
open the lid.
6. Roll out bag to required length and cut using
bag cutter.
Sealing Strip
WARNING: The sealing element becomes
very hot while in use and will remain hot for
some time after use. DO NOT touch the sealing
element as it may cause burns to skin.

7
VACUUM SEALING PROCESS
NOTE: Ensure bags or roll used are those
specified as being suitable for use with this
vacuum sealer model.
1. Add food contents to the bag ensuring at least
3cm of empty space is left at the open end of
the bag for sealing.
2. Open the lid by pressing the Lid Release
Buttons on each side of the unit.
3. Align the open end of the bag within the
Vacuum Chamber just below the Air Intake
(see image below).
4. Press down both sides of lid until they have
clicked into place (see image below).
TIP: Select food type (dry or moist) and
vacuum pressure (gentle or normal). If food
type or vacuum pressure is not selected,
default settings of dry and normal will be
activated.
5. Select “Vacuum and Seal” button to
commence vacuum process. Appliance will
vacuum the bag and automatically seal once
sufcient air has been removed.
6. To release the lid, press Lid Release Buttons
and remove the bag. Store sealed bags
according to contents of bag.
TIP: You can interrupt the sealing process
at any time by pressing ‘CANCEL’ or ‘SEAL
ON LY’. Especially useful for very delicate foods
that you do not wish to crush.
This appliance provides very high vacuum
pressure during vacuum sealing. In order to avoid
crushing delicate items with the high vacuum
pressure, observe the status of the vacuum
pressure inside the bag and press the “SEAL
ONLY” button immediately when the desired
vacuum pressure is achieved. The vacuum pump
will stop and the sealing process will commence.
Air Intake
Port
Vacuum
Chamber
USER MANUAL AND PRODUCT SPECIFICATIONS
8
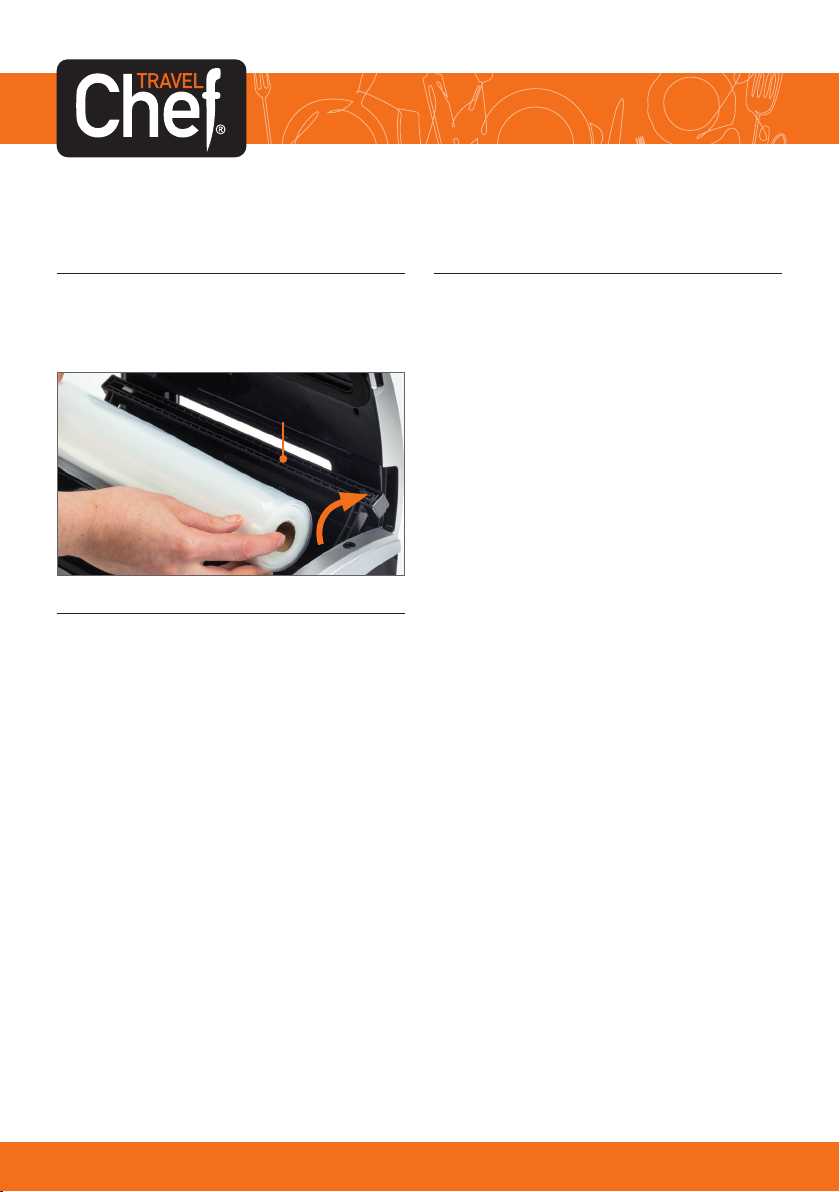
REPLACING THE BAG ROLL
1. Ensure appliance is cool and switched off
before replacing the bag roll.
2. Lift cutter rack and then insert new roll
(as shown) and lower.
HANDY HINTS
1. Do not overll a bag; leave enough empty
space at the open end of the bag so that it can
be placed in the vacuum chamber area without
creating wrinkles.
2. Do not wet the open end of the bag as this will
affect ability to heat seal the bag.
3. If bags do not seal properly:
• bag has not been placed below air intake port.
• bag end has not been positioned within
vacuum chamber.
• bag may be damage, try another bag
• lower gasket on appliance is positioned
incorrectly or damaged.
• Alternatively contact Customer Service
on 1300 555 197.
4. Clean and straighten the open end of the bag
before sealing.
5. When vacuum sealing food or items that have
sharp points, cover these with paper towel to
ensure bag is not damaged.
6. If air has escaped from bag, check the seal on
the bag.
7. Clean appliance thoroughly after each use.
TO VACUUM SEAL CANISTERS
1. Wipe canister cover and base, ensuring they
are completely clean and dry before use
2. Place contents inside canister, ensuring it is not
completely lled so lid can be placed securely
onto canister
3. Place one end of hose onto the hose port and
the other end securely onto hole on canister lid
4. Ensure pressure setting on appliance is set
to NORMAL
5. Appliance lid MUST be closed and locked in
place before continuing
6. Select “Canister” button to start the
vacuum process.
7. Appliance will automatically stop once process
is complete
8. Remove hose from appliance and canister
NOTE: Canisters and hose attachment sold
separately
Optional – Sold SeparatelyMaintenance
Cutter Rack
9
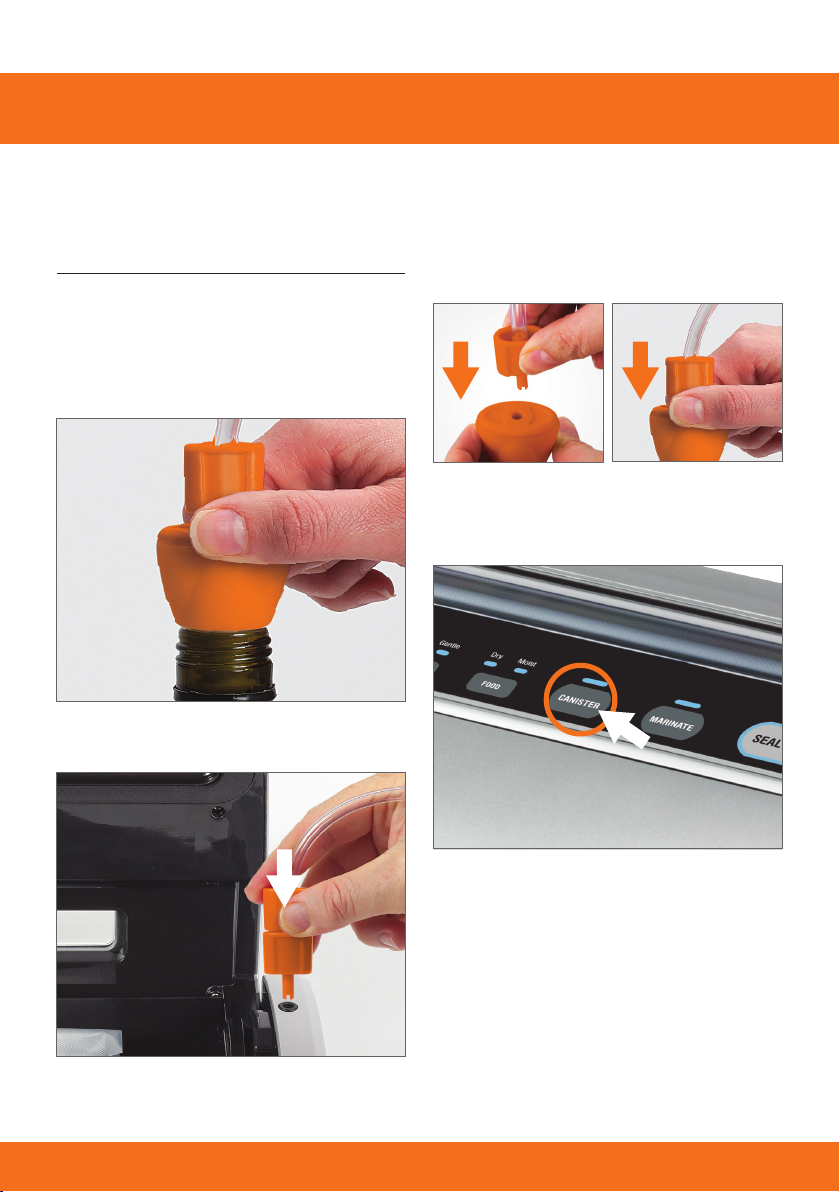
HOW TO VACUUM BOTTLES
1. Place the appliance on a at, dry surface
and plug the power cord into a either 240V or
12V DC power source.
2. Insert the bottle stopper into the neck of
the bottle, leaving at least 2.5cm between
the contents and the rim.
3. Insert one end of the accessory hose into
the air-intake on the appliance.
4. Insert the male adaptor end into the lip
of the bottle stopper (see image below).
5. Press “Canister” button to begin the vacuum
process for either canisters or bottles.
The motor will run until vacuum process
is complete.
6. When light indicator turns off, gently twist and
remove accessory hose from appliance and
bottle stopper.
7. Simply twist and pull up on the bottle stopper
to release the vacuum.
IM PORTA NT: Remember to remove the
accessory hose from the accessory port of
your vacuum sealer once finished.
USER MANUAL AND PRODUCT SPECIFICATIONS

10
Food Safety and Other Useful Information
• Food should be fresh and in peak condition prior
to sealing to ensure benets of vacuum sealing.
• To avoid possible illness, DO NOT reuse bags.
• Ensure vacuum chamber and appliance are
clean before use.
• Ensure your hands, utensils and surfaces being
used are clean before vacuum sealing.
• Refrigerate or freeze perishable foods immediately
after vacuum sealing.
• Vegetables such as broccoli, cauliower
or cabbage emit gases when refrigerated.
Blanch or freeze these vegetables before
vacuum sealing.
• Some fruits and vegetables, such as apples,
bananas or potatoes, will have longer shelf lives
if they are peeled before vacuum sealing.
• Factors such as temperature, moisture, acidity,
salt or sugar content in foods may inuence
the growth of micro-organisms which may be
potentially harmful.
GENERAL RULES FOR FOOD SAFETY
• Once you have heated or defrosted
non-refrigerated perishable foods,
consume them immediately.
• After opening canned food or commercially
vacuum packed foods, they can be vacuumed
packed. Follow the instructions to refrigerate
after opening and store vacuumed packages
appropriately taking note of use by dates.
• Do not defrost foods in hot water or via other
heat sources. It is best to defrost frozen items in
the fridge overnight.
• Do not consume perishable foods that have
been left out at room temperature for more
than a few hours. This is especially important
if they have been prepared with a thick sauce,
in a vacuum package, or in a low oxygen
environment.

11
FOOD STORAGE FACTS:
When preparing and vacuum sealing foods
using your vacuum sealer, there are certain
processes that must be followed to ensure
food quality and safety. Review this section
carefully for your protection:
• Chemical reactions in food from air,
temperature, moisture, enzyme action, growth
of micro-organisms or contamination from
insects will cause food spoilage.
• The main element to cause food to lose
nutritional value, texture, avour, and overall
quality is oxygen in the air. Most micro-
organisms growth relies on air, as it will carry
moisture into and out of foods unless they are
protected with moisture-proof packing.
• Frozen foods being exposed to freezer air will
result in freezer burn.
• In general, there are three categories of micro-
organisms: mould, yeast and bacteria, they
are present everywhere, but only under certain
conditions they can cause problems.
• In a low oxygen environment or in the absence
of moisture, mould cannot grow. In moisture,
sugar and a moderate temperature
circumstances, yeast can grow with or without
air. Refrigeration will slow the growth of yeast
and freezing stops it completely. Bacteria can
grow with or without air.
• Ensure you properly clean your hands, all
utensils and surfaces to be used for cutting and
packaging foods.
• Once you have packed perishable foods,
refrigerate or freeze them immediately. Do not
leave them sitting at room temperature.
• Vacuum sealing can increase the shelf life of dry
foods. Foods that have high fat content develop
rancidity due to oxygen and warm temperature.
Vacuum packaging extends the shelf life of
foods such as nuts, coconut or cereals. Store in
a cool, dark place.
• Vacuum sealing will not extend the shelf life of
fruits and vegetables such as apples, bananas,
potatoes and root vegetables unless they
are peeled before vacuum sealing, fresh for
refrigeration.
USER MANUAL AND PRODUCT SPECIFICATIONS

12
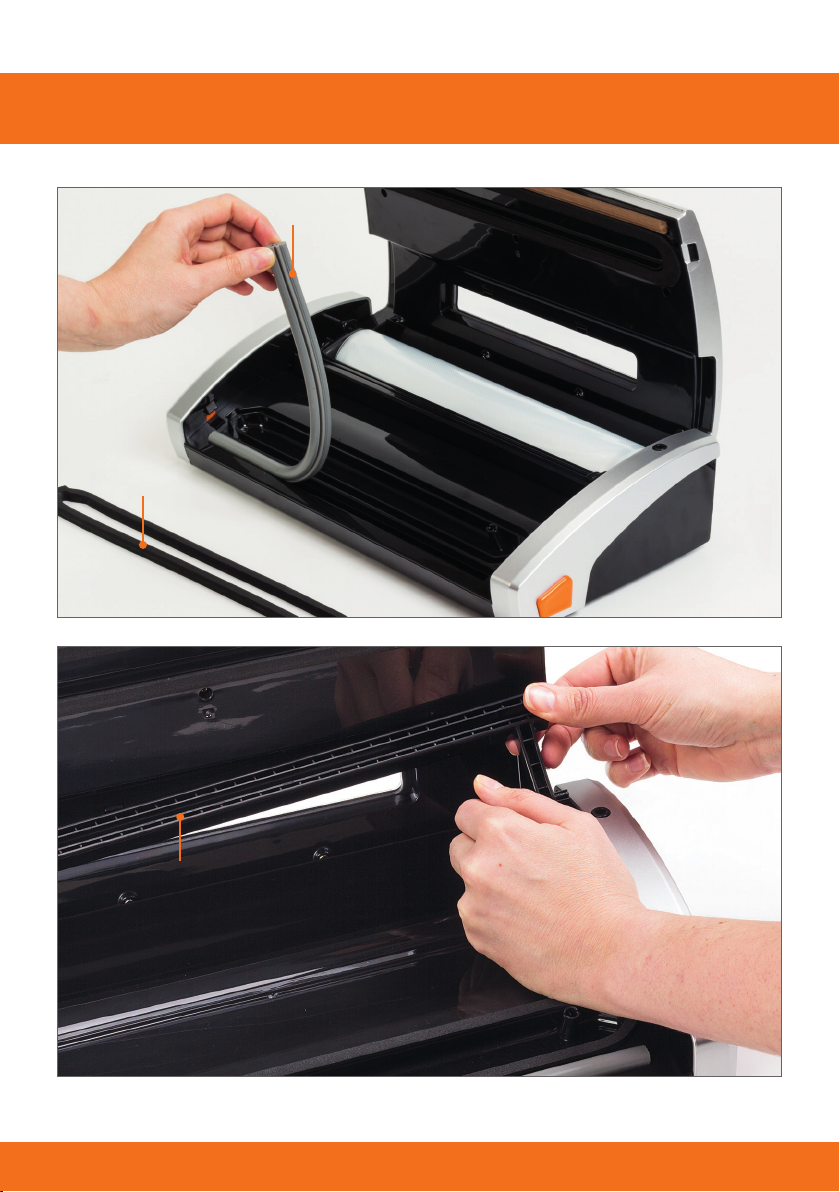
Cleaning, Maintenance and Storage
• Always unplug the appliance from power outlet
or power source before cleaning.
• Wipe appliance clean using a damp cloth.
• Do not immerse in water or any other liquid.
• Do not place in dishwasher.
• Do not use any abrasive products or materials
to clean the appliance.
• Ensure the appliance and all components are
completely clean and dry before use or storage.
• Store the appliance in a cool, safe, dry place,
keep out of reach of children.
• When not in use and before storing, ensure
appliance lid is down but not locked. This will
avoid distorting the foam gaskets and ensure
they remain in good condition.
• Over a long period of use, you may need
to rest the appliance for about 15 minutes
before continuing.
• Check for and remove any liquid spillage or
food residue in the vacuum chamber after each
use, sealing strip and lower gasket can easily
be removed from unit for cleaning. Warm soapy
water may be used to carefully wipe away
spillage or food residue.
• To remove cutter rack, press one side of cutter in
and lift out of appliance (see image bottom right).
• Always leave the appliance lid open to allow it to
cool before storing.
• Only use bags or rolls specied as suitable for
use with this appliance.
• DO NOT wrap 12V or 240V power cords around
the appliance - store the 240V plug inside of its
compartment in the appliances base.
NOTE: This appliance does not require any
lubrication or lubricating oil.
• DO NOT attempt to dismantle the vacuum sealer.
This appliance contains no serviceable parts.
RESPONSIBLE DISPOSAL
At the end of its working life, do not throw this
appliance out with your household rubbish.
Electrical and electronic products contain
substance that can have a detrimental effect on
the environment and human health if disposed
of inappropriately. Observe any local regulations
regarding the disposal of electrical consumer
goods and dispose of it appropriately for
recycling. Contact your local authorities for advice
on recycling facilities in your area.
13
Cutter Rack
Lower Gasket
Sealing Strip
USER MANUAL AND PRODUCT SPECIFICATIONS
14
Troubleshooting
Issue Possible Solutions
Bag does not vacuum Check power cord is rmly plugged into power outlet
and outlet is switched on
Check power cord for any damage
Make sure bag is inserted correctly into vacuum chamber.
DO NOT cover the air intake connection
Check there is no damage to bag or lower gasket
Air still inside bag Make sure bag has no leaks – try a new bag
Check sealing strip and gaskets for any damage
Ensure edge of bag has been placed within the chamber
and is NOT blocking vacuum port. Refer to page 6
Appliance does not seal after vacuuming Check gaskets and sealing strips for any damage
Wipe clean and retry
Check bag for any leaks
Vacuum is released This may depend on contents of bag
Some foods (such as garlic or onions) release gas which
may expand the bag
Check bag is free of holes - try a new bag
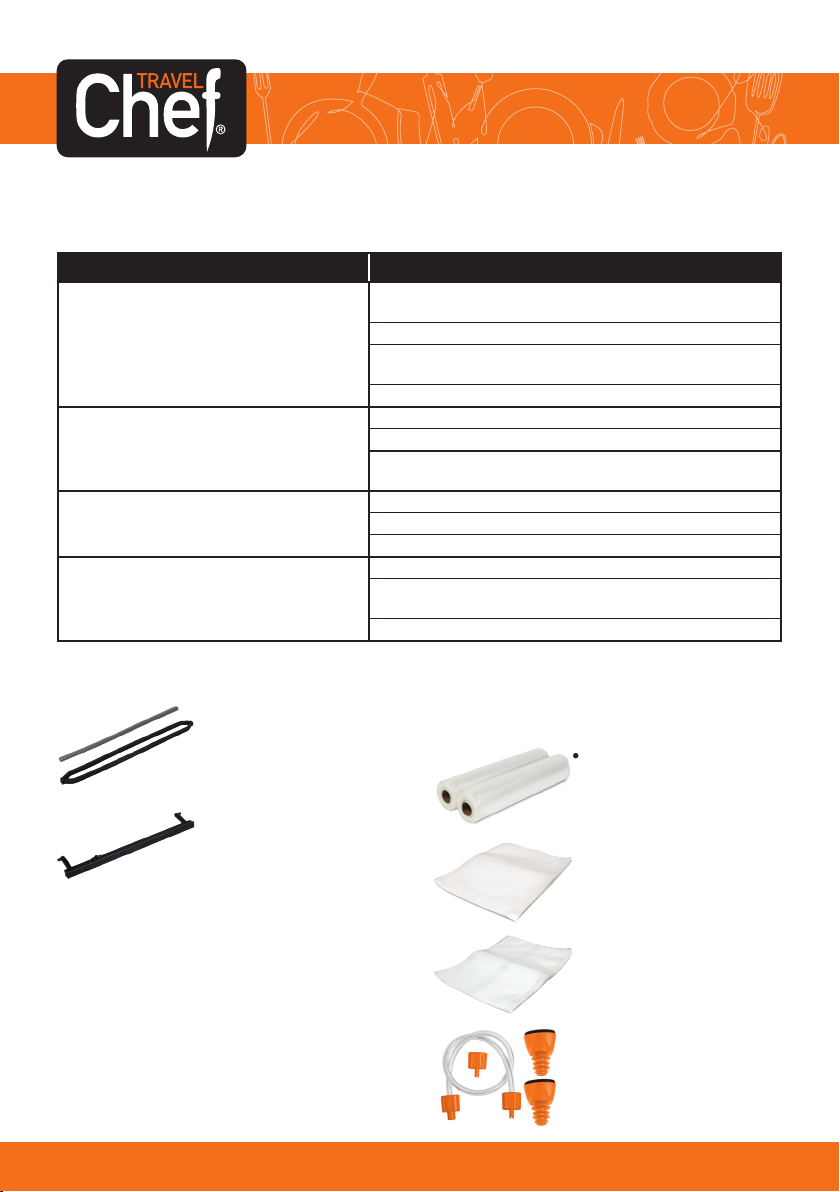
SPARE PARTS: ITEMS SOLD SEPARATELY:
Contact Customer Service for your nearest stockist
on 1300 555 197
• Lower Gasket and Sealing
strip set (contains 1 x lower
gasket and 1 x sealing strip)
Part No. 504333-01S • Rolls
30cm x 10m (2 x 5m)
Part No. PRI5500R10
• Medium Pre-cut Bags
50 Pack 22cm x 30cm
Part No. 504123
• Large Pre-cut Bags
50 Pack 28cm x 40cm
Part No. 504134
• Bottle Stopper Pack
1 x Female Attachment
2 x Male Attachment
1 x Hose
2 x Bottle Stopper
Part No. 504339
• Cutter Rack
Part No. PRI5500-01S

15
Food Preservation Guidelines
Classification Food Items Temperature Normal
Preservation
Vacuum
Preservation
Refrigerant Fresh Raw Meat 5±3°C 2~3 days 8~9 days
Fresh Fish/Seafood 5±3°C 1~3 days 4~5 days
Cooked Meat 5±3°C 4~6 days 10~14 days
Vegetables 5±3°C 3~5 days 7~10 day s
Fruit 5±3°C 5~7 days 14~20 days
Eggs 5±3°C 10~15 days 30~50 days
Frozen Meat -16~-20°C 3~5 months >1 year
Fish -16~-20°C 3~5 months >1 year
Seafood -16~-20°C 3~5 months >1 year
Pantry Items Bread 25±2°C 1~2 days 6~8 days
Biscuit 25±2°C 4~6 months >1 year
Rice/Flour 25±2°C 3~5 months >1 year
Peanut/Legume 25±2°C 3~6 months >1 year
Medical Material 25±2°C 3~6 months >1 year
Tea 25±2°C 5~6 months >1 year
Note: The above information is for guideline purposes only. Check condition of food before cooking
or consumption.
Technical Specifications
For enquiries please contact our Sales Department
Telephone: 1300 555 197
(Mon–Fri 8.30am–5.30pm AEST)
sales@companionbrands.com.au
USER MANUAL AND PRODUCT SPECIFICATIONS
Specifications
Part No. PRI5590DP
Power source AC: 220-240V 50Hz, 130W
DC: 12V
Vacuum speed on normal 12L per minute
Vacuum pressure -0.8 bar (- 80kPa) max.
Sealing strip max. width 30cm
Sealing strip depth 2.5mm
Dimensions 390L x 175W x 80Hmm
Weight 2.1kg

TC002
Distributed by
Companion Brands
Bundoora Victoria 3083
www.companionbrands.com.au
Table of contents
Popular Food Saver manuals by other brands


Seal-a-Meal
Seal-a-Meal VSDC-24 reference guide

Van Der Stahl
Van Der Stahl OPL Series operating instructions

Chesterton
Chesterton TwinHybrid 4400H Installation, Operation and Rebuild Instructions

Westfalia
Westfalia 890127 Original instructions

PFE
PFE AS700 operating instructions

FoodSaver
FoodSaver V325 quick start