manuals.online logo
Brands
  1. Home
  2. •
  3. Brands
  4. •
  5. Grizzly
  6. •
  7. Food Saver
  8. •
  9. Grizzly T26691 User manual

Grizzly T26691 User manual

This manual suits for next models

1

Other Grizzly Food Saver manuals

Grizzly H6151 User manual

Grizzly

Grizzly H6151 User manual

Grizzly H6154 Quick start guide

Grizzly

Grizzly H6154 Quick start guide

Grizzly H6151 Quick start guide

Grizzly

Grizzly H6151 Quick start guide

Grizzly H6161 User manual

Grizzly

Grizzly H6161 User manual

Grizzly H6152 Quick start guide

Grizzly

Grizzly H6152 Quick start guide

Grizzly H6153 Quick start guide

Grizzly

Grizzly H6153 Quick start guide

Popular Food Saver manuals by other brands

ABGENE ALPS 50V user manual

ABGENE

ABGENE ALPS 50V user manual

Teknika MUL-331 Operation manual

Teknika

Teknika MUL-331 Operation manual

MELAG MELAseal 200 operating manual

MELAG

MELAG MELAseal 200 operating manual

FoodSaver FS1000 Series owner's manual

FoodSaver

FoodSaver FS1000 Series owner's manual

Thermopatch NL-30 user manual

Thermopatch

Thermopatch NL-30 user manual

Signode B-250 Operation, parts and safety manual

Signode

Signode B-250 Operation, parts and safety manual

AmeriVacS AVS-20 owner's manual

AmeriVacS

AmeriVacS AVS-20 owner's manual

FoodSaver V1085 quick start

FoodSaver

FoodSaver V1085 quick start

Deni Freshlock 1831 Use and care guide

Deni

Deni Freshlock 1831 Use and care guide

CASO DESIGN VC150 Original operating manual

CASO DESIGN

CASO DESIGN VC150 Original operating manual

Atmovac Santa Ana user manual

Atmovac

Atmovac Santa Ana user manual

WAAGE SV-FOOD Instruction handbook

WAAGE

WAAGE SV-FOOD Instruction handbook

VacuWare Fresh Instruction handbook

VacuWare

VacuWare Fresh Instruction handbook

Melissa 16310179 manual

Melissa

Melissa 16310179 manual

Heinner HAV-130WH manual

Heinner

Heinner HAV-130WH manual

NUTRICHEF PKVS50STS user manual

NUTRICHEF

NUTRICHEF PKVS50STS user manual

U-Line H-57 Operation

U-Line

U-Line H-57 Operation

Klarstein 10029742 manual

Klarstein

Klarstein 10029742 manual

manuals.online logo
manuals.online logoBrands
  • About & Mission
  • Contact us
  • Privacy Policy
  • Terms and Conditions

Copyright 2025 Manuals.Online. All Rights Reserved.

COPYRIGHT © FEBRUARY 2015 BY GRIZZLY INDUSTRIAL, INC.
WARNING: NO PORTION OF THIS MANUAL MAY BE REPRODUCED IN ANY SHAPE
OR FORM WITHOUT THE WRITTEN APPROVAL OF GRIZZLY INDUSTRIAL, INC.
#MN17204 PRINTED IN CHINA
Inventory (Figure 1) Qty
A. Heat Sealing Machine ............................... 1
B. Teflon Fabric Strips .................................... 2
C. Heating Elements ....................................... 2
Model T26691 T26692
Power 400W 1000W
Seal Length 300mm 400mm
Seal Width 3mm 3mm
Seal Thickness 0.4mm 0.4mm
Heating Time 0.2-1.5 (sec) 0.2-2.0 (sec)
Dimensions 3
3⁄4 x 17
3⁄4 x
7
1⁄16 in.
3
5⁄8 x 22
1⁄16 x
7
1⁄16 in.
Weight 10 lbs. 12 lbs.
Operation
1. Remove shipping brace, place sealer on level
surface, and plug into power supply.
2. Adjust dial (see Figure 2) according to thick-
ness and type of plastic bag.
For questions or help with this product contact Tech Support at (570) 546-9663 or techsupport@grizzly.com
MODEL T26691-92
HEAT SEALING MACHINES
INSTRUCTIONS
Introduction
The Model T26691-92 provides a strong, air-tight,
water-tight seal using polyethylene or polypropyl-
ene plastic bags.
Specifications
AB C
Figure 1. Model T26691-92 inventory.
Indicator
Level Polyethylene Polypropylene
1Under 0.06mm
2Under 0.1mm
3Under 0.14mm
4Under 0.2mm Under 0.03mm
5Under 0.044mm
6Under 0.044mm
7Under 0.08mm
Figure 3. Material heating levels.
Note: Use a higher indicator setting for thick
material and a lower setting for thin material (see
Figure 3).
Figure 2. Model T26691-92 component
identification.
Dial
Indicator
Light
Arm
Teflon
Strip
-2- T26691-92 (Mfd. 10/14)
Cleaning/Maintenance
1. DISCONNECT MACHINE FROM POWER!
2. Use eraser, dry cloth, or finger to remove
residue from Teflon strip and rubber strip on
arm. Do not use solvents.
3. Install new Teflon strips and heating element.
Place element between strips, then reinstall
metal plates.
Troubleshooting
• If sealer creates a partial seal, select a higher
dial setting to increase heating time.
• If sealer melts through bag, or if bag sticks to
Teflon strip, select a lower dial setting.
• If bag sticks to rubber strip on arm, hold arm
down longer after red light switches off to
increase cooling time.
If you need help with your new heat sealer, call
our Tech Support at: (570) 546-9663.
3. Open arm, place shortest width of bag across
Teflon strip, and press arm down. Red indica-
tor light will illuminate.
Note: Sealer will not turn ON until you press
arm down.
4. After red light turns off, wait for seal to cool,
then raise arm, and remove bag.
5. Check seal.
— If sealer leaves a 2-3mm wide band across
bag, dial setting is correct.
—If sealer does not leave an evenly melted
band across bag, see Troubleshooting.
Electrical Schematic
FIgure 5. Model T26691-92 electrical schematic.
2. Remove front cover and push forward on ter-
minal assembly to release heating element
(see Figure 4).
Service
If the Teflon strips become torn, replace them and
the heating element.
To replace Teflon strips and heating element:
1. DISCONNECT MACHINE FROM POWER!
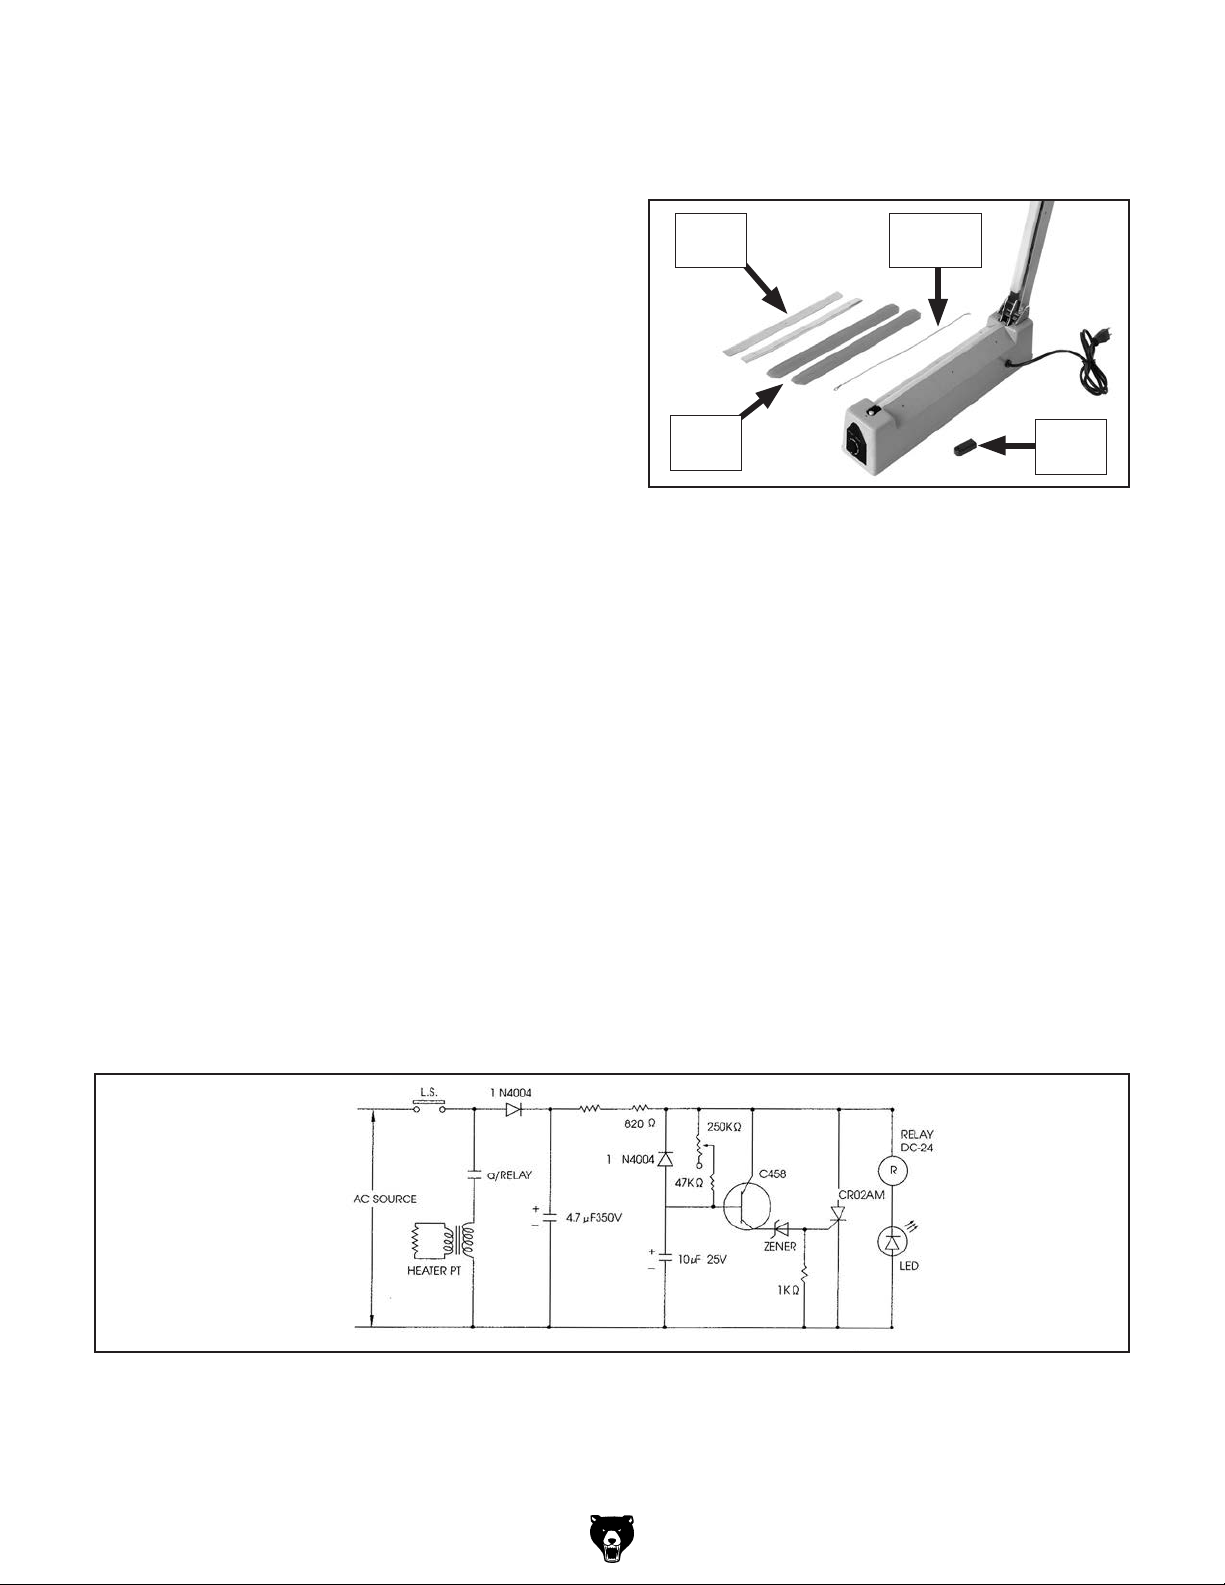
Figure 4. Components that must be removed
when replacing Teflon strips or heating element.
Teflon
Strips
Metal
Plates
Heating
Element
Front
Cover