manuals.online logo
Brands
  1. Home
  2. •
  3. Brands
  4. •
  5. Traxxas
  6. •
  7. Motorized Toy Car
  8. •
  9. Traxxas T-Maxx 3.3 User manual

Traxxas T-Maxx 3.3 User manual

This manual suits for next models

1

Other Traxxas Motorized Toy Car manuals

Traxxas X-MAXX 77086-4 User manual

Traxxas

Traxxas X-MAXX 77086-4 User manual

Traxxas Summit 5607 User manual

Traxxas

Traxxas Summit 5607 User manual

Traxxas 7185A User manual

Traxxas

Traxxas 7185A User manual

Traxxas RUSTLER 4x4 ULTIMATE User manual

Traxxas

Traxxas RUSTLER 4x4 ULTIMATE User manual

Traxxas T-Maxx 3.3 4907 User manual

Traxxas

Traxxas T-Maxx 3.3 4907 User manual

Traxxas Nitro Slash 44054 User manual

Traxxas

Traxxas Nitro Slash 44054 User manual

Traxxas Revo 5304 Platinum Edition 2008 User manual

Traxxas

Traxxas Revo 5304 Platinum Edition 2008 User manual

Traxxas S-Maxx 5109 User manual

Traxxas

Traxxas S-Maxx 5109 User manual

Traxxas Slash 5802 User manual

Traxxas

Traxxas Slash 5802 User manual

Traxxas SLASH 4x4 68086-3 User manual

Traxxas

Traxxas SLASH 4x4 68086-3 User manual

Traxxas HUSTLER 4x4 67064-1 User manual

Traxxas

Traxxas HUSTLER 4x4 67064-1 User manual

Traxxas 58034-1 User manual

Traxxas

Traxxas 58034-1 User manual

Traxxas 4TEC 3.0 93064-4 User manual

Traxxas

Traxxas 4TEC 3.0 93064-4 User manual

Traxxas E-Maxx 3908L User manual

Traxxas

Traxxas E-Maxx 3908L User manual

Traxxas E-Maxx 3906 User manual

Traxxas

Traxxas E-Maxx 3906 User manual

Traxxas 88086-4 User manual

Traxxas

Traxxas 88086-4 User manual

Traxxas 1/16 E REVO 71054 User manual

Traxxas

Traxxas 1/16 E REVO 71054 User manual

Traxxas 58064-1 User manual

Traxxas

Traxxas 58064-1 User manual

Traxxas Revo 3.3 5309 User manual

Traxxas

Traxxas Revo 3.3 5309 User manual

Traxxas 97064-1 User manual

Traxxas

Traxxas 97064-1 User manual

Traxxas Stampede 4x4 67054 User manual

Traxxas

Traxxas Stampede 4x4 67054 User manual

Traxxas MAXX 89086-4 User manual

Traxxas

Traxxas MAXX 89086-4 User manual

Traxxas XRT 78086-4 User manual

Traxxas

Traxxas XRT 78086-4 User manual

Traxxas Velineon RUSTLER VXL BRUSHLESS User manual

Traxxas

Traxxas Velineon RUSTLER VXL BRUSHLESS User manual

Popular Motorized Toy Car manuals by other brands

Reely Dune Fighter 3S operating instructions

Reely

Reely Dune Fighter 3S operating instructions

REVELL 1970 Chevelle SS 454 manual

REVELL

REVELL 1970 Chevelle SS 454 manual

Team Losi Micro Rally Car Operation guide

Team Losi

Team Losi Micro Rally Car Operation guide

Jamara Mercedes-AMG GLE 63 Instruction

Jamara

Jamara Mercedes-AMG GLE 63 Instruction

Eduard Humber Scout Car Mk.I exterior quick start guide

Eduard

Eduard Humber Scout Car Mk.I exterior quick start guide

Jamara VW T1 Bus Instruction

Jamara

Jamara VW T1 Bus Instruction

REVELL 68 CHEVY CHEVELLE SS 396 manual

REVELL

REVELL 68 CHEVY CHEVELLE SS 396 manual

Schumacher Pro Cat instruction manual

Schumacher

Schumacher Pro Cat instruction manual

Tamiya TT-01 TYPE E instruction manual

Tamiya

Tamiya TT-01 TYPE E instruction manual

Eduard Krupp Protze 6x4 1/48 quick start guide

Eduard

Eduard Krupp Protze 6x4 1/48 quick start guide

New Bright 61072UEP quick start guide

New Bright

New Bright 61072UEP quick start guide

Team Durango DEX410v5 manual

Team Durango

Team Durango DEX410v5 manual

Jamara Mercedes Actros Muldenkipper 2,4 GHz Instruction

Jamara

Jamara Mercedes Actros Muldenkipper 2,4 GHz Instruction

PLAYMOBIL 9536 manual

PLAYMOBIL

PLAYMOBIL 9536 manual

Atomic BZ3 instruction manual

Atomic

Atomic BZ3 instruction manual

Jamara McLaren Senna 2,4GHz instructions

Jamara

Jamara McLaren Senna 2,4GHz instructions

Aiyaplay 370-290V00 user manual

Aiyaplay

Aiyaplay 370-290V00 user manual

ZEROTRIBE Zetricks ZT1144 instruction manual

ZEROTRIBE

ZEROTRIBE Zetricks ZT1144 instruction manual

manuals.online logo
manuals.online logoBrands
  • About & Mission
  • Contact us
  • Privacy Policy
  • Terms and Conditions

Copyright 2025 Manuals.Online. All Rights Reserved.

Form 5195INST Rev 060503
Covers Part #5195
Remove the transmission
1. Loosen the 3x3mm grub screw on
top of the brake cam to remove the
brake rod from the brake cam. (A)
2. Position the throttle and the shift
servo horns perpendicular to the
servo (see image B), and then
remove the 3x8mm button head
machine screws that secure them.
3. Gently lift the throttle servo horn off
of the throttle servo, and then
disconnect the return spring from the
transmission case. Note: Be careful
not to move the position of the servo
output shaft. This must
remain in the same position
for re-installation of the servo
horn later. (C & D)
4. Next, lift the shift servo horn
from the shift servo, and
then disconnect the shift
linkage wire from the shift fork. (E)
5. Open the receiver box to access the
OptiDrive™control unit, and then
unplug the sensor wire (blue plug). (F)
6. Now, turn the truck upside down to
access the rear driveshaft, and then
remove the 4x15mm screw pin from
the rear output yoke on the
transmission. Pull the output yoke
from the shaft, and then push it to
the rear to clear the shaft during
removal. (G)
7. While holding the transmission with
one hand, remove the seven
3x12mm cap head machine screws
located in the chassis braces that
secure the transmission to the
chassis. The transmission should then
drop from the chassis. (H & I)
Replace the forward/reverse gears with
the forward-only components:
1. Remove the seven 3x12mm
countersunk machine
screws from the
transmission case, and
carefully separate the two
gearbox halves. (J & K)
2. Remove the OptiDrive sensor from the
gearbox half and replace the sensor
with the cover (included). Use the same
two 2.5x6mm cap head machine
screws. (L)
3. Slide the shift fork with the drive dog
carrier out of the gearbox half, and
plug the shift fork hole with the blue
plug (included - see image). Note: The
black shift shaft seal is glued to the
gearbox half from the factory. The blue
plug can be inserted into gearbox with
or without the grommet installed.
Remove the reverse idler gear along
with the forward and reverse output
gears, output shaft and drive dog
carrier. (M)
4. Remove the forward primary gear
(#5396X) from the two-speed shaft, and
then replace it with the
forward-only primary
gear. Use a small flat-
tip screwdriver to aid in
removing the C-ring
that retains the primary
gear pin. (N & O)
5. Secure the forward-only primary
gear to the two-speed shaft using
the included 2.0mm screw pin. (P)
6. Install the forward-only shaft with
output gear into the rear gearbox
half, and carefully join
the two gearbox
halves together (see
photo for orientation).
Fasten the halves
together with seven
3x12mm counter-
sunk machine screws. (Q & R)
Remove the unused electronics from the chassis
OptiDrive control box
1. Unplug the throttle servo from the
OptiDrive module. Unplug the
OptiDrive module from channels 2 and
3on the receiver (gray and green). Plug
the throttle servo into the CH2 port on
the receiver. (S)
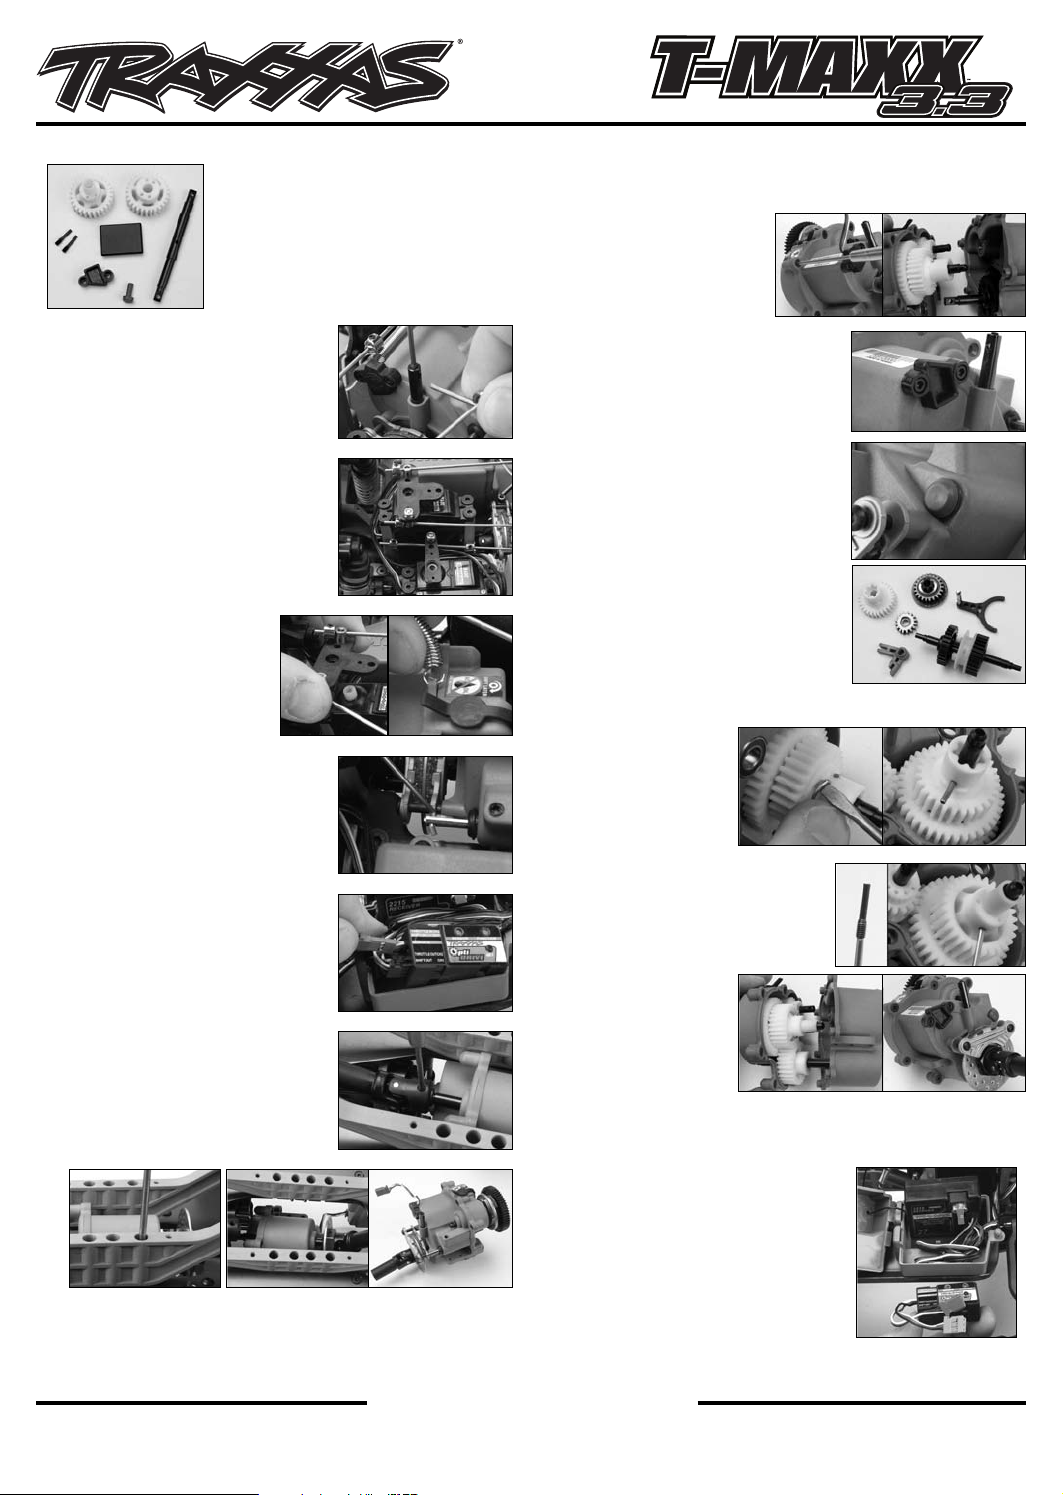
Forward-Only Kit Installation
A
B
www.TRAXXAS.com
Traxxas, 1100 Klein Road, Plano, TX 75074,
Phone: 972-265-8000, Fax: 972-265-8011, e-mail: [email protected]
E
CD
F
G
H I
J K
L
M
NO
P
QR
Components removed
from the transmission
Tools Needed
1.5mm hex wrench
2.0mm hex wrench
2.5mm hex wrench
Needle nose pliers
Small flat-tip screwdriver
Side-cutters (wire cutter)
S
2. Reinstall the cover onto the receiver
box and snap the small plastic cover
(included) into the hole where the
OptiDrive module was located. (T)
Shift servo
1. Separate the shift servo lead from the other wires by cutting the
tie-wraps with side cutters. Be careful not to damage the wires.
2. Remove the four 3x6 flathead cap
screws that secure the shift servo to
the servo mount. Lift the servo from
the mount. (U)
3. To remove the shift servo lead from
the servo mount, loosen the two
steering servo screws shown in the
photo, and then remove the 3x10
button head machine screw from the
servo mount. (V)
4. Lift the mount off the chassis enough
so the servo lead can exit between
the mount and the chassis. Remove the servo lead from the
mount and set the servo aside. Re-secure the two servo screws
and 3x10 button head machine screw into the steering servo
mount. (See image series below)
Install the transmission back into the chassis
(use steps 1-7 as a guide)
Note: Reconnect the throttle servo horn perpendicular to the
servo (as it was before), and then secure it with the 3x8 button
head machine screw. The truck should be ready for operation. If the
throttle linkage seems incorrect, refer to your Owners Manual for
servo linkage set-up.
U
T
If you have questions or need technical assistance, call Traxxas at
1-888-TRAXXAS
(1-888-872-9927) (U.S. residents only)
V
12 3
Lift the servo mount. Pull the servo lead under
the mount.
The lead is free. Reattach
the mount.