Tricity Bendix TDF10 User manual

Instruction Manual
TDF10
Deep Fryer

Please follow all the precautions listed below
for safety and to reduce the risk of re, injury or
electrical shock.
Read all the instructions and retain them. If you pass the
fryer on to a third party, include these instructions
During and after use parts of the appliance are HOT. Do not
touch areas such as the metal surface of the frying well until
they are cool.
Unplug the fryer from the mains after use and allow it to cool
before handling or cleaning any parts.
The oil or fat in the deep fryer will stay hot for some time
after use. Do not move the fryer until it is completely cool.To
lift the appliance, use the handle grips at the sides.
Do not touch hot surfaces, use oven gloves.
Do not pour oil out of the deep fryer when the oil and the ap-
pliance are hot. Allow them to cool rst.This can take at least
3 hours depending on ambient and oil temperatures.
Never connect the deep fryer to the electricity supply with-
out placing the oil in the tank.
Never operate the fryer when the oil in the tank is above
the maximum or below the minimum mark. The minimum
amount of oil is 3 litres.The maximum is 4 litres.
Do not fully immerse the element of the deep fryer in
water or liquids. Follow the cleaning instructions fully!
Do not place the deep fryer on or near a hot gas or electric
burner or near a heated oven or allow it to touch curtains,
wall coverings, clothing, dishtowels or other ammable ma-
terials during use.
Ensure there is ample clearance around and above the appli-
ance so you can work safely.
Use the deep fryer on stable heat-resistant surfaces.
Do not exposed the fryer to direct sunlight.
Operate the fryer with the controls facing you. Do not reach
across the appliance while it is operating or when it is hot.
Never leave the deep fryer unattended when it is connected
to the electricity supply.
Make sure that the power cable does not touch any hot sur-
face or overhang a table edge.
Do not use the deep fryer outdoors.
Do not place the fryer under any overhead cupboards when
in use.
Do not use attachments or accessories not recommended by
the manufacturer.
Do not use the deep fryer with a damaged cord or plug or
after the appliance, or frying basket has malfunctioned or is
damaged. Seek expert advice.
Do not use extension leads with kitchen equipment - they
increase the risk of accidents.
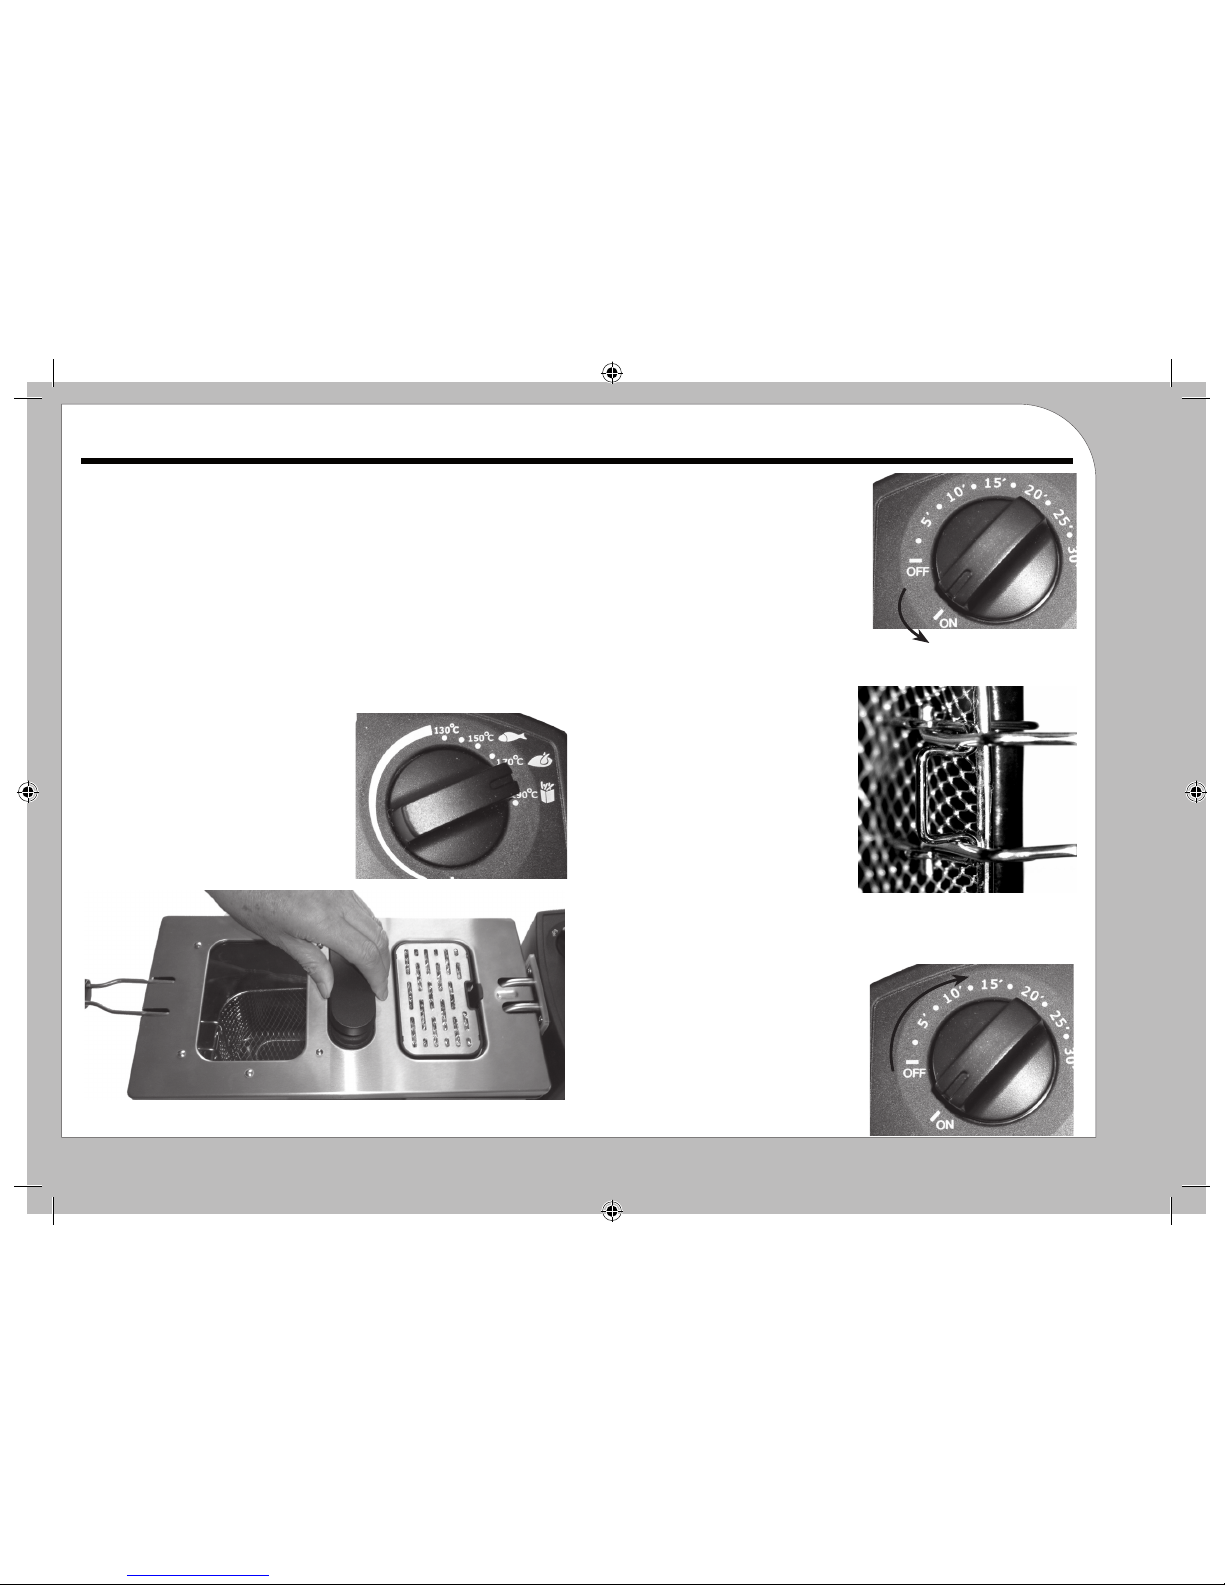
If you are using solid fat, melt this gently in a separate pan
and pour it into the oil tank before switching on. Do not melt
solid fat in the fryer by placing it in the basket or you may
damage the appliance.
Renew cooking oil regularly. Used oil may contain contami-
nants, these may lower smoking temperatures and cause
excess foaming and spattering.
Always dry food before frying as moist foods cause excess
foaming and spattering. Even small amounts of water may
cause the oil to spatter.
Never overload the frying basket. If too much food is fried
at the same time, the food will not get crisp and may cause
excess foaming and spattering.
After completion of frying permit the food to drain before
removing the basket.
This appliance is for household use. Do not use it for any pur-
pose not expressly specied in this manual.
There are no user serviceable parts in your deep fryer. Un-
authorised dismantling or servicing will void the product
warranty.
This appliance is not intended for use by persons (including
children) with reduced physical, sensory or mental capabili-
ties, or lack of experience and knowledge, unless they have
been given supervision or instruction concerning use of this
appliance by a person responsible for their safety.
Parents must warn children not to touch hot appliance parts.
Close supervision is necessary when an appliance is used
near children.
Children should not operate or be encouraged to play with
this appliance.
ELECTRICAL INFORMATION
Before using this appliance ensure that the voltage of your
electricity supply is the same as that indicated on the
apppliance.
The means of disconnecting this appliance from the mains
supply is the mains plug.This should be unobstructed and
readily operable at all times
This appliance must be earthed.
Important Safety Instructions

The Control Panel
The On/O Switch and Timer has three positions:
ON: This switches the Fryer on. Use this position for heating oil to the frying temperature
and for frying batches of food.
OFF: This position switches the Fryer OFF. Always set the switch to OFF before you plug the
fryer into the mains and immediately after you stop using the fryer.
TIMER: Use the timer in conjunction with your recipe to cook food for the appropriate time.
Set the timer after the oil has heated to the correct temperature and just before you lower
the food into the oil.When the set time has expired the timer will return to the OFF position
and a bell will ring.
The Temperature Control is callbrated in Degrees Celsius (Centigrade). Use it in conjunc-
tion with your recipe to set the oil temperature.
The Power Light comes on when the fryer is switched on and goes out when it is
switched o.
The Ready Light comes on when the oil has reached the correct temperature. During use
the light will go on and o as the oil heats and cools.This is a normal part of of its operation.
Know Your Deep Fryer
Features and controls
KEY
Fryer Base1.
Lifting Handle2.
Removeable OilTank3.
Fryer Lid Handle8.
Viewing Window9.
Basket Handle10.
Fryer Basket11.
Control Panel4.
Heater Element5.
Fryer Lid6.
3-Piece Filter & Cover7.
1
3
4
67
8
9
11
10
5
2

Preliminaries
Before You Start
Unpacking
In the box you should nd: The deep fryer ; Frying basket; Fryer element; Removable oil
tank; Detachable lid with three lters.
If any items are missing or damaged, contact your nearestTesco store for assistance.
Retain the packaging. If you dispose of it do so in accordance with any recycling regulations
in your area.
Positioning the Deep Fryer
Site your Deep Fryer on a rm, at, heat-resistant work surface. Steam given o by the
cooking process may mark or damage anything above or around the fryer; keep these areas
clear. In order to avoid any re hazards keep areas above and around the fryer clear. Leave a
clear space all round the fryer, and keep it away from the front edge of the work surface .
Unwrap the power cord. Place the fryer near a wall socket. Do not put the fryer or the power
cord close to any cooking or heating appliance.
Preparation: Before using your fryer for the rst time:
1: Carefully wash the appliance.
The body of the appliance should be wiped with a wet
cloth and then carefully dried.
The oil tank, the frying basket and the appliance lid
should be well washed in warm soapy water, rinsed
thoroughly and then carefully dried.
Remove all lters before washing the lid. Lift up the
lter cover as shown. Remove the lters.Wash the
appliance lid and lter cover and then dry fully.
Replace the lters and the lter cover only when the
lid is dry.
Removing the element:
Lift the control unit carefully o the fryer.
To replace the element:
Align the element with the guides in the fryer
and slide the element into place.There is a safety
switch which prevents the fryer from operating if
the control unit is not properly inserted.
Cleaning the element:
Remove the control unit. Dip the element in
warm soapy water, Lightly brush the surface with
a soft cleaning brush. Repeat using clean water
and then dry with a towel or kitchen paper.
NEVER allow water to contact the control unit
or power cord.
If you need to clean the control unit, wipe it with
a barely damp cloth and then dry fully before op-
erating the fryer.
After cleaning, replace the the element.
Attach the Basket Handle

Fill the Oil Tank
Pos• ition the control unit on the fryer. Place the oil tank in the fryer.
Pour clean oil into the tank. On the inside of the oil tank at one side, there are two•
marks MIN and MAX. Pour in sucient oil to reach the MAX mark. Do not overll.
The capacity of the tank is 4 litres. 3 litres isneeded to reach the MIN mark. There should
always be sucient oil in the tank to cover the MIN mark.
Corn oil, sunower oil, ground nut oil and vegetable oil are all suitable.You may use solid
vegetable fat but this is much more dicult to handle. Solid fat should be melted in a
separate pan before transferring it to the tank.
Do not use margarine, butter or olive oil. NEVER mix dierent oils and fats.
Set the Frying Temperature
Rotate the temperature dial on the control panel to
set the temperature according to your recipe.
Preheat the oil
Place the basket in the fryer and place the lid rmly on the fryer.•
Plug the fryer into the mains point•
Switch on the power.•
Set the Timer to ON•
The RED power light will come on showing the
fryer is operational. After about 10 minutes, the oil
has reached the correct temperature and the GREEN
“ready”light will come on .
Filling the Frying Basket
Remove the lid using the handle•
and place it on a heatproof surface.
Hook the basket over the front of the oil•
tank to lift the basket clear of the oil.
This is the raised position and is used
to ll and remove food from the basket
and to drain excess oil from the food
after frying.
Place the food to be cooked (which•
should be as dry as possible) in the
basket.
Do not overll the basket.•
ALWAYS HOLD THE LID BYTHE HANDLE
Set the frying time
Setting the timer is optional but we recommend
you use it especially with foods that require
relatively short frying times.
Getting Started
Preparing and Using the Fryer

Lower the lled basket carefully into the oil.
During cooking you can raise and lower the basket to inspect the food through the window.
Always fry food with the lid in position.The lid is designed to prevent steam from escaping
and the lters will absorb oil and food vapours and help neutralise frying smells.
Cook the food for the required time
If you are using the timer: When the set time has expired the timer will return to the OFF
position and a bell will ring.
If you are not using the timer: Switch the fryer o unless you are frying a second batch.
During cooking, the“Ready”light may go on and o - this is normal.•
After the food has cooked
Lift the basket, Place it in the raised position and wait a few seconds to let the oil drain•
o and the steam to subside.
Carefully remove the lid using the handle and set it down on a heatproof surface.•
Shake the basket SLIGHTLY to remove excess oil.•
If the food is not fully cooked:• Lower the basket into the oil, reoplace the lid and
continue cooking.
When the food is fully cooked:
Transfer the food to a heatproof utensil. Return the basket to the fryer. Replace the lid.•
Switch o the mains socket and unplug the fryer.•
Leave the appliance to cool fully before cleaning.•
Note:• If you are using solid fat, remove the basket from the fryer before the fat in the
tank solidies. Leave the basket on a heatproof surface to cool after removing it from
the fryer and before washing it as described elsewhere in the manual.
Helpful Hints
Use a recommended oil - do not mix oils or fats.•
Always lter used oil before re-use. Never leave frying residues in the oil.•
Replace oil frequently.• Discoloured oil, rancid oil, oil that emits an unpleasant
odour or oil that foams excessively when heated should not be used.
Take into account the type of food when you set the frying temperature. Generally,•
precooked foods need a higher cooking temperature than raw foods.
If you need to add oil, do so between batches. Allow the oil to heat up to the right•
temperature before continuing - (“Ready”light on).
Follow your recipe to help you set the correct time so the food cooks properly.•
Ensure that the food is completely immersed in the oil.•
Cook food thoroughly.• Food may turn golden brown before it has cooked through.
Do not lean over the fryer when placing, cooking or removing food.•
Check the progress of the food during cooking.•
Do NOT touch the metal surfaces of the fryer during cooking.•
Always hold the basket by the handle during cooking.•
Never shake the basket vigorously - hot oil causes severe burns!!•
WARNING: it is dangerous to operate the fryer with low or no oil in the tank.• Al-
ways ensure the oil in the tank exceeds the minimum mark before you start cooking.
The fryer element thermal reset
I• f you operate the fryer no oil or insucient oil
the element will rapidly overheat, switch o
and disconnect power to the fryer.
To reset the fryer:• Unplug the fryer from the
mains supply, and let it fully cool down. Now
remove the fryer element and depress the Re-
set Button with the tip of a ball point pen or
similar. The fryer will now operate normally.
WARNING: Prolonged misuse may cause•
the element to fail totally.
Operation
Frying the Food

Cleaning Your Deep Fryer
Cleaning should be carried out when the fryer is unplugged from the mains.•
The fryer and the oil should be completely cool.•
Use a non-metallic cloth or pad and a soft detergent to clean the appliance. Avoid the•
use of abrasive cleaning materials as these may damage the appliance surfaces.
Remove the lid and the basket from the fryer.•
Cleaning the basket:• The basket and handle should be washed in warm soppy water,
rinsed and dried.
Cleaning the lid:• Remove the lters from the lid. The appliance lid should now be
washed in warm soppy water, rinsed and dried. After drying, replace the lters.
Cleaning the Fryer Element.• Remove the element from the Fryer. Follow the instruc-
tions on Page 4 to clean the element.
Cleaning the Body:• Wipe the body of the fryer with a damp cloth and dry well.
Cleaning the Oil Tank:• Carefully lift the oil tank out of the fryer and pour the oil o
into a suitable receptacle. Pour warm soapy water into the tank and wash it well. Rinse
in fresh water and allow to fully dry. When washing the oil tank ensure you do not
damage the interior surface.
The Lid, basket and oil tank are dishwasher safe. If you are washing the basket in the dish-
washer we suggest you remove the handle and wash it separately.
To remove the handle:
Cleaning the Filters
The lters should be cleaned at regular intervals.
Remove the lters, separate them and soak them
in warm soapy water. Carefully brush them clean
with a soft brush. Now rinse them, and allow
them to dry before replacing them in the lter
compartment. Always operate the fryer with all
three lters in place.
Storage
Storing the oil
You may store ltered, cooled oil in the fryer.•
Remove the oil tank and carefully pour the cooled oil into a large container .•
Wipe out the oil tank; wash it with mild detergent and warm water. Rinse well; towel•
dry and replace the tank in the fryer.
Place a paper lter in the Basket. Place the Basket in the raised position•
Slowly pour the cool, used oil through the lter into the fryer. Discard the lter.•
Remove the basket, wash and store separately..•
Replace the Lid and store the fryer in a cool location. Store the basket separately.•
If you fry infrequently, store the used oil in a covered container in a cool dark place.•
Solid fat must not be stored in the fryer!•
Storing the Fryer
Re-assemble the fryer after cleaning.•
If you store the oil separately: Remove the handle.• Place the handle in the basket
Place the basket in the fryer. Now replace the lid.
If you store the fryer with oil in the tank:• Store it with the basket removed and the
lid on. Ensure the fryer is securely stored in a cupboard or other covered storage area
where the oil is unlikely to spill or get contaminated.
Care, Cleaning and Storage
After Use

UK: Waste electrical products should not be disposed of with household
waste. Separate disposal facilities exist, for your nearest facilities. See
www.recycle-more.co.uk or in-store for details.
ROI: Produced after 13th August 2005.Waste electrical products should not
be disposed of with household waste. Please recycle where facilities exist.
Check with your Local Authority or retailer for recycling advice.
Te sco Stores Ltd, Delamare Road,
Cheshunt, Herts, EN8 9SL
Warranty and Specifications
Frying Guide
Times are approximate. Adjust to suit quantities, portion sizes and individual taste.
In general, use lower settings for delicate foods (vegetables, sh) and higher settings
for frozen foods, French Fries and chicken.
Item Weight Temp. Frying Time
Fresh Chips 700g 190ºC 10-15 minutes
Frozen Chips 700g 190ºC 13-18 minutes
Fish 500g 150ºC 8-12 minutes
Whitebait ..........(just sucient to cover the basket area) 190ºC 2-3 minutes
Fresh cod or haddock in batter 500g 190ºC 10-15 minutes
Frozen cod or haddock in batter 500g 170ºC 12-18 minutes
Frozen plaice 600g 190ºC 12-18 minutes
Frozen Hamburgers 4(qty) 150ºC 8-10 minutes
Chicken portions in Crumbs 600g 170ºC 12-18 minutes
Fresh crumbed chicken drumsticks 600g 170ºC 12-15 minutes
Frozen veal escalopes 500g 170ºC 8-10 minutes
Warranty
Your Tricity appliance is covered by a warranty for 12 months from the date of purchase. If a
fault develops during this period, please return the unit to your nearestTesco store together
with the original receipt as proof of purchase.This warranty in no way aects your consumer
rights.
Specications
Voltage Rating: 220 -240V AC, 50Hz
Power Consumption: 1800W
NetWeight: 3.8kg
Warranty and Specifications
Table of contents
Other Tricity Bendix Fryer manuals