Trico 30035 Installation manual
1235 Hickory Street | Pewaukee, WI 53072
For Customer Support: 800-558-7008
61433
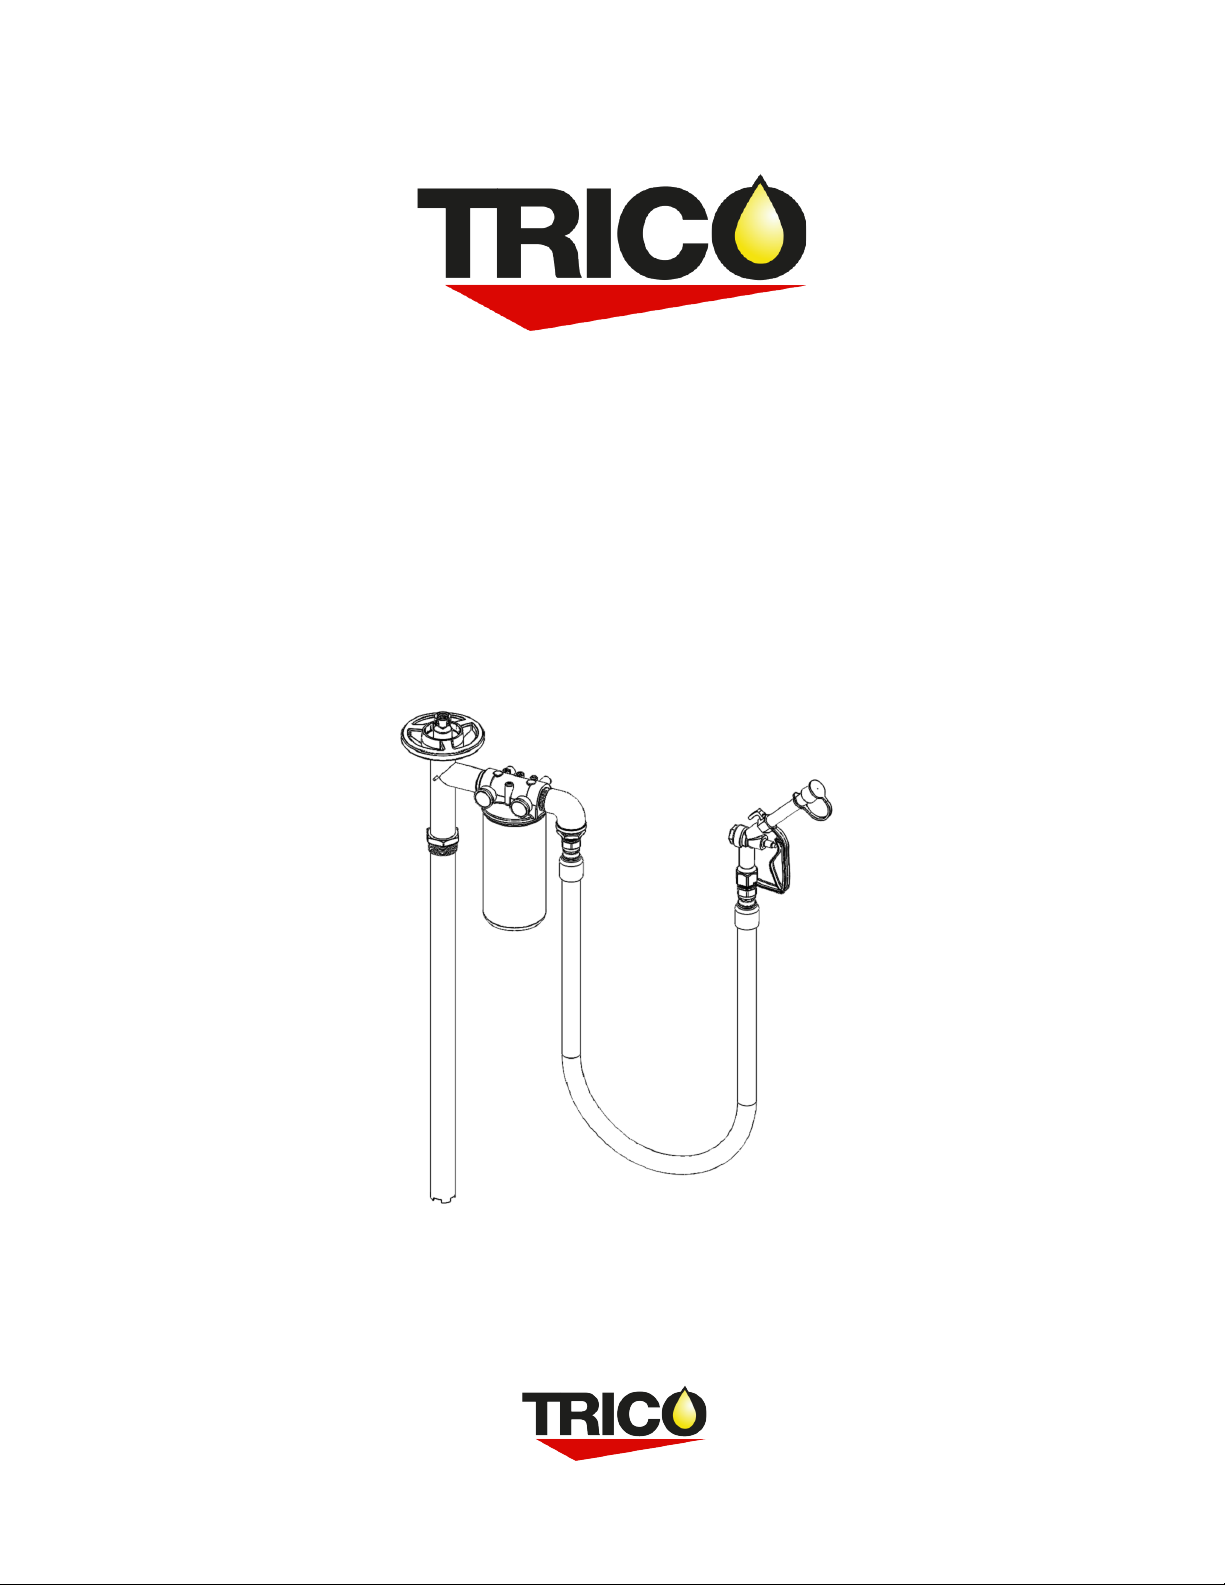
Drum Pump Filtration Unit
Part #30035
Patent Pending
Setup and Operating Instructions
Rev C, October 2020
1235 Hickory Street | Pewaukee, WI 53072
For Customer Support: 800-558-7008
INTRODUCTION
The Low Viscosity (LV) Drum Pump filtration system has been designed to handle lubricants that
have a viscosity of 1250 cSt (5500 SUS) and below, directly filtering and dispensing lubricant
from a standard 55-gallon drum. Exceeding the viscosity limits of this system can cause
damage to the motor. All parts are made from high quality stainless steel and aluminum.
Before purchasing this unit, the customer should be aware of any specific requirements and/or
hazards of their lubricant and ensure that the fluid being filtered and dispensed is compatible
with the filter media and hose material.
REQUIRED ITEMS
Drum Pump motor – A motor is required to drive the pump shaft which attaches to the drive
coupler. It is interchangeable with different Trico Drum Pump designs. Only one motor is
needed and can be interchanged with multiple drum pumps.
30018 – Drum Pump Electric Motor, 1.1Hp, 110-120V, 50/60 Hz
30021 – Drum Pump Electric Motor, 1.1Hp, 220-230V, 50/60 Hz
30019 – Drum Pump Pneumatic Motor, 3/4 HP
INCLUDED COMPONENTS
Remove the Drum Pump components from the shipping container and inspect components for
any signs of damage.
Included Components:
•(1) LV Drum pump assembly
•(1) Hose Assembly
•(1) Hand Wheel
•(1) 3” Retaining ring
•(1) Motor Drive Coupler
•(1) Filter w/ gasket
•(1) 2” MNPT Drum adapter
Tools required for assembly:
•Large flat headed screwdriver
•(2) x 2.5” adjustable wrenches
•Filter Wrench/ Strap Wrench
If items are damaged contact the shipper. Trico Corporation provides a manufacturing
warrantee against product defects and workmanship up to 1 year of purchase, proof of
purchase required. It does not cover damage due to mishandling by shipper or customer nor
damages caused by misuse.
INSTALLATION AND OPERATION VIDEO
Scan this QR Code to see a series of videos on installing and operating the Drum
Pump Filtration System.

1235 Hickory Street | Pewaukee, WI 53072
For Customer Support: 800-558-7008
WARNING
•The use of 30018 and/or 30021 Trico Drum Pump Electric Motor is prohibited with
flammable or combustible materials which could cause serious injury or death if used.
•When filtering higher viscosity oils, such as ISO 460 and ISO 680 gear oils, the use of a drum
heating blanket is required to reduce the viscosity to under 1250 cSt (5500 SUS).
•The minimum allowable micron level for higher viscosity oil is 10 microns. Hydraulic oils
may be filtered down to 3 microns at room temperature.
CAUTION
Bonding and ground safety procedures must be used when operating in hazardous duty
environments or when there is a danger of static discharge. See national Fire Protection Code
77 for proper grounding and bonding procedures. It is the responsibility of the operator to
properly inspect and ground equipment before use.
DRUM PUMP ASSEMBLY
1. Place LV drum pump assembly on a worktable long enough to support the entire unit.
2. Thread the Motor Drive Coupler onto the shaft and hand tighten.
3. Place 3” Retaining Clip over the top of the LV drum pump assembly and slide over the
pump head to the top of tube filter connection.
4. Place Hand Wheel on drum pump assembly with retaining ring groove facing down
toward pump foot.
5. While holding the Hand Wheel onto the pump head, slide one end of the retaining ring
into the groove on the Hand Wheel.
6. Use a flat headed screw driver to push the rest of the retaining ring into the groove.
7. Test the Hand Wheel operation by turning it in either direction making sure it moves
freely.
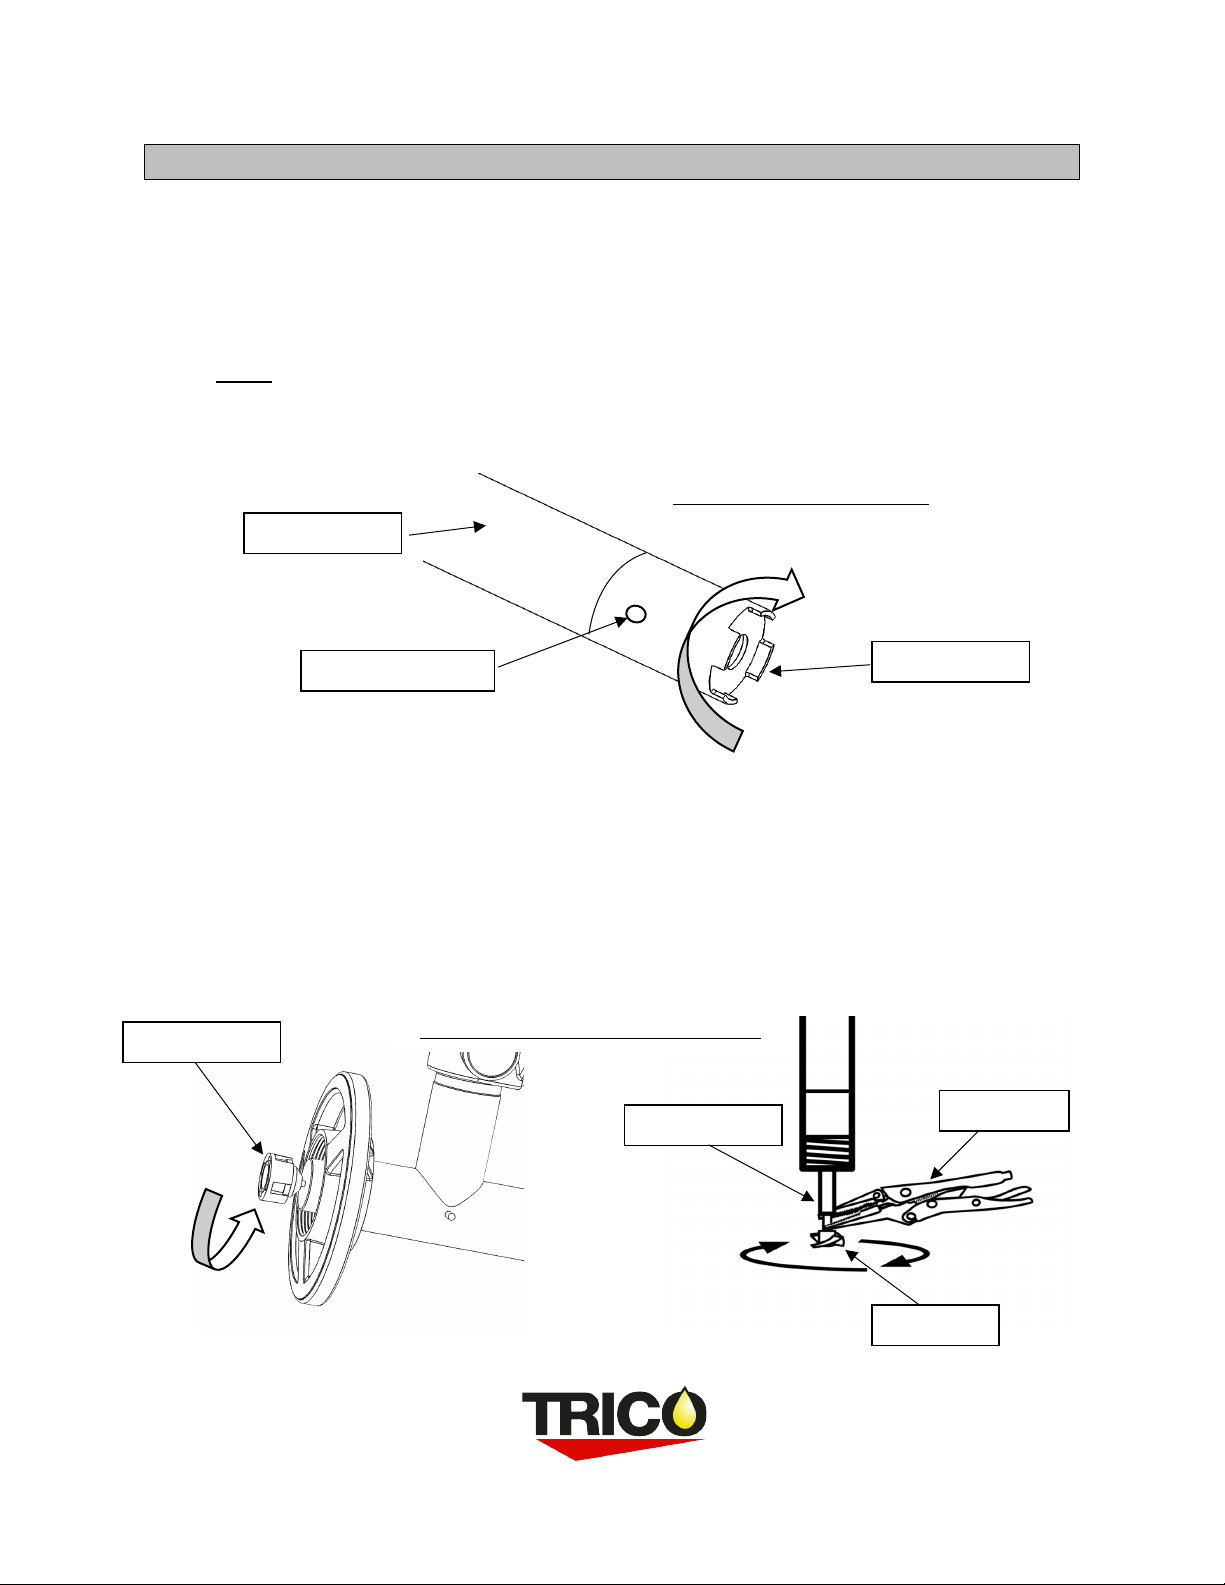
Hand Wheel
Retaining Clip
Drum Pump
Figure 1: Hand Wheel
Motor Drive Coupler

1235 Hickory Street | Pewaukee, WI 53072
For Customer Support: 800-558-7008
8. Attach the 2” MNPT Drum adapter onto the drum.
9. Place some lubricant on the foot of the Drum Pump to help slide it past the O-ring when
inserting into the Drum adapter on the drum.
10. Lift the unit and slide the pump foot into the drum adapter, guiding it until the foot
contacts the bottom of the drum.
11. Using thread sealant, thread the hose onto the elbow connector and tighten (Figure 2)
12. Place the filter gasket onto the groove on the filter head.
13. Thread the filter onto the head and hand tighten.
14. Use a strap wrench, place it at the top of the filter and tighten the filter ¼ turn to seat
the gasket
15. Assemble the short grounding lead with clamp to the Drum pump side ensuring the
fastener is securely tightened.
16. Use the additional supplied leads to bond the consecutive drums together; making sure
that one lead is connected to a grounded source. See NFPA 77.
Hose
Grounding Screw
Elbow Connector
Figure 2: Pump Assembly
Filter
Filter Head

1235 Hickory Street | Pewaukee, WI 53072
For Customer Support: 800-558-7008
OPERATION
1. Ensure the filter and all connections have been tightened before operation.
2. Place the motor onto the drive coupling on the top of the pump and secure it by
threading the handwheel onto the motor.
3. Ensure that the smaller drum plug has been removed or that the drum is fitted with a
breather to prevent the drum from collapsing during operation
4. Before connecting the pump motor to the power or air supply, be sure the switch is in
the off position “0” or that the regulated air supply is not above 100 psi.
5. Plug the motor into the correct power outlet as specified on the motor tag and or
connect an airline to the pneumatic motor.
6. Remove the dust cap from the end of the fill nozzle.
7. Turn the electrical switch to the on position indicated on the handle of the motor or
squeeze the trigger of the pneumatic motor to begin pumping.
8. Place the nozzle into the container or equipment in which you desire to fill.
9. Squeeze the hand trigger on the nozzle to allow lubricant to flow out of the tip.
10. While in operation, check around the filter gasket for leaks. If the filter is leaking stop
the unit and tighten an additional ¼ turn.
11. To stop the flow, release the nozzle hand trigger and then turn the motor off.
WHEN TO CHANGE THE FILTER AND PROCEDURE
The filter head is outfitted with two pressure gauges. The first gauge nearest to the pump
indicates the pressure being produced by the pump. The second gauge near the hose indicates
the pressure after the filter element. To determine when the filter element is at its maximum
holding capacity, calculate the differential pressure by subtracting the higher pressure from the
lower pressure to get the total differential pressure. Differential pressure is a more accurate
means of determining filter usage. The filter should be changed at 40 psi differential.
Example:
P1 (Pressure Produced by Pump)= 43 psi P2 (After Filter)= 35 psi
Differential Pressure= P1-P2 = 43psi -35psi = 8psi (filter still has remaining life)
To change the filter:
1. Remove motor from the top of the drum pump by unthreading the handwheel and
lifting the motor upwards off the coupler.
2. Place an oil catch pan beneath the filter to catch remaining oil in the filter and head that
will come out during the filter change.
3. Using a strap wrench at the top of the filter, turn the filter counter clockwise and
unthread the filter from the head.

1235 Hickory Street | Pewaukee, WI 53072
For Customer Support: 800-558-7008
4. Dispose of remaining oil in the filter and the used filter in accordance to local
environmental laws and practices.
5. Remove the old gasket from the filter head and wipe excess oil residue from the head.
6. Remove the new filter from its packaging and insert the new gasket provided with the
filer into the gasket groove of the head.
7. Thread the new filter onto the head turning it counterclockwise and hand tighten.
8. Using the strap wrench, place the strap near the top of the filter to prevent collapsing
and turn the filter ¼ turn to tighten.
9. Place the motor back on the pump and turn on.
10. Dispense fluid from the nozzle and observe the filter gasket checking for leaks.
11. If the leaking is noticed around the filer gasket, tighten the filter another ¼ turn with the
strap wrench and repeat the procedure.
Replacement Part
Part Number
Particulate Filter - 3 Micron Microglass Spin On Beta > 200 Absolute
36972
Particulate Filter - 10 Micron Microglass Spin On Beta > 200 Absolute
36973
Particulate Filter - 20 Micron Microglass Spin On Beta > 200 Absolute
36974
Water Filter - 10 Micron Nominal Spin On
36975
Water Filter - 25 Micron Microglass Spin On Beta > 200 Absolute
36995
1235 Hickory Street | Pewaukee, WI 53072
For Customer Support: 800-558-7008
REPLACING THE DRIVE COUPLER
The motor drive coupler is designed to break if foreign material is accidently ingested into the
drum pump foot, preventing damage to the impeller, shaft and motor. If the drive coupler
breaks, follow this procedure to remove and install a new motor drive coupler.
1. Remove the drum pump from the drum and place it onto a table large enough to
support the unit
Note: Handling the unit may be easier if the hose is removed at the elbow connection.
2. Remove the pump foot to expose the impeller and shaft by placing the shaft of a long
screwdriver between the tangs on the foot bottom and turning the foot clockwise to
remove it from the pump tube. (Note: Foot threads are left-handed threads)
3. Place vise grips on the drive shaft above the impeller to hold the shaft while removing
the motor drive coupler.
4. Use a plyers on the motor coupler and turn clockwise to remove from drive shaft.
5. Thread the new coupler (P/N 10412) onto the shaft and hand tighten.
6. Remove the vise grips and thread the foot back onto the pump tube turning
counterclockwise to tighten.
7. Place a screwdriver into the discharge hole on the side of the outer tube and tighten the
foot using the shaft of a long screwdriver placed between the tangs on the foot bottom.
Figure 3: Pump Foot Removal
Figure 4: Motor Drive Coupler Removal
Pump Foot
Discharge hole
Outer Tube
Drive Coupler
Drive Shaft
Vise Grips
Impeller

1235 Hickory Street | Pewaukee, WI 53072
For Customer Support: 800-558-7008
DRUM PUMP SPECIFICATIONS
When filtering higher viscosity oils that exceed 1250 cSt (5500 SUS),such as gear oils, the use of
a drum heating blanket is required to reduce the viscosity by heating the contents to 100°F
(40°C) or below 1250 cSt (5500 SUS). The minimum allowable micron level for higher viscosity
oil is 10 microns. Hydraulic oils may be filtered down to 3 microns at room temperature.
• Viscosity range = 0 – 1,250 cSt (0-5,500 SUS)
• Max Flow rate (181 cSt, ISO 68 @70F)= 7.25 GPM
• Max Viscosity = 1,250 cSt (5,500 SUS)
• Min Flow rate @ 1,250 cSt = 1.75 GPM
Average flow rates at room temp, 70°F (21.1°C), with 10 micron particle filter:
ISO 68 (188 cSt)
ISO 100 (302 cSt)
ISO 220 (797 cSt)
ISO 320 (1250 cSt)
Electric Pump #30018
7.25 GPM
5.75 GPM
2.25 GPM
1.75 GPM
Pneumatic Pump #30019
6.0 GPM
5.25 GPM
1.75 GPM
0.91 GPM
MOTORS:
PN
Voltage
Amps
Watts
HP
Phase
Hz
ENC
Haz. Duty
Wt. Lbs(Kg)
30018
110V
8.5
825
1
1
50-60
TEFC (IP54)
NO
12.7 (5.7)
30021
220V
5
825
1
1
50-60
TEFC (IP54)
NO
12.7 (5.7
PN
HP
Max Press.
Min Hose
Max dBA
Airline
Air Consumption
Wt. Lbs(Kg)
30019
3/4
100 psi
3/8”
87
¼ NPT
28 CFM
3.4 (1.5)
0
1
2
3
4
5
6
7
8
9
10
0 100 200 300 400 500 600 700 800 900 1000 1100 1200 1300
Flow Rate (GPM)
Viscosity (cSt)
Flow Rate Data with 10 Micron Filter and Electric Pump #30018

1235 Hickory Street | Pewaukee, WI 53072
For Customer Support: 800-558-7008
WARNING
The Electric Drum Pump motor 30018 and 30021 are totally enclosed fan cooled motors (TEFC)
with a thermal overload switch. Do not use these motors in conjunction with flammable
materials or in hazardous duty areas. Do not submerge motors or let motors contact liquids. If
motor stops running, turn the power switch to the off position “0” and allow at least 10
minutes for the motor to cool. Check the viscosity of lubricant being pumped to remain within
limitations and resume operations. Electric motors cannot be operated continuously and should
not be operated for more than 30 minutes without cooldown.
CAUTION
The Pneumatic Drum Pump motor 30019 has a recommended operating pressure of 90
psi @ 28 CFM. Do not exceed an inlet pressure of 100 psi. Always use a Filter Lubricator
Regulator (FLR) to remove water from the air supply and to lubricate the necessary
components, use SAE 10 weight oil.

1235 Hickory Street | Pewaukee, WI 53072
For Customer Support: 800-558-7008
ISO CLEANLINESS RATING
Lubricating oils stored in bulk containers may contain contaminates. Ordinarily it has been
thought lubricants stored in drums prior to use were contaminant-free; however, it is beneficial
to filter lubricants even prior to its use as the original container may impart impurities to the
lubricants prior to its first use. Most rotating equipment is manufactured to a class 2 or class 3
fit typical of most industrial operations. Hydraulic components and rotary screw compressors
tend to have tighter tolerances in the sliding and rotating elements. Clearances in components
are used to establish cleanliness requirements. The best source for cleanliness requirements is
from the equipment manufacturer. In general, as the viscosity of the oil increases the
cleanliness level decreases. Below is a general guideline for cleanliness levels.
ISO Oil Grade Classification
Cleanliness Code (R4/R6/R14)
32
16/14/11
46
16/14/11
68
17/14/12
100
18/15/13
150
18/15/13
220
19/16/14
320
19/16/14
460
19/16/14
680
20/18/14
Determining the ISO Cleanliness level of equipment requires analysis of the running lubricating
oil. Trico’s oil analysis laboratories can provide an accurate indication of the ISO Cleanliness
level of lubricating oil before and after filtration. Each number in the ISO code represents the
micron range of particulate in which the count lies within (R4microns/ R6microns/ R14 microns).
Example: 19/16/14, the 19 code shows that count of 4 micron particle lies between 5,000 and
2,500 per ml of fluid.
ISO Number
Particle Count per ml of fluid
25
160,000
to
320,000
24
80,000
to
160,000
23
40,000
to
80,000
22
20,000
to
40,000
21
10,000
to
20,000
20
5,000
to
10,000
19
2,500
to
5,000
18
1,300
to
2,500
17
640
to
1,300
16
320
to
640
15
160
to
320
14
80
to
160
13
40
to
80
12
20
to
40
11
10
to
20
10
5
to
10
9
2.5
to
5
8
1.3
to
2.5
ISO 320
19/16/14

1235 Hickory Street | Pewaukee, WI 53072
For Customer Support: 800-558-7008
GROUNDING AND BINDING
The Drum Pump Filtration System is not rated for a hazardous duty environment due to
possible static discharge, use proper bonding and grounding per NFPA 77. A Bonding system
connects various pieces of conductive equipment together to keep them at the same potential.
Static sparking cannot take place between objects that are the same potential. Grounding is a
special form of bonding in which conductive equipment is connected to an earthing electrode,
or to the building grounding system, to prevent sparking between conductive equipment and
grounded structures.
Grounding is an electrical connection between a metal vessel, pump, motor and a constant
ground; i.e. a metal rod driven into the earth. Failure to bond and ground properly can cause a
discharge of static electricity resulting in fire, injury or death. If in doubt, do not start the pump!
Be sure bonding and grounding wires are secure before starting operation. (Ground and bond
wires must have less than one-ohm resistance for safe usage. Check continuity before starting.)
Always check with a safety engineer when any question arises and periodically check safety
procedures with a safety engineer.
.
1235 Hickory Street | Pewaukee, WI 53072
For Customer Support: 800-558-7008
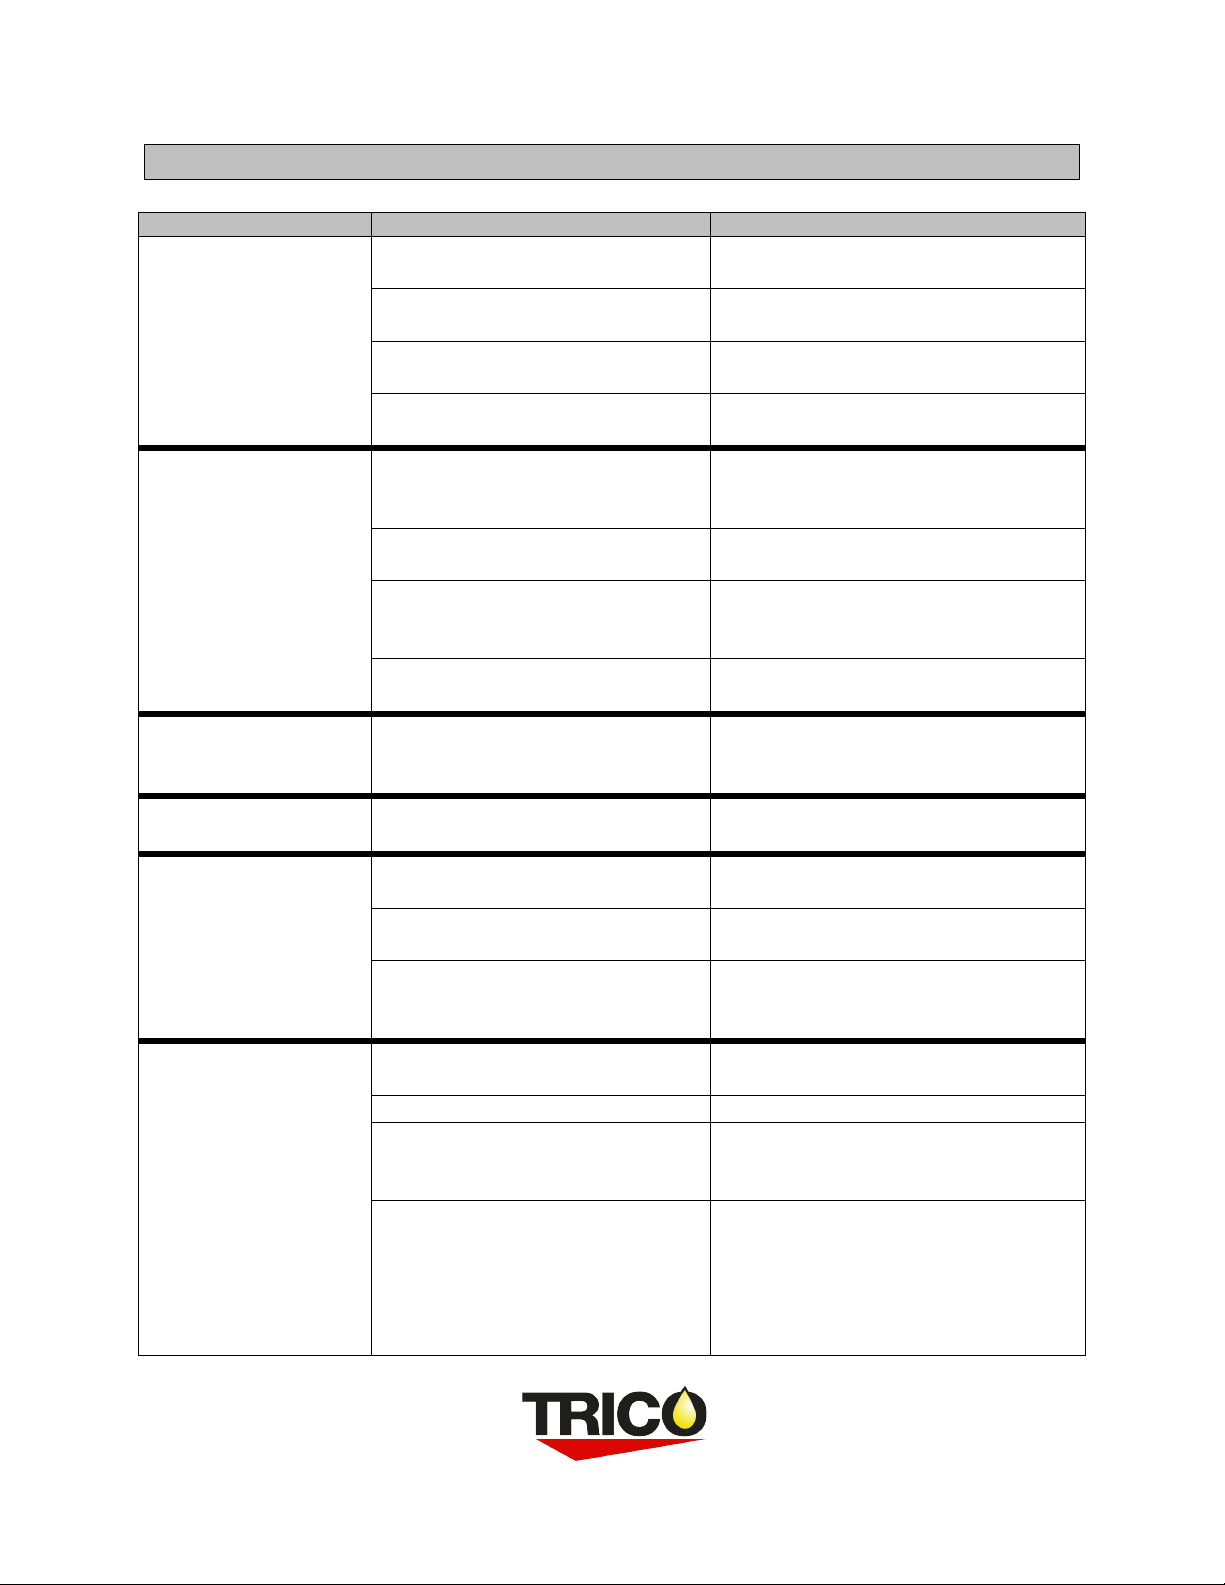
TROUBLE SHOOTING
Symptom
Possible Cause(s)
Corrective Action
Pump system does not
prime
Suction tube is above liquid
Ensure open end of suction tube remains
completely below surface of liquid
Clogged suction tube/ discharge line
and/or filter
Clean suction tube/ discharge line and/or
replace filter
Damaged/worn pump impeller
Remove pump foot and inspect impeller,
replace if damaged
Motor adapter worn, damaged or
detached
Inspect adapter for wear and/or damage,
replace if necessary
Insufficient flow
Clogged filter
Check differential pressure between
gages, if 40 psi or greater, change filter
element
Clogged/ kinked discharge line or
nozzle
Remove and flush discharge line and
nozzle, inspect for damage
Fluid viscosity exceeds
recommended viscosity for motor
Check viscosity of fluid at temperature. If
viscosity exceeds 1250 cSt (5500 SUS),
fluid must be warmed to reduce viscosity
Air supply for Pneumatic motor low
Check air supply and ensure inlet
pressure is 90 psi
Fluid Leaking from filter
area Loose filter and or connections
Check tightness of filter element to
ensure proper seal, check hose
connections
Fluid Leaking from Top
of pump
TFE Seal worn
Remove motor adapter, hand Wheel and
bearing assembly and replace TFE seal
Pneumatic motor turns
slowly or does not
function
Air supply low
Check air supply and ensure pressure is
90 psi
Pneumatic motor improperly
lubricated and or corroded
Ensure a FLR is installed in line of air
supply, use SAE 10 weight oil
Fluid viscosity exceeds
recommended viscosity for
Pneumatic motor
Check viscosity of fluid at temperature. If
viscosity exceeds 1250 cSt (5500 SUS),
fluid must be warmed to reduce viscosity
Electric motor does not
function or stops
working while filtering
Power On/Off switch not fully
switched
Check On/Off switch
No power to receptacle
Check outlet for power and breaker
Unit has overheated tripping internal
overload breaker
Turn unit power to the off position, allow
motor to cool, turn back to “on” position
and resume filtering
Unit generates excessive heat
>140°F
Fluid viscosity exceeds maximum
recommended viscosity. When filtering
ISO 460 and ISO 680 gear oils, use a 55-
gallon drum heating blanket to heat the
oil to reduce viscosity to under 1250 cSt
(5500 SUS)

1235 Hickory Street | Pewaukee, WI 53072
For Customer Support: 800-558-7008
TRICO DRUM PUMP FILTRATION SYSTEM CONFIGURATION
Table of contents


