Tricor TCM 0450 User manual

Instruction Manual
TCM_0450_E80_M_EN_150209_E007
TRICOR® TCM 0450/TCMH 0450
Coriolis Mass Flow Meter for High-Pressure Hydrogen

Version
Version: TCM_0450_E80_M_EN_150209_E007
2
Manual-Version
TCM_0450_E80_M_EN_150209_E007
SW-Version
This manual is valid for
Main SW: Mv3.45 and higher
Display SW: Dv3.45 and higher

Version: TCM_0450_E80_M_EN_150209_E007
Index
3
Index
1. GENERAL INFORMATION........................................................................................................................6
1.1. Features......................................................................................................................................................6
1.2. Safety..........................................................................................................................................................8
1.2.1. General Safety............................................................................................................................................8
1.2.2. Special Requirements for Ex Installations..................................................................................................8
1.2.3. Warnings in this Manual..............................................................................................................................9
1.3. Ordering Codes and Accessories.............................................................................................................10
1.3.1. Ordering Code ..........................................................................................................................................10
1.3.2. Accessories...............................................................................................................................................11
1.4. Measuring Principle TCM .........................................................................................................................12
1.5. Custody Transfer ......................................................................................................................................12
2. GETTING STARTED................................................................................................................................13
2.1. Unpacking.................................................................................................................................................13
2.2. Operating Elements..................................................................................................................................13
2.2.1. TCE 8***-wall mounted and compact version...........................................................................................13
2.2.2. TCM 0450/TCMH 0450.............................................................................................................................14
2.3. Pin Assignments TCE...............................................................................................................................15
2.3.1. TCE 8***-wall mounted and compact version, non-Ex .............................................................................15
2.3.2. TCE 8***-wall mounted and compact version, Ex certified.......................................................................17
2.4. Quick Start................................................................................................................................................19
2.4.1. First Operation ..........................................................................................................................................19
2.4.2. CONTROL Menu ......................................................................................................................................20
2.4.3. Using the magnet......................................................................................................................................20
3. INSTALLATION........................................................................................................................................21
3.1. Mechanical Installation..............................................................................................................................21
3.1.1. Installation Guidelines...............................................................................................................................21
3.1.2. Horizontal Installation................................................................................................................................21
3.1.3. Vertical Installation....................................................................................................................................22
3.1.4. Installation of Multiple Meters (in Series)..................................................................................................22
3.1.5. Mechanical Installation of the Electronics.................................................................................................23
3.1.6. Seals of the electronics housing and the connector.................................................................................23
3.2. Electrical Installation.................................................................................................................................23
3.2.1. Connecting TCE and TCM........................................................................................................................24
3.2.2. Electrical Installation of the Wall Mount Electronics Version....................................................................25
3.2.3. Power Supply and Grounding...................................................................................................................25
3.2.4. Connecting the Control Inputs and Outputs..............................................................................................27
3.2.5. Connecting the Analog Outputs................................................................................................................28
3.2.6. Connecting the Analog Input ....................................................................................................................29
3.3. Ex Installation............................................................................................................................................30

Version
Version: TCM_0450_E80_M_EN_150209_E007
4
4. MANUAL OPERATION............................................................................................................................31
4.1. Power On Sequence and Principles of Manual Control ...........................................................................31
4.1.1. Using the Magnet......................................................................................................................................33
4.2. Setup Guidelines.......................................................................................................................................33
4.2.1. Offset Adjustment .....................................................................................................................................33
4.2.2. Flow Filter .................................................................................................................................................33
4.2.3. CUT OFF ..................................................................................................................................................34
4.2.4. Interaction of the Parameters ...................................................................................................................34
4.3. Measuring Mode.......................................................................................................................................35
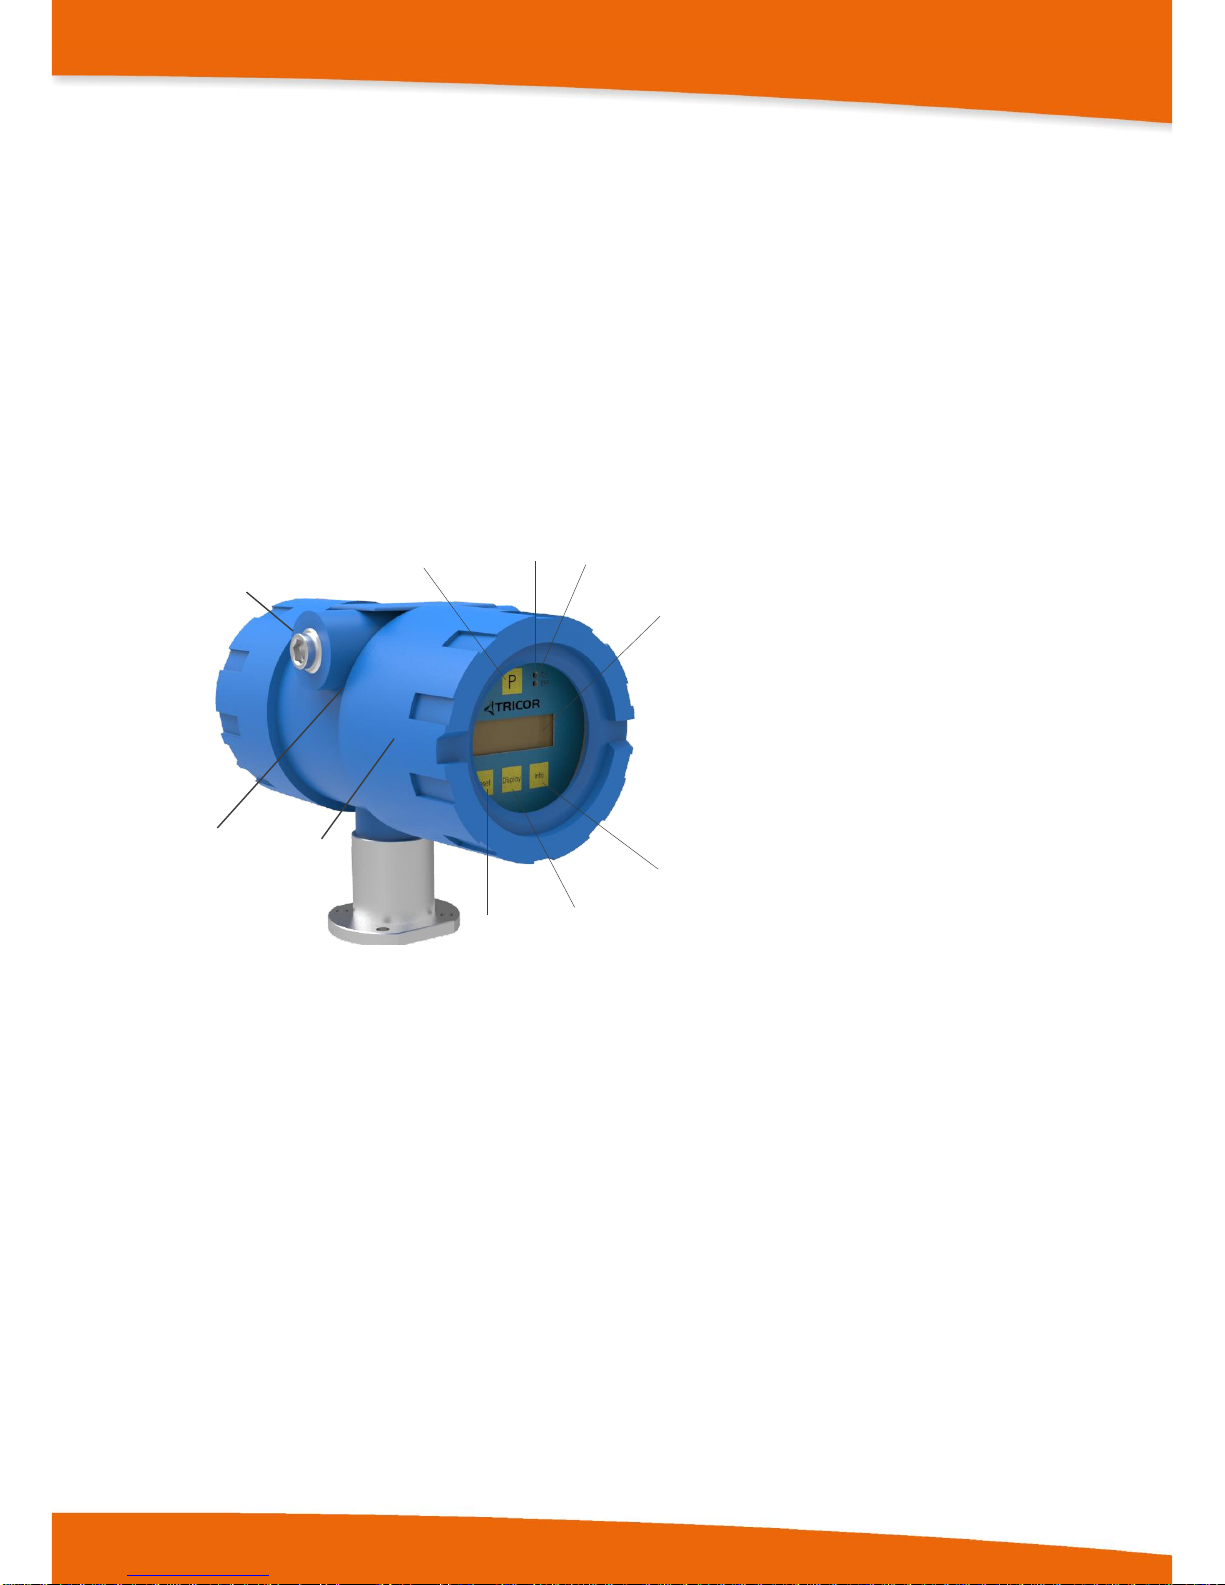
4.3.1. Function of the Pushbuttons.....................................................................................................................35
4.3.2. Display Selection ......................................................................................................................................35
4.3.3. Display Resolution....................................................................................................................................35
4.3.4. Resetting the Batch (TOTAL-) Value........................................................................................................35
4.3.5. Event Logging...........................................................................................................................................36
4.3.6. Totalizer ....................................................................................................................................................40
4.4. Offset Adjustment .....................................................................................................................................40
4.5. Control Mode ............................................................................................................................................41
4.5.1. Function of the Pushbuttons.....................................................................................................................41
4.5.2. Submenus in the Main Menu....................................................................................................................42
4.5.3. ZERO OFFSET Menu...............................................................................................................................42
4.5.4. DISPLAY Menu.........................................................................................................................................43
4.5.5. SETUP Menu............................................................................................................................................50
4.5.6. SETUP PARAMETER Menu ....................................................................................................................51
4.5.7. SETUP FILTER Menu...............................................................................................................................55
4.5.8. SETUP IN/OUTPUTS Menu.....................................................................................................................56
4.5.9. SETUP DATA CONFIGURATION Menu..................................................................................................64
4.5.10. SETUP RESET TOTAL Menu..................................................................................................................65
4.5.11. SETUP CLEAR LOGS Menu....................................................................................................................66
4.5.12. I/O-TEST Menu.........................................................................................................................................66
4.5.13. SERVICE Menu ........................................................................................................................................68
5. REMOTE OPERATION............................................................................................................................69
5.1. Serial RS485 Interface..............................................................................................................................69
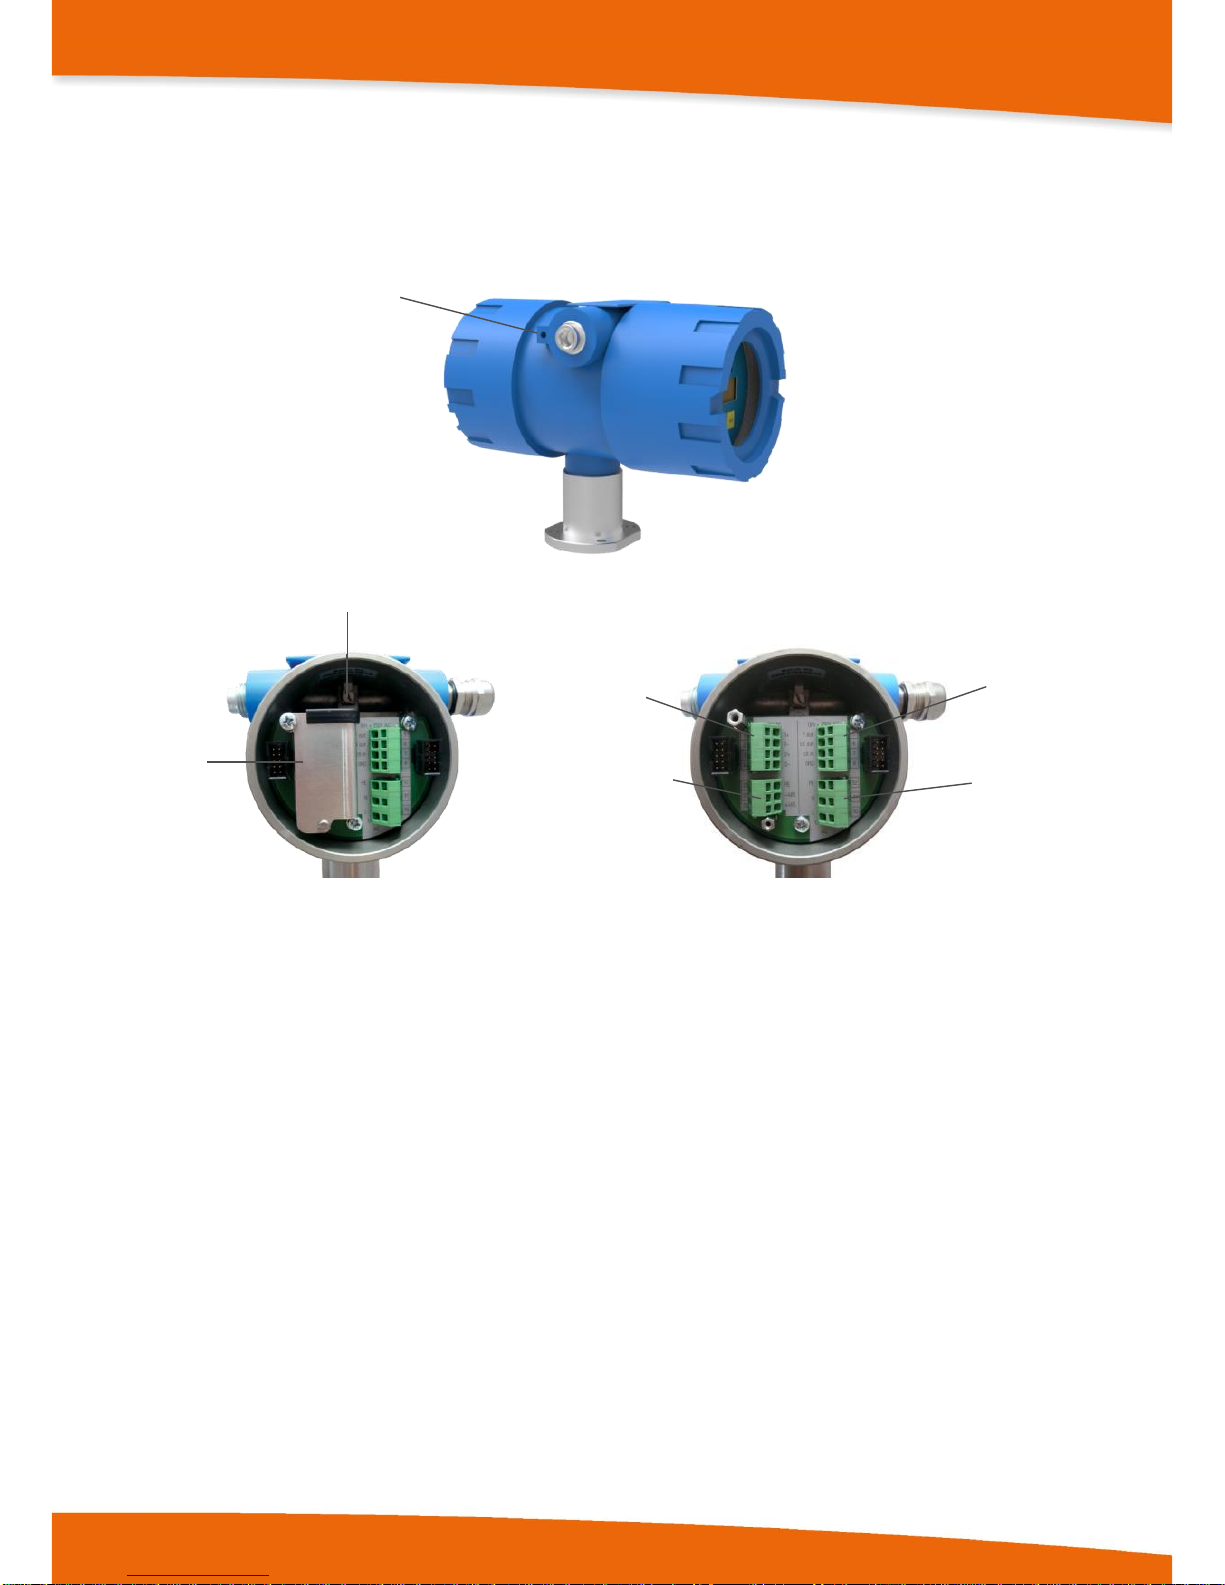
5.1.1. Electrical Connection of RS485 Interface.................................................................................................69
5.1.2. Usage of the TRICOR Configurator..........................................................................................................69
5.1.3. RS485-Interface-Protocol .........................................................................................................................69
5.2. HART®.......................................................................................................................................................70
5.2.1. Electrical Connection for HART®..............................................................................................................70
5.2.2. Device Description File for HART®Interface Protocol..............................................................................70
5.3. Foundation Fieldbus®................................................................................................................................70
5.3.1. Electrical Connection for Foundation Fieldbus®.......................................................................................70
5.3.2. Device Description File for Foundation Fieldbus®Interface Protocol.......................................................70
6. SERVICE AND MAINTENANCE..............................................................................................................71
6.1. Maintenance .............................................................................................................................................71
6.2. Trouble Shooting.......................................................................................................................................71
6.3. Changing the Fuses..................................................................................................................................72

Version: TCM_0450_E80_M_EN_150209_E007
Index
5
6.4. Calibration.................................................................................................................................................72
6.4.1. Temperature Calibration...........................................................................................................................73
6.4.2. Flow Calibration........................................................................................................................................73
6.5. Service......................................................................................................................................................74
6.6. Global Device Password...........................................................................................................................74
6.7. Reloading Factory Settings.......................................................................................................................75
7. LISTINGS .................................................................................................................................................77
7.1. Warranty ...................................................................................................................................................77
7.2. Certifications and Compliances ................................................................................................................77
7.3. Technical Data..........................................................................................................................................79
7.3.1. Technical Data TCM 0450/TCMH 0450 Transducer ................................................................................79
7.3.2. Technical Data TCE 8000 Transmitter .....................................................................................................80
7.3.3. Technical Data TCE/TCM Cable ..............................................................................................................81
7.3.4. Dimensional Drawings..............................................................................................................................82
7.4. WEEE and RoHS......................................................................................................................................83
7.5. List of Figures ...........................................................................................................................................83
7.6. List of Tables.............................................................................................................................................83
8. CONTACT ................................................................................................................................................84

Version: TCM_0450_E80_M_EN_150209_E007
6
General Information
1.General Information
1.1.Features
The TRICOR Mass Flow Meter TCM 0450/TCMH 0450, based on the Coriolis principle, is designed and usable
for high-pressure Hydrogen applications up to 1,050 bar (15,200 psi).
For this TRICOR Mass Flow Meter TCM 0450/TCMH 0450 the transmitter electronics TCE 8000 as a remote
wall mount type is available. It provides following features:
A graphic display
Menu driven control with soft keys for easy operation (also without manual)
Magnet hall switches for Ex areas
Two freely programmable 4…20 mA outputs
One freely programmable frequency output
One control input and one control output
RS485 interface
Available options are:
HART®interface
One 4…20 mA input for pressure measurement
Pressure compensation
Foundation Fieldbus®communications

Version: TCM_0450_E80_M_EN_150209_E007
7
General Information
Fig. 1: Transducer TCM 0450/TCMH 0450 with wall-mountable transmitter electronics TCE 8001-W

Version: TCM_0450_E80_M_EN_150209_E007
8
General Information
1.2.Safety
1.2.1. General Safety
All statements regarding safety of operation and technical data in this manual will only apply when the TRICOR
Coriolis Mass Flow Meter is operated correctly in accordance with this manual.
The data for Ingress Protection (IPxx) will only apply when all connectors are caped properly with the
corresponding counterpart with the same or better IP rating. Cable glands must be populated with cables with
the specified diameter and closed properly. The display cover must be closed.
During operation all openings of the housing must be closed unless otherwise is noted in this manual.
All electrical connections to the load and to the supply must be made with shielded cables unless otherwise is
noted in this manual. This TCM must be grounded.
As a protection against fire in the positive supply, a fuse with a current rating not higher than the current carrying
capacity of the cable used is required.
Before installing the flow meter and transmitter, the user is responsible to ensure that all wetted parts are
compatible with the fluid or gas to be measured.
The user has to adhere to the instructions for installing electrical devices and corresponding instructions.
The devices described in this manual may only be connected and operated by authorized and qualified
personnel.
1.2.2. Special Requirements for Ex Installations
Before installing and using TRICOR Mass Flow Meters in hazardous locations it is absolutely needed to read
and to observe the “Installation Manual for Hazardous Areas”.
Document No.: TCM_E80_E_EN_160520_E004
In hazardous locations the cover of the wall mount electronics is not allowed to open under any circumstances if
the supply voltage is applied. It is possible to operate the electronics with the magnet keys.
The analog and digital I/O signals are not specified for driving Ex ia circuits.
When using long cables make sure that the inductances and capacitances for the respective voltage or gas
group are compliant to the Ex certification.
WARNING!
All specified limiting values and parameters stated in ”Installation Manual for Hazardous Areas” must be
adhered to at all times. Failure to do so can cause equipment failure and can lead to serious injury or death.

Version: TCM_0450_E80_M_EN_150209_E007
9
General Information
1.2.3. Warnings in this Manual
NOTE:
Notes provide important information for the correct usage of the equipment. If the notes are not observed, a
malfunction of the equipment is possible.
WARNING!
Warnings provide very important information for the correct usage of the equipment. Not observing the warnings
may lead to danger for the equipment and to danger for health and life of the user.

Version: TCM_0450_E80_M_EN_150209_E007
10
General Information
1.3.Ordering Codes and Accessories
1.3.1. Ordering Code
TCE
8001
-
X
-
X
X
X
X
-
X X
-
X
X
Housing
Wall mount
W
Options
Interface
RS485 (Modbus RTU)
S
RS485 (Modbus RTU) + HART®
A
Supply Voltage
24 V DC
D
Mains 90…264 V AC
M
Electronic Options
Standard, no options
S
Pressure compensation and input
A
Cable Length
10 ft. (3 m)
S
20 ft. (6 m)
B
33 ft. (10 m)
C
49 ft. (15 m)
D
66 ft. (20 m)
E
Without cable, for Ex3 version
(order corresponding cable separately at TCC06-**)
N
EX-Protection
ATEX + IECEx Zone1: Group IIC, T2…T4
Ex
ATEX Zone 2: II 3G Ex nA IIC T2…T4 Gc
Exn
cCSAus: Class 1, Division 1: Group A, B, C, D, T2…T4
Ex1
ATEX+IEcEx, Zone 1: Group IIC, T2…T4 +
cCSAus: Class 1, Div. 1: Group A, B, C, D, T2…T4
Ex3
Customer Options (01…99)
Push-Pull connector for TCM
(only for versions Exn, Ex, Ex1)
1
2

Version: TCM_0450_E80_M_EN_150209_E007
11
General Information
TCM
0450
-
X
-
X
X
X
X
-
X
X
X
X
-
Ex
Process connections
Autoclave 3/8“ MP
H
Mechanical options
Medium Temperature Range:
-40 °F …+212 °F(-40 °C …+100 °C)
S
Pressure Range
1050 bar process pressure
P
Accuracy
1 % of reading
M
Mechanical Design
Standard
S
Electronics Options
Electronics Type
Remote electronics, Push-Pull connector
P
Interface
Not used
Z
Supply Voltage
Not used
Z
Options
Pressure compensation and 4 - 20 mA input, MID MI002/OIML R137 compliant
G
No options
S
EX-Protection
ATEX + IECEx Zone 1: Group IIC, T2 …T4
Ex
ATEX Zone 2: II 3G Ex nA IIC T2 …T4 Gc
Exn
cCSAus: Class 1, Div. 1:Group A, B, C, D, T2 …T4
Ex1
ATEX + IEcEx, Zone 1: Group IIC , T2 …T4 and
cCSAus:Class1, Div. 1: Group A, B, C, D, T2 …T4
Ex3
TCC
X X
-
X
X
Obligatory accessories for Ex3 Version
Connection Cable
Connector M23 (TCE) with push pull (TCM) for EX3-Version
0 6
10 ft. (3 m) (standard)
0
3
20 ft. (6 m)
0
6
33 ft. (10 m)
1
0
49 ft. (15 m)
1
5
66 ft. (20 m)
2
0
1.3.2. Accessories
There are currently no accessories available for the TCM 0450/TCMH 0450.

Version: TCM_0450_E80_M_EN_150209_E007
12
General Information
1.4.Measuring Principle TCM
Two parallel flow tubes inside the TCM Flow Meter are vibrating at their natural frequency in opposite direction.
Any mass flow passing through the tubes will delay the vibration at the incoming side and accelerate the
vibration at the outgoing side. This causes a small time shift between both ends of the tube. This time shift is
measured and used to calculate the mass flow through the tubes.
By measuring the natural frequency of the tubes the density of the medium can be calculated.
As both effects are temperature dependent, the temperature is measured by means of an accurate temperature
sensor for correcting the temperature effects on flow and density measurement.
As a result a Coriolis Mass Flow Meter measures directly mass flow, density and temperature of the medium.
Knowing the mass flow and the density, also the volume flow can be calculated.
Fig. 2: Principle of operation Coriolis Mass Flow Meter
1.5.Custody Transfer
When the “Custody Transfer”option is selected, the following restrictions apply:
Due to an additional Modbus command filter (additional electronic component), only a few parameters that
are not critical for measuring can be written via Modbus (see the document: “Modbus (RTU) Manual”:
chapter 3.5). Read access to all values that can be read via Modbus remains unchanged from the standard
version.
The speed of the Modbus interface is fixed at 57600 baud and cannot be changed by the user.
As soon as critical events (error messages) are written to the log, this is indicated by alternate flashing of the
red and green LEDs until the user performs a manual reset (see chapter 4.3.5).
The P button on the display cannot be operated with the magnet any more when the front cover is closed.
This means no more device settings can be changed when the housing is closed and sealed.
The two housing covers as well as the plug-in connections of the connecting cable must be secured with
suitable seals to prevent unauthorized opening or unplugging.
In case of a critical error state, all measured flow rate values are accumulated in a failure total counter (FAIL.
TOTAL) instead of the totalizer (GRAND TOTAL) as long as the error state remains active.
The standard displays have the following fixed two-line configuration:
- Standard display: 1st line: “Current mass flow” + 2nd line: “Totalizer”
- Alternative display: 1st line: “Temperature”+ 2nd line “Failure Total Counter”
Remote control is possible exclusively via RS485/Modbus RTU
(HART® or Foundation Fieldbus® are permanently inactive)
The control input (CTRL IN) is permanently inactive (=OFF)

Version: TCM_0450_E80_M_EN_150209_E007
13
Getting Started
2.Getting Started
2.1.Unpacking
Verify that you have received the following items:
TCM 0450/TCMH 0450
TCE 8001-W
Instruction manual
2.2.Operating Elements
2.2.1. TCE 8***-wall mounted and compact version
Fig. 3: Operating Elements of TCE 80xx-W
1 = Pushbutton “P”, activates/selects the different menus and confirms the settings
2 = LED ”OK”, flashes green when there is no error
3 = LED ”ERR”, flashes red when an error occurs
4 = Display
5 = Pushbutton ”Info”, normal: selects the error menu, setup mode: softkey
6 = Pushbutton ”Display”, normal: toggles the display, setup mode: softkey
7 = Pushbutton ”Reset”, normal: resets the BATCH TOTAL counter, setup mode: softkey
8 = Front cover
9 = Set screw for front cover (varying position)
10 = Screw for protective ground
Additionally (not shown on the pictures):
Cable to the meter TCM 0450/TCMH 0450, length as ordered (standard: 10 ft./3 m)
Wall mounting bracket
10
1
2
3
4
6
7
5
8
9

Version: TCM_0450_E80_M_EN_150209_E007
14
Getting Started
2.2.2. TCM 0450/TCMH 0450
Fig. 4: Operating Elements TCM 0450/TCMH 0450
1 = Locking screw for rupture disc
2 = Socket for cable to the TCE
3 = Fluid output, Autoclave
4 = Fluid input, Autoclave
5 = Mounting holes (4 x)
3
4
2
5
1

Version: TCM_0450_E80_M_EN_150209_E007
15
Getting Started
2.3.Pin Assignments TCE
2.3.1. TCE 8***-wall mounted and compact version, non-Ex
Fig. 5: Electrical terminals TCE 8***-W and compact version
1 = Terminal screw for protective ground
2 = Switch for terminating resistor for the RS485 interface
3 = Terminal block for interface
4 = Terminal block power supply
5 = Terminal block for I/O signals
1
4
2
3
5

Version: TCM_0450_E80_M_EN_150209_E007
16
Getting Started
TCE Terminal Connections
1
+I1
Current loop 1 positive terminal
2
-I1
Current loop 1 negative terminal
3
+I2
Current loop 2 positive terminal
4
-I2
Current loop 2 negative terminal
5
FOUT
Frequency/pulse output
6
CTLOUT
Control output
7
CTLIN
Control input
8
GND
Ground (for pins 5 through 7)
20
COMMON
Common (for pins 21 and 22)
21
-RS485
RS485 negative line
22
+RS485
RS485 positive line
30
COMMON
Common (for pins 31 and 32)
31
FF-
Foundation Fieldbus®negative line
32
FF+
Foundation Fieldbus®positive line
24 V DC Supply
50
+V DC
Positive supply voltage (24 V DC)
51
-V DC
Supply ground
52
PE
Protective Ground
100…240 V AC Supply
90
L
Phase (AC voltage)
91
N
Neutral
52
PE
Protective Ground
NOTE:
An active pressure compensation is not needed with the TCM 0450/TCMH 0450 Coriolis meter because of its
extremely low drifts with pressure changes.
Nevertheless, if the option "PRESSURE COMPENSATION" is used the current loop 1 (Terminal 1 and 2) works
as an input.

Version: TCM_0450_E80_M_EN_150209_E007
17
Getting Started
2.3.2. TCE 8***-wall mounted and compact version, Ex certified
Fig. 6: Electrical terminals TCE 8***-W-*-Ex
1 = Terminal screw for protective ground
2 = Terminal screw for protective ground
3 = Protective cover
4 = Terminal block for digital I/O signals (UM = 250 V DC)
5 = Terminal block power supply (UM = 250 V DC)
6 = Terminal block for interface (UM = 30 V DC)
7 = Terminal block for analog I/O signals (UM = 30 V DC)
7
6
5
4
1
2
3

Version: TCM_0450_E80_M_EN_150209_E007
18
Getting Started
TCE Terminal Connections
Terminals with UM= 30 V DC
1
+I1
Current loop 1 positive terminal
2
-I1
Current loop 1 negative terminal
3
+I2
Current loop 2 positive terminal
4
-I2
Current loop 2 negative terminal
20
GND
Common (for pins 21 and 22)
21
-RS485
RS485 negative line
22
+RS485
RS485 positive line
30
GND
Common (for pins 31 and 32)
31
FF-
Foundation Fieldbus®negative line
32
FF+
Foundation Fieldbus®positive line
Terminals with UM= 250 V DC
5
FOUT
Frequency/pulse output
6
CTLOUT
Control output
7
CTLIN
Control input
8
GND
Ground (for pins 5 through 7)
24 V DC Supply
50
+V DC
Positive supply voltage (24 V DC)
51
-V DC
Supply ground
52
PE
Protective Ground
100…240 V AC Supply
90
L
Phase (AC voltage)
91
N
Neutral
52
PE
Protective Ground
NOTE:
An active pressure compensation is not needed with the TCM 0450/TCMH 0450 Coriolis meter because of its
extremely low drifts with pressure changes.
Nevertheless, if the option "PRESSURE COMPENSATION" is used the current loop 1 (Terminal 1 and 2) works
as an input.

Version: TCM_0450_E80_M_EN_150209_E007
19
Getting Started
2.4.Quick Start
WARNING!
As for safety and accuracy reasons many precautions must be taken, read chapter 3 carefully before installing
the TCM!
In case the TCM has only to be operated without flow for testing or learning purpose, at least the following
connections have to be made (see chapter 3.2):
Connect the TCE to the TCM
Connect the supply voltage
The various inputs and outputs as well as the interface may be connected as well, if those features
are required.
WARNING!
If the TRICOR Coriolis Mass Flow Meter is connected to a bigger system, for your personal safety connect the
protective ground as well!
WARNING!
In hazardous areas it is not allowed to operate the TRICOR Coriolis Mass Flow Meter without proper wiring in
accordance with chapter 3.2.5 and with the housing not properly closed!
2.4.1. First Operation
Make sure that all mechanical and electrical connections are made properly.
Switch on the power supply. The LED “OK” will flash green.
After the power up sequence the display shows the preselected values (ex factory: “Flow” and “Batch”)
Switch on the flow. The value indicated in the display should be positive.
In case of an error the LED “ERR” will flash red.
As soon as the TCM has reached the operating temperature, make the zero point calibration (see chapter 4.2.1
for detailed information):
Switch off the flow
Wait until the flow is zero
Start the zero offset calibration in the ZERO OFFSET menu
Wait until the offset procedure is finished
Switch on the flow again
The display can be altered by pressing the pushbutton “Display”.
The internal device status can be viewed by pressing the pushbutton “Info”.
If the function is activated, the BATCH reading can be reset to zero by pressing the pushbutton “Reset”.
To open the control menu press button “P” for three seconds.

Version: TCM_0450_E80_M_EN_150209_E007
20
Getting Started
2.4.2. CONTROL Menu
In the CONTROL menu all configurations can be made. This includes configuration of the analog and digital
outputs, customizing the display and other settings.
The menu itself is self-explaining; the function of the softkeys is indicated in the display above the pushbuttons.
To enter the CONTROL menu press the pushbutton “P” for three seconds.
If a global access code is set, the CONTROL Menu is completely locked (see chapter 6.6). With no global
access code the submenu “DISPLAY” can be entered without a password as any changes in this submenu will
not affect the operation of the TCM.
The submenus “ZERO OFFSET”, “SETUP”, “I/O-TEST” and “SERVICE” are password protected for avoiding
unintentional changes of the operating parameters.
For “ZERO OFFSET”, “SETUP” and “I/O-TEST” the password is “2207”, for “SERVICE” refer to chapter 6.
Change the indicated number “2206” with the softkey “UP” to “2207” and confirm with “P”.
Select the desired submenu with the softkeys and confirm with “P”.
Every setting must be confirmed with “P” for storing the setting or with “EXIT” for exiting without storing.
For leaving the “SETUP” menu press “EXIT” in the main level.
NOTE:
With the “Custody Transfer”option, no settings can be configured when the front cover is closed since the P
button is deactivated.
2.4.3. Using the magnet
The explosion-proof variants with the Ex d housings provide a magnet to be able to operate the pushbuttons
without opening the display cover.
In hazardous, wet and dusty areas the display cover must not be opened to operate the pushbuttons.
Beside every pushbutton there is a hall sensor which can be operated via the magnet attached to the housing.
For operating the pushbuttons hold the magnet to the glass
The best positions for operating the keys are:
Pushbutton Position
P left upper edge of the yellow area
Reset lower edge of the yellow area
Display lower edge of the yellow area
Info lower edge of the yellow area
NOTE:
The P button cannot be operated with the magnet with the “Custody Transfer”option!
This manual suits for next models
1
Table of contents
Other Tricor Measuring Instrument manuals