TRIEF TWISTER basic User manual

Operating instructions
ID number: 243343V03
Machine type: 4120
Language: English
Translation of the original operating instructions
TWISTER basic


EC Declaration of Conformity
For the purpose of the EC Machinery Directive 2006/42/EC, Annex II No. 1 A.
Machinery category: Dicing machine
Machine designation: TWISTER basic
Series / part number:
412012.240412.-
We hereby declare that the design of the above mentioned machine in the supplied version
complies with the applicable provisions of the EC Machinery Directive 2006/42/EC.
The machine also complies with the following Directives / Regulations:
EU EMC Directive 2014/ 30/EU
EC Regulation for Food Contact Materials 1935/2004/EC
EU Plastic Regulation for Food Contact Materials 10/2011/EU
The protection objectives of the Low Voltage Directive 2014/35/EU have been complied with
in accordance with Annex I, No. 1.5.1 of the Machinery Directive 2006/42/EC.
The following harmonised standards have been applied:
DIN EN 13871: 2015-01: Food processing machinery –
Cubes cutting machinery –
Safety and hygiene requirements
The normative references in the European standard mentioned above are also applicable, such as:
DIN EN ISO 12100: 2013-08: Safety of machinery –
General principles for design –
Risk assessment and risk reduction
DIN EN ISO 13849-1: 2016-06: Safety of machinery –
Safety-related parts of control systems –
General principles for design
DIN EN ISO 13857: 2008-06: Safety of machinery –
Safety distance to prevent hazard zones being reached by
upper and lower limbs
DIN EN 60204-1: 2010-05:
[IEC 60204-1: 2005, modified]
Safety of machinery –
Electrical equipment of machines –
General requirements
The dicing machine is exclusively intended for cutting boneless foods such as meat, sau-
sage, cheese and potatoes. Any other use of the machine is prohibited.
Refer to the operating instructions for detailed information about the specification and the
ambient conditions.
This declaration shall be rendered invalid if any modification without our agreement is made
to the machine.
The following person is authorised to compile the technical
documentation:
Jörg Fankhänel
Toni-Reifenhäuser-Str. 1
57641 Oberlahr
TREIF Maschinenbau GmbH
Toni-Reifenhäuser-Str. 1
D – 57641 Oberlahr
Oberlahr, 01. Februar 2019
[Uwe Reifenhäuser – Managing Director]
TREIF
–
ID
–
NR.
243352
Translation of the original d
eclaration of conformity

able of contents
able of contents
1. Before you read on... . . . . . . . . . . . . . . . . . . . . . . . . . . . . . . . . . . . . . . . . . . . . . . . . . . . . . . . . . . . . . . . . 1
1.1 Using these operating instructions . . . . . . . . . . . . . . . . . . . . . . . . . . . . . . . . . . . . . . . . . . . . . . . . . 2
1.2 Symbols . . . . . . . . . . . . . . . . . . . . . . . . . . . . . . . . . . . . . . . . . . . . . . . . . . . . . . . . . . . . . . . . . . . . . 3
1.2.1 In the operating manual . . . . . . . . . . . . . . . . . . . . . . . . . . . . . . . . . . . . . . . . . . . . . . . . . . 3
1.2.2 On the machine . . . . . . . . . . . . . . . . . . . . . . . . . . . . . . . . . . . . . . . . . . . . . . . . . . . . . . . . 3
1.3 Description of the machine, area of application and intended use . . . . . . . . . . . . . . . . . . . . . . . . . 4
1.4 oreseeable misuse . . . . . . . . . . . . . . . . . . . . . . . . . . . . . . . . . . . . . . . . . . . . . . . . . . . . . . . . . . . . 4
1.5 Safety instructions . . . . . . . . . . . . . . . . . . . . . . . . . . . . . . . . . . . . . . . . . . . . . . . . . . . . . . . . . . . . . 4
1.5.1 Protective equipment . . . . . . . . . . . . . . . . . . . . . . . . . . . . . . . . . . . . . . . . . . . . . . . . . . . . 4
1.5.2 Organisational measures . . . . . . . . . . . . . . . . . . . . . . . . . . . . . . . . . . . . . . . . . . . . . . . . . 5
1.5.3 Personnel qualifications and obligations . . . . . . . . . . . . . . . . . . . . . . . . . . . . . . . . . . . . . 5
1.5.4 General safety instructions . . . . . . . . . . . . . . . . . . . . . . . . . . . . . . . . . . . . . . . . . . . . . . . . 6
1.5.5 Safety instructions for this machine . . . . . . . . . . . . . . . . . . . . . . . . . . . . . . . . . . . . . . . . . 7
2. Operation . . . . . . . . . . . . . . . . . . . . . . . . . . . . . . . . . . . . . . . . . . . . . . . . . . . . . . . . . . . . . . . . . . . . . . . . . 9
2.1 Machine overview . . . . . . . . . . . . . . . . . . . . . . . . . . . . . . . . . . . . . . . . . . . . . . . . . . . . . . . . . . . . . 10
2.1.1 General overview . . . . . . . . . . . . . . . . . . . . . . . . . . . . . . . . . . . . . . . . . . . . . . . . . . . . . . 10
2.1.2 Cutting unit . . . . . . . . . . . . . . . . . . . . . . . . . . . . . . . . . . . . . . . . . . . . . . . . . . . . . . . . . . . 11
2.1.3 eeding. . . . . . . . . . . . . . . . . . . . . . . . . . . . . . . . . . . . . . . . . . . . . . . . . . . . . . . . . . . . . . 11
2.1.4 Control panel . . . . . . . . . . . . . . . . . . . . . . . . . . . . . . . . . . . . . . . . . . . . . . . . . . . . . . . . . 12
2.2 Before you start... . . . . . . . . . . . . . . . . . . . . . . . . . . . . . . . . . . . . . . . . . . . . . . . . . . . . . . . . . . . . . 13
2.3 Notes about cutting. . . . . . . . . . . . . . . . . . . . . . . . . . . . . . . . . . . . . . . . . . . . . . . . . . . . . . . . . . . . 14
2.4 Cutting . . . . . . . . . . . . . . . . . . . . . . . . . . . . . . . . . . . . . . . . . . . . . . . . . . . . . . . . . . . . . . . . . . . . . 17
2.4.1 Settings. . . . . . . . . . . . . . . . . . . . . . . . . . . . . . . . . . . . . . . . . . . . . . . . . . . . . . . . . . . . . . 17
2.4.2 Loading and starting . . . . . . . . . . . . . . . . . . . . . . . . . . . . . . . . . . . . . . . . . . . . . . . . . . . . 18
2.5 Cleaning mode . . . . . . . . . . . . . . . . . . . . . . . . . . . . . . . . . . . . . . . . . . . . . . . . . . . . . . . . . . . . . . . 19
2.6 If any malfunction occurs . . . . . . . . . . . . . . . . . . . . . . . . . . . . . . . . . . . . . . . . . . . . . . . . . . . . . . . 19
3. Cleaning / Disinfection . . . . . . . . . . . . . . . . . . . . . . . . . . . . . . . . . . . . . . . . . . . . . . . . . . . . . . . . . . . . . 21
3.1 Check daily . . . . . . . . . . . . . . . . . . . . . . . . . . . . . . . . . . . . . . . . . . . . . . . . . . . . . . . . . . . . . . . . . . 23
3.2 Check and clean cleaning channel . . . . . . . . . . . . . . . . . . . . . . . . . . . . . . . . . . . . . . . . . . . . . . . . 23
3.3 Cleaning of the separating slide . . . . . . . . . . . . . . . . . . . . . . . . . . . . . . . . . . . . . . . . . . . . . . . . . . 24
3.4 Cleaning the discharge conveyor during running operation . . . . . . . . . . . . . . . . . . . . . . . . . . . . . 26
3.5 Instructions for cleaning . . . . . . . . . . . . . . . . . . . . . . . . . . . . . . . . . . . . . . . . . . . . . . . . . . . . . . . . 27
3.6 Dismantling for complete cleaning . . . . . . . . . . . . . . . . . . . . . . . . . . . . . . . . . . . . . . . . . . . . . . . . 28
3.7 Cleaning . . . . . . . . . . . . . . . . . . . . . . . . . . . . . . . . . . . . . . . . . . . . . . . . . . . . . . . . . . . . . . . . . . . . 29
3.8 Cleaning and disinfection schedule . . . . . . . . . . . . . . . . . . . . . . . . . . . . . . . . . . . . . . . . . . . . . . . 30
3.9 Reassembly after cleaning . . . . . . . . . . . . . . . . . . . . . . . . . . . . . . . . . . . . . . . . . . . . . . . . . . . . . . 32
4. Set-up . . . . . . . . . . . . . . . . . . . . . . . . . . . . . . . . . . . . . . . . . . . . . . . . . . . . . . . . . . . . . . . . . . . . . . . . . . . 33
4.1 Removing the feed . . . . . . . . . . . . . . . . . . . . . . . . . . . . . . . . . . . . . . . . . . . . . . . . . . . . . . . . . . . . 34
4.2 Opening/closing the knife box door . . . . . . . . . . . . . . . . . . . . . . . . . . . . . . . . . . . . . . . . . . . . . . . 35
4.3 Dismantling the cut-off knife . . . . . . . . . . . . . . . . . . . . . . . . . . . . . . . . . . . . . . . . . . . . . . . . . . . . . 35
4.4 Dismantling the grating disc or stop disc (optional) . . . . . . . . . . . . . . . . . . . . . . . . . . . . . . . . . . . 36
4.5 Dismantling the cutting unit. . . . . . . . . . . . . . . . . . . . . . . . . . . . . . . . . . . . . . . . . . . . . . . . . . . . . . 37
4.6 Dismantling the product stabiliser. . . . . . . . . . . . . . . . . . . . . . . . . . . . . . . . . . . . . . . . . . . . . . . . . 38
4.7 Dismantling the grid blades . . . . . . . . . . . . . . . . . . . . . . . . . . . . . . . . . . . . . . . . . . . . . . . . . . . . . 38

able of contents
able of contents able of contentsTable of contents
11/2020 243343V03_EN
4.8 Installing the manual feed. . . . . . . . . . . . . . . . . . . . . . . . . . . . . . . . . . . . . . . . . . . . . . . . . . . . . . . 40
4.9 Installing the product stabiliser . . . . . . . . . . . . . . . . . . . . . . . . . . . . . . . . . . . . . . . . . . . . . . . . . . . 41
4.10 Installing the grid blades . . . . . . . . . . . . . . . . . . . . . . . . . . . . . . . . . . . . . . . . . . . . . . . . . . . . . . . . 41
4.11 Installing the cutting unit . . . . . . . . . . . . . . . . . . . . . . . . . . . . . . . . . . . . . . . . . . . . . . . . . . . . . . . . 43
4.12 Installing cut-off knife . . . . . . . . . . . . . . . . . . . . . . . . . . . . . . . . . . . . . . . . . . . . . . . . . . . . . . . . . . 44
4.13 Setting the cutting gap . . . . . . . . . . . . . . . . . . . . . . . . . . . . . . . . . . . . . . . . . . . . . . . . . . . . . . . . . 44
4.14 Installing the grating disc or stop disc (optional). . . . . . . . . . . . . . . . . . . . . . . . . . . . . . . . . . . . . . 45
4.15 Adjustment of the grating disc . . . . . . . . . . . . . . . . . . . . . . . . . . . . . . . . . . . . . . . . . . . . . . . . . . . 46
4.15.1 Inner Setting . . . . . . . . . . . . . . . . . . . . . . . . . . . . . . . . . . . . . . . . . . . . . . . . . . . . . . . . . . 46
4.15.2 Outer Setting . . . . . . . . . . . . . . . . . . . . . . . . . . . . . . . . . . . . . . . . . . . . . . . . . . . . . . . . . 48
4.16 Dismantling / installing the hygiene strip. . . . . . . . . . . . . . . . . . . . . . . . . . . . . . . . . . . . . . . . . . . . 50
4.17 Dismantling / installing the scraper . . . . . . . . . . . . . . . . . . . . . . . . . . . . . . . . . . . . . . . . . . . . . . . . 50
5. Start-up, switch-off . . . . . . . . . . . . . . . . . . . . . . . . . . . . . . . . . . . . . . . . . . . . . . . . . . . . . . . . . . . . . . . . 51
5.1 Initial start-up . . . . . . . . . . . . . . . . . . . . . . . . . . . . . . . . . . . . . . . . . . . . . . . . . . . . . . . . . . . . . . . . 53
5.2 Restart . . . . . . . . . . . . . . . . . . . . . . . . . . . . . . . . . . . . . . . . . . . . . . . . . . . . . . . . . . . . . . . . . . . . . 53
5.3 Start-up after EMERGENCY O . . . . . . . . . . . . . . . . . . . . . . . . . . . . . . . . . . . . . . . . . . . . . . . . 54
5.4 Test run. . . . . . . . . . . . . . . . . . . . . . . . . . . . . . . . . . . . . . . . . . . . . . . . . . . . . . . . . . . . . . . . . . . . . 54
5.4.1 Checking that the cut-off knife runs freely . . . . . . . . . . . . . . . . . . . . . . . . . . . . . . . . . . . 54
5.4.2 Checking rotation direction of the electric motor . . . . . . . . . . . . . . . . . . . . . . . . . . . . . . 54
5.5 unction test of the safety switches . . . . . . . . . . . . . . . . . . . . . . . . . . . . . . . . . . . . . . . . . . . . . . . 55
5.5.1 Knife box door . . . . . . . . . . . . . . . . . . . . . . . . . . . . . . . . . . . . . . . . . . . . . . . . . . . . . . . . 55
5.5.2 Discharge conveyor . . . . . . . . . . . . . . . . . . . . . . . . . . . . . . . . . . . . . . . . . . . . . . . . . . . . 56
5.5.3 Separating slide . . . . . . . . . . . . . . . . . . . . . . . . . . . . . . . . . . . . . . . . . . . . . . . . . . . . . . . 56
5.5.4 eed insert . . . . . . . . . . . . . . . . . . . . . . . . . . . . . . . . . . . . . . . . . . . . . . . . . . . . . . . . . . . 56
5.6 Switch-off . . . . . . . . . . . . . . . . . . . . . . . . . . . . . . . . . . . . . . . . . . . . . . . . . . . . . . . . . . . . . . . . . . . 57
5.6.1 Switch-off at the end of production . . . . . . . . . . . . . . . . . . . . . . . . . . . . . . . . . . . . . . . . . 57
5.6.2 Switching off for maintenance and repair work. . . . . . . . . . . . . . . . . . . . . . . . . . . . . . . . 57
5.6.3 Switch-off via EMERGENCY O . . . . . . . . . . . . . . . . . . . . . . . . . . . . . . . . . . . . . . . . . 57
6. Maintenance . . . . . . . . . . . . . . . . . . . . . . . . . . . . . . . . . . . . . . . . . . . . . . . . . . . . . . . . . . . . . . . . . . . . . . 59
6.1 Maintenance overview . . . . . . . . . . . . . . . . . . . . . . . . . . . . . . . . . . . . . . . . . . . . . . . . . . . . . . . . . 61
6.2 Sharpening cut-off knife . . . . . . . . . . . . . . . . . . . . . . . . . . . . . . . . . . . . . . . . . . . . . . . . . . . . . . . . 62
6.3 Changing blade. . . . . . . . . . . . . . . . . . . . . . . . . . . . . . . . . . . . . . . . . . . . . . . . . . . . . . . . . . . . . . . 62
6.4 Sharpening the grid blades. . . . . . . . . . . . . . . . . . . . . . . . . . . . . . . . . . . . . . . . . . . . . . . . . . . . . . 63
6.5 Changing grid side walls . . . . . . . . . . . . . . . . . . . . . . . . . . . . . . . . . . . . . . . . . . . . . . . . . . . . . . . . 64
6.6 Changing the rollers of the grid drive . . . . . . . . . . . . . . . . . . . . . . . . . . . . . . . . . . . . . . . . . . . . . . 64
6.7 Cleaning or changing the cool air hose . . . . . . . . . . . . . . . . . . . . . . . . . . . . . . . . . . . . . . . . . . . . 65
6.8 Oil level check. . . . . . . . . . . . . . . . . . . . . . . . . . . . . . . . . . . . . . . . . . . . . . . . . . . . . . . . . . . . . . . . 65
6.9 Changing the hydraulic oil . . . . . . . . . . . . . . . . . . . . . . . . . . . . . . . . . . . . . . . . . . . . . . . . . . . . . . 66
6.10 Replacing belt of the discharge conveyor . . . . . . . . . . . . . . . . . . . . . . . . . . . . . . . . . . . . . . . . . . . 68
6.11 Tensioning the belt of the discharge conveyor . . . . . . . . . . . . . . . . . . . . . . . . . . . . . . . . . . . . . . . 69
7. Programming . . . . . . . . . . . . . . . . . . . . . . . . . . . . . . . . . . . . . . . . . . . . . . . . . . . . . . . . . . . . . . . . . . . . . 71
8. ransport and installation . . . . . . . . . . . . . . . . . . . . . . . . . . . . . . . . . . . . . . . . . . . . . . . . . . . . . . . . . . . 73
8.1 Transport and unpacking . . . . . . . . . . . . . . . . . . . . . . . . . . . . . . . . . . . . . . . . . . . . . . . . . . . . . . . 74
8.1.1 Transporting the machine to the installation site . . . . . . . . . . . . . . . . . . . . . . . . . . . . . . 74
8.1.2 Unpacking the machine . . . . . . . . . . . . . . . . . . . . . . . . . . . . . . . . . . . . . . . . . . . . . . . . . 74
8.2 Installation and connection . . . . . . . . . . . . . . . . . . . . . . . . . . . . . . . . . . . . . . . . . . . . . . . . . . . . . . 74

able of contents
Table of contents
11/2020 243343V03_EN
8.2.1 Installation . . . . . . . . . . . . . . . . . . . . . . . . . . . . . . . . . . . . . . . . . . . . . . . . . . . . . . . . . . . 74
8.2.2 Adjustment of the machine feet . . . . . . . . . . . . . . . . . . . . . . . . . . . . . . . . . . . . . . . . . . . 75
8.2.3 Electrical connection. . . . . . . . . . . . . . . . . . . . . . . . . . . . . . . . . . . . . . . . . . . . . . . . . . . . 75
8.3 Installation for machines with running gear (optional) . . . . . . . . . . . . . . . . . . . . . . . . . . . . . . . . . 76
8.3.1 Installation . . . . . . . . . . . . . . . . . . . . . . . . . . . . . . . . . . . . . . . . . . . . . . . . . . . . . . . . . . . 76
8.3.2 Lowering / raising and adjusting machine foot . . . . . . . . . . . . . . . . . . . . . . . . . . . . . . . . 76
8.4 Installing discharge conveyor . . . . . . . . . . . . . . . . . . . . . . . . . . . . . . . . . . . . . . . . . . . . . . . . . . . . 77
8.5 Dismantling discharge conveyor. . . . . . . . . . . . . . . . . . . . . . . . . . . . . . . . . . . . . . . . . . . . . . . . . . 78
9. Help and Service . . . . . . . . . . . . . . . . . . . . . . . . . . . . . . . . . . . . . . . . . . . . . . . . . . . . . . . . . . . . . . . . . . 79
9.1 Your service partner . . . . . . . . . . . . . . . . . . . . . . . . . . . . . . . . . . . . . . . . . . . . . . . . . . . . . . . . . . . 80
9.2 Troubleshooting at a glance . . . . . . . . . . . . . . . . . . . . . . . . . . . . . . . . . . . . . . . . . . . . . . . . . . . . . 81
10. Appendix. . . . . . . . . . . . . . . . . . . . . . . . . . . . . . . . . . . . . . . . . . . . . . . . . . . . . . . . . . . . . . . . . . . . . . . . . 83
10.1 Positioning of the rating plate and electrical wiring diagram. . . . . . . . . . . . . . . . . . . . . . . . . . . . . 84
10.2 Information signs on the machine. . . . . . . . . . . . . . . . . . . . . . . . . . . . . . . . . . . . . . . . . . . . . . . . . 85
10.3 Technical specifications . . . . . . . . . . . . . . . . . . . . . . . . . . . . . . . . . . . . . . . . . . . . . . . . . . . . . . . . 86
10.4 Dimensions . . . . . . . . . . . . . . . . . . . . . . . . . . . . . . . . . . . . . . . . . . . . . . . . . . . . . . . . . . . . . . . . . . 87
10.5 Hydraulic oil . . . . . . . . . . . . . . . . . . . . . . . . . . . . . . . . . . . . . . . . . . . . . . . . . . . . . . . . . . . . . . . . . 88
10.5.1 Approved hydraulic oils . . . . . . . . . . . . . . . . . . . . . . . . . . . . . . . . . . . . . . . . . . . . . . . . . 88
10.5.2 Hydraulic oil quantity . . . . . . . . . . . . . . . . . . . . . . . . . . . . . . . . . . . . . . . . . . . . . . . . . . . 88
10.6 Verifications . . . . . . . . . . . . . . . . . . . . . . . . . . . . . . . . . . . . . . . . . . . . . . . . . . . . . . . . . . . . . . . . . 89
10.6.1 Proof of training . . . . . . . . . . . . . . . . . . . . . . . . . . . . . . . . . . . . . . . . . . . . . . . . . . . . . . . 89
10.6.2 Maintenance record . . . . . . . . . . . . . . . . . . . . . . . . . . . . . . . . . . . . . . . . . . . . . . . . . . . . 89
11. Index . . . . . . . . . . . . . . . . . . . . . . . . . . . . . . . . . . . . . . . . . . . . . . . . . . . . . . . . . . . . . . . . . . . . . . . . . . . . 91

able of contents
able of contents able of contentsTable of contents
11/2020 243343V03_EN

1
Before you read on...
1. Before you read on...
These operating instructions are intended for the owner and all persons
who work on or with the machine, and for all those who install, set up, repair
or clean it.
All the information that must be observed for the safe and careful handling
of the machine can be found in the operating instructions.
In the interest of technical progress, we reserve the right to make changes
to the machine and the operating instructions. Illustrations and other con-
tent of these operating instructions may differ from the delivered machine.
The date of manufacture on the machine is always the determining factor
with respect to conformity.
These operating instructions must always be kept accessible close to the
machine.
Only persons who have read and understood these operating instruc-
tions may work on and with the machine.
For the owner of the machine
In your capacity as the owner, obtain confirmation from your personnel that
the operating instructions have been read and understood. The template in
chapter ☞„Verifications“ on page 89 should be used for this purpose. If
you require more copies of the operating instructions, contact either your
TREI sales partner or TREI directly.
his chapter covers the following:
Using these operating instructions.......................................................... 2
Symbols .................................................................................................. 3
Description of the machine, its area of application and intended use..... 4
oreseeable misuse ............................................................................... 4
Safety instructions .................................................................................. 4
Before you read on...
Using these operating instructions
2 11/2020 243343V03_EN
1.1 Using these operating instructions
These operating instructions have been structured so that information is
bundled based on related activities. Notes within a chapter provide cross-
references to information in other chapters. An overview of the chapters is
provided below. or easier orientation, the symbols are specified that you
will find in the header line of each page.
Before you read on...
Operation
Cleaning / Disinfection
Set-up
Start-up, switch-off
Maintenance
Transport and installation
Help and Service
Appendix

Before you read on...
Symbols
11/2020 243343V03_EN 3
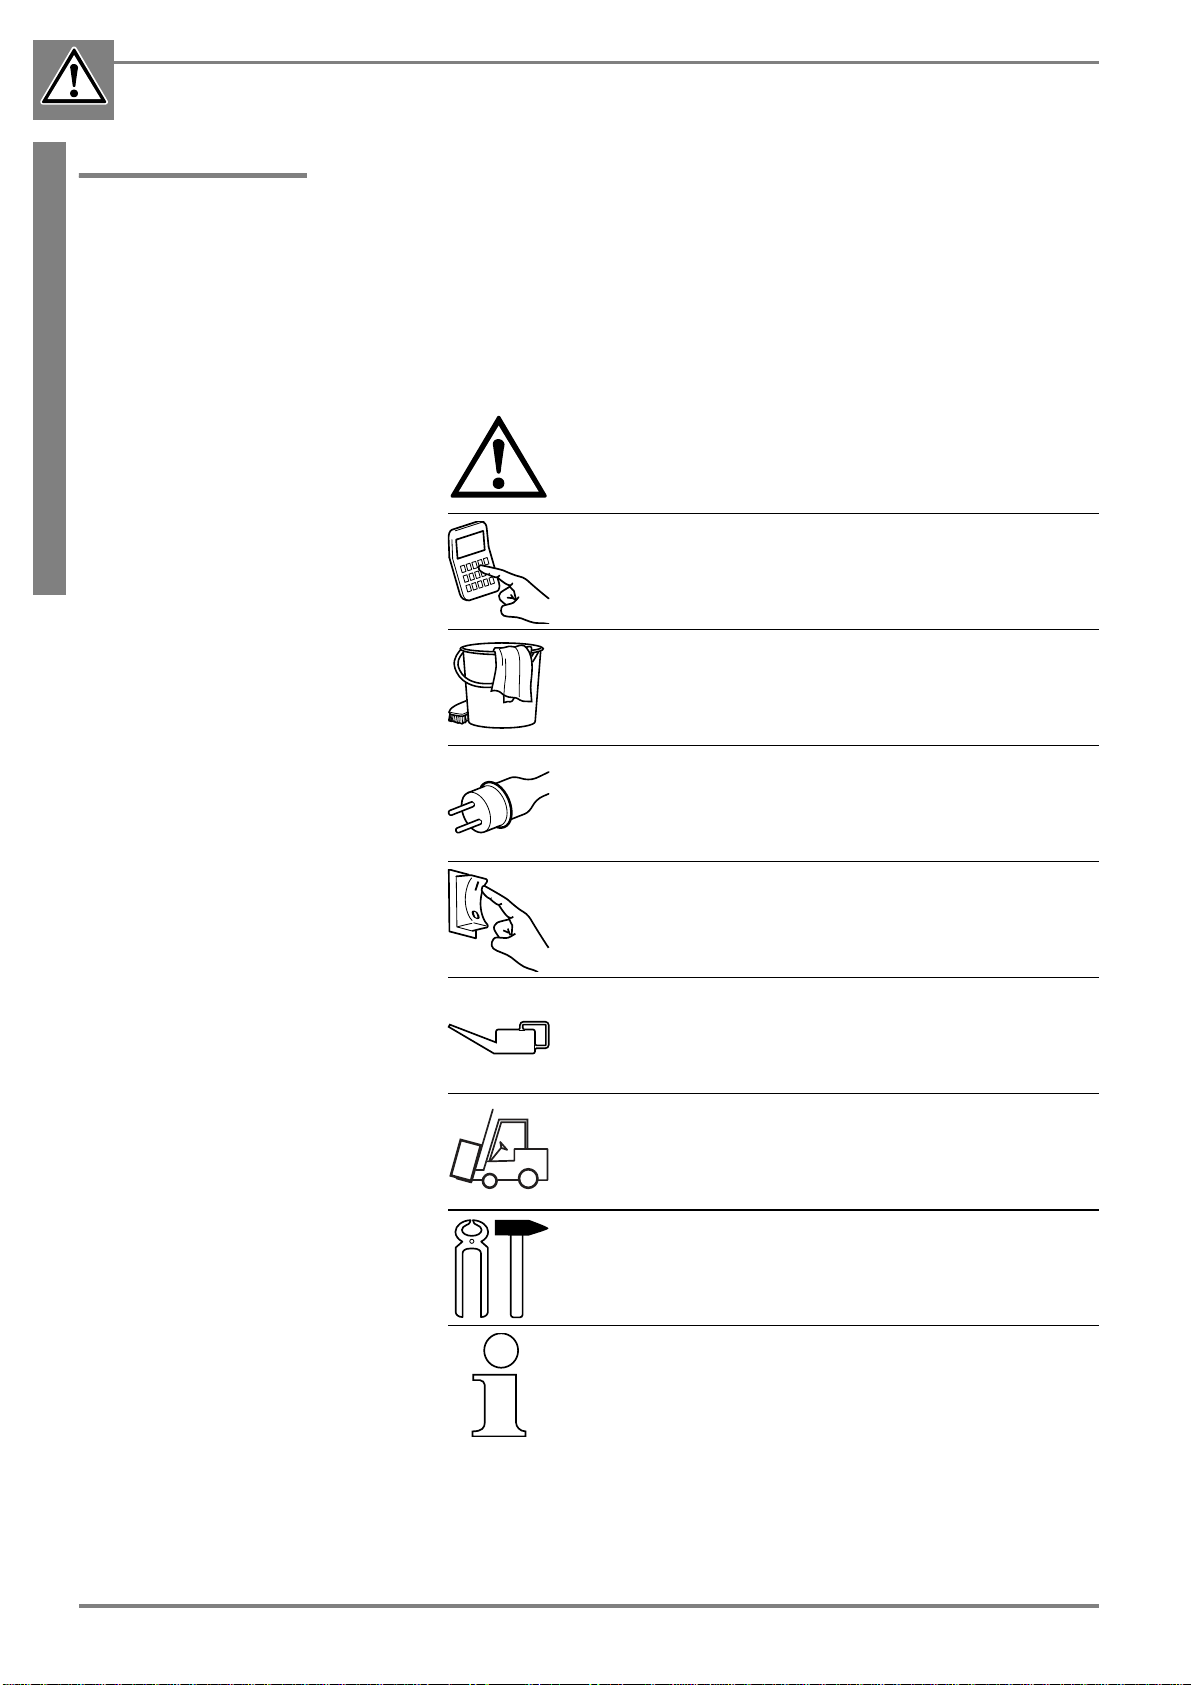
1.2 Symbols
1.2.1 In the operating manual
Hazard warnings and notices are clearly marked in the operating manual.
The following symbols are used:
1.2.2 On the machine
Several information signs have been attached to the machine. These signs
must be complete and legible. They can be reordered.
Danger
ype and source of hazard!
This hazard warning warns about possible personal injury.
Attention
ype and source of hazard
This hazard warning warns about damage to equipment, the
environment or other damage to property.
Note:
This symbol indicates information that is provided for better
understanding of the processes.
Electric shock
Cutting hazard
Wear cut-resistant gloves
Collect hydraulic oil

Before you read on...
Description of the machine, area of application and intended use
4 11/2020 243343V03_EN
1.3 Description of the machine, area of application and intended use
You may only cut food such as meat without bone, sausage, cheese, pota-
toes or fish with this machine.
The machine may only be put into circulation as technical work equipment
and not as a consumer product. It must not be operated in areas with public
access.
The machine must only be operated by trained personnel.
Intended use also includes compliance with the operating instructions and
compliance with the maintenance conditions.
Any other use of the machine is considered as non-intended use.
Thus, for example, wood may not be cut on the machine. The manufacturer
shall not be liable for any kind of damage resulting from this; the risk is
borne solely by the user.
The feed conveyor (optional) must never be used to transport personnel or
objects other than the product to be cut.
1.4 Foreseeable misuse
Other foods, such as meat with bones as well as all non-food articles such
as wood must not be cut on the machine. The manufacturer shall not be
liable for any kind of damage resulting from this; the risk shall be borne
solely by the user.
People or objects other than products for cutting must never be transported
with the feed conveyor and the discharge conveyor.
1.5 Safety instructions
Safety instructions are for your own safety and for the prevention of dam-
age to the machine. Always read the safety instructions.
1.5.1 Protective equipment
Provide your personnel with the necessary personal protective equipment.
Protective equipment includes:
cut-resistant gloves
cut-resistant apron
non-slip and cut-resistant shoes

Before you read on...
Safety instructions
11/2020 243343V03_EN 5
1.5.2 Organisational measures
The organisational measures concern the work processes in the company
where the machine is operated.
Check every day that all safety devices are functioning correctly before
starting up the machine.
In addition to these operating instructions, observe the generally appli-
cable legal and other mandatory regulations for the prevention of acci-
dents and protection of the environment.
The owner must compile an operating instruction that sets out the re-
sponsibilities for start-up, operation and maintenance of the machine.
The machine must not be left unattended while in operation.
The operator must make sure that no unauthorised persons work on
the machine.
At least once a year, all safety-related equipment of the machine must
be checked for perfect functioning by trained specialists.
The owner must verify from time to time that the personnel work in a
safety and risk conscious manner in compliance with the operating in-
structions.
If the machine is sold or leased
- hand over the operating instructions
- point out the safety regulations
- notify TREI in writing about the sale
1.5.3 Personnel qualifications and obligations
The requirements for the personnel and the owner in relation to his person-
nel are summarised here.
The machine may only be operated, cleaned, maintained and repaired
by authorised, trained and instructed personnel. These persons must
have received special instructions regarding potential hazards.
Every person responsible for installing, starting up, operating and
maintaining the machine must have read and understood the complete
operating instructions, particularly the chapter Safety instructions.
oreign personnel is to be trained in a language they understand
☞„Verifications“ on page 89. The owner must also ensure that foreign
language personnel have really understood the operating instructions.
If you require copies of the operating manual in a foreign language, ask
your TREI sales partner or TREI .
Untrained and overtired personnel must not be allowed to work on the
machine.
Persons under the age of 14 are never permitted to work on the ma-
chine.

Before you read on...
Safety instructions
6 11/2020 243343V03_EN
1.5.4 General safety instructions
The general safety instructions are listed below:
Any modifications to the machine that could impair its safety must be
reported by the operator immediately.
Never touch the edge of the knife.
In the case of malfunctions, always disconnect the main power supply
first and secure it against unintended reconnection.
The machine must not be operated if damaged, e.g. defective safety
devices, cover or lid, switches or buttons.
Always wear the personal protective equipment when working in the
open cutting chamber and when cleaning the knife.
Handle the cleaning agent carefully. ollow the manufacturer's direc-
tions for use of the cleaning agent and protective equipment.
In the event of a fire or explosion in the machine, the main power supply
must be disconnected and secured against unintended reconnection.
Before starting any maintenance and repair work on the machine, the
main power supply must be disconnected and secured against unin-
tended reconnection.
Only spare parts or accessories that are supplied or expressly ap-
proved by TREI may be fixed to the machine or replaced. Any liability
and warranty on the part of TREI Maschinenbau GmbH is excluded
for any damage caused by the use of non-GENUINE TREI SPARE
PARTS and accessories.
Unauthorised conversions and modifications to the machine that can
impair its safety are prohibited.
Ensure that all lids, covers and doors for maintenance and operating
work are always opened as far as they will go. Risk of crushing hand
and fingers from automatic closure.
If the knife is running despite any open lid, cover or door, the machine
must be switched off immediately.
Danger
Danger!
ailure to observe the following safety instructions presents a
risk of danger to life, physical injuries or substantial material
damage.
In the case of malfunctions, the machine must generally not be
put back into operation until the cause of the fault has been
cleared by an authorised person (TREI service personnel if
necessary).

Before you read on...
Safety instructions
11/2020 243343V03_EN 7
1.5.5 Safety instructions for this machine
The following safety instructions refer particularly to this machine:
Do not lift the machine at the knife box.
The machine must not be operated for a prolonged period without prod-
uct.
If the seals in the knife box or in the cutting chamber are damaged, a
breeding ground for bacteria can form in the interior of the machine.
Check the seals after every cleaning routine. Arrange for defective
seals to be replaced immediately.
The hydraulic oil can heat up to 70 °C. Let it cool down before you per-
form an oil change or check the oil level.
Hydraulic oil must never get into the waste water system. Collect es-
caping hydraulic oil.
Dispose of used oil filters and cleaning cloths smeared with oil properly.
Only the product may be placed and transported on the conveyor belt.

Before you read on...
Safety instructions
8 11/2020 243343V03_EN

9
Operation
2. Operation
This chapter is intended for the operator and all persons who work on or
with the machine.
Here, you will find basic safety instructions and other general information
that must be observed for safe and careful handling of the machine.
his chapter covers the following:
Machine overview ................................................................................. 10
Before you start... ................................................................................. 13
Notes about cutting............................................................................... 14
Cutting .................................................................................................. 17
If any malfunction occurs ...................................................................... 19
Safety instructions for operation
Note:
The owner must compile an operating instruction that sets out
the responsibilities for working on and with the machine.
Danger
Risk of injury on the upright knife!
If you open any cover or the knife box lid during a running cut-
ting operation, the machine will switch off and the knife will stop
immediately. The knife can come to a standstill in the chamber.
You can injure yourself on the upright knife.

Operation
Machine overview
10 11/2020 243343V03_EN
2.1 Machine overview
2.1.1 General overview
1 Main switch
2. Control panel
3 eed chamber
4 Knife box door
5 Discharge conveyor
Rear view
6 Discharge conveyor connection
1 2 3 4 5
TR_0116_1
6AM_0016

Operation
Machine overview
11/2020 243343V03_EN 11
2.1.2 Cutting unit
1 Upper grid
2 Lower grid
3 Cut-off knife
4 Grid clamping strap
5 Grid drive roller
2.1.3 Feeding
1 eed chamber
2 Separating slide
3 Cleaning channel

Operation
Machine overview
12 11/2020 243343V03_EN
2.1.4 Control panel
1. Main switch
2. Cut thickness adjustment
Continuous adjustment of the cut-off length
between 0 and 34 mm -> for single knife
0 and 20 mm -> for double knife
3. Operating modes selector switch
Single knife mode
for operation with single blade cut-off knife
Cycle feed
Double / multiple knife mode
for operation with multi-blade cut-off knife
Continuous feed
Grating mode
for operation with grating disk
Continuous feed
4. Pre-compression setting
(continuously adjustable pre-compression from 0 - 100%
Pre-compression "0":
The product is pushed through the running cutting unit without
pre-compression.
The cutting unit l
starts up immediately.
Pre-compression "1 - 100%":
The product is first pre-compressed at the set pressure before
starting up the cutting unit.
2
4
1
3
5
Table of contents


