Trillium 8-WSP Manual
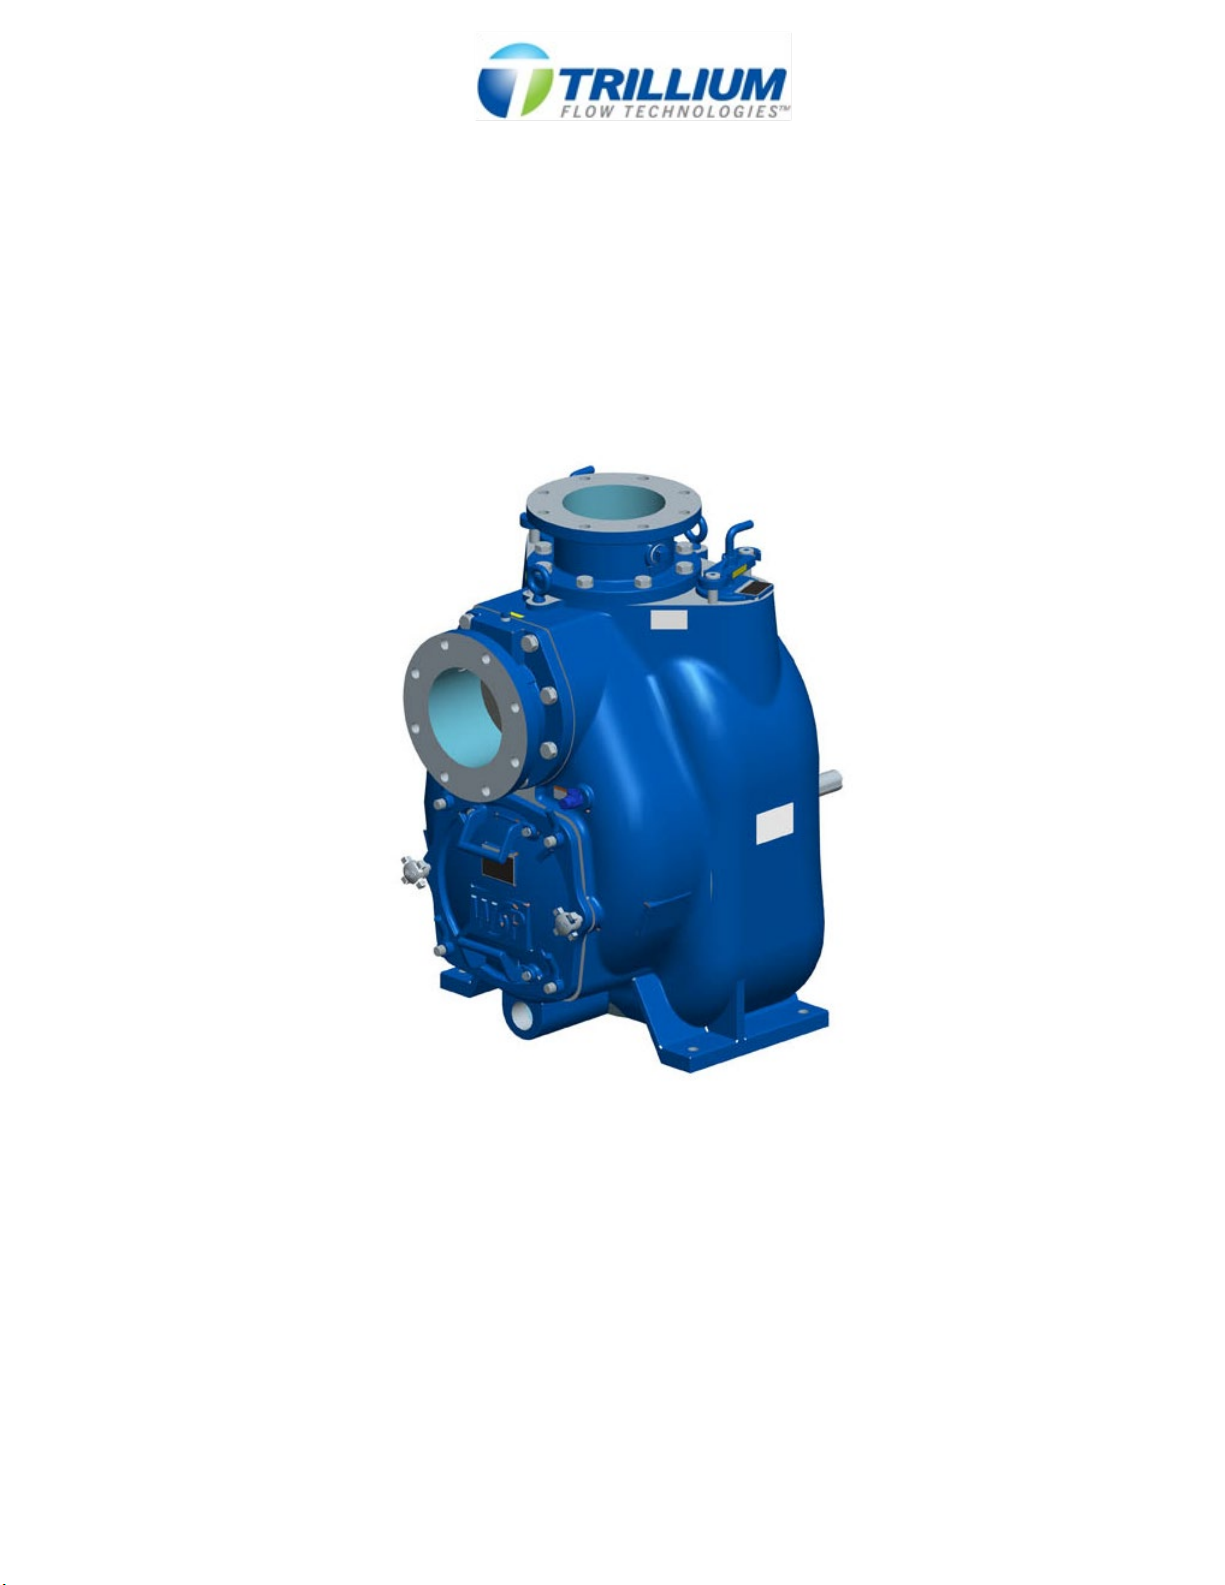
Self-Priming Pumps
Installation, Operation & Maintenance Instructions
Model 8-WSP
WSP-D300_8
Trillium Flow Technologies
Tel: 801-359-8731
Fax: 801-530-7531
© Copyright 2019, The Factory. All rights reserved.

WSP™
DATA SHEET WSP™ SELF-PRIMER PUMPS WSP-D300_8
Rev. 3 01/09/20
© 2019 The Factory
2
I. INTRODUCTION ................................................................................................ 4
PURPOSE.............................................................................................................. 4
II. SAFETY.............................................................................................................. 5
III. PREVENTIVE MAINTENANCE .................................................................... 13
IV. DISASSEMBLY & REASSEMBLY OF THE PUMP & SEAL ......................... 15
A. REMOVING THE COVER PLATE & WEARPLATE ...................................... 17
B. REMOVING THE SUCTION CHECK VALVE ............................................... 18
C. REMOVING THE ROTATING ASSEMBLY................................................... 18
D. REMOVING THE IMPELLER........................................................................ 21
F. REMOVING & DISASSEMBLING THE SHAFT & BEARING........................ 22
G. DISASSEMBLY OF THE TWO-PIECE BEARING HOUSING....................... 23
H. REASSEMBLING THE TWO-PIECE BEARING HOUSING.......................... 24
I. REASSEMBLING & INSTALLATING THE SHAFT & BEARING................... 24
J. INSTALLING THE MECHANICAL SEAL....................................................... 27
1. Mechanical Seal Installation ...................................................................... 29
2. Cartridge Seal Installation.......................................................................... 30
K. INSTALLING & ADJUSTING THE IMPELLER.............................................. 30
L. INSTALLING THE ROTATING ASSEMBLY ................................................. 32
M. INSTALLING THE SUCTION CHECK VALVE .......................................... 32
N. INSTALLING & ADJUSTING THE COVERPLATE ....................................... 32
V. MAINTAINING THE PRESSURE RELIEF VALVE ........................................... 34
A. Final Pump Assembly ................................................................................... 35
VI. LUBRICATION .............................................................................................. 35
A. Seal Cavity .................................................................................................... 35
B. Bearing Cavity............................................................................................... 35
C. Power Source................................................................................................ 36
VII. TROUBLESHOOTING .................................................................................. 36
VIII. INSTALLATION............................................................................................. 38
A. PUMP DIMENSIONS .................................................................................... 39
B. INSPECTION PRIOR TO INSTALLATION.................................................... 39
C. PUMP POSITIONING ................................................................................... 40
1. Lifting ......................................................................................................... 40
2. Mounting.................................................................................................... 40
3. Clearance .................................................................................................. 41
D. SUCTION AND DISCHARGE PIPING .......................................................... 41
1. Materials.................................................................................................... 41
2. Configuring the Line .................................................................................. 41
3. Pump Connections .................................................................................... 41
4. Gauges...................................................................................................... 41
E. SUCTION LINES........................................................................................... 42
1. Fittings ....................................................................................................... 42
2. Strainers .................................................................................................... 42
3. Sealing....................................................................................................... 42
4. Suction Lines in Sumps ............................................................................. 43
5. Suction Line Positioning ............................................................................ 43
F. DISCHARGE LINES ..................................................................................... 45
1. Siphoning................................................................................................... 45

WSP™
DATA SHEET WSP™ SELF-PRIMER PUMPS WSP-D300_8
Rev. 3 01/09/20
© 2019 The Factory
3
2. Valves........................................................................................................ 45
3. Bypass Lines ............................................................................................. 45
G. WSP™ AUTOMATIC AIR RELEASE VALVE (WSP™ ARV) ........................ 47
1. Theory of Operation................................................................................... 47
2. WSP™ Air Release Valve Installation ....................................................... 49
H. ALIGNMENT ................................................................................................. 50
1. Coupled Drives .......................................................................................... 51
2. Spider Insert-Type Couplings .................................................................... 51
3. Non-Spider Type Couplings....................................................................... 51
4. V-Belt Drives.............................................................................................. 52
IX. OPERATION ................................................................................................. 53
A. PRIMING....................................................................................................... 53
B. START-UP .................................................................................................... 54
C. OPERATION................................................................................................. 54
1. Lines with a Bypass................................................................................... 54
2. Lines Without a Bypass ............................................................................. 55
3. Leaking...................................................................................................... 55
4. Liquid Temperature and Overheating ........................................................ 55
5. Strainer Check........................................................................................... 56
6. Checking the Pump Vacuum ..................................................................... 56
D. STOPPING.................................................................................................... 57
1. Preserving the Pump in Cold Weather ...................................................... 57
E. CHECKING THE BEARING TEMPERATURE .............................................. 58
X. TECHNICAL DATA........................................................................................... 59
A. 8” WSP Curve ............................................................................................... 59
B. 8” WSP General Arrangement Drawing ........................................................ 60
C. 8” WSP Sectional Drawing and Parts List ..................................................... 61
D. WSP™ Air Release Valve Drawing and Parts List........................................ 67

WSP™
DATA SHEET WSP™ SELF-PRIMER PUMPS WSP-D300_8
Rev. 3 01/09/20
© 2019 The Factory
4
INSTALLATION, OPERATION AND MAINTENANCE INSTRUCTIONS
I. INTRODUCTION
Warning levels applying to the safe installation, operation and maintenance of all
sizes of WSP™ Self-Primer (WSP) pumps can be located at the beginning of this
manual. You must refer to the manual accompanying your power source before
attempting to begin operation since Weir Specialty Pumps has no control over or
special knowledge of the power source to which you will connect these pumps.
You have made a wise decision in your purchase of a WSP™ Self-Primer (WSP)
pump, and we thank you for your business. To learn how to install and operate your
pump safely, read this manual carefully. Failure to follow the enclosed instructions
may result in damage to the pump or personal injury. The WSP™ Self-Primer Pump
Installation, Operation, and Maintenance manual was created to help you maximize
the pump’s performance while achieving the longest life possible.
Your pump is a centrifugal, self-priming model featuring a semi-open impeller and
suction check valve. The pump is designed with external shimless adjusters for
setting the wear plate to impeller clearance. It pumps liquids containing large,
entrained solids as well as slurries. Its basic material is ductile iron with a cast steel
impeller and a steel wearplate.
For questions about the pump or its application not covered in this manual or other
documentation included with the unit, please contact your WSP™ distributor, or write
to:
Weir Specialty Pumps
P.O. Box 209
Salt Lake City, UT 84110-0209
Phone: (801) 359-8731
Contact the power source manufacturer’s local dealer or representative for
information or technical assistance on your power source before attempting
installation or operation of this Weir Self-Primer Pump.
PURPOSE
This manual is designed for all levels of users from a novice to an experienced
operator. It provides employees with known procedures requiring extra attention as
well as providing information on unsafe situations that could damage the equipment
and/or be dangerous to the operator. While Weir Specialty Pumps is providing you
with this information, we cannot anticipate or provide detailed precautions for every
situation that could occur during maintenance of the unit.
It is your responsibility, as the owner and/or maintenance person, to be sure you
always use safe and established maintenance procedures and that any procedures
not included in this manual are performed only after ensuring you are not
compromising either personal safety or your pump’s integrity by such practices.

WSP™
DATA SHEET WSP™ SELF-PRIMER PUMPS WSP-D300_8
Rev. 3 01/09/20
© 2019 The Factory
5
IMMEDIATE HAZARDS WHICH WILL RESULT
IN SEVERE PERSONAL INJURY OR DEATH.
THESE INSTRUCTIONS DESCRIBE THE
PROCEDURE REQUIRED AND THE INJURY
WHICH WILL RESULT FROM FAILURE TO
FOLLOW THE PROCEDURE.
HAZARDS OR UNSAFE PRACTICES WHICH
COULD RESULT IN SEVERE PERSONAL
INJURY OR DEATH. THESE INSTRUCTIONS
DESCRIBE THE PROCEDURE REQUIRED
AND THE INJURY WHICH COULD RESULT
FROM FAILURE TO FOLLOW THE
PROCEDURE.
HAZARDS OR UNSAFE PRACTICES WHICH
COULD RESULT IN MINOR PERSONAL
INJURY OR PRODUCT OR PROPERTY
DAMAGE WHICH COULD RESULT FROM
FAILURE TO FOLLOW THE PROCEDURE.
II. SAFETY
The installation, operation and maintenance warnings for all sized WSP™ Self-
Primer (WSP) Pumps follows:
PLEASE STUDY THESE INSTRUCTIONS CAREFULLY BEFORE PUTTING THE
PUMP INTO SERVICE. ADHERENCE TO THESE INSTRUCTIONS IS NECESSARY
TO ENSURE THAT OPERATOR SAFETY AND SATISFACTORY PUMP OPERATION
ARE NEVER COMPROMISED. OPERATING PERSONNEL MUST READ AND
UNDERSTAND THESE INSTRUCTIONS BEFORE ANY ATTEMPT TO SERVICE THE
PUMP IS MADE.
FAILURE TO FOLLOW THESE INSTRUCTIONS MAY RESULT IN SEVERE INJURY.

WSP™
DATA SHEET WSP™ SELF-PRIMER PUMPS WSP-D300_8
Rev. 3 01/09/20
© 2019 The Factory
6
WHEN A MANUAL SHUT-OFF VALVE IS INSTALLED IN A BYPASS LINE, IT MUST
REMAIN OPEN DURING OPERATION. CLOSING THE MANUAL SHUT-
OFF VALVE
COULD CAUSE A PUMP, WHICH
HAS LOST PRIME, TO CONTINUE TO OPERATE
WITHOUT REACHING PRIME. THIS COULD CAUSE DANGEROUS OVERHEATING OF
THE PUMP AND POSSIBLY RUPTURE THE PUMP CASING.
BEFORE SERVICING, ALLOW SUFFICIENT TIME FOR THE OVERHEATED PUMP TO
COMPLETELY COOL. ONCE THE PUMP HAS
COMPLETELY COOLED, DRAIN THE
LIQUID FROM THE PUMP BY REMOVING THE CASING DRAIN PLUG. WHEN
REMOVING THE DRAIN PLUG, USE CAUTION. FAILURE TO DO SO MAY RESULT IN
INJURY. PLATES, COVERS, GAUGES, OR FITTINGS MUST NOT BE REMOVED FROM
AN OVERHEATED PUMP. LIQ
UIDS IN THE PUMP CAN REACH BOILING
TEMPERATURES AND PRESSURE INSIDE THE PUMP CAN CAUSE PARTS TO BE
EXPELLED VIOLENTLY.
BEFORE SERVICING, ALLOW SUFFICIENT TIME FOR AN OVERHEATED PUMP TO
COMPLETELY COOL. ONCE THE PUMP HAS COMPLETELY COOLED, DRAIN THE
LIQUID FROM THE PUMP BY REMOVING THE CASING DRAIN PLUG. WHEN
REMOVING THE DRAIN PLUG, USE CAUTION. FAILURE TO DO SO MAY RESULT IN
INJURY. PLATES, COVERS, GAUGES, OR FITTINGS MUST NOT BE REMOVED
FROM AN OVERHEATED PUMP. LIQUIDS IN THE PUMP CAN REACH BOILING
TEMPERATURES AND VAPOR PRESSURE INSIDE THE PUMP CAN CAUSE PARTS
TO BE EXPELLED VIOLENTLY.
WHEN PERFORMING EQUIPMENT MAINTENANCE OR IF THE PUMP IS TO
REMAIN OUT OF SERVICE FOR A PERIOD OF TIME, THE EQUIPMENT
ELECTRICAL SERVICE MUST BE DISCONNECTED WITH AN APPROVED
LOCKOUT AND KEY. FAILURE TO LOCK OUT THE EQUIPMENT MAY RESULT IN
INJURY.
1. IF OVERHEATED, THE PUMP MUST BE ALLOWED TO COMPLETELY
COOL BEFORE ATTEMPTING ANY PROCEDURES.
2. CHECK THE TEMPERATURE BEFORE OPENING ANY COVERS,
PLATES, OR PLUGS.
3. ENSURE THAT SUCTION AND DISCHARGE VALVES ARE CLOSED.
4. SLOWLY AND CAREFULLY VENT THE PUMP.
5. DRAIN THE PUMP.

WSP™
DATA SHEET WSP™ SELF-PRIMER PUMPS WSP-D300_8
Rev. 3 01/09/20
© 2019 The Factory
7
ONCE THE PUMP HAS BEEN POSITIONED, ENSURE THAT ALL PUMP AND PIPING
CONNECTIONS ARE TIGHTENED, SECURED, AND SUPPORTED PROPERLY.
ALL GUARDS AND PROTECTIVE DEVICES MUST BE INSTALLED BEFORE THE PUMP
IS STARTED. CONTACT WITH UNGUARDED BELTS, SHEAVES, OR COUPLINGS
COULD RESULT IN INJURY.
PLATES, COVERS, GAUGES, PIPE PLUGS, OR FITTINGS MUST NOT BE
REMOVED FROM AN OVERHEATED PUMP. VAPOR PRESSURE WITHIN THE
PUMP MAY CAUSE PARTS TO BECOME DISENGAGED AND EJECTED WITH
GREAT FORCE, CAUSING POTENTIAL SEVERE INJURY TO PERSONNEL.
ALWAYS ALLOW THE PUMP TO COOL BEFORE SERVICING ANY EQUIPMENT.
DO NOT OPERATE PUMP WITH BOTH SUCTION AND DISCHARGE VALVES CLOSED
OR WITH SUCTION OR DISCHARGE BLOCKED BY CLOGGING – THIS COULD CAUSE
DAMAGE AND IS DANGEROUS. THESE PUMPS ARE TO BE USED FOR LIQUID
SERVICE ONLY. EXCESSIVE PRESSURE CAN CAUSE MALFUNCTION LEADING TO
INJURY.
PUMP LIFTING EYES ON THE SELF-PRIMING PUMP ARE ONLY DESIGNED TO
HANDLE THE WEIGHT OF THE BARE PUMP. BEFORE LIFTING, ENSURE THAT
ALL SUCTION AND DISCHARGE HOSES AND PIPING HAVE BEEN REMOVED
FROM THE PUMP, AND THE PUMP IS FREE FROM ANY BASE OR DRIVER.
EQUIPMENT LIFTING DEVICES SUCH AS CHAIN, LIFTING EYES, HOOKS, ETC.,
MUST BE APPROVED BY LOCAL, STATE, OR FEDERAL SAFETY CODES.
HOIST AND CRANES MUST BE ADEQUATELY SIZED TO LIFT RATED LOADS.
FAILURE TO USE APPROVED LIFTING DEVICES MAY RESULT IN INJURY.

WSP™
DATA SHEET WSP™ SELF-PRIMER PUMPS WSP-D300_8
Rev. 3 01/09/20
© 2019 The Factory
8
ENSURE THAT THE BYPASS LINE IS DIRECTED BACK INTO THE WET-
WELL OR TANK
TO PREVENT HAZARDOUS SPILLS AS SOME LEAKING (1 TO 5 GALLONS [3.8 TO 19
LITERS] PER MINUTE) WILL OCCUR WHEN THE VALVE IS IN THE FULL-
CLOSED
POSITION.
WHEN CHECKING ALIGNMENT YOU MUST FIRST DISCONNECT THE POWER
SOURCE.
YOUR PUMP HAS BEEN ENGINEERED TO PUMP LIQUIDS THAT CONTAIN SOLIDS OR
SLURRIES. AT NO TIME SHOULD THE LIQUID BE VOLATILE
, CORROSIVE, OR
COMBUSTIBLE. FAILURE TO DO SO C
OULD DAMAGE THE PUMP OR RESULT IN
INJURY.
AFTER THE PUMP CASING HAS BEEN FILLED, REINSTALL AND TIGHTEN THE FILL
PLUG. FAILURE TO OPERATE THE PUMP WITHOUT ALL CONNECTION PIPING
SECURELY INSTALLED COULD CAUSE LIQUID IN THE PUMP TO BE FORCED OUT
UNDER PRESSURE AND MAY RESULT IN INJURY.
PRIO
R TO WORKING ON THIS PUMP, ALWAYS LOCK OUT OR DISCONNECT THE
PUMP FROM ITS POWER SOURCE. IT MUST REMAIN INOPERABLE DURING REPAIRS.

WSP™
DATA SHEET WSP™ SELF-PRIMER PUMPS WSP-D300_8
Rev. 3 01/09/20
© 2019 The Factory
9
NO PERSON SHOULD ATTEMPT TO OPEN OR SERVICE THIS PUMP BEFORE
BECOMING THOROUGHLY FAMILIAR WITH ALL THE PROCEDURES OUTLINED
IN THIS MANUAL.
1. PLEASE STUDY THESE INSTRUCTIONS CAREFULLY.
2. WHEN PERFORMING EQUIPMENT MAINTENANCE, THE EQUIPMENT
ELECTRICAL SERVICE MUST BE LOCKED OUT WITH AN APPROVED
LOCKOUT AND KEY.
3. IF THE PUMP HAS OVERHEATED, ALLOW SUFFICIENT TIME FOR THE
PUMP TO COMPLETELY COOL BEFORE ATTEMPTING TO OPEN OR
SERVICE THE PUMP.
4. CAREFULLY CHECK THE TEMPERATURES BEFORE OPENING ANY
COVERS, PLATES, OR PLUGS.
5. CLOSE THE SUCTION AND DISCHARGE VALVES.
6. CAREFULLY AND SLOWLY VENT THE PUMP.
7. DRAIN THE PUMP.
PUMP LIFTING EYES ON THE SELF-PRIMING PUMP ARE ONLY DESIGNED TO
HANDLE THE WEIGHT OF THE BARE PUMP. BEFORE LIFTING, ENSURE
THAT ALL SUCTION AND DISCHARGE HOSES AND PIPING HAVE BEEN
REMOVED FROM THE PUMP, AND IT IS FREE OF ANY BASE AND DRIVER.
EQUIPMENT LIFTING DEVICES SUCH AS CHAIN, LIFTING EYES, HOOKS, ETC.,
MUST BE APPROVED BY LOCAL, STATE, OR FEDERAL SAFETY CODES.
HOIST AND CRANES MUST BE ADEQUATELY SIZED TO LIFT RATED LOADS.
FAILURE TO USE APPROVED LIFTING DEVICES MAY RESULT IN INJURY.
BEFORE USING ANY CLEANING SOLVENTS CAREFULLY READ AND FOLLOW ALL
PRECAUTIONS PRINTED ON THE SOLVENT CONTAINER. CLEANING SOLVENTS ARE
KNOWN TO BE TOXIC AND FLAMMABLE AND ARE ONLY TO BE USED IN WELL-
VENTILATED AREAS AWAY FROM EXCESSIVE HEAT, SPARKS, AND FLAMES.
WSP™
DATA SHEET WSP™ SELF-PRIMER PUMPS WSP-D300_8
Rev. 3 01/09/20
© 2019 The Factory
10
PRESSURE WITHIN THE PUMP MAY CAUSE PARTS TO BECOME DISENGAGED
AND EXPELED VIOLENTLY, CAUSING POTENTIAL SEVERE INJURY TO
PERSONNEL. ALWAYS ALLOW THE PUMP TO COOL BEFORE SERVICING.
THIS PUMP SHOULD ONLY BE OPERATED IN THE DIRECTION SHOWN ON THE
ARROW ON THE PUMP BODY AND ON ANY ACCOMPANYING DECALS.
SERIOUS DAMAGE COULD OCCUR TO THE PUMP ASSEMBLY IF BOTH LIFTING EYES
ARE NOT UTILIZED DURING LIFTING AND MOVEMENT OF THE UNIT. ONLY LIFT THE
PUMP WITH THE LIFTING EYES.
IN HIGH DISCHARGE HEAD APPLICATIONS THE DISCHARGE THROTTLING VALVE
MUST BE GRADUALLY CLOSED BEFORE THE PUMP IS STOPPED.
BYPASS LINES MUST BE SECURED AGAINST BEING DRAWN INTO THE PUMP
SUCTION INLET WHEN RETURNED TO A WET WELL.
ALIGNMENT ADJUSTMENT IN ONE DIRECTION MAY DISRUPT ALIGNMENT
ADJUSTMENT IN ANOTHER DIRECTION. CHECK EACH PROCEDURE AFTER
ALTERING ALIGNMENT.

WSP™
DATA SHEET WSP™ SELF-PRIMER PUMPS WSP-D300_8
Rev. 3 01/09/20
© 2019 The Factory
11
PUMP PERFORMANCE INCLUDING SPEED AND OPERATING CONDITIONS ARE
REQUIRED TO BE WITHIN THE RANGE SHOWN ON THE MANUFACTURER’S PUMP
PERFORMANCE CURVE.
THIS PUMP SHOULD ALWAYS BE OPERATED WITH LIQUID IN THE PUMP CASING.
WHEN OPERATING THE PUMP DRY, THE PUMP WILL NOT PRIME.
DISASSEMBLY OF THE SHAFT AND BEARING IS NOT RECOMMENDED IN THE FIELD.
PERFORM THESE OPERATIONS
ONLY IN A PROPERLY EQUIPPED SHOP BY
QUALIFIED TECHNICIANS.
IT IS RECOMMENDED THAT THE BEARING BE CLEANED AND INSPECTED IN PLACE
TO PREVENT DAMAGE DURING REMOVAL FROM THE SHAFT. WE HIGHLY
RECOMMEND REPLACEMENT OF THE BEARINGS ANYTIME THE SHAFT AND
BEARINGS ARE REMOVED.
BEARINGS MUST BE KEPT IN AN ENVIRONMENT THAT IS FREE OF ALL DIRT AND
FOREIGN MATERIAL. FAILURE TO DO SO WILL RESULT IN A SHORTER BEARING
LIFE. THE BEARINGS SHOULD NEVER BE SPUN DRY AS THIS MAY SCRATCH THE
BALLS OR RACES AND WILL CAUSE PREMATURE BEARING FAILURE.
NEVER PRESS OR HIT AGAINST THE OUTER RACE, BALLS, OR BALL CAGE DURING
BEARING INSTALLATION ONTO THE SHAFT. PRESS THE INNER RACE ONLY.

WSP™
DATA SHEET WSP™ SELF-PRIMER PUMPS WSP-D300_8
Rev. 3 01/09/20
© 2019 The Factory
12
PUSH AGAINST THE OUTER RACE DURING INSTALLATION OF THE BEARINGS INTO
THE BEARING BORE. NEVER STRIKE THE BALL CAGE OR BALLS.
ANY TIME THE OLD SEAL IS REMOVED FROM THE PUMP A NEW SEAL ASSEMBLY
SHOULD BE INSTALLED. DURING REASSEMBLY WEAR PATTERNS ON THE
FINISHED FACES CANNOT BE REALIGNED. PREMATURE SEAL FAILURE WILL
RESULT FROM USING AN OLD SEAL.
OPERATION AT TEMPERATURES ABOVE 160OF (71OC). IS NOT RECOMMENDED FOR
THIS SEAL. THIS PUMP SHOULD NOT BE USED AT HIGHER OPERATING
TEMPERATURES, WITHOUT CONSULTING THE FACTORY.
WHEN REUSING AN OLD SEAL, DO NOT ATTEMPT TO SEPARATE THE
ROTATING PORTION OF THE SEAL FROM THE SHAFT SLEEVE. DURING USE
THE RUBBER BELLOWS WILL BOND TO THE SLEEVE AND ATTEMPTING TO
SEPARATE THEM WILL DAMAGE THE BELLOWS.
BEFORE REINSTALLING THE IMPELLER, COMPLETELY CLEAN THE SHAFT AND
IMPELLER THREADS. THE SMALLEST AMOUNT OF DIRT ON THE THREADS COULD
CAUSE THE IMPELLER TO SEIZE ON THE SHAFT, WHICH, IN TURN, MAKES FUTURE
REMOVAL DIFFICULT IF NOT IMPOSSIBLE WITHOUT SHAFT AND IMPELLER
DAMAGE.

WSP™
DATA SHEET WSP™ SELF-PRIMER PUMPS WSP-D300_8
Rev. 3 01/09/20
© 2019 The Factory
13
INSTALLATION AND OPERATION OF THE PUMPS AND ASSOCIATED EQUIPMENT
MUST BE IN ACCORDANCE WITH ALL NATIONAL AND LOCAL CODES, AS WELL AS
INDUSTRY STANDARDS.
REGULARLY OBSERVE THE CONDITION OF THE BEARING LUBRICANT FOR SIGNS
OF RUST OR MOISTURE, ESPECIALLY IN AREAS WHERE VARYING HOT AND COLD
TEMPERATURES ARE TYPICAL.
III. PREVENTIVE MAINTENANCE
Wear on the pump is affected by any number of pump applications. Abrasive
qualities due to specific applications as well as the pressure and the liquid
temperature being pumped will all cause pump wear. This section provides basic
practices and recommendations for preventive maintenance on your WSP™ Self-
Primer pump.
Following a consistent preventive maintenance schedule will help maintain peak
performance and an extended life from your WSP™ Self-Primer pump.
If you have questions about your current or proposed application, contact your
WSP™ distributor or the Weir Specialty Pump factory.
The key to a quality preventive maintenance program is continuous record keeping.
Always note changes in suction and discharge gauge readings if your pump includes
such gauges. If there are changes between regular inspections, it may indicate
some type of dysfunction that can be corrected before damage to your system or
total failure happens. Document any wearing parts during inspections for later
comparison. Make note in your records whether certain parts fail during the same
duty cycle so the part can be checked and replaced before it fails. This helps reduce
unscheduled down time.
Inspect wearing parts at 250 hours to ascertain the wear rate when implementing
new applications. Later inspections should be completed at designated times noted
on the following chart. Be aware that critical applications must be inspected more
frequently.
THIS SPACE INTENTIONALLY LEFT BLANK

WSP™
DATA SHEET WSP™ SELF-PRIMER PUMPS WSP-D300_8
Rev. 3 01/09/20
© 2019 The Factory
14
Preventive Maintenance Guide
Daily
Service
Owner
Status
Notes
Check the following:
Check the overall condition of the pump
Notice: Hardware for tightness
Are there any leaks?
Is there unusual vibration?
Monitor and record the gauge readings
Are the speed and flow normal?
Weekly
Service
Owner
Status
Notes
Check the following:
Bearing oil level in the sight gauge
Notice if the bearing oil is cloudy. If the
oil is cloudy, drain and replace.
Seal oil level and condition. If the oil is
cloudy, drain and replace.
Monthly
Service
Owner
Status
Notes
Check the following: If your pump is
driven by V-Belts
Check tightness
Alignment of belts
Tension belts
Check the following: If your pump is
direct drive with a coupling
Inspect the coupling for signs of:
− Wear
− Misalignment
− Loose fasteners
Check the following: If your pump
has an Air Release Valve
Inspect and lubricate
Semi Annually
Service
Owner
Status
Notes
Check the following:
Adjust impeller to wear plate clearance
Adjust impeller to seal plate clearance
Inspect, clean and lubricate air release
valve
Annually
Service
Owner
Status
Notes
Check the following:
Piping for:
− Leaks
− Loose fasteners
Bearing oil:
− Drain and replace
Seal oil:
− Drain and replace
Note: Service interval based on an intermittent duty cycle equal to approximately 4000
hours annually. Adjust schedule as required for lower or higher duty cycles or extreme
operating conditions.

WSP™
DATA SHEET WSP™ SELF-PRIMER PUMPS WSP-D300_8
Rev. 3 01/09/20
© 2019 The Factory
15
IV. DISASSEMBLY & REASSEMBLY OF THE PUMP & SEAL
Review all warnings before performing installation and follow the directions on all
tags, labels, and decals attached to the pump very closely.
Your pump requires minimum service due to its rugged, low maintenance design.
Should you need to inspect or replace wearing parts, follow these instructions. They
match the sectional views and the list of appropriate parts.
Instructions in this manual are intended to inform the operator about any procedures
that need extra attention. It will also make note of procedures that could damage
equipment or cause danger to the operator and/or other employees. This manual
will not anticipate or provide in-depth precautions for every possible situation that
could happen during maintenance or repair of the WSP™ Self-Primer Pump. As
always, it is the owner’s and maintenance staff’s duty to be sure that safety and
established maintenance procedures and processes are used. Any procedures or
processes not noted in this manual should only be completed after determining that
personal safety and equipment integrity is not harmed.
A number of servicing functions may be completed by draining all the liquid from the
pump and removing the cover plate assembly. Before making significant repairs,
disconnect the power source and piping. The following instructions require complete
disassembly.
Before disassembly, determine the material type and configuration of the pump if
unknown. The first set of characters in the pump name describes the size and model
of the pump (8-WSP is an 8” self-primer). Use the following key to determine the
materials used in the pump from the remaining characters in the pump name.
THIS SPACE INTENTIONALLY LEFT BLANK

WSP™
DATA SHEET WSP™ SELF-PRIMER PUMPS WSP-D300_8
Rev. 3 01/09/20
© 2019 The Factory
16
* This letter indicates a Ductile Iron pump case with a Hi-Chrome Cover Plate. A Hi-
Chrome case is not available.
For example, 8-WSP-BBBBB-B1-BLG is a stainless pump with a stainless ANSI
flange, stainless hardware, nitrile o-rings, and Type 2 tungsten carbide seal.
If an “X” is present in the materials code, please contact the factory providing the
pump serial number for assistance in determining the material type and configuration
of the pump.
Prior to working on the pump, lock out or disconnect its power source. It must
remain inoperable during repairs. Next, shut all the valves in both discharge and
suction lines.
PRIOR TO WORKING ON THIS PUMP, ALWAYS LOCK OUT OR DISCONNECT THE
PUMP FROM ITS POWER SOURCE. IT MUST REMAIN INOPERABLE DURING REPAIRS.
To take apart and repair the power source, refer to the documentation supplied with
your power source, or contact your local power source representative.
Digit 1
Digit 2
Digit 3
Digit 4
Digit 5
-
Digit 6
-
Digit 7
Digit 8
Digit 9
Case / Cover Plate
Seal
Plate Wear Plate
Bearing
Housing Impeller - Flanges - Hardware O-rings Seal
A – DI
A - CI
A - Steel
A - DI/CI
A - Steel
-
A1 - CI ANSI
-
A - Steel
L - Nitrile
F - Type 2 SC
B – SS B - CD4
B – SS
8 & 10” – CD4
B – SST/CI
2” – CD4/CI B - CD4 - A2 - CI DIN - B - Stainless M - Buna G - Type 2 TC
*C – HiCr
(DI/HiCr) C - HiCr
C – HiCr
ONLY 8” & 10” C – HiCr/CI C - HiCr - A3 - CI JIS N - Viton H - Type 9 SS
D – Mangabraze
Except 8”
D – DI
3” ONLY
A4 - CI NPT
P - Kalrez I - Type 9 TT
E - DI
A5 - CI BSP
B1 - SS ANSI
B2 - SS DIN
B3 - SS JIS
B4 - SS NPT
B5 - SS BSP
X - Other
X-
Other X - Other X - Other X - Other
X - Other
X - Other X - Other X - Other

WSP™
DATA SHEET WSP™ SELF-PRIMER PUMPS WSP-D300_8
Rev. 3 01/09/20
© 2019 The Factory
17
NO PERSON SHOULD ATTEMPT TO OPEN OR SERVICE THIS PUMP BEFORE
BECOMING THOROUGHLY FAMILIAR WITH ALL THE PROCEDURES OUTLINED
IN THIS MANUAL.
1. PLEASE STUDY THESE INSTRUCTIONS CAREFULLY.
2. WHEN PERFORMING EQUIPMENT MAINTENANCE, THE EQUIPMENT
ELECTRICAL SERVICE MUST BE LOCKED OUT WITH AN APPROVED
LOCKOUT AND KEY.
3. IF THE PUMP HAS OVERHEATED, ALLOW SUFFICIENT TIME FOR THE
PUMP TO COMPLETELY COOL BEFORE ATTEMPTING TO OPEN OR
SERVICE THE PUMP.
4. CAREFULLY CHECK THE TEMPERATURES BEFORE OPENING ANY
COVERS, PLATES, OR PLUGS.
5. CLOSE THE SUCTION AND DISCHARGE VALVES.
6. CAREFULLY AND SLOWLY VENT THE PUMP.
7. DRAIN THE PUMP.
A. REMOVING THE COVER PLATE & WEARPLATE
Remove the pump casing drain plug. Drain the pump before attempting to maintain
or repair the unit. Once the cover plate assembly is removed, the wearplate
becomes accessible and is easy to maintain. When service or repair is completed,
clean, inspect and reinstall the drain plug.
After removing the hand nuts, use the adjuster knobs; pull (or use jackbolts to
remove) the cover plate and assembled wearplate from the pump casing.
To determine how much wear has taken place, rest the wear plate on top of the
impeller and measure the gap as shown in Figure 1. If more the 1/8th inch out of flat,
the wear plate should be replaced (Figure 1).

WSP™
DATA SHEET WSP™ SELF-PRIMER PUMPS WSP-D300_8
Rev. 3 01/09/20
© 2019 The Factory
18
Figure 1
Disengage the hardware to remove the wearplate then inspect it and replace if it is
badly gouged or worn.
Carefully inspect the O-rings in the back cover and replace if worn or damaged.
B. REMOVING THE SUCTION CHECK VALVE
Remove the check valve pin. Pull the complete assembly from the suction flange by
reaching through the back cover opening. Once this is completed, service, inspect
and replace the check valve assembly.
NOTE: Additional check value disassembly is not needed. It must be replaced as a
complete unit since individual parts are not sold separately.
C. REMOVING THE ROTATING ASSEMBLY
To service the rotating assembly without disconnecting the suction or discharge
piping, remove the power source. This will provide clearance for servicing.
To prevent seal cavity oil from escaping when the impeller is loosened, remove the
seal cavity drain plug, and drain the oil in the seal cavity before loosening the
impeller.
With the rotating assembly still attached to the pump casing, loosen the impeller.
When done, clean, inspect and reinstall the drain plug in the seal cavity.
Wedge a block of wood between the impeller vanes and the pump casing prior to
removing the stainless steel impeller screw.
Install the impeller shaft key before installing a lathe dog on the drive end of the
shaft. When installing the lathe dog, be sure the “V” notch is positioned over the
shaft key.

WSP™
DATA SHEET WSP™ SELF-PRIMER PUMPS WSP-D300_8
Rev. 3 01/09/20
© 2019 The Factory
19
While the impeller rotation still has a block (Figure 3), use a piece of long, heavy bar
to lever against the arm of the lathe dog in a counterclockwise direction (You should
be facing the drive end of the shaft.). Be very careful and avoid damaging either the
keyway or the shaft. Once the impeller is dislodged, take out the lathe dog, the wood
block and the key.
NOTE: The rotating assembly may be removed through the coverplate opening if
desired.
Figure 2

WSP™
DATA SHEET WSP™ SELF-PRIMER PUMPS WSP-D300_8
Rev. 3 01/09/20
© 2019 The Factory
20
Figure 3
Remove hardware attaching the rotating assembly to the pump casing. Use the
jackbolts to detach the rotating assembly by pulling directly away from the pump
casing, then tag and tie the rotating assembly shims to simplify reassembly.
NOTE: If you prefer, a tool for disassembly may be obtained from Weir Specialty
Pumps. Should you select this option, follow all instructions included in the
package. You may construct a tool that is similar if you use a ½-inch pipe
made of schedule 80 steel or malleable iron with a standard tee connection
(Figure 4). All threads should be ½-inch NPT. Do not build the tool
beforehand.
Figure 4
Table of contents
Other Trillium Water Pump manuals

Trillium
Trillium FLOWAY Owner's manual

Trillium
Trillium Roto-Jet RO-FT Series Instruction manual

Trillium
Trillium Roto-Jet R11 Quick start guide

Trillium
Trillium ROTO-JET RO III 4x3 Quick start guide

Trillium
Trillium 10-WSP Guide

Trillium
Trillium WSP-6 Guide

Trillium
Trillium ROTO-JET RGA III 2x2 Quick start guide

Trillium
Trillium ROTO-JET VSR 175 Quick start guide
Popular Water Pump manuals by other brands


KNF
KNF N860 TRANSLATION OF ORIGINAL OPERATING AND INSTALLATION INSTRUCTIONS

Honeywell
Honeywell CBU142 installation instructions

Rothenberger
Rothenberger RODIA-VAC Instructions for use

Grundfos
Grundfos MTR instructions

BREWFERM
BREWFERM Pump'in 018.600.15 user guide

Shinhoo
Shinhoo LPA Series Installation and operating instructions


