Trimax Genuine Parts Stealth S3 Use and care manual
1
SPARE PARTS
INSTRUCTIONS # 47
Date Created: 30/03/2017
Product: Procut S3 (All Models)
Title: Gearbox Pulley Removal and Replacement
SAFETY! Before attempting to make any adjustments or carry out maintenance on the mower, review
the hazard identification table (section 3a of your Operator Manual) and take all necessary precautions.
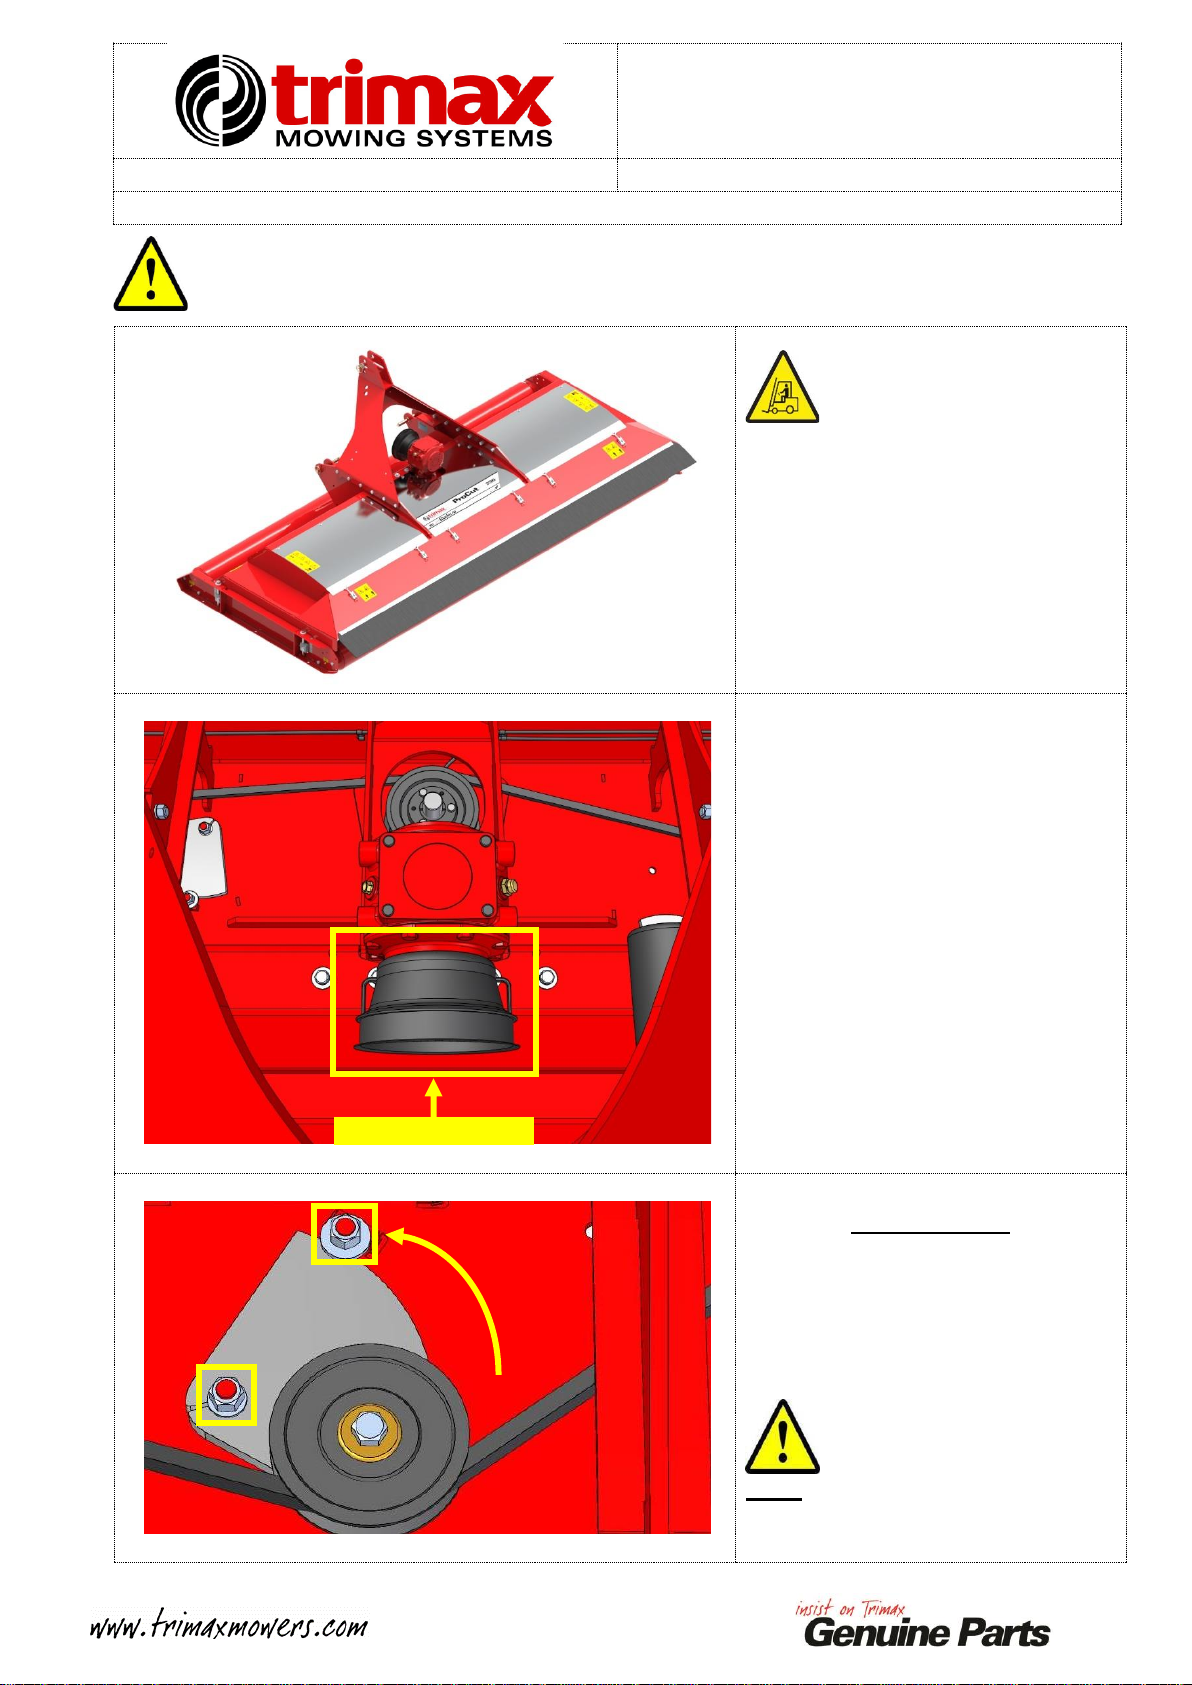
Position the Procut S3 in the work
area.
Unlatch the Covers and remove ALL
M8 Nyloc Nuts and M8 Flat Washers
used to retain the Covers.
Remove ALL Covers and carefully
place to one side.
Remove the P.T.O Cone form the
FRONT of the Gearbox Assembly by
removing the four M8 x 16 Bolts and
M8 Flat Washers.
Place the P.T.O Cone and Fasteners to
one side for later refitment.
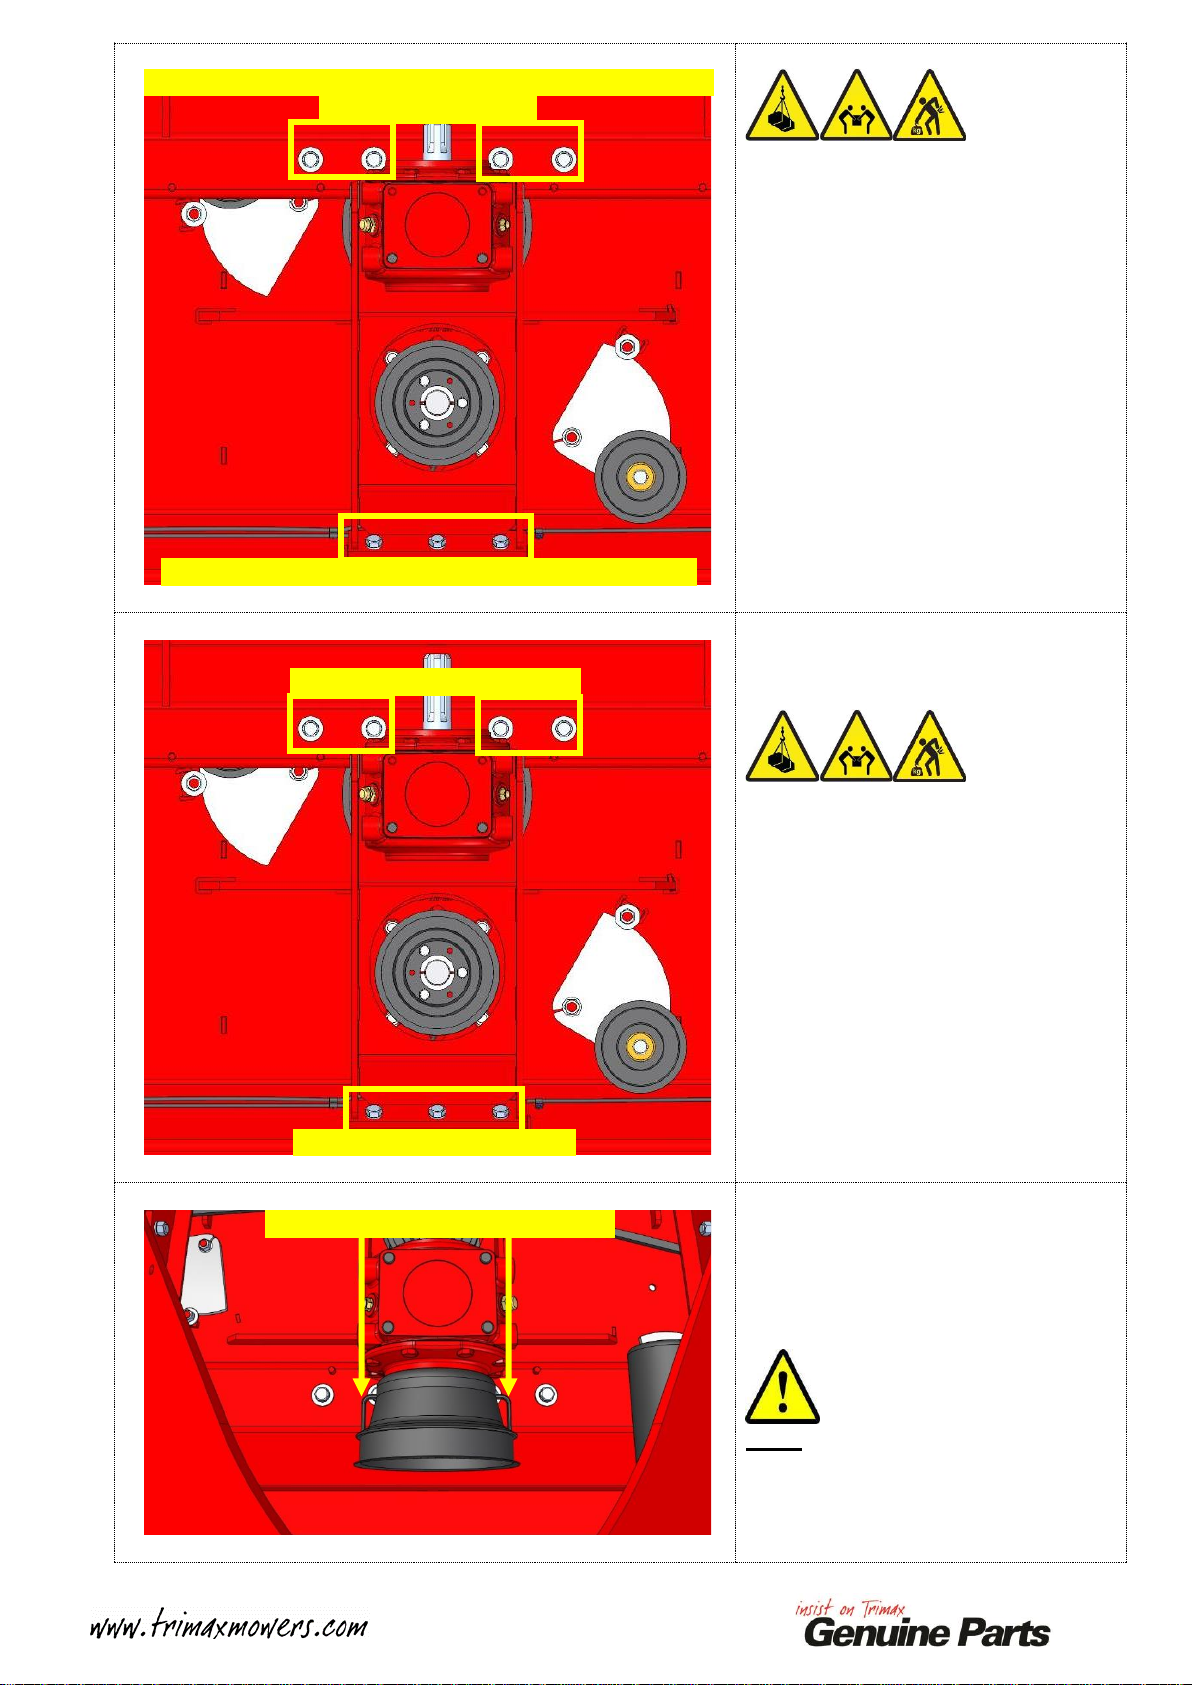
ALL MODELS
Slacken ALL Idler Mounting Nuts
and pivot the Idlers away from the
Belts to relieve belt tension.
One Idler shown in this example.
Note:
DO NOT remove Idlers!
Remove P.T.O Cone

2
Procut 237 has a special SLOTTED
Idler located near the Gearbox Pulley.
Loosen this Idler by slackening the
Mounting Nut, then unwinding the
M12 x 150 Set Screw.
Note:
DO NOT remove Idlers!
Remove ALL Vee Belts and place to
one side for later re-fitment
Support the weight of the Gearbox
Assembly.
Undo and remove the Gearbox
Mounting Bolts highlighted.
Place the fasteners to one side for re-
use.
Slacken this
Nut first
Then
unwind the
Set Screw

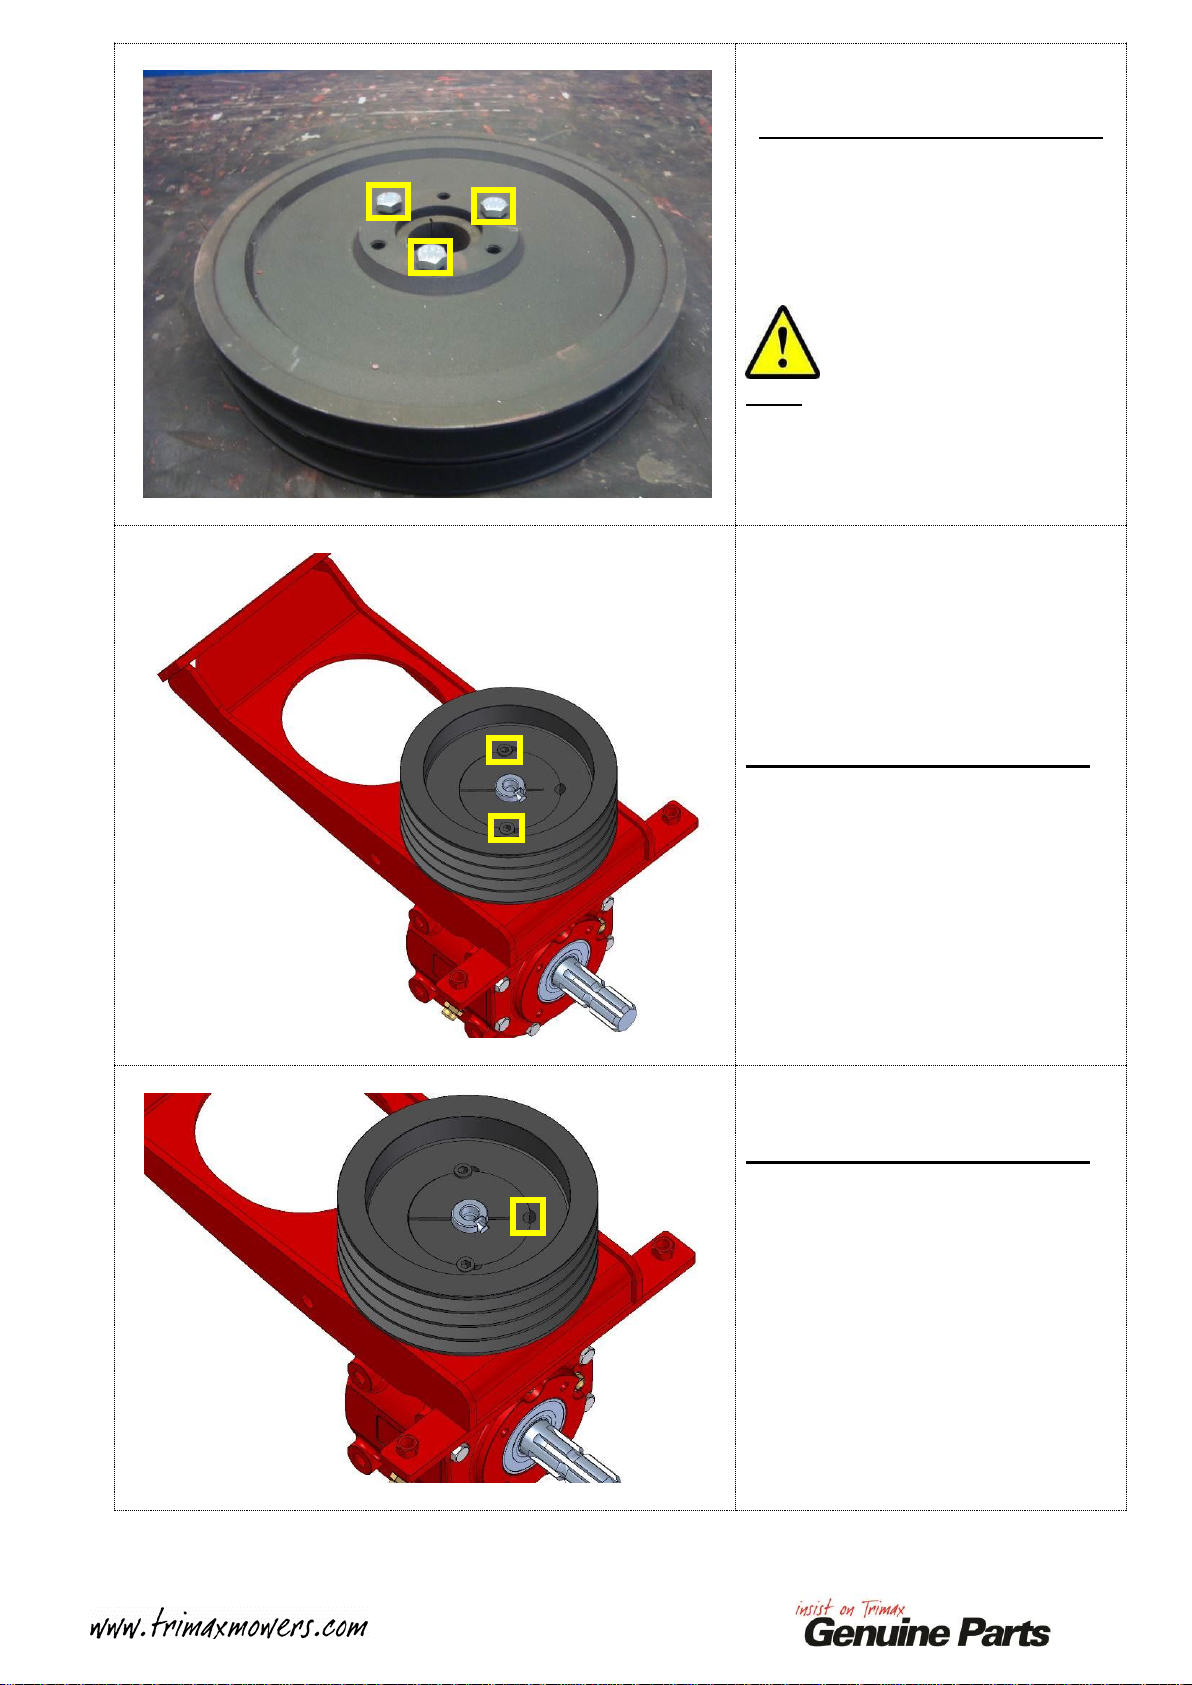
3
Lift the Gearbox Assembly clear of
the Procut and place on a bench.
Remove ALL Lifting Equipment
from the Gearbox Assembly.
Flip the Gearbox Assembly over to
the position shown.
Note:
Place the Gearbox Assembly on
cardboard or rubber to minimise paint
damage!
PROCUT 178 and 210 Only:
Slacken the three M8 x 40 Bolts
highlighted.
Tap the heads of each of the Bolts
with a Hammer.
This will separate the Pulleys off the
Biloc Bush.
Remove the M8 x 40 Bolts.
Remove the first Pulley.

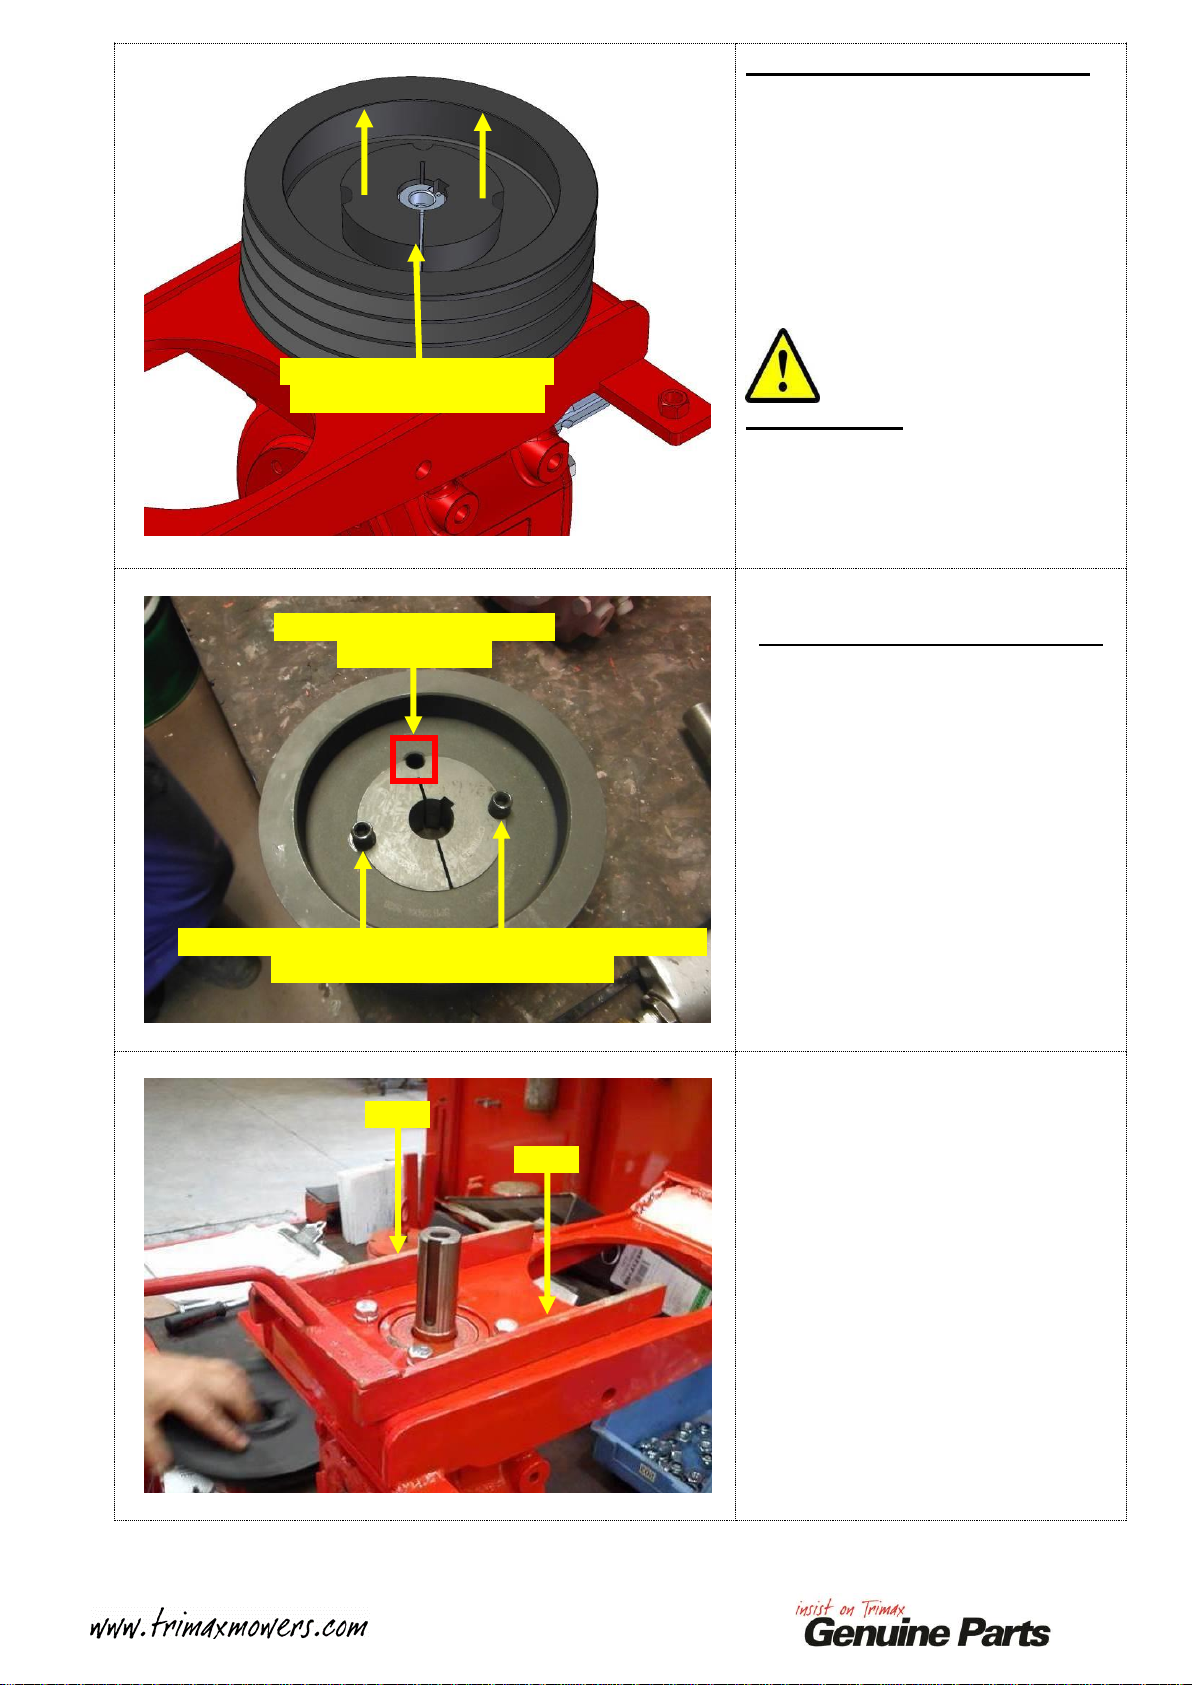
4
PROCUT 178 and 210 Only:
Insert a Flat Bladed Screwdriver in
the Slot in the Biloc Bush.
Carefully lever the Bush open
slightly.
Slide the Bush up and off the Gearbox
Output Shaft.
Remove the second Pulley.
PROCUT 178 and 210 Only:
Clean the Taper in the centre of
BOTH Gearbox Pulleys using White
Spirits and a Clean Cloth.
Clean the Welded 33mm Biloc Bush
using White Spirits and a Clean
Cloth.
One Pulley is shown opposite.
PROCUT 178 and 210 Only:
Lay one Pulley as shown and fit the
Welded 33mm Biloc Bush into the
Pulley with the LONG side of the
taper facing DOWNWARDS as
shown opposite.
Insert Flat Screw
driver here to
lever bush open
slightly
Long side of Biloc
Taper MUST face
DOWNWARDS!
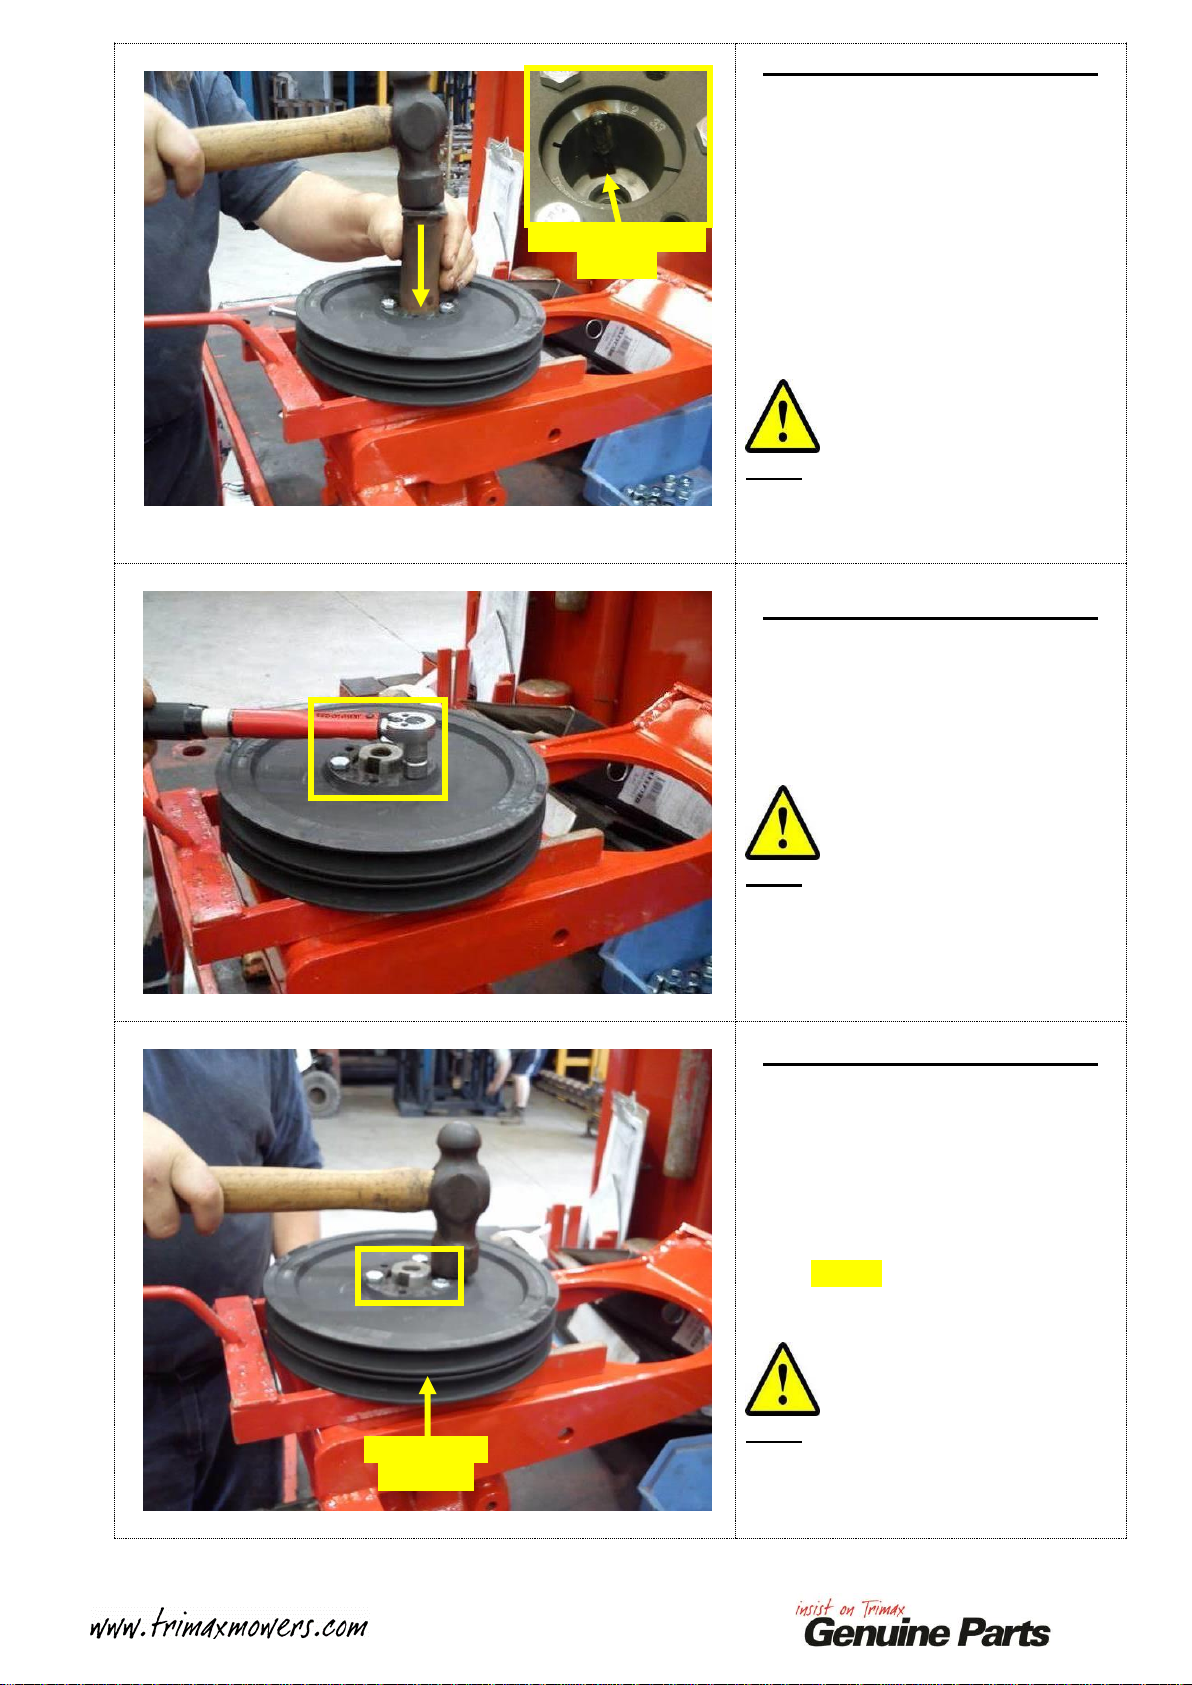
5
PROCUT 178 and 210 Only:
Fit the Second Pulley over the
Welded 33mm Biloc Bush.
Fit the three M8 x 40 bolts into the
Pulley.
Note:
DO NOT tighten the M8 x 40 bolts at
this stage!
PROCUT 237 and 290 Only:
Remove the two Grub Screws
highlighted.
PROCUT 237 and 290 Only:
Re-insert one of the Grub Screws in
the hole highlighted.
Gradually tighten until the Pulley
separates from the Taper Lock Bush.
Continue to tighten this Grub Screw
to drive the Taper Lock Buch
upwards.
6
PROCUT 237 and 290 Only:
Insert a Flat Bladed Screwdriver in
the Slot in the Biloc Bush.
Carefully lever the Bush open
slightly.
Slide the Bush up and off the Gearbox
Output Shaft.
Remove the Pulley.
IMPORTANT:
Apply MINIMAL leverage while
removing the Taper Lock Bush,
otherwise cracking can occur through
the thinnest section of the Taper Lock
Bush!
PROCUT 237 and 290 Only:
Clean the Bore in the Centre of the
Pulley, the Taper Lock Bush and the
Gearbox Output Shaft with White
Spirits and a clean cloth
Re-assemble the Pulley as shown with
MEDIUM STRENGTH THREAD
LOCKING COMPOUND applied to
the Grub Screws.
Leave the Grub Screws loose at this
stage.
Place two Spacers onto the Gearbox
Mounting Plate in the locations
shown opposite. These will be used to
set the spacing of the Pulley.
There are TWO different
measurements used:
•Procut 178 and 210 require:
27mm (1 1/16”) Spacers
•Procut 237 and 290 require:
10mm (3/8”) Spacers
Insert Flat Screw driver here
to lever bush open slightly
Leave empty, used for pulley
removal ONLY
Grub screws with MEDIUM STRENGTH THREAD
LOCKING COMPOUND applied
Spacer
Spacer
7
Procut S3 178 and 210 only:
Re-fit the Gearbox Pulley
Assembly onto the Output Shaft.
Lightly tap the Gearbox Pulley
Sub-assembly down until it is hard
against the 27mm (1 1/16”) Spacers.
A section of steel tube with an I.D
40mm (1 9/16”)is an ideal drift for
this task.
Note:
Ensure the weld in the Biloc Bush
aligns with the Keyway in the Output
Shaft! see inset for detail.
Procut S3 178 and 210 only:
Tighten the three M8 x 40 bolts
gradually and evenly.
Once nipped up, torque to 25Nm
(18ft/lbs).
Note:
The M8 x 40 bolts MUST be
tightened evenly to ensure a
consistent gap between the two
Pulleys!
Procut S3 178 and 210 only:
Tap the Pulley with a Hammer
between the bolts and re-torque to
25Nm (18ft/lbs). This ensures that the
Pulley is securely mounted.
Stripe the heads of the M8 x 40 Bolts
with a Yellow Paint Marker.
Remove the Spacers.
Note:
Check gap between Pulleys is
consistent around the circumference
of the Pulley! Reset the Pulley if not!
Weld aligned with
Keyway
Check gap is
consistent

8
Procut S3 237 and 290 only:
Fit the Gearbox Pulley
Sub-assembly onto the Output Shaft.
Align the Key in the Output Shaft
with the Keyway in the Gearbox
Pulley Assembly.
Lightly tap the Gearbox Pulley
Sub-assembly down until it is hard
against the 10mm (3/8”) Spacers.
Fully tighten.
Procut S3 237 and 290 only:
Torque the Grub Screws to 90Nm
(66ft/lbs)
Tap around the Bush with a Hammer,
this will ensure that the Bush is seated
squarely in the Bore
Re-torque the Grub Screws to 90Nm
(66ft/lbs) This ensures that the Pulley
is securely mounted.
Note:
It may be necessary to prevent the
Gearbox from rotating, an old P.T.O
Yoke can be used for this task.
Procut S3 237 and 290 only:
Once torqued, remove the Spacers.
Stripe across the Grub Screws with a
Yellow Paint Marker
9
Re-fit the Gearbox Assembly into its
original position.
Apply MEDIUM STRENGTH
THREAD LOCKING
COMPOUND to ALL Gearbox
Mounting Bolts
Secure the REAR of the Gearbox
Assembly using the M12 x 30 Bolts
and M12 Spring Washers.
Secure the FRONT of the Gearbox
Assembly using the M12 x 35 Bolts,
M12 Spring Washers and M12 Heavy
Flat Washers.
Hand tight only at this stage.
Support the weight of the Gearbox
Assembly so it is contacting the Body
at BOTH ends simultaneously.
While supported, fully tighten the
Rear Gearbox Mount Bolts FIRST.
Then, fully tighten the Front Gearbox
Mount Bolts LAST.
Remove ALL Lifting Equipment.
Refit the P.T.O Cone using the
M8 x 16 Bolts and M8 Flat Washers
that were removed earlier.
Tighten to secure.
Note:
Ensure that the P.T.O Cone Safety
Chain Lugs are HORIZONTAL as
shown.
Tighten FRONT Bolts LAST
Tighten REAR Bolts FIRST
M12 x 35 Bolts, M12 Spring Washers and M12 Heavy Flat
Washers used this side
M12 x 30 Bolts and M12 Spring Washers used this side
Safety Chain Lugs HORIZONTAL

10
Refit and tension the Drive Belts.
Refit the Covers.
Installation is the reverse of removal.
For further detail, please refer to your
Operators Manual.
This process is now complete.
Other manuals for Genuine Parts Stealth S3
1
Popular Tractor Accessories manuals by other brands

Land Pride
Land Pride STH1590 Operator's manual

McConnel
McConnel EZI-EDGER Operator's & parts manual

MTD
MTD 19A30045OEM Operator's manual

New Holland
New Holland 717173046 Operator's manual

Grouser Products
Grouser Products 450 Owner's manual & parts book

Tiger
Tiger JD5075E T4F Mounting and operating instructions


