SaMASZ AlpS 271 User manual

SaMASZ Sp. z o.o.
ul. Trawiasta 1
16-060 Zabłudów
Polska
tel. (+48) (85) 664 70 31
fax (+48) (85) 664 70 41
e-mail: samasz@samasz.pl
www.samasz.pl
OPERATOR’S MANUAL
Serial No
The original operator’s manual
ENGLISH
IN194EN008
10.01.2020
VERSION 8
SNOW PLOW
AlpS 271
AlpS 271 Up
AlpS 301
AlpS 301 Up
AlpS 331
AlpS 331 Up
AlpS 361
AlpS 271 Up H
AlpS 401
AlpS 301 Up H
AlpS 331 Up H
Olimp 300
Olimp 300 Up
Olimp 330
Olimp 300 Up H

2
ALPS / OLIMP
SNOW PLOW
OPERATOR’S MANUAL
Well-proven design with thousands of machines in regular use in many countries and quality
materials ensure high durability and reliability of SaMASZ machines.
We congratulate you on making the correct choice in your snow plow purchase and wish you
satisfaction from its use.
General warning:
Statements in this operating manual with this sign as well as
warning signs on the device warn the user of possible dangers.
NOTE:
his operating manual is an indispensable part of every snow plow
and aims to familiarize the user with the rules of proper operation
and utilization of the device as well as the dangers inherent in its
use. Before starting up the machine for the first time carefully read
this operating manual and all safety advice.
NOTE:
Keep this manual for future use.

3
OPERATOR’S MANUAL
SNOW PLOW
ALPS / OLIMP
Table of contents
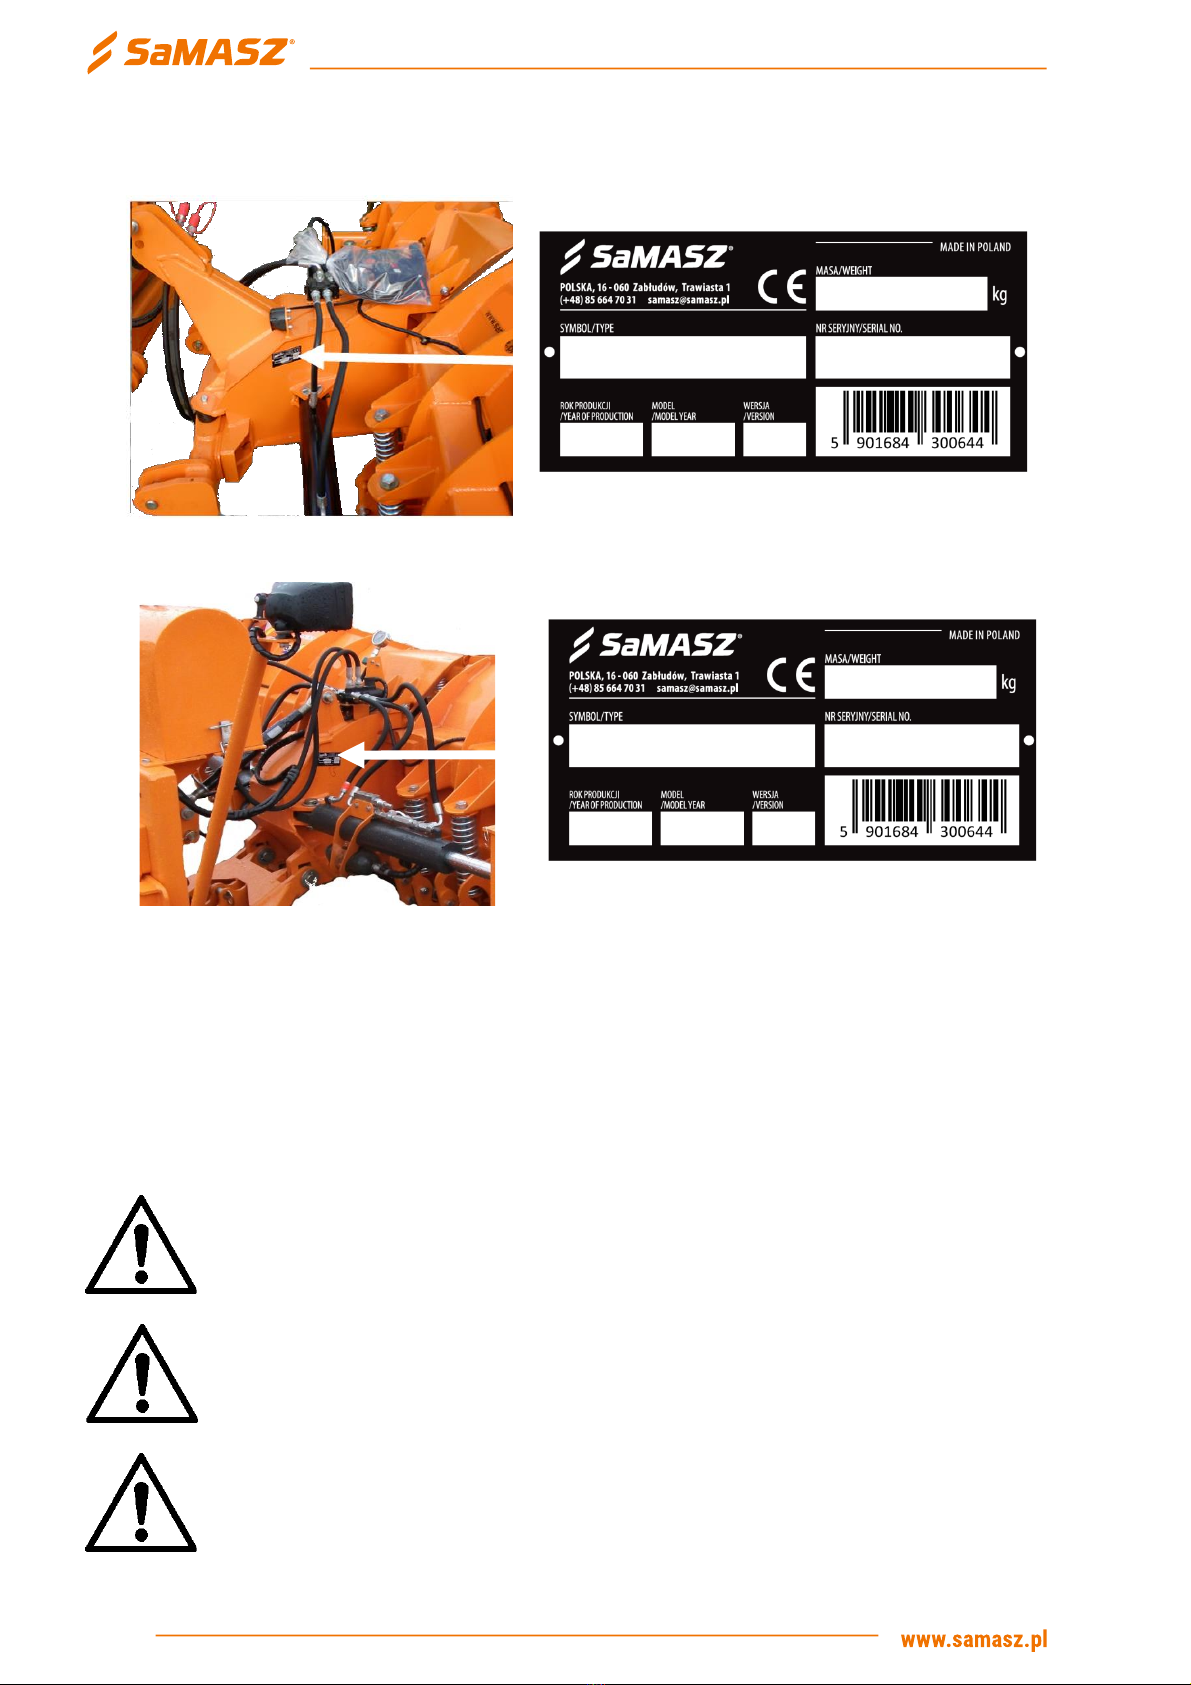
1. IDENTYFICATION......................................................................................................................4
2. SAFETY CONDITIONS................................................................................................................5
2.1. Safety rules........................................................................................................................5
2.2. Qualifications of operator...................................................................................................6
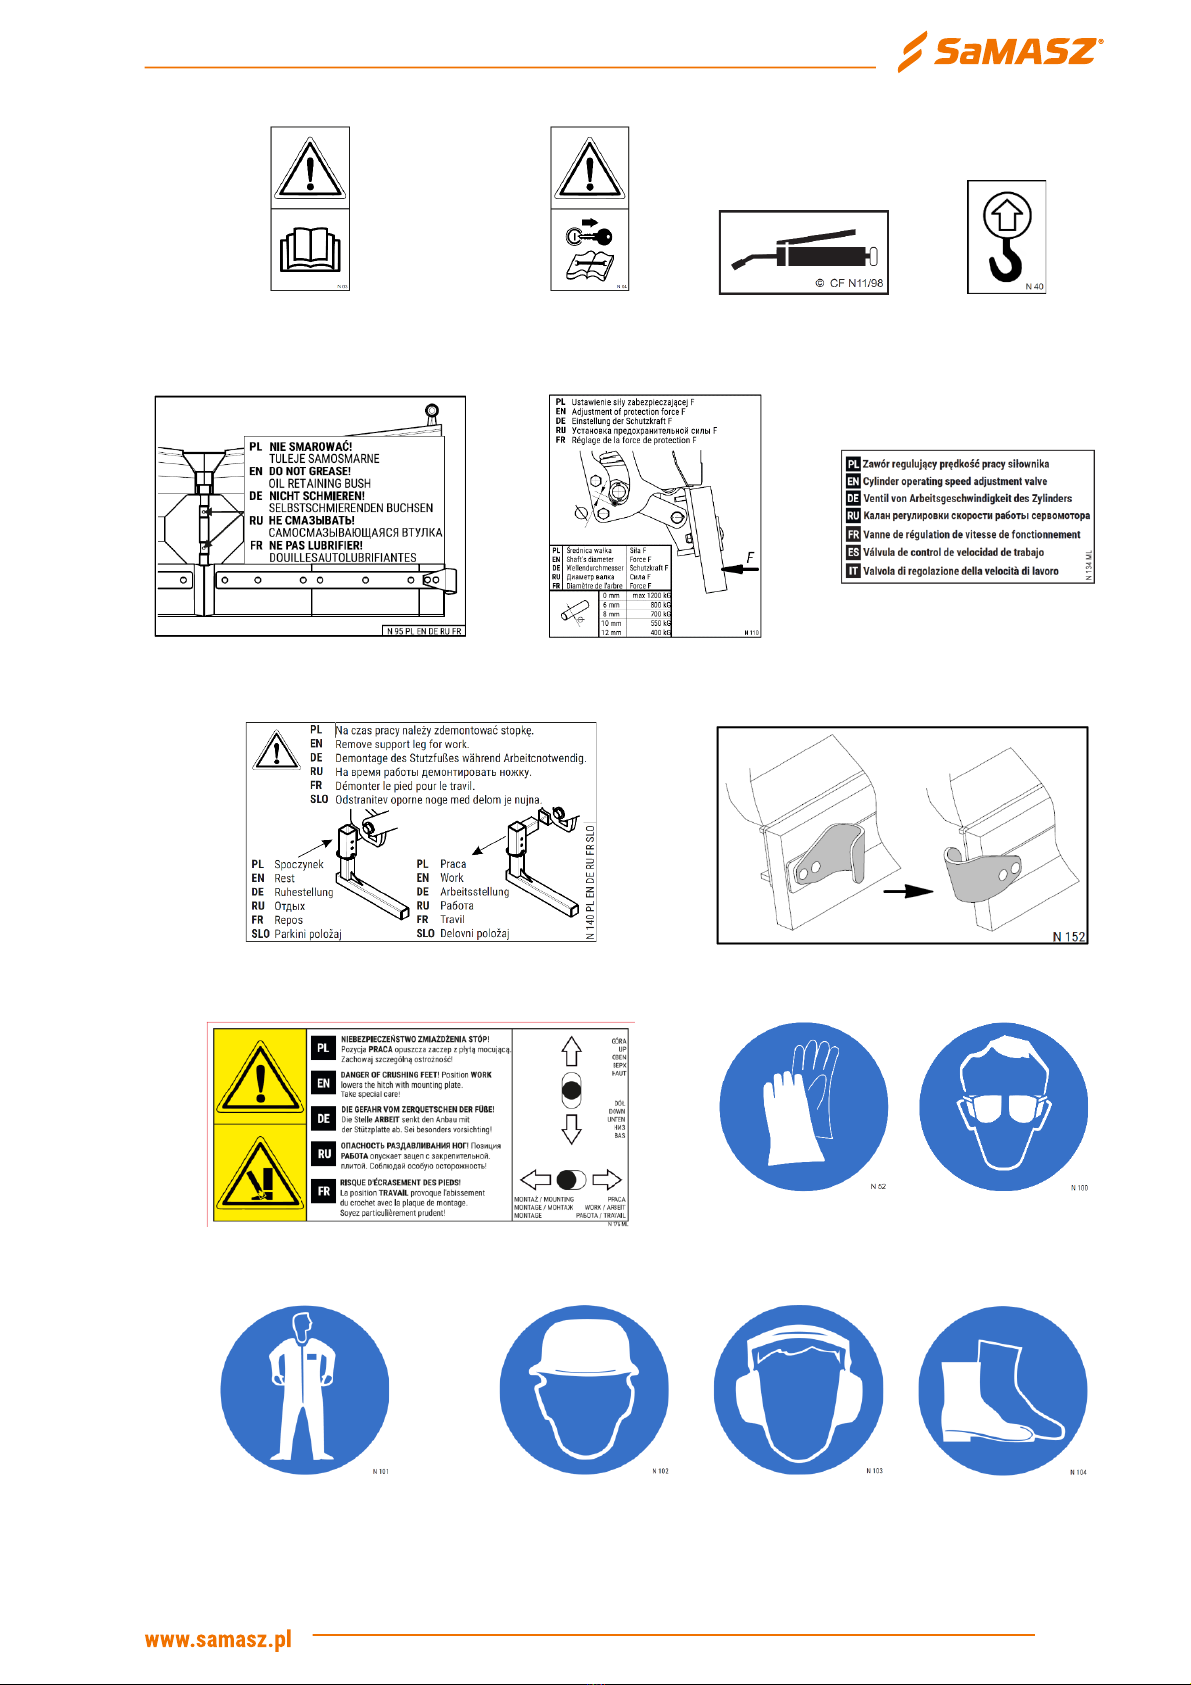
2.3. Warning signs ....................................................................................................................6
2.4. Warnings and prohibitions ..................................................................................................8
2.5. Transport and delivery ........................................................................................................9
3.1. Technical charakteristics..................................................................................................11
3.2. AlpS and Olimp plows.......................................................................................................12
3.3. AlpS Up (H) and Olimp Up (H) snow plows.........................................................................14
4. EQUIPMENT AND SPARE PARTS .............................................................................................15
4.1. Standard equipment .........................................................................................................15
4.2. Optional equipment ..........................................................................................................15
4.3. Spare parts ......................................................................................................................15
5. PLOW OPERATION..................................................................................................................16
5.1. Connecting the plow.........................................................................................................16
5.1.1. Connecting the plow to the tractor .............................................................................16
5.1.2. Montage plow AlpS Up, Olimp Up on truck/ tractor .....................................................18
5.1.3. Mounting AlpS Up H, Olimp Up H plow on a truck........................................................19
5.2. Plow control.....................................................................................................................20
5.2.1. AlpS and Olimp plow standard control........................................................................21
5.2.2. Optional control with AlpS and Olimp plows – Multi Plus ............................................21
5.2.3. AlpS and Olimp plow optional control - multifunctional ...............................................22
5.2.4. AlpS Up, Olimp Up plow control..................................................................................22
5.2.5. Controlling plow AlpS Up H, Olimp Up H .....................................................................23
5.3. Plow transport and parking positions ................................................................................24
5.3.1. Transport and parking positions of the AlpS and Olimp plow.......................................24
5.3.2. Preparing the plow for operation AlpS Up (H), Olimp Up (H) plow ................................25
5.4. Preparing the plow for operation.......................................................................................26
5.5. Operating the plows .........................................................................................................28
6. OPERATIONAL MAINTENANCE................................................................................................36
7. MAINTENANCE AND STORAGE ...............................................................................................37
8. DISASSEMBLY AND DISPOSAL................................................................................................37
8.1. Disassembly.....................................................................................................................37
8.2. Dismantling and disposal .................................................................................................37
8.3. The environment ..............................................................................................................38
9. WARRANTY ............................................................................................................................38
9.1. Warranty card...................................................................................................................38
9.2. Warranty conditions .........................................................................................................39
9.3. Record of warranty repairs................................................................................................41

4
ALPS / OLIMP
SNOW PLOW
OPERATOR’S MANUAL
1. IDENTYFICATION
Every snow plow can be clearly identified using the identification plate which is permanently
attached to the suspension body, as shown below Fig. 1 and Fig. 2.
Fig. 1. Identification plate and its location –AlpS, Olimp
Fig. 2. Identification plate and its location - AlpS Up , Olimp Up
Data plate includes:
❑name and adress of the manufacturer,
❑model year,
❑CE marking means, that the produce
❑version number,
conforms to 2006/42/EC Directive and
❑machine weight,
harmonized standards,
❑id number,
❑machine symbol,
❑barcode.
❑date of manufacture,
ATTENTION!
The identification plate is a document and it is forbidden to change it or to allow it
to become illegible.
ATTENTION!
The identification plate contains essential information necessary when contacting
the manufacturer in the event of any questions or doubts.
ATTENTION!
When ordering spare parts for a device please include data from the identification
plate of that device: name, model, serial number and date of manufacture.

5
OPERATOR’S MANUAL
SNOW PLOW
ALPS / OLIMP
2. SAFETY CONDITIONS
ATTENTION!
Operating the machine without previous familiarizing with its content as well as
by unauthorized personnel, and especially by children, is strictly forbidden. Every
operator of the plow should be fully aware of existing dangers and should know
how to avoid those dangers.
2.1. Safety rules
❑Before operation the operator must read this operating manual.
❑Unfamiliarity with the operating manual can lead to damaging of the plow.
❑Using the plow for purposes other than the intended use is forbidden.
❑The AlpS and Olimp plow with the frame has bolts on the mount which act as a mechanical overload
safety system. If those are broken all resulting damages are not covered under warranty - does not
apply to plows AlpS Up (H) and Olimp Up (H).
❑Introducing of changes to the construction without manufacturer's approval is forbidden.
❑Observe the regulations of the traffic code while operating the plow.
❑Operating speeds of the tractor-plow unit should be appropriate to working conditions, such as:
level of unevenness, rocks, curbs and other immovable obstacles.
❑Low operating speeds are recommended – using low gears of the tractor. Use of higher speeds can
cause injury to the driver and damage to the plow and the front TPH (three-point hitch) of the
tractor.
❑It is recommended to drive at low operating speeds, that are adjusted to conditions on the road
(snow cover height and kind). Operation at higher speeds may expose vehicle’s driver to injuries
and plow’s parts and vehicle’s front linkage to damaging
❑Unauthorized personnel can not remain in the vicinity of the plow.
❑Before starting work conduct a check of the device and especially the condition of the main
connections of the plow and the connection of the plow to the tractor.
❑Prior to work commencement check whether support leg is lifted/dismounted.
❑In the event of the necessity of working under a plow raised on the TPH of the tractor/track the plow
must be secured so that it does not fall.
❑The condition of bolt connections and other connecting elements should be periodically checked.
Operation with damaged connections is forbidden.
❑Carrying people or loads on the plow during transport or operation is forbidden.
❑Use original pins and safeguards to connect the plow to the tractor/track.
❑When standing the plow should be in the parking position (Fig. 23a, Fig. 25).
❑Plow AlpS Up (H) / Olimp Up (H) has gas batteries. If work is complete then reduce pressure in the
assembly for idle period. Pressure gauge should indicate "0".
❑Damaged hydraulic hoses and other elements of the hydraulic system should be replaced.
❑Use only original spare parts which are purchased at our company store or at a dealership.
❑During operation, maintenance or adjustment always use protective gloves.
❑Do not leave the tractor/track and plow on inclines. If such need occurs turn off the engine, engage
the parking brake and lower the plow.
❑The plow should be stored in a covered area in the retracted position – with the actuators retracted
to protect the piston rods.

6
ALPS / OLIMP
SNOW PLOW
OPERATOR’S MANUAL
❑It is forbidden to leave the tractor's cabin when driving.
ATTENTION!
Ensuring the safety of the work area is the responsibility of the person operating the
machine.
2.2. Qualifications of operator
To provide safe machine operation each person being the machine operator must meet the
following requirements:
❑Operator should hold driving license, have ability to drive vehicles safely and know road traffic rules.
❑Operator must be in proper physical condition to be able to operate the machine.
❑Operator must not be under the influence of alcohol, drugs and medicines, which all have influence
on vehicle driving and machine operation.
❑Operator should be familiarized with this manual and follow its provisions.
❑Operator should be familiar with working principles of both the tractor and the machine, and be
able to recognize and avoid hazards resulting from operation of the aggregate.
2.3. Warning signs
ATTENTION!
Always observe the instructions on warning signs on the plow which warn of
dangers.
ATTENTION!
❑All warning labels should be clean and legible.
❑In the event of loss or damage of labels they should be replaced.
❑Labels can be purchased from the manufacturer.
ATTENTION!
Any replacement parts should have all warning signs required by
the manufacturer.

7
OPERATOR’S MANUAL
SNOW PLOW
ALPS / OLIMP
Tab. 1. Warning labels located on the plow
N 03
Read the operating manual
before operation
N 04
Turn off power before
starting
servicing or repairs
N-11
Lubrication point
N-40
Transport hook for
lifting of the plow
N-95
N-110
N-134
(plows AlpS Up (H), Olimp Up
(H))
N-140
(plows AlpS Up (H), Olimp Up (H))
N-152
Proper adjustment of safety bumpers for
operation
N-176
Mounting the plows AlpS Up H, Olimp Up H on a truck
N-52
Use protective gloves
N-100
Use protective
glasses
N-101
Use protective clothing
N-102
Use head protection
N-103
Use hearing protection
N-104
Use protective shoes

8
ALPS / OLIMP
SNOW PLOW
OPERATOR’S MANUAL
Fig. 3. Warning decals placed on the AlpS and Olimp plows
Fig. 4. Warning decals placed on the AlpS Up (H) and Olimp Up (H) plows
2.4. Warnings and prohibitions
ATTENTION!
Despite the fact that the manufacturer of the mower SaMASZ Sp. z o. o.
Bialystok, in order to eliminate danger, assumes responsibility for the design
and construction of its plows, some elements of risk (so called residual risk) are
unavoidable during plow use.

9
OPERATOR’S MANUAL
SNOW PLOW
ALPS / OLIMP
ATTENTION!
Existing residual risk mainly result from inappropriate behavior of the snow plow
operator and not adhering to the rules of the operating manual.
ATTENTION!
Despite following the specified instructions and prohibitions, residual risk is
still present.
ATTENTION!
While assessing residual risk the snow plow is treated as a machine which to
the moment of its manufacture was designed and constructed according to
the level of technology used at the time of its manufacture.
The danger of injury
Occurs during replacement of any working elements with sharp edges. During all repairs or maintenance
always wear protective gloves.
PROHIBITIONS!
Remember the following prohibitions during snow plow operation.
❑Operation of the plow under the influence of alcohol, drugs or medications which reduce motor
skills is forbidden.
❑Operation of the plow by unauthorized or untrained personnel is forbidden.
❑Using the plow for activities other than those described in the operating manual is forbidden.
ATTENTION!
Statements in this operating manual with this sign as well as warning signs on
the device warn the user of possible dangers.
2.5. Transport and delivery
ATTENTION!
The snow plow is delivered assembled, fully adjusted and ready for use.
ATTENTION!
The snow plow is delivered assembled, fully adjusted and ready for use. During
transport the snow plow should be on a level and hard surface and should be
secured using transport belts to prevent it from shifting. When loading the plow
on a transport vehicle it should be lifted using transport hooks/openings which
are marked with special labels. Use only a lift/hoist with the lifting capacity no
smaller than the weight of the snow plow.
Both the carrier and the driver shall be responsible for the plow transport safety. Any
equipment and parts must be secured properly for transport. In order to safely relocate the snow plow
onto another vehicle, please follow these rules:
❑to lift the mower, use only lifting devices with hoisting capacity bigger than the mower weight
❑provided on data plate. It also applies to ropes and chains used for lifting,
❑transport belts, belt suspensions, ropes cannot be damaged. Whenever damages to these parts are
spotted replace these with new ones,

11
OPERATOR’S MANUAL
SNOW PLOW
ALPS / OLIMP
Tab. 2. Location of centre of gravity
Dimension
[mm]
Model
AlpS
271/
271Up/
271Up H
AlpS
301/
301Up/
301Up H
AlpS
331/
331Up/
331Up H
AlpS
361
AlpS
401
Olimp
300
Olimp
300 Up
Olimp
300 Up H
Olimp
330
A
445/
432/
469
449/
425/
467
447/
428/
466
443
379
494
467
494
454
B
300/
395/
440
298/
425/
432
317/
378/
421
229
260
282
381
425
229
L
1352/
1350/
1337
1501/
1488/
1496
1655/
1655/
1658
1800
1987
1504
1502
1501
1665
❑when mounting slings, chains, handles etc. always pay attention to setting the machine's center of
gravity properly,
❑to catch machines, pick ropes of adequate length, so that the angle between them is no greater than
120°, and the angle between the strand and the vertical is no greater than 60°,
❑collapsible parts should be blocked in transport position,
❑during putting the mower onto another vehicle it is forbidden for anybody to remain in transport
area,
❑on the vehicle’s trailer the machine should be secured against moving.
ATTENTION:
Securing both the danger area and activity performed shall lie under the
responsibility of the person in charge of the mower transporting.
3. INTENDED USE AND CONSTRUCTION
Plows AlpS, Olimp and AlpS Up (H), Olimp Up (H) are heavy duty machines. Plows are designed to clear
snow from roads, parking lots, squares with minor unevenness or for any other similar works. These
can cooperate with both agricultural tractors and other self-propelled machines (e.g. telescopic loader,
loader/excavator etc.). Plows AlpS Up (H) and Olimp Up (H) cooperate with all popular trucks or
tractors equipped with front linkage in accordance with standard PN-EN 15432 (DIN 76060).
3.1. Technical charakteristics
Main technical information has been shown in Tab. 3. The operating width of the plow changes along
with the settings of the moldboards. The hydraulic system allows for the moldboards to rotate in the
range of ±30°.

12
ALPS / OLIMP
SNOW PLOW
OPERATOR’S MANUAL
Tab. 3. Technical data
Plow model
Operating width:
min - max
[cm]
Transport
width
min - max
[cm]
Moldboard
Height
middle/ side
[cm]
Dimensions
length/width/height
[cm]
Mount
type
Weight
[kg]
AlpS 271
245 – 270
257 - 284
99 / 109
129 / 270 / 118
II cat. TPH
DIN
plate
665
AlpS 271 Up
815
AlpS 271 Up H
870
AlpS 301
270 – 300
282 - 315
99 / 111
135 / 315 / 113
II cat. TPH
730
AlpS 301 Up
DIN
plate
880
AlpS 301 Up H
935
AlpS 331
295 – 330
309 - 345
99 / 112
135 / 345 / 116
II cat. TPH
800
AlpS 331 Up
DIN
plate
900
AlpS 331 Up H
960
AlpS 361
322 – 362
335 - 376
99 / 113
135 / 375 / 123
II cat. TPH
865
AlpS 401
357 – 400
371 - 413
99 / 115
135 / 415 / 123
900
Olimp 300
263 – 300
118 / 132
135 / 315 / 140
II cat. TPH
DIN
plate
900
Olimp 300 Up
263 – 300
285 - 315
1050
Olimp 300 Up H
263 – 300
1105
Olimp 330
290 – 330
312 - 345
118 / 134
135 / 345 / 142
925
3.2. AlpS and Olimp plows
Snow plow generally comprises linkage with replaceable hitch (G), as well as adjustable operating
assemblies - right (C) and left one (D) controlled with hydraulic cylinders (B). On/Off hydraulic cylinders
are controlled by tractor’s hydraulics through controllable way valve (H). Design of plows in more detail
is provided on Fig. 7.
As an option support wheels or skids, thanks to which we can reduce the pressure of the plow on the
ground, can be purchased. If support wheels or sliding skids are used, the service life of the clearing
bars is extended.

13
OPERATOR’S MANUAL
SNOW PLOW
ALPS / OLIMP
Fig. 7. Construction of the plow and a hydraulic schematic.
P1, P2 – drive, A, B, – actuator 1, C, D – actuator 2
Construction of a AlpS, Olimp plow
A. – Spring mechanism of the plowshare
G. – hitch
B. – Turn actuator
H. – directional valve,
C. – Right moldboard
I. – Support leg
D. – Left moldboard
J. – Side bumper
E. – Plowshare
K. – Hitch control arm
F. – Rubber blade insert
L. – sliding skid
– Transport pionts
Optionally the plow can be equipped with hitch featuring no frame system (Fig. 8).
Fig. 8. 3-point linkage with ground following bar
D
H
C
J
A
F
B
G
I
K
E
L

14
ALPS / OLIMP
SNOW PLOW
OPERATOR’S MANUAL
3.3. AlpS Up (H) and Olimp Up (H) snow plows
AlpS Up, Olimp Up means that plow has no own electric pomp. Has to be part of a vehicle needs to
have 2 pairs of hydraulic connector. AlpS Up H, Olimp Up H has its own electric pomp and in result
cooperation with any truck is possible. Plow design in detail is provided on Fig. 9.
Snow plow AlpS Up H generally comprises linkage (G) designed to cooperate with vehicles featuring
front linkage in accordance with standard PN-EN 15432 (DIN 76060) and adjustable right shield (C) as
well as left one (D) controlled by hydraulic cylinders (B). On/off hydraulic cylinders are controlled by
hydraulics through controllable way valve.
As an option support wheels or skids, thanks to which we can reduce the pressure of the plow on the
ground, can be purchased. If support wheels or sliding skids are used, the service life of the clearing
bars is extended.
Fig. 9. Construction of the AlpS Up H plow
Construction of a AlpS Up (H), Olimp Up (H) plow
A. – Spring mechanism of the plowshare
G. – Suspension system
B. – Turn actuator
H. – directional valve,
C. – Right moldboard
I. – Support leg
D. – Left moldboard
J. – Side bumper
E. – Plowshare
K. – Electric pump*
F. – clearing bar
– Transport pionts
* AlpS Up, Olimp Up plows have no electric pump
H
G
I
A
E
F
K
D
C
J
B

15
OPERATOR’S MANUAL
SNOW PLOW
ALPS / OLIMP
4. EQUIPMENT AND SPARE PARTS
4.1. Standard equipment
AlpS, Olimp plow
AlpS Up (H), Olimp Up (H) plow
❑warranty card,
❑operating manual and spare parts
catalogue,
❑clearing bar (to choose),
❑hydraulic plowshare steering,
❑safety device – inclined blades,
❑hydraulic overload protection of hydraulic
cylinders (AlpS 361, AlpS 401, Olimp),
❑hitch’s overload safety device (not
applicable to AlpS with frameless hitch),
❑clearance LED (12 - 24V) lighting,
❑wiring system 12V,
❑support leg,
❑safety bumpers,
❑spray paint (150 ml),
❑snow protection screen – re Olimp.
❑warranty card,
❑operating manual and spare parts catalogue,
❑clearing bar (to choose),
❑hydraulic plowshare steering,
❑safety device – inclined blades,
❑own independent hydraulics (AlpS 301 Up H, AlpS
331 Up H, Olimp 300 Up H),
❑overload hydraulic safety device,
❑clearance lighting LED 12 - 24V,
❑road lights,
❑wiring system 24V - AlpS Up H /Olimp Up H, 12V-
Alps Up H/Olimp Up),
❑safety bumpers,
❑control panel – with electric pump option (AlpS
301 Up H, AlpS 331 Up H, Olimp Up H),
❑mounting on vehicle's front linkage in accordance
with PN-EN 15432, DIN 76060,
❑spray paint (150 ml).
4.2. Optional equipment
AlpS, Olimp plow
AlpS Up (H), Olimp Up (H) plow
❑hydraulic overload protection of hydraulic
cylinders (AlpS 271, AlpS 301, AlpS 331),
❑set of support wheels,
❑set of support skids,
❑Küper’s Slide – kpl.,
❑safety flags with locks,
❑frame with other type of mounting.
❑snow protection screen - AlpS
❑multifunctional control,
❑Multi Plus control.
❑wiring system 12V / 24V,
❑set of support wheels
❑set of support skids,
❑Küper’s Slide – kpl.,
❑safety flags with locks,
❑snow protection screen.
4.3. Spare parts
Spare part should be ordered according to the spare parts catalogue, using full name of the part and
the part number from the catalogue.

16
ALPS / OLIMP
SNOW PLOW
OPERATOR’S MANUAL
ATTENTION!
Use only original equipment and spare parts from the SaMASZ Company. Parts
from an unknown source or home made are less durable and have a negative
influence on the operation of the plow and work safety.
ATTENTION!
The SaMASZ Company is not responsible for harm or damages as a result of
using non-original parts or equipment.
5. PLOW OPERATION
5.1. Connecting the plow
ATTENTION!
In order to facilitate transport the plows have turned away safety bumpers,
which need to be reserved before operation, as shown in Fig. 10.
Fig. 10.Proper monting of safety bumpers
5.1.1. Connecting the plow to the tractor
Conditions for connecting the AlpS and Olimp plow to the tractor:
❑all AlpS and Olimp plows have been designed to be front mounted plows so they can only be
mounted on the front TPH of a category II tractor,
❑depending on client's needs plow with frame system can be adopted to cooperate with vehicles
equipped with: 3-point linkage category III, EURO, SMS, frame with catches to be welded, custom
linkage as well as other standard excavator-loaders,
❑plows with no frame system can be equipped optionally,
❑with category III suspension system which will allow them to be mounted on the rear TPH of a
tractor - in this event it is recommended that the tractor is equipped with a device allowing it to be
driven backwards, a so called "rewers",
❑the tractor must have a 12 V power outlet (cigarette lighter outlet),
❑the tractor must have one pair of hydraulic connections.

17
OPERATOR’S MANUAL
SNOW PLOW
ALPS / OLIMP
Fig. 11. Mounting the AlpS and Olimp plow on a cat II, or III, three point hitch
In order to mount the plow on the tractor:
❑approach the plow so that the lower lifting arms of the three point hitch are inserted into the
mountings of the plow's suspension,
❑secure the mounting using pins and cotter pins,
❑connect the upper part of the suspension system using a regulated tie and secure them with a pin
and cotter pin (Fig. 11),
❑next connect the hydraulic connections and the power plug along with the control switch,
❑the rotation axis of the moldboards should be perpendicular to the ground,
❑after lifting the plow the support foot should be lifted and secured with a pin,
❑if the plow has been equipped with support wheels or skids they should be adjusted to the correct
height.
Fig. 12. Connecting the AlpS and Olimp plow on a cat. II three point hitch.
A – Pins with cotter pins, B – Hydraulic connections, C – Support foot, D – Electric outlet,
E – Lower TPH arms, F – Upper TPH regulated tie, G - Rotation axis of the moldboards
Secure the pins of the
mount with cotter pins
Open and connect
the hydraulic connections
to the tractor
90
°
G
D
C
A
E
F
B

18
ALPS / OLIMP
SNOW PLOW
OPERATOR’S MANUAL
ATTENTION:
The manufacturer is not responsible for damages to the device resulting from
improper mounting of the plow on the TPH of the tractor. Disconnecting of
the plow can cause damage to the plow as a result of collision with the tractor.
During operation periodically check weather the plow is still properly mounted.
5.1.2. Montage plow AlpS Up, Olimp Up on truck/ tractor
Requirements concerning mounting plow AlpS Up, Olimp Up on truck/tractor (Fig. 13):
❑install control panel – ATTENTION! Before connecting the plug in control panel, make sure that
the main switch is turned off!,
❑plug in power plug to lighter's connector,
❑connect hydraulic hoses to vehicle,
❑it is recommended to retract both cylinders responsible for shields' shifting (item V) to improve
plow's overall stability,
❑lift hitch up to required mounting height,
❑set vehicle in position which enables mounting plow on, so that hitch holders are above linkage
connectors,
❑lower plow's hitch onto vehicle/tractor DIN linkage (with use of vehicle's hydraulics),
❑upon mounting of the hitch on DIN linkage, protect the connection with two M27 bolts.
Fig. 13.The AlpS Up plow mounted on the tractor
AlpS Up, Olimp Up Snow Plow features unloading assembly. In order to use it perform the
following:
❑upon mounting the machine lift the plow by means of vehicle’s hydraulics and close the valve on
connector hose located nearby EURO plug,
❑lower the plow to 5÷10 cm above the ground so it does not touch the surface,
❑read out pressure value from the gauge,
❑then, lower the plow with the vehicle's hydraulics so that the pressure gauge shows 5÷10 bar less
than the previous reading.
Protect hitch with bolts by
screwing to front linkage
Place hitch holders in
front linkage connectors

19
OPERATOR’S MANUAL
SNOW PLOW
ALPS / OLIMP
5.1.3. Mounting AlpS Up H, Olimp Up H plow on a truck
Snow plow AlpS Up H, Olimp Up H can be directly mounted on vehicle's linkage. In order to mount
the plow on the vehicle the following should be performed:
❑take hydraulic power supply cover off,
❑connect main power supply 4-pin plug and steering panel,
❑turn switch MOUNT on and while holding UP button lift the hitch up to required mounting height
(switch underneath power supply cover Fig. 15),
❑set the vehicle in position which enables plow to be mounted on, so that hitch holders are above
linkage connectors (Fig. 14),
❑lower plow's hitch onto vehicle's DIN linkage while holding DOWN button (switch underneath power
supply cover - Fig. 15),
❑set switch in WORK position and pay special attention as in such position the hitch falls down freely,
what may cause bodily injury,
❑upon mounting of the hitch on DIN linkage, protect the connection with two M27 bolts (Fig. 14),
❑install control panel,
❑put hydraulic power supply cover on.
Fig. 14. The AlpS Up H plow mounted on the track
ATTENTION!
The manufacturer does not bear any responsibility for machine’s damages
resulting from improper mounting to vehicle. Plow’s disconnection may cause
its damage as a result of a collision with the vehicle. Plow’s proper mounting on
linkage should be inspected periodically when operating.
Lifting plow up with use of control panel does not work if MOUNTING switch is
on, and switches should be set in WORK position .
Mounting of the set with switch in MOUNTING mode on may cause the battery
discharge.
Place hitch holders in
front linkage connectors
Protect hitch with bolts by
screwing to front linkage

20
ALPS / OLIMP
SNOW PLOW
OPERATOR’S MANUAL
Fig. 15.Placement of N-176 decal –mounting plow on vehicle
5.2. Plow control
ATTENTION:
Prior to mounting plow make sure that polarity of aggregated machine is the
same as driver's (Fig. 16). Wrong polarity will cause damage to the driver.
Fig. 16.Polarity of driver's plug
Once hydraulics and power plug are connected, move control panel along with cable to tractor's cabin
and connect the plug to lighter's connector 12V (Fig. 17). In order to lift/lower the plow, use control
lever for tractor's front 3-point linkage.
ATTENTION!
The control panel should be connected to the machine in the following order:
1. connect the control panel so that the control system is completely electrically
connected,
2. connect the 7-pin connector in the plow,
3. connect the power plug (lighter connector) in the tractor.
Reverse connecting sequence is not permitted and, as a result, may damage the
control panel.
When disconnecting, do the opposite, first disconnect the power supply and then
the panel!
ATTENTION:
After mounting the plow check its functions:
- opening and closing of the left plow moldboard,
- opening and closing of the right plow moldboard,
- lifting and lowering of the plow on the TPH.
+
This manual suits for next models
14
Table of contents
Other SaMASZ Tractor Accessories manuals