Trinity THA-0310 User manual

TRINITY 32” x 16” Stainless Steel Utility Sink
w/Pull-out Faucet
Model # THA-0310
OWNER’S MANUAL
Important / Important / Importante
DOWNLOAD THE FREE APP | TÉLÉCHARGERL’APPLICATION GRATUITE | DESCARGUE LAAPLICACIÓNGRATUITA
Directives intelligentes
Instrucciones Inteligentes
FOR QUICK & EASY 3D ASSEMBLY INSTRUCTIONS
POUR DES DIRECTIVES D’ASSEMBLAGE 3D RAPIDES ET FACILES
PARA INSTRUCCIONES DE ENSAMBLAJE RÁPIDAS Y SENCILLAS EN 3D

Your TRINITY Stainless Steel Utility Sink w/Pull-out Faucet should include the following parts. Please
inspect box contents to ensure you have received all components.
If you are missing any parts, need assistance with assembly or have questions, please contact
TRINITY Customer Service: 800.985.5506 or customerservice@trinityii.com. Parts can also be
requested online at www.trinityii.com (Help & More, Contact Us).
A Phillips head screwdriver is required for assembly, and a pipe wrench is recommended.
SINK (1)
A
LEG (4)
w/ Feet Leveler
B C
HEX KEY (1)
FAUCET
ASSEMBLY (1)
w/ Hoses
DRAIN
ASSEMBLY (1)
P-trap not included
G
HEX SCREW
(18) + (2) extra
(8) are pre-installed on sink,
(10) are pre-installed on connectors.
I
F J
M
BRACKET (1) MOUNTING SCREW
(2)
ANCHOR
(2)
PARTS LIST
D
SCREW CAP (8)
N
E
SHORT CROSS
BEAM (2)
LONG CROSS
BEAM (1)
H
2-WAY
CONNECTOR (2)
3-WAY
CONNECTOR (2)
K L
© 2019 TRINITY -800.985.5506
1

ASSEMBLY INSTRUCTIONS
Unscrew HEX SCREWS (I) that are pre-
installed on Connectors (G/H) until Cross
Beams (E/F) can be fully inserted.
On a flat surface connect Connectors (G/H)
and Cross Beams (E/F) into a U-shape as
shown in diagram.
Make sure all Cross Beams (E/F) are pushed
all the way into the Connectors (G/H).
Use HEX KEY (K) to tighten HEX SCREW (I)
against Cross Beams
With two people, lay SINK (A) upside-down.
Unscrew HEX SCREWS (I) that are pre-
installed on Leg Collars on bottom of SINK
(A) until LEGS (B) can be fully inserted.
Insert LEGS (B) into Leg Collars. Do not
tighten HEX SCREWS (I) until Step 3.
STEP 1
STEP 2
I (8) K (1)
B (4)
B
A
A (1)
E
IKLeg Collar
1
2
G (2) K (1)
F (1)
E (2) H (2) I (6)
E
H
F
I
K
GH
© 2019 TRINITY -800.985.5506 2
G

ASSEMBLY INSTRUCTIONS
With two people, carefully turn sink right-
side up, standing it upright.
Unscrew large 3-3/8” Nut from bottom of
DRAIN ASSEMBLY (D). From inside SINK (A),
insert Drain through White Seal and opening
at bottom.
From under SINK (A), first slide on Black
Gasket and Paper Gasket then screw large
3-3/8” Nut back on tightly. If necessary,
use a pipe wrench to tighten.
Note: P-trap NOT included.
With two people, take Cross Beams
assembly in STEP 2 and slide Connectors
(G+H) over all LEGS (B).
Use Alignment Stickers to help level out
Cross Beams, by lowering Cross Beam
assembly adjacent to stickers.
Tighten HEX SCREW (I) on each Connector
to LEGS (B) with HEX KEY (K).
Tighten both HEX SCREWS (I) on each Leg
Collar with HEX KEY (K). Place a SCREW
CAP (J) over each HEX SCREW (I).
STEP 3
STEP 4
D
I
D (1)
© 2019 TRINITY -800.985.5506
3
Drain Assembly (D)
Inside
the sink
Under
the sink
Drain
Black
Gasket
Paper
Washer
3-3/8”
Nut
White
Seal
Alignment
Sticker K
J
34
I (4) K (1)J (8)
Leg
Collar
1
2

ASSEMBLY INSTRUCTIONS
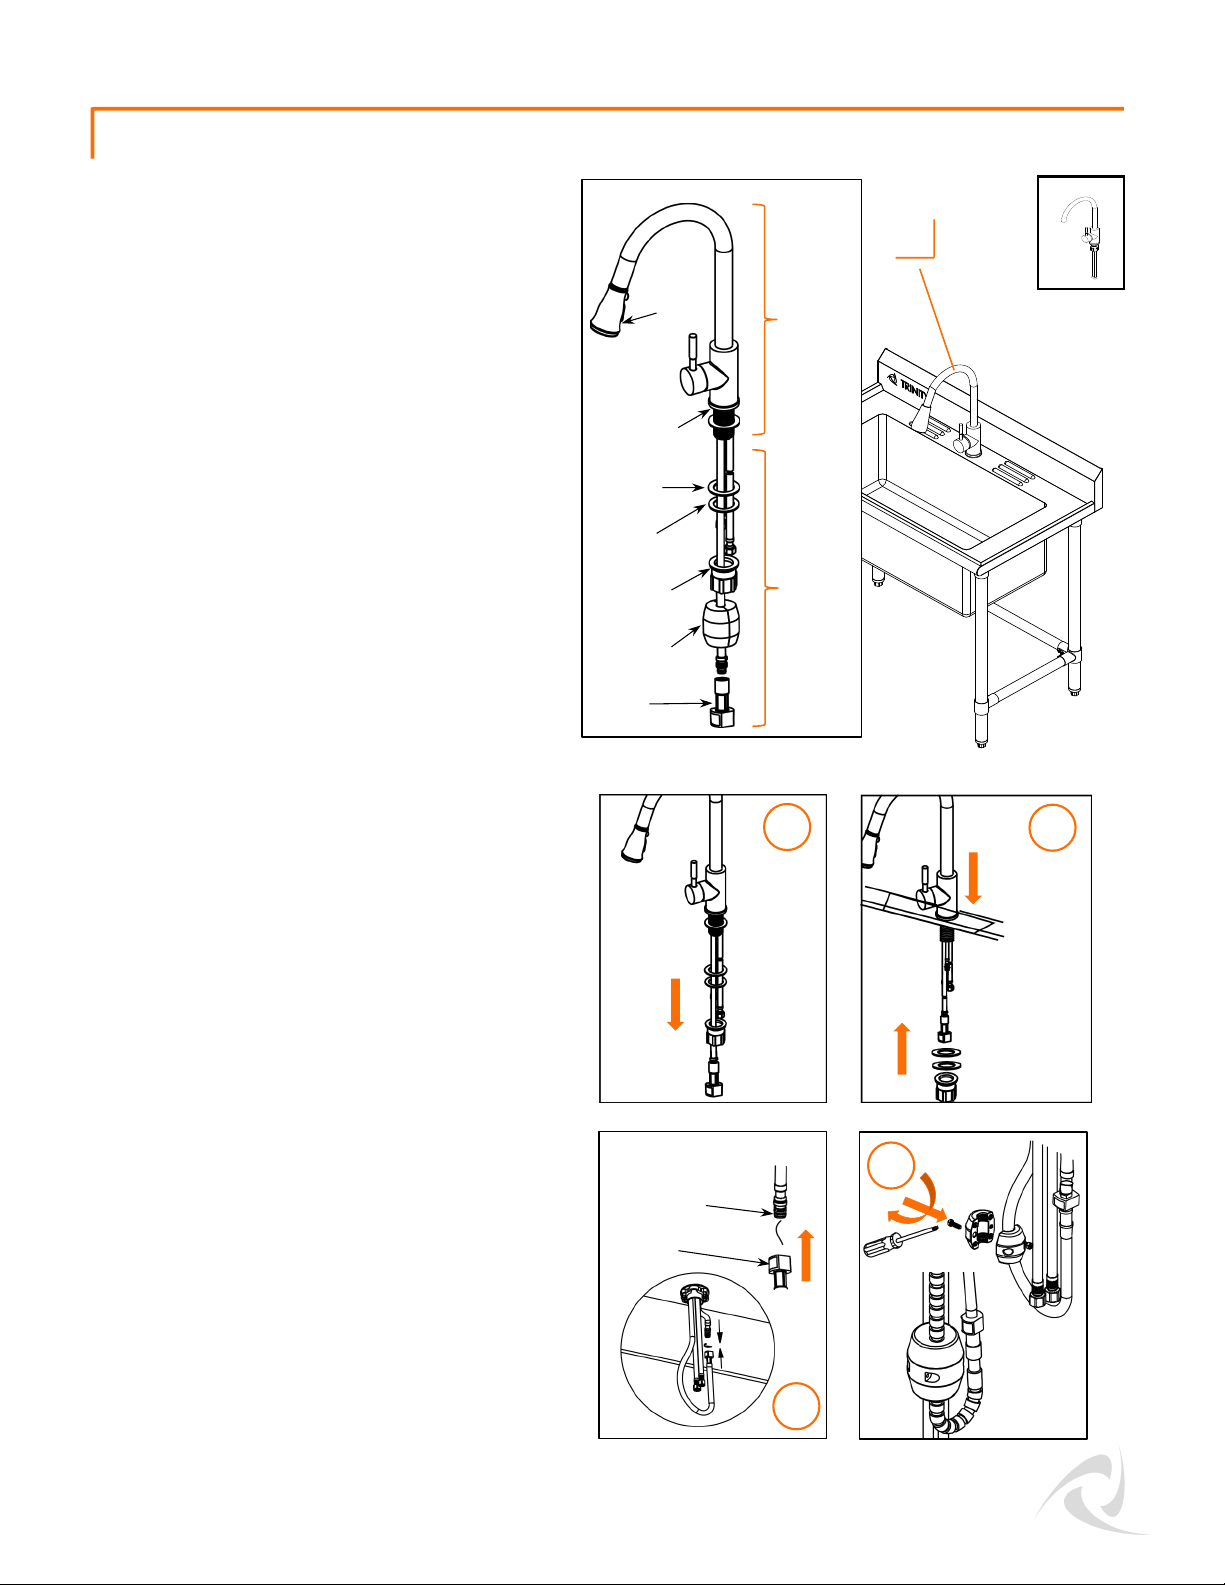
Unscrew Lock Nut from bottom of FAUCET
ASSEMBLY (C) and remove Lock Nut, White
Washer and Black Flat Gasket.
From top side, make sure Metal Base w/
Gasket is on top of SINK (A) and all 4 hoses
are straight and untangled. Insert FAUCET
ASSEMBLY (C) through hole, first with Quick
Connector hose, then hot and cold water
supply hoses with metal fittings, finally the
short hose with plastic cap.
Once all hoses are carefully threaded
through hole and FAUCET ASSEMBLY (C) is
sitting flush on top of SINK (A), align faucet
handle facing towards front of SINK (A).
From under SINK (A), first slide on Black Flat
Gasket, then White Washer, then screw on
Lock Nut. Tighten Lock Nut as much as you
can by hand. If necessary, use a pipe
wrench to tighten.
Remove and discard the Plastic Cap from
short hose and push Quick Connector to
connect two ends of hoses. You should
hear a soft click to indicate secure
connection and orange release button
should return to flush with housing. You may
also give two ends of hose a soft tug to
ensure they are connected securely.
Locate Counterweight in the box, use a
Phillips screwdriver to separate two halves
of Counterweight by unscrewing screws
securing them. Make sure Spray Head is
pushed up against the spout and pull-out
hose is dangling unhindered. Re-secure
Counterweight just above the turn of pull-out
hose, on side opposite Quick Connector.
Counterweight position can be moved up to
decrease amount of Spray Head pull-out if
desired.
STEP 5
C (1)
C
On top of
the sink
Under
the sink
© 2019 TRINITY -800.985.5506 4
Faucet Assembly (C)
Spray
Head
Metal Base
w/ Gasket
Black Flat
Gasket
White
Washer
Lock Nut
Counterweight
Quick
Connector
Remove and discard
Plastic Cap
Orange release
button
Black Flat
Gasket
White
Washer
Lock Nut
Black Flat
Gasket
White
Washer
Lock Nut
1
4
2
3

ASSEMBLY INSTRUCTIONS
Carefully move sink against wall at your
desired location. If needed, use a pencil to
mark off mounting height of BRACKET (L).
Position BRACKET (L) on wall, marking off
fastening location on wall through holes on
BRACKET (L). Drill holes in marked locations.
Insert ANCHOR (N) completely into each
drilled hole. Fasten MOUNTING SCREWS (M),
through holes on BRACKET (L), into anchors
tightly with a screwdriver.
Slightly lift sink and hook flange of sink over
BRACKET (L). Adjust Feet Levelers to ensure
sink is stable and level. Connect Hoses and
Drain to plumbing system.
Note: Bracket is to prevent sink tipping,
NOT for mounting sink to a wall. Do NOT
mount sink to a wall without legs.
STEP 6
L (1) M (2) N (2)
L
M
N
flange
L
© 2019 TRINITY -800.985.5506
5

SERVICE PARTS LIST
TRINITY Customer Service provides the following replacement parts:
5
2
14
10
1
3
6
11
4
15
9
7
8
12
13
Part Number Description Part Number Description
1) XBS-19-007-1600 Bracket 9) XGL-13-013-1615 Short Cross Beam
2) XGR-01-032-0440 Anchor 10) XSV-01-039-0302 2-Way Connector
3) XSV-01-033-0440 Mounting Screw 11) XSV-01-040-0303 3-Way Connector
4) XBS-18-019-3216 Sink 12) XGL-13-013-3640 Long Cross Beam
5) XBK-23-005-0815 Screw Cap 13) XSV-01-034-0808 Hex Screw
6) XXX-97-001-0001 Hex Key 14) XGL-02-003-0002 Drain Assembly
7) XGL-04-046-3200 Leg 15) XBS-02-009-0007 Faucet Assembly
8) XSV-98-004-4287 Feet Leveler
© 2019 TRINITY -800.985.5506 6

WARNINGS
1. Read and understand all instructions. Failure to follow all instructions may result in
injury and/or damage.
2. The warnings, cautions, and instructions discussed in this manual cannot cover
all possible conditions or situations that may occur. The user must always be
aware of their environment and ensure that they use the product in a safe and
responsible manner.
3. Do NOT modify the product in any way. Unauthorized modification may impair the
function and/or safety of the product, and may affect the life of the product. Any
modifications will void product warranty.
4. Check for damaged parts. Before using this product, carefully check that all parts are
in good condition, and that the product will operate properly and perform its intended
function. Check for damaged parts and any other conditions that may affect the
operation of this product. Replace damaged or worn parts, and never use this product
with a damaged part.
5. Do NOT overload the product.
6. Ensure backflow prevention compliance. Equipment is to be installed with adequate
backflow prevention to comply with applicable federal, state and local codes.
7. Do NOT let children climb on or in Utility Sink.
8. Ensure to install the wall bracket. Failure to do so may result in tipping.
9. Do NOT mount the sink to a wall without legs. The wall bracket is to prevent tipping,
NOT for mounting the sink to a wall.
10.Ensure plumbing connections are tightened fully. Failure to tighten may result in
leakage.
11.Strongly recommended for professional installers to perform installation.
Observe local plumbing and building codes.
Total weight capacity 300 lb
© 2019 TRINITY -800.985.5506
7

CARE AND MAINTENANCE
•Avoid harsh, abrasive cleaners, and other corrosive chemicals. Do not leave salt in sink
or near saltwater environment.
•Rinse surface thoroughly with hot water after using soaps and detergents containing
chlorides to prevent corrosion.
•Do not use scouring pad, carbon steel brushes, or steel wool for cleaning. Iron particles
left behind can lead to rust.
•Avoid the use of oily rags or greasy cloths when wiping the surface. Wipe dry after use
so that water does not leave water spots.
•Use a quality stainless steel cleaner and follow instructions that come with the cleaner.
Wipe ALONG the grain (NOT against).
•This product is intended for indoor use. Outdoor use is not recommended.
© 2019 TRINITY -800.985.5506 8

Thank you for purchasing a TRINITY Stainless Steel Utility Sink w/Pull-out Faucet. In order to
register your product and receive streamlined customer service, please fill out the following
Product Registration Form and (1) fax the form to 310.347.4134 (2) complete the Product
Registration Form online at www.trinityii.com or (3) scan and email the form to
customerservice@trinityii.com. Include a copy of your original receipt with your submission.
First Name: Last Name:
Address:
City: State: Zip Code:
Email Address: Phone:
Product Model #: THA-0310 Purchase Date: / /
Location of Purchase:
Please rate the importance of each feature (1=least important; 10=most important)
Quality Price Size/Capacity Appearance Other
How did you hear about our product?
Magazine Ad Catalog Salesperson Word of Mouth
Internet Store Display Other
Marital Status: Single Married
Household Income: Below $50,000 $50,000-$150,000 $150,000+
Education: High School College Graduate School
Primary Residence: Own Rent
Comments/Suggestions:
PRODUCT REGISTRATION
© 2019 TRINITY -800.985.5506
9

1 YEAR LIMITED WARRANTY
TRINITY Stainless Steel Utility Sink w/Pull-out Faucet
Model # THA-0310
Trinity International Industries (“Trinity”) warrants to the original consumer purchaser (“Purchaser”) of the
TRINITY Stainless Steel Utility Sink w/Pull-out Faucet (“Product”) that each Product shall be free from
defects in workmanship and materials for a period of 1 year from the date of original purchase. Trinity’s
obligation under this warranty shall be limited to repair or replacement of, or adequate compensation for
the Product which shall not be greater than the amount of the purchase price of the Product, at the option
of Trinity, during the warranty period. All replaced parts and Products become the property of Trinity and
must be returned to Trinity.
This warranty excludes normal wear and tear of the Product and its parts or components, and damage
arising from any of the following: negligent use or misuse of the Product, use contrary to this User’s
Manual, or alteration by any one other than Trinity. The warranty period of 1 year shall not be extended or
renewed by the repair or replacement of, or compensation for, the Product. Any warranty implied by
applicable law is limited in duration to one year from the date of purchase and is subject to the same
conditions and limitations as is provided for our express warranty.
Except as set forth herein, and to the extent of applicable there are no warranties on this Product either
express or implied, and Trinity disclaims all warranties including, but not limited to, any implied warranties
of merchantability, infringement or fitness for a particular purpose. No warranty or guarantee given by
any person, firm, or corporation with respect to this product shall be binding on Trinity.
If your Product is defective or otherwise requires service or parts, please call TRINITY Customer Service
toll-free at (800) 985-5506, between 5:00 a.m. and 5:00 p.m., PST. Please tell us which model you
purchased, the date of the purchase, and the problem with your Product. A copy of your original
purchase receipt must accompany your service request.
LIMITATION OF REMEDIES AND LIABILITY
Trinity (and its employees, officers, members, managers, affiliates an assigns) shall not be liable for any
incidental, consequential, special, indirect, remote, special or punitive damages for breach of any
warranty, express or implied, including, but not limited to, lost profits, lost savings, loss of anticipated
benefits and attorneys’ fees, which arise out of the purchase, use or inability to use the Product, whether
arising out of contract, negligence, strict tort, product liability, or any other legal theory on which a claim
is based. As noted above, to the extent damages are allowed by our express warranty or by applicable
law, those damages may not exceed the purchase price paid for the Product. Without limiting the
foregoing Purchaser assumes all risk and liability for loss, damage or injury to Purchaser and Purchaser’s
property and to others and their property arising out of the use, misuse, or inability to use this Product.
This limited warranty shall not extend to anyone other than the original purchaser of this product, is
nontransferable and states your exclusive remedy.
Some states do not allow the exclusion or limitation of incidental, consequential, special, or punitive
damages, so the above limitation or exclusion may not apply to you. The above warranty gives you
specific legal rights, and you may have other rights which vary from state to state.
© 2019 TRINITY -800.985.5506 10

TRINITY Customer Service
TEL: 800.985.5506
FAX: 310.347.4134
EMAIL: customerservice@trinityii.com
Monday through Friday
5:00 AM –5:00 PM (PST)
www.trinityii.com
QUESTIONS? NEED PARTS?
WE ARE HERE TO HELP!
Please feel free to contact us. There are no questions too
small, or any problems too big. We’re committed to
providing our customers with the highest level of service.
CONTACT US
Table of contents