Tristan Auron BT1D7007 User manual


EN-1
Safety Precautions
Never expose this unit, amplifier,
and speakers to moisture or water to
Do not change the fuse on the power
Using an improper fuse may cause
Please contact your nearest dealer if one
of the following is experienced:
Only connect the unit to a 12-volt power
Never install this unit where operating it
Never use the front video display
function when driving, so as to prevent
violating traffic regulations or causing
Please read through these operating
instructions so you will know how to
keep this manual in a safe place for
Heruntergeladen von manualslib.de Handbücher-Suchmachiene

EN-2
Contents
Safety Precautions ...................................1
Contents....................................................2
Before using..............................................3
Basic Operations......................................9
9
Mute9
Power On / Off9
9
Playing Source Selection9
9
EQ Menu9
Select Preset Equalizer10
10
10
11
Radio Mode .............................................11
11
Select Radio as Playing Source12
Select One Radio Band12
12
Preset Station12
Local Seeking12
EQ Selection12
RDS Basics13
13
RDS ( Radio Data System )13
13
13
13
DAB Mode ...............................................14
Select DAB as playing source14
14
14
14
Intro14
Auto store14
Manual store15
Delete stored services15
Recall the stored services15
15
15
Service Link15
Playback Mode........................................16
Load a Disc16
16
16
16
16
Remove a USB Device16
Insert SDcard16
Remove the SDcard16
Play/Pause16
Previous/Next17
17
Repeat17
Repeat A-B17
17
Select Audio Mode18
18
Video Setup18
18
18
Rotate Pictures18
Zoom18
Bluetooth Mode ......................................19
19
Disconnect Bluetooth Device19
19
19
20
Settings ...................................................21
Display System21
21
21
22
22
22
23
23
Other Modes............................................24
Listen to Other Devices24
Reset24
24
24
24
24
Device connections................................25
Installation and uninstall .......................27
.........................................28
Appendix .................................................30
Troubleshooting .....................................31
Wire Connections...................................32
Heruntergeladen von manualslib.de Handbücher-Suchmachiene


EN-4
Before using
1. [ ] button: Next
2. [ ] button: Previous
3. [ /MUTE] knob: Adjust volume
Turn clockwise to increase display angle, and turn counter-clockwise to decrease display
angle(press [AS/PS/TILT] icon).
Turn mute on/off(short press)
Power on/ Power off (long press)
4. [MENU] button: Return to the home menu
5. [BAND]
: Change radio band
6. [NAVI] button: Enter Nav mode
7. [DISP/DIM] button: Display information
Enter the adjust screen brightness mode
On/off screen brightness
8. [Reset] button: Reset the unit
9. USB Slot
10. AV IN2 jack
11. Internal Microphone
12. [
13. [OPEN/CLOSE]
: Open / Close the TFT monitor
14. [AS/PS/TILT]
: Auto Save/Preview Scan/Press display icon
15. Disc slot
16. SD/MMC card slot
17. Map card slot
Heruntergeladen von manualslib.de Handbücher-Suchmachiene

EN-5
Before using
Auxiliary LCD
LOUD
6
1. Disc indicator
Light up when one disc is inside;
lightning when disc is playing.
2. Repeat mode indicator
Light up when repeat mode is on; Light off when repeat mode is off.
3. Main display area
Display characters, playback time, tuning frequency, clock and other text information.
4. Radio status indicators
Stereo indicator lights up when the radio broadcast is a stereo one;
Local indicator lights up when the local seeking function is activated.
5. RDS function indicators
AF: Alternative Frequency
PTY: Program TYpe
TA: Traffic Announcement
TP: Traffic Program
6. Light up when loud is on; Light off when loud is off.
Note:
①Most information can be displayed on this LCD only when the TFT monitor is closed.
②Only English font support on this LCD.
Remove the DCP
The control panel can be detached to prevent theft. When
detaching the control panel, keep it in the safety place and
prevent scratches.
We recommend taking the DCP with you when leaving the car.
1. Press the [ / MUTE ] knob (2 sec.) to turn off the power.
2. Deeply push in [OPEN] button to unlock the DCP.
3. Hold the side popped out, take off the DCP.
Re-attach the DCP
Note:
Heruntergeladen von manualslib.de Handbücher-Suchmachiene


EN-7
Before Using
Key Operation Description
1 Press Change Current Source.
2 Press TFT Display Close/Open.
3 Press Enter the DVD menu.
4 Press Enter the DVD Title.
5 Press Zoom in /out on an image.
6 Press Select radio band
7 Press Naviation/Power On
8Press Dimmer Mode
Press and hold TFT Display Off
9 Press
[ ]- Fast Reverse
[ ]- Fast Forward
10 Press Slowly Play
Dial call
11 Press
12 Press
[ ]-Play Photo:UP-DOWN Mirror; Play Disc:Select Files.
[ ]-Play Photo:Left-Right Mirror; Play Disc:Select Files.
[ ]-Return To Play List
[ ]-Play Photo:Clockwise Rotation ; Play Disc:Select Files.
13 Press Stop Play
14 Press Number Input
15 Press Return to Main Menu
16 Press Power On/Off
17 Press Photo Angle Select
18 Press DVD Subtitle
19 Press Repeat A-B
20 Press Repeat playback of current chapter
21 Press [ ]- Decrease display angle (TILT-).
[ ]- Increase display angle (TILT+).
22 Press [ ]- Previous
[ ]- Next
23 Press Random Play
Hang up
24 Press Increase/Decrease Volume
25 Press Pause playback/Start playback.
26 Press Toggle on/off audio output.
27 Press Audio Channel Select.
28 Press Number 10+,20+,30+…100+… Select.
Heruntergeladen von manualslib.de Handbücher-Suchmachiene

EN-8
Before Using
PULL OUTPUSH IN
Notes on Remote Control Usage
1. Aim the remote control at the remote sensor on the unit.
2. Replace the battery from the remote control or insert a battery insulator if the battery has not
been used for a month or longer.
3. DO NOT store the remote control in direct sunlight or in a high temperature environment, as it
may not function properly.
4. The battery can last up to for 6 months in normal conditions. If the remote control does not
work, please change the battery.
5. Use“button shaped” lithium battery“CR2025”(3V) only.
6. DO NOT recharge, disassemble, heat or expose the battery to fire.
7. Insert the battery in the proper direction according to the ( + ) and ( - ) poles.
8. Store the battery in a place where it cannot be reached by children to avoid the risk of accident.
Uninstall Battery
Install Battery
Heruntergeladen von manualslib.de Handbücher-Suchmachiene

EN-9
Basic Operations
Parking Brake Inhibit
the brake switch, the display on the TFT
monitor will display video only when the
vehicle is applied.
the driver from watching content while
driving. Rear video screens are not
affected.
Mute
Press [ /MUTE
audio setup features cancels the mute
Power On / Off
Press the [ /MUTE on the unit (or
to turn the unit on. The current mode status
appears in the LCD.
Press and hold the [ /MUTE to
power off the unit.
selection. The Beep tone can be disabled
through the Setup menu.
Playing Source Selection
4
3
2 1
3 5 3
1. Date and Time display. Double click to
switch to Clock mode.
2. Function icons
3. or : Touch this page button to view
the first or second page of on-screen
buttons. You also can drag left or right on
the blank area to switch the pages.
4. Touch repeatedly to change wall papers.
5. Touch for quick access to Equalizer level
settings.
Volume Adjustment
To increase or decrease the volume level,
turn the [ /MUTE ] knob on the front panel
or press the [ VOL+ ] / [ VOL ] button on the
volume level for 3 seconds.
EQ Menu
acoustical characteristics of your vehicle,
which vary depending on the type of vehicle
Heruntergeladen von manualslib.de Handbücher-Suchmachiene

EN-10
Basic Operations
Select Preset Equalizer
1. Enter the EQ setup mode
Touch the [ ] icon in the user interface
and the EQ setup interface will display on
the screen.
2. Select EQ mode
∙ [User] ∙ [Rock]
∙ [Flat] ∙ [Class]
∙ [Pop] ∙ [Jazz]
∙ [Techno] ∙ [Optimal]
Adjust EQ Parameters
To adjust EQ parameters, touch and drag the
parameters adjustment bar.
Touch [ ] / [ ] or drag [ ] to adjust the
parameters.
[ User ]: Set the desired audio effect.
∙ [BAS] bass range: -7 to +7
∙ [MID] middle range: -7 to +7
∙ [TRE] treble range: -7 to +7
∙ [LPH] low pass filter range: 60HZ, 80HZ,
100HZ, 200HZ
∙ [MPF] middle pass filter range: 0.5KHZ,
1.0KHZ, 1.5KHZ, 2.5KHZ
∙ [HPF] high pass filter rang: 10.0KHZ,
12.5KHZ, 15.0KKHZ, 17.5KKHZ
[ LOUD: On/Off ]: When listening to music
at low volumes, this featurewill selectively
boost certain bass and treble frequencies.
[ RESET ]: Cancel the equalizer function
settings.
Adjust Fader/Balance
You can adjust front/back/left/right balance
of the speaker and the subwoofer volume to
get balanced listening effect according to the
surroundings and your interest.
1. Enter the EQ setup mode
Touch the [ ] icon in the user interface
and the EQ setup interface will display on
the screen.
2. Adjust subwoofer volume
Touch [ ] / [ ] or drag [ ] to adjust
subwoofer volume from 0 to38.
3. Adjust fader / balance value
Touch [ ] / [ ] / [ ] / [ ] to adjust
fader / balance value
∙ [ ]: Front speaker, fader range: 0 to 7.
∙ [ ]: Rear speaker, fader range: 0 to 7.
∙ [ ]: Left speaker, balance range: 0 to 7.
∙ [ ]:
Right speaker, balance range: 0 to 7.
Note:
1. The parameters of the EQ modes has
been preset and you can not change them
besides ‘User’.
2. The EQ mode will change to ‘User’
automatically when you adjust the
frequency value under the modes besides
‘User’.
3. The value of Sub is independent of EQ
mode and can be adjusted separately.
Heruntergeladen von manualslib.de Handbücher-Suchmachiene

EN-11
Basic Operations
Set Date /Time
· Set Date
] or [ ] to set year, month
· Set Time Mode
· Set Time
] or [ ] to set hour and
· Set Desk Timer
· Set Time Zone
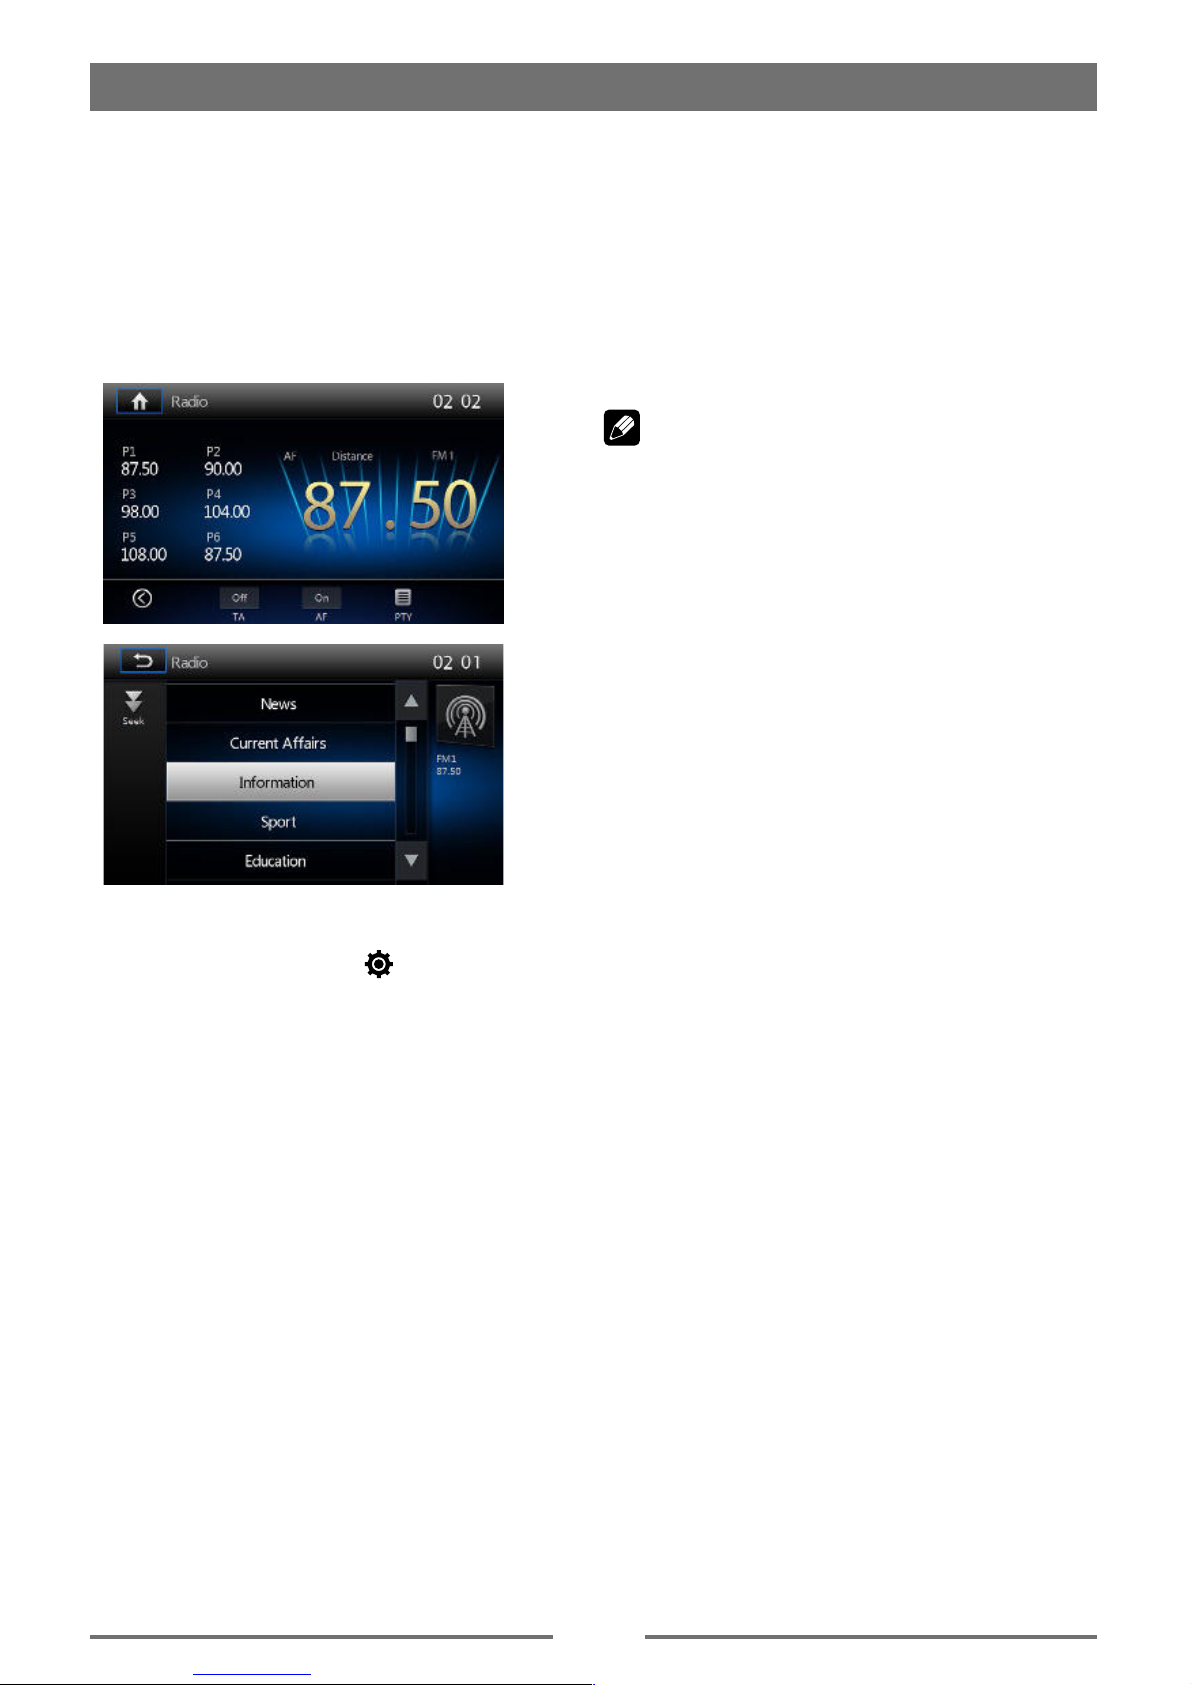
Tuner TFT Display
7
1
5
6
8
2
9
3 4
10
11
14 15 161312
1. Touch to view the SOURCE MENU and
select a new playback source
istant
and preset radio stations
Distance
Enter frequency directly
1
settings
Radio Mode
Heruntergeladen von manualslib.de Handbücher-Suchmachiene

EN-12
Radio Mode
Select Radio as Playing Source
Open the Source Menu and then touch
Select One Radio Band
or touch the [ ] icon on the user interface
Tune
Auto Tuning
Press the [ ] / [
] / [ ] icon on
the user interface for more than 1 second to
Note:
Manual Tuning
Method 1:
Press the [ ] / [
control or touch the [ ] / [ ] icon on the
user interface to tune in a higher / lower
Method 2:
Preset Station
stations; hence the unit can store 30 stations
Intro/Scan
Press the [
station will play for 5 seconds automatically.
Hold down the [ ] icon to scan. Only
stations with sufficient signal strength will
be detected and stored in the memory. After
scaning, P1 will play automatically.
Manual Store
Tune to a Preset Station
Local Seeking
] icon and choose Local or
EQ Selection
Press the [
Heruntergeladen von manualslib.de Handbücher-Suchmachiene
EN-13
RDS Basics
RDS transmits data to the radio which
displays information such as station
Please understand if RDS service is not
Adjust RDS Settings
RDS ( Radio Data System )
The unit provides basic functions of RDS.
RDS service availability varies with areas.
Please note that if RDS service is not
available in your area, the following settings
are not available.
AF Function
Alternative Frequencies Lists are used for the
same program service and used in conjunction
with the PI code (Program Identification code)to
assist automatic tuning.
Using this information, a radio can automatically
search out another station that is playing the
same material. This is useful when the station
you are listening to is fading out.
Note:
interference could be heard.
problem.
TA Function
The TA (Traffic Announcement flag) function
lets the unit receive traffic announcements
automatically no matter what media source is
playing back. The TA function can be activated
by a TP (Traffic Program) station broadcasting
traffic information.
When TA is activated and a traffic
announcement is received, the current
playing source will be overridden by the traffic
announcement if the current radio band is
FM, indicating that the unit is waiting for traffic
announcements.
The unit returns to the original source after the
traffic announcement has been received.
To activate TA function, touch the [TA] button on
the user interface.
To cancel this function, do the operation above
again.
PTY Function
Radio Mode
Heruntergeladen von manualslib.de Handbücher-Suchmachiene

EN-14
DAB Mode
Select DAB as playing source
Press [ MENU
menu, then select [DAB
If DAB is not on the current source menu,
touch [ ] / [
the screen, or hold the center of screen and
Playback menu
1
5
2
6
3 4
87 9 10
1514131211
11. Turn on/off L Band
12. Search all service available and Store
stations automatically
13. Search service by Programme Type
14. Turn on/off traffic announcement
15. Turn on/off Service Link
Select one DAB band
Band] icon on the screen to select
Tune
search mode from the followings:
1. Preset Search
2. Current Search
3. ALL Search
4. Manual Search
During manual tuning, the frequency will
] or [ ] icon to tune in a
Note:
Intro
Press the [
Search
Auto store
Only stations with sufficient signal strength will
be detected and stored in the memory.
Touch [ ] to search all service available
and store stations automatically.
To stop auto store, press other icons having
radio functions.
Note:
1. After auto store, the previous stored
stations will be overwritten.
2. The unit has 3 bands, such as DAB1,
DAB2 and DAB3.
Heruntergeladen von manualslib.de Handbücher-Suchmachiene

EN-15
Manual store
] icon to enter store preset
Delete stored services
Recall the stored services
DAB Mode
PTY Search
PTY
] or [ ] icon to scroll, and
Touch [
Seek
] to seek a channel within the
selected category.
L-BAND ON/OFF
Touch [
L
L_Band
Service Link
Heruntergeladen von manualslib.de Handbücher-Suchmachiene

EN-16
Playback Mode
Load a Disc
on the following discs:
Note:
Eject a Disc
Press the [ ] on the front panel to
Touch Screen Controls
B
C
A
A: Return to the main menu
information
Controlling Playback
screen except upper left corner, and touch
] to view
Connect a USB Device
Remove a USB Device
Insert SD card
Remove the SDcard
Play/Pause
[
Heruntergeladen von manualslib.de Handbücher-Suchmachiene

EN-17
Playback Mode
Previous/Next
] / [ ] icon on the screen to skip
Search for a Folder
For Video Files
For Audio Files
For Picture Files
folders
Repeat
For DVD/VCD movie disc:
] repeatedly to select:
DVD
[ ] Repeat chapter: Play the current
[ ] Repeat title: Play all chapters in the
[ ] Repeat off: Play all in the all
[ 1] Repeat single: Play the current
[ ] Repeat all: Play all in the all
corner to display menu on the screen, if
] repeatedly:
[ 1] Repeat single: Play the current
[ ] Repeat all: Play all in the all
[ ] Repeat folder: Play all in the current
[
Repeat A-B
] to display the 2nd menu, if
Repeat A-: the start of the section to
Repeat A-B: the end of the section to
] to display the 2nd menu, if
] on the screen repeatedly to
Heruntergeladen von manualslib.de Handbücher-Suchmachiene

EN-18
Playback Mode
Select Audio Mode
screen to display menu on the screen, if
] repeatedly until the audio
Select Subtitle Language
] repeatedly to select a
Video Setup
] to access video setup mode,
touch [ ] or [
Playback Information
Touch the screen when playing back DVD and
VCD discs and the playback information will
be displayed on the top area of the TFT.
For DVD
1. Disc type.
2. DVD Title information. “1/8” indicates that
this DVD has 8 titles and the title playing
back now is the first title.
3. DVD Chapter information. “5/12” indicates
that current title has 12 chapters and
the chapter playing back now is the fifth
chapter.
4.
12 3
DVD TTL:1/8 CHP:5/12 15:25
For VCD
1. Disc type.
2. VCD Track information. “1/8” indicates
that this VCD has 8 tracks and the track
playing back now is the first title.
3.
3
12
VCD 1/8 15:25
Elapsed Time
1. Elapsed time of the current track.
2. Total time of the current track.
12
00:01:20 00:30:17
Direct Track Entry
]
icon on screen control to displaythe direct
Rotate Pictures
screen to display menu on the screen, if
] repeatedly to rotate the
Zoom
screen to display menu on the screen, if
] repeatedly to zoom in or out
Heruntergeladen von manualslib.de Handbücher-Suchmachiene

EN-19
Pair the Bluetooth-enabled Devices
You also can search
for Bluetooth devices by mobile phone.
+] to search for Bluetooth device
the Bluetooth device ID in the
pairing list.
4.
Note:
and a Bluetooth device is approximately 5
to this unit, familiarize yourself with the
a Bluetooth device can reduce the
electronic device that may cause
Bluetooth Mode
Disconnect Bluetooth Device
Note:
• If you do not want to reconnect the device
to the unit automatically, touch [ ], then
set [ Auto Connect ] to [ Off ].
For details, see the “Adjust Bluetooth
Settings” section.
Make a Call
following list:
[ ]: Phone Book
[
[Missed calls]
[Received calls]
[Dialed calls]
Answer an Incoming Call
By default, all incoming calls are received
the screen will
appear “Incoming”
Heruntergeladen von manualslib.de Handbücher-Suchmachiene
Other manuals for BT1D7007
1
Table of contents
Other Tristan Auron Car Video System manuals


