Tristar Cares Power Fit Elite User manual
Save These Instructions – For Household/Residential Use Only
Owner’s Manual
MODEL: ETF012C POWER: 150W, 110V~12Hz
MODEL: ETF012C-Smart POWER: 120W, 110V~12Hz
When using electrical appliances, basic safety precautions
should always be followed. Do not use the Power Fit until
you have read this manual thoroughly.
Visit TristarCares.com for tutorial
videos, product details, and more.
Guarantee Information Inside
PF_IB_TP_ENG_V1_191206.indd 1 12/6/19 5:42 PM

2 Power Fit®Elite & Power Fit®Elite Deluxe
Power Fit
BEFORE YOU BEGIN
It’s very important that you read this entire manual,
making certain that you are completely familiar with
this Unit’s operation and precautions.
Model Number Supply Power Rated Power Maximum Weight
ETF012C-Smart AC 110V~12Hz 120W 220.46 lb. (100 kg)
ETF012C AC 110V~12Hz 150W 330 lb. (150 kg)
ELITE DELUXE
ETF012C
ELITE
ETF012C-Smart
PF_IB_TP_ENG_V1_191206.indd 2 12/6/19 5:42 PM

Power Fit®Elite & Power Fit®Elite Deluxe 3
Table of Contents
IMPORTANT SAFEGUARDS 4-5
_______________________________________________________________________________
Features & Benefits 6
_______________________________________________________________________________
Parts & Accessories 7-8
_______________________________________________________________________________
Walking, Jogging and Running 9
_______________________________________________________________________________
General Operating Instructions 10-11
_______________________________________________________________________________
Stretching 12–14
_______________________________________________________________________________
Complementary Workouts 15–17
_______________________________________________________________________________
Maintenance & Cleaning 18
_______________________________________________________________________________
60-Day Guarantee 19
_______________________________________________________________________________
Replacing the Fuse 19
_______________________________________________________________________________
PF_IB_TP_ENG_V1_191206.indd 3 12/6/19 5:42 PM
4 Power Fit®Elite & Power Fit®Elite Deluxe
When using an electrical appliance, basic precautions
should always be followed, including the following:
1. This appliance should never be left unattended
when plugged in. Unplug the appliance from the
power outlet when not in use and before putting
on or taking off parts.
2. Do not operate under a blanket or pillow.
Excessive heating can occur and cause re,
electric shock, or injury to persons.
3. This appliance is not intended for use by persons
with reduced physical, sensory, or mental
capabilities or lack of experience and knowledge
unless they are under supervision or have been
instructed how to use the appliance by a person
responsible for their safety. Keep children under
the age of 13 away from this appliance.
4. Use this appliance only for its intended use as
described in this manual. Do not use attachments
not recommended by the manufacturer.
5. Never operate this appliance if it has a damaged
cord or plug, if it is not working properly, if it
has been dropped or damaged, or if it has been
dropped into water. Contact Customer Service
using the contact information on the back of this
manual.
6. Do not carry this appliance by its power cord or
use the cord as a handle.
7. Keep the power cord away from heated surfaces.
8. Never operate the appliance with the air openings
blocked. Keep the air openings free of lint, hair,
and the like.
9. Do not use outdoors.
10. Do not operate where aerosol (spray) products
are being used or where oxygen is being
administered.
11. To disconnect, turn all controls to the off position
and then remove the plug from outlet.
IMPORTANT SAFEGUARDS
WARNING: READ ALL INSTRUCTIONS BEFORE USING THIS APPLIANCE.
CONSULT YOUR DOCTOR BEFORE BEGINNING ANY NEW HEALTH REGIME.
This product can expose you to Bisphenol A, which is known
to the State of California to cause birth defects or other
reproductive harm. For more information, go to
www.P65Warnings.ca.gov.
For California Residents
WARNING:
DANGER:
TO REDUCE THE RISK OF ELECTRIC SHOCK:
Always unplug this appliance from the electrical outlet
immediately after using and before cleaning.
TO REDUCE THE RISK OF PERSONAL INJURY, READ AND
UNDERSTAND ALL INSTRUCTIONS BEFORE USING THIS PRODUCT
• Keep children under the age of 13 away from this
appliance.
• Servicing or cleaning must be performed with the
appliance disconnected from the power supply.
WARNING:
PF_IB_TP_ENG_V1_191206.indd 4 12/6/19 5:42 PM
Power Fit®Elite & Power Fit®Elite Deluxe 5
IMPORTANT SAFEGUARDS
SAVE THESE INSTRUCTIONS –
FOR HOUSEHOLD/RESIDENTIAL USE ONLY
• NOTE: The Power Fit is fitted with a Quick-
Release Magnetic Power Cord.
• DO NOT USE WITH ANY OTHER ELECTRICAL
OUTLET or modify the plug.
• The Power Fit has been designed for use with
a 3-prong, 120V dedicated electrical outlet only.
Always attach electrical cord to the Power Fit
before plugging the Unit into an outlet. Plug into
a 3-prong wall outlet with no other appliances on
the same outlet. Plugging other appliances into
the outlet may cause the circuit to overload.
• In the event of Unit malfunction, disconnect the
Power Cord quickly from the Unit with a gentle tug
where it is connected to the Unit.
• Never tug the plug forcefully from the wall outlet.
• NEVER USE WITH AN EXTENSION CORD.
A detachable power-supply cord is provided to
reduce the risk from becoming entangled in or
tripping over a longer cord.
• A short power supply cord is provided to reduce
risk of becoming entangled or presenting a
tripping hazard.
Always attach electrical cord to the Power Fit before
plugging the Unit into an outlet. Plug into a 3-prong
wall outlet with no other appliances on the same
outlet. Plugging other appliances into the outlet will
cause the circuit to overload. If the electrical circuit is
overloaded with other appliances, your Unit may not
operate properly.
CAUTION: Attaching the Power Cord
Grounding Instructions
This product must be grounded. If it should
malfunction or breakdown, grounding provides a path
of least resistance for electric current to reduce the
risk of electric shock. This product is equipped with
a cord that has an equipment-grounding conductor
and a grounding plug. The plug must be plugged
into an appropriate outlet that is properly installed
and grounded in accordance with all local codes and
ordinances.
DANGER:
Improper connection of the equipment-grounding
conductor can result in a risk of electric shock. Check
with a qualied electrician or serviceman if you are in
doubt as to whether the product is properly grounded.
Do not modify the plug provided with the product – if
it will not t the outlet, have a proper outlet installed
by a qualied electrician.
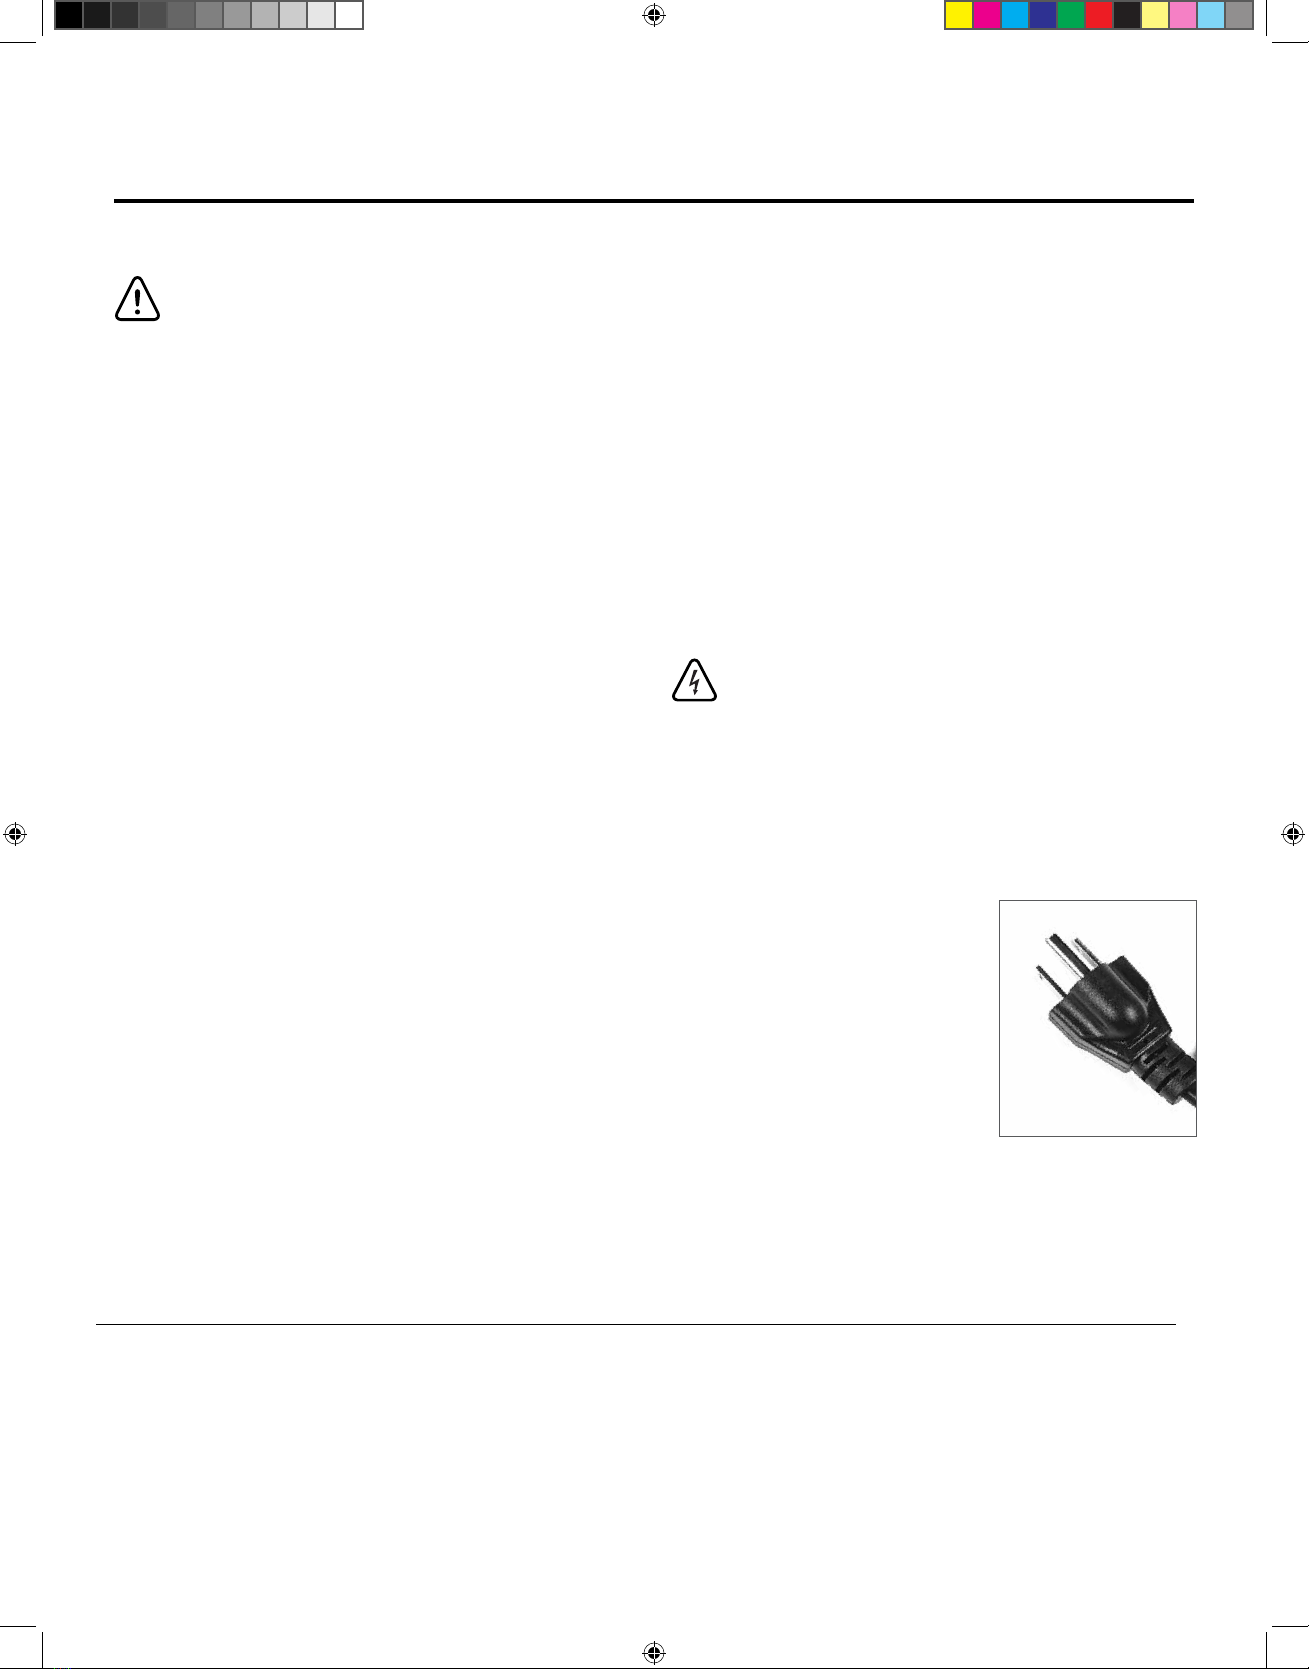
This product is for use on a
nominal 120-V circuit and has
a grounding plug that looks like
the plug illustrated in Fig. A.
Make sure that the product is
connected to an outlet having
the same conguration as the
plug. No adapter should be
used with this product. Fig. A
PF_IB_TP_ENG_V1_191206.indd 5 12/6/19 5:42 PM
6 Power Fit®Elite & Power Fit®Elite Deluxe
How Does it Work?
By placing your feet in different positions on the exercise area, you will be able to simulate walking, jogging, and
running while you stand on Power Fit inside the comfort of your own home. It is recommended to use Power Fit
for 10 minutes a day 3 days a week.
Features & Benets
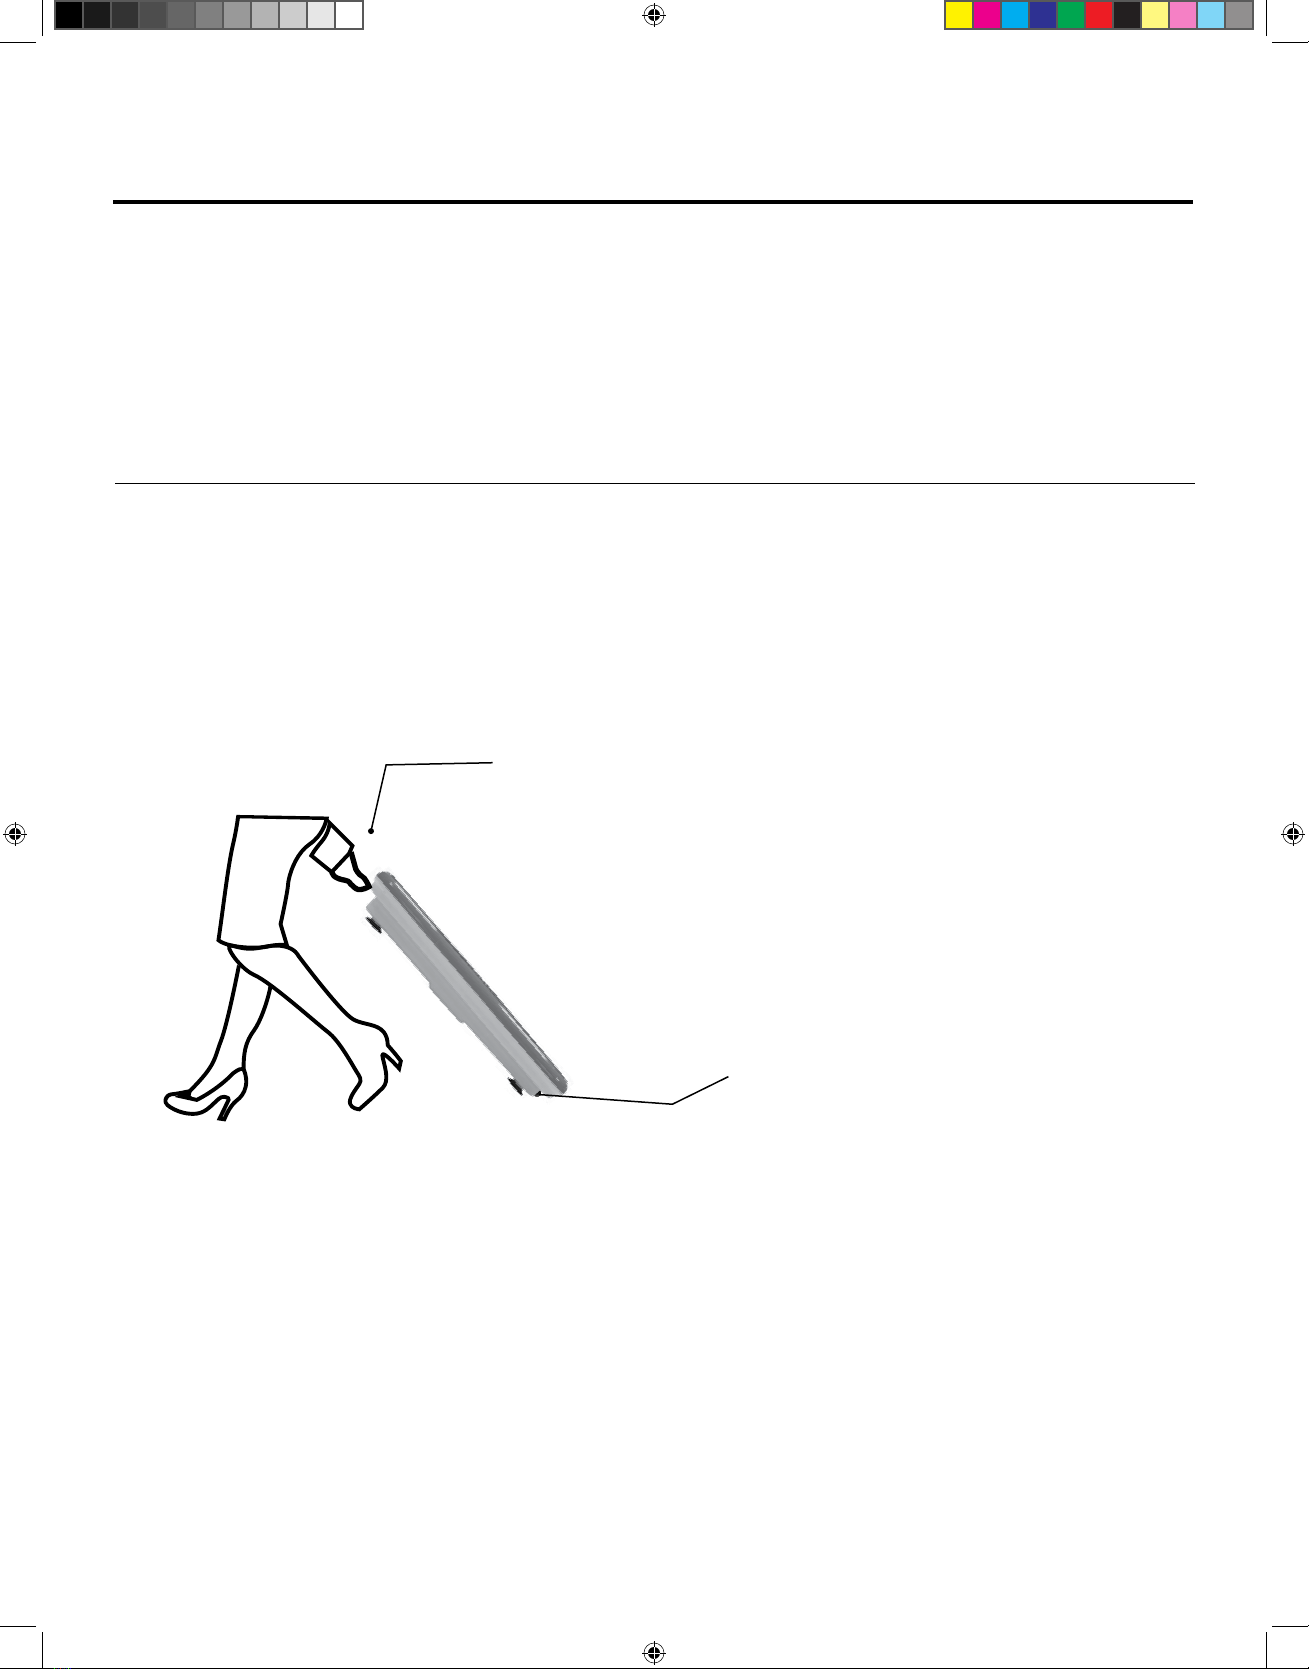
• To transport Power Fit*, grasp the handle located
on the right side of the Unit and pick up the right
side so that the Unit is at an angle and the wheels
touch the floor. Then, pull the Unit gently to move.
*For Model ETF012C
• Always use the Product on a stable, horizontal
surface.
• Keep the Unit at least 8 inches away from any
wall or object.
• When using the Unit for first time, sit down on
a chair placed in front of the Unit and put your
feet on it. Then, turn on the Unit in order to test
the intensity of the movements. This method will
allow you to get used to the Unit’s vibrations.
• Make sure to wear comfortable clothes and
footwear for exercise.
Before Using the Power Fit for the First Time
HANDLE
TRANSPORT
WHEELS
PF_IB_TP_ENG_V1_191206.indd 6 12/6/19 5:42 PM
Power Fit®Elite & Power Fit®Elite Deluxe 7
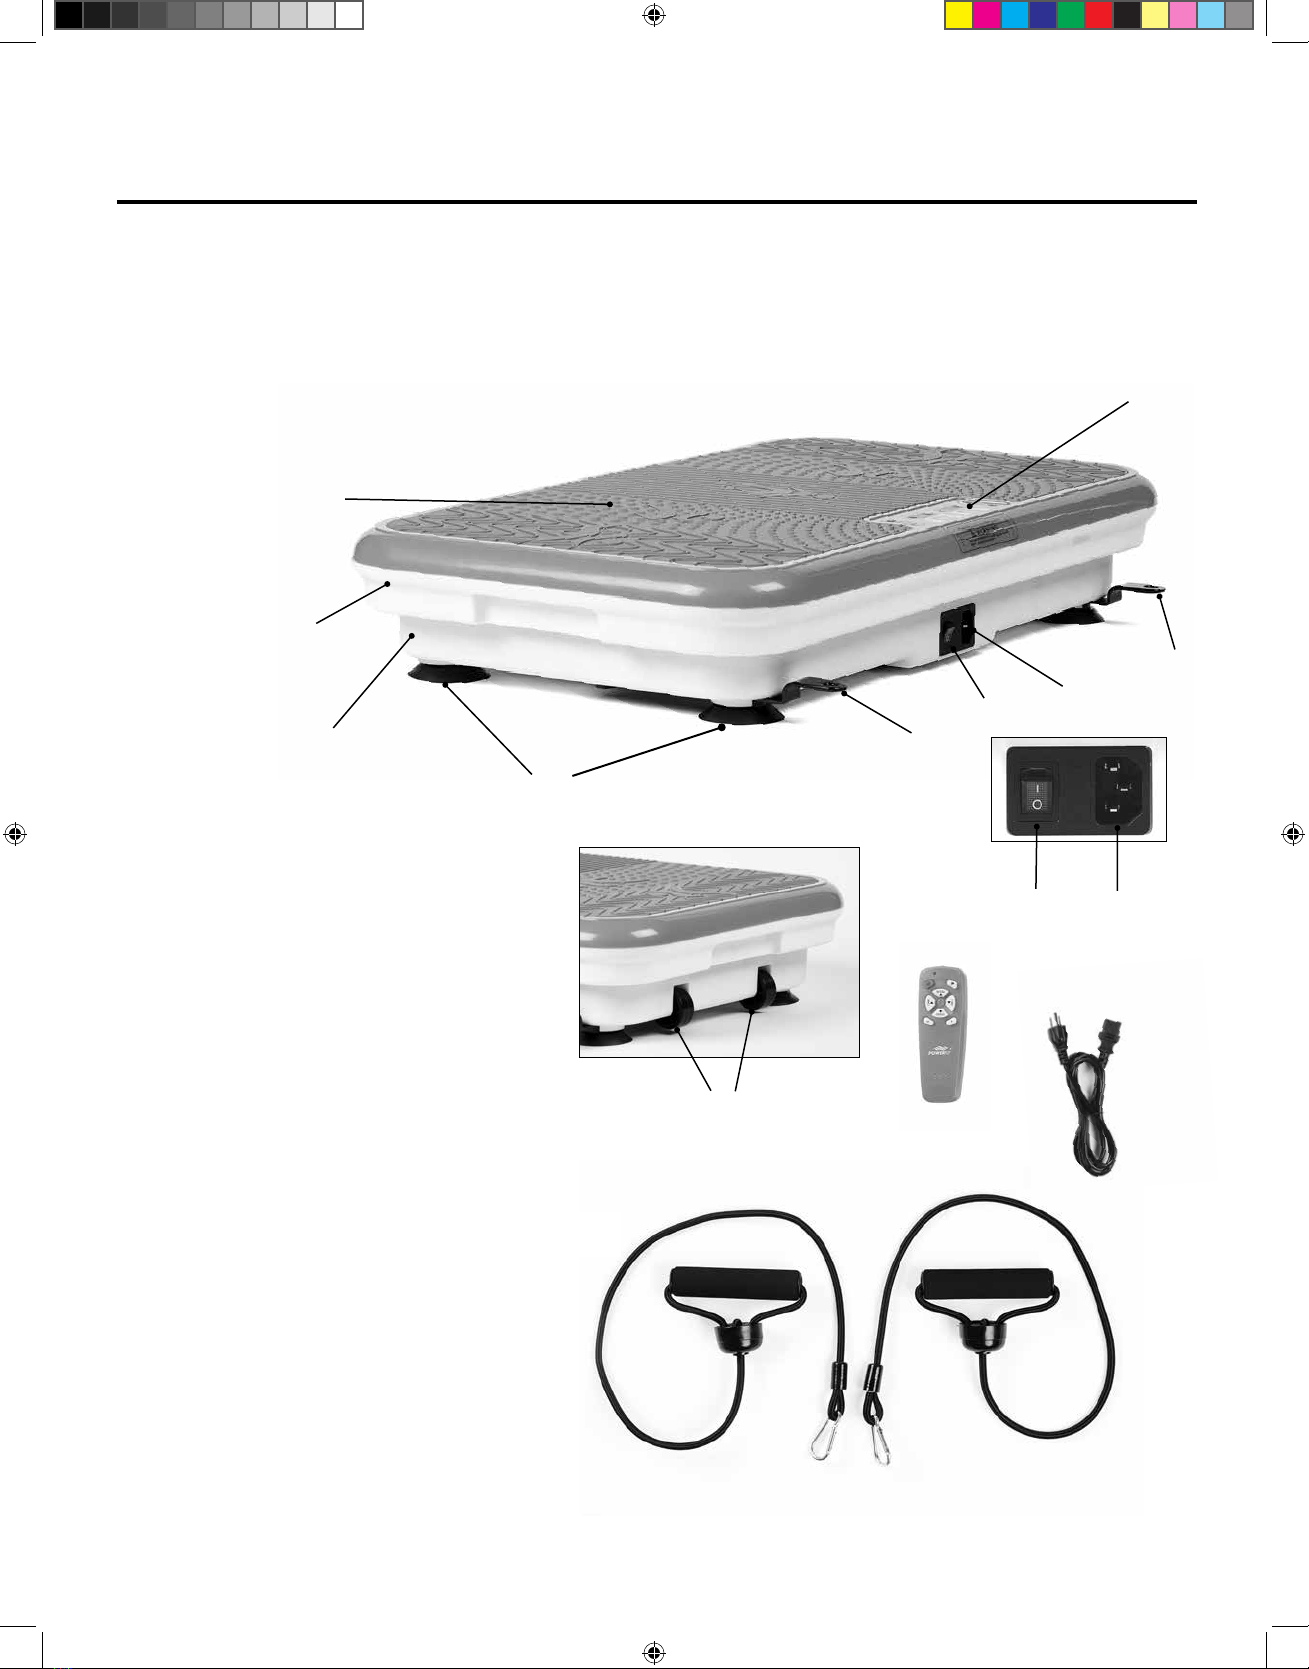
1. ANTI-SLIP COVER
2. INTERMEDIATE COVER
3. BASE COVER
4. ANTI-SLIP RUBBER BASES
5. ELASTIC BAND ANCHOR POINTS*
6. POWER SWITCH
7. POWER CORD SOCKET
8. CONTROL PANEL
9. TRANSPORT WHEELS*
10. REMOTE CONTROL
11. POWER CORD
12. EXERCISE ELASTIC BANDS
WITH FIT TENSOR TECHNOLOGY*
* (Elite Deluxe model only)
Parts & Accessories
Your Power Fit has been shipped with the parts and
accessories shown below. Check everything carefully
before use. If any part appears damaged, do not use
this product and contact Customer Service using the
number located in the back of this manual.
12
2
3
8
67
5
5
1
67
9
4
10
11
PF_IB_TP_ENG_V1_191206.indd 7 12/6/19 5:42 PM
8 Power Fit®Elite & Power Fit®Elite Deluxe
4
5
61 23
78 9 10 11
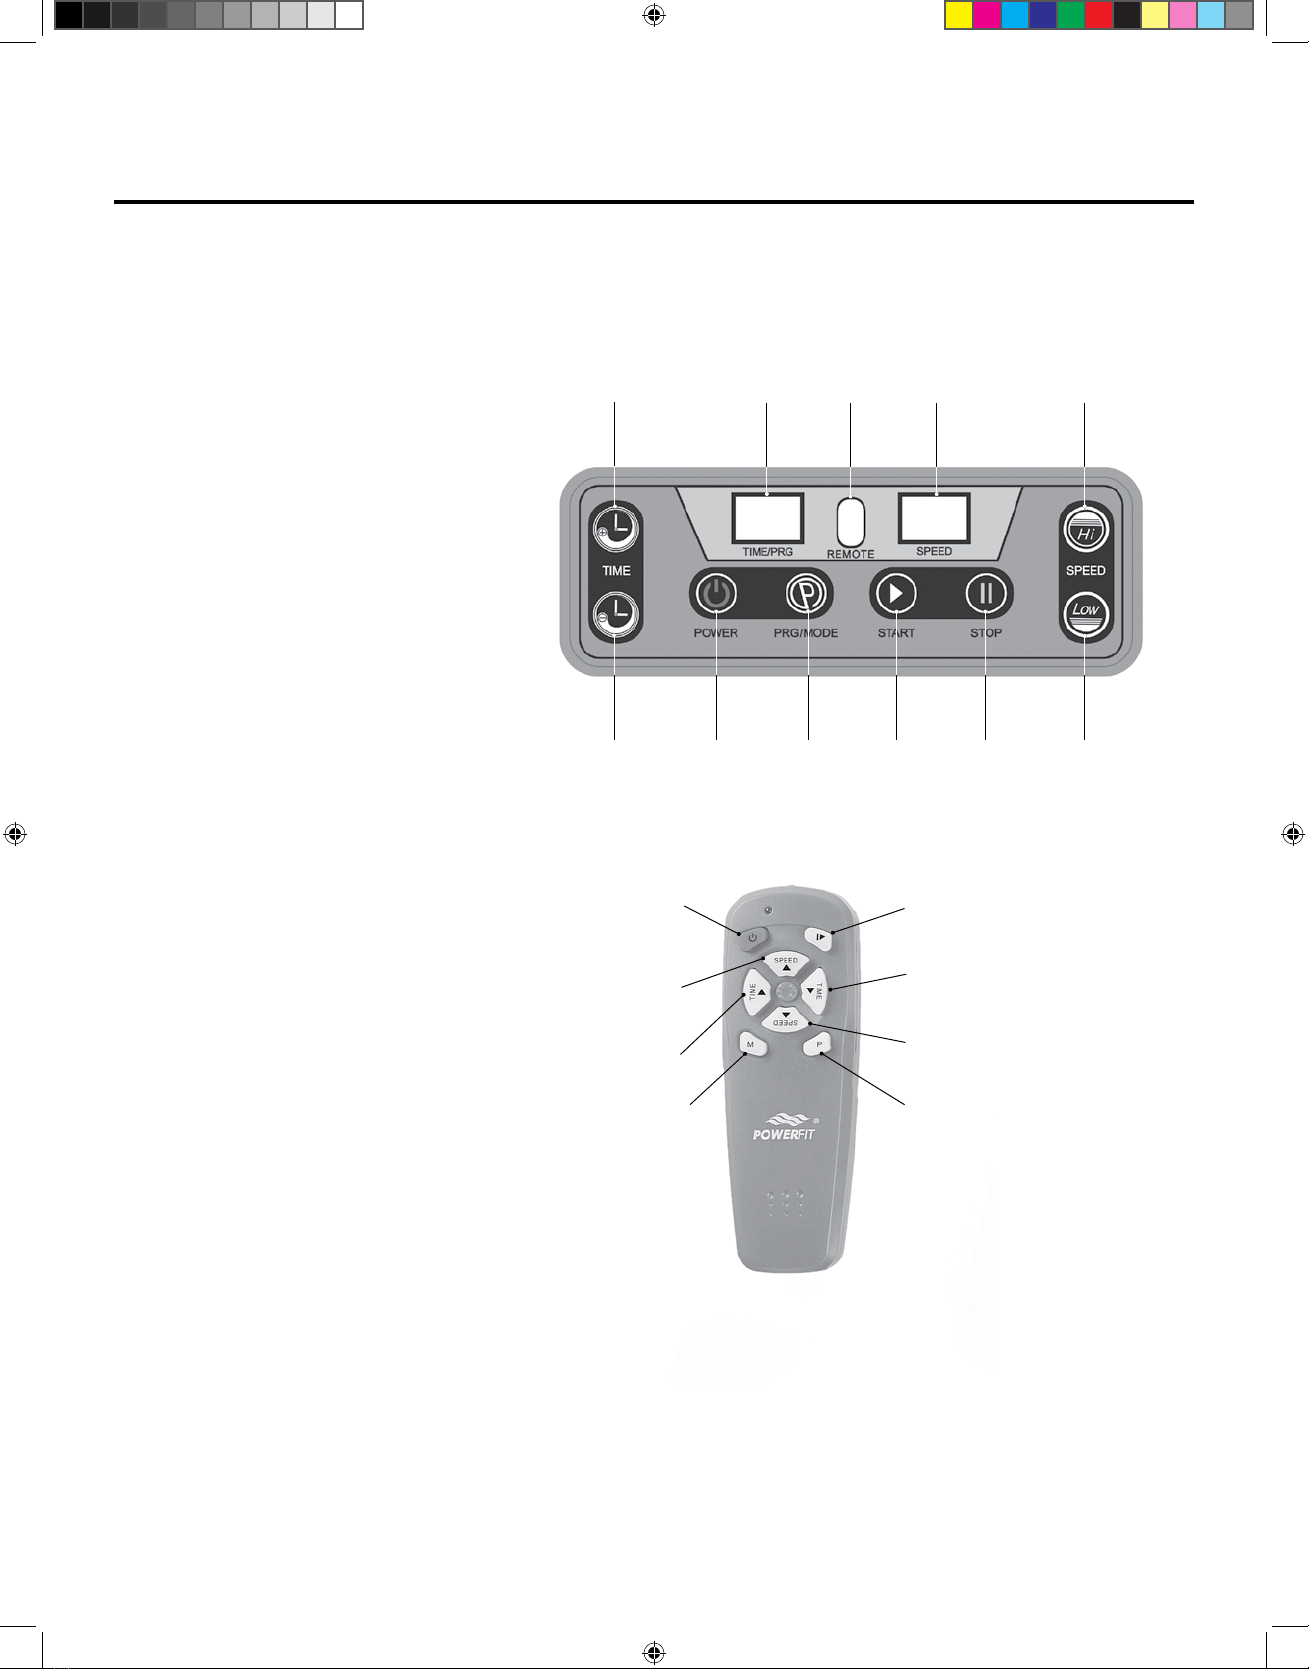
A. ON/OFF
B. START/STOP
C. INCREASE SPEED
D. DECREASE SPEED
E. INCREASE TIME
F. DECREASE TIME
G. SKIP SPEED TO 30, 60 AND 90
H. PROGRAM SELECTION
Parts & Accessories
1. TIME/PROGRAM DISPLAY
2. SPEED/PROGRAM DISPLAY
3. INFRARED RECEPTOR
FOR THE REMOTE CONTROL
4. INCREASE TIME
5. DECREASE TIME
6. INCREASE SPEED
7. DECREASE SPEED
8. ON/OFF
9. PROGRAM SELECTION
10. START EXERCISE
11. STOP EXERCISE
Power Fit Control Panel
Power Fit Remote Control
A
D
F
H
B
C
E
G
• Non-rechargeable batteries
are not to be recharged.
• Rechargeable batteries are
only to be charged under adult
supervision.
• Rechargeable batteries are to
be removed from the device
before being charged.
• Different types of batteries or
new and used batteries are
not to be mixed.
• Batteries are to be inserted
with the correct polarity.
• Exhausted batteries are to be
removed from the remote.
Never drop or insert any object
into any opening.
Remote uses two AAA batteries
(not included).
PF_IB_TP_ENG_V1_191206.indd 8 12/6/19 5:42 PM

Power Fit®Elite & Power Fit®Elite Deluxe 9
Walking, Jogging and Running
Power Fit is a vibrating platform that simulates the action of walking, jogging, or running through horizontal
oscillatory movements. Placing your feet closer together while standing on the Unit simulates walking, while
placing your feet farther apart simulates jogging.
The Three Stances
With Power Fit, you can experience
the sensation of walking, jogging, or
running in the comfort of your home.
The table below shows the differences
between the three different stances
availble for use on the Power Fit.
Feet Position
Walking Close together
on the center of the Unit
Jogging Slightly separated
Running Separated and planted
toward the edge of the Unit
PF_IB_TP_ENG_V1_191206.indd 9 12/6/19 5:42 PM

10 Power Fit®Elite & Power Fit®Elite Deluxe
General Operating Instructions
Modes of Use
Power Fit gives you two modes of use: manual mode
and automatic mode. In both modes, you can use the
exercise Elastic Bands. To use the Elastic Bands,
attach the hook on each Elastic Band to
one of the Elastic Band Anchor Points, located at the
back of the Unit.
CAUTION: Before each use, ensure that the Elastic
Bands are undamaged and properly anchored to
the Power Fit. Do not use if the Elastic Bands are
damaged.
Manual Mode
Using manual mode, you can set the time and the
speed of the exercise. To use manual mode:
1. Connect the Power Cord of the Unit in the outlet.
Use the Power Switch to turn on the Unit.
2. Press the On/Off Button on the Control Panel or
the Remote Control.
3. Use the Increase Time and Decrease Time
Buttons on the Control Panel or Remote Control
to set an exercise time (range: 1–10 minutes;
interval: 1 minute). The current exercise time is
displayed on the Time/Program Display on the
Control Panel.
4. Press the Start Button on the Control Panel or
the Start/Stop Button on the Remote Control to
begin the exercise.
5. Use the Increase Speed and Decrease Speed
Buttons on the Control Panel or Remote Control to
adjust the vibration speed (range: 1–99; interval: 1).
You can press the Skip Speed Button on the
Remote Control to rapidly increase vibration speed
to 30. Refer to the table on the right for
recommended vibration speeds and exercise times
according to your level of experience.
6. Press the Stop Button on the Control Panel or
the Start/Stop Button on the Remote Control to
stop the exercise at any time.
7. When you are done with the exercise, press the
On/Off Button on the Control Panel or the Remote
Control to turn off the Unit.
Time
(minutes) Beginners Intermediate Advanced
10 30-33 64-66 98-99
927-39 62-64 96-98
824-26 60-62 94-96
720-23 56-59 92-94
616-19 53-55 88-91
513-16 49-52 84-87
4 10-12 45-48 81-83
36-9 41-44 75-78
24-5 37-40 71-74
11-3 34-36 67-70
Speed for Each Level
NOTE: Always step off of the Unit before adjusting the
Unit’s Control Panel.
PF_IB_TP_ENG_V1_191206.indd 10 12/6/19 5:42 PM

Power Fit®Elite & Power Fit®Elite Deluxe 11
Automatic Mode
When using Automatic Mode, the Unit will follow
your selected preset exercise program. To use
Automatic Mode:
1. Connect the Power Cord of the Unit to the outlet.
Use the Power Switch to turn on the Unit.
2. Press the On/Off Button on the Control Panel or
the Remote Control.
3. Press the Program Selection Button to cycle
between the three available preset program (P1,
P2, and P3). P1 is intended for beginners. P2 is
intended for intermediate users. P3 is intended for
advanced users. Refer to the table on the right for
detailed information about the preset programs.
4. When you have selected your desired program,
press the Start Button on the Control Panel or the
Start/Stop Button on the Remote Control to begin
the exercise.
5. Press the Stop Button on the Control Panel or the
Start/Stop Button on the Remote Control to stop
the exercise at any time.
6. When you are done with the exercise, press the
On/Off Button on the Control Panel or the Remote
Control to turn off the Unit.
General Operating Instructions
Time
(minutes)
Beginners
P1
Intermediate
P2
Advanced
P3
916 20 10
818 40 44
728 60 99
638 80 33
548 99 99
458 40 22
348 99 99
238 40 11
128 99 99
Speed for Each Program
NOTE: Always step off of the Unit before adjusting the
Unit’s Control Panel.
PF_IB_TP_ENG_V1_191206.indd 11 12/6/19 5:42 PM

12 Power Fit®Elite & Power Fit®Elite Deluxe
Stretching
Stretching Routines
TALK TO YOUR PHYSICIAN BEFORE STRETCHING AND USING THIS PRODUCT.
Before starting any exercise routines with this device, we recommend stretching to gain exibility and reduce
muscle pain. Stretching routines must be done slowly and gently without any swift movements or jumping.
Perform the exercises until you feel a slight but not painful tension while stretching for 20–30 seconds. You must
breathe slowly, rhythmically, and naturally in order to oxygenate your body thoroughly.
Quadriceps Stretching
Standing with your back straight, step forward with
your right foot and place your left foot behind your
body and your right hand on your leg. Stretch your
left side while maintaining a straight position. Maintain
this position for 20–30 seconds and then repeat by
switching leg positions.
Back Stretching
Stand up with your feet one shoulder width apart.
Bend your back forward and place your hands on the
thighs for support. Flex your lower back in an arched
position and hold the position for 20–30 seconds.
Then, straighten your back and repeat.
Tendon Stretching
Stand with your feet close together and pointing
forward. Extend your right foot with the heel on the
ground and toes facing upward while exing your left
leg slightly. Lean your upper body forward with your
hands on the thighs for support. Maintain the position
for 20–30 seconds and then repeat with the other leg.
Calf Stretching
With your toes pointing in front of you, step forward
with your right foot and lean forward while bending
your right knee. Do not allow your knee to pass
the tip of your foot. Keep your left leg straight and
your left foot on the oor. Maintain the position for
20–30 seconds and then repeat with the other leg.
PF_IB_TP_ENG_V1_191206.indd 12 12/6/19 5:42 PM

Power Fit®Elite & Power Fit®Elite Deluxe 13
Stretching
Calf And Hip Stretching
With your toes facing forward, step forward with
your right foot. Lean forward while bending your right
knee.Do not allow your knee to pass the tip of your
foot. Keep your left leg straight and your left heel on
the oor. Twist your torso toward your left leg while
keeping your hip facing forward. Maintain the position
for 20–30 seconds and then repeat with the other leg.
Shoulder Stretching
Stand straight with your feet together. Cross your right
arm to the other side of the your body. Use your left
hand to keep your arm in position and push. Maintain
the position for 20–30 seconds and then repeat with
the other arm.
Inner Thigh Stretching
Stand with your legs apart at a comfortable distance.
Lean forward, bending your right knee without letting
your knee surpass your toes. Place your hands on
your thighs for support. Maintain the position for
20–30 seconds and then repeat with the other leg.
Oblique Muscles Stretching
Stand with your legs apart and feet pointing forward.
Extend your right arm above your head as far as you
can. Maintain the position for 20–30 seconds and
then repeat with the other arm.
Buttocks, Hip, And
Oblique Muscles Stretching
While seated on the oor, bend one leg over the other.
While keeping the body in a straight position, press
your hand against the outer part of your thigh in order
to bring the thigh closer to the body. Maintain the
position for 20–30 seconds and then repeat with the
other leg.
PF_IB_TP_ENG_V1_191206.indd 13 12/6/19 5:42 PM

14 Power Fit®Elite & Power Fit®Elite Deluxe
Stretching
Triceps Stretching
Raise your left elbow and reach toward your upper
back. Stand straight with your feet spread apart and
your knees bent slightly. Point your left elbow toward
the ceiling and touch the center of your upper back
with your left hand. If you cannot reach your upper
back, put your hand on the back of your head instead.
Bend your head forward when you put your hand on it
and then push your head back gently
Back And Thighs Stretching
Sit down on the appliance with your legs apart and
the soles of your feet on the oor. Arch your back and
lean forward to touch your toes with your hands.
Abs And Hip Stretching
Lie on your side with your hip on the Unit. Elevate
your legs and hold on with only one arm on the oor
while keeping your abdomen tight. Then, switch sides
and repeat.
Calves And Legs Stretching
Stand with the Unit in front of you. With your hands
on your hips, put your right leg in front of the Unit and
bend your left knee down to touch the surface of the
Unit. Maintain the position for 20–30 seconds and
then repeat with the other leg.
PF_IB_TP_ENG_V1_191206.indd 14 12/6/19 5:42 PM
Power Fit®Elite & Power Fit®Elite Deluxe 15
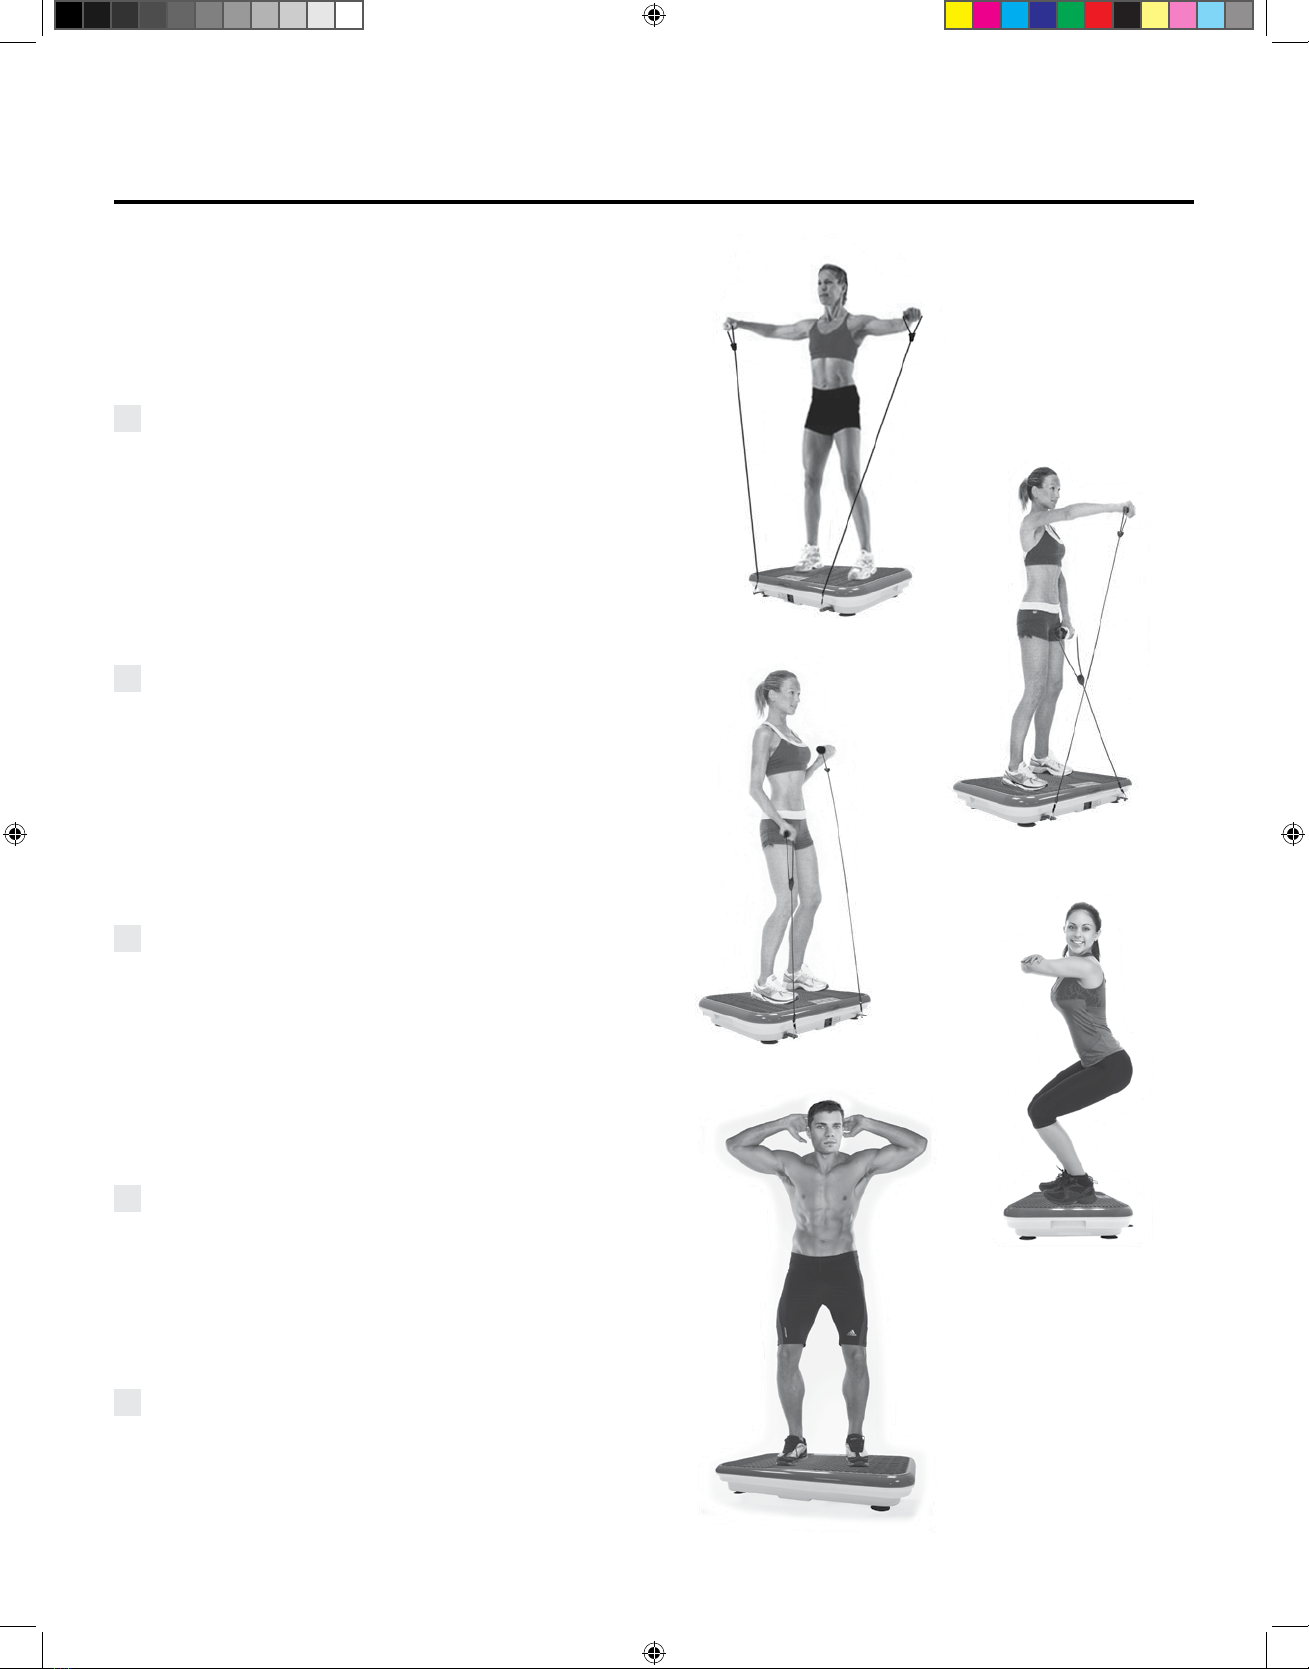
Complementary Workouts
NOTE: All workouts should be performed with the Unit
powered on.
AStand on the Unit with your legs separated and
aligned with your shoulders. Take the Elastic Bands in
your hands. Place your hands on the outside of your
legs and then raise your arms upward and outward as
far as you can with your elbows always in a straight
position. Repeat the motion until the Unit stops
vibrating.
WORKS: Abs, thighs, biceps, and arms.
BStand on the Unit with your legs separated and
aligned with your shoulders. Take the Elastic Bands in
your hands. Place your hands on the outside of your
legs and then lift your right hand up to chest height
whil ekeeping your elbow straight. Lower your right
hand and raise your left hand. Repeat the motion until
the Unit stops vibrating.
WORKS: Abs, thighs, arms, back, and biceps.
CStand on the Unit with your legs separated and
aligned with your shoulders. Take the Elastic Bands in
your hands. Place your arms with your palms facing
up and raise your the left arm by exing your elbow as
if you were lifting a weight. Lower your left arm and
raise your right arm in the same way. Hold the position
until the unit stops vibrating.
WORKS: Abs, thighs, arms, back, and biceps.
DStand on the Unit with your legs separated and
aligned with your shoulders and your knees slightly
bent. Cross your arms and place your palms on the
opposite forearm in order to maintain balance. Repeat
the motion until the Unit stops vibrating.
WORKS: Abs, thighs, triceps, and buttocks.
EStand on the Unit with your legs separated
and aligned with your shoulders. Place your hands on
your neck and perform squats very slowly while
maintaining balance.
WORKS: Abs, thighs, triceps, buttocks, and back.
Workout
A
D
B
C
E
PF_IB_TP_ENG_V1_191206.indd 15 12/6/19 5:42 PM
16 Power Fit®Elite & Power Fit®Elite Deluxe
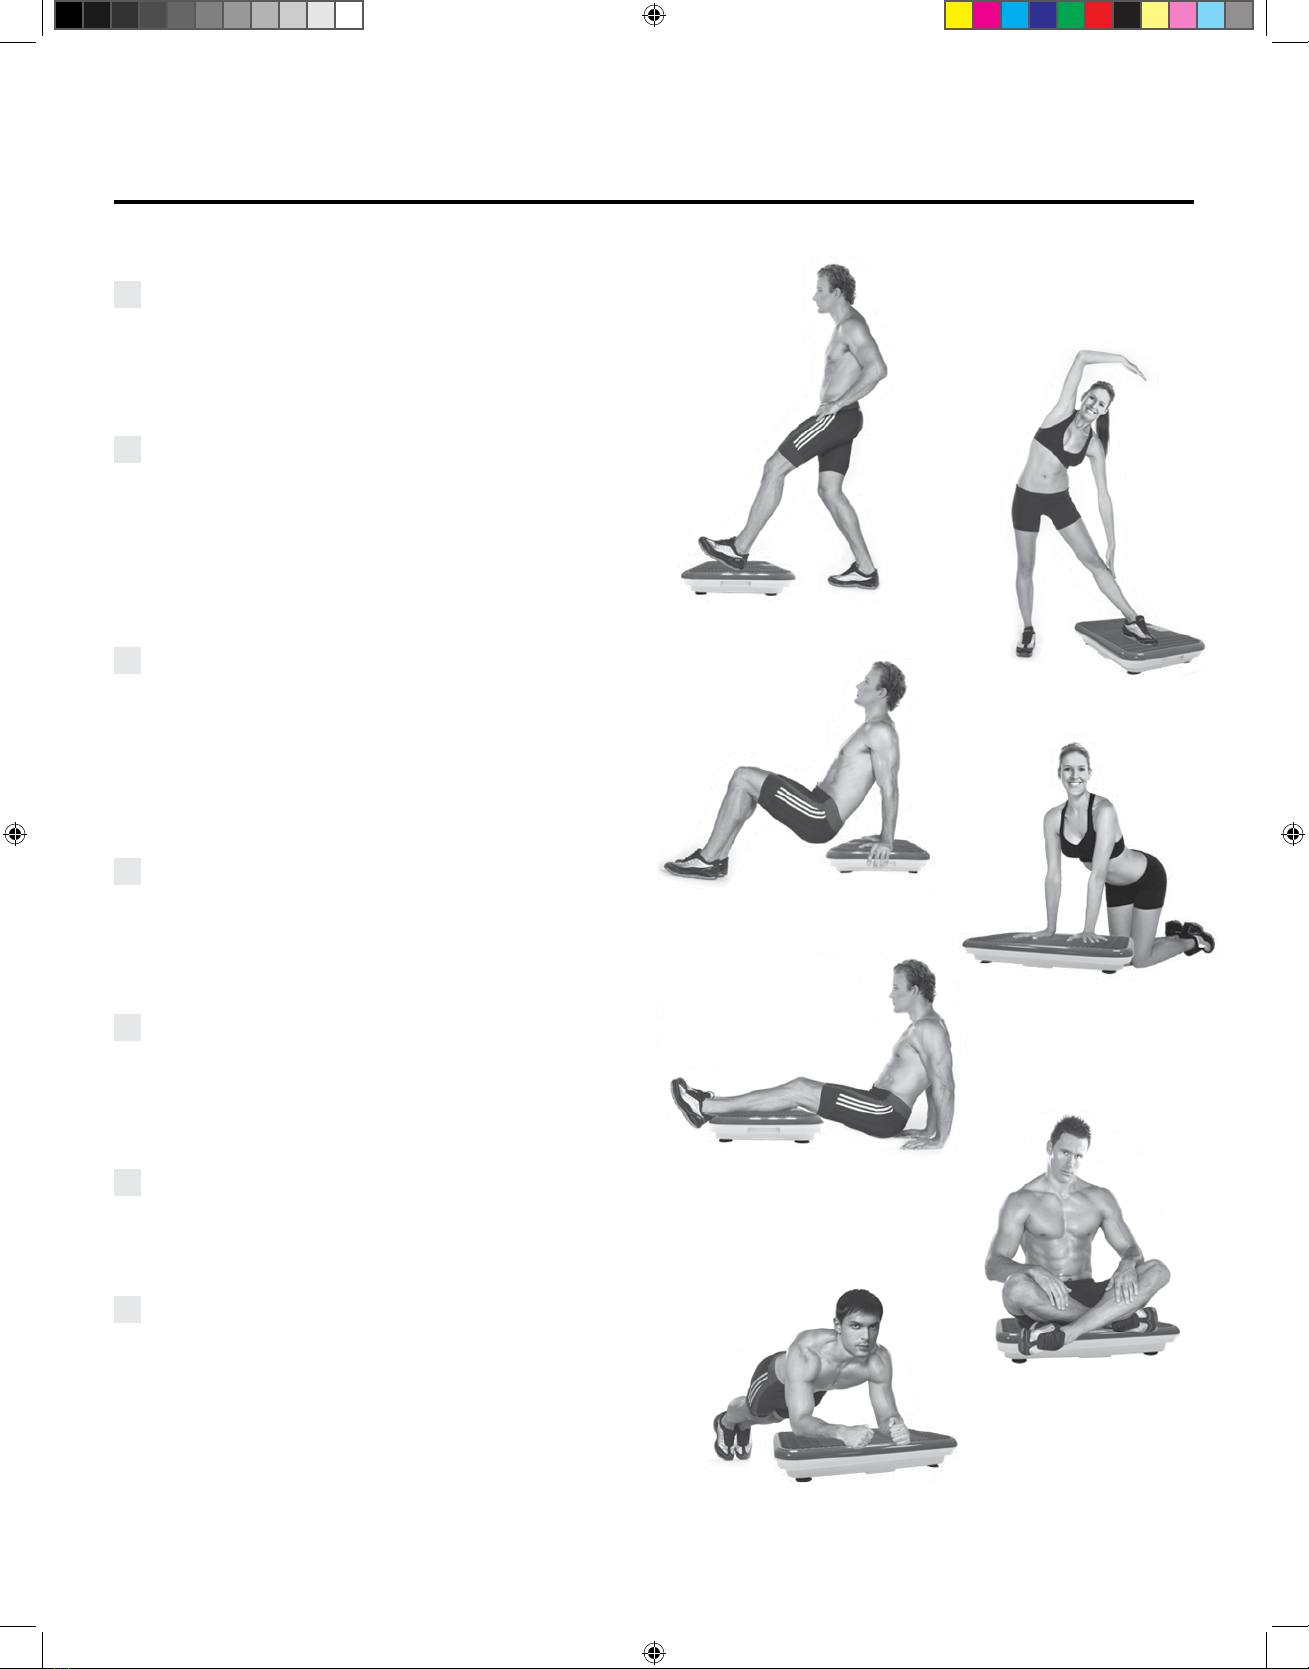
Workout
F
J
H
L
G
I
K
FPlace the heel of one foot on the Unit. Bend your
legs without moving the other foot from the oor and
keep your back tight.
WORKS: Calf, thighs, and buttocks.
GPlace your left foot on the Unit and the other foot
on the oor. Keep both legs straight. Stretch toward
the leg on the Unit, sliding your left arm down your leg
and your right arm above your head. Then, repeat with
the other leg.
WORKS: Hips, calf, and adductor muscles.
HPlace your feet at on the ground in front of the
Unit. Place both hands on the Unit with your elbows
slightly bent to support your body weight. Keep your
abs tight.
WORKS: Triceps, biceps, abs, forearm, dorsal muscles,
back, shoulders, and pectorals.
IKneel on the oor with both hands on the Unit and
keep your arms straight while bending the back slightly.
WORKS: Back, hips, shoulders, forearms, biceps,
and triceps.
JSit down on the oor and place your calves
on the Unit with the palms of your hands on the oor.
Keep your back straight.
WORKS: Calf, femoral muscles, and quadriceps.
KSit on the Unit with your legs in the lotus position
with your back straight. Keep your abs tight.
WORKS: Hips, abs, buttocks, and back.
LPlace your forearms on the Unit and the tips of
your toes on the oor. Keep your whole body straight
and tighten your abs and buttocks.
WORKS: Arms, back, abs, buttocks, thighs, calf, and
shoulders. Also helps to strengthen the neck.
PF_IB_TP_ENG_V1_191206.indd 16 12/6/19 5:42 PM

Power Fit®Elite & Power Fit®Elite Deluxe 17
MPlace your palms on the Unit and the tips of your
toes on the oor. Keep your whole body straight and
tighten your abs and buttocks.
WORKS: Arms, back, abs, buttocks, thighs, calf, and
shoulders. Also helps to strengthen the neck.
NLie on your back on the oor with the soles of
your feet on the Unit. Lift your hips, raising your lower
back off the oor. Tighten your abs and buttocks.
Maintain the position for a few seconds before
returning to the starting position and repeating.
WORKS: Calf, thighs, buttocks, abs, and back.
OLie on your side on the oor, place your forearm
on the Unit, and support all your weight on your
forearm. Stretch your legs with one leg against the
other. Tighten your whole body.
WORKS: Forearm, biceps, triceps, shoulders, back,
buttocks, and abs. Also helps to strengthen the neck.
PSit down on the Unit with your hands on your
neck or crossed on your chest. Bow slightly backward
while bending your back a little. Raise both your legs
with your knees slightly bent.
WORKS: Abs, buttocks, and legs.
QPlace your left foot on the Unit and the other foot
on the oor with your knee slightly bent. Keep your
back straight.
WORKS: Calf and thighs.
RPlace your body in a push-up position. Then,
place the tips of your toes on the Unit and your palms
on the oor. Keep your back straight.
WORKS: Back, chest, shoulders, buttocks, and calf.
Workout
P
M
R
N
O
Q
PF_IB_TP_ENG_V1_191206.indd 17 12/6/19 5:42 PM

18 Power Fit®Elite & Power Fit®Elite Deluxe
Issue Cause Fix
The Unit
does not work.
The Power Cord is not plugged into a power outlet. Connect the Power Cord to a power outlet.
The Power Switch is in the Off position. Place the Power Switch in the On position.
The Remote Control
does not work.
The Remote Control’s batteries are dead. Replace the batteries.
The remote control is too far away from the Unit’s
Infared Receptor.
The effective distance of the Remote Control
is 6.56 feet.
The machine stopped
working suddenly. The programmed exercise time ended. Reset the exercise time.
The Unit is
not responding.
Too many commands were input at once and
the Unit cannot respond to all of them.
Turn off the Unit, wait 1 minute, and turn the Unit
back on again.
Maintenance & Cleaning
Troubleshooting
Before cleaning the Unit, make sure that the
Power Switch is off and that the Power Cord is
unplugged from the outlet.
• You can use a dry, clean broom or brush to
sweep dust from device.
• The exercise area can be cleaned with a slightly
wet cloth.
• Do not clean the Unit with corrosive substances
because they can damage the Unit.
• Clean the remote control with a clean cloth.
• If you are not using the Unit for a long time, put
it in its packaging box and store the box in a
cool, dry place. Remove the batteries from the
remote control.
• If Power Fit presents any issues that cannot be
solved using the solutions in the Troubleshooting
section, please contact Customer Service using
the contact information in the back of this manual.
PF_IB_TP_ENG_V1_191206.indd 18 12/6/19 5:42 PM
Power Fit®Elite & Power Fit®Elite Deluxe 19
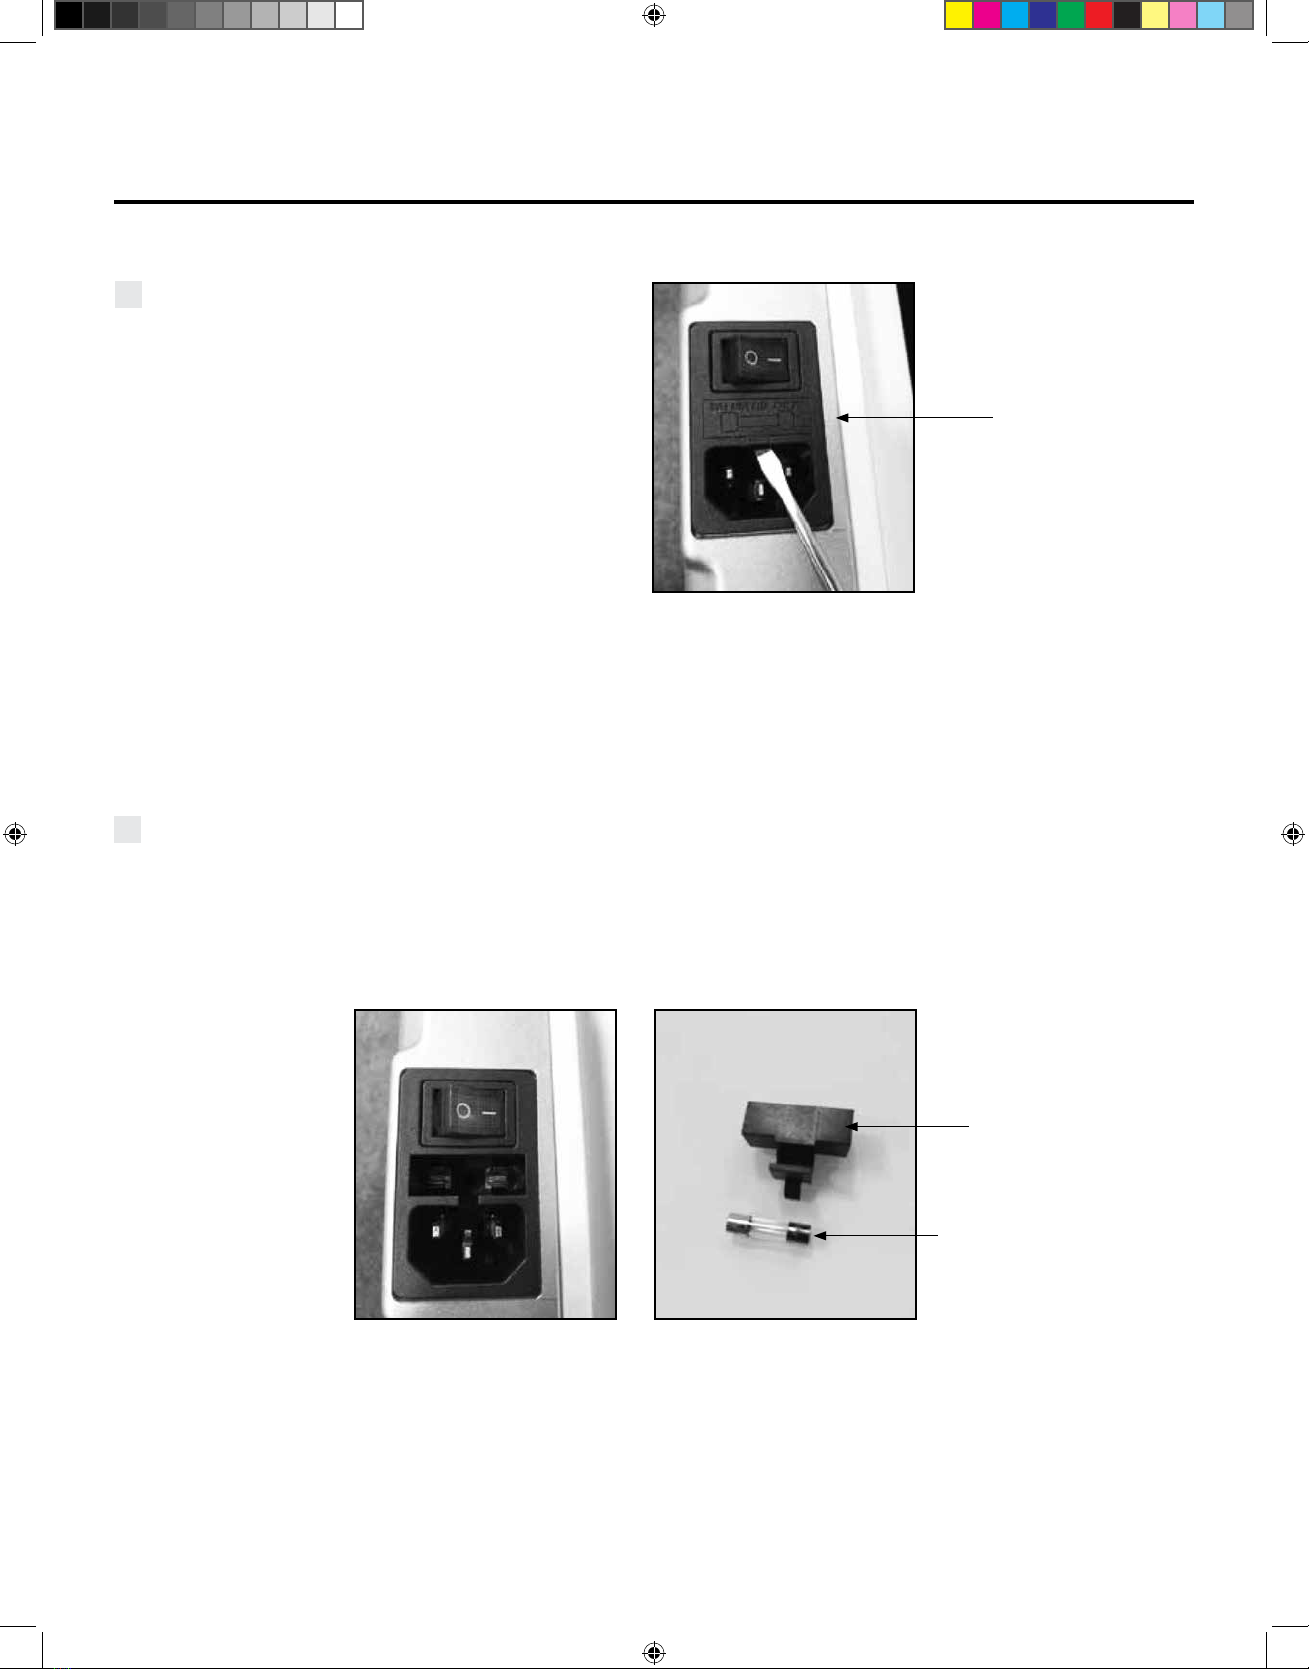
Replacing the Fuse
1
Use a screwdriver to pry the fuse holder
in the middle of the socket.
Note: Screwdriver not included.
Fuse Holder
Fuse
Fig. A Fig. B
Fuse Holder
2
Remove the fuse from the fuse holder
illustrated in Fig. A & Fig. B.
PF_IB_TP_ENG_V1_191206.indd 19 12/6/19 5:42 PM

20 Power Fit®Elite & Power Fit®Elite Deluxe
Replacing the Fuse
3
Install a new fuse into the fuse holder.
Note: New Fuse not included.
Fig. C Fig. D
4
Insert the new fuse and holder into
the middle of the switch socket
according to the direction of the notch
illustrated in Fig. C & Fig. D.
PF_IB_TP_ENG_V1_191206.indd 20 12/6/19 5:42 PM
This manual suits for next models
3
Table of contents
Popular Fitness Equipment manuals by other brands


G-FITNESS
G-FITNESS AIR ROWER user manual

CAPITAL SPORTS
CAPITAL SPORTS Dominate Edition 10028796 manual

Martin System
Martin System TT4FK user guide

CIRCLE FITNESS
CIRCLE FITNESS E7 owner's manual

G-FITNESS
G-FITNESS TZ-6017 user manual

Accelerated Care Plus
Accelerated Care Plus OMNISTIM FX2 CYCLE/WALK user manual


