Tritton TRI-UV150 User manual

USB
2.0
EXTERNAL VIDEO ADAPTER
TRI-UV150
USER MANUAL

SEE2 UV150 USB 2.0 EXTERNALVIDEOADAPTER
CONTENTS
I
NTRODUCTION
..........................................................................................................................1
F
EATURES
.........................................................................................................................1
S
YSTEM
R
EQUIREMENTS
.....................................................................................................1
P
ACKAGE
C
ONTENTS
..........................................................................................................1
R
EGULATORY
C
OMPLIANCE
.................................................................................................1
S
UPPORTED
D
ISPLAY
R
ESOLUTIONS
:
..........................................................................................2
D
EVICE
I
NSTALLATION
W
INDOWS
2000/XP..........................................................................3
S
OFTWARE
I
NSTALLATION
...........................................................................................3
W
INDOWS
2000/XP
H
ARDWARE
I
NSTALLATION
............................................................5
V
ERIFYING
D
EVICE
D
RIVER
I
NSTALLATION IN
W
INDOWS
2000/XP...........................................6
D
EVICE
D
RIVER
U
N
-
INSTALLATION IN
W
INDOWS
2000/XP
S
YSTEM
........................................7
D
EVICE
I
NSTALLATION ON
W
INDOWS
V
ISTA
S
YSTEM
....................................................................8
S
OFTWARE
I
NSTALLATION
.............................................................................................8
H
ARDWARE
I
NSTALLATION ON
W
INDOWS
V
ISTA
S
YSTEM
...............................................10
V
ERIFYING
D
EVICE
D
RIVER
I
NSTALLATION IN
W
INDOWS
V
ISTA
..............................................12
D
EVICE
D
RIVER
U
N
-
INSTALLATION IN
W
INDOWS
V
ISTA
........................................................13
F
UNCTION
D
ESCRIPTION
..........................................................................................................14
“Primary” Mode
...............................................................................................15
“Extended” Mode (Default)
............................................................................15
“Mirror” Mode
..................................................................................................16
“OFF” Mode
.....................................................................................................16
Rotation
............................................................................................................16
Q&A
...............................................................................................................................18
T
ROUBLESHOOTING
T
IPS
..................................................................................................19

SEE2 UV150 USB 2.0 EXTERNALVIDEOADAPTER
1
I
NTRODUCTION
Thank you for purchasing the SEE2 UV150. The flexibility and prevalence of USB 2.0
technology makes it unnecessary to open your computer. The SEE2 UV150 enables
you to connect one or more display devices (CRT/LCD monitor, projector) to your
desktop or notebook PC. The connected display can act as a mirrored or extended
desktop of the main display on your computer. Turn your monitor sideways, and enable
portrait mode for easier web and print viewing.
F
EATURES
Resolutions up to 1600 x 1200
Primary, Extended, Mirror and Rotated modes
Multiple Unit Support
USB 2.0 compliant
Plug-and-Play compliant
Windows OS 2000 SP4 / Windows XP SP2 / Windows Vista (basic)
S
YSTEM
R
EQUIREMENTS
PC USB 2.0 Port
512MB RAM or Higher; Pentium 4 /Celeron family or AMD K6/Athlon/Duron family
with 1.5GHz
OPERATING SYSTEMS SUPPORTED
Windows OS 2000 SP4 /Windows XP SP2 / Windows Vista (basic)
P
ACKAGE
C
ONTENTS
SEE2 UV150
CD with User Guide and Installation Driver
Quick Start Guide
R
EGULATORY
C
OMPLIANCE
FCC / CE / C-tick / VCCI

SEE2 UV150 USB 2.0 EXTERNALVIDEOADAPTER
2
S
UPPORTED
D
ISPLAY
R
ESOLUTIONS
:
Color Bits
Resolutions Supported
16 Bits 32 Bits
1600 x 1200 V V
1680 x 1050 V V
1400 x 1050 V V
1440 x 900 V V
1600 x 900 V V
1360 x 768 V V
1280 x 1024 V V
1280 x 960 V V
1280 x 800 V V
1280 x 768 V V
1280 x 720 V V
1152 x 864 V V
1024 x 768 V V
800 x 600 V V
640 x 480 V V

SEE2 UV150 USB 2.0 EXTERNALVIDEOADAPTER
3
D
EVICE
I
NSTALLATION
W
INDOWS
2000/XP
¾
S
OFTWARE
I
NSTALLATION
Installing the device driver enables your computer’s operating system to recognize the
SEE2 UV150. Please check what operating system you are using, and ensure you are
referring to the appropriate installation procedure before you begin. Please make sure
the SEE2 UV150 is unplugged from your PC or Notebook before executing the setup
program.
Step 1.
Insert
the
Driver
CD
into
the CD-
ROM drive; the
CD menu
should
launch
automatically. Click “Install
Driver” to launch the setup
program. If the setup program
does not begin automatically, click
Start, Run and type
“
D:\Driver\Setup.exe
” (where D:
is the path of your CD-ROM drive).
You can also access it from My
Computer
Click “
Next
” to continue.
Step 2.
License Agreement; please
review and select
“I accept the
terms of the license
agreement
.” Click “
Next
” to
accept the License Agreement.
Step 3.
The Microsoft Software
Installation Certificate warning
dialogue box will be displayed
under Windows XP up to 6
times. Please select
“
Continue Anyway
” to
continue with the device driver
installation. This will not affect
the device driver installation or
usage.
The Microsoft Certificate warning

SEE2 UV150 USB 2.0 EXTERNALVIDEOADAPTER
4
dialogue boxes will not appear
once the driver receives the WHQL
certification.
Step 4.
Click “
Finish
” to exit the Driver
Wizard and reboot your computer.

SEE2 UV150 USB 2.0 EXTERNALVIDEOADAPTER
5
¾
W
INDOWS
2000/XP
H
ARDWARE
I
NSTALLATION
Step 1
Connect the external display device (monitor/projector) to the VGA connector of the
SEE2 UV150 and ensure the display device is on.
Step 2
Plug the SEE2 UV150 into an available USB
2.0 port of your PC. The driver installation
will proceed automatically.
Step. 3
Please select “
Continue Anyway
” to
continue with the installation each time this
window appears. It will not affect the
device installation and the device usage.
*
The Microsoft Certificate warning dialogue
boxes will not appear when the driver
receives the WHQL certification.
Step. 4
When the installation is complete you will
see the icon appear in the task bar.
*Note: When installing more than one
SEE2 UV150, repeat steps 1-6 for each
device.
SEE2 UV150 USB 2.0 EXTERNALVIDEOADAPTER
6
V
ERIFYING
D
EVICE
D
RIVER
I
NSTALLATION IN
W
INDOWS
2000/XP
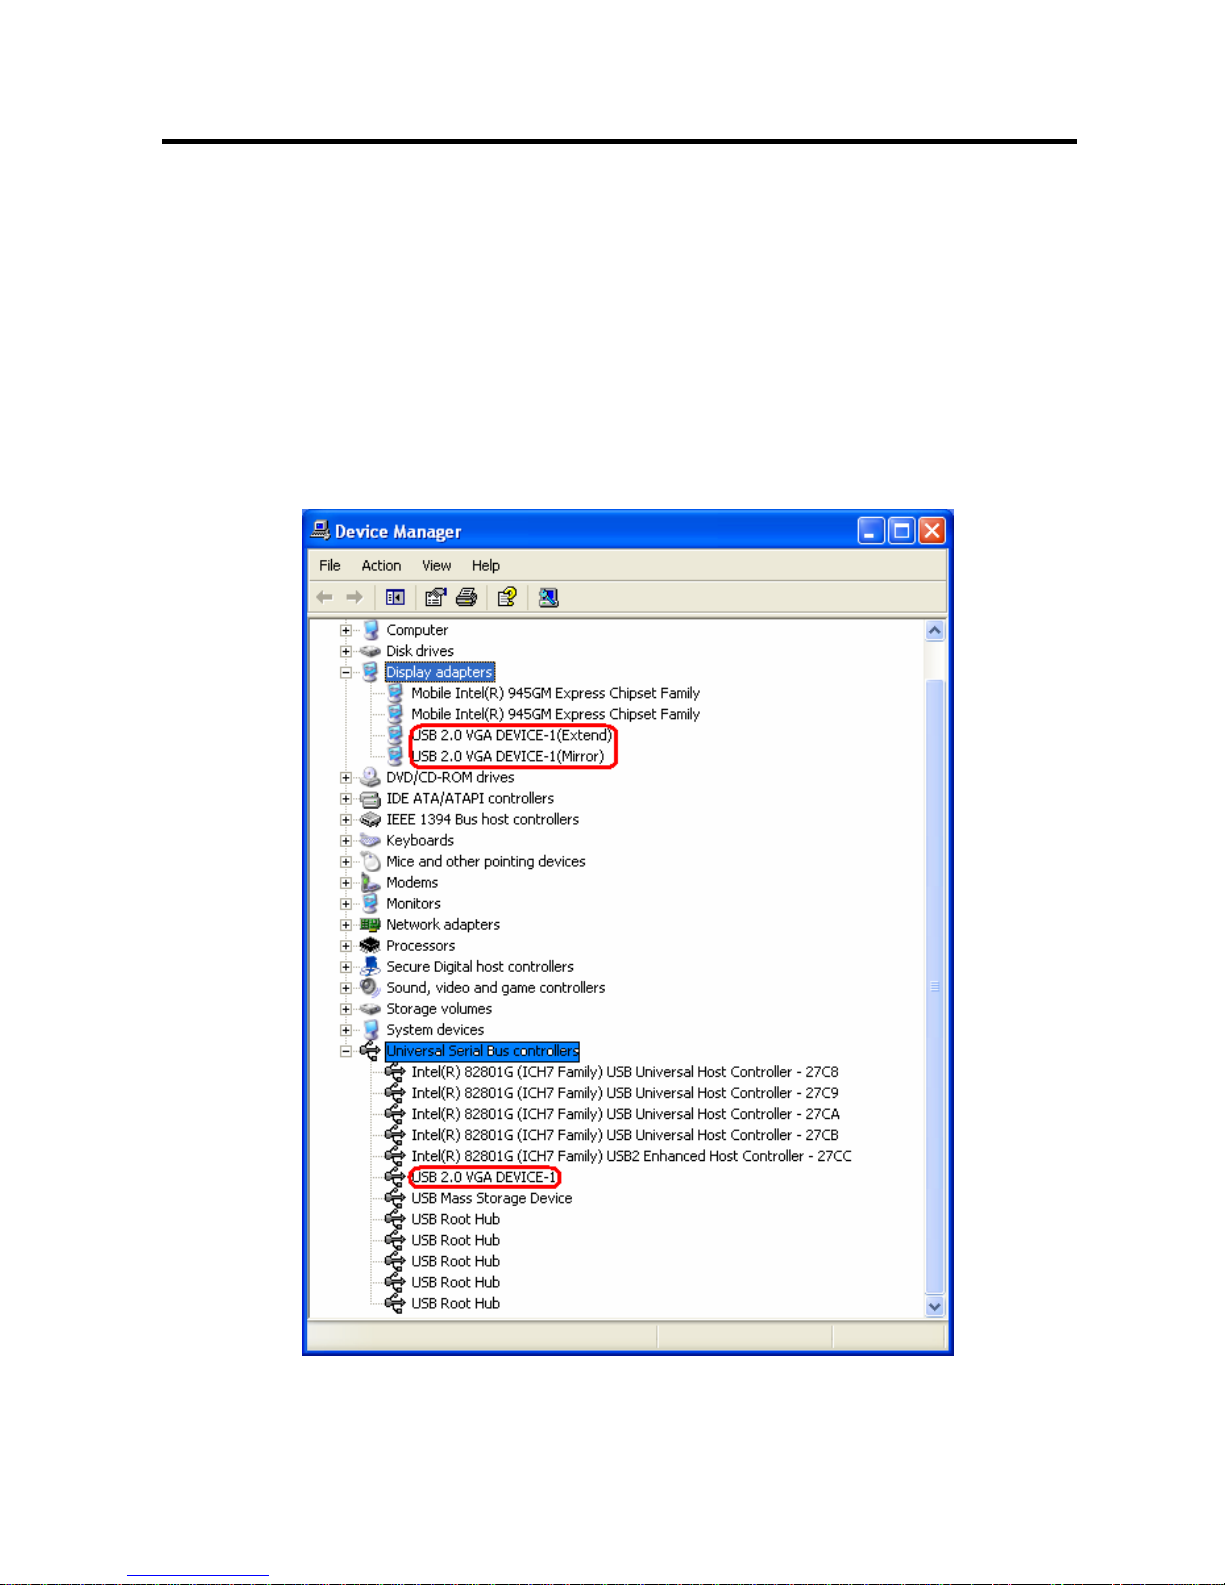
The following procedure allows you to verify the device driver installation. It is
optional, but a useful troubleshooting tool.
Right click “My Computer” →“Properties” →“Hardware” →“Device Manager”.
Double click “Display adapters”, and “Universal Serial Bus controllers”.

SEE2 UV150 USB 2.0 EXTERNALVIDEOADAPTER
7
D
EVICE
D
RIVER
U
N
-
INSTALLATION IN
W
INDOWS
2000/XP
S
YSTEM
The following procedure allows you to un-install the SEE2 UV150 device
driver.
Step 1 Please make sure the SEE2 UV150 is
unplugged
from your PC or Notebook
before executing the device driver un-installation program.
Step 2.
Default Windows XP Start menu:
Click “Start
”
→
“Control
Panel” →
“Add
or
Remove
Programs”.
Classic
start
menu:
Click
“Start”
→
“Settings” →
“Control
Panel” →
“Add
or
Remove
Programs”.
Select
“
SEE2 UV150 driver”
item.
Click
the
“
Remove
”
button.
Step 3.
Make sure the SEE2 UV150 is
unplugged from notebook/PC USB
port and click “
OK
” to continue.
Step. 4
Select “
Yes, I want to restart my
computer now
” and click “
Finish
” to
reboot. After reboot, you will complete
the driver un-installation
SEE2 UV150 USB 2.0 EXTERNALVIDEOADAPTER
8
D
EVICE
I
NSTALLATION ON
W
INDOWS
V
ISTA
S
YSTEM
¾
S
OFTWARE
I
NSTALLATION
Installing the device driver enables your computer’s operating system to recognize the
SEE2 UV150. Please check what operating system you are using, and ensure you
are referring to the appropriate installation procedure before you begin.
Please make sure the SEE2 UV150 is unplugged from your desktop or notebook
before executing the setup program.
This section illustrates the simple device driver
installation procedure for computer running the Windows Vista operating system.
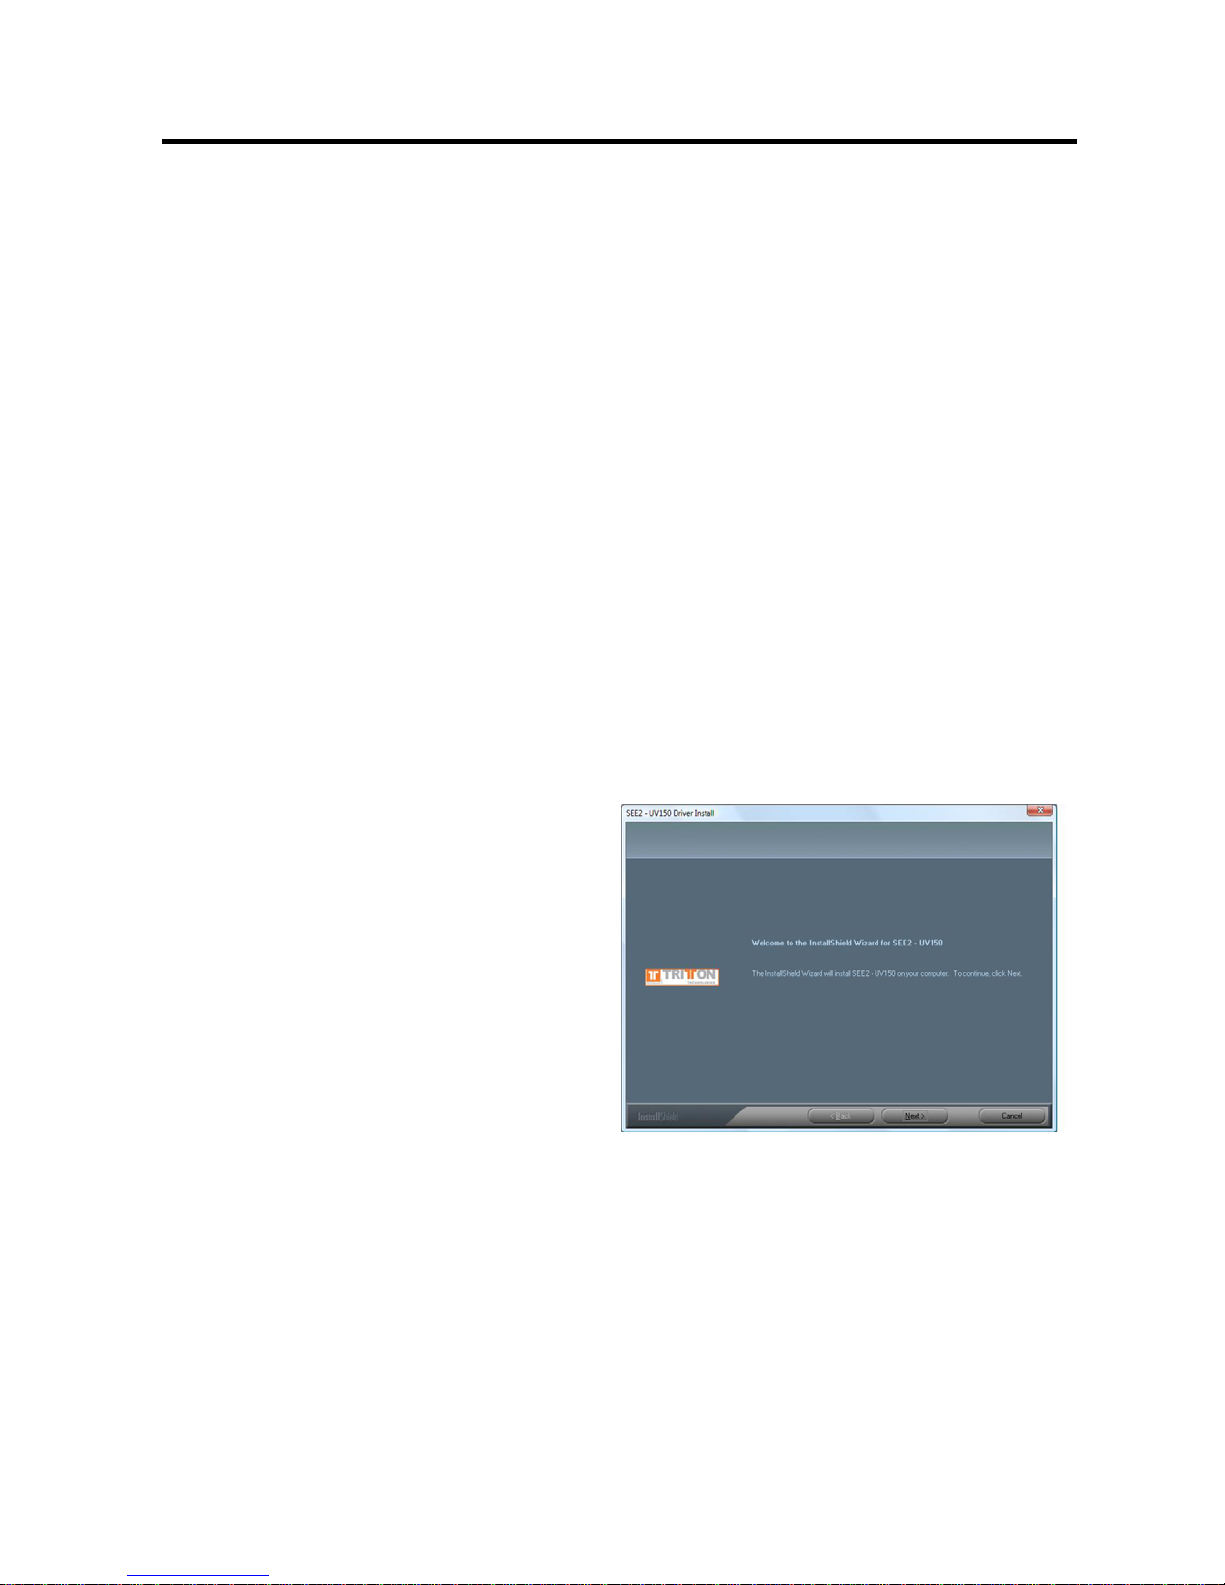
Step 1.
Insert
the
Driver
CD
into
the CD-ROM drive; the
CD menu
should launch
automatically. Click “Install Driver” to launch the setup program. If the setup
program does not begin automatically, click Start, Run and type
“
D:\Driver\Setup.exe
” (where D: is the path of your CD-ROM drive). You can also
access it from My Computer
Step 2.
Driver Installation Wizard, click “Next” to
continue

SEE2 UV150 USB 2.0 EXTERNALVIDEOADAPTER
9
Step 3
License Agreement; review it and check
“
I accept the terms of the license
agreement.
” Click “
Next
” to accept the
License Agreement
Step 4
A Windows Security warning dialogue
box will display under Windows Vista,
but it will not affect the device driver
installation and usage the device. Please
select “
Always trust software from
“Magic Control Technology Corp.
”,
then click “
Install
” to continue
Step 5
Setup is searching for installed
features…
Normally, it will take around 5 to10
minutes during the period of time

SEE2 UV150 USB 2.0 EXTERNALVIDEOADAPTER
10
Step. 6
Driver Installation Wizard, click “
Finish
”
to continue and restart the computer.

SEE2 UV150 USB 2.0 EXTERNALVIDEOADAPTER
11
¾
Installation of SEE2 UV150
Step 1
Connect the external display device (monitor/projector) to the VGA connector of the
SEE2 UV150 and ensure the display device is on.
Step 2
Plug the SEE2 UV150 into an available USB 2.0 port of your PC. The driver
installation will proceed automatically. When the installation is complete you will see
the icon appear in the task bar.
SEE2 UV150 USB 2.0 EXTERNALVIDEOADAPTER
12
V
ERIFYING
D
EVICE
D
RIVER
I
NSTALLATION IN
W
INDOWS
V
ISTA
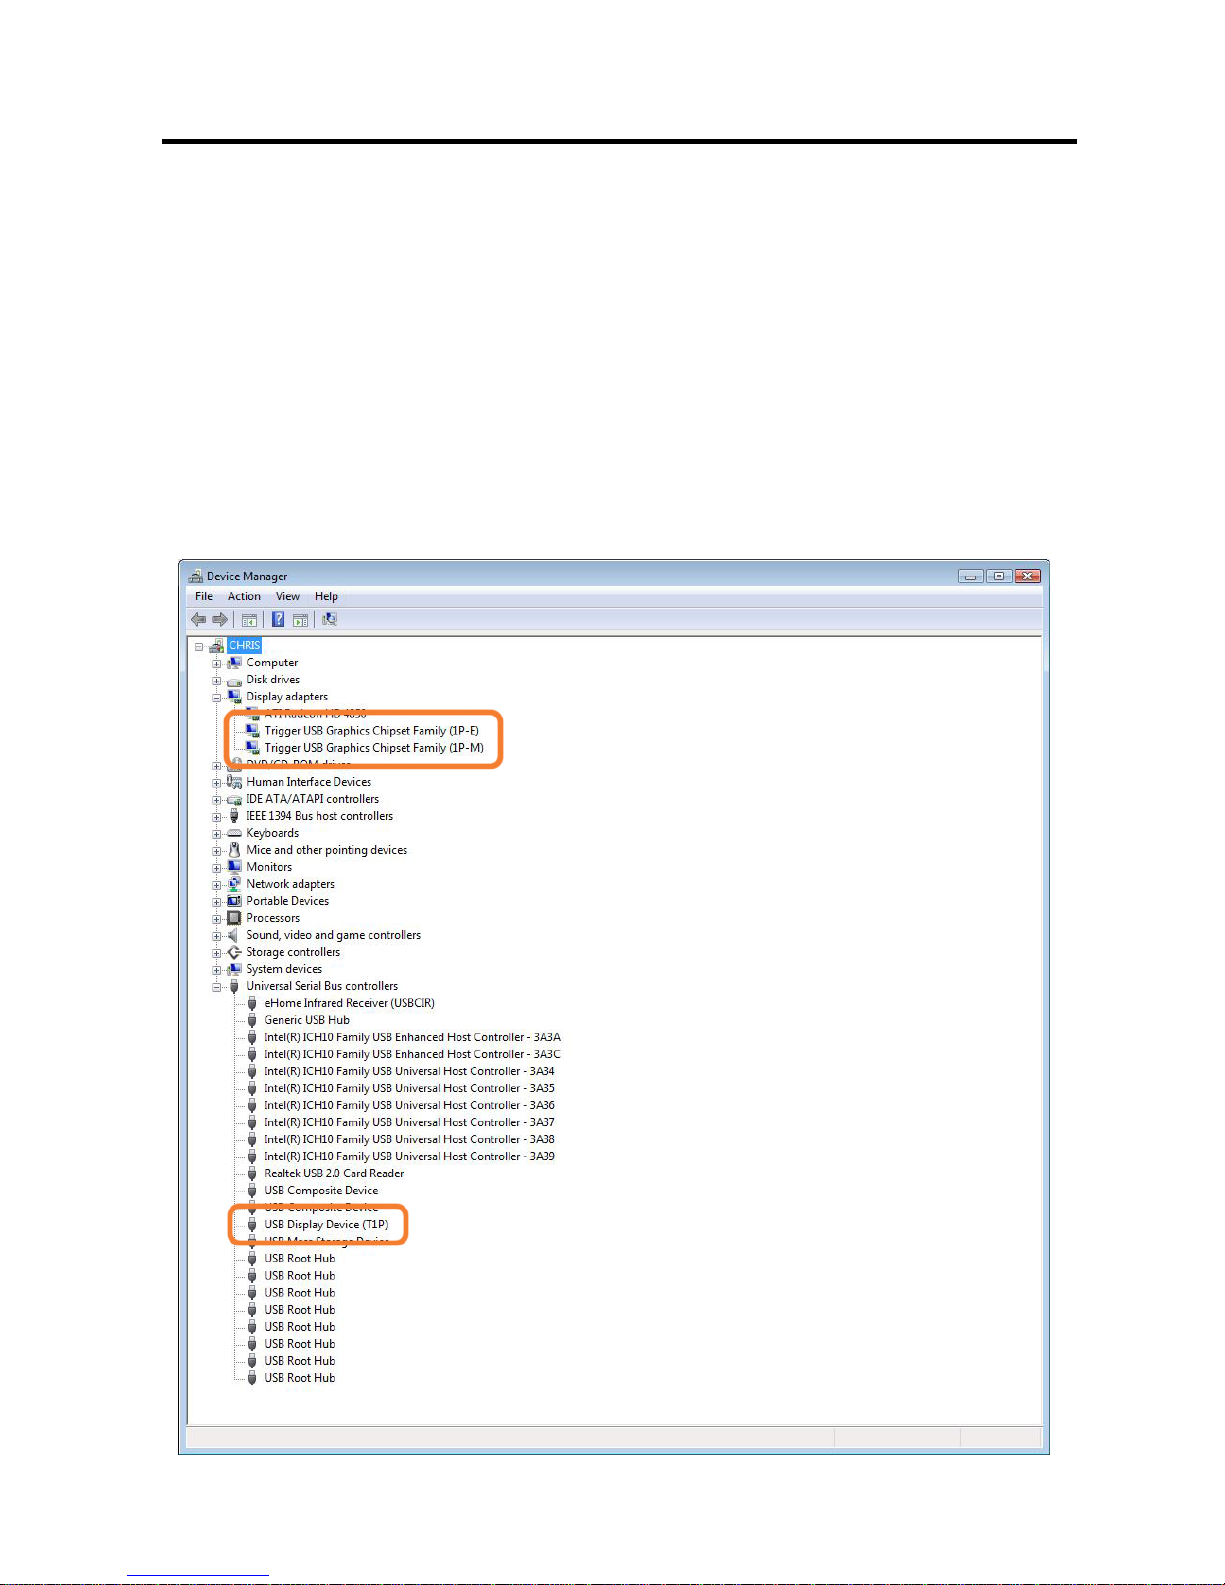
The following procedure allows you to verify the device driver installation. It is optional,
but a useful troubleshooting tool.
Please right click “Computer” →“Properties” →“Device Manager”.
Please double click “Display adapters”, and “Universal Serial Bus controllers”.

SEE2 UV150 USB 2.0 EXTERNALVIDEOADAPTER
13
D
EVICE
D
RIVER
U
N
-
INSTALLATION IN
W
INDOWS
V
ISTA
The following procedure allows you to un-install the SEE2 UV150’s device driver.
Please make sure the SEE2 UV150 is
unplugged
from your PC or Notebook before
executing the device driver un-installation program.
Step 1.
Standard menu:
Please
click
“
Start
”
→
“
Control
Panel
”
→
“
Program and Features
”.
Classic Start menu:
Please
click
“
Start
”
→
“
Settings
”
→
“
Control
Panel
”
→
“
Program and
Features
”.
Select
“
SEE2 UV150
” item. Click
“Uninstall” button.
Step 2.
Click “
OK
” to continue
Step 3.
select “
Yes, I want to restart my
computer now
” and click “
Finish
” to
reboot. After reboot, you will complete the
driver un-installation.

SEE2 UV150 USB 2.0 EXTERNALVIDEOADAPTER
14
F
UNCTION
D
ESCRIPTION
This section describes the main functions provided by the SEE2 UV150.
-The SEE2 UV150 can support LCD or CRT displays; The VGA interface can be
used on LCD or CRT monitors. Four different modes are available for use:
Primary, Extended, Mirror and Portrait Mode (Rotation) by right-clicking the utility
icon.
- The resolution can be modified via the Utility Icon or Display Properties. There is a
shortcut to Display Properties in the SEE2 UV150 system tray icon menu.

SEE2 UV150 USB 2.0 EXTERNALVIDEOADAPTER
15
Display Settings Shortcut
Choosing the “Display Settings…” option
from the pop-up menu will open the Windows
Display Settings Control Panel.
“Primary” Mode
The system’s main graphics adapter will
automatically switch to act as the secondary
graphics adapter and the main screen as the
extended desktop.
The monitor connected to the SEE2 UV150
will now act as the primary Windows desktop.
Please be advised that display utilities that
shipped with some AGP and built-in display
adapters may prevent this option from working
on some systems. You can disable the other
utility program (usually found in the same
toolbar located on the bottom right hand
corner) to make this function work properly.
“Extended” Mode (Default)
By default, the monitor connected to SEE2
UV150 will work as, “Extended Desktop” which
extends the primary Windows desktop of your
system. You can change the relative position
of this extended desktop under the Display
Properties.

SEE2 UV150 USB 2.0 EXTERNALVIDEOADAPTER
16
“Mirror” Mode
By setting this mode, the Windows desktop will
be mirrored/replicated to the secondary
CRT/LCD monitor. The screen resolution
setting on the secondary monitor MUST match
the primary screen’s resolution. For example, if
the primary resolution is 1600 x 1200 x 32bit,
the secondary monitor’s resolution will be the
same. If the selected resolution setting is not
supported by the primary screen, a warning
dialogue box will be displayed and the
suggested screen resolution will be shown.
“OFF” Mode
This option disables the SEE2 UV150 on the
system.
Rotation
This feature enables setting the orientation of
the secondary CRT/LCD monitor. Several
options such as “0 degrees”, “90 degrees”,
“180 degrees” or “270 degrees” are available
under the Extended or Primary mode. This is
helpful because some monitors rotate to the
left, and some to the right.

SEE2 UV150 USB 2.0 EXTERNALVIDEOADAPTER
17
Multi-Display Control Panel
The Multi-Display Control Panel will allow you
to setup hotkey shortcuts for moving windows
to other displays. Check the “Move Window
and Fullscreen” checkbox to maximize the
window when it is moved to the selected
display.
Identify Monitors
Choosing the Identify Monitors option will
display a number on each monitor to help
identify each monitor. The number will
appear in a blue box in the upper right corner.

SEE2 UV150 USB 2.0 EXTERNALVIDEOADPATER
18
¾
Q&A
This section describes the common Q&A regarding the installation and operation of the
SEE2 UV150.
Q: Why can’t I make the SEE2 UV150 the primary display?
A: Some video cards ship their product with a utility that prevent other video cards
from being set as the primary card. Check the bottom right hand corner taskbar for
the utility. Disable the utility before switching our adapter to be the primary display.
Q: Why won’t my DVD player work when I move it over to the extended display?
A: Some DVD playback software packages do not support playing on a second
display adapter of any kind. Sometimes opening the program in the secondary
display before playing the DVD can help this.
Q: How come my video will not play on Media Player if I move it over to the extended
desktop?
A: Ensure that you have moved the Media Player window completely over to the
second screen, if it is overlapping both screens, this will affect playback
Q: Why does my mouse not move past the right side of the screen, as it should on
extended desktop?
A: Check the display settings and make sure that your displays are oriented correctly.
You have to tell the computer how the monitors are physically positioned on your
desk. From Control Panel > Display Properties (see page 17 for example), click the
“Identify Monitors” button, you will see how the computer has numbered the monitors.
If this does not match how your computer has them oriented on “display properties”,
you must drag-and-drop the monitors in display properties so that the numbers are
oriented the same as displayed when you click the “Identify Monitors” button.
Q: There are lines running horizontally up and down my screen.
A: This is due to a low refresh rate setting. You can change this in the Display
Properties > Settings > Advanced > Monitor. Make sure you select the USB 2.0
VGA Device first and not set the refresh rate higher than what your monitor can
support. This may damage your monitor. You can also try to
reset/refresh/resynchronize your monitor.
Q: Direct3D does not work?
A: This is a current limitation of the adapter. Please check for driver updates in the
future to add support for this. If your application requires this, please use the main
display adapter.
This manual suits for next models
1
Table of contents
Other Tritton Adapter manuals


Popular Adapter manuals by other brands


Philips
Philips SWA2035 Specifications

Amped Wireless
Amped Wireless UA150C Setup guide

2E
2E 2E-WR701 user manual

Daikin
Daikin BRP069C41 Installer's reference guide

Atlantis Land
Atlantis Land Wireless Turbo USB Adapter A02-UP1-W54 Specification sheet

Radio Shack
Radio Shack Notebook Computer Universal 30W Power... owner's manual