TRUEKINETIX TRUETRAINER User manual

'
T R U E T R A I N E R
Q U I C K S T A R T G U I D E
QUICK START GUIDE
Join us in the revolution.
#StrongerThroughScience
@truekinetix_
2

Only use the external power adapter that came with the TrueTrainer. Use of
another type or brand of external power adapter may cause a dangerous
situation, which could lead to personal injury or damage to the equipment or
even fire, or it can cause irreversible damage to the TrueTrainer.
Keep the TrueTrainer and power cord away from heat.
To ensure your data is saved, please shut down the trainer correctly after use.
Shut down by pressing the switch for 3 seconds or via the TrueKinetix app.
Perspiration moisture and condensation can harm the electronics. Therefore,
do not use the TrueTrainer in damp areas and do not expose the product to
water or moisture.
Incorrect use and/or maintenance will void the warranty.
Only use the TrueTrainer when fully assembled and properly set up.
We recommend keeping the original packaging for the duration of the return
period. In case you lost the original packaging, you can request new packaging
through the TrueKinetix Online Support Centre. Additional costs may apply.
Before beginning any exercise program, consult your physician. This is
especially important for persons over age 35 or persons with pre-existing health
problems.
This appliance is not intended for use by persons (including children) with
reduced physical, sensory, or mental capabilities, or lack of experience and
knowledge unless they have been given supervision or instruction concerning
the use of the appliance by a person responsible for their safety.
Never allow children under age 14 or pets on or around the trainer. Children
should be supervised to ensure that they do not play with the appliance.
1.1 IMPORTANT PRECAUTIONS
QUICK START GUIDE
The TrueTrainer is not just another indoor trainer, it is the world's first robotic indoor
direct-drive trainer with many features to enhance your indoor training. To use the
trainer properly, first read this quick start guide. This document contains
instructions to assemble your TrueTrainer correctly and start your first ride.
1. BEFORE YOU START
3

1.2 PARTS OF THE TRUETRAINER
Power button
Bolts 2x
Legs 2x
Rubber feet 5x
Power adapter
Power cable
Quick release skewer
1.
2.
3.
4.
5.
6.
7.
8. Cassette*
9. TrueTrainer
10. Motor unit
11. User status LED
12. Battery status LED
13. Thru axle adapter set (S-L-R)
14. Quick release adapter set (S-L-R)
*Included with TrueTrainer 6.2.
8.
RL
S
13.
S
L R
7.
2.
3.
1.
4.
5.
6.
9.
10.
11.
14.
QUICK START GUIDE
1.3 TOOLS NEEDED FOR ASSEMBLY [NOT INCLUDED]
Lockring tool (only TrueTrainer 4.2)
1.8 mm spacer (only 8, 9 or 10 speed cassette)
5 mm allen key (only thru axle bikes)
12.
4
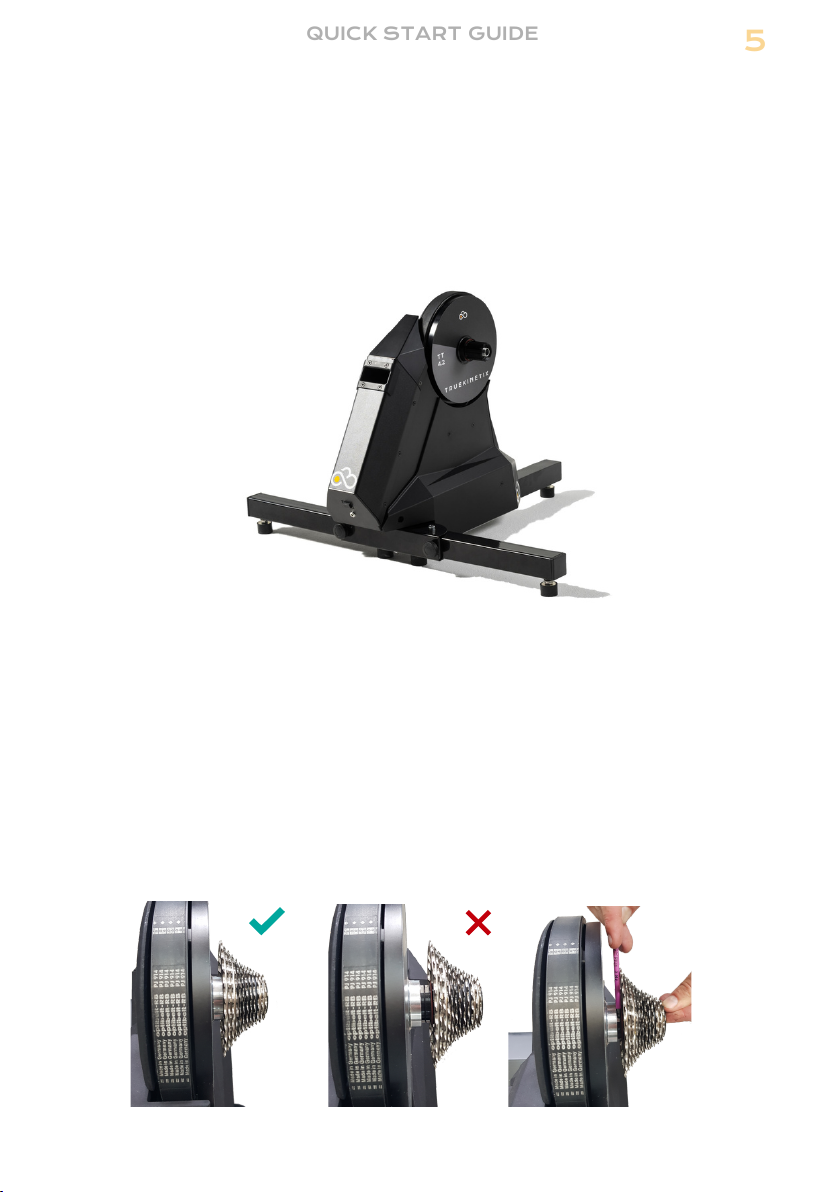
Image 1
Remove the trainer from the packaging.
Unfold the legs at both sides.
Secure each leg with the supplied bolts (a).
Turn the rubber feet (b) until trainer is levelled.
2.1 UNPACK & UNFOLD THE LEGS
1.
2.
3.
4.
To install a 11-speed cassette, place the cassette on the hub and use a lockring
tool (not included) to secure the cassette.
To install an 8, 9 or 10 speed cassette, it is necessary to use a 1.8mm spacer (not
included) between the hub and cassette.
Make sure the free hub is aligned with the trainer (image 1). If the freehub sticks
out (image 2), push the three pawls with a screw driver and push the cassette
simultaneously in while turning the cassette anti-clockwise (image 3).
2.2 INSTALL THE CASSETTE [ONLY TRUETRAINER 4.2]
If you have a TrueTrainer 6.2 with a pre-installed cassette, you can skip this step.
1.
2.
3.
2. SET UP THE TRAINER
QUICK START GUIDE
b
b
b
a
a
Image 2 Image 3
5

LS
2.3 MOUNT YOUR BIKE [QUICK RELEASE]
135mm axle130mm axle
S
S L L
130mm
135mm
R R
QUICK START GUIDE
Measure the distance between your rear-ends by using the arrows on this page.
For a 130mm axle, part S should be on the outside of the bike frame.
For a 135mm axle part S should be on the inside of the bike frame.
1. MEASURE YOUR BIKE
Depending on the distance between the rear-ends and thus the length of your axle,
part S should be inside or outside your frame.
1.
2.
3.
R
Part R is already mounted on the trainer.
Position part L and S at the non-drive side.
Shift your bike into its smallest sprocket.
Install your bike by aligning the chain with the smallest sprocket and then
placing the rear-ends onto the adapters. Make sure part S is on the right side of
the bike frame.
Make sure the rear-ends are fully seated and then tighten and close the lever.
This should take significant effort.
2. MOUNT THE ADAPTERS AND ATTACH YOUR BIKE
1.
2.
3.
4.
5.
6
If your bike has thru axle, proceed to the next page (2.4).

148mm axle only
R
L S
2.4 MOUNT YOUR BIKE [THRU AXLE]
R
148mm axle
L RL
142mm axle
142mm
148mm
S
QUICK START GUIDE
1. MEASURE YOUR BIKE
Measure the distance between your rear-ends by using the arrows on this
page.
For a 142mm thru axle, part S should be left out.
For a 148mm thru axle, part S should slide over part L.
Depending on the distance between the rear-ends and thus the length of your
axle, part S should be included.
1.
2.
3.
Remove the nut on the drive side using a 5 mm allen key. Make sure the
cassette stays aligned with the trainer. If not aligned, refer to step 2.2.
Position part R (of the thru axle adapter set) at the drive side and tighten
gently. It should be hand-tight, the cassette must be able to turn freely.
Position part L and, if necessary, S at the non-drive side.
Shift your bike into its smallest sprocket.
Install your bike by aligning the chain with the smallest sprocket and then
placing the rear-ends onto the adapters.
Make sure the rear-ends are fully seated and then pass the thru axle through
the rear-ends and tighten until fastened.
2. MOUNT THE ADAPTERS AND ATTACH YOUR BIKE
1.
2.
3.
4.
5.
6.
7

3. START TRAINING
Connect the adapter to the TrueTrainer and a main power source.
Push the power button. The LEDs will start to color green, followed by blue.
Once the LEDs are blue, open the TrueKinetix app and select 'CONNECT'.
Select the TrueTrainer with the corresponding TrueTrainer ID.
Once connection has been established, the 'CONNECT' button has changed to
'SETUP'.
3.1 CONNECT THE TRUEKINETIX APP
1.
2.
3.
4.
5.
Before you proceed, please download the TrueKinetix app and make a TrueAthletes
account first. Using the TrueKinetix app you can connect the TrueTrainer with your
WIFI network, configure virtual gears (if TrueTrainer 6.2) and view your training
data. Scan the QR code below to download the TrueKinetix app from the Google
Play Store (Android) or App Store (IOS), and create a TrueAthletes account.
QUICK START GUIDE
TRUEKINETIX APP
Caution: please fully run the start-up procedure before your start your
training. The TrueTrainer is ready when the motor has spun.
In the TrueKinetix app navigate to the 'TRAIN' tab.
Select 'START TRAINING'.
To simulate hills or descends, move the HILL slider to the desired elevation
percentage.
To train with ERG mode, move the POWER slider to the desired power level in
watts.
3.2 START TRAINING SESSION
1.
2.
3.
4.
8

To end the training session, select 'FINISH training'.
To ensure your training is saved correctly, shut down the trainer properly by
pressing the power button until white lights start flashing (aproximately 3
seconds) or via the TrueKinetix App.
3.3 END TRAINING SESSION
1.
2.
QUICK START GUIDE
9

4. NEED MORE HELP?
LINK TO MANUAL
Scan the QR-code below to view a more detailed manual of your TrueTrainer.
QUICK START GUIDE
In case you have further questions regarding your TrueTrainer, please visit one of
the following links for further help and clarification. Or visit the following URL:
https://truekinetix.com/support/.
LINK TO TRUETRAINER VIDEOS
Scan the QR-code below to view supporting videos on how to get started with your
TrueTrainer and get visual support with installing the TrueTrainer.
LINK TO OUR SUPPORT CENTER
If you run into issues, please scan the QR-code below to visit the support center to
look at the frequently asked questions and troubleshooting instructions.
10

Join us in the revolution.
#StrongerThroughScience
@truekinetix_
11

truekinetix.com Satellietbaan 12B, 2181 MG Hillegom, The Netherlands Follow @truekinetix_
Table of contents
Popular Fitness Equipment manuals by other brands


G-FITNESS
G-FITNESS AIR ROWER user manual

CAPITAL SPORTS
CAPITAL SPORTS Dominate Edition 10028796 manual

Martin System
Martin System TT4FK user guide

CIRCLE FITNESS
CIRCLE FITNESS E7 owner's manual

G-FITNESS
G-FITNESS TZ-6017 user manual

Accelerated Care Plus
Accelerated Care Plus OMNISTIM FX2 CYCLE/WALK user manual


