TRUlink 89023 User manual

1
USER GUIDE
4PORTS HDMI SPLITTER
BENUTZERHANDBUCH
HDMI-SPLITTER MIT 4ANSCHLÜSSEN
GUIDE D’UTILISATION
REPARTITEUR HDMI 4PORTS
MANUALE DELL’UTENTE
SPLITTER HDMI 4PORTE
HANDLEIDING
4-POORTS HDMI-SPLITTER
GUÍA DEL USUARIO
DIVISOR HDMI DE 4PUERTOS
Model: 89023

1
TABLE OF CONTENTS
INDICE
Introduzione.................................................................2
Caratteristiche .............................................................3
Requisiti del sistema....................................................4
Contenuto della confezione.........................................5
Panoramica del dispositivo..........................................6
Installazione del dispositivo.........................................7
Risoluzione dei problemi ...........................................10
Specifiche tecniche....................................................11
Garanzia di un anno C2G..........................................12
Informazioni di sicurezza importanti..........................13
INHOUDSOPGAVE
Inleiding.......................................................................2
Onderdelen .................................................................3
Systeemvereisten .......................................................4
Inhoud verpakking.......................................................5
Overzicht apparaat...................................................... 6
Installatie apparaat......................................................7
Probleemoplossing ...................................................10
Technische specificaties...........................................11
C2G 1 jaar garantie...................................................12
Belangrijke veiligheidsinformatie ..............................13
ÍNDICE
Introducción.................................................................2
Características ............................................................3
Requisitos del sistema................................................4
Contenidos del paquete..............................................5
Descripción general del dispositivo.............................6
Instalación del dispositivo ...........................................7
Resolución de problemas..........................................10
Especificaciones técnicas.........................................11
Garantía de un año de C2G......................................12
Información importante sobre seguridad ..................13
TABLE OF CONTENTS
Introduction..................................................................2
Features ......................................................................3
System Requirements.................................................4
Package Contents .......................................................5
Device Overview..........................................................6
Device Installation .......................................................7
Troubleshooting.........................................................10
Technical Specifications............................................11
C2G One Year Warranty...........................................12
Important Safety Information.....................................13
INHALTSVERZEICHNIS
Einführung................................................................... 2
Merkmale .................................................................... 3
Systemanforderungen.................................................4
Packungsinhalt............................................................ 5
Geräteübersicht ..........................................................6
Geräteinstallation........................................................7
Fehlerbehebung........................................................10
Technische Daten.....................................................11
Einjährige Garantie von C2G....................................12
Wichtige Sicherheitshinweise ...................................13
TABLE DES MATIERES
Introduction .................................................................2
Fonctions.....................................................................3
Configuration du système ...........................................4
Contenu du pack.........................................................5
Vue générale du périphérique.....................................6
Installation du périphérique.........................................7
Dépannage................................................................10
Caractéristiques techniques......................................11
Garantie d'un an C2G ...............................................12
Informations de sécurité importantes........................13

2
INTRODUCTION
The TruLink® compliant HDMI Splitter with HDCP compatibility will connect an HDMI equipped source to four HDTV displays equipped with HDMI inputs.
The TruLink® Splitter is designed to support 480i, 480P, 720P, 1080i and 1080P resolutions. We recommend that you read this manual thoroughly
and retain for future reference.
EINFÜHRUNG
Der TruLink®-konforme HDMI-Splitter mit HDCP-Kompatibilität dient zum Anschließen einer mit HDMI ausgestatteten Quelle an vier HDTV-
Anzeigegeräte mit HDMI-Eingängen. Der TruLink®-Splitter unterstützt Auflösungen von 480i, 480P, 720P, 1080i und 1080P. Bitte lesen Sie dieses
Handbuch sorgfältig durch und bewahren Sie es zum zukünftigen Nachschlagen auf.
INTRODUCTION
Le répartiteur HDMI TruLink® compatible HDPC connecte une source avec HDMI à quatre écrans TVHD équipés d’entrées HDMI. Le répartiteur
TruLink® est conçu pour prendre en charge les résolutions 480i, 480p, 720p, 1080i et 1080p. Nous recommandons de lire attentivement ce manuel
et de le conserver pour toute référence ultérieure.
INTRODUZIONE
Lo splitter HDMI conforme TruLink® con compatibilità HDCP collegherà una sorgente provvista di HDMI a quattro display HDTV provvisti di ingressi
HDMI. Lo splitter TruLink® è progettato per supportare risoluzioni da 480i, 480P, 720P, 1080i e 1080P. Si consiglia di leggere il presente manuale
attentamente e di conservarlo per riferimento futuro.
INLEIDING
De flexibele TruLink® HDMI-splitter met HDCP-compatibiliteit sluit een van HDMI voorziene bron aan op vier HDTV-displays die van HDMI-ingangen zijn
voorzien. De TruLink®splitter is ontworpen om 480i, 480p, 720p, 1080i en 1080p resoluties te ondersteunen. We raden u aan deze handleiding goed
door te lezen en te bewaren voor gebruik in de toekomst.
INTRODUCCIÓN
El divisor HDMI TruLink® compatible con HDCP sirve para conectar fuentes equipadas con HDMI a cuatro pantallas HDTV que cuenten con entradas
HDMI. El divisor TruLink® está diseñado para admitir resoluciones 480i, 480P, 720P, 1080i y 1080p. Es recomendable que lea atentamente este
manual y que lo guarde para poder consultarlo en el futuro.
INTRODUCTION

3
FEATURES
FEATURES
HDMI® (3D, Deep Color, x.v. color, high speed
refresh rates and lossless multi-channel surround
sound.)
Supports 480i, 480p, 720p, 1080i, 1080p 12-bit
Deep Color
HDCP-compliant for HDTV applications
MERKMALE
HDMI® (3D, erweiterter Farbraum, x.v. color, hohe
Bildwiederholfrequenzen und verlustloser Mehrkanal-
Surround-Sound)
Unterstützt erweiterten 12-Bit-Farbraum mit 480i,
480p, 720p, 1080i, 1080p
HDCP-konform für HDTV-Anwendungen
FONCTIONS
HDMI® (3D, Deep Color, x.v. color, fréquences de
rafraîchissement à grande vitesse et appareils
d'ambiophonie multivoies sans perte).
Prend en charge le coloris Deep Color 12 bits
480i, 480p, 720p, 1080i et 1080p
Compatible avec le protocole HDCP pour les
applications TVHD
FUNZIONI
HDMI® (3D, Deep Color, colore x.v., velocità di
aggiornamento ad alta velocità e suono surround
multicanale privo di perdite)
Supporta Deep Color da 12 bit 480i, 480p, 720p,
1080i, 1080p
Conforme HDCP per applicazioni HDTV
KENMERKEN
HDMI® (3D, Deep Color, x.v. color, hogesnelheid
verversingsfrequenties en verliesvrij omgevingsgeluid
via meerdere kanalen.)
Ondersteunt 480i, 480p, 720p, 1080i, 1080p 12-bits
Deep Color
Voldoet aan HDCP voor HDTV-toepassingen
CARACTERÍSTICAS
HDMI® (3D, Deep Color, x.v.Color, tasas de
refresco elevadas y sonido envolvente multicanal
sin pérdida).
Compatible con 480i, 480p, 720p, 1080i, 1080p 12-
bit Deep Color.
Compatible con HDCP para usarlo con televisores
de alta definición.

4
SYSTEM REQUIRMENTS
SYSTEM REQUIREMENTS
One HDMI source device
One HDMI cable to connect the output of the
source to input of the splitter.
Up to 4 HDTVs with an available HDMI port
1 HDMI cable for each HDTV.
SYSTEMANFORDERUNGEN
Ein HDMI-Quellgerät
Ein HDMI-Kabel zum Anschließen an den
Ausgang der Quelle und an den Eingang des
Splitters
Bis zu 4 HD-Fernseher mit freiem HDMI-Anschluss
1 HDMI-Kabel für jeden HD-Fernseher
CONFIGURATION DU SYSTÈME
Un périphérique source HDMI
Un câble HDMI pour brancher la sortie de la
source à l’entrée du répartiteur.
Jusqu’à 4 TVHD avec un port HDMI disponible
1 câble HDMI pour chaque TVHD.
REQUISITI DI SISTEMA
Un dispositivo sorgente HDMI
Un cavo HDMI per collegare l’uscita della
sorgente all’ingresso dello splitter.
Fino a 4 HDTV con una porta HDMI disponibile
1 cavo HDMI per ogni HDTV
SYSTEEMVEREISTEN
Eén HDMI-bronapparaat
Eén HDMI-kabel om de uitgang van de bron aan
te sluiten op de ingang van de splitter.
Tot wel 4 HDTV’s met een beschikbare HDMI-
poort
1 HDMI-kabel voor iedere HDTV.
REQUISITOS DEL SISTEMA
Un dispositivo de origen HDMI
Un cable HDMI para conectar la salida del
dispositivo de origen a la entrada del divisor
Hasta 4 televisores de alta definición con un
puerto HDMI libre
1 cable HDMI para cada televisor de alta
definición

5
PACKAGE CONTENTS
PACKAGE CONTENTS
TruLink® 4 Port HDMI Splitter
Universal (UK-EU)Power Adapter
User’s Manual
PACKUNGSINHALT
TruLink® HDMI-Splitter mit 4 Anschlüssen
Universal-Netzadapter (UK-EU)
Benutzerhandbuch
CONTENU DU PACK
Répartiteur HDMI 4 ports TruLink®
Adaptateur universel (RU-UE)
Manuel d’utilisation
CONTENUTO DELLA CONFEZIONE
Splitter HDMI 4 porte TruLink®
Adattatore di alimentazione universale (UK-UE)
Manuale per l’utente
INHOUD VERPAKKING
TruLink® 4-poorts HDMI-splitter
Universele (GB-EU) Stroomadapter
Gebruiksaanwijzing
CONTENIDO DEL PAQUETE
Divisor HDMI de 4 puertos TruLink®
Adaptador de corriente universal (Reino Unido-
UE)
Guía del usuario

6
DEVICE OVERVIEW /GERÄTEÜBERSICHT /VUE GÉNÉRALE DE L’APPAREIL /PANORAMICA DISPOSITVO
OVERZICHT APPARAAT /DESCRIPCIÓN GENERAL DEL DISPOSITIVO /

7
DEVICE INSTALLATION
Note: Ensure that power is off on the source and display(s)
before beginning setup.
Step 1
Make sure that your HDMI enabled device and
televisions/monitors are turned off.
Step 2
Using an HDMI cable (not included), connect the HDMI
output of your source device to the HDMI input on the rear
panel of the HDMI splitter.
Step 3
Using HDMI cables connect the HDMI Splitter outputs to the
HDMI inputs on your televisions/monitors.
Step 4
Plug in the included 5VDC power adapter to the rear panel of the
HDMI splitter, and connect the opposite end into a receptacle
outlet.
Step 5
Turn power on to the source device as well as your
televisions/monitors.
Step 6
Change your televisions/monitors to its HDMI input. (Please refer
to your television/monitor owner’s manual if assistance is
needed with changing inputs).
Step 7
The LED output indicator will illuminate to show proper
connection and “handshake”.
NOTE: The maximum recommended HDMI cable length
connecting the source device to the HDMI splitter is 10m.
The maximum recommended HDMI cable length connecting
the HDMI splitter to your televisions/monitors is 15m.
Attempting to use cables longer than the recommended
length may cause the image to flicker, become distorted or
no image to appear at all. Cable quality will affect distance
between the source device, the HDMI splitter and
televisions/monitors. To obtain maximum distance we
recommend using cables constructed with a larger wire
gauge. For best performance, we recommend using
SonicWave™ High-Speed HDMI® cables.
.
GERÄTEINSTALLATION
Hinweis: Stellen Sie sicher, dass die Quelle und die
Anzeigegeräte ausgeschaltet sind, bevor Sie mit dem Einrichten
beginnen.
Schritt 1
Stellen Sie sicher, dass Ihr HDMI-fähiges Gerät und die
Fernsehgeräte/Monitore ausgeschaltet sind.
Schritt 2
Schließen Sie ein HDMI-Kabel (nicht mitgeliefert) an den
HDMI-Ausgang Ihres Quellgeräts und an den HDMI-Eingang
an der Rückseite des HDMI-Splitters an.
Schritt 3
Schließen Sie HDMI-Kabel an die HDMI-Splitterausgänge
und an die HDMI-Eingänge an Ihren
Fernsehgeräten/Monitoren an.
Schritt 4
Schließen Sie den mitgelieferten 5-V-Netzadapter an die
Rückseite des HDMI-Splitters und das andere Ende an eine
Netzsteckdose an.
Schritt 5
Schalten Sie das Quellgerät und Ihre Fernsehgeräte/Monitore
ein.
Schritt 6
Schalten Sie Ihre Fernsehgeräte/Monitore zum HDMI-Eingang
um. (Sehen Sie in der Bedienungsanleitung Ihres
Fernsehgeräts/Monitors nach, wenn Sie beim Umschalten der
Eingänge Hilfe benötigen.)
Schritt 7
Die LED-Ausgangsanzeige leuchtet, um anzuzeigen, dass
Verbindung und „Handshake“ ordnungsgemäß erfolgt sind.
HINWEIS: Die empfohlene maximale HDMI-Kabellänge
zwischen Quellgerät und HDMI-Splitter beträgt 10 m. Die
empfohlene maximale HDMI-Kabellänge zwischen HDMI-
Splitter und Ihren Fernsehgeräten/Monitoren beträgt 15 m.
Der Versuch, längere Kabel als empfohlen zu verwenden,
kann dazu führen, dass das Bild flimmert, verzerrt ist oder
überhaupt kein Bild angezeigt wird. Die Kabelqualität hat
Einfluss auf den möglichen Abstand zwischen Quellgerät,
HDMI-Splitter und Fernsehgeräten/Monitoren. Für maximale
Entfernung sollten Kabel mit größerem Leitungsquerschnitt
verwendet werden. Für optimale Leistung empfehlen wir die
Verwendung von SonicWave™ High-Speed HDMI®-Kabeln.
INSTALLATION DU PERIPHERIQUE
Remarque : s'assurer que la source et le ou les écrans sont hors
tension avant de procéder à l'installation.
Étape 1
S’assurer que le périphérique HDMI et les téléviseurs/écrans sont
éteints.
Étape 2
Utiliser un câble HDMI (non fourni) pour brancher la sortie HDMI du
périphérique source à l’entrée HDMI à l'arrière du répartiteur HDMI.
Étape 3
Utiliser des câbles HDMI pour brancher les sorties du répartiteur
HDMI aux entrées HDMI des téléviseurs/moniteurs.
Étape 4
Brancher l’adaptateur CC fourni à l'arrière du répartiteur HDMI, et
brancher l’extrémité opposée à une prise de courant.
Étape 5
Allumer le périphérique source ainsi que les téléviseurs/moniteurs.
Étape 6
Changer les téléviseurs/moniteurs avec leur entrée HDMI (se reporter
au manuel d’utilisation du téléviseur/moniteur le cas échéant, pour
changer les entrées).
Étape 7
Le témoin de sortie à DEL s’allume pour indiquer une connexion
correcte et l'établissement de la liaison automatique.
REMARQUE : la longueur maximale recommandée du câble HDMI
reliant le périphérique source au répartiteur HDMI est de 10 m. La
longueur maximale recommandée du câble HDMI reliant le répartiteur
HDMI au téléviseur/moniteur est de 15 m. Tenter d’utiliser des câbles
plus longs que la longueur maximale recommandée peut entraîner
une scintillation, une distorsion de l’image, ou l'absence d’affichage
d’image. La qualité du câble a une incidence sur la distance entre le
périphérique source, le répartiteur HDMI et les téléviseurs/moniteurs.
Pour obtenir la distance maximum, nous recommandons d'utiliser des
câbles d'un calibre supérieur. Pour une performance optimale, nous
recommandons d’utiliser des câbles SonicWave™ High-Speed
HDMI®.

8
DEVICE INSTALLATION
INSTALLAZIONE DISPOSITIVO
Nota: assicurarsi che l’alimentazione sia disattivata sulla sorgente
e sui display prima dell’installazione.
Fase 1
Assicurarsi che il dispositivo abilitato HDMI e i monitor/le
televisioni siano spenti.
Fase 2
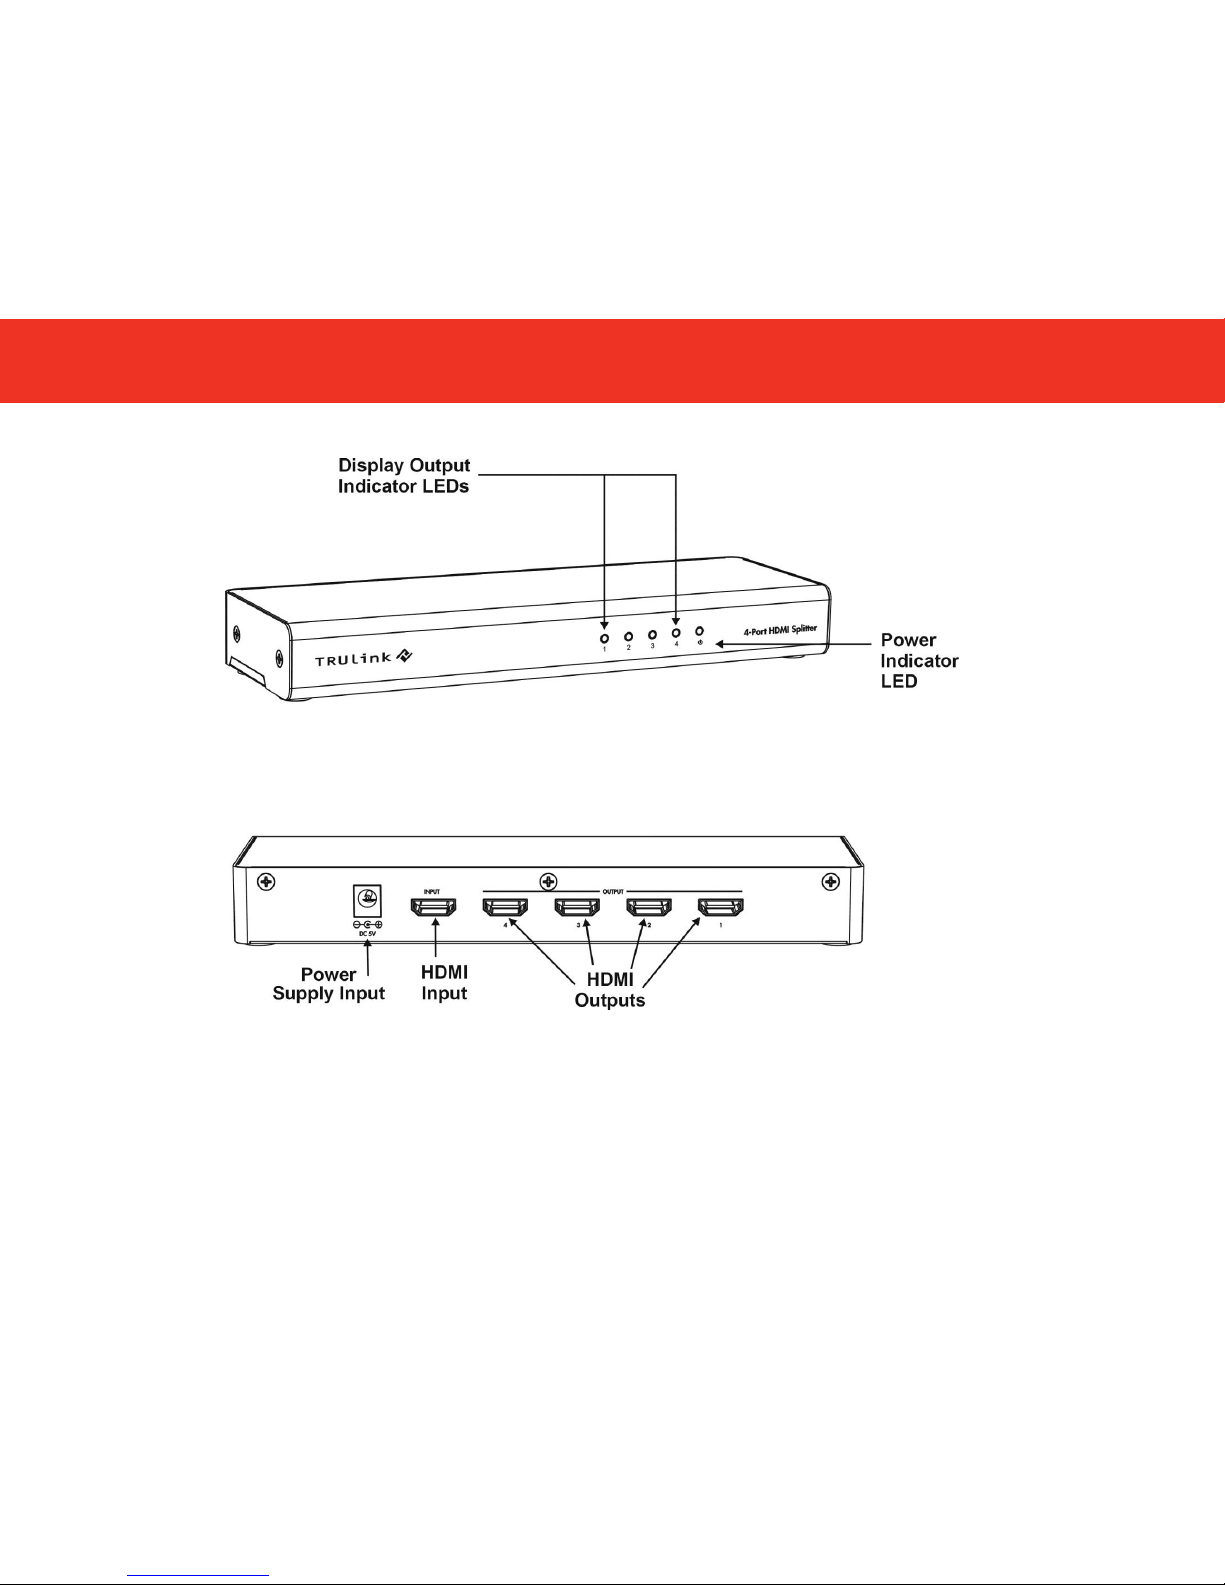
Usando un cavo HDMI (non incluso), collegare l’uscita HDMI
del dispositivo sorgente all'ingresso HDMI sul pannello
posteriore dello splitter HDMI.
Fase 3
Usando cavi HDMI, collegare le uscite dello splitter HDMI agli
ingressi HDMI sulle televisioni/sui monitor.
Fase 4
Collegare l’adattatore di alimentazione 5V CC incluso al pannello
posteriore dello splitter HDMI e collegare l’estremità opposta a
un’uscita della presa.
Fase 5
Alimentare il dispositivo sorgente e le televisioni/i monitor.
Fase 6
Cambiare l'input delle televisioni/dei monitor in HDMI (fare
rifermento al manuale per l’utente della televisione/del monitor in
caso sia necessaria assistenza per il cambiamento degli input).
Fase 7
L’indicatore di uscita del LED si illumina, a indicare il corretto
collegamento.
NOTA: la lunghezza del cavo HDMI raccomandata massima
che collega il dispositivo sorgente allo splitter HDMI è 10 m.
La lunghezza del cavo HDMI raccomandata massima che
collega lo splitter HDMI alle televisioni/ai monitor è 15 m. Il
tentativo di usare cavi più lunghi della lunghezza
raccomandata può provocare tremolii dell’immagine,
distorsioni o la mancata visualizzazione dell’immagine. La
qualità del cavo influenzerà la distanza tra il dispositivo
sorgente, lo splitter HDMI e le televisioni/i monitor. Per
ottenere la distanza massima, si raccomanda l’utilizzo di cavi
con calibri maggiori. Per prestazioni ottimali, si raccomanda
l'utilizzo di cavi SonicWave™ High-Speed HDMI®.
INSTALLATIE APPARATUUR
Opmerking: Zorg ervoor dat de bron en de display(s) zijn
uitgeschakeld voordat u met de installatie begint.
Stap 1
Zorg ervoor dat uw voor HDMI geschikte apparaat en de
televisies/monitoren zijn uitgeschakeld.
Stap 2
Met behulp van een HDMI-kabel (niet meegeleverd) sluit u
de HDMI-uitvang van uw bronapparaat aan op de HDMI-
invoer aan de achterzijde van de HDMI-splitter.
Stap 3
Met behulp van HDMI-kabels sluit u de HDMI-
splitteruitgangen aan op de HDMI-ingangen op uw
televisies/monitoren.
Stap 4
Steek de meegeleverde 5V DC stroomadapter in de achterzijde
van de HDMI-splitter, en sluit het andere uiteinde aan op een
wandcontactdoos.
Stap 5
Zet de stroom van het bronapparaat en van uw
televisies/monitoren aan.
Stap 6
Wijzig uw televisies/monitoren naar hun HDMI-invoersignaal (zie
de gebruiksaanwijzing van uw televisie/monitor als u hulp nodig
hebt bij het wijzigen van het invoersignaal).
Stap 7
De LED uitgangsindicator licht op om te laten zien dat er een
goed contact en “overeenstemming” is.
OPMERKING: De maximaal aanbevolen HDMI-kabellengte
die het bronapparaat op de HDMI-splitter aansluit, bedraagt
10 m. De maximaal aanbevolen HDMI-kabellengte die de
splitter op uw televisies/monitoren aansluit, bedraagt 15 m.
Als u probeert deze kabels langer dan de aanbevolen lengte
te maken, kan dit ertoe leiden dat het beeld flikkert,
vervormd raakt, of er zelfs helemaal geen beeld verschijnt.
De kwaliteit van de kabels is van invloed op de afstand
tussen het bronapparaat, de HDMI-splitter en
televisies/monitoren. Om de maximale afstand te verkrijgen,
bevelen wij het gebruik van kabels met een grotere
kabeldikte aan. Voor de beste prestaties bevelen wij het
gebruik van SonicWave™ High-Speed HDMI® kabels aan.
INSTALACIÓN DEL DISPOSITIVO
Nota: Compruebe que esté apagada la alimentación del
dispositivo de origen y los dispositivos de visualización antes de
empezar con la instalación.
Paso 1
Compruebe que los dispositivos con HDMI y los televisores o
los monitores estén apagados.
Paso 2
Con un cable HDMI (no incluido), conecte la salida HDMI del
dispositivo de origen a la entrada HDMI del panel posterior
del divisor HDMI.
Paso 3
Use los cables HDMI para conectar las salidas HDMI del
divisor a las entradas HDMI de los televisores o monitores
que tenga.
Paso 4
Enchufe el adaptador de CC al panel posterior del divisor HDMI y
conecte el extremo opuesto a una toma de corriente.
Paso 5
Encienda la alimentación del dispositivo de origen y de los
televisores o monitores.
Paso 6
Cambie los televisores o monitores a la entrada HDMI que
tengan. (Consulte el manual de usuario de estos aparatos si
necesita ayuda con el cambio de entradas.)
Paso 7
El LED indicador de salida se encenderá para señalar que la
conexión es correcta y los dispositivos han establecido
comunicación.
NOTA: La longitud de cable HDMI máxima recomendada
para conectar el dispositivo de origen al divisor HDMI es de
10 m. La longitud de cable HDMI máxima recomendada para
conectar el divisor HDMI a los televisores o monitores es de
15 m. Si trata de usar cables con mayor longitud de la
recomendada es posible que la imagen parpadee, sufra
distorsiones o no se pueda visualizar en absoluto. La calidad
del cable influye en la distancia entre el dispositivo de
origen, el divisor HDMI y los televisores o monitores. Para
alcanzar la máxima distancia recomendamos utilizar cables
que tengan integrado un calibre de hilo mayor. Asimismo,
para obtener los mejores resultados, recomendamos utilizar
cables SonicWave™ High-Speed HDMI®.

9
DEVICE INSTALLATION APPLICATION DIAGRAMS

10
TROUBLESHOOTING
No Operation
1. Verify the 5V power supply is connected to the selector.
2. Verify unit’s power is on by the power indicator Red LED.
No picture or signal; Poor picture.
1. Make sure your video display is HDCP compliant.
2. Make sure HDMI cable length is no longer than 10m from
the source to the splitter and no longer than 15m from the
splitter to your television/monitor.
3. Make sure all HDMI connectors are tightly secured to all
HDMI ports. The LEDs will glow Blue to show activity.
4. Turn all equipment power to off and then restore power.
5. If 3D content is not shown on your display.
Please make sure that both your source device and
displays support 3D and that they support the same 3D
format.
Please check that the play mode of the source has been
set to 3D mode or AUTO mode for video output.
Please make sure the video content is 3D content.
6. If the picture displayed is not the proper 3D image, please
check that the 3D format of your source (BD player, PS3, etc.)
and displays (TV or projector) are set correctly.
7. If the picture displayed is symmetric, where the top and
bottom or right and left are symmetric images, then please
check that the displays support 3D function. Also make sure
that the 3D function is enabled. If the display does not support
3D video format, then you will need to turn off the 3D play
mode of source.
FEHLERBEHEBUNG
Kein Betrieb
1. Überprüfen Sie, ob das 5-V-Netzteil an den Selector
angeschlossen ist.
2. Überprüfen Sie anhand der roten LED-Netzanzeige, ob das
Gerät eingeschaltet ist.
Kein Bild oder Signal; schlechtes Bild
1. Vergewissern Sie sich, dass Ihr Videoanzeigegerät HDCP-
konform ist.
2. Vergewissern Sie sich, dass die HDMI-Kabellänge
zwischen Quelle und Splitter nicht länger als 10 m und
zwischen Splitter und Fernsehgerät/Monitor nicht länger als
15 m ist.
3. Vergewissern Sie sich, dass alle HDMI-Stecker richtig an
allen HDMI-Anschlüssen angeschlossen sind. Die LEDs
leuchten blau, um Aktivität anzuzeigen.
4. Schalten Sie alle Geräte aus und wieder ein.
5. Wenn auf Ihrem Anzeigegerät keine 3D-Inhalte dargestellt
werden.
Vergewissern Sie sich, dass sowohl das Quellgerät als
auch das Anzeigegerät 3D unterstützen und dass sie
dasselbe 3D-Format unterstützen.
Bitte überprüfen Sie, dass die Quelle im
Wiedergabemodus auf den 3D-Modus oder AUTO-
Modus für die Videoausgabe eingestellt wurde.
Bitte vergewissern Sie sich, dass der Videoinhalt in 3D
ist.
6. Wenn das angezeigte Bild kein richtiges 3D-Bild ist,
überprüfen Sie bitte, ob das 3D-Format Ihrer Quelle (BD-
Player, PS3 usw.) und Anzeigegeräte (Fernsehgerät oder
Projektor) korrekt eingestellt sind.
7. Wenn das angezeigte Bild symmetrisch ist, wobei oben und
unten oder rechts und links symmetrische Bilder sind,
überprüfen Sie bitte, ob das Anzeigegerät die 3D-Funktion
unterstützt. Vergewissern Sie sich außerdem, ob die 3D-
Funktion aktiviert ist. Wenn das Anzeigegerät das 3D-
Videoformat nicht unterstützt, müssen Sie nur den 3D-
Wiedergabemodus der Quelle abschalten.
DEPANNAGE
Dysfonctionnement
1. Vérifier que l’alimentation 5 V est branchée sur le sélecteur.
2. Vérifier que le périphérique est allumé grâce au témoin à
DEL rouge.
Pas d’image ou de signal ; mauvaise image.
1. S’assurer que l’écran vidéo est compatible avec le
protocole HDPC.
2. S’assurer que la longueur du câble HDMI ne dépasse pas
10 m entre la source et le répartiteur, et ne dépasse pas 15 m
entre le répartiteur et le téléviseur/moniteur.
3. S’assurer que toutes les connexions sont bien branchées
sur tous les ports HDMI. La DEL s’allumera en bleu pour
indiquer une activité.
4. Éteindre tous les périphériques, puis les rallumer.
5. Si le contenu 3D ne s'affiche pas à l'écran :
S'assurer que le périphérique source et l'écran prennent
en charge la fonction 3D ainsi qu'un même format 3D.
Vérifier que le mode de lecture de la source est bien réglé
sur 3D ou sur AUTO pour la sortie vidéo.
S'assurer que le contenu vidéo est en 3D.
6. Si l'image affichée n'est pas une image 3D correcte, vérifier
que le format 3D de la source (lecteur BD, PS3, etc.) et des
écrans (TV ou projecteur) sont correctement réglés.
7. Si l'image affichée est symétrique, le bas et le haut ou la
gauche et la droite étant symétriques, vérifier que l'écran
prend bien en charge la fonction 3D. S'assurer aussi que la
fonction 3D est activée. Si l'écran ne prend pas en charge le
format vidéo 3D, il faut alors désactiver le mode de lecture 3D
de la source.

11
RISOLUZIONE DEI PROBLEMI
Nessun funzionamento
1. Verificare che l’alimentazione da 5 V sia collegata al
selettore.
2. Verificare che l’alimentazione dell’unità sia attiva tramite il
LED rosso di alimentazione.
Nessuna immagine o segnale; immagini di scarsa qualità.
1. Accertarsi che il display video sia conforme HDCP.
2. Accertarsi che la lunghezza del cavo non sia superiore a 10
m dalla sorgente dello splitter e a 15 m dallo splitter alla
televisione/monitor.
3. Assicurarsi che tutti i connettori HDMI siano saldamente
fissati a tutte le porte HDMI. I LED diventeranno blu a indicare
attività.
4. Spegnere tutte le apparecchiature e quindi riattivare
l’alimentazione.
5. Se il contenuto 3D non viene visualizzato sul display.
Accertarsi che entrambi i dispositivi di origine e i display
supportino la funzionalità 3D e lo stesso formato 3D.
Controllare che la modalità di riproduzione del dispositivo
di origine sia stata impostata sulla modalità 3D o
AUTOMATICO per l’uscita video.
Assicurarsi che i contenuti video siano in formato 3D.
6. Se l’immagine selezionata non è un’immagine 3D corretta,
verificare che il formato 3D del dispositivo di origine (lettore
BD, PS3, ecc.) e dei display (TV o proiettore) sia impostato
correttamente.
7. Se l’immagine visualizzata è simmetrica, ovvero le parti
superiore e inferiore o destra e sinistra sono immagini
simmetriche, verificare se il display supporta la funzione 3D.
Controllare inoltre che la funzione 3D sia abilitata. Se il display
non supporta il format video 3D, sarà necessario disattivare la
modalità di riproduzione 3D del dispositivo di origine.
PROBLEEMOPLOSSING
Apparaat werkt niet
1. Controleer of de 5V stroomvoorziening is aangesloten op
de keuzeschakelaar.
2. Controleer of de stroom op het apparaat aan staat door het
rode LED-lampje te controleren.
Geen beeld of signaal; slecht beeld
1. Zorg ervoor dat uw videodisplay geschikt is voor HDCP
2. Zorg ervoor dat de HDMI-kabellengte niet langer dan 10 m
van de bron tot de splitter is, en niet langer dan 15 m van de
splitter naar uw televisie/monitor.
3. Zorg ervoor dat alle HDMI-connectoren stevig vastzitten in
alle HDMI-poorten. De LED-lampjes lichten op om activiteit
aan te geven.
4. Schakel alle apparatuur uit en vervolgens weer aan.
5. Als er geen 3D-inhoud op uw display wordt weergegeven:
Zorg er a.u.b. voor dat zowel uw bronapparaat als uw
displays 3D ondersteunen, en dat ze hetzelfde 3D-format
ondersteunen;
Controleer a.u.b. dat de PLAY modus van het
bronapparaat op de 3D-modus is ingesteld, of op de
AUTO modus van de video-ingang;
Zorg er a.u.b. voor dat de video-inhoud 3D-inhoud bevat.
6. Als het beeld niet als gewoon 3D-beeld wordt
weergegeven, controleer dan a.u.b. dat het 3D-format van uw
bronapparaat (BD-speler, PS3, enz.) en de displays (TV of
projector) juist staan ingesteld.
7. Als het getoonde beeld symmetrisch is, terwijl de boven- en
onderzijde, of rechter- en linkerzijde symmetrische beelden
tonen, controleer dan a.u.b. of de displays de 3D-functie
ondersteunen. Zorg er ook voor dat de 3D-functie is
ingeschakeld. Als de display geen 3D-videoformat
ondersteunt, dient u de 3D-afspeelmodus van het
bronapparaat uit te schakelen.
RESOLUCIÓN DE PROBLEMAS
El dispositivo no funciona
1. Compruebe que la fuente de alimentación de 5 V esté
conectada al selector.
2. Fíjese en el LED indicador rojo para comprobar que la
alimentación esté encendida.
Sin imagen o señal; imagen de mala calidad.
1. Compruebe que el dispositivo de visualización de vídeo se
adhiera a la norma HDCP.
2. Asegúrese de que el cable HDMI no tenga más de 10 m de
extensión entre el dispositivo de origen y el divisor y que no
tenga más de 15 m de extensión entre el divisor y el televisor
o monitor.
3. Asegúrese de que todos los conectores HDMI estén bien
fijos en todos los puertos HDMI. Los LED se encenderán en
azul para indicar que hay actividad.
4. Apague todos los equipos y restablezca la alimentación.
5. Si el contenido 3D no aparece en la pantalla:
Asegúrese de que tanto el dispositivo de origen y como el
monitor sean compatibles con 3D y que admitan en
mismo formato 3D.
Compruebe que el modo de reproducción de la fuente se
haya ajustado en modo 3D o en el modo AUTO para la
salida de vídeo.
Asegúrese de que el contenido de vídeo sea contenido
3D.
6. Si la imagen que aparece no es una imagen 3D correcta,
verifique que el formato 3D del origen (reproductor BD, PS3,
etc) y las pantallas (TV o proyector) se hayan ajustado
correctamente.
7. Si la imagen mostrada es simétrica, es decir, la parte
superior e inferior o la derecha e izquierda son imágenes
simétricas, entonces compruebe que las pantallas sean
compatibles con la función 3D. Asegúrese también de que la
función 3D esté habilitada. Si la pantalla no es compatible con
el formato de vídeo 3D, entonces tendrá que desactivar el
modo de reproducción en 3D del origen.
TROUBLESHOOTING

12
Product No.
89023
Output Ports
HDMI Type A 19-pin Female x 4
Input Port
HDMI Type A 19-pin Female
Video Amplifier Bandwidth
2.25 Gbps
Operation Pixel Frequency
Range
25 MHz~225 MHz
Single Link Range
1080p max.
HDMI DDC Signal
5 V p-p (TTL)
HDMI 3D video format
Frame packing
Side-by-Side (Half)
[email protected]/60Hz
1920x1080i@50Hz
Top-and-Bottom
Input Video Signal
1.2 V p-p
Product Dimensions
22.2 cm x 6.9 cm x 3.1 cm
Product Weight
0.45 kg
Power Supply Output
DC 5 V 2.0 A
TECHNICAL SPECIFICATIONS

13
At C2G, we want you to be totally confident in your purchase. That is why we offer a one year warranty on this device. If you
experience problems due to workmanship or material defect for the duration of this warranty, we will repair or replace this
device. To request a Return Merchandise Authorisation (RMA) number, contact customer service at 0800 328 2916 or
www.c2g.com
Wir bei C2G möchten, dass Sie mit Ihrem Kauf vollständig zufrieden sind. Deshalb bieten wir eine einjährige Garantie auf
dieses Gerät. Wenn während dieser Garantie Probleme aufgrund eines Fertigungs- oder Materialfehlers auftreten, reparieren
oder ersetzen wir dieses Gerät. Wenden Sie sich zum Anfordern einer Return Merchandise Authorization (RMA)-Nummer an
unseren Kundenservice unter 0800 328 2916 oder www.c2g.com.
Chez C2G, nous voulons que vous soyez complètement satisfait de votre achat. C'est pourquoi vous bénéficiez d'un an de
garantie sur cet appareil. Si vous rencontrez des problèmes liés à des défauts matériels ou de fabrication pendant la durée de
cette garantie, nous réparerons ou remplacerons cet appareil. Pour demander un numéro d'autorisation de retour de
marchandise (ARM), contactez le service client au 0800.328.2916 ou www.c2g.com.
Alla C2G, vogliamo che i nostri clienti abbiano totale fiducia nei loro acquisti. Ecco perché, su questo dispositivo offriamo una
garanzia di un anno. Qualora nel corso del periodo coperto da garanzia dovessero verificarsi problemi legati alla manodopera
o ai materiali utilizzati, sarà nostra cura occuparci della riparazione o della sostituzione del dispositivo. Per richiedere un
numero RMA (Return Merchandise Authorization / autorizzazione alla restituzione della merce), contattare il Servizio Clienti al
numero 0800 328 2916 o visitare il sito www.c2g.com.
Bij C2G willen we dat u volledig op uw aankoop kunt vertrouwen. Daarom bieden we een garantie van een jaar op dit apparaat.
Als u problemen ondervindt door slecht vakmanschap of een materieel defect tijdens de garantieperiode, zullen we het
apparaat repareren of vervangen. Als u een RMA-nummer (Return Merchandise Authorization - Toestemming voor retour van
consumentenproducten) wilt, kunt u contact opnemen met klantenservice op 0800 328 2916 of via www.c2g.com.
En C2G queremos que confíe completamente en su compra. Esa es la razón por la que ofrecemos un año de garantía en este
dispositivo. Si experimenta problemas debidos a mano de obra o defectos de material durante el periodo de validez de esta
garantía, repararemos o sustituiremos este dispositivo. Para solicitar un número de autorización de devolución de mercancía,
contacte con el servicio de atención al cliente en el número de teléfono 0800 328 2916 o visite www.c2g.com
C2G™ ONE YEAR WARRANTY /
EINJÄHRIGE GARANTIE VON C2G™ /
GARANTIE D'UN AN DE C2G™ /GARANZIA DI
UN ANNO C2G™ /C2G™ EÉNJAARSGARANTIE /UN AÑO DE GARANTÍA C2G™

14
IMPORTANT SAFETY INFORMATION
INFORMATIONS DE SÉCURITÉ IMPORTANTES
Non collegare l'unità a prese che non dispongono di un quantitativo di
corrente sufficiente a garantire il corretto funzionamento del
dispositivo. Consultare le specifiche tecniche presenti in questo
manuale per maggiori informazioni relative al livello energetico del
dispositivo.
Liquidi: Se l'unità o il relativo alimentatore entrano in contatto con dei
liquidi, non cercare di utilizzare il dispositivo. Non cercare di utilizzare
il prodotto in presenza di pioggia, neve, grandine, ecc. Il dispositivo si
potrebbe danneggiare.
In caso di temporale si consiglia di scollegare il dispositivo dalla presa
di corrente.
Evitare di posizionare il dispositivo nelle vicinanze di oggetti che
producono calore come ad esempio stufette portatili, convettori termici
o condotti di riscaldamento.
IL DISPOSITIVO NON CONTIENE PARTI CHE POSSONO ESSERE
RIPARATE DALL’UTENTE. Non cercare di aprire il prodotto fino a
scoprire i circuiti interni. Se si ritiene che il prodotto sia difettoso,
scollegare l'unità e consultare la sezione informativa sulla garanzia
all'interno del presente
manuale.
IMPORTANT SAFETY INFORMATION
Do not plug the unit in any outlet that does not have enough
current to allow the device to function. Refer to the specifications
in this manual for power level of the unit.
Liquid: If this unit or its corresponding power adapter has had
liquid spilled on or in it, do not attempt to use the unit. Do not
attempt to use this product in an outdoor environment as
elements such as rain, snow, hail, etc. can damage the product.
In case of a storm, it is recommended that you unplug this device
from the outlet.
Avoid placing this product next to objects that produce heat such
as portable heaters, space heaters, or heating ducts.
THERE ARE NO USER SERVICEABLE PARTS. Do not attempt
to open this product and expose the internal circuitry. If you feel
that the product is defective, unplug the unit and refer to the
warranty information section of this manual.
WICHTIGE SICHERHEITSHINWEISE
Schließen Sie das Gerät nicht an eine Steckdose an, die nicht
genug Strom für das Gerät liefert. Die entsprechenden Daten für
das Gerät finden Sie in diesem Handbuch.
Flüssigkeit: Wenn auf dieses Gerät oder den dazugehörigen
Netzadapter Flüssigkeiten geschüttet wurden, darf es/er nicht
verwendet werden. Verwenden Sie dieses Produkt nicht im
Freien, da Regen, Schnee, Hagel usw. das Produkt beschädigen
können. Ziehen Sie bei einem Gewitter den Netzstecker des
Geräts.
Stellen Sie dieses Produkt nicht in der Nähe von Gegenständen
auf, die Hitze erzeugen, zum Beispiel tragbare Heizgeräte,
Heizöfen oder Heizungsleitungen.
ES BEFINDEN SICH KEINE VOM BENUTZER
REPARIERBAREN TEILE IM GERÄT. Versuchen Sie nicht, das
Produkt zu öffnen und den internen Schaltkreis freizulegen. Wenn
das Produkt defekt ist, ziehen Sie den Netzstecker und sehen Sie
im Abschnitt mit den Garantieinformationen in diesem Handbuch
nach.
BELANGRIJKE VEILIGHEIDSINFORMATIE
Sluit de unit niet aan op een stopcontact dat niet genoeg spanning
levert om het apparaat te laten functioneren. Raadpleeg de
specificaties in deze handleiding voor het spanningsniveau van de
unit.
Vloeistof: Als op of in deze unit of de bijbehorende stroomadapter
vloeistof is gemorst, moet u de unit niet gebruiken.
Gebruik dit product niet buitenshuis aangezien regen, sneeuw, hagel
enz. schade aan het product kunnen toebrengen.
Bij onweer is het aan te bevelen dit product van de stroom af te halen.
Plaats dit product niet bij voorwerpen die hitte afgeven zoals
radiatoren, verwarmingselementen of verwarmingsbuizen.
ER ZIJN GEEN ONDERDELEN DIE DE GEBRUIKER ZELF KAN
HERSTELLEN. Dit product niet openen en het interne circuit niet
blootstellen. Als u meent dat het product defect is, koppel de unit dan
af en raadpleeg het gedeelte in deze handleiding over de garantie-
informatie.
INFORMATIONS DE SECURITE IMPORTANTES
Pour permettre à l'appareil de fonctionner, ne branchez pas l'unité sur
une prise ne délivrant pas assez de courant. Reportez-vous aux
spécifications de ce manuel pour connaître le niveau d'alimentation de
l'unité.
Liquide : Si du liquide s'est répandu sur ou à l'intérieur de cette unité
ou son adaptateur d'alimentation correspondant, n'essayez pas
d'utiliser cette unité. N'essayez pas d'utiliser ce produit dans un
environnement extérieur car des éléments tels que la pluie, la neige,
la grêle, etc. peuvent endommager ce produit.
En cas de tempête, il est recommandé de débrancher cet appareil de
la source de courant.
Évitez de placer ce produit près d'objets produisant de la chaleur
comme les appareils de chauffage portables ou non et les conduits de
chauffage
AUCUNE PIÈCE NE NÉCESSITE D'ÊTRE ENTRETENUE PAR
L'UTILISATEUR. N'essayez pas d'ouvrir ce produit et d'exposer sa
circuiterie interne. Si vous pensez que ce produit présente des
défauts, débranchez l'unité et reportez-vous à la section de ce guide
comportant des informations de
garantie.
INFORMACIÓN DE SEGURIDAD IMPORTANTE
No conecte la unidad en una salida que no disponga de suficiente
corriente como para permitir que el dispositivo funcione. Consulte en
este manual las especificaciones sobre nivel de potencia de la
unidad.
Líquidos: Si se han derramado líquidos sobre la unidad, en la unidad
o en su correspondiente adaptador de potencia, no intente utilizar la
unidad. No intente utilizar este producto en el exterior, ya que
elementos como la lluvia, la nieve, el granizo, etc. pueden dañar el
producto.
En caso de tormenta, se recomienda que desconecte este dispositivo
del enchufe.
Evite situar este producto cerca de objetos que produzcan calor,
como calefacciones portátiles, calefactores o conductos de
calefacción.
NO HAY PIEZAS QUE PUEDA REPARAR EL PROPIO USUARIO.
No intente abrir este producto y exponer la circuitería interna. Si cree
que el producto presenta algún defecto, desconecte la unidad y
consulte la sección de garantía de este manual.

15
For more information on this product or to check for updated drivers,
manuals or frequently asked questions please visit our website.
Weitere Informationen über dieses Produkt und aktualisierte Treiber,
Handbücher und häufig gestellte Fragen finden Sie auf unserer Website.
Pour plus d'informations concernant ce produit ou pour rechercher des pilotes actualisés,
des manuels ou des questions souvent posées, veuillez visiter notre site web.
Per ulteriori informazioni su questo prodotto oppure per verificare la presenza di aggiornamenti di driver
e manuali o per consultare le domande frequenti, visitare il nostro sito web.
Ga voor meer informatie over dit product of over bijgewerkte stuurprogramma’s,
handleidingen of veel gestelde vragen naar onze website.
Para obtener más información sobre este producto o para comprobar controladores actualizados,
manuales o preguntas frecuentes, visite nuestro sitio web.
www.c2g.com
VER.2.2.09.30.10
Table of contents
Other TRUlink Cables And Connectors manuals
Popular Cables And Connectors manuals by other brands

NEUTRIK
NEUTRIK NAC3FX Operating & assembly instruction

PCB Piezotronics
PCB Piezotronics 003P20 Installation and operating manual

Gomax
Gomax SP-4102Z-PT user manual

HDX
HDX 800 Series Use and care guide

Ribimex
Ribimex Ribitech PRDAE10/1 User and maintenance manual

StarTech.com
StarTech.com VS440HDMI user guide