Truper MULH-35A User manual

Oscillating multi-tool
MULH-35A
ModelCode
MULH-35A
Applies for:
102429
Motor
3 A
Manual
Read this manual thoroughly
before using the tool.
CAUTION
ENGLISH
ESPAÑOL
DRAFT
DRAFT
DRAFT
DRAFT
DRAFT
DRAFT

MULH-35A
2
Technical data
Electrical requirements
General power tool safety warnings
Safety warnings for oscillating tools
Parts
Preparation
Operation
Maintenance
Authorized Service Centers
Warranty Policy
3
3
4
5
6
7
8
10
11
12
CAUTION
Contents
Keep this manual for future references.
The illustrations in this manual are for reference
only. They might be different from the real tool.
To gain the best performance of
the tool, prolong the duty life,
make the Warranty valid if
necessary, and to avoid hazards
of fatal injuries please read and
understand this Manual before
using the tool.
ENGLISH
DRAFT
DRAFT
DRAFT
DRAFT
DRAFT
DRAFT

3
MULH-35A
102429
3.2°
Class II
60 Hz
Oscillating multi-tool
18 AWG x 2C with 221 °F insulation temperature
30 minutes of work and 15 minutes of rest.
Maximum 3 hours per day.
3 A
350 W
11 000 orbits / min - 22 000 orbits / min
Code
Description
Oscillation angle
Voltage
Frequency
Current
Power
Speed
Work cycle
Conductors
Insulation
The power cable has cable clamps type: Y
The construction class of the tool is: Reinforced insulation.
The thermal insulation class of the motor windings is: Class B.
127 V
Power requirements
Technical data
ENGLISH
Tools with double insulation and reinforced insulation are built with a
polarized plug (one prong is wider than the other) This plug fits in any polarized outlet
and can only be connected one way. If the plug does not fit completely into the outlet,
reverse the plug. If it is not fitting, call a qualified electrician or install a polarized outlet.
Do not alter the plug in any way. Double insulation eliminates the need of a three-prong
grounded power plug or a grounded electric system.
When using an extension cable, make it has sufficient gauge to
carry the current your tool will draw. A lower gauge cable will cause voltage drop in the line, resulting in power loss and
the motor will overheat. The following table shows the right size to use depending on cable’s length and the ampere
capability shown in the tool’s nameplate. When in doubt use the next higher gauge.
WARNING
WARNING
From 0 A and up to 10 A
From 10 A and up to 13 A
From 13 A and up to 15 A
From 15 A and up to 20 A
18 AWG
16 AWG
14 AWG
8 AWG
16 AWG
14 AWG
12 AWG
6 AWG
3 (one grounded)
From 6 ft to 49 ft | Higher than 49 ft
Ampere
Capacity Number of
Conductors Extension Gauge
When using power tools outdoors use grounded extension cable labeled “Outdoors
Use”. These extension cables are specially manufactured for outdoors use and reduce the risk of electric shock.
WARNING
WARNING
WARNING Avoid the risk of electric shock or severe injury. When the power cable gets damaged
it should only be replaced by the manufacturer or at a Authorized Service Center.
The build quality of the electric insulation is altered if spills or liquid gets into the tool while in use.
Do not expose to rain, liquids and/or dampness.
Before gaining access to the terminals all power sources should be disconnected.
*It is safe to use only if the extensions have a built-in artifact for over current protection.
AWG = American Wire Gauge-Reference NMX-J-195-ANCE
DRAFT
DRAFT
DRAFT
DRAFT
DRAFT
DRAFT

4ENGLISH
This tool is in compliance with
the Official Mexican Standard
(NOM - Norma Oficial Mexicana).
Work area
Keep your work area clean, and well lit.
Cluttered and dark areas may cause accidents.
Never use the tool in explosive atmospheres, such as in the
presence of flammable liquids, gases or dust.
Sparks generated by power tools may ignite the flammable material.
Keep children and bystanders at a safe distance while operating
the tool.
Distractions may cause loosing control.
Electrical Safety
The tool plug must match the power outlet. Never modify
the plug in any way. Do not use any adapter plugs with
grounded power tools.
Modified plugs and different power outlets increase the risk of electric shock.
Avoid body contact with grounded surfaces, such as pipes,
radiators, electric ranges and refrigerators.
The risk of electric shock increases if your body is grounded.
Do not expose the tool to rain or wet conditions.
Water entering into the tool increases the risk of electric shock.
Do not force the cord. Never use the cord to carry, lift or unplug
the tool. Keep the cord away from heat, oil, sharp edges or
moving parts.
Damaged or entangled cords increase the risk of electric shock.
When operating a tool outdoors, use an extension cord suitable
for outdoor use.
Using an adequate outdoor extension cord reduces the risk of electric shock.
If operating the tool in a damp location cannot be avoided, use
a ground fault circuit interrupter (GFCI) protected supply.
Using a GFCI reduces the risk of electric shock.
Personal safety
Stay alert, watch what you are doing and use common sense
when operating a tool. Do not use a power tool while you are
tired or under the influence of drugs, alcohol or medication.
A moment of distraction while operating the tool may result in personal injury.
Use personal protective equipment. Always wear eye
protection.
Protective equipment such as safety glasses, anti-dust mask, non-skid shoes,
hard hats and hearing protection used in the right conditions significantly
reduce personal injury.
Prevent unintentional starting up. Ensure the switch is in the
“OFF” position before connecting into the power source and /
or battery as well as when carrying the tool.
Transporting power tools with the finger on the switch or connecting power
tools with the switch in the “ON” position may cause accidents.
Remove any wrench or vice before turning the power tool on.
Wrenches or vices left attached to rotating parts of the tool may result in personal
injury.
Do not overreach. Keep proper footing and balance at all times.
This enables a better control on the tool during unexpected situations.
Dress properly. Do not wear loose clothing or jewelry. Keep
hair, clothes and gloves away from the moving parts.
Loose clothes or long hair may get caught in moving parts.
If you have dust extraction and recollection devices connected
onto the tool, inspect their connections and use them correctly.
Using these devices reduce dust-related risks.
Power Tools Use and Care
Do not force the tool. Use the adequate tool for your
application.
The correct tool delivers a better and safer job at the rate for which it was designed.
Do not use the tool if the switch is not working properly.
Any power tool that cannot be turned ON or OFF is dangerous and should be
repaired before operating.
Disconnect the tool from the power source and / or battery
before making any adjustments, changing accessories or
storing.
These measures reduce the risk of accidentally starting the tool.
Store tools out of the reach of children. Do not allow persons
that are not familiar with the tool or its instructions to
operate the tool.
Power tools are dangerous in the hands of untrained users.
Service the tool. Check the mobile parts are not misaligned or
stuck. There should not be broken parts or other conditions that
may affect its operation. Repair any damage before using the
tool.
Most accidents are caused due to poor maintenance to the tools.
Keep the cutting accessories sharp and clean.
Cutting accessories in good working conditions are less likely to bind and are
easier to control.
Use the tool, components and accessories in accordance with
these instructions and the projected way to use it for the type of
tool when in adequate working conditions.
Using the tool for applications different from those it was designed for, could
result in a hazardous situation.
Service
Repair the tool in a Authorized Service Center
using only identical spare parts.
This will ensure that the safety of the power tool is maintained.
General power tool
safety warnings
WARNING! Read carefully all safety warnings and instructions listed below. Failure to comply with any of
these warnings may result in electric shock, fire and / or severe damage. Save all warnings and instructions for
future references.
DRAFT
DRAFT
DRAFT
DRAFT
DRAFT
DRAFT

5
ENGLISH
Safety warnings for
oscillating tools
• Do not use accessories that are not
specifically designed or recommended by the manufactu-
rer of this tool. Just because an attachment can be fitted to
your power tool does not guarantee safe operation.
• Use only accessories with holes that
match the tool's attachment.
• Use only accessories specific to the
material being worked on.
• Do not use broken or damaged
accessories.
Choose the appropriate accessory
• Take your time to evaluate the work to be done and
make sure that you have observed all the necessary
precautions before starting work.
• Check that the accessory is securely
fastened to the tool.
• Make sure the switch is turned off
before connecting the tool, otherwise the tool will start to
operate unexpectedly and may cause serious injury.
• To work on small parts or thin sheets, secure them with
clamps or brackets. Never use your hands for this purpose.
Before operating the tool
While operating the tool
• This power tool is designed for sawing, cutting, grinding
and sanding.
• Read all safety warnings, instructions, illustrations and
specifications included with this power tool. Failure to
follow all instructions listed below may result in electric
shock, fire and/or serious injury.
• When performing an operation where the cutting
accessory may contact hidden wiring or its own cord, hold
the power tool by the insulated insulating surfaces. If the
rotating accessory contacts a live wire, exposed metal parts
of the power tool will also be electrified and the operator
may receive a shock.
• Use clamps or some practical way to secure and fasten
the workpiece to a stable platform. Holding the workpiece
by hand or against your body causes instability and a likely
loss of control.
• Position the cable so that it is clear of the rotating
attachment. If you should lose control, the cable may be
cut, tangled, and your hand or arm may be pulled into the
rotating attachment.
• Always wear safety glasses or goggles. Regular eyeglasses
or sunglasses are NOT safety glasses.
• Avoid cutting nails. Check the workpiece and remove all nails
before using the tool.
• Hold the tool firmly.
• Make sure the accessory is not making contact with the
workpiece before turning on the switch.
• Keep hands away from moving parts.
• Do not leave the tool running. Run the tool only when it is in
your hand.
• Always turn the tool off and wait until the cutter has come to
a complete stop before removing the blade from the
workpiece.
• Do not touch the application part of the tool or the workpiece
immediately after use; they could be very hot and cause skin
burns.
• Do not operate the tool under vacuum unnecessarily.
• Always use the respirator/mask indicated for dust protection
corresponding to the application or material being worked on.
• Some materials contain chemicals that may be toxic. Take
precautions to avoid inhalation of dust or skin contact with
dust.
Consult the material supplier's safety information.
• This tool is not waterproof, so do not use water on the work
surface.
• Ventilate the work area adequately when sanding.
• Using this tool to sand some products, e.g. lead-based paint,
wood and metal surfaces may expose the user to dust
containing hazardous substances.
• Make sure there are no cracks or tears in the pad before using
the tool. Breaks and cracks may cause personal injury.
• Wear personal protective equipment.
Depending on the application, wear face shield or goggles.
As appropriate, use ear protectors, gloves and work apron
capable of stopping fragments generated by the workpiece.
Eye protection must be capable of stopping particles that are
projected from various operations. The dust mask or respirator
must be capable of filtering particles generated during the
operation. Prolonged exposure to high intensity noise can
cause hearing loss.
• Keep people around at a safe distance away from the work
area.
• Never place the power tool on the ground until the accessory
has come to a complete stop.
• Do not run the power tool when it is charging on its side.
• Do not operate the power tool near flammable materials.
• Do not use accessories that require cooling fluids.
• Always make sure the tool is turned off and disconnected
before making any inspections or adjustments to the tool.
• If the work place is extremely hot and humid or heavily
contaminated with conductive dust, use a short circuit breaker
(30 mA).
CAUTION
CAUTION
CAUTION
WARNING
WARNING
WARNING
DRAFT
DRAFT
DRAFT
DRAFT
DRAFT
DRAFT
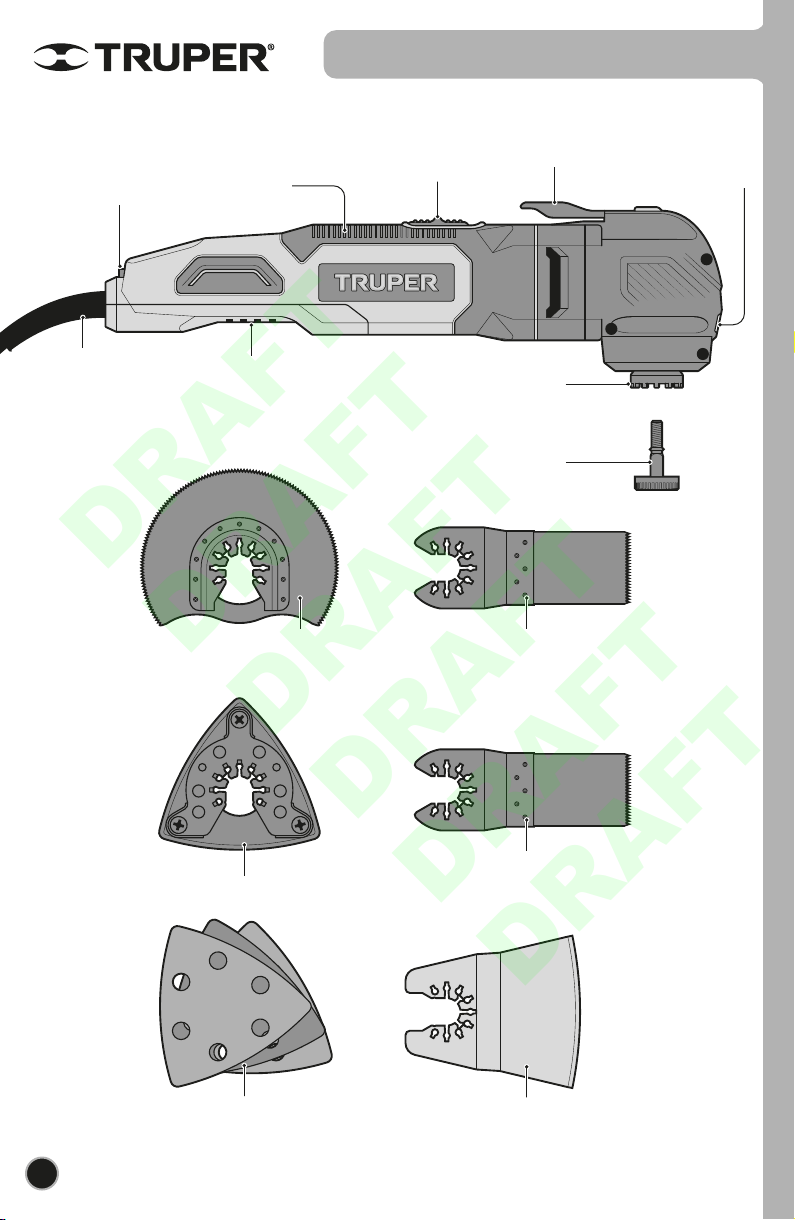
Parts
Switch
Quick release
lever
LED light
Ventilation
slots
1 Sanding pad
1 Sanding papers for wood, plastic and resin
(80, 120 and 180 grit).
Accessories holder
1 Clamping screw knob
Power cord
protector
HandleSpeed
control
6ENGLISH
1 Cutting blade for wood, plastic and
metal 1 1/4” (32 mm)
1 Cutting blade bimetallic for metal
1 1/4” (32 mm) copper, aluminum,
nails.
1 Rigid scraper
old paint, hardened adhesives,
carpets.
Multipurpose oscillating blade 3 11/32” (85
mm), for cutting wood, plastic and drywall
panels
DRAFT
DRAFT
DRAFT
DRAFT
DRAFT
DRAFT
A
B
C
E
D
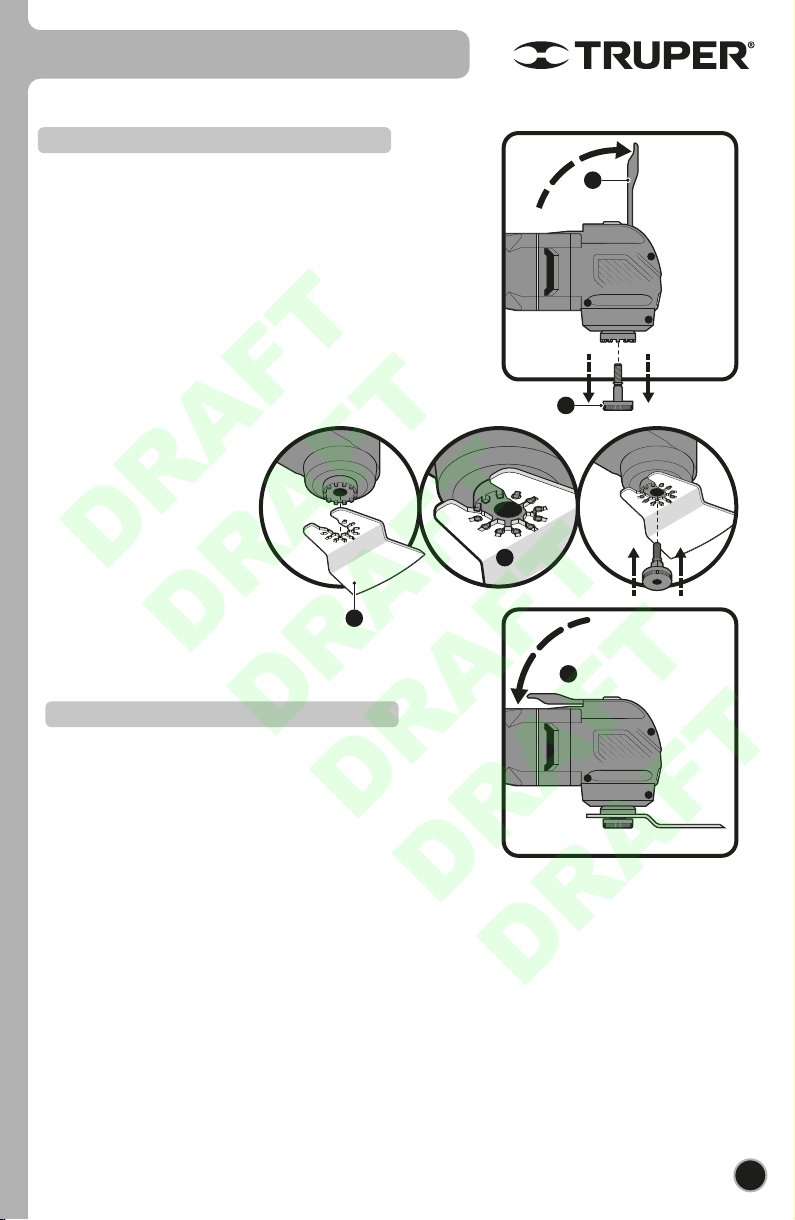
Preparation
7
ENGLISH
• Move the quick release lever forward (A) to the open
position to release the clamping screw clamp.
• Remove the set screw (B).
• Install the desired accessory by inserting it into the
accessories holder (C) matching its slots with the notches in
the tool holder (D).
• Replace the set screw and hold it in place momentarily to
keep the accessory secure.
• Place the quick release lever in its original position to secure
the accessory (E).
Mounting accessories
• The sanding sheet backing mounts just like any other
accessory.
• It has a hook and loop attachment system to receive the
included sanding sheets.
• Align the sanding sheet and press it by hand onto the
sanding plate .
• Press the power tool firmly with the sanding sheet
against a flat surface and briefly turn the power tool on.
This will promote good adhesion and help prevent
premature wear.
• To change the sanding sheet, simply detach the old
sanding sheet, dust off the backing pad, if necessary, and
press the new sanding sheet into the correct position.
• For maximum abrasive usage, rotate the pad 120 degrees
as the abrasive tip wears.
Use coarse grit sandpaper for rough surfaces, medium grit
for smooth surfaces and fine grit for finish surfaces. If
necessary, test with scrap material first.
• Excessive force will reduce the efficiency of the work and
cause motor overload.
Sanding attachment assembly
DRAFT
DRAFT
DRAFT
DRAFT
DRAFT
DRAFT
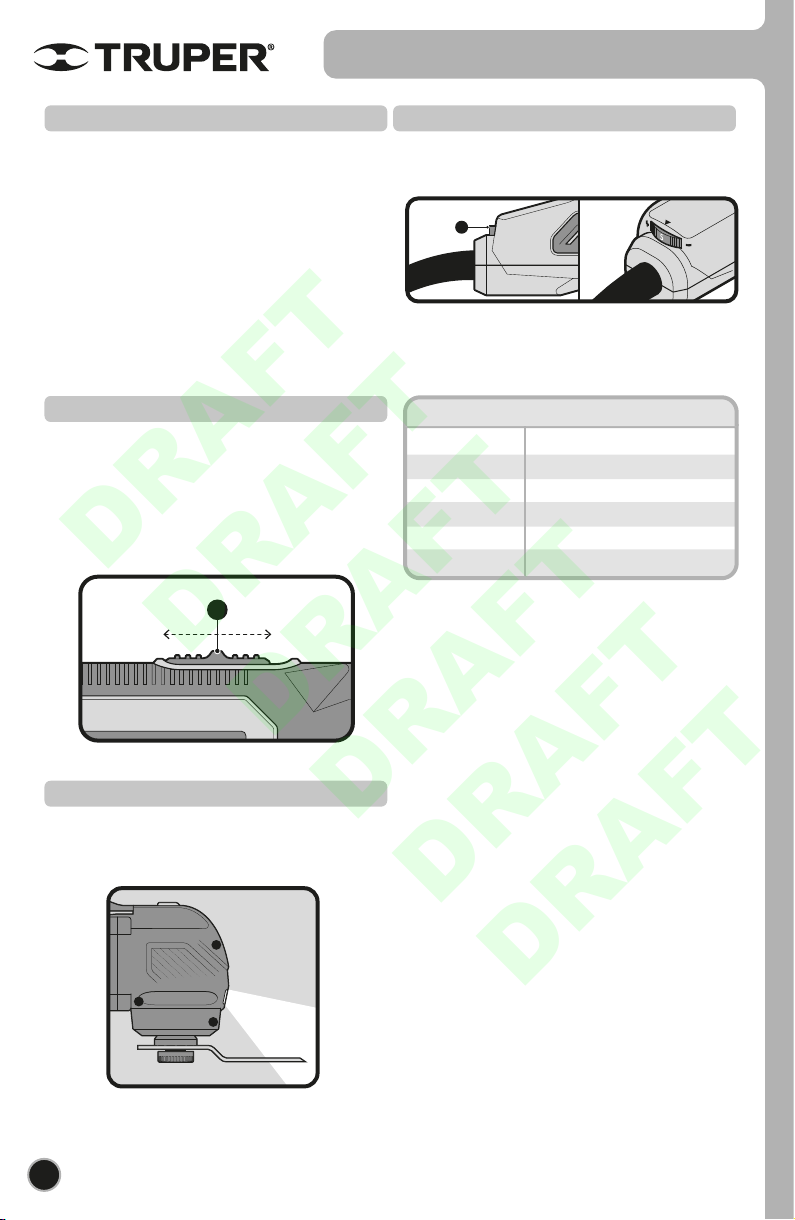
B
Turning ON
LED light on
Learning to use the tool
• Connect the plug to the socket.
• Slide the switch (A) forward so that the power tool can
be switched on.
• Slide the switch backwards to stop its operation.
• Start the tool before working and turn it off only when
you stop working.
• The LED work light comes on when the switch is slid
forward in the same way as the tool.
Getting the most out of your oscillating tool is a matter of
learning to let the speed and feel of the tool in your hands
work for you. The first step in learning to use the tool is to
become familiar with the feel of it. Hold it in your hand and
feel its weight and balance. Depending on the application,
you will need to adjust your hand position for optimum
comfort and control. The special comfort grip on the tool
body provides additional comfort and control during use.
When gripping the tool, do not cover the ventilation
openings with your hand. Blocking the vents may result in
the motor overheating.
Speed control
• Rotate the speed control (B) to select the oscillation
frequency (speed) with the engine running.
• The speed control allows you to adjust the appropriate
oscillation frequency level depending on the accessories
used and the work to be done. See the following table.
• To achieve the best results when working with different
materials, adjust the variable speed control to suit the job.
To select the proper speed for the accessory you are using,
practice on scrap material first.
• The tool is equipped with an internal electronic feedback
system, which helps maintain the preset speed nearly
constant between no-load and load conditions.
NOTE: Speed is affected by voltage variations. A decrease
in input voltage will reduce the OPM of the tool, especially
at the lowest setting. If the tool seems to be running
slowly, increase the speed setting accordingly. The tool
may not start at the lowest switch setting in areas where
the outlet voltage is less than 127V. Simply move the
speed setting to a higher position to begin operation.
8ENGLISH
Operation
A
ONOFF
11 000
13 000
15 000
16 500
18 000
22 000
1
2
3
4
5
6
Level Orbits / minute
DRAFT
DRAFT
DRAFT
DRAFT
DRAFT
DRAFT

9
ENGLISH
Operation
• Accessories last longer if wear is evenly distributed.
• Make cuts or sand with a steady motion and light pressure. A strong pressure does not increase the speed of the work,
instead the accessory wears faster.
• If the tool gets too hot, especially when used at low speed, set the speed to maximum and run without load for 2-3
minutes to cool down the motor. Avoid prolonged use at very low speeds.
• Make sure cutting accessories are always sharp.
• Always make sure the workpiece is securely clamped or fastened to prevent it from moving during cutting or sanding
work. Any movement of the material can affect the quality of the cut or sanding finish.
Cualquier movimiento del material puede afectar a la calidad del corte o del acabado de lijado.
• Replacing the accessory every time it shows wear will maintain optimum working efficiency.
Correct and incorrect uses
CORRECT: Sand moving
smoothly back and forth,
let the weight of the tool do
the work .
CORRECT: When sanding
corners, keep the edge of
the pad in line with the
corner profile and move
gently back and forth.
Operation
INCORRECT: Avoid tilting
the pad. Always sand with
the pad parallel to the
surface.
INCORRECT: To get a good
result when sanding
corners and angles, avoid
working with the tip of the
pad pointing toward the
profile.
CORRECT: When cutting
move smoothly back and
forth without forcing the
blade by applying only
enough force to guide the
tool.
CORRECT: Make sure the
flexible attachment blade
stays flexed during work .
INCORRECT: Do not force
or tilt the tool while cutting,
otherwise it may bind or
damage.
INCORRECT: Failure to
keep accessory pliable
could result in set screw
contacting work surface.
DRAFT
DRAFT
DRAFT
DRAFT
DRAFT
DRAFT

10 ENGLISH
Repair
Change of carbon brushes
Use only parts and accessories recommended by the
manufacturer. In the event that the tool does not work, the
repair must be carried out by any
Authorized Service Center.
Storage
Store the tool neatly in a dry place protected from dust
and water.
• It is necessary to replace worn carbon brushes (burnt,
broken or less than 5 mm long), with new carbons.
• When changing carbon brushes, both carbons must
always be changed.
• Use a screwdriver to remove the cover of the carbon
brushes.
• Remove worn carbon brushes from the brush holder and
remove accumulated dust with compressed air.
• Place new carbon brushes s in reverse order. The carbon
brushes should fall into the coal holders easily.
• After fitting the new carbon brushes, allow the multi-tool
to run for a few minutes without load so that the carbons
have a better fit.
• Only original replacement carbon brushes should be
used, specifically designed with the appropriate hardness
and electrical resistance for each type of motor. Out of
specification carbon brushes can damage the engine.
Maintenance
• Always unplug the tool before cleaning it.
• Never use water or other liquids, only use a brush.
• To prevent the motor from overheating, you should
clean the ventilation slots on a regular basis.
• Check that all the components of the tool are well fixed.
• The casing must not be cracked or damaged.
• Always check that the cable is not cut or frayed.
• After prolonged use, the grease in the head of the tool
must be changed at a Authorized Service
Center.
Maintenance
DRAFT
DRAFT
DRAFT
DRAFT
DRAFT
DRAFT

Authorized Service Centers
11
ENGLISH
In the event of any problem contacting a Authorized Service Center, please see our webpage
www.truper.com to get an updated list, or call our toll-free numbers 800 690-6990 or 800 018-7873 to get
information about the nearest Service Center.
AGUASCALIENTES
BAJA
CALIFORNIA
BAJA
CALIFORNIA SUR
CAMPECHE
CHIAPAS
CHIHUAHUA
MEXICO CITY
COAHUILA
COLIMA
DURANGO
ESTADO DE
MÉXICO
GUANAJUATO
GUERRERO
HIDALGO
JALISCO
MICHOACÁN
DE TODO PARA LA CONSTRUCCIÓN
GRAL. BARRAGÁN #1201, COL. GREMIAL, C.P. 20030,
AGUASCALIENTES, AGS. TEL.: 449 994 0537
SUCURSAL TIJUANA
AV. LA ENCANTADA, LOTE #5, PARQUE INDUSTRIAL EL
FLORIDO II, C.P 22244, TIJUANA, B.C.
TEL.: 664 969 5100
FIX FERRETERÍAS
FELIPE ÁNGELES ESQ. RUIZ CORTÍNEZ S/N, COL. PUEBLO
NUEVO, C.P. 23670, CD. CONSTITUCIÓN, B.C.S.
TEL.: 613 132 1115
TORNILLERÍA Y FERRETERÍA AAA
AV. ÁLVARO OBREGÓN #324, COL. ESPERANZA
C.P. 24080 CAMPECHE, CAMP. TEL.: 981 815 2808
FIX FERRETERÍAS
AV. CENTRAL SUR #27, COL. CENTRO, C.P. 30700,
TAPACHULA, CHIS. TEL.: 962 118 4083
SUCURSAL CHIHUAHUA
AV. SILVESTRE TERRAZAS #128-11, PARQUE INDUSTRIAL
BAFAR, CARRETERA MÉXICO CUAUHTÉMOC, C.P. 31415,
CHIHUAHUA, CHIH. TEL. 614 434 0052
FIX FERRETERÍAS
EL MONSTRUO DE CORREGIDORA, CORREGIDORA # 22,
COL. CENTRO, C.P. 06060, CUAUHTÉMOC, CDMX.
TEL: 55 5522 5031 / 5522 4861
SUCURSAL TORREÓN
CALLE METAL MECÁNICA #280, PARQUE INDUSTRIAL
ORIENTE, C.P. 27278, TORREÓN, COAH.
TEL.: 871 209 68 23
BOMBAS Y MOTORES BYMTESA DE MANZANILLO
BLVD. MIGUEL DE LA MADRID #190, COL. 16 DE
SEPTIEMBRE, C.P. 28239, MANZANILLO, COL.
TEL.: 314 332 1986 / 332 8013
TORNILLOS ÁGUILA, S.A. DE C.V.
MAZURIO #200, COL. LUIS ECHEVERRÍA, DURANGO,
DGO.TEL.: 618 817 1946 / 618 818 2844
SUCURSAL CENTRO JILOTEPEC
PARQUE INDUSTRIAL # 1, COL. PARQUE INDUSTRIAL
JILOTEPEC, JILOTEPEC, EDO. DE MÉX. C.P. 54257
TEL: 761 782 9101 EXT. 5728 Y 5102
CÍA. FERRETERA NUEVO MUNDO S.A. DE C.V.
AV. MÉXICO - JAPÓN #225, CD. INDUSTRIAL, C.P. 38010,
CELAYA, GTO. TEL.: 461 617 7578 / 79 / 80 / 88
CENTRO DE SERVICIO ECLIPSE
CALLE PRINCIPAL MZ.1 LT. 1, COL. SANTA FE, C.P. 39010,
CHILPANCINGO, GRO. TEL.: 747 478 5793
FERREPRECIOS S.A. DE C.V.
LIBERTAD ORIENTE #304 LOCAL 30, INTERIOR DE PASAJE
ROBLEDO, COL. CENTRO, C.P. 43600, TULANCINGO,
HGO. TEL.: 775 753 6615 / 775 753 6616
SUCURSAL GUADALAJARA
AV. ADOLFO B. HORN # 6800, COL: SANTA CRUZ DEL
VALLE, C.P.: 45655, TLAJOMULCO DE ZUÑIGA, JAL.
TEL.: 33 3606 5285 AL 90
FIX FERRETERÍAS
AV. PASEO DE LA REPÚBLICA #3140-A, COL.
EX-HACIENDA DE LA HUERTA, C.P. 58050, MORELIA,
MICH. TEL.: 443 334 6858
FIX FERRETERÍAS
CAPITÁN ANZURES #95, ESQ. JOSÉ PERDIZ, COL.
CENTRO, C.P. 62740, CUAUTLA, MOR.
TEL.: 735 352 8931
HERRAMIENTAS DE TEPIC
MAZATLAN #117, COL. CENTRO, C.P. 63000, TEPIC, NAY.
TEL.: 311 258 0540
SUCURSAL MONTERREY
CARRETERA LAREDO #300, 1B MONTERREY PARKS,
COLONIA PUERTA DE ANÁHUAC, C.P. 66052, ESCOBEDO,
NUEVO LEÓN, TEL.: 81 8352 8791 / 81 8352 8790
FIX FERRETERÍAS
AV. 20 DE NOVIEMBRE #910, COL. CENTRO, C.P. 68300,
TUXTEPEC, OAX. TEL.: 287 106 3092
SUCURSAL PUEBLA
AV PERIFÉRICO #2-A, SAN LORENZO ALMECATLA,
C.P. 72710, CUAUTLACINGO, PUE.
TEL.: 222 282 8282 / 84 / 85 / 86
ARU HERRAMIENTAS S.A DE C.V.
AV. PUERTO DE VERACRUZ #110, COL. RANCHO DE
ENMEDIO, C.P. 76842, SAN JUAN DEL RÍO, QRO.
TEL.: 427 268 4544
FIX FERRETERÍAS
CARRETERA FEDERAL MZ. 46 LT. 3 LOCAL 2, COL EJIDAL,
C.P. 77710 PLAYA DEL CARMEN, Q.R.
TEL.: 984 267 3140
FIX FERRETERÍAS
AV. UNIVERSIDAD #1850, COL. EL PASEO, C.P. 78320,
SAN LUIS POTOSÍ, S.L.P. TEL.: 444 822 4341
SUCURSAL CULIACÁN
AV. JESÚS KUMATE SUR #4301, COL. HACIENDA DE LA
MORA, C.P. 80143, CULIACÁN, SIN.
TEL.: 667 173 9139 / 173 8400
FIX FERRETERÍAS
CALLE 5 DE FEBRERO #517, SUR LT. 25 MZ. 10, COL.
CENTRO, C.P. 85000, CD. OBREGÓN, SON.
TEL.: 644 413 2392
SUCURSAL VILLAHERMOSA
CALLE HELIO LOTES 1, 2 Y 3 MZ. #1, COL. INDUSTRIAL,
2A ETAPA, C.P. 86010, VILLAHERMOSA, TAB.
TEL.: 993 353 7244
VM ORINGS Y REFACCIONES
CALLE ROSITA #527 ENTRE 20 DE NOVIEMBRE Y GRAL.
RODRÍGUEZ, FRACC. REYNOSA, C.P. 88780, REYNOSA,
TAMS. TEL.: 899 926 7552
SERVICIOS Y HERRAMIENTAS INDUSTRIALES
PABLO SIDAR #132, COL . BARRIO DE SAN BARTOLOMÉ,
C.P. 90970, SAN PABLO DEL MONTE, TLAX.
TEL.: 222 271 7502
LA CASA DISTRIBUIDORA TRUPER
BLVD. PRIMAVERA. ESQ. HORTENSIA S/N, COL.
PRIMAVERA C.P. 93308, POZA RICA, VER.
TEL.: 782 823 8100 / 826 8484
SUCURSAL MÉRIDA
CALLE 33 #600 Y 602, LOCALIDAD ITZINCAB Y MULSAY,
MPIO. UMÁN, C.P. 97390, MÉRIDA, YUC.
TEL.: 999 912 2451
MORELOS
NAYARIT
NUEVO LEÓN
OAXACA
PUEBLA
QUERÉTARO
QUINTANA ROO
SAN LUIS
POTOSÍ
SINALOA
SONORA
TABASCO
TAMAULIPAS
TLAXCALA
VERACRUZ
YUCATÁN
DRAFT
DRAFT
DRAFT
DRAFT
DRAFT
DRAFT

2
YEAR
12 ENGLISH www.truper.com
11-2022
102429
Warranty
policy
Stamp of the business. Delivery date:
Code
MULH-35A
Model Brand
Warranty. Duration: 2 year. Coverage: parts, components and workmanship against manufacturing or operating
defects, except if used under conditions other than normal; when it was not operated in accordance with the
instructive; was altered or repaired by personnel not authorized by Truper®. To make the warranty valid, present
the product, stamped policy or invoice or receipt or voucher, in the establishment where you bought it or in
Corregidora 22, Centro, Cuauhtémoc, CDMX, 06060, where you can also purchase parts, components,
consumables and accessories. It includes the costs of transportation of the product that derive from its fulfillment
of its service network. . Phone number 800-018-7873. Made in China. Imported by Truper, S.A. de C.V. Parque
Industrial 1, Parque Industrial Jilotepec, Jilotepec, Edo. de Méx. C.P. 54257, Phone number 761 782 9100.
DRAFT
DRAFT
DRAFT
DRAFT
DRAFT
DRAFT

2
AÑOS
102429
www.truper.com
11-2022
Código
MULH-35A
Modelo Marca
Sello del establecimiento comercial. Fecha de entrega:
12 ESPAÑOL
Póliza de
Garantía
Garantía. Duración: 2 años. Cobertura: piezas, componentes y mano de obra contra defectos de fabricación o
funcionamiento, excepto si se usó en condiciones distintas a las normales; cuando no fue operado conforme
instructivo; fue alterado o reparado por personal no autorizado por Truper®. Para hacer efectiva la garantía
presente el producto, póliza sellada o factura o recibo o comprobante, en el establecimiento donde lo compró
o en Corregidora 22, Centro, Cuauhtémoc, CDMX, 06060, donde también podrá adquirir partes, componentes,
consumibles y accesorios. Incluye los gastos de transportación del producto que deriven de su cumplimiento de
su red de servicio. Tel. 800-018-7873. Made in/Hecho en China. Importador Truper, S.A. de C.V. Parque
Industrial 1, Parque Industrial Jilotepec, Jilotepec, Edo. de Méx. C.P. 54257, Tel. 761 782 9100.
DRAFT
DRAFT
DRAFT
DRAFT
DRAFT
DRAFT

Centros de Servicio Autorizados
11
ESPAÑOL
En caso de tener algún problema para contactar un Centro de Servicio Autorizado Truper
®
consulte nuestra página
www.truper.com donde obtendrá un listado actualizado, o llame al: 800 690 6990 u800-018-7873 donde le
informarán cuál es el Centro de Servicio más cercano.
AGUASCALIENTES
BAJA
CALIFORNIA
BAJA
CALIFORNIA SUR
CAMPECHE
CHIAPAS
CHIHUAHUA
CIUDAD DE
MÉXICO
COAHUILA
COLIMA
DURANGO
ESTADO DE
MÉXICO
GUANAJUATO
GUERRERO
HIDALGO
JALISCO
MICHOACÁN
MORELOS
NAYARIT
NUEVO LEÓN
OAXACA
PUEBLA
QUERÉTARO
QUINTANA ROO
SAN LUIS
POTOSÍ
SINALOA
SONORA
TABASCO
TAMAULIPAS
TLAXCALA
VERACRUZ
YUCATÁN
DE TODO PARA LA CONSTRUCCIÓN
GRAL. BARRAGÁN #1201, COL. GREMIAL, C.P. 20030,
AGUASCALIENTES, AGS. TEL.: 449 994 0537
SUCURSAL TIJUANA
AV. LA ENCANTADA, LOTE #5, PARQUE INDUSTRIAL EL
FLORIDO II, C.P 22244, TIJUANA, B.C.
TEL.: 664 969 5100
FIX FERRETERÍAS
FELIPE ÁNGELES ESQ. RUIZ CORTÍNEZ S/N, COL. PUEBLO
NUEVO, C.P. 23670, CD. CONSTITUCIÓN, B.C.S.
TEL.: 613 132 1115
TORNILLERÍA Y FERRETERÍA AAA
AV. ÁLVARO OBREGÓN #324, COL. ESPERANZA
C.P. 24080 CAMPECHE, CAMP. TEL.: 981 815 2808
FIX FERRETERÍAS
AV. CENTRAL SUR #27, COL. CENTRO, C.P. 30700,
TAPACHULA, CHIS. TEL.: 962 118 4083
SUCURSAL CHIHUAHUA
AV. SILVESTRE TERRAZAS #128-11, PARQUE INDUSTRIAL
BAFAR, CARRETERA MÉXICO CUAUHTÉMOC, C.P. 31415,
CHIHUAHUA, CHIH. TEL. 614 434 0052
FIX FERRETERÍAS
EL MONSTRUO DE CORREGIDORA, CORREGIDORA # 22,
COL. CENTRO, C.P. 06060, CUAUHTÉMOC, CDMX.
TEL: 55 5522 5031 / 5522 4861
SUCURSAL TORREÓN
CALLE METAL MECÁNICA #280, PARQUE INDUSTRIAL
ORIENTE, C.P. 27278, TORREÓN, COAH.
TEL.: 871 209 68 23
BOMBAS Y MOTORES BYMTESA DE MANZANILLO
BLVD. MIGUEL DE LA MADRID #190, COL. 16 DE
SEPTIEMBRE, C.P. 28239, MANZANILLO, COL.
TEL.: 314 332 1986 / 332 8013
TORNILLOS ÁGUILA, S.A. DE C.V.
MAZURIO #200, COL. LUIS ECHEVERRÍA, DURANGO,
DGO.TEL.: 618 817 1946 / 618 818 2844
SUCURSAL CENTRO JILOTEPEC
PARQUE INDUSTRIAL # 1, COL. PARQUE INDUSTRIAL
JILOTEPEC, JILOTEPEC, EDO. DE MÉX. C.P. 54257
TEL: 761 782 9101 EXT. 5728 Y 5102
CÍA. FERRETERA NUEVO MUNDO S.A. DE C.V.
AV. MÉXICO - JAPÓN #225, CD. INDUSTRIAL, C.P. 38010,
CELAYA, GTO. TEL.: 461 617 7578 / 79 / 80 / 88
CENTRO DE SERVICIO ECLIPSE
CALLE PRINCIPAL MZ.1 LT. 1, COL. SANTA FE, C.P. 39010,
CHILPANCINGO, GRO. TEL.: 747 478 5793
FERREPRECIOS S.A. DE C.V.
LIBERTAD ORIENTE #304 LOCAL 30, INTERIOR DE PASAJE
ROBLEDO, COL. CENTRO, C.P. 43600, TULANCINGO,
HGO. TEL.: 775 753 6615 / 775 753 6616
SUCURSAL GUADALAJARA
AV. ADOLFO B. HORN # 6800, COL: SANTA CRUZ DEL
VALLE, C.P.: 45655, TLAJOMULCO DE ZUÑIGA, JAL.
TEL.: 33 3606 5285 AL 90
FIX FERRETERÍAS
AV. PASEO DE LA REPÚBLICA #3140-A, COL.
EX-HACIENDA DE LA HUERTA, C.P. 58050, MORELIA,
MICH. TEL.: 443 334 6858
FIX FERRETERÍAS
CAPITÁN ANZURES #95, ESQ. JOSÉ PERDIZ, COL.
CENTRO, C.P. 62740, CUAUTLA, MOR.
TEL.: 735 352 8931
HERRAMIENTAS DE TEPIC
MAZATLAN #117, COL. CENTRO, C.P. 63000, TEPIC, NAY.
TEL.: 311 258 0540
SUCURSAL MONTERREY
CARRETERA LAREDO #300, 1B MONTERREY PARKS,
COLONIA PUERTA DE ANÁHUAC, C.P. 66052, ESCOBEDO,
NUEVO LEÓN, TEL.: 81 8352 8791 / 81 8352 8790
FIX FERRETERÍAS
AV. 20 DE NOVIEMBRE #910, COL. CENTRO, C.P. 68300,
TUXTEPEC, OAX. TEL.: 287 106 3092
SUCURSAL PUEBLA
AV PERIFÉRICO #2-A, SAN LORENZO ALMECATLA,
C.P. 72710, CUAUTLACINGO, PUE.
TEL.: 222 282 8282 / 84 / 85 / 86
ARU HERRAMIENTAS S.A DE C.V.
AV. PUERTO DE VERACRUZ #110, COL. RANCHO DE
ENMEDIO, C.P. 76842, SAN JUAN DEL RÍO, QRO.
TEL.: 427 268 4544
FIX FERRETERÍAS
CARRETERA FEDERAL MZ. 46 LT. 3 LOCAL 2, COL EJIDAL,
C.P. 77710 PLAYA DEL CARMEN, Q.R.
TEL.: 984 267 3140
FIX FERRETERÍAS
AV. UNIVERSIDAD #1850, COL. EL PASEO, C.P. 78320,
SAN LUIS POTOSÍ, S.L.P. TEL.: 444 822 4341
SUCURSAL CULIACÁN
AV. JESÚS KUMATE SUR #4301, COL. HACIENDA DE LA
MORA, C.P. 80143, CULIACÁN, SIN.
TEL.: 667 173 9139 / 173 8400
FIX FERRETERÍAS
CALLE 5 DE FEBRERO #517, SUR LT. 25 MZ. 10, COL.
CENTRO, C.P. 85000, CD. OBREGÓN, SON.
TEL.: 644 413 2392
SUCURSAL VILLAHERMOSA
CALLE HELIO LOTES 1, 2 Y 3 MZ. #1, COL. INDUSTRIAL,
2A ETAPA, C.P. 86010, VILLAHERMOSA, TAB.
TEL.: 993 353 7244
VM ORINGS Y REFACCIONES
CALLE ROSITA #527 ENTRE 20 DE NOVIEMBRE Y GRAL.
RODRÍGUEZ, FRACC. REYNOSA, C.P. 88780, REYNOSA,
TAMS. TEL.: 899 926 7552
SERVICIOS Y HERRAMIENTAS INDUSTRIALES
PABLO SIDAR #132, COL . BARRIO DE SAN BARTOLOMÉ,
C.P. 90970, SAN PABLO DEL MONTE, TLAX.
TEL.: 222 271 7502
LA CASA DISTRIBUIDORA TRUPER
BLVD. PRIMAVERA. ESQ. HORTENSIA S/N, COL.
PRIMAVERA C.P. 93308, POZA RICA, VER.
TEL.: 782 823 8100 / 826 8484
SUCURSAL MÉRIDA
CALLE 33 #600 Y 602, LOCALIDAD ITZINCAB Y MULSAY,
MPIO. UMÁN, C.P. 97390, MÉRIDA, YUC.
TEL.: 999 912 2451
DRAFT
DRAFT
DRAFT
DRAFT
DRAFT
DRAFT

10 ESPAÑOL
Reparación
Cambio de carbones
Utilice únicamente refacciones y accesorios recomendados
por el fabricante. En caso de que la herramienta no
funcione la reparación deberá ser realizada por
algún Centro de Servicio Autorizado .
Almacenamiento
Almacene la herramienta ordenadamente en un lugar
seco y protegida de polvo y agua.
• Es necesario reemplazar los carbones desgastados
(quemados, rotos o de menos de 5 mm de largo), con
carbones nuevos.
• Cuando se haga el cambio de carbones siempre deben
cambiarse los dos carbones.
• Utilice un destornillador para quitar la tapa de los
carbones.
• Retire los carbones desgastados del portacarbones y
retire el polvo acumulado con aire comprimido.
• Coloque los carbones nuevos invirtiendo el orden. Los
carbones deben caer en los portacarbones fácilmente.
• Después de colocar los carbones nuevos, permita que la
multiherramienta funcione durante algunos minutos sin
carga de trabajo para que los carbones tengan un mejor
ajuste.
• Sólo se deben de usar carbones de repuesto originales,
diseñados específicamente con la dureza y la resistencia
eléctrica adecuada para cada tipo de motor. Los carbones
fuera de especificaciones pueden dañar el motor.
Mantenimiento
• Desconecte siempre la herramienta antes de proceder a
limpiarla.
• Nunca utilice agua u otros líquidos, solamente utilice un
cepillo.
• Para evitar que se sobrecaliente el motor, debe limpiar
las ranuras de ventilación de manera regular.
• Revise que todos los componentes de la herramienta
estén bien fijos.
• La carcasa no debe estar cuarteada o dañada.
• Siempre revise que el cable no esté cortado o pelado.
• Después de un uso prolongado la grasa de la cabeza de
la herramienta debe de ser cambiada en un Centro de
Servicio Autorizado .
Mantenimiento
DRAFT
DRAFT
DRAFT
DRAFT
DRAFT
DRAFT

9
ESPAÑOL
Operación
• Los accesorios duran más si el desgaste se distribuye uniformemente.
• Realice los cortes o el lijado con un movimiento constante y una ligera presión. Una presión fuerte no aumenta la
velocidad del trabajo, en cambio el accesorio se desgasta más rápido.
• Si la herramienta se calienta demasiado, especialmente cuando se utiliza a baja velocidad, ajuste la velocidad al máximo
y hágala funcionar sin carga durante 2 o 3 minutos para enfriar el motor. Evite el uso prolongado a velocidades muy bajas.
• Asegúrese de que los accesorios de corte estén siempre afilados.
• Asegúrese siempre de que la pieza de trabajo esté sujeta firmemente con mordazas o abrazaderas para evitar que se
mueva durante el trabajo de corte o lijado.
Cualquier movimiento del material puede afectar a la calidad del corte o del acabado de lijado.
• Sustituir el accesorio cada vez que presente un desgaste mantendrá una eficiencia de trabajo óptima.
Usos correctos e incorrectos
CORRECTO: Lije moviendo
suavemente hacia adelante
y hacia atrás, deje que el
peso de la herramienta
haga el trabajo.
CORRECTO: Al lijar
esquinas mantenga
alineado el canto de la
almoadilla con el perfil de
la esquina y mueva
suavemente hacia adelante
y hacia atrás.
Operación
INCORRECTO: Evite
inclinar la almohadilla. Lije
siempre con la almoadilla
paralela a la superficie de
trabajo.
INCORRECTO: Para
obtener un buen resultado
al lijar esquinas y ángulos,
evite trabajar con la punta
de la almohadilla
apuntando hacia el perfil.
CORRECTO: Al cortar
mueva suavemente hacia
adelante y hacia atrás sin
forzar la hoja aplicando
solo la fuerza necesaria
para guiar la herramienta.
CORRECTO: Asegúrese de
que la hoja del accesorio
flexible se mantenga
flexionada durante el
trabajo.
INCORRECTO: No fuerce o
incline la herramienta
mientras corte, de lo
contrario el accesorio
podría atorarse o dañarse.
INCORRECTO: De no
mantener flexible el
accesorio, el tornillo de
sujeción podría hacer
contacto con la superficie
de trabajo.
DRAFT
DRAFT
DRAFT
DRAFT
DRAFT
DRAFT

B
Encendido
Encendido de Luz LED
Aprendizaje del uso de la herramienta
• Conecte la clavija al tomacorriente.
• Deslice el interruptor (A) hacia adelante para que la
herramienta comience a trabajar.
• Deslice el interruptor hacia atrás para interrumpir su
funcionamiento.
• Ponga en marcha la herramienta antes de trabajar y
apáguela sólo cuando deje de hacerlo.
• La luz led de trabajo se enciende cuando el interruptor
se desliza hacia adelante al igual que la herramienta.
Sacar el máximo provecho de su herramienta oscilante es
cuestión de aprender a dejar que la velocidad y la
sensación de la herramienta en sus manos trabajen para
usted. El primer paso para aprender a usar la herramienta
es familiarizarse con su sensación”. Sosténgala en la mano
y sienta su peso y equilibrio. Dependiendo de la aplicación,
usted tendrá que ajustar la posición de la mano para lograr
una comodidad y un control óptimo. El agarre cómodo
especial del cuerpo de la herramienta brinda comodidad y
control adicional durante la utilización. Cuando agarre la
herramienta, no cubra las aberturas de ventilación con la
mano. Si se bloquean las aberturas de ventilación, el
resultado podría ser que el motor se sobrecaliente.
Control de velocidad
• Gire el control de velocidad (B) para seleccionar la
frecuencia de oscilación (velocidad) con el motor en
marcha.
• El control de velocidad permite ajustar el nivel de la
frecuencia de oscilación adecuado en función de los
accesorios utilizados y del trabajo a realizar. Consulte la
siguiente tabla.
• Para lograr los mejores resultados cuándo trabaje con
diferentes materiales, ajuste el control de velocidad variable
para adecuarse al trabajo. Para seleccionar la velocidad
adecuada para el accesorio que se esté utilizando,
practique primero con material de desecho.
• La herramienta está equipada con un sistema de
retroalimentación electrónica interna, que ayuda a
mantener la velocidad preseleccionada prácticamente
constante entre las condiciones sin carga y de carga.
NOTA: La velocidad es afectada por los cambios de voltaje.
Una disminución en el voltaje de entrada reducirá las
OPM de la herramienta, especialmente en el ajuste más
bajo. Si parece que la herramienta funciona despacio,
aumente el ajuste de velocidad de manera
correspondiente. Es posible que la herramienta no
arranque en el ajuste más bajo del interruptor en las áreas
donde el voltaje del tomacorriente sea inferior a 127 V.
Simplemente mueva el ajuste de velocidad a una posición
más alta para comenzar la operación.
8ESPAÑOL
Operación
A
ONOFF
11 000
13 000
15 000
16 500
18 000
22 000
1
2
3
4
5
6
Nivel órbitas / minuto
DRAFT
DRAFT
DRAFT
DRAFT
DRAFT
DRAFT

A
B
C
E
D
Preparación
7
ESPAÑOL
• Mueva la palanca de liberación rápida hacia adelante (A) a
la posición abierta para liberar la sujeción del tornillo de
sujeción.
• Retire el tornillo de fijación (B).
• Instale el accesorio deseado insertándolo en el porta
accesorios (C) haciendo coincidir sus ranuras con las
muescas del portaherramientas (D).
• Vuelva a colocar el tornillo de sujeción y manténgalo en su
lugar momentáneamente para mantener el accesorio seguro.
• Colocar la palanca de liberación rápida en su posición
original para asegurar el accesorio (E).
Montaje de accesorios
• El respaldo para hoja de lija se monta igual que cualquier
otro accesorio.
• Cuenta con un sistema de fijación hook and loop para
recibir las hojas de lija incluidas.
• Alinee la hoja de lija y presiónela a mano sobre la placa
de lijado.
• Presione firmemente la herramienta eléctrica con la hoja
de lija contra una superficie plana y encienda brevemente
la herramienta eléctrica. Esto promoverá una buena
adhesión y ayudará a evitar el desgaste prematuro.
• Para cambiar la hoja de lija, simplemente desprenda la
hoja de lija vieja, quite el polvo de la almohadilla de
soporte, si es necesario, y presione la hoja de lija nueva en
la posición correcta.
• Para obtener el máximo uso del abrasivo, rote la
almohadilla 120 grados cuando la punta del abrasivo se
desgaste.
Utilice la hoja de lija de grano grueso para lijar superficies
rugosas, de grano medio para superficies lisas y de grano
fino para superficies de acabado. Si es necesario, haga
primero una prueba con material de desecho.
• Una fuerza excesiva reducirá la eficacia del trabajo y
provocará una sobrecarga del motor.
Montaje de accesorio para lijado
DRAFT
DRAFT
DRAFT
DRAFT
DRAFT
DRAFT

Partes
Interruptor
Palanca de
liberación
rápida
Luz LED
Ranuras de
ventilación
Respaldo para hoja de lija
Hojas de lija:
Madera, plástico y rellenos endurecidos.
(grano 80, 120 y 180)
Porta accesorios
Tornillo de sujeción
Protector
de cable de
alimentación
MangoControl de
velocidad
6ESPAÑOL
Hoja recta para corte de madera y
plástico 1 1/4” (32 mm)
Hoja recta para corte de
metal 1 1/4” (32 mm)
(cobre, aluminio, clavos).
Hoja raspadora:
Pintura vieja, adhesivos endurecidos,
alfombras.
Hoja circular de uso general 3 11/32”(85 mm)
(Madera, plástico y tableros de yeso)
DRAFT
DRAFT
DRAFT
DRAFT
DRAFT
DRAFT

5
ESPAÑOL
Advertencias de seguridad
para uso de multiherramientas oscilatorias
• No use accesorios que no hayan
sido específicamente diseñados o recomendados por el
fabricante de esta herramienta. Sólo por que un
aditamento pueda ensamblarse en su herramienta
eléctrica no garantiza una operación segura.
• Utilice únicamente accesorios con
orificios que correspondan al adaptador de la herramienta.
• Utilice únicamente accesorios
específicos para el material a trabajar.
• No utilice accesorios rotos o en
mal estado.
Elija el accesorio apropiado
• Tómese su tiempo para evaluar el trabajo a realizar y
asegúrese de haber respetado todas las precauciones
necesarias antes de comenzar a trabajar.
• Revise que el accesorio esté bien
afianzado a la herramienta.
• Asegúrese que el interruptor esté
apagado antes de conectar la herramienta, de lo contrario
ésta comenzará a funcionar inesperadamente, pudiendo
provocar lesiones graves.
• Para trabajar piezas pequeñas o láminas delgadas fíjelas
con mordazas o abrazaderas. Nunca use las manos para
tal fin.
Antes de operar la herramienta
Mientras opera la herramienta
ATENCIÓN
ATENCIÓN
ATENCIÓN
ADVERTENCIA
ADVERTENCIA
ADVERTENCIA
• Esta herramienta motorizada está diseñada para el
aserrado, corte, esmerilado y lijado.
• Lea todas las advertencias de seguridad, instrucciones,
ilustraciones y especificaciones que se incluyen con esta
herramienta eléctrica. Si no sigue todas las instrucciones
indicadas a continuación, podrá ocasionar una descarga
eléctrica, un incendio y/o graves lesiones.
• Cuándo realice una operación donde el accesorio de
corte pueda entrar en contacto con cableado oculto o con
su propio cable, sujete la herramienta eléctrica por las
superficies de aislamiento aisladas. Si el accesorio giratorio
hace contacto con un cable con corriente, las piezas
metálicas expuestas de la herramienta eléctrica se
electrificarán también y el operador puede recibir una
descarga.
• Utilice abrazaderas o algún modo práctico para asegurar
y sujetar la pieza de trabajo a una plataforma estable .
Sostener la pieza de trabajo con la mano o contra su
cuerpo produce inestabilidad y una posible pérdida de
control.
• Coloque el cable de forma que esté despejado del
accesorio giratorio. Si llegara a prender el control, puede
que el cable se corte o enrede y que su mano o brazo se
jale hacia el accesorio giratorio.
• Use siempre gafas de seguridad o protectortas.
Los anteojos comunes o para el sol NO son gafas de
seguridad.
• Evite cortar clavos. Revise la pieza de trabajo y quite todos los
clavos antes de utilizar la herramienta.
• Sostenga la herramienta con firmeza.
• Asegúrese de que la broca no esté haciendo contacto con la
pieza de trabajo antes de activar el interruptor.
• Mantenga las manos alejadas de las partes móviles.
• No deje la herramientaen marcha. Tenga en marcha la
herramienta solamente cuándo la tenga en la mano.
• Siempre apague la herramienta y espere a que la segueta se
haya detenido por completo antes de retirar la hoja de la pieza
de trabajo.
• No toque la pieza de aplicación de la herramienta, ni la pieza
de trabajo inmediatamente después de utilizarla; podrían estar
muy calientes y producirle quemaduras de piel.
• No opere la herramienta al vacío innesesariamente.
• Siempre utilice el respirador / máscara indicado para
protegerse del polvo que corresponda con la aplicación o
material con el que trabaje.
• Algunos materiales contienen sustancias químicas que
pueden ser tóxicas. Tome precauciones para evitar la inhalación
de polvo o que éste tenga contacto con la piel.
Consulta la información de seguridad del proveedor de los
materiales.
• Esta herramienta no es a prueba de agua, por lo que no
deberá utilizar agua en la superficie de trabajo.
• Ventile el área de trabajo adecuadamnte cuándo realice
operaciones de lijado.
• La utilización de esta herramienta para lijar algunos productos
p. ej., superficies con pintura con base de plomo, madera y
metal podrá exponer al usuario a polvo que contenga
sustancias peligrosas.
• Asegúrese de que no haya grietas o roturas en la almohadilla
antes de usar la herramienta.
Las roturas y las grietas pueden causar heridas personales.
• Use equipo de protección personal.
Dependiendo de la aplicación, utilice careta o gafas protectoras.
Según sea apropiado, utilice protectores para los oídos guantes
y mandil de trabajo capaz de detener fragmentos que se
generen con la pieza de trabajo. La protección ocular debe ser
capaz de detener las partículas que se proyecten a raíz de
varias operaciones. La Mascarilla contra el polvo o respirador
deben ser capaces de filtrar las partículas generadas durante la
operación. La exposición prolongada al ruido de alta intensidad
puede provocar pérdida auditiva.
• Mantenga a las personas alrededor a una distancia segura y
apartada del área de trabajo.
• Nunca coloque la herramienta eléctrica en el suelo hasta que
el accesorio se haya detenido por completo.
• No ejecute la herramienta eléctrica uándo la esté cargando a
su costado.
• No opere la herramienta motorizada cerca de materiales
inflamables.
• No utilice accesorios que requieran de líquidos enfriadores
• Asegúrese siempre de que la herramienta esté apagada y
desconectada antes de realizar cualquier inspección o ajuste en
la herramienta.
• Si el lugar de trabajo es extremadamente caliente y húmedo,
o muy contaminado con povo conductor, utilice un interruptor
de corto circuito de (30 mA).
DRAFT
DRAFT
DRAFT
DRAFT
DRAFT
DRAFT
This manual suits for next models
1
Table of contents
Other Truper Power Tools manuals

Truper
Truper CANT-6X User manual

Truper
Truper CALA-A3 User manual

Truper
Truper CALA-A2 User manual

Truper
Truper CAU-50 User manual

Truper
Truper Pro PISCA-A User manual

Truper
Truper AFB-118 User manual

Truper
Truper PISCA-A2 User manual

Truper
Truper PISCA-AM User manual

Truper
Truper CALA-NX6 User manual

Truper
Truper TPN-711 User manual

Truper
Truper CALA-A4 User manual

Truper
Truper HIDR-1/2X24 User manual

Truper
Truper PISCA-A2 User manual

Truper
Truper MOTO-A2 User manual

Truper
Truper LIMI-20A User manual

Truper
Truper TALI-20A User manual

Truper
Truper ENNE-120 User manual

Truper
Truper MOTO-AI User manual

Truper
Truper CALA-A3 User manual

Truper
Truper CALA-NX6 User manual


