dji MAVIC PRO User manual

Flight
Mavic Pro User Manual
54
©2017 DJI All Rights Reserved.
Calibrating the Compass
It is recommended to calibrate the compass in any of the following situations when ying outdoors:
1. Flying at a location farther than 10 km away from the last ight location.
2. The aircraft hasn’t been own for more than one month.
3. A compass interference warning appears in the DJI GO 4 app, and the warning persists after chang-
ing location.
Restart the aircraft when calibration is complete.
DO NOT calibrate your compass where there is a chance of strong magnetic interference, such
as magnetite, parking structures, and steel reinforcements underground.
DO NOT carry ferromagnetic materials with you during calibration such as cellular phones.
The DJI GO 4 app will prompt you to resolve the compass issue if the compass is affected by
strong interference after calibration is complete. Follow the prompted instructions to resolve the
compass issue.
Calibration Procedures
Choose an open area to carry out the following procedures.
1. Tap the Aircraft Status Bar in the app and select “Calibrate”, then follow the on-screen instructions.
2. Hold the aircraft horizontally and rotate 360 degrees. The Aircraft Status Indicators will display a solid
green light.
3. Hold the aircraft vertically, with nose pointing downward, and rotate it 360 degrees around the center
axis.

Flight
Mavic Pro User Manual
©2017 DJI All Rights Reserved.
55
If the Aircraft Status Indicator blinks red and yellow after the calibration procedure, move your
aircraft to a different location and try again.
DO NOT calibrate the compass near metal objects such as a metal bridge, cars, scaffolding.
If the aircraft status indicator is blinking red and yellow alternately after placing the aircraft on
the ground, the compass has detected magnetic interference. Change your location.
Auto Takeoff and Auto Landing
Auto Takeoff
Use auto takeoff only if the Aircraft Status Indicators are blinking green. Follow the steps below to use the
auto takeoff feature:
1. Launch the DJI GO 4 app, and enter “Camera” page.
2. Complete all steps on the pre-ight checklist.
3. Tap “ ”, and conrm that conditions are safe for ight. Slide the icon to conrm and takeoff.
4. Aircraft takes off and hovers at 1.2 meters above ground.
Aircraft Status Indicator blinks rapidly when it is using the Downward Vision System for
stabilization. The aircraft will automatically hover below 13 meters. It is recommended to wait
until there is sufcient GPS before using the Auto Take-off feature.
4. Re-calibrate the aircraft if the aircraft status indicators blink red.
Auto-Landing
Use auto-landing only if the Aircraft Status Indicator is blinking green. Follow the steps below to use the
auto-landing feature:
1. Tap on , to ensure the landing condition is ideal. Slide to conrm.
2. Abort landing process immediately by using the button on the screen.
3. a. When Landing Protection determines that the ground is suitable for landing, the Mavic Pro will
land gently.
b. If Landing Protection determines that the ground is not suitable for landing, the Mavic Pro will hover
and wait for pilot conrmation.
c. If Landing Protection is not operational, the DJI GO 4 app will display a landing prompt when the
Mavic Pro descends below 0.5 meters. Pull down on the throttle or use the auto landing slider to
land.
4. Aircraft will land and turn off automatically.

Flight
Mavic Pro User Manual
56
©2017 DJI All Rights Reserved.
Stopping the Motors
There are two methods to stop the motors.
Method 1: When Mavic Pro has landed, push the left stick down , then conduct the same CSC that was
used to start the motors, as described above . Motors will stop immediately. Release both sticks once
motors stop.
Method 2: When the aircraft has landed, push and hold the left stick down. The motors will stop after three
seconds.
OR
Method 1 Method 2
OR
Flight Test
Takeo/Landing Procedures
1. Place the aircraft in an open, at area with the battery level indicators facing towards you.
2. Turn on the remote controller and your mobile device, then turn on the Intelligent Flight Battery.
3. Launch the DJI GO 4 app and enter the Camera page.
4. Wait until the Aircraft Indicator blinks green. This means the Home Point is recorded and it is now safe
to y. If they ash yellow, the Home Point has not been recorded.
5. Push the left stick up slowly to take off or use Auto Takeoff.
6. Shoot photos and videos using the DJI GO 4 app.
7. Pull down the left stick to descend, the aircraft will hover at 1.5 ft (0.5 m) above the ground for about 1
second, then hold the left stick at its lowest position until you touch the ground and the motors stop.
8. Turn off the Intelligent Flight Battery rst, then the Remote Controller.
Stop Motors Mid-ight
Stop motors mid-ight will cause the aircraft to crash. The motors can only be stopped mid-ight when the
ight controller detects a critical error. (This setting can be changed in the DJI GO 4 app)
Starting/Stopping the Motors
Starting the Motors
A Combination Stick Command (CSC) is used to start the motors. Push both sticks to the bottom
inner or outer corners to start the motors. Once the motors have started spinning, release both sticks
simultaneously.

Flight
Mavic Pro User Manual
©2017 DJI All Rights Reserved.
57
When the Aircraft Status Indicator blinks yellow rapidly during ight, the aircraft has entered Failsafe
mode.
A low battery level warning is indicated by the Aircraft Status Indicators blinking red slowly or
rapidly during ight.
Watch our video tutorials for more ight information.
Video Suggestions and Tips
1. Go through the full pre-ight checklist before each ight.
2. Select the desired gimbal operation mode in the DJI GO 4 app.
3. Only shoot video when ying in P-mode.
4. Always y in good weather and avoid ying in rain or heavy wind.
5. Choose the camera settings that suit your needs. Settings include photo format and exposure
compensation.
6. Perform ight tests to establish ight routes and preview scenes.
7. Push the control sticks gently to keep the aircraft’s movement smooth and stable.

58
©2017 DJI All Rights Reserved.
Appendix

Appendix
©2017 DJI All Rights Reserved.
59
Appendix
Specications
Aircraft
Weight 1.62 lbs (734 g)
Weight (including gimbal cover) 1.64 lbs (743 g)
Dimensions 83 × 83 × 198 mm (folded)
Diagonal Length (propellers excluded) 335 mm
Max Ascent Speed 16.4 ft/s (5 m/s) in Sport Mode
Max Descent Speed 9.8 ft/s (3 m/s)
Max Speed 40.4 mph (65 kph) in Sport Mode without wind
Max Service Ceiling Above Sea Level 16404 feet (5000 m)
Max Flight Time Mavic Pro Platinum: 30 minutes; Mavic Pro: 27 minutes
(0 wind at a consistent 15.5 mph (25 kph))
Max Hovering Time Mavic Pro Platinum: 27 minutes; Mavic Pro: 24 minutes
(0 wind)
Avg. Flight Time 21 minutes (general ight, 15% battery left)
Max Flight Distance Mavic Pro Platinum: 9.3 mi (15 km); Mavic Pro: 8 mi (13 km)
(0 wind)
Operating Temperature 32° to 104° F (0° to 40° C)
Satellite Positioning Systems GPS/GLONASS
Operating Frequency
FCC: 2.4-2.4835 GHz; 5.150-5.250 GHz; 5.725-5.850 GHz
CE: 2.4-2.4835 GHz; 5.725-5.850 GHz
SRRC: 2.4-2.4835 GHz; 5.725-5.850 GHz
Transmitter Power (EIRP)
2.4 GHz
FCC: ≤26 dBm; CE: ≤20 dBm; SRRC: ≤20 dBm
5.2 GHz
FCC: ≤23 dBm
5.8 GHz
FCC: ≤23 dBm; CE ≤13 dBm; SRRC: ≤23 dBm
Gimbal
Controllable Range Pitch: -90° to +30°, Roll: 0°or 90° (Horizontally and vertically)
Forward Vision System
Sensing Range Precision measurement range: 2 ft (0.7 m) to 49 ft (15 m)
Detectable range: 49 ft (15 m) to 98 ft (30 m)
Operating Environment Surfaces with clear patterns and adequate lighting (lux > 15)
Downward Vision System
Velocity Range ≤ 22.4 mph (36 kph) at 6.6 ft (2 m) above ground
Altitude Range 1 - 43 feet (0.3 - 13 m)
Operating Range 1 - 43 feet (0.3 - 13 m)
Operating Environment Surfaces with a clear patterns and adequate lighting (lux > 15)
Camera
Sensor 1/2.3” CMOS Effective pixels:12.35 Megapixels
(Total pixels: 12.71 M)

Appendix
Mavic Pro User Manual
60
©2017 DJI All Rights Reserved.
Remote Controller
Operating Frequency 2.400 GHz to 2.4835 GHz
Max Transmission Distance FCC: 4.3 mi (7 km); CE: 2.5 mi (4 km)
SRRC: 2.5 mi (4 km) Unobstructed and free of interference.
Operating Temperature 32° to 104° F (0° to 40° C)
Battery 2970 mAh
Transmitter Power ( EIRP ) FCC: ≤ 26 dBm; CE: ≤ 20 dBm; SRRC: ≤20 dBm
Operating Voltage 950 mA @ 3.7 V
Supported Mobile Device Size
Thickness supported: 6.5 - 8.5 mm, Max length: 160 mm
Supported USB port types:
Lightning, Micro USB (Type-B), USB Type-CTM
Charger
Voltage 13.05 V
Rated Power 50 W
Intelligent Flight Battery
Capacity 3830 mAh
Voltage 11.4 V
Battery Type LiPo 3S
Energy 43.6 Wh
Net Weight Approx. 0.5 lbs (240 g)
Operating Temperature 41° to 104° F (5° to 40° C)
Max. Charging Power 100 W
Lens 78.8° FOV, 28 mm (35 mm format equivalent) f/2.2
Distortion <1.5% Focus from 0.5 m to ∞
ISO Range 100 - 3200 (video), 100 - 1600 (photo)
Electronic Shutter Speed 8 s to 1/8000 s
Max Image Size 4000×3000
Still Photography Modes
Single shot
Burst shooting: 3/5/7 frames
Auto Exposure Bracketing (AEB):
3/5 bracketed frames at 0.7EV Bias
Interval
HDR
Video Recording Modes
C4K: 4096×2160 24p, 4K: 3840×2160 24/25/30p
2.7K: 2720×1530 24/25/30p
FHD: 1920×1080 24/25/30/48/50/60/96p
HD: 1280×720 24/25/30/48/50/60/120p
Video Storage Bitrate 60 Mbps
Supported File Systems FAT32 (≤ 32 GB), exFAT (> 32GB)
Photo JPEG, DNG
Video MP4, MOV (MPEG-4 AVC/H.264)
Supported SD Cards microSDTM. Max capacity: 64GB Class 10 or UHS-1 rating
required.

Appendix
Mavic Pro User Manual
©2017 DJI All Rights Reserved.
61
Firmware Updates
Use DJI Assistant 2 or DJI GO 4 app to update aircraft and remote controller.
Using the DJI GO 4 App
Connect the remote controller and the DJI GO 4 app, You will be reminded if a new rmware upgrade
is available. To start upgrading, connect your mobile device to the Internet and follow the on-screen
instructions.
Using DJI Assistant 2
Use the DJI Assistant 2 to update the rmware for the remote controller and the aircraft simultaneously.
Follow the instructions below to update the rmware through DJI Assistant 2:
1. With the remote controller and the aircraft powered off, connect the remote controller to the computer
through the charging port using a micro USB cable.
2. Power on the remote controller and aircraft.
3. Launch DJI Assistant 2 and login with your DJI account.
4. Select “Mavic Pro” and click on the “Firmware Updates” on the left panel.
5. Select the rmware version that you wish to update.
6. Wait for the rmware to be downloaded and rmware update will start automatically.
7. Reboot the aircraft and the remote controller after the rmware update is complete.
The remote controller and the aircraft can also be updated separately.
If you connect the aircraft to the computer via the aircraft’s micro USB port, you are only able to
update the aircraft rmware.
The rmware update will take around 15 minutes. It is normal that the gimbal goes limp, aircraft
status indicator blinks abnormally and the aircraft reboots. Please wait patiently until the update
is complete.
Ensure the computer has access to the Internet.
Ensure the batteries have at least 50% power.
Do not disconnect the aircraft from the computer during rmware update.
Please note that rmware update may reset various Main Controller Settings, such as the RTH
Altitude and Maximum Flight Distance, to factory defaults. Before the update, take note of your
preferred DJI GO 4 settings, and readjust them after the update to suit your preference.
Intelligent Flight Mode
Intelligent Flight mode includes Course Lock, Home Lock, Point of Interest (POI), Follow Me and
Waypoints features to assist users to create professional shoots during the ight. Course Lock and Home
Point lock helps to lock the orientation of aircraft so that the user can focus more on other operations.
Point of Interest, Follow Me and Waypoints mode enable aircraft to y automatically according to the
pre-set ight maneuvers.
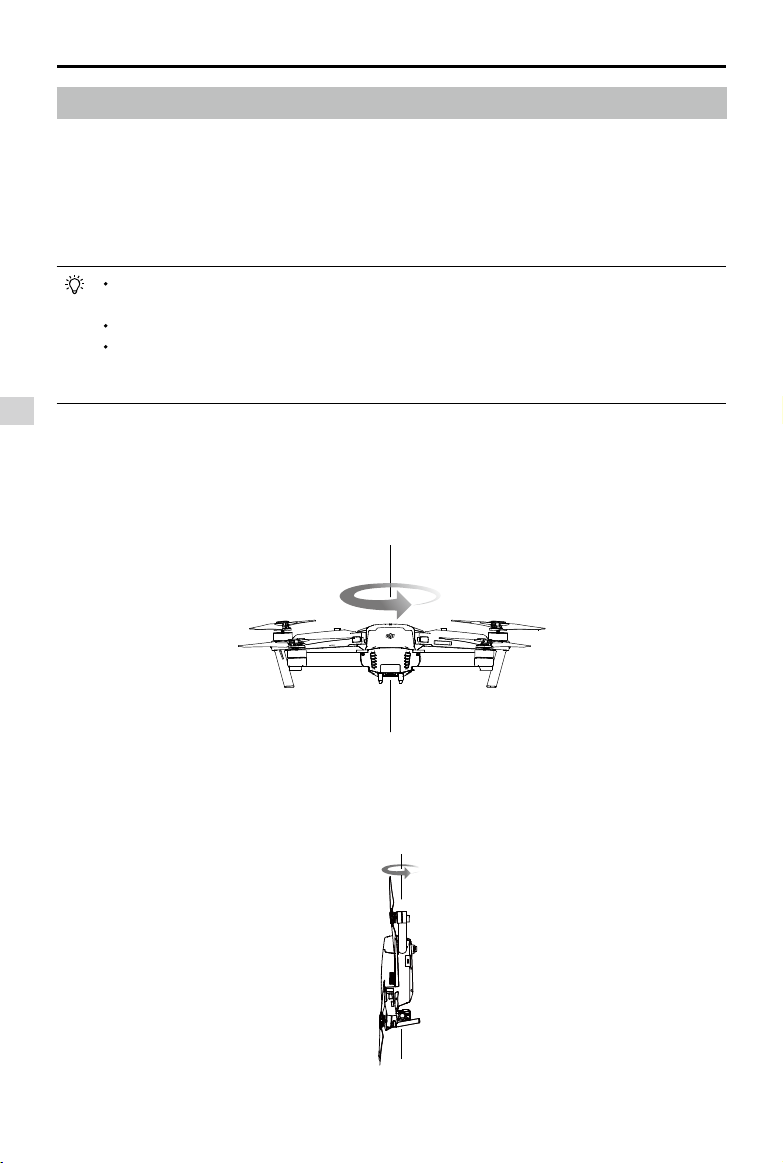
Course Lock Lock the current nose direction as the aircraft’s forward direction. The aircraft will
move in the locked directions regardless of its orientation (yaw angle).
Home Lock Pull the pitch stick backward to move the aircraft toward its recorded Home Point.
Point of Interest The aircraft will orbit around the subject automatically to allow the operator can be
more focus on framing their shoot on the subject in Point of Interest.

Appendix
Mavic Pro User Manual
62
©2017 DJI All Rights Reserved.
Remote Controller LCD Screen Menu Information
Remote Controller Status
BAT xx PCT Remote Controller battery level.
SHUTDOWN_ Remote controller is powering off.
CHARGING_ Remote controller is charging.
USB PLUGGED Mavic Pro has been connected to a computer.
FC U-DISK Flight Controller is reading data.
UPGRADING Upgrading.
BINDING Aircraft is binding with the remote controller.
Before Flight
CONNECTING_ The remote controller is connecting to the aircraft.
SYS INITING System is initiating.
READY TO GO Ready to take off.
Flight Mode
BEGINNER In Beginner Mode.
GPS MODE In P-GPS Mode.
OPTI MODE In P-OPTI Mode.
ATTI MODE In P-ATTI Mode.
SPORT MODE In Sport Mode.
Flight Status
TAKING OFF Taking off.
LANDING Landing.
GOING HOME Returning to Home.
NAV GOHOME Returning to home.
NAV LANDING Landing.
MAX ALT. Aircraft has reached maximum altitude.
MAX RADIUS Aircraft has reached maximum radius.
OBSTACLE Obstacle detected.
NO FLY ZONE Aircraft is in a No Fly zone.
Intelligent Flight Mode Status
TRIPOD In Tripod Mode.
ACTIVETRACK Using ActiveTrack.
TAP FLY Using TapFly.
COURSE LOCK In Course Lock Mode
HOME LOCK In Home Lock Mode
POI MODE In Point of Interest Mode
Follow Me
A virtual tether is created between the aircraft and the mobile device so that the
aircraft can track your movement as you move. Note that Follow Me performance is
subject to the GPS accuracy on the mobile device.
Waypoints
Record a flight path, then the aircraft will fly along the same path repeatedly
while you control the camera and orientation. The ight path can be saved and
re-apply in the future.
Enable Multiple Flight Mode by launching the DJI GO 4 app > Camera View > > Multiple Flight Mode
before using the Intelligent Flight Mode for the rst time.

Appendix
Mavic Pro User Manual
©2017 DJI All Rights Reserved.
63
WAY POINT In Waypoints Mode.
FOLLOW ME In Follow Me Mode.
TERRAIN In Terrain Follow Mode.
System Waning and Error Information
SYS WARNING+CHECK APP System Warning. See DJI GO 4 app for more information.
UNACTIVATED+CHECK APP Aircraft not Activated. See DJI GO 4 app for more information.
MAG INTERF+CHECK APP Compass Error. See DJI GO 4 app for more information.
BATTERY ERR+CHECK APP Battery Error. See DJI GO 4 app for more information.
SD ERR+CHECK APP Micro SD Card Error. See DJI GO 4 app for more information.
CALIBRATING IMU Calibrating/Did not restart aircraft after calibration is
complete.
STICK ERR+RE-CTR STCK Control stick is not centered. Re-center it.
WHEEL ERR+RE-CTR WHEL Left Dial on the remote controller is not centered. Re-center it.
STICK ERR Control stick error. Calibrate the control sticks in the DJI GO 4 app.
MECH ERR Remote Controller Error. Calibrate the remote controller in the DJI
GO 4 app. If this problem persists, contact DJI support.
STICK EMI3+AUTO RTH Control Sticks are experiencing severe electromagnetic
interference and cannot function. The aircraft will return to home
and land immediately.
STICK EMI2+MANUAL RTH Control Sticks are experiencing electromagnetic interference and
may not function. Use Smart RTH and land the aircraft as soon as
possible.
STICK EMI1 Control Sticks are experiencing slight electromagnetic
interference, y the aircraft to another location.
SD FULL Micro SD Card is full.
NO PROP No propellers attached.
BAT TEMP HI Intelligent Flight Battery is too hot.
BATTERY ERR Intelligent Flight Battery error.
BAT TEMP LO Intelligent Flight Battery is too cold.
LOW BATTERY Intelligent Flight Battery low battery.
RC LOW BAT Remote Controller low battery.
NO RC SIGNL Remote Controller signal lost.
RC TEMP HI Remote Controller too hot.
NO RTH Aircraft cannot Return to Home.
After-Sales Information
Visit the following pages to learn more about After-sales policy and warranty information:
1. After-sales Policy: http://www.dji.com/service
2. Refund Policy: http://www.dji.com/service/refund-return
3. Paid Repair Service: http://www.dji.com/service/repair-service
4. Warranty Service: http://www.dji.com/service/warranty-service

This content is subject to change.
Download the latest version from
http://www.dji.com/mavic
If you have any questions about this document, please contact DJI by
DJI Support
http://www.dji.com/support
MAVICTM is a trademark of DJI.
Copyright © 2017 DJI All Rights Reserved.
Other manuals for MAVIC PRO
11
Table of contents
Other dji Drone manuals

dji
dji MAVIC MINI Instruction Manual

dji
dji MAVIC 2 PRO User manual

dji
dji DSLRPros Nighthawk Aerial Kit User manual

dji
dji MAVIC 3 PRO User manual

dji
dji SPARK User manual

dji
dji PHANTOM 4 PRO User manual

dji
dji MAVI 3 CLASSIC User manual

dji
dji M30 User manual

dji
dji P4 MULTISPECTRAL User manual

dji
dji MATRICE 210 RTK V2 User manual

dji
dji MATRICE 30 Series Instruction Manual

dji
dji Phantom 2 Vision + User manual

dji
dji T20 User manual

dji
dji MATRICE 300 RTK User manual

dji
dji MATRICE 350 RTK User manual

dji
dji Phantom 4 RTK User manual

dji
dji Matrice 600 Pro User manual

dji
dji Matrice 600 Pro User manual

dji
dji SPARK User manual

dji
dji Mini 2 User manual