TTI TX-1446 User manual

PMR 446 TRANSCEIVER
INSTRUCTION MANUAL
www.ttikorea.co.kr

Thank you for purchasing this radio.
All our products are built to offer excellent
value by combining advanced features,
great design and manufacturing quality.
To ensure you are familiar with the operation
and features of your radio, and in order to
obtain the best performance, please read
this manual carefully before operation.

Caution...................................................... 4
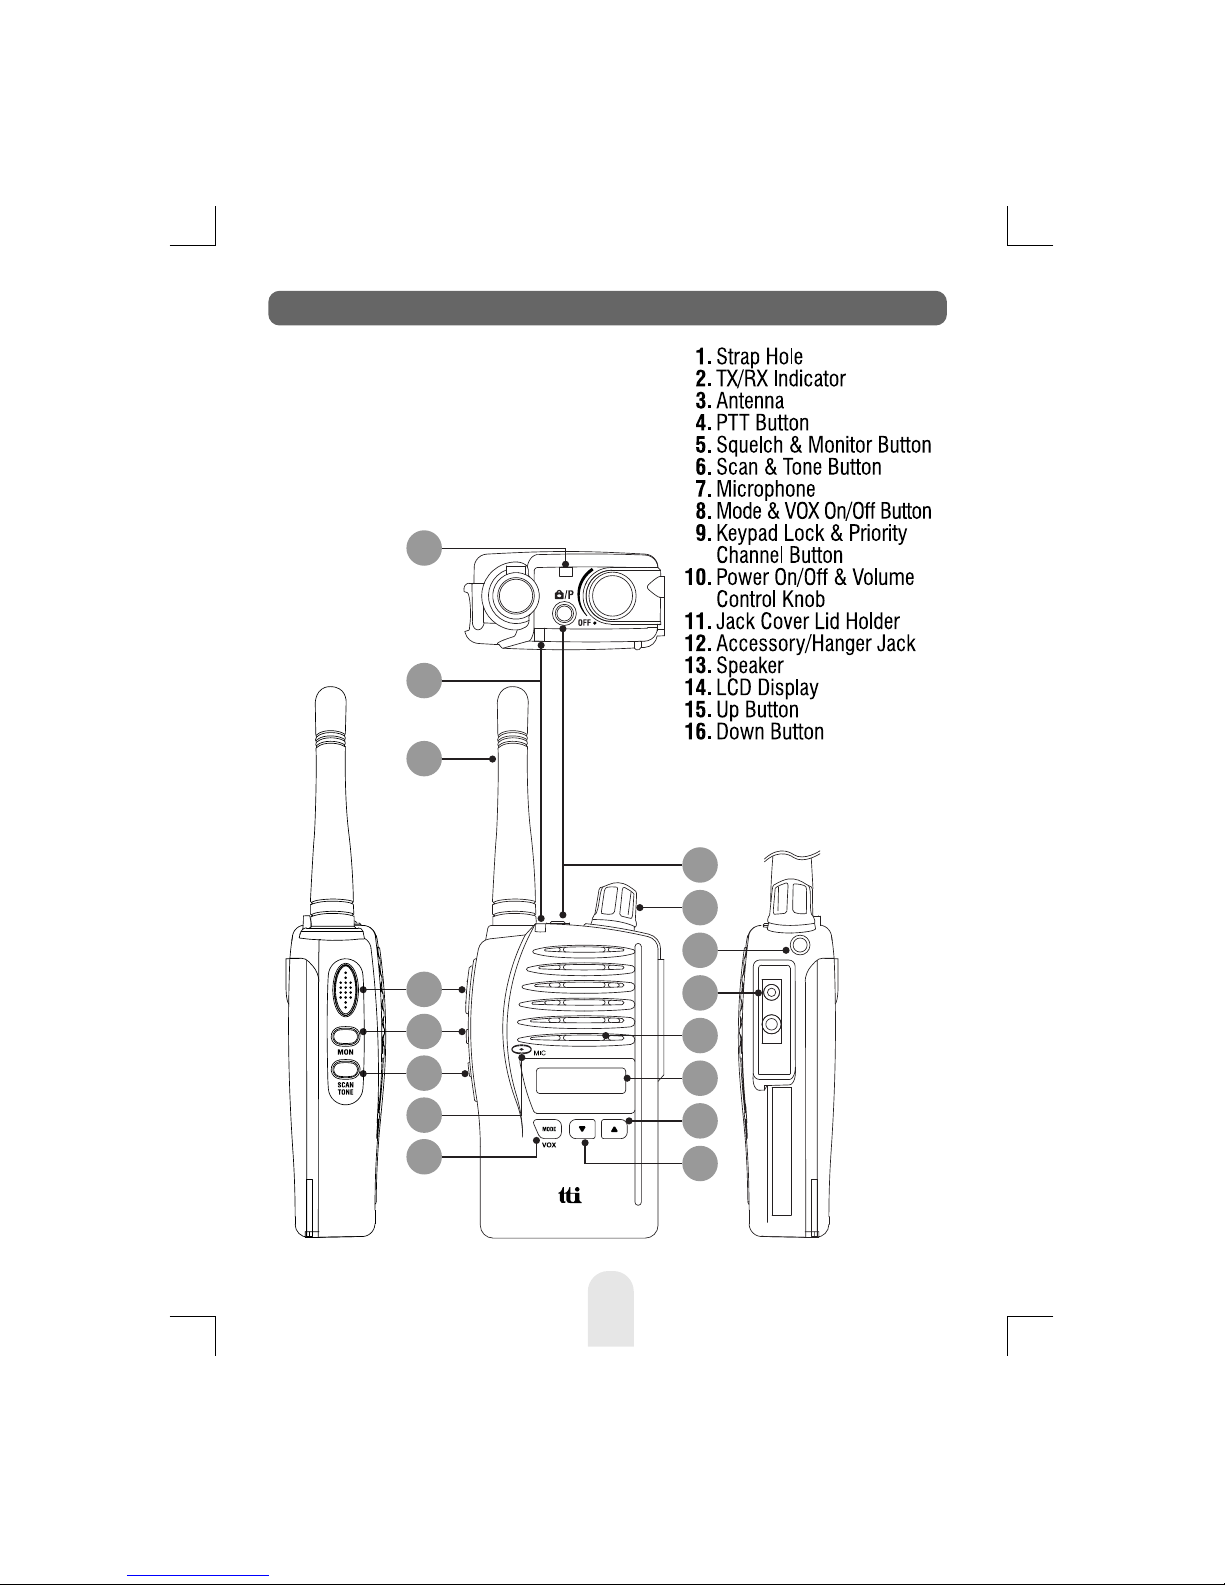
1Radio Controls........................................... 5
2Equipment and Accessories Supplied....... 6
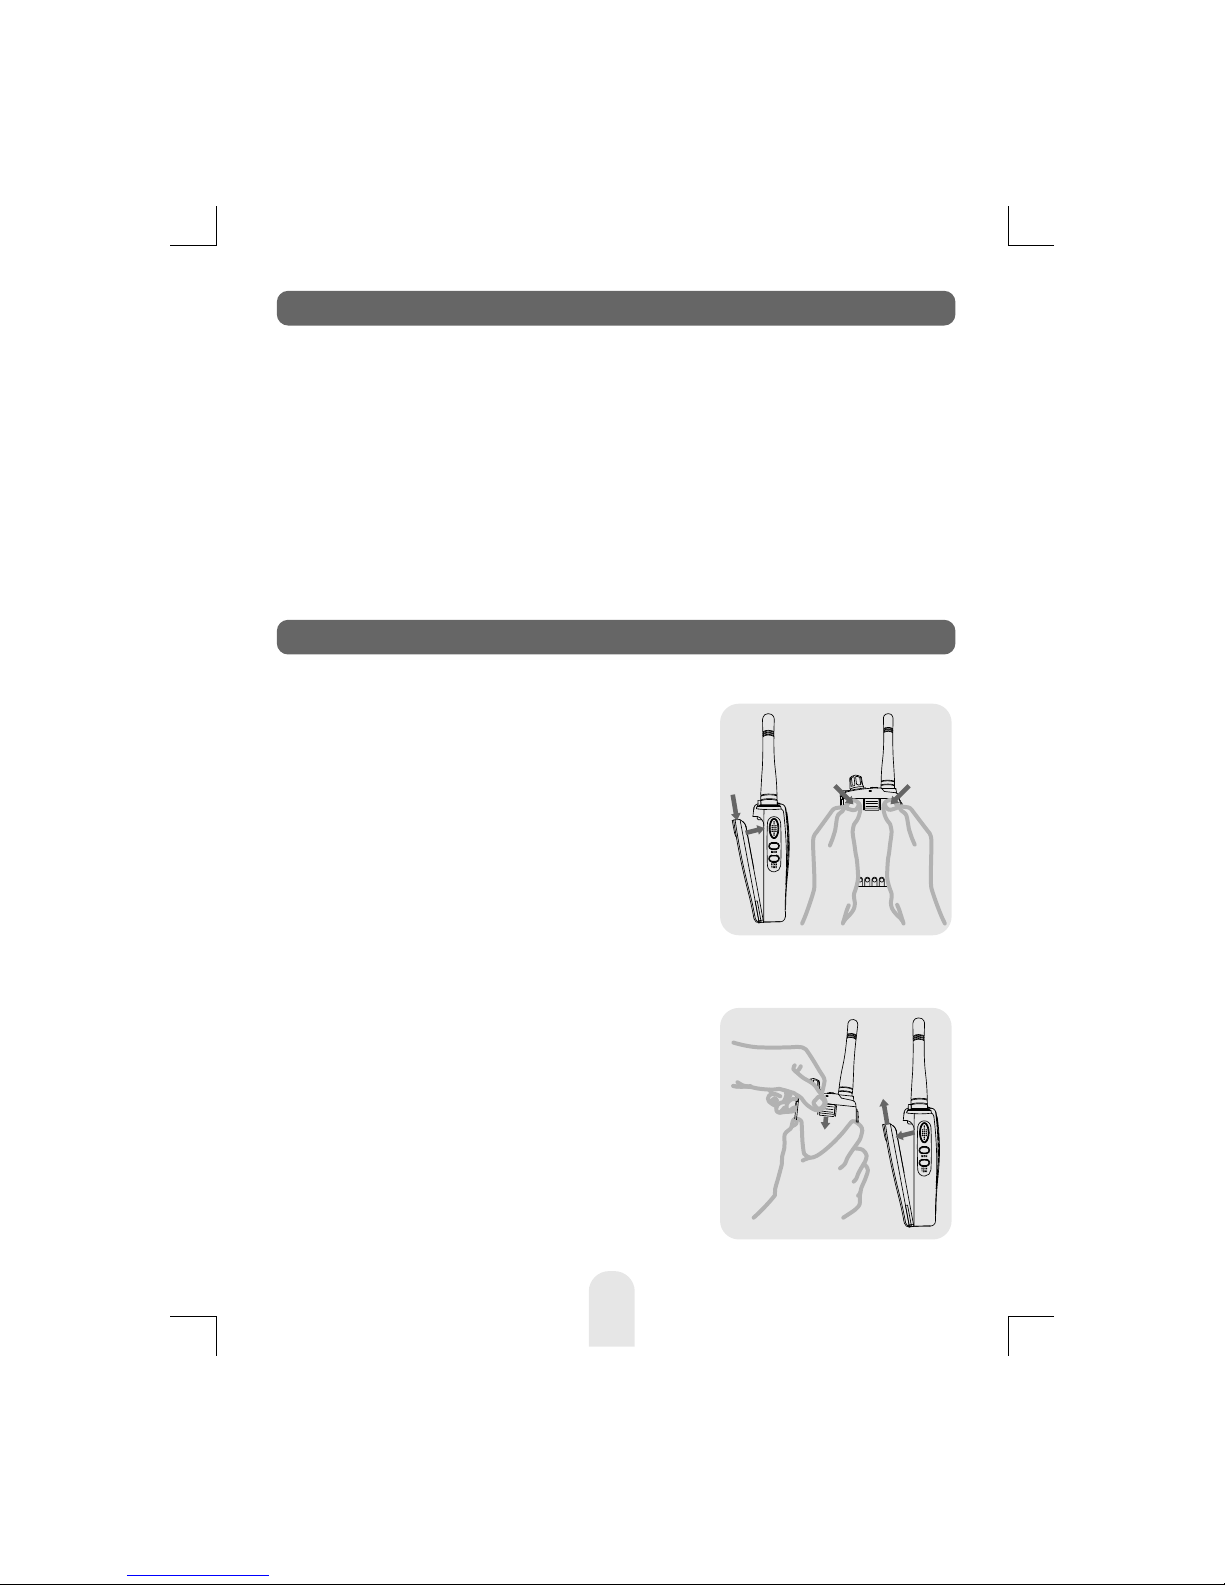
3Fitting the Battery pack.............................. 6
4Battery Charging....................................... 7
5Radio Controls........................................... 8
6LCD Display............................................... 9
7Basic Radio Operation............................. 10
8Radio IDEditing ....................................... 10
9Function Mode - User Mode.................... 11
10Function Mode - Advanced Mode............ 12
11Radio Features Explained....................... 13
Volume level.......................................13
Channels........................................... 13
Power Hi / Low ................................. 13
Privacy Codes................................... 14
Scan Pause Timer............................. 14
Hands Free (VOX) Mode................... 15
Busy Channel Lock Out (BCLO)....... 15
Priority Channel................................. 16
Priority Channel Scan Time............... 16
Dual Watch........................................ 16
Roger Beep....................................... 17
Key Beep........................................... 17
Time Out Timer.................................. 18
Call Alert............................................ 18
Clone................................................. 18
Squelch Level.................................... 19
Monitor............................................... 19
Display & Keypad Backlight.............. 19
Channel Scan.................................... 19
Privacy Code Scan/Decode.............. 20
Battery Level..................................... 21
Power Save....................................... 21
Keypad Lock...................................... 21
12Troubleshooting........................................ 22
13CE Declaration......................................... 22
14Safety Requirements................................ 23
15Technical Specifications........................... 23
CONTENTS

4
Caution
IMPORTANT - READ ALL INSTRUCTIONS carefully and
completely before operating your radio and retain this manual
for future reference.
NEVER connect the radio to a power source other than the
supplied battery. This may damage your product.
NEVER operate your radio with the antenna less than 5cm
from exposed parts of the body.
NEVER use the radio in or near a mining facility or other area
which uses remotely triggered explosives or an area labelled
"Blasting Area".
NEVER use or charge your radio in a potentially explosive
atmosphere.
DO NOT place your radio in front of a vehicle airbag.
DO NOT operate your radio on board an aircraft.
DO NOT use your radio with a damaged antenna.
DO NOT attempt to modify your radio in any way.
ALWAYS charge your radio at normal room temperature.
ALWAYS switch off your radio where notices restrict the use of
two-way radio or mobile telephones.
ALWAYS replace the accessory jack cover (if applicable)
when the jack is not in use.
ONLY use TTI approved rechargeable batteries with the
supplied charger.
AVOID exposing your radio to water. It can widthstand spray
water and some rain, but has no higher waterproof class.
AVOID storing or charging your radio in direct sunlight.
AVOID storing or using your radio where temperatures are
below -20ºC or above +60ºC.

2
9
10
11
12
13
14
15
5
3
6
4
16
7
1
8
5
1. Radio Controls

6
Fitting
1. Ensure that your radio is switched
off.
2. Align the bottom of the battery
pack with the securing slots at the
back of the radio.
3. Press the top of the battery into
the back of the radio until it 'clicks'
home.
Removal
1. Ensure that your radio is switched
off.
2. Press down on the battery release
catch and separate the battery
pack from the radio.
1. TX-1446 radio (with fixed antenna) 1 unit
2. Li-Ion Battery pack (1000mAh) 1 unit
3. Charging Cradle 1 unit
4. Power Adaptor 1 unit
5. Instruction Manual 1 unit
2. Equipment and Accessories Supplied
3. Fitting the Battery pack

7
To charge your radio, carefully follow these instructions:
1.Connect the power adaptor to the mains power supply and
connect the adaptor power plug to the charging cradle.
2.Disconnect any radio accessories and ensure the radio is
switched off.
3.Insert the radio into the charging cradle until it 'clicks' home.
The charger LED will glow red and charging will start. If the
charger LED blinks red and green or the charger LED does
not light, re-insert the radio into the charging cradle.
4.The battery charging time is typically 12 to 15 hours. When
the battery is fully charged the charger LED will turn green.
4. Battery Charging
Charge Cradle
Adaptor Power Plug
Power Adaptor :
- Input: 230VAC
- Output: 15VDC
LED

8
1. Power On/Off/Volume control
Turn the knob clockwise to switch on and increase
the volume and counter-clockwise to decrease the
volume and switch off the radio. The radio will emit a
confirmation tone when it switches on.
2. Push-To-Talk (PTT) button
Press and hold this button to speak (transmit) and
release the button to hear (receive) messages. You
can only communicate with other PMR446 radios
when the channel and privacy code settings are the
same as yours.
3. UP button
Pressing this button will increase the channel
number. In some modes this button is used to adjust
the function setting.
4. DOWN button
Pressing this button will decrease the channel
number. In some modes this button is used to adjust
the function setting.
5. MODE/VOX button
Press this button briefly to activate the function
mode. Press the button again (repeatedly) to step
through the function menu. Press and hold this
button to activate or de-activate the VOX function.
6. SQUELCH/MONITOR button
Press this button briefly to activate and de-activate
the squelch level mode. Press and hold this button to
activate or de-activate the MONITOR function.
5. Radio Controls

9
7. SCAN/TONE button
Press this button briefly to activate or de-activate the
scan mode. Press and hold this button to activate or
de-activate the current privacy code (CTCSS/DCS).
8. KEYPAD LOCK/PRIORITY CHANNEL button
Press this button briefly to activate or de-activate the
priority channel mode. Press and hold this button to
activate or de-activate the keypad lock.
1
2
3
4
5
6
7
8
9
Receiver Busy
Icon
Transmit Icon
Dual Watch Icon
VOX Icon
Key Lock Icon
DCS Icon
/ Display
Keytone Icon
Time Out Timer Icon
Monitor Icon
8 10 11 1291 2 3 4 5 76
14
15
13
16
19
17
18
10
11
12
13
14
15
16
17
18
19
Scan Icon
Roger Beep Icon
Battery Icon
Priority Channel Icon
Hi Power Icon
BCLO Icon
Clone Icon
Information Display
Channel Display
CTCSS Icon / Display
6. LCD Display

10
The PMR446 service which this radio uses shares channels on a
'take turns' basis. This means that other users and groups may be
using any channel and privacy code combination.
To communicate with other PMR446 radios, all units must be
switched to the same channel (8 choices) and privacy code (50
CTCSS and 104 DCS choices). If the combination you have
chosen is already in use please make an alternative selection.
1.Switch on your radio.
2.Check and if necessary change the channel and privacy code
settings (see Function Mode).
3.To speak, hold the radio upright, about 10cm from your mouth
and press the PTT. Speak slowly and clearly towards the
radio. Release the PTT when you finish speaking.
You will hear messages from other radios that are within range
and have the same channel and privacy code setting.
The appropriate icon will appear in the radio display when you
receive or transmit a message.
An up to 3 digit Radio ID can be programmed when the radio is
switched on. You can customise this Radio ID to identify your
radio.
To enter the Radio ID edit mode, switch on the radio whilst
pressing the SCAN button and the MODE button.
1.Press the MODE button to select the first position.
2.Use the UP or DOWN button to change the character.
3.Press the MODE button to select the next letter.
4.Repeat steps 2 and 3 until the ID is complete.
5.Turn off the radio to finish editing.
7. Basic Radio Operation
8. Radio ID Editing

The user mode allows you to set-up and edit the basic functions
(see Radio Features Explained).
To access the consumer mode, press the MODE button briefly.
Each press of the MODE button steps the radio sequentially
through the different functions. The radio display indicates the
current function. The present setting and associated icon flash.
Use the UP or DOWN button to change the setting. Press the PTT
or MODE button or wait for 5 seconds to store your choice. If your
do not press any key for 5 seconds your radio will return to
standby mode automatically.
NB. Squelch level adjustment works via the SQUELCH button.
9. Function Mode - User Mode
11
Display SettingsFunctions
Select Hands Free
Mode (VOX)
Change Privacy Tone
Code (CTCSS)
Change Digital Privacy
Tone Code (DCS)
1 to 50 , Off
1 to 104 , Off
1 to 5 , Off
Select Dual Watch Mode 1 to 8 , Off
Activate Roger Beep On , Off
On , OffActivate Key Beep
Change Call Alert Tone
Change Squelch Level
1 to 5 , Off
1 to 15 , Auto ,
Off

Display SettingsFunctions
Select Hands Free
Mode (VOX)
Select Scan Stay Timer
Select Priority Channel
Change Privacy Tone
Code (CTCSS)
Change Digital Privacy
Tone Code (DCS)
1 to 50 , Off
1 to 104 , Off
1 to 5 , Off
1 to 8
10 ,15 , 20 , 30 ,
1 , 2 , 3 , 5 ,
45 ,60 , Off
Select Busy Channel Lock
out Mode (Main Channel)
Carrier , Correct tone ,
Different tone , Off
The advanced mode allows you to program user preferences,
activate features and use advanced functions (see Radio
Features Explained).
To access the advanced mode, turn on the radio whilst pressing
and holding the SQUELCH button and SCAN button.
Each press of the MODE button steps the radio sequentially
though the different functions. The radio display indicates the
current function. The present setting and associated icon flash.
Use the UP or DOWN button to change the setting. Press the PTT
or MODE button or wait for 5 seconds to store your choice. If you
do not press any key for 5 seconds your radio will return to
standby mode automatically. If the radio is turned off and turn on
again without pressing any buttons, the radio will return to the
user mode.
Select Priority Scan Time 1 to 5 , Off
Select Dual Watch Mode 1 to 8 , Off
10. Function Mode - Advanced Mode
12

Activate Roger Beep On , Off
On , OffActivate Key Beep
Time-Out-Timer Settings
Clone Parameters
Change Call Alert Tone
Change Squelch Level
1 to 5 , Off
Send , Receive ,
Off
1 to 15 , Auto ,
Off
15 , 30 , 45 ,
60 , 90 , 120 ,
180 , 240 , Off
Volume Level
To adjust the volume level, use the POWER On/Off/VOLUME control.
To increase the volume turn this control clockwise, to decrease the
volume turn this control counter-clockwise.
Channels
This radio operates on any one of the 8 PMR446 licence free
channels.
To communicate with other PMR446 radios, all units must be switched
to the same channel and privacy code. To change the radio channel,
press the UP or DOWN button when the radio is in stand-by mode.
Power High / Low
This feature permits selection of the transmit power level to High or
Low. Your radio will have the high power when you switch it on. The
LCD indicator will display "HI". Using low power, the radio will have a
lower transmit range but the battery life will be increased.
Pressing the PTT button, press the UP or DOWN button to select the
low power. The LCD indicator, "HI" will disappear. To return to the high
power, press again the PTT button and UP or DOWN button.
11. Radio Features Explained
13

Privacy Codes (CTCSS and DCS Tone Codes)
This radio is fitted with 50 Analogue Privacy codes (also known as
CTCSS, sub-codes or sub-channels) and 104 Digital Privacy codes
(also known as DCS codes).
Only one type of Privacy code can be used on each channel.
Selecting a Digital Privacy code will override any Analogue Privacy
code settings. If the other unit(s) do not have privacy codes ensure
your units privacy codes (analogue and digital) are set to 'Off'.
Please note that privacy codes do not prevent other radio users
from hearing your conversation. They simply allow you to ignore
messages that are using a different privacy code.
Selecting an Analogue Privacy Code
To change the Analogue Privacy Code, press the MODE button
until the CTCSS icon and privacy code number flash. Use the UP or
DOWN button to select the desired code. Press the PTT or MODE
button or wait for 5 seconds to store your choice. The CTCSS icon
will appear when an Analogue Privacy Code is selected.
Selecting a Digital Privacy Code
To change the Digital Privacy Code, press the MODE button until
the DCS icon and privacy code number flash. Use the UP or DOWN
button to select the desired code. Press the PTT or MODE button or
wait for 5 seconds to store your choice. The DCS icon will appear
when a Digital Privacy Code is selected.
Scan Pause Timer (Advanced mode only)
The Scan Pause Timer allows you to select the period of time that
your radio will dwell on an active channel when the scan mode is
activated.
Timer values from 1 second to 60 seconds and Off can be selected.
If the timer value is 'Off', the radio will remain on the scanned
channel until the signal disappears.
To change the Scan Pause Time, press the FUNCTION button until
SC is shown in the display. Use the UP or DOWN button to select
the desired setting. Press the PTT or MODE button or wait for 5
seconds to store your choice.
14

15
Hands Free (VOX) Mode
When Hands Free (VOX) Mode is selected the radio will
automatically transmit when the microphone detects your voice (or
other noise). It can be used with the internal microphone or a
suitable audio accessory (available separately). To avoid accidental
operation and reduce the effect of background noise, there are 5
microphone sensitivity settings.
To select the VOX sensitivity level, press the MODE button until the
VOX icon and current setting flashes. Use the UP or DOWN button
to change the sensitivity level (5 is the most sensitive). Press the
PTT or MODE button or wait for 5 seconds to store your choice.
To activate the VOX mode press and hold the MODE button until
the VOX icon appears. To de-activate VOX mode, press and hold
the MODE button until the VOX icon disappears. VOX mode can
only be activated if a sensitivity level has been selected.
Busy Channel Lock Out (BCLO) Mode (Advanced mode only)
Busy Channel Lock Out prevents you from transmitting when
another signal is present. Three modes are available:
a. Carrier only (CA)
This will prevent your radio from transmitting when a signal is
present on the same channel, regardless of the privacy code.
b. Correct Tone (CT)
This will prevent your radio from transmitting when a signal is
present on the same channel, using the same privacy code as your
current setting.
c. Different Tone (DT)
This will prevent your radio from transmitting when a signal is
present on the same channel, using a different privacy code setting.
To activate and select the BCLO mode, press the MODE button
until the BCLO icon and current setting flashes. Use the UP or
DOWN button to change the setting. Press the PTT or MODE
button or wait for 5 seconds to store your choice. A setting of 'Off'
will de-activate this mode.
The BCLO icon will appear when BCLO mode is active.

16
Priority Channel Mode (Advanced mode only)
A 'Quick Access' Priority Channel is available by briefly pressing
the KEYPAD LOCK button. This can be used as a reserve or
secondary channel.
To program a Priority Channel, press the MODE button until the
Priority Channel icon and current channel setting flashes. Use the
UP or DOWN button to change the channel setting. Press the PTT
or MODE button or wait for 5 seconds to store your choice.
The Priority Channel icon will appear when the Priority Channel is
selected.
Priority Channel Scan Time
When the Priority Channel is selected, pressing the SCAN button
toggles the Priority Channel scan.
Priority Channel scan is similar to channel scanning, however the
priority channel is scanned in addition to the other channels. You
can select how often the priority channel is checked according to
your needs.
To select the Priority Channel Scan Time, press the MODE button
until the Priority Channel Scan Time icon and current setting
flashes. Use the UP or DOWN button to change the priority
channel scan time. Set the scan time to '1' for most frequent and
'5' for least frequent. Press the PTT or MODE button or wait for 5
seconds to store your choice.
Each number represents a half second, so a setting of '4' will
result in the priority channel being checked every 2 seconds. A
setting of '1' will cause the radio to scan the priority channel
alternately with the other channels, e.g. channel 1, priority
channel, channel 2, priority channel etc.
Dual Watch Mode
Dual Watch mode allows you to monitor two channels; a primary
channel and the dual watch channel. When a signal is received on
either channel the unit will pause for 5 seconds before resuming
the dual watch.

17
To activate the dual watch mode, first select a radio channel (see
Channels) as the primary channel. To select the dual watch
channel press the MODE button until the Dual Watch Icon and
current setting flashes. Use the UP or DOWN button to select the
desired dual watch channel. Press the PTT or MODE button or
wait for 5 seconds to store your choice and activate the dual
watch.
The radio display will alternate between the primary and dual
watch channels and the dual watch icon will appear.
To deactivate the dual watch press the SCAN button.
If you press the PTT button whilst receiving a signal in Dual Watch
Mode the radio will transmit on the currently displayed channel. If
you press the PTT button when no signal is present the radio will
transmit on the primary channel.
Roger Beep
The Roger Beep is a short tone that is automatically added to the
end of your transmissions to tell other users that you have
finished speaking. You can activate or deactivate the Roger Beep
as required.
To change the Roger Beep setting, press the MODE button until
the Roger Beep icon and current setting flashes. Use the UP or
DOWN button to change the setting. Press the PTT or FUNCTION
button or wait for 5 seconds to store your choice.
The Roger Beep icon will appear when Roger Beep is active.
Key Beep
If the Key Beep is activated, your radio will emit a confirmation
tone whenever you use the keypad. You can activate or
deactivate the Key Beep as required.
To change the Key Beep setting, press the MODE button until the
Key Beep icon appears. Use the UP or DOWN button to change
the setting. Press the PTT or FUNCTION button or wait for 5
seconds to store your choice.
The Key Beep icon will appear when Key Beep is active.

18
Time Out Timer (TOT) setting (Advanced mode only)
This timer is used to limit the transmit time of your radio. By
selecting a timer setting, your radio will automatically release the
PTT when the selected time limit is reached.
To change or select the TOT time, press the MODE button until the
TOT icon appears. Use the UP or DOWN button to change the
setting. Press the PTT or FUNCTION button or wait for 5 seconds
to store your choice.
The TOT icon will appear when Key Beep is active.
Call Alert
To alert other users to your message and gain their attention you
can send a Call Alert melody by pressing the PTT button twice in
quick succession.
There are five different call alert tones and off.
To change the Call Alert melody, press the FUNCTION button until
'CA' appears. Use the UP or DOWN button to change the setting.
Press the PTT or FUNCTION button or wait for 5 seconds to store
your choice.
Clone (Advanced mode only)
The settings of your radio (except the Radio ID) can be transferred
to or from another Tectalk PRO. To perform this function you will
require a TCC-1000 Cloning cable (available separately).
1.Place the two radios side by side and connect the Cloning
cable.
2.Switch on the unit whose settings are to be copied (the master
unit). Press the MODE button until 'CL' appears. Use the UP or
DOWN buttons and select 'OUT'. Press the PTT or FUNCTION
button or wait for 5 seconds to store your choice.
3.Switch on the unit whose settings are to be changed (the slave
unit). Press the MODE button until 'CL' appears. Use the UP or
DOWN buttons and select 'IN'. Press the PTT or FUNCTION
button or wait for 5 seconds to store your choice. The radios
LED will turn green to indicate that it is ready to receive data.

19
4.Press the PTT button of the master radio while the slave radio
LED is green. The LED of the slave radio will go off. The master
radio and slave radio will emit a confirmation beep.
5. If the clone fails the slave radio sends an error beep and the
LED remains green. Repeat step 4 until a confirmation beep is
heard.If repeated clone attempts fail, repeat the whole
procedure from step 1.
If the clone procedure was successful switch off both radios and
disconnect the cloning cable. Switch on the slave radio to use the
copied data.
Squelch Level Adjustment
This function allows you to adjust the squelch level of your radio.
To change the squelch level, press the Squelch/Mon button briefly.
The current squelch setting will flash. Use the UP or DOWN
button to change the setting. Press the PTT button or wait for 5
seconds to store your choice.
There are 15 squelch levels. Level 1 is the most sensitive (open)
and level 15 is the least sensitive (closed). Auto is the optimum
factory setting and 'Off' is fully open, with constant static noise.
Monitor
The Monitor function is used to briefly check for activity on the
current channel, regardless of privacy code settings. It is the same
as setting the squelch level to 'Off'.

20
To activate or deactivate the Monitor press the SQUELCH button
for about 2 seconds. The Monitor icon will appear when the Monitor
is active. It is normal to hear background static noise.
Display & Keypad Backlight
The display and keypad backlight will illuminate for 5 seconds
whenever any buttons (except for the PTT button) are pressed.
Channel Scan
The Channel Scan can be used to find or detect users on other
radio channels.
To activate/deactivate the channel scan, press the SCAN button
briefly. The Scan icon will appear when the channel scan is active.
Scanning will only stop when you deactivate the scan function.
The radio will scan through the 8 channels. If your radio detects a
valid signal the scan will pause according to your Scan Pause
Timer settings.
If you press the PTT button when your radio detects a signal, the
radio will transmit on the same channel. Scanning will resume after
approximately 15 seconds. Press the UP or DOWN button to
resume scanning immediately.
If you press the PTT button during scanning, the radio will return to
your original channel. Scanning will resume after approximately 15
seconds.
Privacy Code (CTCSS/DCS) Scan and Decode
Privacy Code Scan is used to determine which Privacy Code is in
use on the current channel.
To activate the privacy code scan press the MODE button until the
privacy code number flashes, then press the SCAN button briefly.
The Scan icon will blink when the privacy code scan is active.
The radio will scan through the 50 CTCSS and 104 DCS codes. If
your radio detects a valid signal the scan will pause for 5 seconds.
If you press the PTT button when your radio detects a signal, the
radio will transmit on the same privacy code and the privacy code
will be automatically selected.
Table of contents
Other TTI Transceiver manuals
Popular Transceiver manuals by other brands

SRT
SRT CS100 Installation and operation manual

Nokia
Nokia NME-2A Series Tuning Instructions

Kenwood
Kenwood VHF P25 Transceiver TK-5710 Service manual

Dahua Technology
Dahua Technology PFS3102-1T user manual

Kenwood
Kenwood TS-700S Operation guide

Alcatel-Lucent
Alcatel-Lucent OmniSwitch 6800 Series user guide

Northern Airborne Technology
Northern Airborne Technology NTX403 Series Installation and operation manual

Standard Horizon
Standard Horizon QUANTUM GX2360S supplementary guide

Kenwood
Kenwood NX-1000 Series user manual

Midland
Midland M-5 manual

Radio Shack
Radio Shack HTX-202 owner's manual

Garmin
Garmin GDL 82 installation manual