TTM NoXygen C650 User guide

2023-11
TTM NoXygen®C650
INSTALLATION,
OPERATING AND MAINTENANCE INSTRUCTIONS................2
KOKOAMISOHJEET,
KÄYTTÖ- JA HUOLTO-OHJEET ........................................12
INSTALLATIE-INSTRUCTIES,
BEDIENINGS- EN ONDERHOUDSINSTRUCTIES..................22
MONTAGEANVISNING,
DRIFT- OCH SKÖTSELINSTRUKTION................................32
EN
FI
NL
SE
Modbus
RTU
Degasser
Technical data
Art.no .................................................... 515 968
System pressure at the connection point,
max.:.....................................................+5.0 bar
Allowable operational temperature:........0 – +70 °C
Ambient temperature:............................0 – +40 °C
Allowable fluids: ....................................Water and deionised water
Ethanol* less than 30 vol%
Kilfrost max 30 vol%
Pressure classification: ..........................PN10
Capacity, degassed fluid:.......................min. 135 l/h
Connection dimension:..........................DN15
Electrical data:.......................................1~230 V, 50 Hz, plug
Internal fuse: .........................................10 A
Nominal power: .....................................0.75 kW
Nominal current:....................................5.0 A
Protective class: ....................................IP44
Energy usage: .......................................37 kWh/year **
Communication protocol: ......................Modbus RTU (RS485)
Sound level:...........................................61 dB
Weight:..................................................29 kg
*) When degassing ethanol, make sure the room is well ventilated.
**) Operation with 30 days of fast degassing gives a
energy consumption of 102 kWh in the first year.
TTM NoXygen®is environmentally assessed.
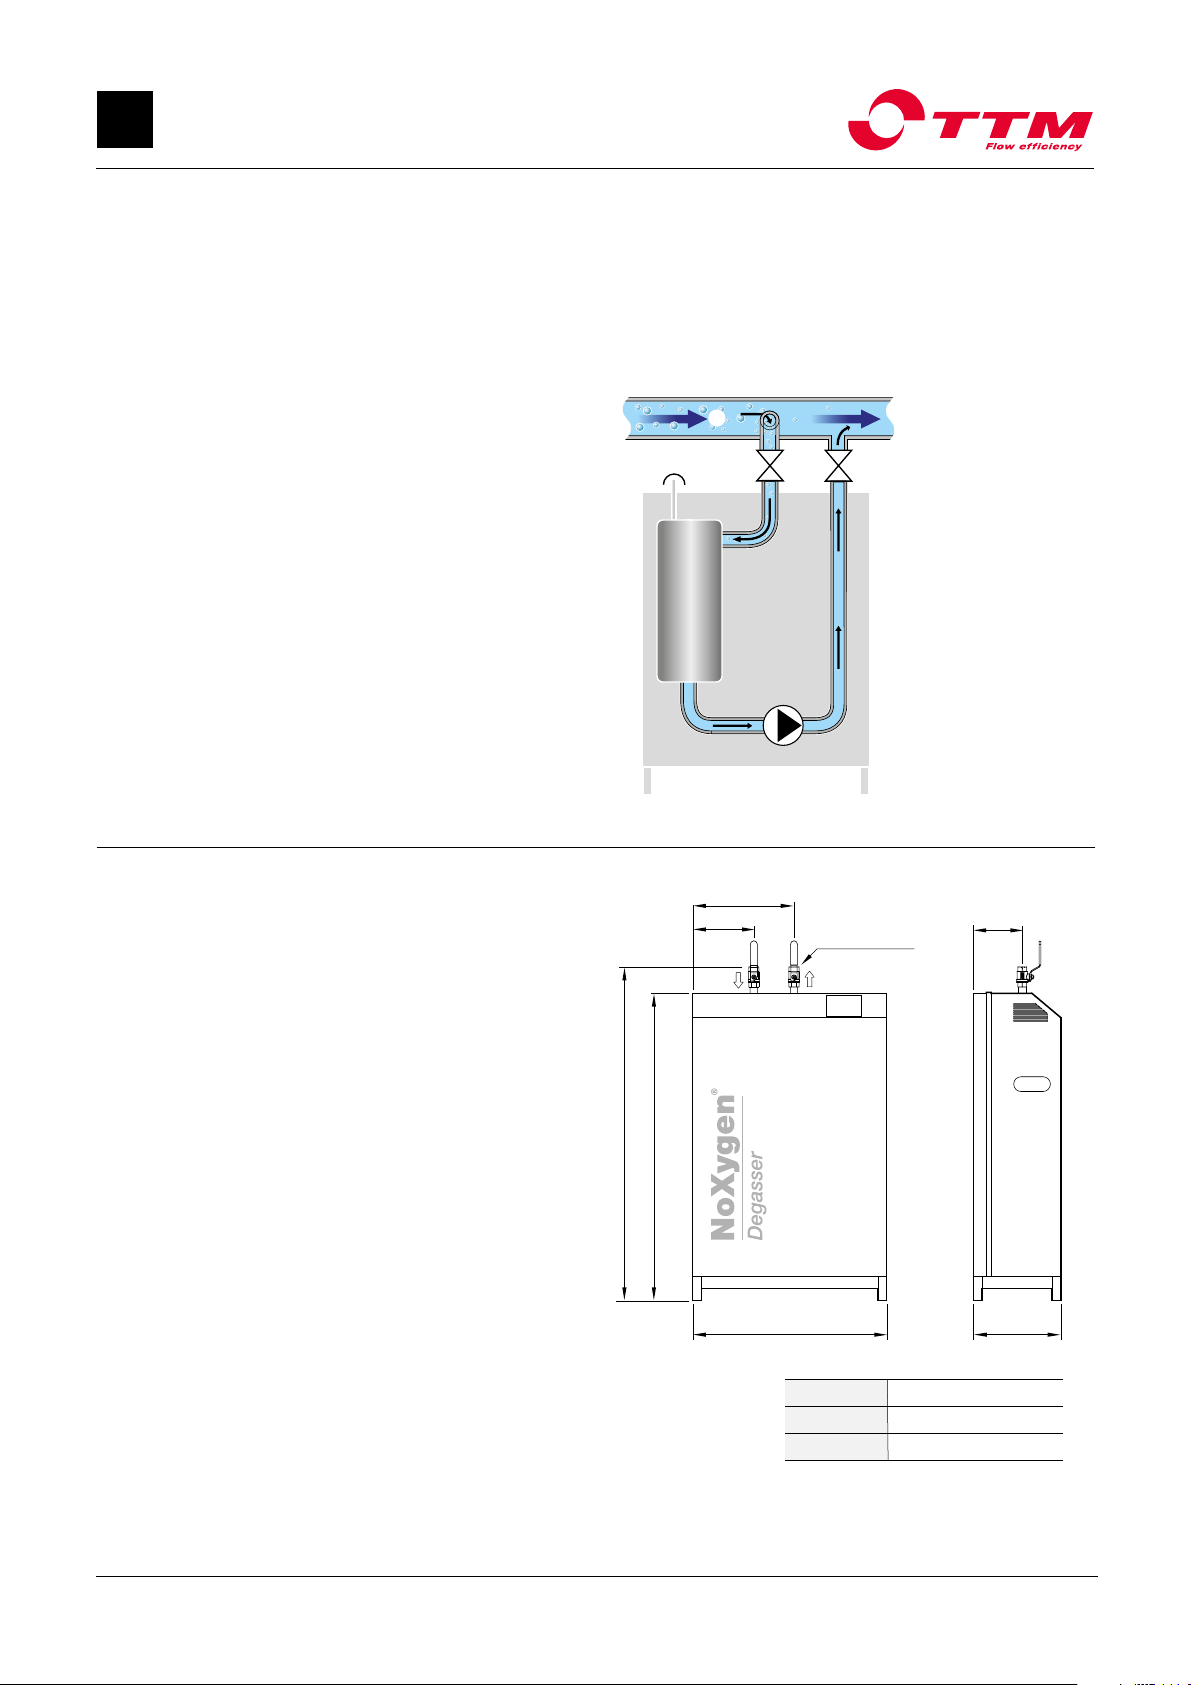
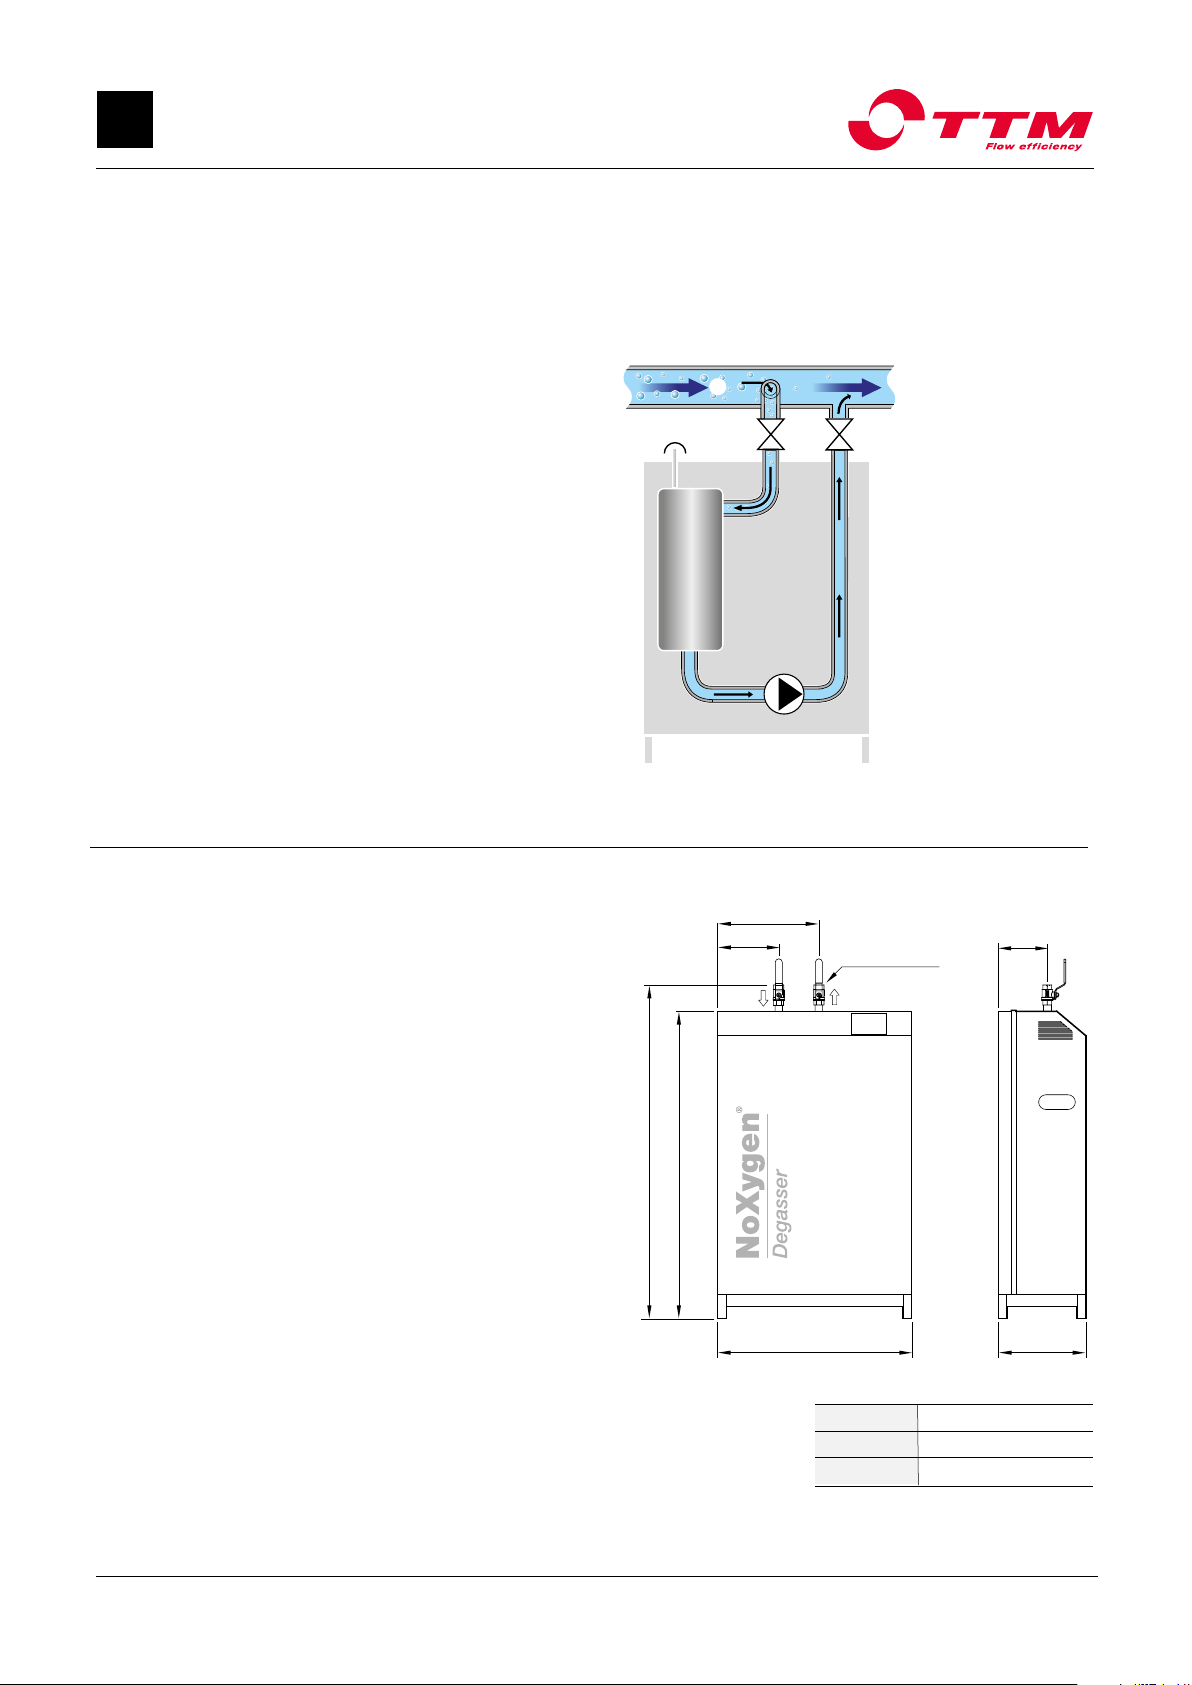
Width: 560 mm
Height: 960 mm
Depth: 253 mm
2023-11
EN
Upon delivery
Instructions: Immediately upon receiving, check to ensure
that the delivery is complete and that nothing
is damaged.
Report any transport damage immediately.
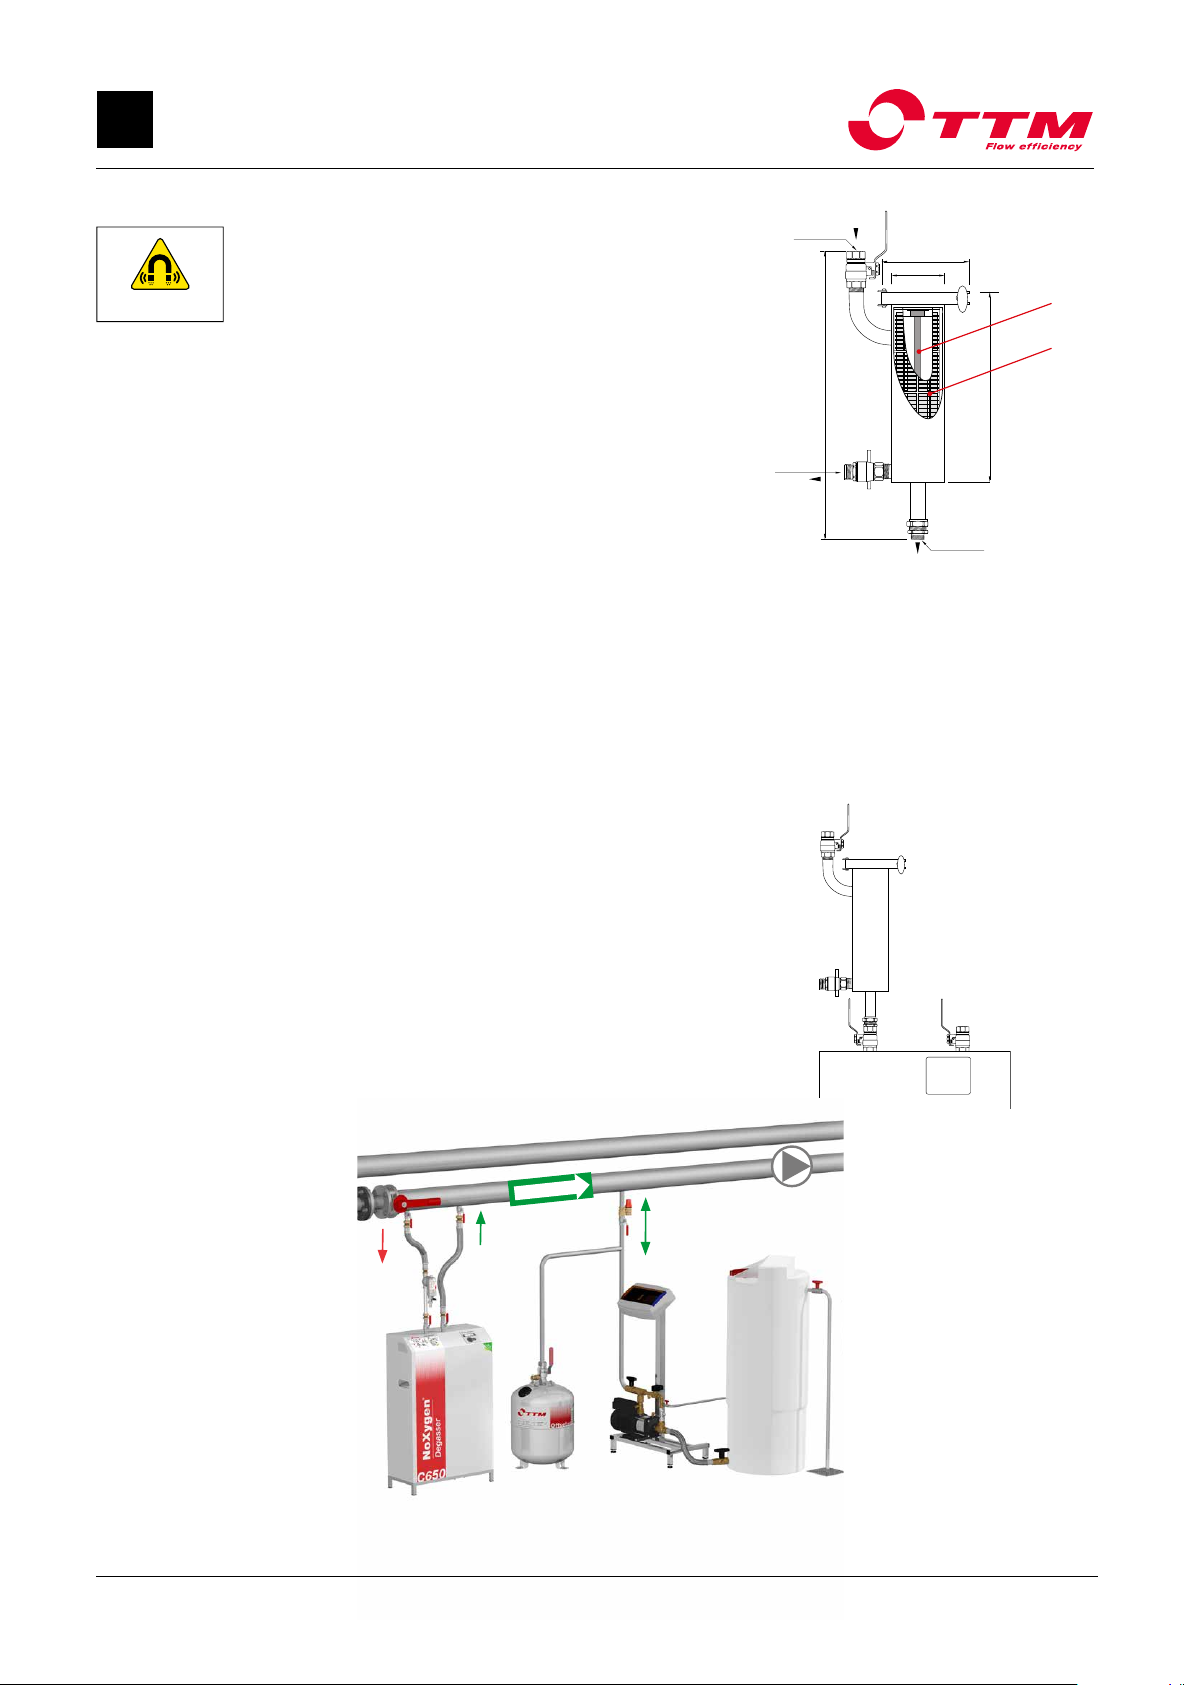
A. Main pipe (return)
B. Inlet with shut-off valve
C. Treatment chamber
D. Return with shut-off valve
Principle of Operation
Table of Content
General
Principle of Operation................................................... 2
Technical Data.............................................................. 2
General Safety Instructions .......................................... 3
Installation .............................................................. 4
Pipe connection .......................................................... 4
Electrical Connection .................................................. 4
Commissioning and Operation...................... 5
Display ..................................................................... 6
Factory Reset ............................................................... 6
Alarm list ....................................................................... 6
Operating Modes ................................................ 6
Maintenance .......................................................... 7
Functional Control............................................... 9
Modbus instructions ..........................................10
Troubleshooting....................................................11
560 253
880
960
290
140
180
1/2” int. thread
B
C
D
A
TTM NoXygen® C650
Installation, operating and maintenance instructions
2
TTM Energiprodukter AB
Slöjdaregatan 1 | 393 66 Kalmar | Sweden | Tel. + 46 480-41 77 40 | [email protected] | www.ttmenergi.se
For latest updates visit www.ttmenergi.se.
2023-11 2023-11
EN
General safety instructions
TTM NoXygen®C650 is designed for stationary operation; it
is not meant for mobile system operation. The stipulated war-
ranty period applies only to a maximum of 10,000 degassing
intervals per year.
Installation must be done in accordance with national regula-
tions. Installation must be done by professionals and specially
trained staff. Information on the manufacturer, year of manu-
facture, serial number and technical data can be read on the
data plate affixed to the TTM NoXygen®C650 unit.
Take measures for temperature and pressure fusing in the
system so that the stated, allowable maximum and minimum
operating parameters are not exceeded or undercut, respec-
tively. TTM NoXygen®C650 must only be used in systems for
containing allowable fluids.
Systems using expansion vessels and pressurised expansion vessels
When operating TTM NoXygen®C650, there must be 6 litres of free expansion volume in the system.
Without this, the pressure in the system will increase and the system safety valve may release fluid in order
to reduce the pressure. If this occurs, the system’s expansion vessel like has the wrong input pressure or
there is too little room for expansion and it needs to be replaced with a larger expansion vessel.
Rule of thumb: The input pressure must be 70% of the system pressure.
NOTE: The pressure at the safety valve opening should be 30% above the system pressure.
Systems using pressure maintenance systems with compressors or pumps
Systems with pressure maintenance vessels/compressor vessels for expansion can begin to work intermit-
tently with the degasser, i.e., the expansion vessel empties and fills according to TTM NoXygen®C650's
opertation cycles. A surge vessel measuring 50 litres should be installed in connection with the pump expan-
sion. (See the image below). The reason why this happens is that the nominal value between the opening and
the magnetic valve and the pump switch is too narrow.Then check the system pressure and system height so
that the correct system pressure is set and then give the nominal value a larger pan.
System pressure and filling of system fluid
As gasses are removed from the system fluid, the
fluid decreases in volume and the pressure within the
system is reduced. Therefore it is important to moni-
tor the system pressure and to add more system fluid
when necessary. A high gas content and continuous
operation of TTM NoXygen®can result in the system
pressure falling very quickly. An initial inspection is therefore
recommended after only 24 hours of operation.
System pressure
System pressure = system height (m) + 5 m.
Example
System height = 5m + 5m => 1 bar of system pressure
• Before maintenance work, the plug must be disconnected from the wall socket.
• Installation, maintenance and troubleshooting should only be carried out by
qualified personnel.
• The TTM NoXygen is usually maintenance-free but an annual function check
is recommended to ensure maintained performance, see function check page 9.
• Checking and cleaning of pre-filters should be done in conjunction with the
function check. In dirty systems cleaning of pre-filters needs to be done more
frequently, see page 7 and 8.
IMPORTANT!
TTM NoXygen® C650
Installation, operating and maintenance instructions
3
TTM Energiprodukter AB
Slöjdaregatan 1 | 393 66 Kalmar | Sweden | Tel. + 46 480-41 77 40 | [email protected] | www.ttmenergi.se
For latest updates visit www.ttmenergi.se.
2023-11
EN
Fig. 2.
Fig. 1
Fig. 3
Fig. 4
Fig. 5
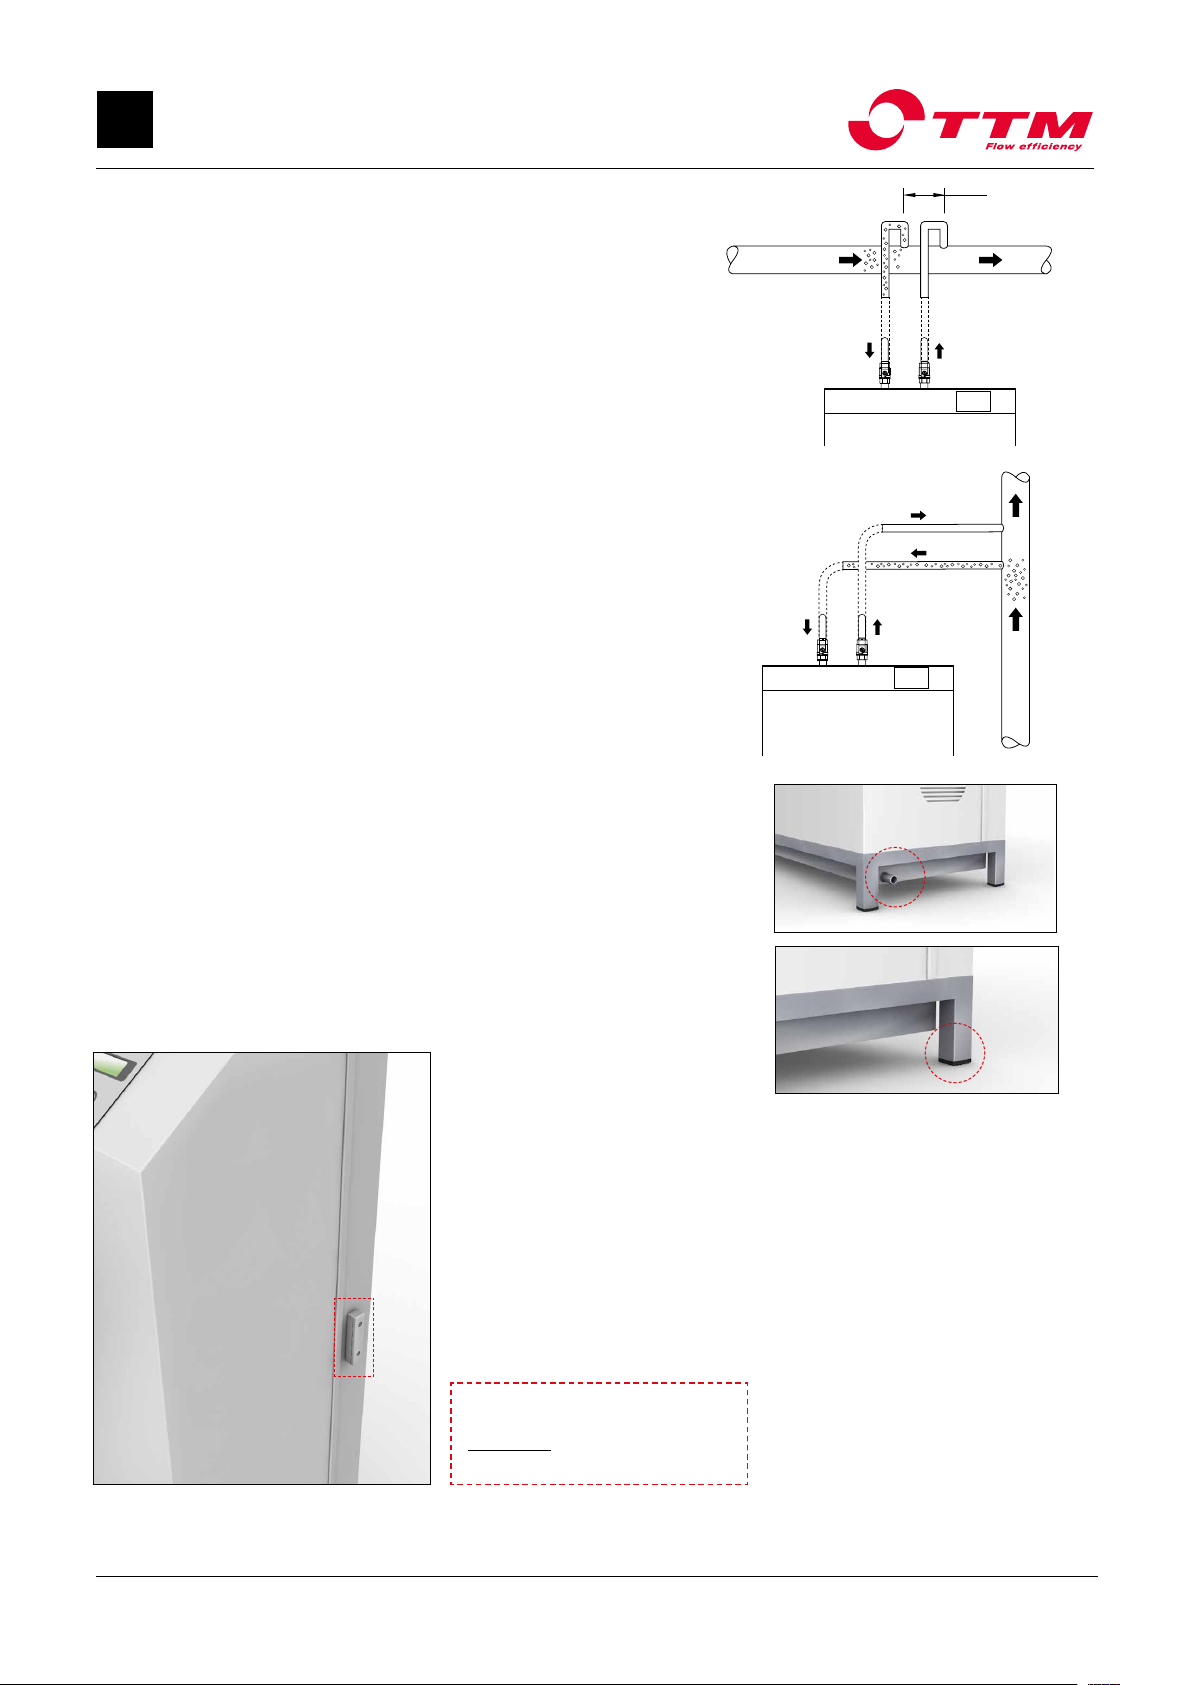
OBS!
Existing cables in the coupling slot
should not be moved or
disconnected.
Main flow V
Circulation water
≥300
High gas
Low gas
High gas
Low gas
Main flow V
Circulation water
Main flow V
Circulation water
≥300
High gas
Low gas
High gas
Low gas
Main flow V
Circulation water
Installation
Pipe connection
• TTM NoXygen®is fitted with a ½” internally threaded connection.
The connection is made with a steel-braided hose to system’s return
conduit in front of the pump and exchanger.
• Connection to the system should always be made at the top of the
pipework. When connecting on the bottom of the pipe, TTM MAG 54
or TTM MAG 76 filters should be installed before TTM NoXygen®
on the incoming pipe. Installation of a filter on the incoming pipework
is recommended for all other connections.
• The pipe to the degasser must be fitted with shut-off valves. The
distance between connection points shall be at least 300 mm
(Fig. 1 och 2).
Drip Tray
The drip tray’s ½” connection is connected to the floor drain (Fig. 3).
Floor installation
For floor mounting, the TTM NoXygen®is placed on its feet so that it is
horizontal (Fig. 4).
Electrical Connection
TTM NoXygen®is connected by plugging in the wall plug to an earthed
socket 1-230 V, 50 Hz Alternatively, it can be connected to a fixed
earthed connection with a circuit breaker. The electrical unit should be
equipped with a residual current device.
Connection to External Monitoring (DUC)
The TTM NoXygen®C650 can be integrated in the building automation
system with MODBUS RTU via RS485. The switching pin is mounted
externally on the right side of the device (Fig. 5).
Adjust the adjusting screws at the floor
Installation.
TTM NoXygen® C650
Installation, operating and maintenance instructions
4
TTM Energiprodukter AB
Slöjdaregatan 1 | 393 66 Kalmar | Sweden | Tel. + 46 480-41 77 40 | [email protected] | www.ttmenergi.se
For latest updates visit www.ttmenergi.se.

2023-11 2023-11
EN
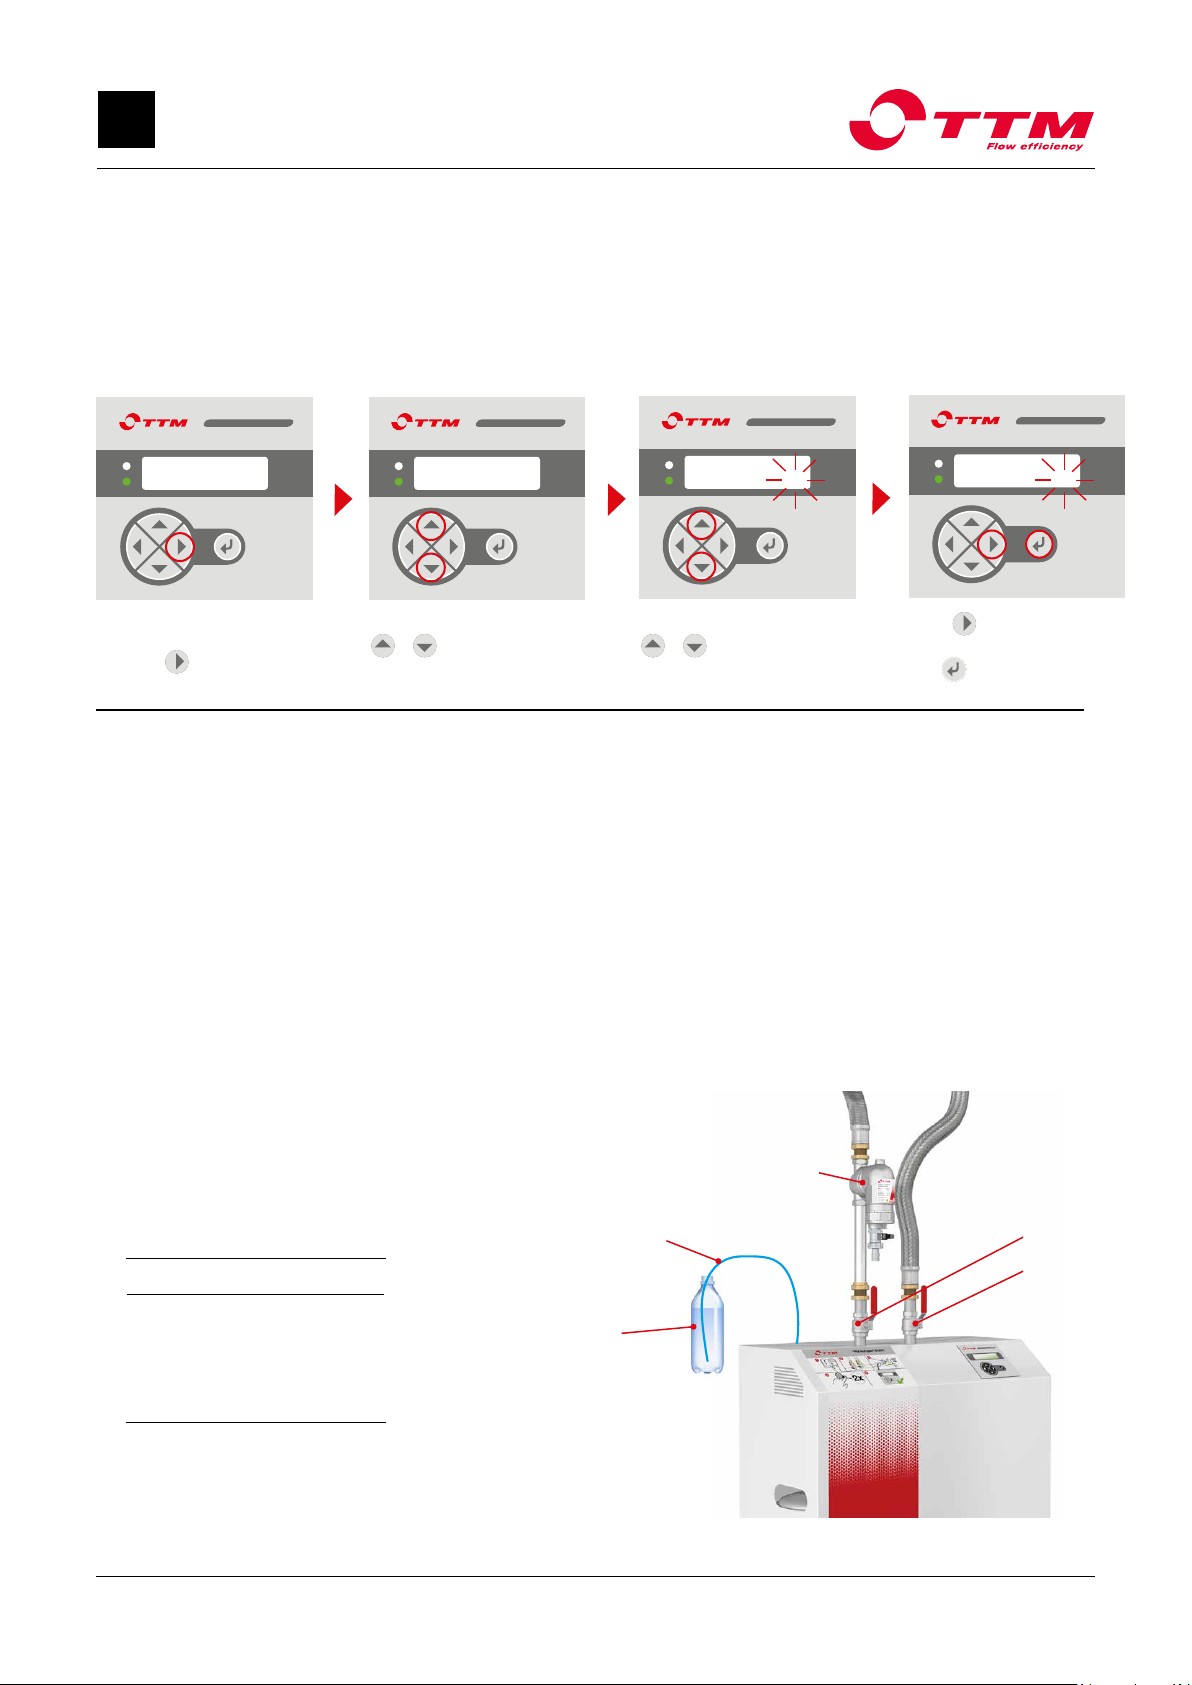
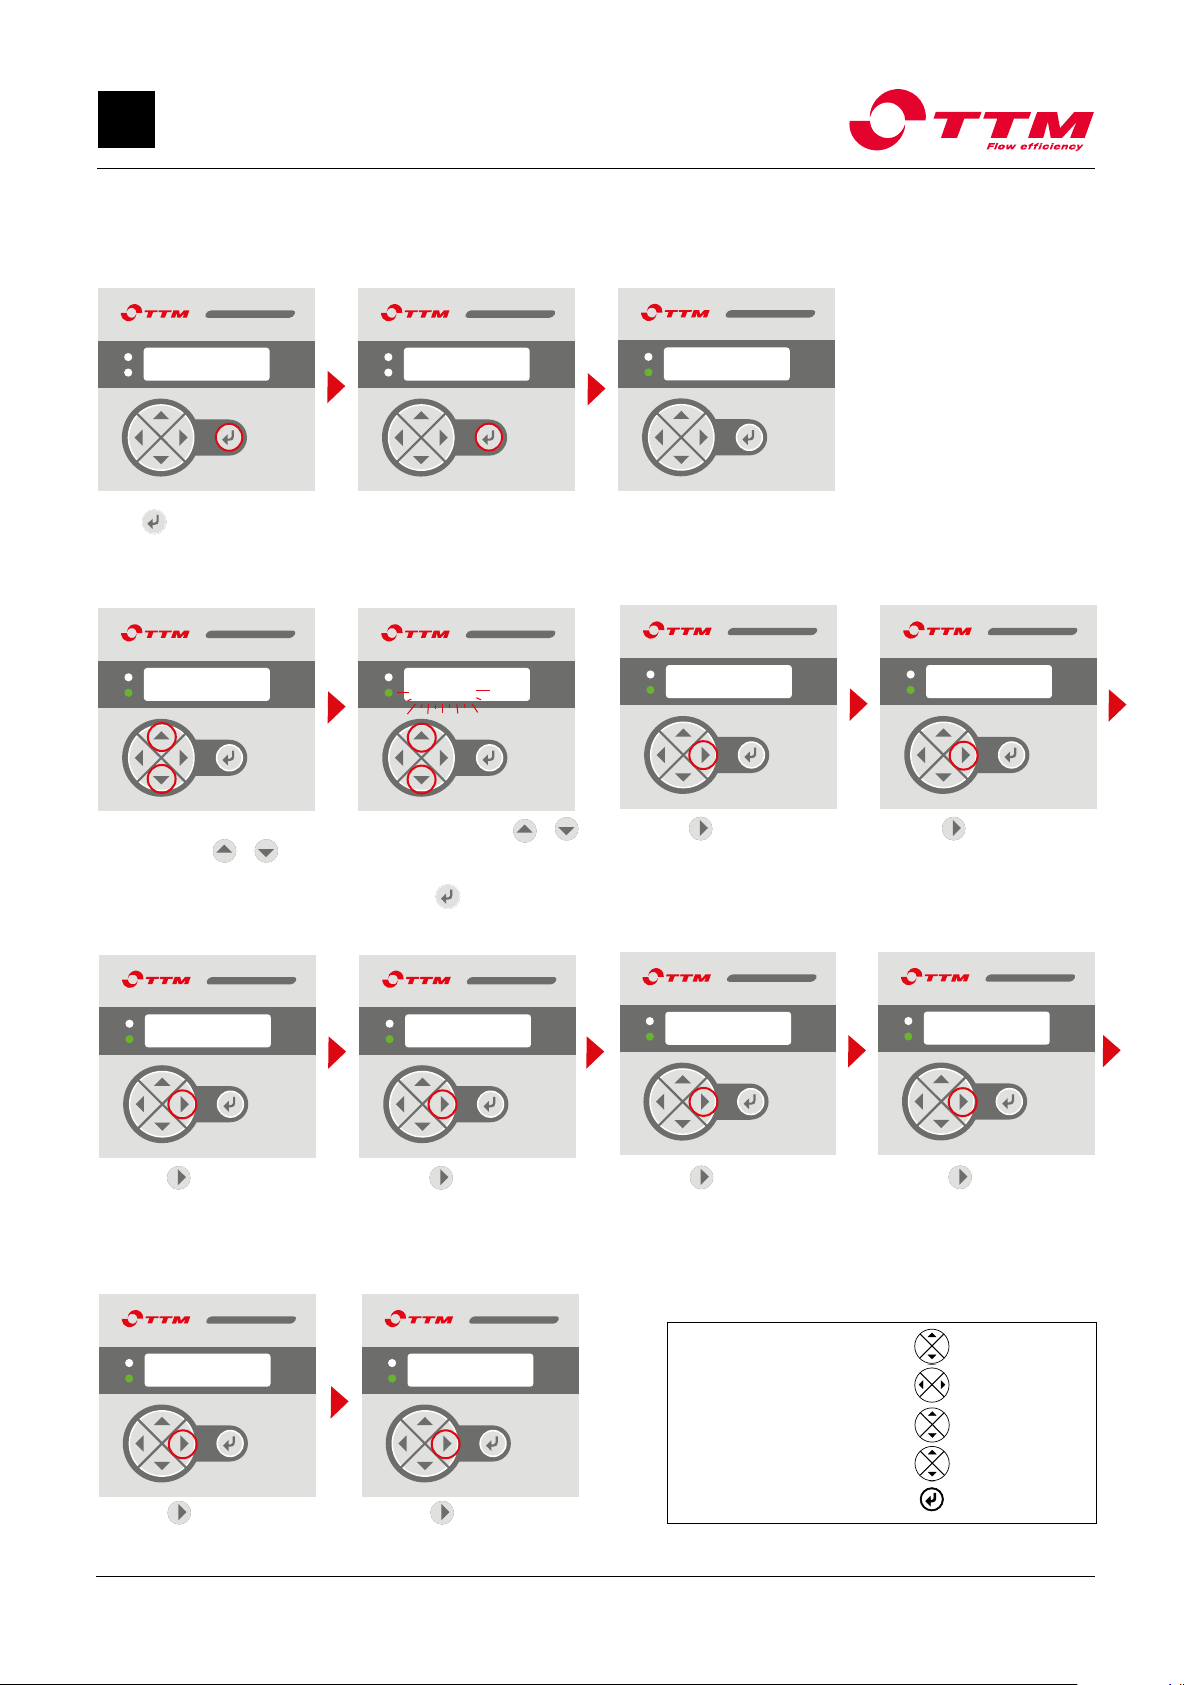
Commissioning and operation
1. Starting TTM NoXygen®
Press
MOVEO
twice to start the TTM NoXygen. When the green LED lights up, the unit is now in operation.
2.2 Press
MOVEO
to check time
settings "hh-mm-ss".
2.3 Press
MOVEO
to check start
time for maintenance
degassing "Tstart".
2.4 Press
MOVEO
to check the
number of hours the degasser
should be active during main-
tenance degassing, "Toperat".
2. Check and change settings
MOVEOMOVEOMOVEO
Start?
T Pint: 1.2 bar
0
T Pint: 1.2 bar
0
MOVEOMOVEO
MOVEO
PROGV 2.23
hh-mm-ss
MOVEOMOVEO
MOVEO
Sengs
hh-mm-ss
Sengs
yy-mm-dd
Sengs
To change settings, press
simultaneously
MOVEO
+
MOVEO
(up arrow
and down arrow), to get to the
change mode ("Settings" is
displayed on the display).
Simultaneously press
MOVEO
+
MOVEO
once more to change values.
Confirm and save the setting with
MOVEO
. For further instructions, see
page 6.
2.1 Press
MOVEO
to check date
settings "yy-mm-dd".
MOVEO MOVEO
2.5 Press
MOVEO
to check how long
the TTM NoXygen will run in fast
degassing mode "Days left".
2.6 Press
MOVEO
to change Modbus
address "Modbus ID".
Sengs
Tstart: 13:00
Sengs
Toperat: 1h
Sengs
Modbus ID: 1
Sengs
Days le: 30/30
Sengs
yy-mm-dd
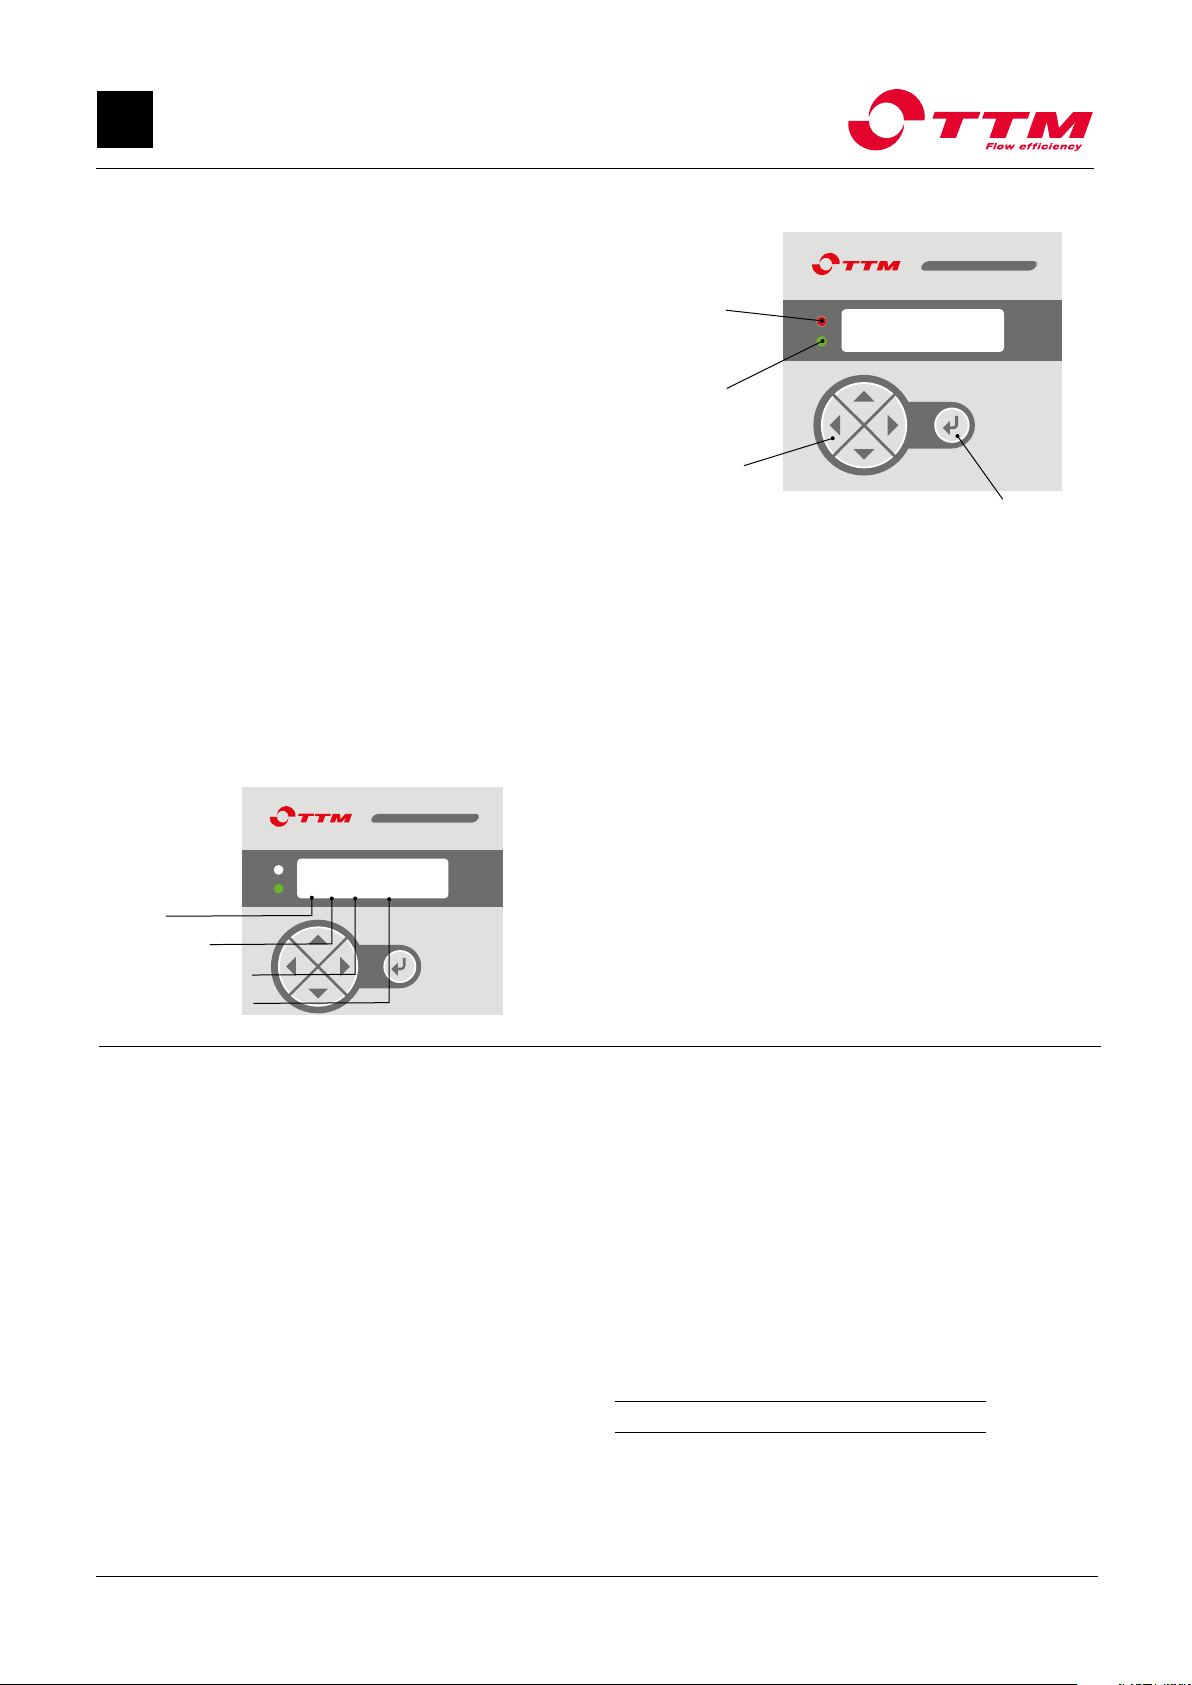
1. Menu for setting of nominal value:
2. Search value to be changed:
3. Menu for changing of nominal value:
4. Set the new nominal value:
5. Lock nominal value:
Up or down
2X to get to the
main menu
Up/down
simultaneously
Up/down
simultaneously
2.7 Press
MOVEO
to change the
minimum permissible system
pressure "Pmin".
2.8 Press
MOVEO
to change the
maximum permissible operating
pressure "SafetyP".
MOVEO MOVEO
Sengs
Pmin: 0.8 bar
Sengs
SafetyP: 5.0 bar
TTM NoXygen® C650
Installation, operating and maintenance instructions
5
TTM Energiprodukter AB
Slöjdaregatan 1 | 393 66 Kalmar | Sweden | Tel. + 46 480-41 77 40 | [email protected] | www.ttmenergi.se
For latest updates visit www.ttmenergi.se.
2023-11
EN
Display
MOVEO
TTM NoXygen®
PROGV 2.23_650
Factory reset
• Unplug the unit. When in a non-powered state, press
the left and down arrows simultaneously as you
reconnect the plug.
• Hold until “OFF NOW” is shown on the display.
• Release the arrows and unplug the unit again.
• Reconnect NoXygen with the contact.
• NoXygen is now factory reset.
Operating modes
Fast degassing/Intensive degassing
For new installations and system fluid replacement, fast
degassing is recommended. Fast degassing means that the
TTM NoXygen®runs continuously between 00:00 on Monday
and 23:59 on Friday.
The preset value is 30 days of fast degassing, which in most
cases is sufficient to degass the system. In large systems or in
systems with many air pockets, longer time may be needed to
remove all air. It is possible to increase the number of days in
fast degassing mode up to 90 days.
Explanation of display messages
Pint Displays the current pressure inside the vacuum
chamber of the NoXygen®.
Date Setting the date "yy-mm-dd".
Clock Setting of the clock "hh-mm-ss".
Tstart The time when TTM NoXygen®shall start in
timer operation.
Toperat How many hours the TTM NoXygen®shall run in
maintenance degassing per day.
Days left How many days of fast degassing mode
remains before the TTM NoXygen®enters the
maintenance degassing.
Modbus ID TTM NoXygen®address in modbus system.
Pmin Setting the minimum permissible system
pressure (Alarm limit).
SafetyP Setting to avoid the release of the safety valve
(Alarm limit).
nbpumps Number of pump starts.
Maintenance degassing
When the system is degassed, there is very little air left in the
system and it only costs money to keep the degasser active
around the clock and increases wear on the unit.
There is always some air leakage into the system that needs
to be taken care of. During maintenance degassing, the TTM
NoXygen®only runs for a few hours per day, which is sufficient
to take care of the system air leakage. The number of hours
per day needed to maintain low gas levels is shown in the table
below.
Recommended operating time per day
System volume Operating time
10 000 litres 1 hour
20 000 litres 2 hours
30 000 litres 3 hours
40 000 litres 5 hours
50 000 litres 7 hours
Red LED indicates
alarm.
Green LED indicates
that the unit is in
operation.
Enter
Arrows right/left,
up/down.
MOVEO
Pos
01>2 1021 14:37
Position in
alarm list
Alarm number
Alarm date (mm-dd)
Alarm time (hh-mm)
Alarm list
#2 Pmin: The pressure in the connection point is
too low. Increase the pressure up to at
least 0.8 bar.
#4 Pint > SafetyP: The system pressure has exceed the
maximum permissible pressure
"SafetyP".
#5 Max Tcycle: The cycle time has been more than
3 minutes. This indicates that the
incoming flow is blocked in the filter or
the flow restrictor.
TTM NoXygen® C650
Installation, operating and maintenance instructions
6
TTM Energiprodukter AB
Slöjdaregatan 1 | 393 66 Kalmar | Sweden | Tel. + 46 480-41 77 40 | [email protected] | www.ttmenergi.se
For latest updates visit www.ttmenergi.se.

Maintenance
2023-11 2023-11
EN
Mounting the strainer basket
5. Replace the strainer basket Cin the inlet valve. Ensure that the filter
basket is entirely submerged and sits evenly with the valve body.
6. Make sure that the protective cap gasket is correctly located. Screw
the protective cap Bon the inlet valve with a spanner.
7. Turn the inlet and outlet valve handle A to the open position.
Disassembly of the inlet valve
3. Loosen the protective cap Bon the inlet valve with a spanner.
Let the gasket remain in the protective cover.
4. Remove the filter basket Cand clean it and the protective
cap with water.
Before starting cleaning of the inlet valve,
ensure that:
1. The inlet and outlet valve handle A is in the closed position.
2. The TTM NoXygen® is turned off or the the main power is isolated.
A
BC
Inlopp Utlopp
Cleaning the filter basket of the inlet valve
Maintenance of TTM MAG 54
A
A
Inlopp Utlopp
!WARNING
If TTM NoXygen®is installed in a heating system then hot
pressurised system fluid may leak out when the protec-
tive cap B is unscrewed.
A
A
Inlet
Inlet
Outlet
Outlet
Cleaning the particle lter
1. Switch off both TTM NoXygen®and the main
power.
2. Close both inlet valves 1.
3. Install hose 6on the hose connector.
4. Empty the magnetite filter by opening the
drain valve 3. Leave the water to run until the
housing is empty of water.
5. Unscrew the bottom insert 4.
6. Unscrew the magnet insert 2 (see image 1).
7. Clean the particle filter 5and other parts
with lukewarm water.
8. Screw the magnet insert back in place 2.
9. Ensure the particle filter 5 and the O-ring
are correctly installed and screw the bottom
insert 4into the housing.
10. Close the drain valve 3.
11. Open both inlet valves 1.
12. Start TTM NoXygen®.
Cleaning the magnetite trap
1. Switch off both TTM NoXygen®and the
main power.
2. Close both inlet valves 1
(see image 2).
3. Install hose 6on the hose connector.
3. Unscrew the magnet insert 2.
4. Empty the particle trap by opening
the drain valve 3. Leave the water to run
until the housing is empty or until the fluid
is clear and without contaminants.
5. Close the drain valve 3and screw the
magnet insert back in place 2.
6. Open both inlet valves 1
(see image 2).
7. Start TTM NoXygen®.(Image 1)
TTM MAG 54 should be inspected and cleaned regularly, at least
twice per year. The intervals depend on the quantity of particles and
magnesite in the system fluid. If you know the system fluid is very dirty,
the filter should be inspected and cleaned more often. One sign that
TTM MAG 54 requires cleaning is, for example, that TTM NoXygen®
runs for long intervals exceeding 3 minutes “pump start to pump start”
(see Operating and maintenance instructions for TTM NoXygen®).
(Image 2)
24
5
1
6
1
3
6
3
Strong magnetic
field
Can affect
pacemaker/ICD Risk of pinching
Also be aware that the
magnet may interfere with
electronic equipment and
pacemakers.
TTM NoXygen® C650
Installation, operating and maintenance instructions
7
TTM Energiprodukter AB
Slöjdaregatan 1 | 393 66 Kalmar | Sweden | Tel. + 46 480-41 77 40 | [email protected] | www.ttmenergi.se
For latest updates visit www.ttmenergi.se.

Maintenance
2023-11
EN
Maintenance of TTM MAG 76
TTM MAG 76 must be checked and cleaned regularly – at least twice per
year. The interval depends on the quantity of dirt and magnetite in the system
fluid. One sign that TTM MAG 76 requires cleaning is, for example, that TTM
NoXygen®runs for long intervals exceeding 3 minutes “pump start to pump
start”.
Note: Copper paste/silicone grease must be applied to the thread of the
clamp ring once per year or every time the filter is opened.
1. Switch off TTM NoXygen®.
2. Shut off the shut off valves on the inlet to
TTM MAG 76 and the inlet to TTM NoXygen®.
3. Place a container under the drain valve or connect a hose to it.
4. Open the drain valve.
5. Undo the clamp ring and lift out the magnetic rod and filter cartridge.
6. Wipe off the black magnetite that is collected on the magnetic rod.
7. Clean the filter cartridge or replace it if it is damaged.
8. Refit the filter cartridge and magnetic rod and fix into place with the
clamp ring. Grease the clamp ring threads with copper paste/silicone
grease before tightening.
2. Replaceable filter cartridge
Article no: u2001217
1. Magnetic rod
261
Ø75
Ø140
410
DN15 (1/2”)
DN15 (1/2”)
DN15 (1/2”)
IN
Avtappning
UT
1
2
Drainage
OUT
The TTM MAG 54/76 mounts directly on the TTM NoXygen®inlet valve. It is connected
to the system via 1/2" female pipe thread and it is recommended to use a flexible hose.
1. Fit the supplied clamping ring coupling.
2. Connect the flat end of the TTM MAG 54/76 to the clamping ring coupling.
3. Mount the TTM MAG 54/76 directly on the shut-off valve on the inlet of the
TTM NoXygen®.
Installation of TTM MAG 54 and TTM MAG 76
Installation of TTM Offset 510
Art.no: 506430
TTM NoXygen®
Degasser
TTM MAG 54
Magnetite filter
Main pump
TTM Flexible
hose
TTM Offset
Equalisation
vessel
Return flow
TTM GeniX®
Pressurization unit
Art.no: 506188
Art. no: 514428
1. Close the shut-off valve to the system.
2. Remove the protective cover on the drain valve.
3. Open the drain valve (the spindle located on the side) and let the
water drain out.
4. Remove the black protective cover and take off the valve cap to
air valve.
5. Adjust the rubber lock pre-pressure so that this corresponds to
70-80% of the system pressure by releasing or replenishing air
through the air nipple.
6. Close the drain valve and reinstall the valve bonnet and
protective cover.
7. Reassemble the protective cover to the drain valve.
8. Open the shut-off valve to the system.
Magnetic field
TTM NoXygen® C650
Installation, operating and maintenance instructions
8
TTM Energiprodukter AB
Slöjdaregatan 1 | 393 66 Kalmar | Sweden | Tel. + 46 480-41 77 40 | [email protected] | www.ttmenergi.se
For latest updates visit www.ttmenergi.se.
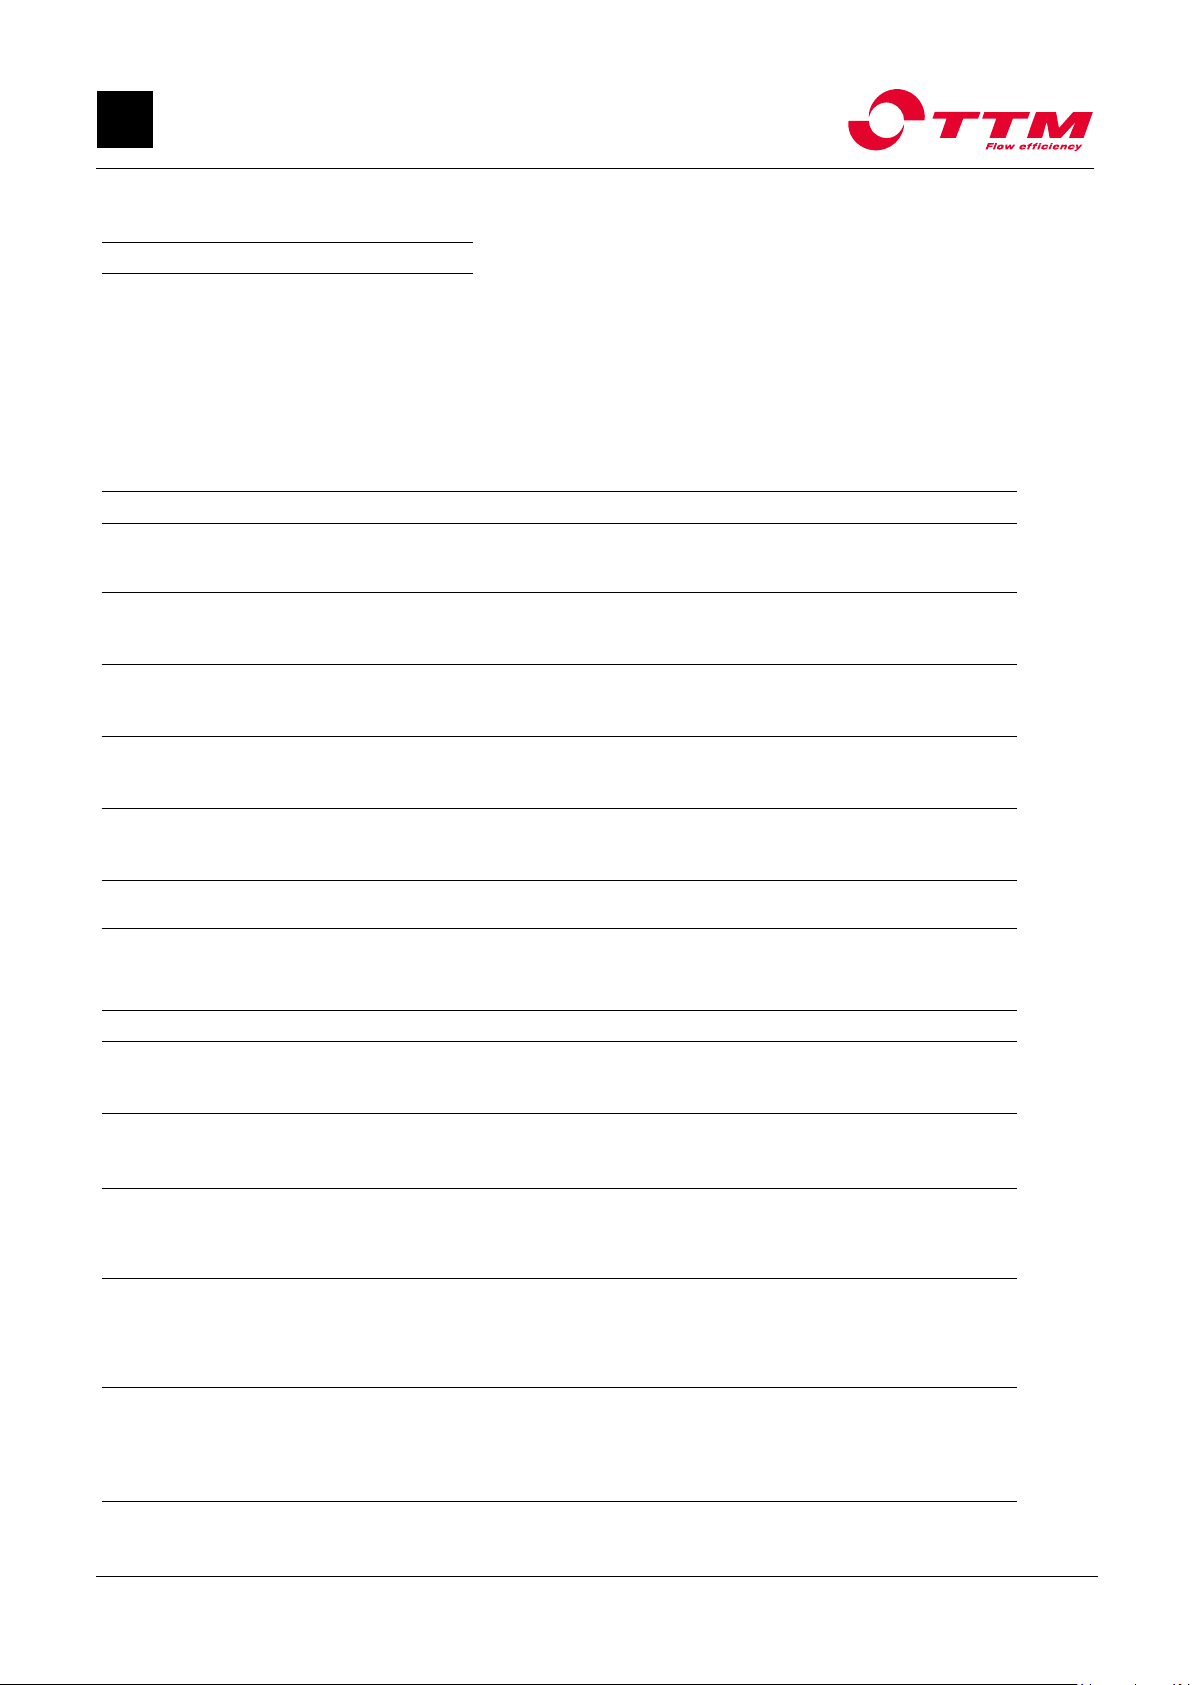
TTM NoXygen®
Degasser
Blue
control hose
Transparent
bottle
filled with
water.
TTM MAG 54
Magnetite
separator
Shut off valve
Shut off valve
2023-11 2023-11
EN
Pressure Time
1.0 bar 150 s
2.0 bar 140 s
3.0 bar 130 s
4.0 bar 120 s
5.0 bar 110 s
2. Replaceable filter cartridge
Article no: u2001217
1. Magnetic rod
Before the function check, the pre-filters must be cleaned (see page 7) and the system pressure
needs to be at least 0.8 bar for the function check to be made.
MOVEO
1. Cleaning prelters
See page 7-8.
2. Expansion vessel control
Check that the expansion vessel is correctly adjusted with cor-
rect pre-pressure and that there is free expansion volume. The
TTM NoXygen®C650 requires at least 6 litres of free expansion
space. If it is suspected that the expansion space is too small,
install TTM Oset expansion vessel (art.no. 506430).
3. Pressure sensor control
Check that the "Pint" pressure on the TTM NoXygen®display
in idle mode is between minimum 0.8 bar and maximum 5.0
bar (the unit will not start if the pressure is below 0.8 bar, see
troubleshooting action 1.1). If the pressure on the display does
not match the system pressure, see troubleshooting action 7.
Also check that the "Pint" reaches at least -0.7 while the pump
is running. If not, see troubleshooting action 2.
4. Operating cycle time control
The time from pump start to pump start should not exceed the
recommendations in the table below. Long cycle times
indicate clogging of lters or ow restrictors.
See troubleshooting action 3.
5. Leakage control
Check that no uid is leaking from the blue control hose, when
the "Pint" pressure is equal to the system pressure of the plant,
in case of leakage, contact TTM. Check that no system uid
is leaking from any of the connections to the pump or vacuum
chamber.
6. Degassing capability control
When the TTM NoXygen® starts, close the shut-o valve on the
inlet and check that the "Pint" pressure reaches at least -0.7. If
not, see troubleshooting action 2. Allow the machine to stand
with the valves closed for at least 5 minutes and check that the
pressure does not change. If the pressure increases, there is a
leak, see troubleshooting action 5:3.
Preparation before function check - Test run settings
Functional control
PROGV 2.23
Days le: 0/30
MOVEO
Sengs
Days le: 0d
Then press simultaneously
MOVEO
+
MOVEO
to activate
"Settings".
Then press simultaneously
MOVEO
+
MOVEO
to activate
editing mode.
Press
MOVEO
to set "Days left = 1d".
Confirm by saving the setting
with
MOVEO
.
MOVEO
Sengs
Days le: 1d
MOVEO
Set the TTM NoXygen® to
continuous operation by
pressing
MOVEO
until "Days left"
appears on the display.
Sengs
Set the TTM NoXygen®to continuous operation by adjusting "Days left" to 1day
TTM NoXygen® C650
Installation, operating and maintenance instructions
9
TTM Energiprodukter AB
Slöjdaregatan 1 | 393 66 Kalmar | Sweden | Tel. + 46 480-41 77 40 | [email protected] | www.ttmenergi.se
For latest updates visit www.ttmenergi.se.
2023-11
EN
Name Address Read/Write Comment
Pressure 0 Read Present pressure in mbar
Reserved 1 Read Reserved, reads as 0
Reserved 2 Read Reserved, reads as 0
Total pump start count high 3 Read Total number of pump starts, most significant 16 bits
Total pump start count low 4 Read Total number of pump starts, least significant 16 bits
Stop reason 5 Read Reason for system not running
Reserved 6 Read Reserved, reads as 0
Reserved 7 Read Reserved, reads as 0
Reserved 8 Read Reserved, reads as 0
Reserved 9 Read Reserved, reads as 0
Log entry 1 (newest) – Month 10 Read Month for log entry 1 (newest)
Log entry 1 (newest) – Day 11 Read Day for log entry 1 (newest)
Log entry 1 (newest) – Hour 12 Read Hour for log entry 1 (newest)
Log entry 1 (newest) – Minute 13 Read Minute for log entry 1 (newest)
Log entry 1 (newest) – Code 14 Read Code for log entry 1 (newest)
Log entry 2 – Month 15 Read Month for log entry 2
Log entry 2 – Day 16 Read Day for log entry 2
Log entry 2 – Hour 17 Read Hour for log entry 2
Log entry 2 – Minute 18 Read Minute for log entry 2
Log entry 2 – Code 19 Read Code for log entry 2
Name Address Read/Write Comment
On/Off 0 Read/write Read/set whether the device is started/stopped
Date - Year 1 Read/write Read/set year for system date
Date - Month 2 Read/write Read/set month for system date
Date - Day 3 Read/write Read/set day for system date
Time - Hour 4 Read/write Read/set hour for system time
Time - Minute 5 Read/write Read/set minute for system time
Time - Second 6 Read/write Read/set second for system time
Start time - Hour 7 Read/write Read/set hour for start time of the degassing
Operating time 8 Read/write Read/set number of hours per degassing run
Initial operating time 9 Read/write Read/set initial run time in number of days
Safety valve pressure 10 Read/write Read/set the safety valve’s pressure in mbar
Reserved 11 Read/write Reserved, reads as 0
Min pressure 12 Read/write Read/set lower target threshold for pressure
Reserved 13 Read/write Reserved, reads as 0
Reserved 14 Read/write Reserved, reads as 0
Reserved 15 Read/write Reserved, reads as 0
Alarm type 16 Read/write Read/clear alarms
Modbus registers
Input registers
Modbus settings
Parameter Value
Baud rate 9600
Parity None
Stop bits 1
Modbus mode RTU
Holding register read/write using Modbus function 3 respectively 6.
For log entry 3-6 use address 20-24, 25-29, 30-34, 35-39. For more information please contact TTM.
TTM NoXygen® C650
Installation, operating and maintenance instructions
10
TTM Energiprodukter AB
Slöjdaregatan 1 | 393 66 Kalmar | Sweden | Tel. + 46 480-41 77 40 | [email protected] | www.ttmenergi.se
For latest updates visit www.ttmenergi.se.
2023-11 2023-11
EN
Solution
Raise the system pressure to at least 0.8 bar.
Check that there is voltage to the TTM NoXygen®.
Check that the TTM NoXygen®is in operating mode.
Press twice, then enter.
Check and change settings if necessary.
If necessary, change start time Tstart and/or operating
time "Toperat" or change time and date settings.
Ventilate the pump. NOTE It may take up to 10 minutes
for the pump to vent itself.
Check that the shut-off valves to the system are open.
Check that nothing else is blocking the flow paths.
Close the shut-off valve on the inlet and check if negative
pressure is created. If negative pressure is created,
remove the front shroud and adjust the balancing valve
by closing and opening it a couple of times. 1.8 is the
default value for the balancing valve.
Clean any pre-filters and the strainer on the inlet
valve. If necessary, check the flow restrictors according
to 2.3.
Increase the set point between the solenoid valve and
the pump.
Install the Offset Equalizing vessel at the pressure
maintenance vessel, see instructions on page 2.
Install a new safety valve.
TTM NoXygen®requires 6 litres of free expansion space.
Install a TTM Offset Equalizing Vessel at the pressure
holding vessel, see instructions on page 2.
Check oxygen content. At oxygen levels below 1 mg/l, it
may take several cycles before air bubbles are released
through the vent.
Contact TTM.
Connect the control hose to a bottle of water if it is not
already connected and check that water is not being
sucked from the bottle into the TTM NoXygen®. If this is
the case, contact TTM.
Check that a vacuum is building up (at least -0.8 bar).
Check that the shut-off valves of the system are open.
Clean inlet valve filters and any pre-filters, see mainte-
nance instructions.
Contact TTM.
See alarm list on page 6.
Cause
1:1 The system pressure is lower than 0.7 bar.
1:2 The control panel is without power.
1:3 Green LED is not lit.
1:4 Date or time is incorrectly set.
1:5 TTM NoXygen®is in maintenance mode and
start and run time settings put the unit in sleep
mode.
2:1 Air in the pump.
2:2 Flow at the outlet is obstructed.
2:3 Flow restrictor on inlet misadjusted.
3:1 See recommended operation cycle times in
the table under function check on page 9.
4:1 Set point between solenoid valve and pump is
set too narrow on the pressure retaining vessel.
4:2 There is no free expansion volume in the
system.
5:1 Fault in safety valve.
5:2 There is no free expansion volume in the
system.
6:1 The system is degassed or the gas content is
low.
6:2 The deaerator is clogged with dirt and
cannot open to release air.
6:3 The check valve on the air vent is leaking.
6:4 The degassing function is not working.
7:1 Restricted or no flow through inlet.
7:2 Pressure sensor is defective.
8:1 An alarm is active
Issue
1. TTM NoXygen®does not
start.
2. A negative pressure is not
created in the TTM NoXygen®
(at least -0.7 bar).
3. The time between degassing
cycles is too long.
4. The systems's pressure ves-
sel works intermittently with the
TTM NoXygen®.
5. The system safety valve
releases system fluid.
6. No air bubbles comes out
of the control hose (NOTE: the
control hose needs to be placed
into a bottle of water).
7. System pressure does not
match the pressure on the
display.
8. Red led diod ligths up/flashing
Troubleshooting
TTM NoXygen® C650
Installation, operating and maintenance instructions
11
TTM Energiprodukter AB
Slöjdaregatan 1 | 393 66 Kalmar | Sweden | Tel. + 46 480-41 77 40 | [email protected] | www.ttmenergi.se
For latest updates visit www.ttmenergi.se.
2023-11
FI
560 253
880
960
290
140
180
1/2” int. thread
Toimituksessa
Ohje: Tarkista heti, että toimitus on täydellinen ja ettei mikään
ei ole vaurioitunut. Ilmoita mahdollisista
kuljetuksen aikaisista vaurioista viipymättä.
A. Päälinja (paluu)
B. Tulo sulkuventtiilillä
C. Käsittelytila
D. Paluu sulkuventtiilillä
Toimintaperiaate
Sisällysluettelo
Yleistä
Toimintaperiaate ............................................................ 12
Tekniset tiedot ............................................................... 12
Yleiset turvallisuusohjeet. ............................................... 13
Käyttöönotto – asennus ja kokoonpano ... 14
Putkiliitäntä ................................................................... 14
Sähköliitäntä ................................................................. 14
Käyttöönotto – ohjaus ja käyttö ................... 15
Näyttö ...................................................................... 16
Näyttöpainikkeiden käyttö.............................................. 16
Hälytyslista .................................................................... 16
Käyttötila ................................................................. 16
Kunnossapito Varusteet .................................. 17
Varusteet.................................................................. 18
Toimintatarkastus.................................................19
Modbus ohjeet ....................................................... 20
Vianetsintä ...............................................................21
Tekniset tiedot
LVI: .................................................416 35 00
Tuotenro:.........................................L550509554
Linjapaine vakio, kokonaispaine
liitäntäpisteessä, enint:.....................+5,0 bar
Sallittu käyttölämpötila:....................0 – +70 °C
Ympäristön lämpötila: .....................0 – +40 °C
Sallitut nesteet: ...............................Vesi ja deionisoitu vesi
Etanoli* alle 30 vol%
Kilfrost GEO enint. 35 vol%
Paineluokka:....................................PN10
Tilavuus, käsitelty neste: ..................vähint. 135 l/h
Liitännän koko: ................................DN15
Sähkötiedot:....................................1~230 V, 50 Hz, pistotulppa
Sisäinen sulake:...............................10 A
Nimellisteho:....................................0,75 kW
Nimellisvirta: ....................................5.0 A
Suojausluokka: ................................IP44
Energiankulutus:..............................37 kWh / vuosi **
Viestintäprotokolla: ..........................Modbus RTU (RS485)
Hälytyslähtö, enimmäiskuormitus:....24 V, 1,0 A
Äänenpainetaso:..............................61 dB
Paino:..............................................29 kg
*) Kun poistat kaasua etanolista, varmista, että huoneessa on hyvä ilmanvaihto.
**) Käyttö 30 päivän nopealla kaasunpoistolla johtaa 102 kWh:n
energiankulutukseen ensimmäisen vuoden aikana.
TTM NoXygen®on ympäristöarvioitu Byggvarubedömningen ja SundaHusin
mukaan.
Leveys: 560 mm
Korkeus: 960 mm
Syvyys: 253 mm
Sisäkierre
B
C
D
A
TTM NoXygen® C650
Kokoamisohjeet, käyttö- ja huolto-ohjeet
12
TTM Energiprodukter AB
Slöjdaregatan 1 | 393 66 Kalmar | Sweden | Puh: + 46 480 41 77 40 | [email protected] | www.ttmenergi.se
Viimeisimmät päivitykset osoitteessa www.ttmenergi.se.

2023-11 2023-11
FI
A. Päälinja (paluu)
B. Tulo sulkuventtiilillä
C. Käsittelytila
D. Paluu sulkuventtiilillä
Leveys: 560 mm
Korkeus: 960 mm
Syvyys: 253 mm
Yleiset turvallisuusohjeet
TTM NoXygen®C650 on suunniteltu kiinteään käyttöön, ei
siis siirrettävän laitteiston käyttöön. Asetettua takuuaikaa
sovelletaan vain enintään 10 000 ilmanpoistoväliin vuodessa.
Asennuksen on oltava kansallisten määräysten mukainen.
Asennuksen suorittajien on oltava ammattilaisia ja erityisesti
tähän tehtävään koulutettuja. Valmistajaa, valmistusvuotta ja
valmistusnumeroa koskevat tiedot sekä tekniset tiedot
löytyvät TTM NoXygen®C650:n tyyppikilvestä.
Toimi laitteiston lämpötilan ja paineen varmistamiseksi niin,
että määritellyt, sallitut enimmäis- ja vähimmäiskäyttöpara-
metrit eivät ylity eivätkä alitu. TTM NoXygen®C650 -laitetta
saa käyttää vain hyväksyttyjä järjestelmänesteitä sisältävissä
järjestelmissä.
Laitteisto, jossa käytetään paisunta-astioita ja esipaineistettuja paisunta-astioita
Kun TTM NoXygen®C650 on käytössä, järjestelmässä on oltava vapaata paisuntatilavuutta 6 litraa. Jos
näin ei ole, laitteiston paine kasvaa ja sen varoventtiili voi vapauttaa nestettä paineen alentamiseksi. Jos
näin tapahtuu, laitteiston paisunta-astiassa on todennäköisesti väärä esipaine tai liian vähän vapaata
paisuntatilavuutta, ja se on korvattava suuremmalla paisunta-astialla.
Peukalosääntö: Esipaineen on oltava 70 % järjestelmäpaineesta.
HUOMAA: Varoventtiilin avautumispaineen tulisi olla 30% järjestelmän paineen yläpuolella.
Laitteisto, jossa käytetään paineenpitojärjestelmää kompressorilla tai pumpuilla
Järjestelmät, joissa on paineenpitoastia/kompressoriastia paisunta-astiana, voivat alkaa toimia jaksoittain
kaasunpoistimen kanssa, jolloin paisuntasäiliö tyhjenee ja täyttyy TTM NoXygen®C650:n syklien mukaan.
Seuraavaksi pumpun laajennuksen yhteyteen on asennettava 50 litran TTM Offset-tasoitussäiliö. (ks. kuva
alla). Syynä tähän on se, että asetusarvot magneettiventtiilin avautumisen ja/tai pumpun päällekytkemisen
välillä ovat liian lähekkäin.Tarkista sitten järjestelmän paine ja järjestelmän korkeus, jotta järjestelmälle
voidaan säätää oikea paine. Säädä pumpun käynnistymispaineelle ja magneettiventtiilin avautumispaineelle
suurempi paine-ero.
Järjestelmäpaine ja järjestelmänesteen täyttö
Kun kaasut poistetaan järjestelmänesteestä, sen
tilavuus vähenee ja laitteiston järjestelmäpaine laskee.
Siksi on tärkeää tarkkailla järjestelmäpainetta ja
tarvittaessa lisätä järjestelmänestettä. Korkean
kaasupitoisuuden ja nopean kaasunpoiston tilassa
laitteiston järjestelmäpaine voi laskea hyvin nopeasti. Siksi ensimmäinen tarkastus suositellaan tehtäväksi
yhden päivän käytön jälkeen.
Järjestelmäpaine
Järjestelmäpaine = järjestelmän korkeus (m) + 5 m.
Esimerkki
Järjestelmän korkeus = 5 m + 5 m => järjestelmäpaine 1 bar
• Ennen huoltotöitä pistoke on irrotettava pistorasiasta.
• Asennuksen, huollon ja vianetsinnän saa suorittaa vain tehtävään koulutettu
henkilö.
• TTM NoXygen on yleensä huoltovapaa, mutta vuosittainen toimintatarkastus on
suositeltavaa tasaisen suorituskyvyn varmistamiseksi, katso toimintatarkastus
sivulla 19.
• Esisuodattimen tarkastus ja puhdistus on suoritettava toimintatarkastuksen
yhteydessä. Likaisissa järjestelmissä esisuodatin on puhdistettava useammin,
ks. sivu 17 ja 18.
TÄRKEÄÄ!
TTM NoXygen® C650
Kokoamisohjeet, käyttö- ja huolto-ohjeet
13
TTM Energiprodukter AB
Slöjdaregatan 1 | 393 66 Kalmar | Sweden | Puh: + 46 480 41 77 40 | [email protected] | www.ttmenergi.se
Viimeisimmät päivitykset osoitteessa www.ttmenergi.se.

2023-11
FI
Käyttöönotto – asennus ja kokoonpano
Putkiliitäntä
• TTM NoXygen®-laitteen liitäntä tehdään ½ tuuman
sisäkierteellä. Liitäntä tehdään teräs punotulla letkulla
järjestelmän paluulinjassa ennen pumppua ja vaihtokytkintä.
• Järjestelmään liittämisen on aina tapahduttava putken yläpuolella, ellei
TTM MAG 54 - tai TTM MAG 76 -suodatinta asenneta
sisääntulolinjaan ennen TTM NoXygen®-laitetta.
• Kaasunpoistimeen menevä linjahaara on varustettava sulkuventtiileillä.
Liitäntäpisteiden välisen etäisyyden on oltava vähintään 300 mm
(Kuvat 1 ja 2).
Tiputusastia
Tiputusastian ½” - liitäntä kytketään lattiakaivoon (Kuva 3).
Kokoonpano
Säädä TTM NoXygenin jalkojen kiinnitysruuvit niin, että se on
vaaterissa (Kuvat 4).
Sähköliitäntä
TTM NoXygen®liitetään pistotulpalla maadoitettuun pistorasiaan, 1-230 V, 50
Hz. Vaihtoehtoisesti voidaan käyttää kiinteää maadoitettua liitäntää työkytki-
mellä. Sähkölaitteistossa on oltava maavikavirtakytkin.
Liitäntä ulkoiseen valvontaan (DUC)
TTM NoXygen®C650 voidaan integroida rakennusautomaatiojärjestelmään
MODBUS RTU:lla RS485:n kautta. Kytkentärima on asennettu laitteen
ulkopuolelle oikealla puolella (Kuva 5).
Säädä asetusruuvit lattiakokoonpanossa.
Kuva 4
Kuva 3
Kuva 2.
Kuva 1
≥300 mm
Runsaskaasuinen
Vähäkaasuinen
Päävirtaus
kiertävä vesi
≥300 mm
Runsaskaasuinen
Vähäkaasuinen
Päävirtaus
kiertävä vesi
≥300 mm
Runsaskaasuinen
Vähäkaasuinen
Päävirtaus
kiertävä vesi
≥300 mm
Runsaskaasuinen
Vähäkaasuinen
Päävirtaus
kiertävä vesi
Kuva 5
HUOM!
Liitinlohkon kaapeleita
ei saa siirtää eikä irrottaa.
TTM NoXygen® C650
Kokoamisohjeet, käyttö- ja huolto-ohjeet
14
TTM Energiprodukter AB
Slöjdaregatan 1 | 393 66 Kalmar | Sweden | Puh: + 46 480 41 77 40 | [email protected] | www.ttmenergi.se
Viimeisimmät päivitykset osoitteessa www.ttmenergi.se.
2023-11 2023-11
FI
MOVEOMOVEO
Käyttöönotto – ohjaus ja käyttö
1. Käynnistä TTM NoXygen®
'
Paina
MOVEO
kaksi kertaa, jolloin TTM NoXygen käynnistyy. Kun vihreä LED-valo syttyy, laite on toiminnassa.
2.2 Paina
MOVEO
kellonaika-asetus-
ten "tt-mm-ss” tarkistamiseksi.
2.3 Paina
MOVEO
huoltokaasun-
poiston käynnistysajan tarkis-
tamiseksi, "Aloitus”.
2.4 Paina
MOVEO
sen tarkista-
miseksi, kuinka monta tuntia
kaasunpoistimen tulisi olla
aktiivisena huoltokaasunpois-
ton aikana, "Tuntia".
2. Käyttöasetusten tarkistus ja muuttaminen
MOVEO
Aloitus?
T P sis. 1,2 bar
0
T P sis. 1,2 bar
0
MOVEOMOVEO
MOVEO
PROGV 2.23
tt-mm-ss
MOVEOMOVEO
MOVEO
Asetukset
-mm-ss
Asetukset
vv-kk-pp
Asetukset
Muuta asetuksia painamalla
samanaikaisesti
MOVEO
+
MOVEO
(ylös
osoittava nuoli ja alas osoittava
nuoli), jolloin siirryt asetustilaan
(”Asetukset” lukee näytössä).
Paina samanaikaisesti
MOVEO
+
MOVEO
yhden kerran arvon muuttamiseksi.
Vahvista ja tallenna asetus
painamalla
MOVEO
. Katso lisäohjeet
sivu 16.
2.1 Paina
MOVEO
päivämääräasetus-
ten ”vv-kk-pp” tarkistamiseksi.
MOVEO
2.5 Paina
MOVEO
nähdäksesi, kuinka
pitkään kaasunpoistin on vielä
nopean kaasunpoiston tilassa,
"Pvää jälj".
Asetukset
Aloitus: 13:00
Asetukset
Tuna: 1
Asetukset
Pvää jälj: 30/30
Asetukset
vv-kk-pp
MOVEO
2.6 Paina
MOVEO
vaihtaaksesi
Modbus osoite "Modbus ID".
Asetukset
Modbus ID: 1
2.7 Paina
MOVEO
muuttaaksesi
pienintä sallittua järjestelmäpai-
netta "Pmin".
2.8 Paina
MOVEO
muuttaaksesi
varoventtiilin avautumispainetta
"VaroventP".
MOVEO MOVEO
Asetukset
Pmin: 0.8 bar
Asetukset
VaroventP: 5.0 bar
TTM NoXygen® C650
Kokoamisohjeet, käyttö- ja huolto-ohjeet
15
TTM Energiprodukter AB
Slöjdaregatan 1 | 393 66 Kalmar | Sweden | Puh: + 46 480 41 77 40 | [email protected] | www.ttmenergi.se
Viimeisimmät päivitykset osoitteessa www.ttmenergi.se.
1. Asetukset-valikko:
2. Etsi muutettava arvo:
3. Valikko arvon muuttamiseksi:
4. Määritä uusi arvo:
5. Lukitse arvo:
ylös/alas samanaikaisesti
ylös tai alas
Kaksi kertaa
päävalikkoon palaamiseksi
ylös/alas samanaikaisesti

Näyttö
MOVEO
Punainen LED
ilmoittaa hälytyksestä
Vihreä LED ilmaisee,
että laite on
toiminnassa
Enter
TTM NoXygen®
Ohjvers 2.16
Nuoli oikealle/va-
semmalle, ylös/alas
Tehdasasetusten palautus:
• Vedä pois pistotulppa. Paina virrattomassa tilassa vasenta
nuolta ja alaspäin osoittavaa nuolta samalla kun kytket
pistotulpan takaisin.
• Pidä painettuna, kunnes näyttöön ilmestyy ”OFF NOW”.
• Vapauta nuolet ja irrota pistotulppa uudelleen.
• Kytke TTM NoXygen®takaisin pistorasiaan.
• TTM NoXygen®on nyt tehdasasetuksissa.
Käyttötila
Nopea kaasunpoisto / intensiivinen
kaasunpoisto
Nopeaa kaasunpoistoa suositellaan uusissa asennuksissa ja
järjestelmänestettä vaihdettaessa. Nopea kaasunpoisto
tarkoittaa, että TTM NoXygen toimii jatkuvasti alkaen
maanantaista klo 00.00 perjantaihin klo 23.59 asti.
Esiasetettu arvo on 30 päivää nopeaa kaasunpoistoa, mikä
useimmissa tapauksissa riittää järjestelmän kaasunpoistoon.
Suurissa järjestelmissä tai järjestelmissä, joissa on useita
ilmataskuja, kaiken ilman poistaminen voi viedä pidemmän
ajan. Päivien lukumäärää voidaan lisätä nopean kaasunpois-
ton tilassa 90 päivään asti.
Näytön tekstien selitykset:
P sis Näyttää alipainekammion senhetkisen paineen
TTM NoXygen®-laitteessa.
Päivämäärä Päivämäärän asettaminen ”vv-kk-pp”.
Kello Kellonajan asettaminen ”tt-mm-ss”.
Aloitus Mihin kellonaikaan TTM NoXygen®-laitteen tulisi
käynnistyä huoltokaasunpoistotilassa.
Tuntia Kuinka monta tuntia TTM NoXygen®-laitteen
tulisi päivittäin käydä huoltokaasunpoistotilassa.
Pvää jälj Kuinka monena päivänä TTM NoXygen®-laitteen
tulisi kuukauden aikana suorittaa kaasunpoisto.
Modbus ID TTM NoXygen®-osoite modbus-järjestelmässä.
Pmin Laitteiston pienin sallittu järjestelmäpaine.
(vedentäyttö käynnistyy tästä paineesta ja täyttyy,
kunnes ”Pjärj” on saavutettu).
VaroventP Järjestelmän varoventtiilin asetusarvo.
pump k: Pumpun käynnistysten lukumäärä.
Huoltokaasunpoisto
Kun järjestelmästä on poistettu kaasut, sinne jää hyvin vähän
ilmaa, ja kaasunpoiston pitäminen käynnissä 24/7 ei ole
tarpeellista.
Järjestelmään vuotaa aina jonkin verran ilmaa, josta on
huolehdittava. Huoltokaasunpoiston aikana TTM NoXygen®
toimii vain muutaman tunnin päivässä, mikä riittää ilmavuodon
korjaamiseen. Matalan kaasutason ylläpitämiseen tarvittava
tuntimäärä päivässä on esitetty alla olevassa taulukossa.
Alarm list
#2 Pmin: Järjestelmäpaine on liian alhainen.
Nosta painetta vähintään 0,8 bar.
#4 P sis. > Järjestelmäpaine on ylittänyt asetetun
VaroventP varoventtiilin avautumispaineen
"Varovent P".
#5 Max Tsyklin: Kiertoaika on ollut yli 3minuuttia. Tämä
osoittaa, että saapuvan virtauksen
suodatin on tukossa tai virtauksessa
on rajoitin.
Suositeltu käyttöaika päivässä
Järjestelmän tilavuus Käyttöaika
10 000 litraa 1 tunti
20 000 litraa 2 tuntia
30000 litraa 3 tuntia
40000 litraa 5 tuntia
50 000 litraa 7 tuntia
MOVEO
Sijain
01>2 1021 14:37
Sijainti
hälytyslistassa
Hälytysnumero
Hälytyksen päivä-
määrä (kk-pp)
Hälytysaika (tt-mm)
2023-11
FI TTM NoXygen® C650
Kokoamisohjeet, käyttö- ja huolto-ohjeet
16
TTM Energiprodukter AB
Slöjdaregatan 1 | 393 66 Kalmar | Sweden | Puh: + 46 480 41 77 40 | [email protected] | www.ttmenergi.se
Viimeisimmät päivitykset osoitteessa www.ttmenergi.se.

2023-11 2023-11
FI
Korisiivilän kokoaminen
5. Laita korisiivilä Ctakaisin imuventtiiliin. Varmista, että korisiivilä on
täydellisesti alas sijoitettuna ja istuu tasaisesti venttiilirungossa.
6. Varmista, että suojakapan tiiviste on kunnolla paikallaan.
Kierrä imuventtiilin suojakappaa Bkiintoavaimella.
7. Käännä imu- ja poistoventtiileiden kahvat A auki-asentoon.
Imuventtiilin purkaminen
3. Löysää imuventtiilin suojakappaa Bkiintoavaimella.
Jätä tiiviste suojakappaan.
4. Poista korisiivilä C, ja puhdista se sekä suojakappa vedellä.
Ennen kuin aloitat imuventtiilin puhdistami-
sen, varmista, että:
1. Imu- ja poistoventtiileiden kahvat A ovat kiinni-asennossa.
2. TTM Noxygen® on pois päältä ja että päävirta on katkaistu.
A
BC
Inlopp Utlopp
Imuventtiilin korisiivilän puhdistus
TTM MAG 54:n puhdistus
A
A
Inlopp Utlopp
!VAROITUS
Jos TTM NoXygen®on asennettu lämmitysjärjestelmään, kuu-
maa nestettä voi tulla ulos, kun suojakappaa B kierretään irti.
Kunnossapito
Hiukkassuodattimen puhdistus
1. Sammuta TTM NoXygen®ja katkaise päävirta.
2. Sulje molemmat imuventtiilit 1.
3. Asenna letku 6letkuliitäntään.
4. Tyhjennä magnetiittiloukku avaamalla
tyhjennysventtiili 3. Anna veden virrata,
kunnes kotelo on tyhjentynyt vedestä.
5. Kierrä irti pohjaistukas 4.
6. Kierrä magneetti irti 2 (ks. kuva 1).
7. Puhdista korisiivilä 5ja muut osat
haalealla vedellä.
8. Kierrä magneetti 2 takaisin paikalleen.
9. Varmista, että korisiivilä 5 ja O-rengas ovat
paikoillaan oikein ja kierrä pohjaosa
4 paikalleen koteloon.
10. Sulje tyhjennysventtiili 3.
11. Avaa molemmat imuventtiilit 1.
12. Käynnistä TTM NoXygen®.
Mangetiittiloukun puhdistus
1. Sammuta TTM NoXygen®ja katkaise
päävirta.
2. Sulje molemmat imuventtiilit 1(ks. kuva 2).
3. Asenna letku 6letkuliitäntään.
4. Kierrä magneetti irti 2.
5. Tyhjennä hiukkasloukku avaamalla
tyhjennysventtiili 3. Anna veden virrata,
kunnes kotelo on tyhjä tai neste kirkasta
vailla epäpuhtauksia.
6. Sulje tyhjennysventtiili 3ja kierrä
magneetti 2 takaisin paikalleen.
7. Avaa molemmat imuventtiilit 1(ks. kuva 2).
8. Käynnistä TTM NoXygen®.
(Kuva 1)
TTM MAG 54 on tarkastettava ja puhdistettava säännöllisesti vähintään
2 kertaa vuodessa. Puhdistusväli riippuu lian ja magnetiitin määrästä jär-
jestelmänesteessä. Jos järjestelmänesteen tiedetään olevan hyvin likais-
ta, suodatin on tarkastettava ja puhdistettava useammin. Merkki siitä,
että TTM MAG 54 vaatii puhdistamista, on esim. se, että TTM NoXygen®
käy pitkiä, yli 2 minuuttia kestäviä, aikavälejä ”pumpun käynnistymisestä
pumpun käynnistymiseen” (ks. toimintatarkastus sivulla 20).
(Kuva 2)
24
5
1
6
1
3
6
3
A
A
UlostuloSisääntulo
UlostuloSisääntulo
Vahva
magneettikenttä
Saattaa vaikuttaa
sydämentahdistimeen / ICD:hen Puristumisvaara
Integroitu magneetti voi aiheuttaa
puristusvammoja. Muista myös, että
magneetti voi häiritä elektronisia laitteita
ja sydämentahdistimia.
TTM NoXygen® C650
Kokoamisohjeet, käyttö- ja huolto-ohjeet
17
TTM Energiprodukter AB
Slöjdaregatan 1 | 393 66 Kalmar | Sweden | Puh: + 46 480 41 77 40 | [email protected] | www.ttmenergi.se
Viimeisimmät päivitykset osoitteessa www.ttmenergi.se.
2023-11
FI
TTM MAG 76:n puhdistus
2. Vaihdettava suodatinpatruuna
1. Magneettisauva
261
Ø75
Ø140
410
DN15 (1/2”)
DN15 (1/2”)
DN15 (1/2”)
IN
Avtappning
UT
TTM MAG 54/76 kiinnitetään suoraan TTM NoXygen®kaasunpoistimen imuliitäntään.
Se yhdistetään 1/2" sisäkierteeseen ja on suositeltavaa käyttää joustavaa letkua.
1. Asenna mukana toimitettu kiristysrengasliitin.
2. Liitä TTM MAG 54/76:n litteä pää kiristysrengasliittimeen.
3. Asenna TTM MAG 54/76 suoraan sulkuventtiiliin, joka on tuloaukon päällä
TTM NoXygen®.
TTM MAG 54:n ja TTM MAG 76:n asennus
LVI: 392 65 01LVI: 392 65 00
Viemäröinti
Ulostulo
Sisääntulo
TTM MAG 76 tulee tarkastaa ja puhdistaa säännöllisesti vähintään 2 kertaa vuodessa,
puhdistusväli riippuu järjestelmänesteessä olevan lian ja magnetiitin määrästä. Merkki
siitä, että TTM MAG 76 vaatii puhdistamista, on esim. se, että TTM NoXygen®käy
pitkiä, yli 2 minuuttia kestäviä, aikavälejä ”pumpun käynnistymisestä pumpun käynnisty-
miseen”.
Huomaa: Kiristysrenkaan kierre on voideltava kuparitahnalla/silikonirasvalla kerran
vuodessa tai aina, kun suodatin avataan.
1. Sammuta TTM NoXygen®.
2. Sulje sulkuventtiilit TTM MAG 76:n sisääntulossa
sekä TTM NoXygen®-laitteen sisääntulossa.
3. Laita astia tyhjennysventtiilin alle
tai liitä letku.
4. Avaa tyhjennysventtiili.
5. Löysää kiristysrengasta ja nosta pois magneettitanko ja
suodatinpatruuna.
6. Pyyhi pois magneettisauvaan kerääntynyt musta magnetiitti.
7. Puhdista suodatinpatruuna tai vaihda uuteen, jos se on vaurioitunut.
8. Laita suodatinpatruuna ja magneettisauva takaisin paikoilleen ja kiinnitä
kiinnitysrenkaalla. Voitele kiinnitysrenkaan kierre kuparitahnalla/
silikonirasvalla ennen kiristämistä.
1
2
TTM NoXygen®
Kaasunpoistin
TTM MAG 54
Magnetiittisuodatin
Pääpumppu
TTM-
joustoletku
Paluuvirtaus
Tasoitussäiliö Paineenpitolaite
Magneettikenttä
Kunnossapito
TTM NoXygen® C650
Kokoamisohjeet, käyttö- ja huolto-ohjeet
18
TTM Energiprodukter AB
Slöjdaregatan 1 | 393 66 Kalmar | Sweden | Puh: + 46 480 41 77 40 | [email protected] | www.ttmenergi.se
Viimeisimmät päivitykset osoitteessa www.ttmenergi.se.

2023-11 2023-11
FI
2. Vaihdettava suodatinpatruuna
1. Magneettisauva
1. Esisuodattimien puhdistus
Katso sivut 17-18.
2. Paisunta-astian tarkistus
Varmista, että paisunta-astia on järjestelmässä oikein säädettynä
oikealla esipaineella ja että siinä on vapaata paisuntatilavuutta.
TTM NoXygen®C650 vaatii vähintään 6 litraa vapaata paisun-
tatilaa. Jos epäilet, että paisuntatila on liian pieni, asenna TTM
Oset -tasoitussäiliö LVI: 3480404.
3. Paineanturin tarkistus
Varmista, että paine ”P sis” TTM NoXygen® -laitteen näytöllä
lepotilassa on vähintään 0,8 baaria ja enintään 5,0 baaria (laite ei
käynnisty, jos paine on alle 0,8 baaria, ks. vianmääritystoimen-
pide 1.1). Jos näytön paine ei vastaa järjestelmäpainetta, ks.
vianmääritystoimenpide 7. Varmista myös, että ”P sis” saavuttaa
vähintään arvon -0,7 pumpun ollessa käynnissä. Jos niin ei ole,
ks. vianetsintätoimenpide 2.
4. Jakson keston tarkistus
Aika pumpun käynnistyksestä pumpun käynnistykseen ei saa
olla alla olevan kaavion suosituksia pitempi. Jakson pitkä kesto
on merkki suodattimen tai virtauksenrajoittimen
tukkeutumisesta. Ks. vianetsintätoimenpide 3.
5. Vuototarkistus
Varmista, ettei sinisestä tarkistusletkusta vuoda nestettä, kun
paine ”P sis” on sama kuin laitteiston järjestelmäpaine, jos vuo-
toa esiintyy, ota yhteyttä TTM:ään. Varmista, että järjestelmänes-
tettä ei vuoda mistään pumpun tai tyhjiökammion liitännästä.
6. Kaasunpoistokyvyn tarkistus
Kun TTM NoXygen®käynnistyy, sulje tuloaukon sulkuventtiili
ja varmista, että paine ”P sis” saavuttaa vähintään arvon -0,7.
Jos niin ei ole, ks. vianetsintätoimenpide 2. Anna laitteen levätä
venttiilien ollessa kiinni vähintään 5 minuuttia ja varmista, että
paine ei muutu. Paineen kasvu on
merkki vuodosta, ks. vianetsintätoimenpide 5:3.
Esisuodatin on puhdistettava ennen toimintatarkastusta (ks. sivu 17), ja järjestelmäpaineen on oltava
vähintään 0,8 baaria, jotta toimintatarkastus voidaan suorittaa.
MOVEO
TTM NoXygen®
Kaasunpoistin
Sininen
tarkistusletku
Läpinäkyvä
vedellä täytetty
astia.
TTM MAG 54
Magnetiittisuodatin
Vedentäytön
venttiili
Vedentäytön
venttiili
Toimintatarkastusta edeltävät valmistelut - Asetukset koeajoa varten
Toimintatarkastus
Ohjvers 2.16
Pvää jälj: 0/30
MOVEO
Asetukset
Pvää jälj: 0d
Paina sitten samanaikaisesti
MOVEO
+
MOVEO
, jolloin ”Asetukset”
aktivoituu.
Paina sitten samanaikaisesti
MOVEO
+
MOVEO
muuttamistilan
aktivoimiseksi.
Paina
MOVEO
, jotta voit asettaa
arvon ”Pvää jälj = 1d”.
Vahvista tallentamalla asetus
painikkeella
MOVEO
.
MOVEO
Asetukset
Pvää jälj:
MOVEO
Aseta TTM NoXygen®jatkuvalle
käytölle painamalla
MOVEO
kunnes
näytöllä lukee ”Pvää jälj”.
Asetukset
Aseta TTM NoXygen®jatkuvan käytön tilaan säätämällä ”Pvää jälj” arvoon 1d
Paine Aika
1,0 baaria 150 sekuntia
2,0 baaria 140 sekuntia
3,0 baaria 130 sekuntia
4,0 baaria 120 sekuntia
5,0 baaria 110 sekuntia
TTM NoXygen® C650
Kokoamisohjeet, käyttö- ja huolto-ohjeet
19
TTM Energiprodukter AB
Slöjdaregatan 1 | 393 66 Kalmar | Sweden | Puh: + 46 480 41 77 40 | [email protected] | www.ttmenergi.se
Viimeisimmät päivitykset osoitteessa www.ttmenergi.se.

2023-11
FI
Nimi Osoite Read/Write Kommentti
Pressure 0 Read Present pressure in mbar
Reserved 1 Read Reserved, reads as 0
Reserved 2 Read Reserved, reads as 0
Total pump start count high 3 Read Total number of pump starts, most significant 16 bits
Total pump start count low 4 Read Total number of pump starts, least significant 16 bits
Stop reason 5 Read Reason for system not running
Reserved 6 Read Reserved, reads as 0
Reserved 7 Read Reserved, reads as 0
Reserved 8 Read Reserved, reads as 0
Reserved 9 Read Reserved, reads as 0
Log entry 1 (newest) – Month 10 Read Month for log entry 1 (newest)
Log entry 1 (newest) – Day 11 Read Day for log entry 1 (newest)
Log entry 1 (newest) – Hour 12 Read Hour for log entry 1 (newest)
Log entry 1 (newest) – Minute 13 Read Minute for log entry 1 (newest)
Log entry 1 (newest) – Code 14 Read Code for log entry 1 (newest)
Log entry 2 – Month 15 Read Month for log entry 2
Log entry 2 – Day 16 Read Day for log entry 2
Log entry 2 – Hour 17 Read Hour for log entry 2
Log entry 2 – Minute 18 Read Minute for log entry 2
Log entry 2 – Code 19 Read Code for log entry 2
Nimi Osoite Read/Write Kommentti
On/Off 0 Read/write Read/set whether the device is started/stopped
Date - Year 1 Read/write Read/set year for system date
Date - Month 2 Read/write Read/set month for system date
Date - Day 3 Read/write Read/set day for system date
Time - Hour 4 Read/write Read/set hour for system time
Time - Minute 5 Read/write Read/set minute for system time
Time - Second 6 Read/write Read/set second for system time
Start time - Hour 7 Read/write Read/set hour for start time of the degassing
Operating time 8 Read/write Read/set number of hours per degassing run
Initial operating time 9 Read/write Read/set initial run time in number of days
Safety valve pressure 10 Read/write Read/set the safety valve’s pressure in mbar
Reserved 11 Read/write Reserved, reads as 0
Min pressure 12 Read/write Read/set lower target threshold for pressure
Reserved 13 Read/write Reserved, reads as 0
Reserved 14 Read/write Reserved, reads as 0
Reserved 15 Read/write Reserved, reads as 0
Alarm type 16 Read/write Read/clear alarms
Modbus rekisterit
Input rekisterit
Modbus asetukset
Parametri Arvo
Tiedonsiirtonopeus 9600
Pariteetti None
Lopetusbitit 1
Modbus mode RTU
Säilytysrekisterin luku/kirjoitus käyttämällä Modbus-toimintoa 3,
For log entry 3-6 use address 20-24, 25-29, 30-34, 35-39. For more information see www.ttmenergi.com.
TTM NoXygen® C650
Kokoamisohjeet, käyttö- ja huolto-ohjeet
20
TTM Energiprodukter AB
Slöjdaregatan 1 | 393 66 Kalmar | Sweden | Puh: + 46 480 41 77 40 | [email protected] | www.ttmenergi.se
Viimeisimmät päivitykset osoitteessa www.ttmenergi.se.
Table of contents
Languages:
Other TTM Industrial Equipment manuals


Popular Industrial Equipment manuals by other brands

woodmizer
woodmizer MKIII Safety, Installation, Operation, Maintenance & Parts Manual

woodmizer
woodmizer SlabMizer MB200 quick start guide

woodmizer
woodmizer BMT100-2 Operation, parts & maintenance manual

Süd wind
Süd wind Ambientika SOLO Instruction and maintenance manual

SignalFire
SignalFire AI-6C user manual

Blue Max
Blue Max Mini Modular Plus operating manual


FEB
FEB 825YD Series installation instructions

Tripp Lite
Tripp Lite SRWBTLCPLRBS installation guide

Lake Shore
Lake Shore CRX-EM-HF instructions

Premier Manufacturing Co.
Premier Manufacturing Co. 235SM Installation, Inspection, Operation & Maintenance Guide

Grand
Grand GT36-12 manual

PSS
PSS RoadQuake 2 Product guide