TUFTINGSHOP AK-I User manual

COPYRIGHT © 2023 TUFTINGSHOP Page 1 of 24
CARPET TUFTING
GUN MANUAL
AK- I , A K - II, A K H I G H A N D
A K D U O
TUFTINGSHOP
LAAN VAN HAAGVLIET 30
2271 XP VOORBURG
NETHERLANDS
Email: info@tuftingshop.com
Phone: +31 6 40194349
COPYRIGHT © 2023 TUFTINGSHOP
Version 1.0

COPYRIGHT © 2023 TUFTINGSHOP Page 2 of 24
Contents
04
GENERAL
SAFETY NOTICE
PRODUCT PARAMETER TABLE
05
HOW TO USE
MAINTENANCE
CONNECTING THE MACHINE
THREADING THE MACHINE
START TUFTING
09
PILE HEIGHT
ADJUSTMENT
STEP 1: PILE HEIGHT ADJUSTMENT FOR THE
DUO MACHINE
STEP 2: AK-I AND AK-II PILE HEIGHT
ADJUSTMENTS
STEP 3: ADJUST THE SCISSORS CLOSER
STEP 4: ADJUSTING THE SCISSOR OPENER
STEP 5: ADJUST THE BRAKING SET
BACKING LINE AND FRONT PILE
PARAMETER LIST
14
FROM CUT
TO LOOP
OPTION I: BOTH DUO AND AK-I
OPTION 2: ONLY FOR THE DUO
STEP 1: MOVE PARTS ASIDE TO MAKE
THE SCISSOR ACCESIBE
STEP 2: REMOVE THE SCISSOR AND
REPLACE IT WITH THE LOOP HEAD
18
RUNNING CHECK
19
TROUBLE SHOOTING
THE SCISSORS ARE NOT CUTTING
THE MACHINE IS NOT GETTING POWER
THE MACHINE IS BEEPING
THE BACK STITCH IS UNEVEN OR
INCONSISTENT
THE MACHINE IS MAKING HOLES IN THE
CLOTH
THE YARN IS NOT STICKING IN THE CLOTH
21
MATERIAL
SELECTION
CLOTH
YARN
SECONDARY BACKING AND GLUE
23
MACHINE MARTS
AND NAMES
Contents

COPYRIGHT © 2023 TUFTINGSHOP Page 3 of 24
Welcome to the
Tuing Gun Manual!
This powerful tool is essential for
creating professional-looking rugs,
carpets, and textiles. Designed for use
with a variety of materials, including
wool, cotton, nylon, and synthetic fibers,
the tufting gun creates loops and pile
quickly and easily. Its intuitive design
makes it easy to use, and it's perfect for
creating intricate designs or large areas
of color. Our comprehensive manual
guides you through every step, from
setup to material selection, ensuring
you get the best results. Whether you're
a beginner or an experienced user, this
manual will help you get the most out of
your tufting gun and create beautiful,
high-quality textiles. Let's get started!

COPYRIGHT © 2023 TUFTINGSHOP Page 4 of 24
SAFETY NOTICE
To ensure your safety when
using this tufting gun, please
carefully read and follow the
following safety precautions
to avoid accidents such as
fire, electric shock, and
injury:
•Maintain a clean and dry
work area, and avoid
using the machine in dark
and humid conditions.
•Keep the machine out of
reach of children and
untrained individuals.
•Prior to operating the
machine, ensure that the
on-off switch is turned off.
•Before beginning any
work with the machine,
carefully check that all
movable parts are in their
correct positions and that
the screws of the fixed
parts are securely
tightened.
By adhering to these safety
guidelines, you can help
ensure safe and efficient
use of the tufting gun,
minimizing the risk of
accidents and injuries.
PRODUCT PARAMETER TABLE
Specification
Cut Pile
Loop Pile
DUO
Input
voltage
100V-240V
100V-240V
100V-
240V
Output
voltage
30V
30V
30V
Power
120W
120W
120W
Frequency
50HZ-60HZ
50HZ-60HZ
50HZ-
60HZ
Pile height
range
8mm-18mm
6mm-16mm
Tufting
Speed
6-30
stitching/sec
6-30
stitching/sec
Net Weight
1.5 kg
1.5 kg
1.5 kg
GENERALHOW TO USE

COPYRIGHT © 2023 TUFTINGSHOP Page 5 of 24
MAINTENANCE
Proper maintenance of a tufting gun is
important to ensure that it continues to
operate smoothly and effectively over
time. Here are some recommended
maintenance tasks for a tufting gun:
•Clean the machine regularly: Dust and
debris can accumulate in the
machine's moving parts, affecting its
performance. Regular cleaning with a
soft cloth or brush can help keep the
machine clean and free of debris.
•Replace worn or damaged parts: Over
time, the machine's parts may become
worn or damaged, affecting its
performance. Check the machine
regularly for signs of wear or damage,
and replace any parts as needed to
keep the machine running smoothly.
•Store the machine properly: When not
in use, store the tufting gun in a clean,
dry place, and cover it to protect it
from dust and debris.
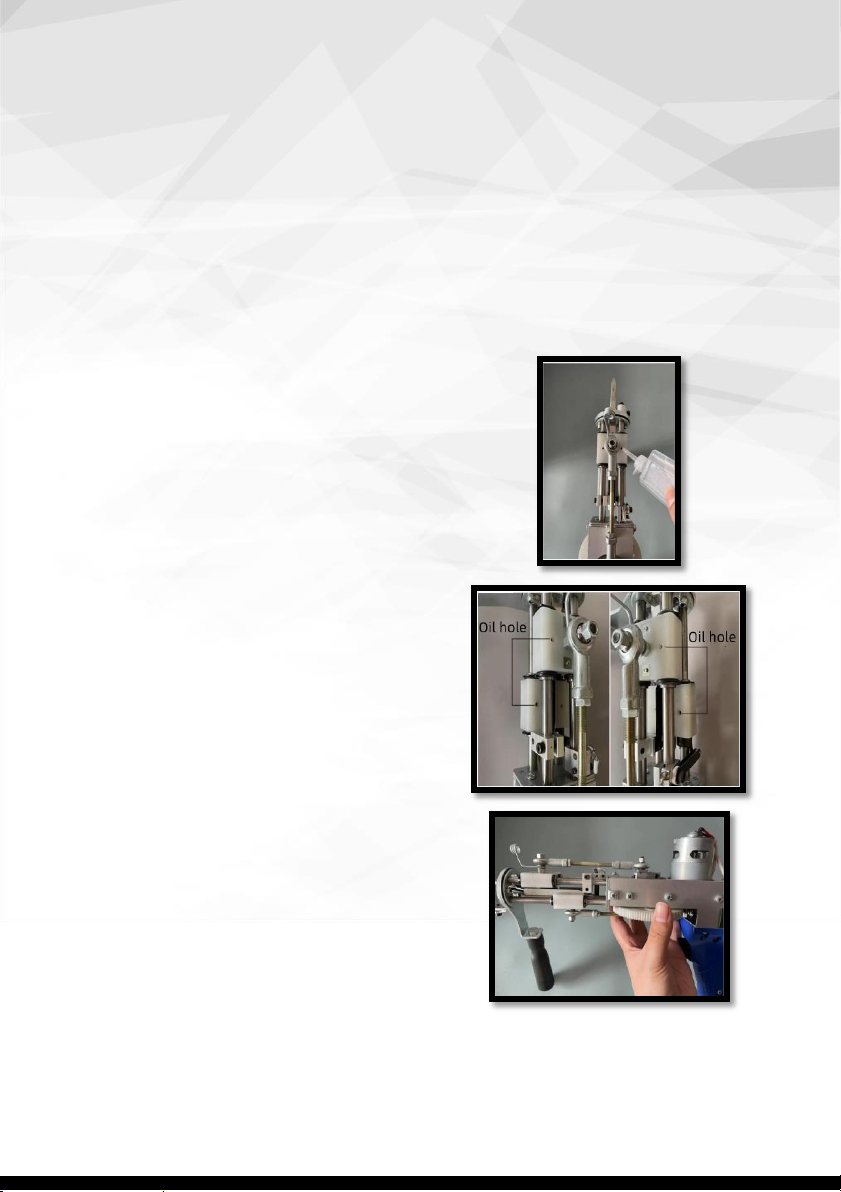
•Oil the machine: Applying a small
amount of lubricating oil to the
machine's moving parts can help
prevent friction and wear, ensuring
smoother operation. Consult the
manufacturer's instructions for specific
recommendations on how to oil your
tufting gun. Oil the machine on a
regular basis. Each machine has 4 oil
holes, and each oil hole drips 3-5 drops
of oil. Turn the big gear to make the oil
fully lubricate the machine.
By following these maintenance tips, you
can help ensure that your tufting gun
stays in good condition and continues to
produce high-quality tufts for years to
come.

COPYRIGHT © 2023 TUFTINGSHOP Page 6 of 24
CONNECTING THE MACHINE
Insert the power cord into the adapter:
Locate the power cord that came with
your tufting gun and insert one end into
the power adapter. The other end of the
power cord should have a plug that
connects to your wall outlet.
Turn on the machine: Once the power
cord and adapter are properly
connected, turn on the machine using the
on/off switch or button. Test the machine
to make sure it is working properly.
Connect the adapter to the machine:
Locate the input port on the tufting gun
and insert the adapter plug into the port.
Make sure the plug is securely inserted
and that there are no loose connections.
The power indicator lights up after power-
on.

COPYRIGHT © 2023 TUFTINGSHOP Page 7 of 24
THREADING THE MACHINE
Check whether the power switch is o.
Thread the yarn through the coil.
Thread the threader through the needle hole and
use the threader to bring the yarn into the needle.
➔For the AK HIGH pile, you will nd 2 eyes on the needle.
Choose the eye right in front of the foot.
oThe front eye is for 30-40 mm
oThe other is for 40 - 48 mm

COPYRIGHT © 2023 TUFTINGSHOP Page 8 of 24
START TUFTING
Push the front part of the
needle against the cloth.
Press hard so that the foot
touches the cloth. While
working, keep pressing so
that the foot keeps
contact with the cloth.
Now press
the start switch.
The machine will now start
running when you press the
trigger. Keep the balance of the
electric tool, and start working
from bottom to top and from left
to right. If you are well practiced,
you might try making circles.

COPYRIGHT © 2023 TUFTINGSHOP Page 9 of 24
The pile height of a tufting gun refers to the length of the tufts or loops that are created
by the machine. The pile height varies per machine and whether the machine is cut or
loop pile. The adjustments consist of various steps, please be sure to consult the whole
chapter and before making any changes, ensure the gun is Unplugged.
STEP 1.
To adjust the pile height, use the quick switch wheel located on the
side of the gun. For pile heights up to 16 millimeters. There are 2 group
of Pile height adjustment holes on the wheel. First group have 9, 11, 13,
15 mm five heights, Second group have 8, 10, 12, 14, 16 mm five heights
(Figure1); Each hole on the wheel represents a pile height. When a
certain height is required, place the screw on the positioning hole to
the required hole. The machine’s default pile height is set in the first
group 13 mm, from the first group. If you need heights in the second
group, move the positioning screw to the required height-holes, then:
•Turn the positioning screw on the wheel to the bottom End (Figure
2);
•Loosen the upper eccentric screw (machine parts 20) ;
•Rotate the eccentric wheel (machine parts 20) 180 degrees,
•Tighten the screws again (Figure 3);
After the rotation, the head of the eccentric wheel goes to the front
and bottom position screw on the wheel goes to the end (Figure 4).
If you need a 17-18mm pile height firstly adjust the positioning screw
on wheel to the number 16,then adjust the tooth on the eccentric
PILE HEIGHT ADJUSTMENT FOR THE DUO
MACHINE
PILE HEIGHT
ADJUSTMENT

COPYRIGHT © 2023 TUFTINGSHOP Page 10 of 24
(structure drawing 20) to the slot at the front end (this slot is special for 17-18mm).
STEP 2.
Unscrew the screw on the upper bearing rod (machine
part 2) and take it off.
Rotating the rod (machine part 15) clockwise, will increase
the pile height. Rotating is counterclockwise will reduce
the pile height. After adjusting to desired pile height, put
the bearing rod back in place and tighten.
STEP 3.
After adjusting the pile height, the scissor closer need to
be adjusted (not for the AK-II).
Loosen the screw on the scissor closer (machine part 7).
Turn the plastic wheel (machine part 32) to turn the
scissors to the front (Figure 8).
Move the scissors closer down (machine part 5) to close
the scissors completely, then tighten the screw
(structure picture 7)
AK-I, AK-II AK HIGH PILE HEIGHT
ADJUSTMENTS
ADJUST THE SCISSORS
CLOSER

COPYRIGHT © 2023 TUFTINGSHOP Page 11 of 24
STEP 4.
When the pile height is adjusted, the scissors opener also
needs to be adjusted.
Loosen the screws (machine part 12) on the scissors
opener holder, and move the opener holder back by 15mm
( Figure 10);
Rotate the wheel to make the bearing rod return to the
back end ( Figure 11);
Move the scissors opener holder forward, so that the
opener will force the scissors open, then lock the screw on
the opener holder (machine part 12), (Figure 12)
STEP 5.
The brake positioning needs to be adjusted sometimes
when the pile height is adjusted:
Turn the bearing rod to the back end. (Figure 13);
Make the stopper protrusions (machine part 28)
overlap the black brake pads so that the two contact
points on the brake pads touch each other (Figure14).
When the yarn height increases, it moves backward,
and when the yarn height decreases, it moves forward;
ADJUSTING THE SCISSOR
OPENER
ADJUSTING THE BRAKING
SET

COPYRIGHT © 2023 TUFTINGSHOP Page 12 of 24
BACKING LINE AND FRONT PILE PARAMETER LIST
First Group
positioning holee
Distance between
scissor
mouth &
needle hole
Distance between
Protect
bow &
needle hole
Distance between
Spot strip &
scissors blade
9mm
17-18mm
3-4mm
10-11mm
11mm
18-19mm
3-4mm
12-13mm
13mm
20-21mm
3-4mm
14-15mm
15mm
22-23mm
3-4mm
19-20mm
Second Group
positioning holee
Distance between
scissor
mouth &
needle hole
Distance between
Protect
bow &
needle hole
Distance between
Spot strip &
scissors blade
8mm
16-17mm
3-4mm
9-10mm
10mm
17-18mm
3-4mm
11-12mm
12mm
19-20mm
3-4mm
12-14mm
14mm
21-22mm
3-4mm
15-17mm
16mm
25-26mm
3-4mm
20-21mm

COPYRIGHT © 2023 TUFTINGSHOP Page 13 of 24
STEP 6.
Always make sure the needle hole is right in front of the foot.
ADJUSTING THE FOOT

COPYRIGHT © 2023 TUFTINGSHOP Page 14 of 24
In tufting, cut and loop refer to
the way the yarn is treated after it
is inserted into the backing
material. Cut pile and loop pile
are the two main types of carpet
styles produced through tufting,
and they differ in their
appearance, texture, and
durability.
Cut pile carpets are made by
cutting the yarn loops created
during tufting, resulting in
individual yarn strands standing
straight up from the backing. This
creates a plush, soft surface.
Loop pile carpets, on the other
hand, leave the yarn loops intact,
resulting in a surface of
continuous loops. This creates a
more textured surface that is
often more durable and better
suited to high-traffic areas.
In summary, the main difference
between cut and loop pile in
tufting is that cut pile has
individual strands of yarn
standing upright while loop pile
has continuous loops of yarn. Cut
pile carpets tend to be softer and
more formal-looking while loop
pile carpets tend to be more
textured and durable.
There are 2 ways to
change the machine
from cut to loop. The
first option is the
easy option and the
most advised one.
FROM CUT
TO LOOP

COPYRIGHT © 2023 TUFTINGSHOP Page 15 of 24
OPTION 1.
This is the simplest method to changing you
machine from cut to loop. You deactivate the
scissors by moving the part that makes the
scissors cut. The scissors stay open this way
and the machine will create a loop effect.
First you loosen this screw.
Next you lift the black Iron Block to the top and
then fix the screw.
BOTH DUO AND AK-I and AK-
HIGH
For further
details, please
check the video.
https://www.youtube.com/
watch?v=G3WmA6SLKpM

COPYRIGHT © 2023 TUFTINGSHOP Page 16 of 24
OPTION 2.
This is a more complex way of changing between functions in which the scissor inside
the machine is replace with the loop head.
STEP 1: MOVE PARTS
ASIDE TO MAKE THE
SCISSOR ACCESIBE
Take off the upper screw.
And remove the bearing
rod from the screw.
Push the slider to the front.
Unscrew the scissors opener and flip the scissors opener to the outside to expose the
screw that holds the scissor. Turn the gear and push the connecting rod to the front side.
Use a screwdriver to unscrew the scissors. The scissors can be easily removed from the
side with pliers.
ONLY FOR THE DUO

COPYRIGHT © 2023 TUFTINGSHOP Page 17 of 24
STEP 2: REMOVE THE SCISSOR AND REPLACE
IT WITH THE LOOP HEAD
After removing the scissors, you can install the Loop Head
that came in the box using the same screw. The scissor
opener does not work in Loop pile made, move it to the
back of the rod and fix it there. Reinstall the bearing rod.
Note that the yarn feeding circle and the gasket above go
under the bearing rod. Make sure the yarn feeder is in the
direction of the needle hole.
For however Loop pile obtained at this time is about 10
millimeters (0.39 inch). If you use 9 millimeters Loop head,
Loop half height is 12 millimeters (0.47 inch).
Finally, check the position of a loop head in the needle.
Make sure the loop head is in the middle of the needle and
doesn’t scratch the needle when moving back and forth.
For further
details, please
check the video.
https://www.youtube.com/w
atch?v=llk4kXvzcfU&t=40s

COPYRIGHT © 2023 TUFTINGSHOP Page 18 of 24
If you change the scissor or
function, please do this running
check before you start.
For further
details, please
check the video.
https://www.youtube.com/w
atch?v=9Z84OCC7-vI&t=48s
RUNNING
CHECK

COPYRIGHT © 2023 TUFTINGSHOP Page 19 of 24
THE SCISSORS ARE NOT CUTTING
There are several potential reasons why
the scissors of a tufting gun may not be
cutting the yarn:
•Dull blades: If the blades of the tufting
gun are dull, they may not be sharp
enough to cut through the yarn. This
can happen over time with frequent
use, or if the blades are not properly
maintained. It is normal for them to
wear overtime. Replace the scissor or
sharpen the blades.
•Yarn thickness: If the yarn being used
is too thick or dense, the blades may
not be able to cut through it. In this
case, using a thinner yarn may be
necessary.
•Tension settings: If the tension settings
on the tufting gun are too low, the yarn
may not be held tightly enough for the
blades to cut through it. Adjusting the
tension settings may help resolve the
issue.
•Improper technique: If the user is not
using the tufting gun properly, it may
be difficult for the blades to cut
through the yarn. For example, if the
user is not applying enough pressure
or is moving the gun too quickly, the
blades may not have enough time to
cut through the yarn.
•Maintenance issues: If the tufting gun
is not properly maintained, such as if it
has become clogged with yarn fibers,
this can prevent the blades from
cutting through the yarn. Regular
cleaning and maintenance of the
tufting gun can help prevent this issue.
THE MACHINE IS NOT GETTING
POWER
There are several possible reasons why a
tufting gun may not power on:
•Improperly connected or adaptor not
working. Please check all the wires and
connections and see if the light on the
adapter is on.
•Loose connections: If the tufting gun
has loose connections or if the power
cord is damaged, this can prevent it
from turning on. Check the
connections and the power cord to
make sure everything is secure and
undamaged.
•Malfunctioning switch: If the switch on
the tufting gun is malfunctioning, it
may prevent it from turning on. Try
toggling the switch a few times to see if
this is the issue.
If the problem persists,
it may be necessary to
seek assistance from
our customer service
where we are happy to
help you solve the
issue.
TROUBLE
SHOOTING

COPYRIGHT © 2023 TUFTINGSHOP Page 20 of 24
THE MACHINE IS BEEPING
If you hear a high-pitched beeping noise
from your tufting gun, it's likely that your
rug machine requires lubrication. Apply a
few drops of lubricating oil to the moving
parts of the machine, then turn it on to
check if it's functioning properly. To keep
your tufting gun in good condition, it's
recommended that you lubricate it at
least once a week.
However, if your rug gun emits a high-
pitched sound and then stops, it's an
indication that the motor lacks sufficient
power to push through the fabric. This is
commonly caused by tufting over existing
tufted lines or using rigid and thick yarns.
Also it could be a signal that yarn is stuck
in the wheel. Unplug the machine and
check.
THE BACK STITCH IS UNEVEN OR
INCONSISTENT
There are several reasons why the stitch
of a tufting gun may be uneven:
•Uneven pile height: If the pile height of
the yarn being used is not consistent,
this can result in an uneven stitch.
Make sure the yarn being used has a
consistent pile height.
•Uneven yarn tension: If the tension of
the yarn being fed into the tufting gun
is not consistent, this can cause an
uneven stitch. Make sure the tension is
adjusted properly and that the yarn is
being fed through the gun smoothly.
•Uneven speed or pressure: If the tufting
gun is being moved too quickly or too
slowly, or if too much or too little
pressure is being applied, this can
result in an uneven stitch. Try adjusting
the speed and pressure to achieve a
more consistent stitch.
•Clogged or damaged needles: If the
needles of the tufting gun are clogged
or damaged, this can cause an uneven
stitch. Check the needles to make sure
they are clean and undamaged.
•Uneven backing material: If the
backing material being used is
stretched properly and therefore not
flat or consistent, this can cause an
uneven stitch. Make sure the backing
material is smooth and consistent.
•The pusher is too close to the foot if the
machine shows loops on the back of
the cloth. Try to move it forward a
millimeter or 2 to see if the stitch is
more tight.
THE MACHINE IS MAKING HOLES
IN THE CLOTH
In the case where your tufting gun is
making holes in the cloth, there could be
a few reasons why. Firstly, it's possible that
the cloth is not stretched enough and
needs to be taut like a drum. Additionally,
the position of the foot may be incorrect,
and it should be right below the needle
hole (almost touching the bottom of the
needle hole) when the needle is in the
highest position.
THE YARN IS NOT STICKING IN THE
CLOTH
If your yarn won't stay in the cloth, it's
likely due to one of two reasons. Either
your yarn is too thin, and you need to use
thicker yarn or double up on the yarn, or
the needle doesn't reach far enough
because the position of the foot is
incorrect, and it should be right below the
needle hole (almost touching the bottom
of the needle hole) when the needle is in
the highest position.
This manual suits for next models
3
Table of contents
Popular Industrial Equipment manuals by other brands

Stark
Stark RF 900 User and maintenance manual

INOXPA
INOXPA MM-1 Installation, service and maintenance instructions

New Leader
New Leader AGCO NL4258 Operator's manual

ABB
ABB HT574488 Operation manual

Mayr
Mayr EAS-Compact Type 49. 4. Size 4 Series Installation and operational instructions

Hornady
Hornady LOCK-N-LOAD 050130 instructions

Vestil
Vestil HOP-LP-N quick start guide

SuperMax
SuperMax 71938-7F-CL installation instructions

Zepro
Zepro ZHD 3000-150 Installation instruction

Agilent Technologies
Agilent Technologies E444 AU Series installation guide

schmersal
schmersal AZM400Z-ST2-2P2P-BOW-E manual

Bühler technologies
Bühler technologies GAS 222.20 AMEX Assembly, installation and operation instructions