Tumbleweed Pet Poo Worm Farm User manual

The Tumbleweed Pet Poo Worm Farm has been developed to turn your pet
droppings into great free organic fertiliser that promotes fantastic growth
in your plants. By allowing worms to process your pet poo and take the
castings into the surrounding soil, this product will enrich the soil in your
garden with minerals and nutrients.
Pet Poo Worm Farm
www.tumbleweed.com.au
Assembly Instructions
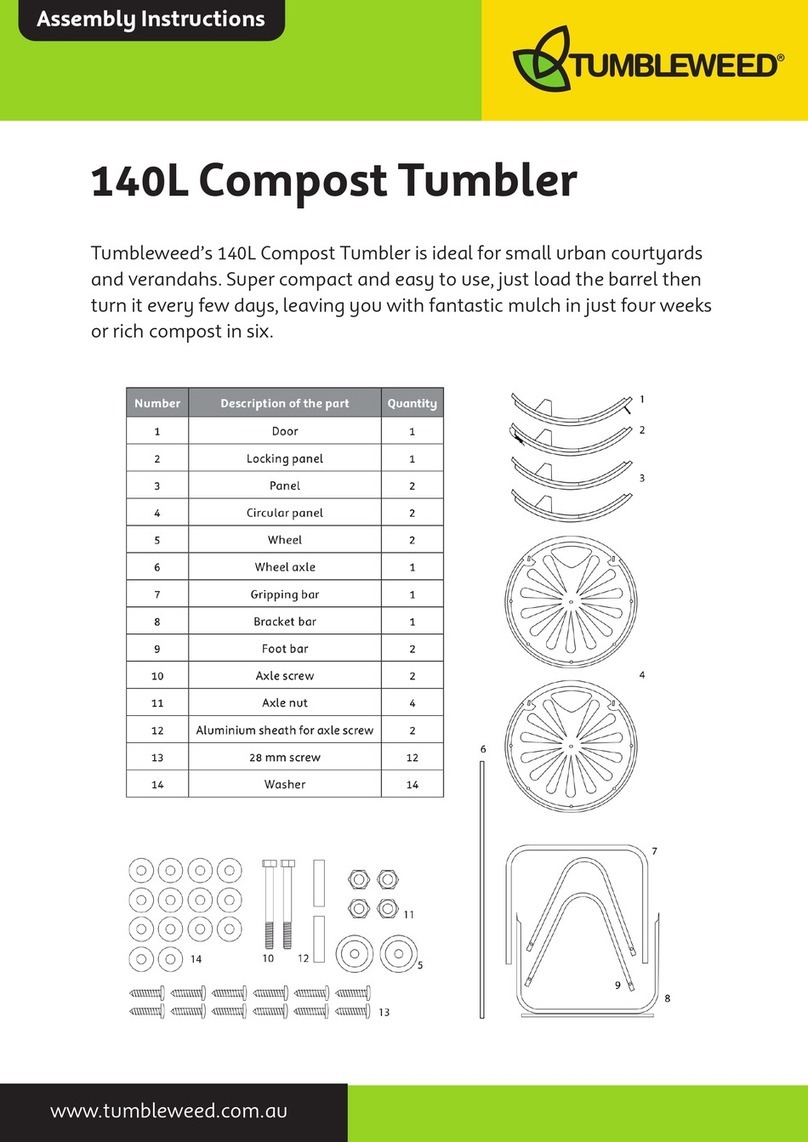
Assembly of your Tumbleweed Pet Poo Worm Farm is easy. This product includes
the following components:
2
Lid
Screws, washers, nuts
Axle,Nyloc Nut
Lid LiftingBar
Pedal Bar
Rear Body
Worms are not included with this product
Front Body
1 x Lid1 x Pedal Bar1 x WormBedding Block
1 x RearBody 12 x Screws, Washers & Nuts
1 x Lid Lifting Bar1 x Lid Axle and1 x Nyloc Nut
1 x Front Body 1 x Instruction Manual

www.tumbleweed.com.au
Assembly Instructions
1. Slide the Lid Lifting Bar onto the Pedal bar and position between the pinch marks at
the rear of the Pedal Bar – ensure correct alignment of Lid Lifting Bar.
Step 1 - Assemble Pedal Mechanism
www.tumbleweed.com.au
Keep tools clean
Store tools inside unit
Keep lid closed
Keep children away from pet droppings
Slide the Lid LiftingBaronto the Pedal barandposition between the pinch marks at the rear
of the Pedal Bar – ensure correct alignment of LidLiftingBar.
Step 1 - Assemble Pedal Mechanism
13564 Tumbleweed_Yardart Instruction Manual_V4.indd 3 19/12/12 10:55 AM
1.Locate one end of the Pedal Bar into one collar of the Rear Body.
2.Squeeze the Rear Body to locate the Pedal Bar into the collar on the other side.
Step 2 - Assemble Pedal Mechanism to Rear Body
Locate one endof the Pedal bar into one collar of the RearBody
Squeeze the Rear Body to locate the pedal Barinto the collar on the other side
Slide the body halves together
Secure with 12 screws, washers and nuts
Step 2 – Assemble Pedal Mechanism to Rear Body
Step 3 – Assemble Front Body to Rear Body
4

1.Slide the body halves together.
2.Secure with 12 screws, washers and nuts
Step 3 - Assemble Front Body to Rear Body
Slide the body halves together
Secure with12 screws, washers and nuts
Step 3 – Assemble Front Body to Rear Body
13564 Tumbleweed_Yardart Instruction Manual_V4.indd 4 19/12/12 10:55 AM
www.tumbleweed.com.au
Assembly Instructions
1.Slide Lid onto Lid Lifting Bar.
2. Locate Lid and Rear Body and Secure with Lid axle and nyloc nut.
Step 4 - Assemble Lid
Slide Lid onto Lid Lifting Bar
Locate Lid and Rear Body and Secure with Lid axle andnyloc nut
Step 4 – Assemble Lid
5

1. Find a suitable location in your yard or garden
toset up your Tumbleweed Pet Poo Worm
Farm. The location can be in a sunny or shady
spot. Tumbleweed does not recommend
that the Pet Poo Worm Farm be placed in a
vegetable or herb garden.
2. Prepare the bedding block as per instruction
on the packaging. The bedding block provides
a “home base” for the worms to move in and
out of as they process your pets dropping.
3. Dig a hole approximately 400mm square (16”)
and 320mm (13”) deep, deep enough sothe
slange is buried just below ground level.
4. Sprinkle a good handful of Tumbleweed
Worm Farm & Compost Conditioner in the
base of the hole.
5. Locate your Tumbleweed Pet Poo Worm
Farm centrally in the hole.
6. Pack approximately 50% of the prepared
bedding block around the outside of the unit.
7. Pack the remaining 50% in the bottom of
inside the Pet Poo Worm Farm – remember
the bedding is a home for your composting
worms to live in whilst they process the pet
waste.
Installation Instructions
1. Find a suitable location in your yard orgarden
to set up your Tumbleweed Yardart Pet Poo
Composter. The location can be in a sunny
or shady spot. Tumbleweed does not recommend
that the Yardart Pet Poo Composter be placed in
a vegetable or herbgarden.
2. Prepare the bedding block as perinstruction on
the packaging.The bedding block provides a “home
base” for the worms to move in andout of as they
process your pets dropping.
3. Dig a hole approximately 400mm square (16”)
and320mm (13”) deep, deep enough so the ange
is buried just below ground level.
4. Sprinkle a good handful of Tumbleweed Worm
Farm & Compost Conditionerin the base of the hole.
5. Locate your Yardart pet Poo Composter centrally
in the hole.
6. Pack approximately 50% of the prepared bedding
block around the outside of the unit.
7. Pack the remaining 50% in the bottom of inside the
Yardart – remember the bedding is a home for your
composting worms to live in whilst they process the
pet waste.
8. Using the left over soil, back ll the surrounding
outside of the hole,ensuring the ange is buried
just below ground level. Ensure you don’t bury the
unit too deep, as you will restrict the movement
of the pedal.
Installation Instructions
6
www.tumbleweed.com.au
Assembly Instructions

www.tumbleweed.com.au
Assembly Instructions
8.
surrounding outside of the hole, ensuring
the flange is buried just below ground level.
Using the left over soil, back fill the
Ensure you don’t bury the unit too deep, as
you will restrict the movement of the pedal.
9. Your Tumbleweed Pet Poo Worm Farm is
now ready to add worms. Just like a worm
farm you need composting worms, not garden
worms. Add a minimum of 2000 composting
worms on top of the bedding inside the unit
to ensure the system gets going quickly and
efficiently. At this point make sure your worms
are well watered – Do not let your system
dry out. You can source your worms through
tumbleweed at www.tumbleweed.com.au
Note: You can add all of the cardboard packaging that your
Tube-O-Worms comes in to your Pet Poo Worm Farm and
send back to Tumbleweed the two plastic end caps for
recycling.
10. Leave the Pet Poo Worm Farm for
approximately 1 week, for the worms to
adjust to their new home.Then start adding
small amounts of pet droppings mixed with
food scraps from the kitchen and sprinkle
with Tumbleweed Worm Farm & Compost
Conditioner. Gently mix with Compost Mate.
Over a period of a month, slowly reduce
the amount of kitchen scraps until you are
just feeding pet droppings only.
www.tumbleweed.com.au
7
9. Your Tumbleweed Yardart Pet Poo Composter is
now ready to add worms.Just like a worm farm
youneed composting worms, not garden worms.
Add a minimum of 2000 composting worms on
top of the bedding inside the unit to ensure the
system gets going quickly and eciently.At this
point make sure your worms are well watered
– Do not let your system dry out. You can source
your worms through Tumbleweed at
www.tumbleweed.com.au
Note: You can add all of the cardboard packaging
that your Tube O Worms comes in to your Yardart
andsendback to Tumbleweed the two plastic
end caps for recycling.
10.Leave the Yardart for approximately 1 week,
for the worms to adjust to their new home.
Then start adding small amounts of pet
droppings mixed with food scraps from the
kitchen andsprinkle with Tumbleweed Worm
Farm & Compost Conditioner. Gently mix with
Compost Mate. Over a period of a month,slowly
reduce the amount of kitchen scraps until you
are just feeding pet droppings only.
11.The Tumbleweed Yardart Pet Poo Composter
must always remain moist. When adding your
pets droppings to the unit, water generously.
This will stop the pet droppings from becoming
too hard and dry, making it dicult for the
worms to digest the droppings.
Table of contents
Other Tumbleweed Lawn And Garden Equipment manuals
Popular Lawn And Garden Equipment manuals by other brands

FLORABEST
FLORABEST FHE 550 B2 translation of original operation manual

Sunsystem
Sunsystem Sun Stand 2 Assembly instructions

Euro Systems
Euro Systems P130 Translation of the original

Feelgood
Feelgood Specials Calypso Manual For Assembly

N'oveen
N'oveen IKN1080 instruction manual

Euro Systems
Euro Systems Lucciola operating instructions