manuals.online logo
Brands
  1. Home
  2. •
  3. Brands
  4. •
  5. Tungsram
  6. •
  7. Outdoor Light
  8. •
  9. Tungsram LED 2D2P User manual

Tungsram LED 2D2P User manual

LED 2D2P 6.5W/835/GR8/220-240 TU BX1/10
LED 2D2P 6.5W/840/GR8/220-240 TU BX1/10
LED 2D4P 12.5W/835GR10q/220-240TU BX1/10
LED 2D4P 12.5W/840GR10q/220-240TU BX1/10
BEFORE YOU BEGIN
To install the LED 2D plug-in lamps, please read the entire installation guide carefully.
The product is not intended to be used with dimmers and emergency light luminaires. This LED 2D lamp is designed for
direct connection to the mains. For proper operation, bypassing the original ballast and starter is required. Furthermore,
it should be taken into consideration the maximum LED 2D lamps connected to one circuit breaker according to its
specification. The replaced fluorescent lamp should be disposed of properly based on local regulation.
WARNING Risk of electric shock. Disconnect power before installation of the product.
WARNING Risk of fire or electric shock. LED retrofit installation must be done by a qualified electrician only and all safety
instruction must be followed to avoid a risk of injury or property damage.
Bi-pin lamps:
Note: Check the lamp socket condition. If damaged or corroded, replace it with a new one.
Note: Caution label with the following warning shall be placed onto the fixture in a location where readily visible by the user
during re-lamping and after installation.
CAUTION: Risk of Injury or Damage. This luminaire has been modified and can no longer operate a fluorescent 2D lamp or an
LED 2D lamp which is designed for CCG or ECG ballasts. Only use the replacement LED 2D plug-in lamp type or contact
manufacturer for more information.
1) Turn power off.
2) Remove fixture cover.
3) Remove fluorescent lamp and dispose of properly.
4) Open inner cover of the fixture to access ballast and socket wiring.
5) Re-wire the fixture according to the following sketch:
a. Observe original wiring prepared for fluorescent lamp operation:
b. Remove crossed-through wires. When you cut the wire that was connected to the socket, it is
recommended to cut it as far from the socket as possible and re-use it according to step c. below,
if its length allows:
c. Connect new wire marked with tick-mark:
GR8 socket
ballast
L
N~
GR8 socket
ballast
L
N~
GR8 socket
ballast
L
N~
d. Obsolete wires shall be insulated properly or removed completely.
e. Ballast is no more connected. You may remove it or leave it in as is. If you remove it, dispose of
properly according to local regulation.
6) Replace the inner cover.
7) Apply the caution label provided with the product.
8) Place the LED 2D lamp in the socket.
9) Replace fixture cover.
10) Turn power on.
4-pin lamps:
Note: Check the lamp socket condition. If damaged or corroded, replace it with a new one.
Note: Caution label with the following warning shall be placed onto the fixture in a location where readily visible by the user
during re-lamping and after installation.
CAUTION: Risk of Injury or Damage. This luminaire has been modified and can no longer operate a fluorescent 2D lamp or an
LED 2D lamp which is designed for CCG or ECG ballasts. Only use the replacement LED 2D plug-in lamp type or contact
manufacturer for more information.
1) Turn power off.
2) Remove fixture cover.
3) Remove fluorescent lamp and dispose of properly.
4) Open inner cover of the fixture to access ballast and socket wiring.
5) Re-wire the fixture according to the following sketch:
a. Observe original wiring prepared for fluorescent lamp operation:
I) Option A: AC input is connected to the left side of the socket (relative to the indicated
lamp orientation).
II) Option B: AC input is connected to the right side of the socket (relative to the indicated
lamp orientation).
b. Remove crossed-through wires. When you cut the wires that were connected to the socket,
it is recommended to cut them as far from the socket as possible and re-use them according to
step c. below, if their length allow:
I) Option A: AC input is connected to the left side of the socket (relative to the indicated
lamp orientation).
GR10q socket
ballast
L
N
starter
~
GR10q socket
ballast
L
N
starter
Lamp orientation is
such that horizontal
bar is on the bottom
like this:
~
GR10q socket
ballast
L
N
starter
~
Lamp orientation is
such that horizontal
bar is on the bottom
like this:
Lamp orientation is
such that horizontal
bar is on the bottom
like this:
II) Option B: AC input is connected to the right side of the socket (relative to the indicated
lamp orientation).
c. Connect new wires marked with tick-mark:
I) Option A: AC input is connected to the left side of the socket (relative to the indicated
lamp orientation).
II) Option B: AC input is connected to the right side of the socket (relative to the indicated
lamp orientation).
d. Obsolete wires shall be insulated properly or removed completely.
e. Ballast and starter are no more connected. You may remove them or leave them in as is. If you
remove them, dispose of properly according to local regulation.
6) Replace the inner cover.
7) Apply the caution label provided with the product.
8) Place the LED 2D lamp in the socket.
9) Replace fixture cover.
10) Turn power on.
This lamp is designed for general lighting service (excluding for example explosive atmosphere).
This lamp may not be suitable in all applications where a traditional fluorescent lamp has been used. The temperature range
of this lamp is more restricted. In case of doubt regarding suitability of the application the manufacturer of this product shall
be consulted.
Processing of electric and electronic equipment at the end of their service life. This symbol indicates that the product
must not be processed with household waste. It must be brought to an electric and electronic waste collection point
for recycling and disposal. Please contact your municipality, local waste disposal centre or the store where the product
was purchased.
Dimming is not allowed.
GR10q socket
ballast
L
N
starter
~
GR10q socket
ballast
L
N
starter
~
GR10q socket
ballast
L
N
starter
~
Lamp orientation is
such that horizontal
bar is on the bottom
like this:
Lamp orientation is
such that horizontal
bar is on the bottom
like this:
Lamp orientation is
such that horizontal
bar is on the bottom
like this:
Lamp is not suitable for emergency
operation.
Lamp shall be used in dry
conditions or in a luminaire
that provides protection.
Please retain this installation guide for further reference.
Tungsram Group disclaims liability for any damage caused by not following the instructions of this installation guide
Verziju uputstva za instalaciju i informacija o bezbednosti na srpskom jeziku možete pronaći na sledećoj lokaciji:
EL
ET
SV
DA
SL
CS
BG
Die deutsche Version der Installationsanleitung und Sicherheitinformationen finden Sie in folgendem Verzeichnis:
DE
La version francaise des instuctions d’installation et information de sécurité est disponible
à
l’adresse suivante:
FR
IT La versione italiana del manuale di installazione e sicurezza puó essere reperita nella seguente sezione:
ES La versión espanola de las instrucciones de instalación y la información sobre seguridad puede encontrarse en la siguiente ubicación:
A versão em Portugues das instruções de instalação e das informações de segurança pode ser encontrada na seguinte localização:
Versiunea în limba românăa instrucţiunilor de instalare şi a informaţiilor de siguranţă pot fi găsite la:
PT
RO
PL
SK
HR
HU
NL
FI
NO
LV
LT
Polsk
ą
wersj
ę
instrukcji instalacji oraz informacje dotycz
ą
ce bezpiecze
ń
stwa mo
ż
na znale
źć
w nast
ę
puj
ą
cej lokalizacji:
Návod k montáži a bezpe
č
nostní informace v
č
eštiněnajdete zde:
Slovenskú verziu montážnej príru
č
ky a bezpe
č
nostných inštrukcií nájdete na nasledujúcej lokalite:
Hrvatska verzija priru
č
nika za ugradnju i sigurnosnih informacija nalazi se na sljede
ć
oj lokaciji:
Slovenska razli
č
ica navodil za namestitev in varnostnih navodil se nahaja na naslednji strani:
A telepítési útmutató és a biztonsági információk magyar nyelvű változata az alábbi címen található:
De Nederlandse versie van de installatie-instructies en veiligheidsinformatie kan op de volgende locatie worden gevonden:
De danske version af installationsvejledningen og sikkerhedsoplysninger kan findes p
å
f
ø
lgende placering:
Asennusohjeiden ja turvallisuustietojen suomenkielinen versio löytyy seuraavasta paikasta:
Den norske versjonen av installasjonsinstruksjonene og sikkerhetsinformasjonen finnes under:
Ni hittar den svenska versionen av installationsanvisningarna och s
ä
kerhetsinformationen p
å
följande plats:
Eestikeelse paigaldusjuhendi ja ohutusnõuded leiate aadressilt:
Uzst
ā
d
īš
anas instrukciju un dro
šī
bas inform
ā
ciju latvie
š
u valod
ā
var atrast
š
eit:
Lietuvi
š
k
ą
diegimo instrukcijos ir saugos informacijos versij
ą
galima rasti
š
ioje vietoje:
Μ
πoρείτε να βρείτε την ελληνική εκδοχή των οδηγιών εγκατάστασης και των πληροφοριών ασφάλειας στην εξής τοποθεσία:
Българската версия на инструкциите за инсталация и
информация
за
безопасност мо
г
ат
да бъд
ат намерени на с
л
е
д
ни
я
а
д
рес:
Montaj talimatı ve güvelik bilgilerinin Türkçe sürümü, aşağıdaki konumda bulunabilir:
BS BiH verziju priručnika za instalaciju, kao i sigurnosnu informaciju, možete pronaći na ovom mjestu:
Українську версію інструкції по установці і техніці безпеки можна знайти тут:
Македонската верзија од упатството за инсталација и безбедносните информации е достапна на следната локација:
RU
Русскую версию инструкции по установке и технике безопасности можно найти здесь:
EL
HR
AR
IL
TR
UA
MK
SR
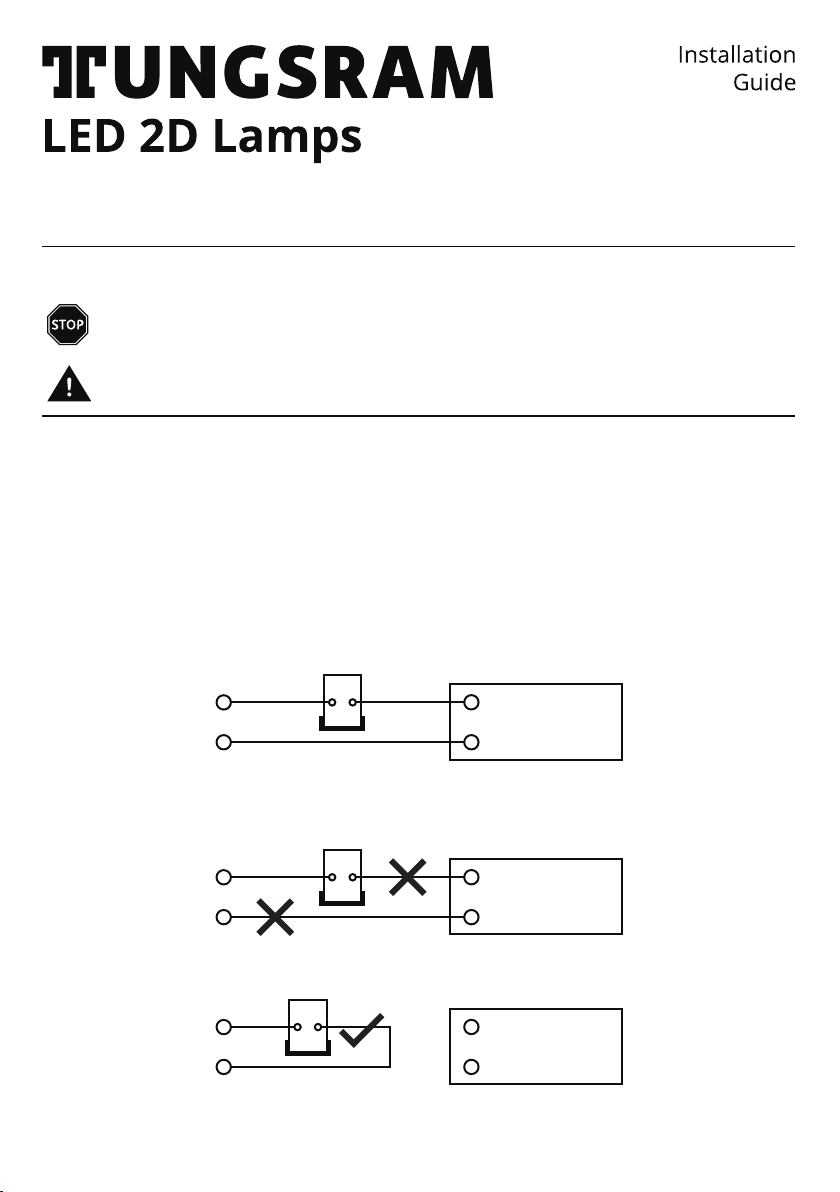
The English version of the installation instruction and safety information can be found at the following location:
EN

This manual suits for next models

1

Other Tungsram Outdoor Light manuals

Tungsram Twin Spot Configuration guide

Tungsram

Tungsram Twin Spot Configuration guide

Tungsram Nobila User manual

Tungsram

Tungsram Nobila User manual

Tungsram ALIx User manual

Tungsram

Tungsram ALIx User manual

Tungsram Bollard Configuration guide

Tungsram

Tungsram Bollard Configuration guide

Tungsram SMBt T1-T2 User manual

Tungsram

Tungsram SMBt T1-T2 User manual

Popular Outdoor Light manuals by other brands

FLOS Michael Anastassiades COPYCAT F1952030 quick start guide

FLOS

FLOS Michael Anastassiades COPYCAT F1952030 quick start guide

ATOMI Smart Color String Lights user manual

ATOMI

ATOMI Smart Color String Lights user manual

Portfolio 00768 manual

Portfolio

Portfolio 00768 manual

Weelko 1001T instruction manual

Weelko

Weelko 1001T instruction manual

Micasa SESTO operating instructions

Micasa

Micasa SESTO operating instructions

Good Earth Lighting SE1216-BRS-02LF4-G quick start guide

Good Earth Lighting

Good Earth Lighting SE1216-BRS-02LF4-G quick start guide

DS Produkte TY-366-1 instructions

DS Produkte

DS Produkte TY-366-1 instructions

Dyson Lightcycle CD05 operating manual

Dyson

Dyson Lightcycle CD05 operating manual

Gama Sonic 301iST60822 instruction manual

Gama Sonic

Gama Sonic 301iST60822 instruction manual

Meyer Fluxa C 8 277 1.8 Mounting instructions

Meyer

Meyer Fluxa C 8 277 1.8 Mounting instructions

MAXSA 43319 Assembly and Instruction Guide

MAXSA

MAXSA 43319 Assembly and Instruction Guide

Xterior MICRO FACET LED INSTALLATION, CLEANING AND MAINTENANCE

Xterior

Xterior MICRO FACET LED INSTALLATION, CLEANING AND MAINTENANCE

Halma Ocean Optics HL-2000-CAL Installation and operation manual

Halma

Halma Ocean Optics HL-2000-CAL Installation and operation manual

Hudson & Canal TL0481 instructions

Hudson & Canal

Hudson & Canal TL0481 instructions

Safavieh TBL4350A instructions

Safavieh

Safavieh TBL4350A instructions

Vasner Splitty Black user manual

Vasner

Vasner Splitty Black user manual

Faro Barcelona SABA 68544 quick start guide

Faro Barcelona

Faro Barcelona SABA 68544 quick start guide

HUDSON VALLEY LIGHTING Troy Lighting Napa County installation instructions

HUDSON VALLEY LIGHTING

HUDSON VALLEY LIGHTING Troy Lighting Napa County installation instructions

manuals.online logo
manuals.online logoBrands
  • About & Mission
  • Contact us
  • Privacy Policy
  • Terms and Conditions

Copyright 2025 Manuals.Online. All Rights Reserved.