Turpone KPO-PZ300 Operator's manual

MANUAL &
SAFETY INSTRUCTIONS
Ve r s i o n N o . KN-20220901 US-V01

2
IMPORTANT!
PLEASE READ THESE INSTRUCTIONS CAREFULLY BEFORE
USING
THE APPLIANCE!
READ THE ASSEMBLY INSTRUCTIONS IN THIS MANUAL
BEFORE REMOVING THE CONTENTS OF THIS CARTON
FOR YOUR SAFETY
1. Do not store or use gasoline or
other flammable vapours or liquids
in the vicinity of this or any other
appliance.
2. A gas cylinder not connected for
use shall not be stored in the
vicinity of this or any other
appliance.
FOR YOUR SAFETY
If you smell gas:
1. Shut off gas to the appliance.
2. Extinguish any open flame.
3. If odour continues, keep away from
the appliance and immediately call
your fire department
Failure to follow these instructions could
result in fire or explosion which could
cause property damage, personal injury
or death.
FOR
OUTDOOR
USE ONLY
• This instruction manual contains important information necessary for proper
assembly and safe use of the appliance.
• Read and follow all warming and instruction before assembly and using the appliance.
• Follow all warming and instruction before assembling and using the appliance.
• Keep this manual for future reference.
• For outdoor use only. Do not use indoors.
• Improper installation, adjustment, alteration, service or maintenance can cause
property damage, injury or death.
• WARNING! This pizza oven will become very hot, do not move it during operation.
• Warning: Accessible parts may be very hot. Keep children and pets away
• Never leave a lighted pizza oven unattended.
• Only use the pizza oven on a level surface.
• Turn off the gas supply at the gas cylinder after use.
• Any modification of the appliance may be dangerous and will void the warranty.
• Installer to leave instructions with the consumer and consumer to retain them for
future reference.
• Please ensure all packaging and transit protection materials are removed prior to
using the pizza oven.
• Do not use the pizza oven in a confined or enclosed space such as a garage, carport,
tent, marquee, to avoid risk of fire and the accumulation of smoke and fumes.
• The appliance is not intended for commercial use.

3
SAFETY INSTRUCTIONS
IMPORTANT: READ THE ASSEMBLY INSTRUCTIONS IN THIS MANUAL BEFORE
REMOVING THE CONTENTS OF THIS CARTON
IMPORTANT SAFETY INSTRUCTIONS
This appliance must only be used in an above ground
open-air situation with natural ventilation,
without stagnant areas, where gas leakage and
products of combustion are rapidly dispersed by
wind and natural convection
• This pizza oven is an outdoor appliance only. Under
no circumstances should it be use indoors.
• READ ALL OPERATING INSTRUCTION BEFORE
LIGHTING
• Do not perform any servicing on the pizza oven
yourself. This includes internal adjustment of the
regulator and gas valves. Servicing can only be
carried out by authorized technicians.
• When gas cylinder is replaced or reconnected,
check for leaks.
• Do not store chemicals or flammable materials near
this appliance.
• Unsupervised children should not be near a pizza
oven while cooking or during warm up or cool
down.
• People with flammable clothing such as nylon etc.
should keep well away from the pizza oven when it
is operating.
• Do not leave food unattended on the pizza oven.
• In case of fat fire, turn gas cylinder off.
• Turn all gas valves off including gas cylinder after use.
• Never leave burners on high for more than 10 minutes
unless cooking. If the burner makes hissing sound
when lit, it may be burning inside. Turn burner off,
allow it to cool and try again.
• Do not allow build-up of unburned gas.
• The appliance is recommended to use on an outdoor
incombustible bench top. Do not use under overhead
construction. Minimum clearance from side and back
of unit to combustible construction: 24"(600mm) from
sides and 24"(600mm) from back.
• The supporting bench top must not be tipping as this
might cause serious hazard.
DO NOT
OPERATE THIS APPLIANCE BEFORE READING THEINSTRUCTION BOOKLET
DO NOT PLACE ARTICLES ON OR AGAINST THIS APPLIANCE
DO NOT STORE CHEMICALS OR FLAMMABLE MATERIALS OR SPRAYAEROSOLS
NEAR THIS APPLIANCE
DO NOT OPERATE THIS APPLIANCE INDOORS
DO NOT ENCLOSE THIS APPLIANCE
DO NOT LIGHT OR OPERATE WITH THE COVER ON (COVER NOT INCLUDED)

4
.
WARNING
A strong gas smell or the hissing sound of gas
indicates a serious problem with your gas pizza oven
or the gas cylinder. Failure to immediately follow the
steps listed below could cause serious bodily injury,
death, or property damage.
• Shut off gas supply to the gas pizza oven.
• Turn the control knobs to OFF position.
• Put out any flame with a class B fire extinguisher.
• Get away from the gas cylinder.
• Do not try to fix the problem yourself.
If odour continues or you have a fire you cannot
extinguish, call your fire department. Do not call near
the gas cylinder because your telephone is an
electrical device and could create a spark resulting in
fire and/or explosion.
NOTE: The normal flow of gas through the regulator
and hose assembly can create a humming sound. A
low volume of sound is perfectly normal and will not
interfere with operation of the pizza oven. If
humming sound is loud and excessive you may need
to purge air from the gas line or reset the regulator
excess gas flow device. This purging procedure should
be done every time a new gas cylinder is connected
to your pizza oven.
OTHER CONSIDERATIONS
• Strong winds and low temperatures can affect the
heating and performance of your gas pizza oven so
factor in these elements when positioning your pizza
oven outdoors for cooking.
• Never use your gas pizza oven in a garage, porch,
shed, breezeway, or any other enclosed area.
• Do not obstruct the flow of ventilation air around the
gas pizza oven housing. This gas pizza oven is not
intended to be installed in or on recreational vehicles
and/or boats.
INSTALLATION COMPLIANCE
• This appliance must be installed in accordance with
the installation instructions provided by the
manufacturer, local gas fitting regulations, municipal
building codes and any other relevant statutory
regulations
• The installation must conform with local codes or, in
the absence of local codes, with the National Fuel
Gas Code, ANSI Z223.1/NFPA 54, Storage and
Handling of Liquefied Petroleum Gases, ANSI/NFPA
58; or Natural Gas and Propane Installation Code,
CSA B149.1; Propane Storage and Handling, CSA
B149.2; or the Standard for Recreational Vehicles,
ANSI A119.2/NFPA 1192; and Recreational Vehicle
Code, CSA Z240 RV Series, as applicable.

5
GAS CYLINDER SAFETY INFORMATION
3. Detach the regulator assembly from the
cylinder valve by turning the quick coupling
nut counterclockwise.
4. Place dust cap for cylinder valve outlet
whenever the cylinder is not in use. Only
install the type of dust cap on the cylinder
valve outlet that is provided with the cylinder
valve. Other type of caps or plugs may result
in leakage of propane.
HOSE AND REGULATOR REPLACEMENT
In the case of a problem arising with the hose and
regulator please contact your pizza oven supplier
for a list of approved replacement parts.
GAS CYLINDER STORAGE
If the appliance is not in use, the gas must be turned
off at the supply cylinder.
Do not store a spare LP gas cylinder under or near
this appliance, never fill the cylinder beyond 80% full,
and if not followed exactly, a fire causing death or
serious injury may occur.
Storage of an appliance indoors is permissible only if
the cylinder is disconnected and removed from the
appliance.
Store gas cylinder in well ventilated area out of reach
of children and shall not be stored in a building,
garage, or any other enclosed area.
SAFETY WHEN LEAKAGE OF GAS IS
SUSPECTED
• Turn off the pizza oven's gas supply and
disconnect the regulator from the gas cylinder.
• Wipe out any open flames and remove possible
ignition sources. If the smell of gas is sustained,
please contact your gas supplier or the fire
department immediately.
• If the gas cylinder appears to be the source of
smell/leakage, place this outdoor with good
ventilation and away from possible ignition
sources.
GAS TYPE
Propane(LPG)ONLY
WARNING
• Please always keep the gas bottle in upright
position.
• The size for 20 lbs LP gas cylinder is 12.2 inches
in diameter and 17.9 inches tall.
• If the appliance is not in use, the gas must be
turned off at the supply cylinder.
• The cylinder used must include a collar to protect
the cylinder valve.
• The minimum distance for the appliance and the
20lb gas tank is 40 inches apart.
CONNECTING THE LIQUID PROPANE GAS
CYLINDER
1. To connect the l i q u i d p r o p a n e g a s c y l i n d e r :
2. The cylinder valve should be in OFF position.
3. Make sure the burner valve is in OFF position.
4. Inspect the valve connections, port and regulator
assembly. Remove debris and inspect the hose for
damage.
5. When connecting the regulator assembly to the
valve, use your hand to tighten the nut clockwise
until it stops. Use of a wrench could damage the
quick coupling nut and result in a hazardous
situation.
6. Open the cylinder valve fully by turning the valve
counterclockwise.
7. Before lighting the oven, use a soap and water
solution to check all connections for leaks.
8. If a leak is found, turn the cylinder valve OFF, and
do not use the oven until local liquid propane dealer
can make repairs.
DISCONNECTING THE LIQUID PROPANE GAS
CYLINDER
1. Turn the oven burner valve OFF and make sure the
oven is cool.
2. Turn the liquid propane cylinder valve OFF by
turning clockwise until it stops.

6
CONNECTING THE LIQUID PROPANE GAS
CYLINDER
This gas fitting is counterclockwise. Make sure that
the tank is completely switched off and screw the
regulator as far as possible into the gas tank valve.
NOTE.:
• The cylinder supply system must be arranged
for vapor withdrawal.
• The cylinder used, if exceed of 2.2 lb(1.00 kg)
propane capacity, must include a collar to
protect the cylinder valve.
LEAK TESTING
Please check for gas leakage the first time you are
connecting the pizza oven to the gas cylinder, and
also each time you are replacing the gas cylinder or
disconnecting/reconnecting any fittings. Inspect the
hose before each use.
To che c k for ga s l e aka g e , turn on the gas supply at
the gas cylinder, but do not switch on the burners
inside the pizza oven. The gas hose will now be
filled with gas. Then pour water with soap over all
connections. Any gas leakage should result in
bubbles within 20 seconds. If a gas leakage is
detected, tighten the connection. If the gas leakage
persist, contact your supplier or place of purchase.
As an alternative, you may use a gas leak detector,
following the manufacturer’s instructions, available
at all major pizza oven retailers. This provides an
easier way to check for gas leaks
DON'T USE NAKED FLAME FOR
LOCATING GAS LEAKS.
IF A LEAK PERSISTS, CALL AN
AUTHORISED PERSON
1. Add soap and water to spray bottle or
soapy water with brush
3. Turn gas cylinder
on
2. Turn off
gas valves
5. If leak is
present, bubbles
will appear
4. Spray or
apply soapy
water on gas
connections

7
LIGHTING PROCEDURE
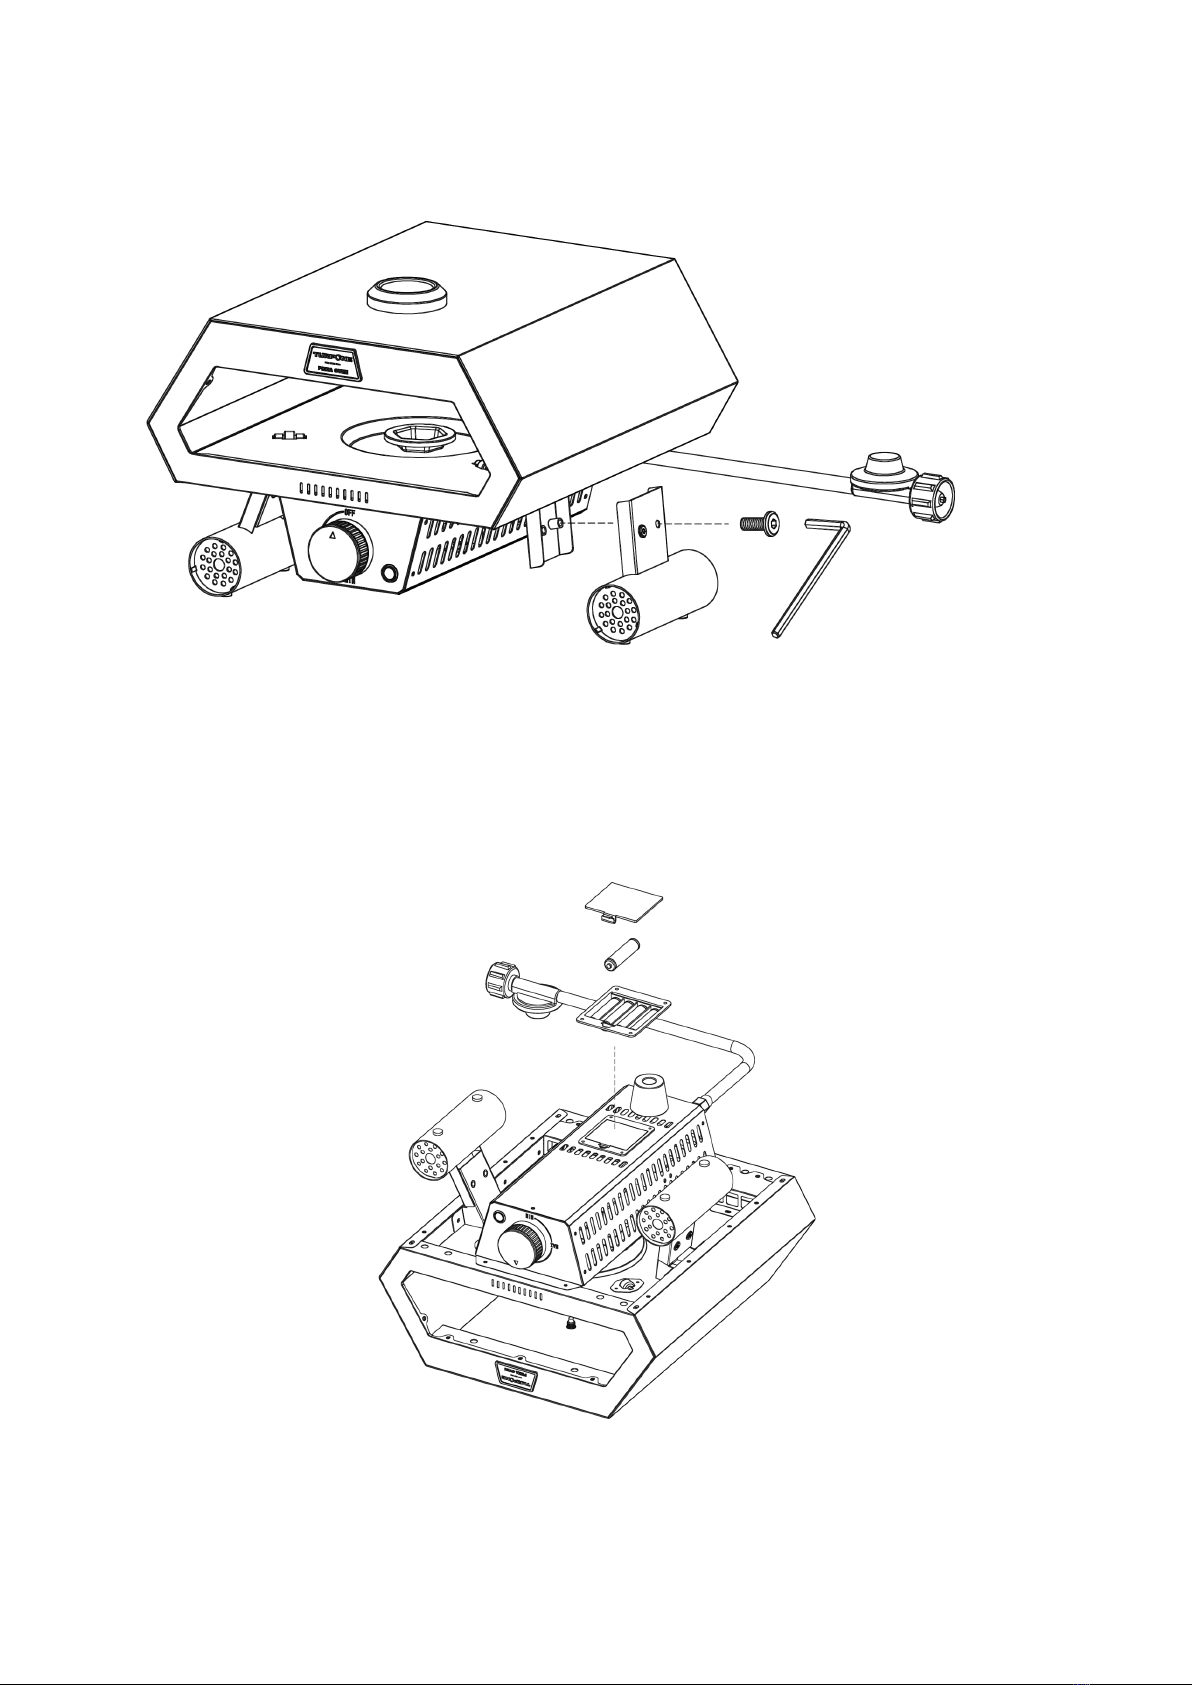
1. Connect the gas cylinder to the barbecue
following the instructions supplied with the
regulator.
2. Turn the control knobs to the ‘OFF’ position.
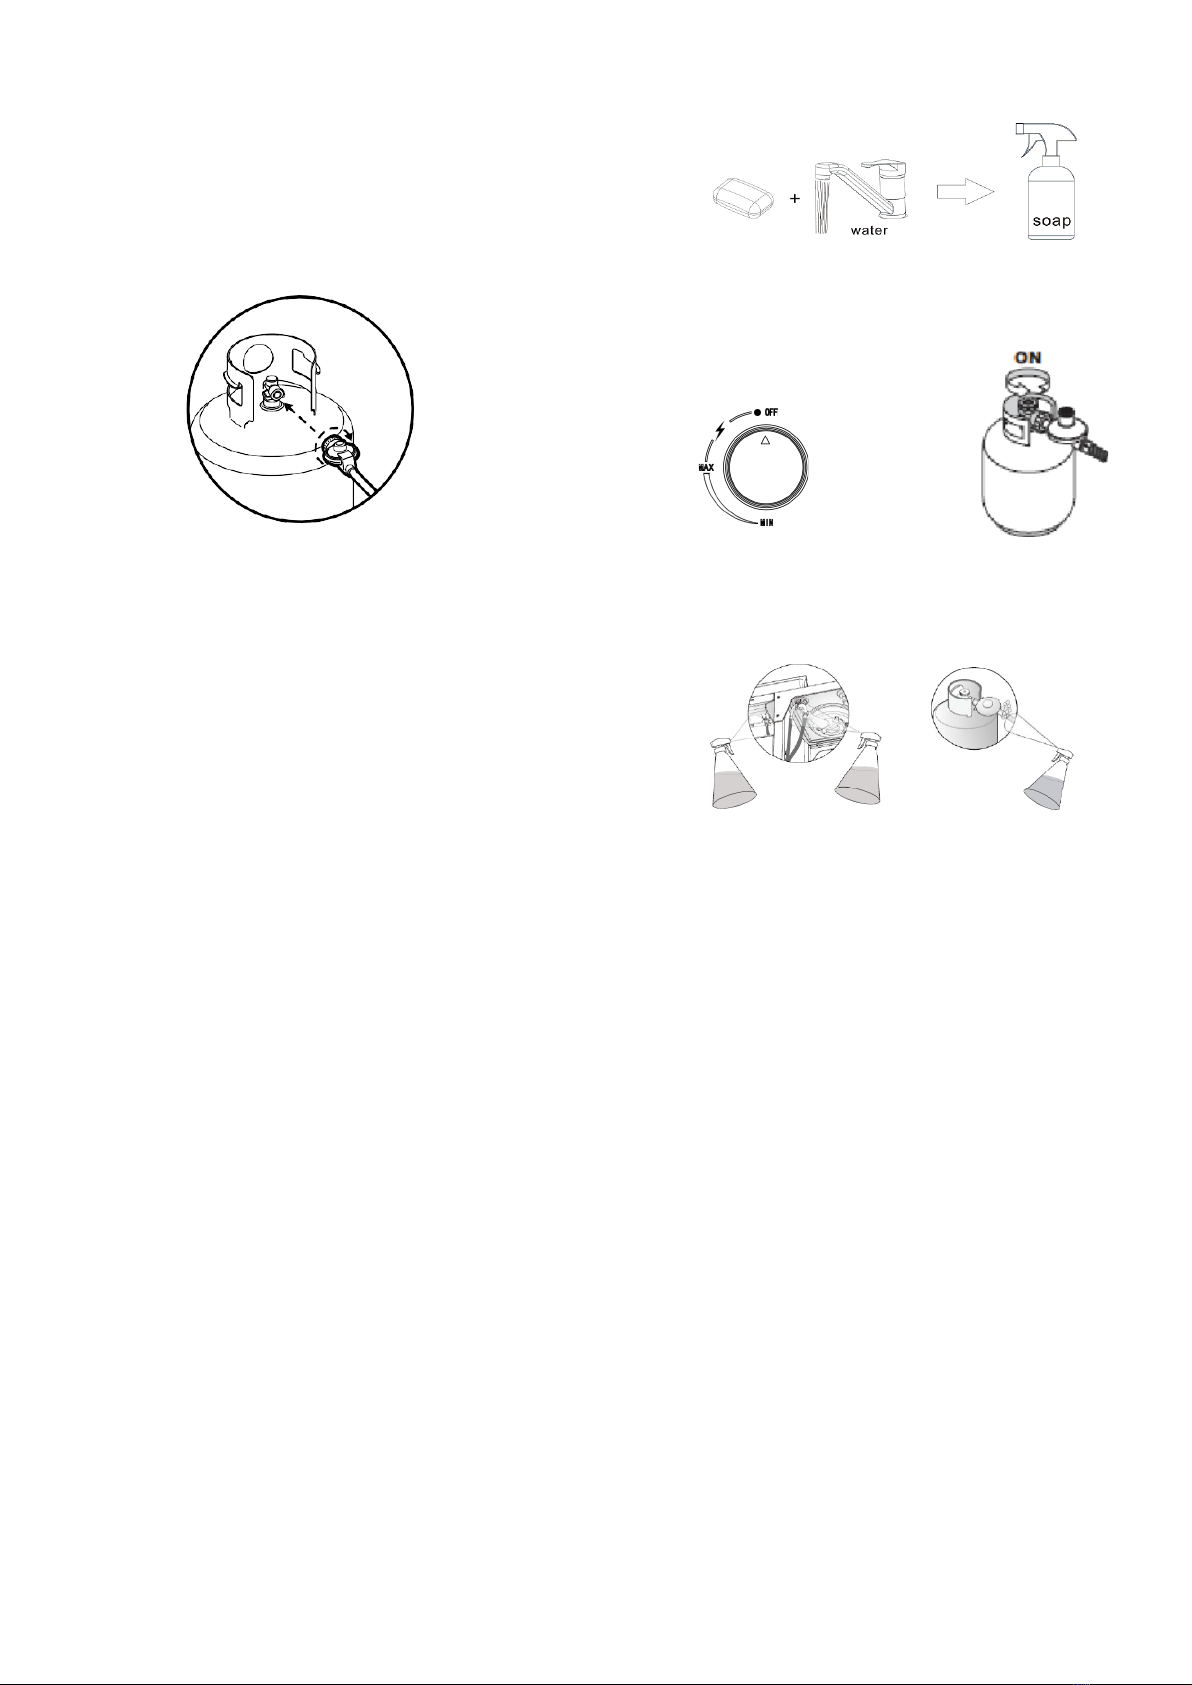
3. Turn ‘ON’ the gas supply at the cylinder or
regulator switch following the regulator
connection and operating instructions. Check
the cylinder to regulator connection and hose
to barbecue hose inlet connection for leakage
using soapy water. Any leakage will show as
bubbles in the area of the leak. If leak is found,
do not use the barbecue. Consult your gas or
barbecue supplier for advice.
4. To l i gh t th e b u r n er, p u s h d o wn a nd t urn th e
control knob anti-clockwise to the 90°position
(full rate position). An audible click will be
heard, this should light the burner. Check that
the burner is lit, and keep knob down for 5
second to allow the thermocouple on work and
maintain the gas flow open. If the burner has
not lit, repeat this process.
5. If the burner has not lit after two attempts, turn
‘OFF’ the gas tap, and wait 5 minutes before
retrying the ignition sequence.
6. When the burner has lit, the burner rate can be
adjusted by push down and turn the knob anti-
clockwise to any position between the full and
low-rate position.
7. To t u r n ‘ O FF’ t h e pizza oven, turn the cylinder
valve handle or regulator switch to the ‘OFF’
position by following the regulator
instructions. Once the burners have
extinguished turn the control knobs to the
‘OFF’ position.
TURNING OFF THE PIZZA OVEN
When turning off the pizza oven, close the gas
supply from the gas cylinder first; this will allow the
gas remaining in the hose to evaporate. This will
only require a few seconds. The burners can then
be switched off.
TO LIGHT WITH A MATCH
1. If burner will not light after several attempts
using the control knob, the burner may be lit
with a match.
2. If you have already attempted to light the
burner using the control knob, wait 5
minutes for any gas to dissipate.
3. Insert a match into the matchstick holder,
ignite the match and insert through the oven
opening to the burner.
4. Push and turn the control knob to HI slowly,
the burner should ignite immediately.
5. If the burner does not light within seconds,
turn the control knob OFF and wait 5
minutes and try again.
CONTROLLING THE FLAMES
The knobs have three basic positions. You can
achieve any flame height between low and high by
rotating the knob between these positions.
Burner off
Burner on high
Note: ‘Blowback’ is a situation where the flame
burns inside the burner, towards the front,
recognized by a sharp roaring sound coming from
the burner. It is not dangerous unless allowed to
persist. If this occurs, simply turn the burner off,
wait a few seconds, and then relight.
Burner on low

8
PIZZA OVEN MAINTENANCE
• Keep appliance area clear and free from
combustible materials, gasoline, and other
flammable vapors and liquids.
• Not obstructing the flow of combustion and
ventilation air.
• Keep the ventilation opening(s) of cylinder
enclosure free and clear from debris.
• Visually checking burner flames, with pictorial
representations.
• Cleaning appliance, including special surface,
with recommended cleaning agents, if
necessary.
• Check and cleaning burner/venturi tubes for
insects and insect nests, A clogged tube can
lead to a fire beneath the appliance.
• Store the pizza oven out of direct sunlight and
indoors where possible and when storing for
extended periods of time
• It should not be exposed to harsh weather
conditions such as snow, heavy rain and strong
winds.
• Wait for pizza oven to cool completely before
moving.
• The outer shell of pizza oven may fade over
time and through use. This will not affect
performance.
STONE BAKING BOARD MAINTANCE
• DO NOT use the stone over an open flame
• Avoid extreme temperature change to the
stone. DO NOT place frozen foods on a hot
stone
• The stone is fragile and can break if bumped or
dropped
• The stone is very hot during use and stays hot
for a long time after use.
• DO NOT cool the stone with water when the
stone is hot
• After cleaning the stone with water, please dry
the stone before use. This can be done in a
conventional oven at 60°C (140°F) for 2 hours.
IMPORTANT INFORMATION
• This product is for outdoor use only.
• Do not use indoors.
• Do not use below ground level.
• Do not store gas cylinders below ground level.
• Gas is heavier than air so if a leak occurs the gas
will collect at a low level and could ignite in the
presence of a flame or spark.
• Do not store or use gas cylinders on their side as
this could allow liquid gas into the supply pipes with
serious consequences.
• Leak test your pizza oven before each use. Leak
test the hose connections each time you reconnect
the gas cylinder.
• Always turn off the gas at the cylinder when not in
use.
• Open the door of the frame to inspect the hose
before each use. If there is evidence of excessive
abrasion or wear, or the hose is cut it must be
replaced prior to the pizza oven being put into
operation.
• Only use hose supplied from the manufacturer.
You must have the correct gas cylinder, regulator
and hose for pizza oven to operate safely and
efficiently. Use of an incorrect gas cylinder,
regulator or hose is dangerous and will void the
warranty on this product.

9
Turpone Group Inc.
6832 rue Jarry East, Montreal, Quebec, Canada H1P 1W3
CANADA
PRODUCT NAME
12INCH GAS PIZZA OVEN
MODEL NO.
KPO-PZ300
TYPE OF GAS
PROPANE(LPG)
GASS PRESSURE
2.74KPa
INPUT RATE(MAIN)
12000BTU/HR
1x Gas pizza oven body
1x Pizza plate
1x round feet RH
1x round feet LH
4x M6 x 15 screws
1x M6 x 30 screw
1x Rubber support feet
1x Allen key
ASSEMBLY INSTRUCTIONS
ASSEMBLY TIPS
• Remove all contents from packaging, and make sure all the parts are present before attempting to
assemble!
• Tighten all bolt connections by hand first.
• When the pizza oven is fully assembled, re-tighten the screws, nuts and bolts by using a wrench and
screw driver.
TOOLS REQUIRED
• Philips screwdriver
• Pliers or adjustable spanner
Parts list in the packaging
5024615

10
STEP 1
Install the 2x round feet to the gas pizza oven body
STEP 2
Place 4x battery into the battery box its proper position.
Note: The 4 batteries (size: AA, 1.5V
)
are not supplied along this packaging.

11
STEP 3
Fix the rubber support feet on to the pizza oven body.
STEP 4
Place the pizza plate in the pizza oven in its proper position.
STEP 5
Follow the safety instruction to connect with the gas, and enjoy your pizza.
Before ignite the pizza oven, make sure the leak test was done.

MANUAL &
INSTRUCCIONES DE
SEGURIDAD
Vers ió n No. KN -20220901 US-V01

2
¡IMPORTANTE!
POR FAVOR, LEA ESTAS INSTRUCCIONES CUIDADOSAMENTE ANTES DE USAR
¡EL ELECTRODOMÉSTICO!
LEA LAS INSTRUCCIONES DE MONTAJE DE ESTE MANUAL
ANTES DE RETIRAR EL CONTENIDO DE ESTA CAJA
PARA SU SEGURIDAD
1. No almacene ni utilice gasolina u
otros vapores o líquidos
inflamables cerca de este o
cualquier otro aparato.
2. Las botellas de gas no conectadas
para su uso no deberán
almacenarse cerca de este o de
cualquier otro aparato.
PARA SU SEGURIDAD
Si huele a gas:
1. Cierre el gas del aparato.
2. Apaga cualquier llama abierta.
3. Si el olor continúa, manténgase
alejado del aparato y llame
inmediatamente a su departamento
de bomberos.
El incumplimiento de estas instrucciones
podría provocar un incendio o una
explosión que podría causar daños a la
propiedad, lesiones personales o la
muerte.
SOLO PARA
USO EN
EXTERIORES
• Este manual de instrucciones contiene información importante necesaria para un
montaje adecuado y un uso seguro del aparato.
• Lea y siga todas las instrucciones de calentamiento antes de montar y utilizar el
aparato.
• Siga todas las instrucciones de calentamiento antes de montar y utilizar el aparato.
• Guarde este manual para futuras referencias.
• Solo para uso en exteriores. No usar en interiores.
• La instalación, ajuste, alteración, servicio o mantenimiento incorrectos pueden
causar daños a la propiedad, lesiones o la muerte.
• ¡ADVERTENCIA! Este horno de pizza se calentará mucho, no lo mueva durante
la operación.
• Advertencia: Las partes accesibles pueden estar muy calientes. Mantenga alejados
a los niños y mascotas
• Nunca deje un horno de pizza encendido desatendido.
• Solo use el horno de pizza en una superficie nivelada.
• Apague el suministro de gas en el cilindro de gas después de usarlo.
• Cualquier modificación del aparato puede ser peligrosa y anulará la garantía.
• Instalador para dejar instrucciones con el consumidor y el consumidor para
conservarlas para referencia futura.
• Asegúrese de que todos los materiales de embalaje y protección de tránsito se
retiren antes de usar el horno de pizza.
• No use el horno de pizza en un espacio confinado o cerrado, como un garaje,
cochera, tienda de campaña, carpa, para evitar el riesgo de incendio y la
acumulación de humo y humos.
• El aparato no está diseñado para uso comercial.

3
INSTRUCCIONES DE SEGURIDAD
IMPORTANTE: LEA LAS INSTRUCCIONES DE MONTAJE DE ESTE MANUAL ANTES
DE RETIRAR EL CONTENIDO DE ESTA CAJA
INSTRUCCIONES DE SEGURIDAD IMPORTANTES
Este aparato sólo debe utilizarse en una situación
aérea al aire libre con ventilación natural,
sin áreas estancadas, donde las fugas de gas y los
productos de la combustión se dispersan
rápidamente por
Viento y convección natural
• Este horno de pizza eso un electrodoméstico al aire
libre solamente. Bajo ninguna circunstancia debe
usarse en interiores.
• LEA TODAS LAS INSTRUCCIONES DE
FUNCIONAMIENTO ANTES DE ENCENDER
• No realice ningún servicio en el horno de pizza
usted mismo. Esto incluye el ajuste interno del
regulador y las válvulas de gas. El mantenimiento
solo puede ser realizado por técnicos autorizados.
• Cuando se reemplace o vuelva a conectar el cilindro
de gas, compruebe si hay fugas.
• Norasgue productos químicos o materiales
inflamables cerca de este aparato.
• Los niños sin supervisión no deben estar cerca de un
horno de pizza mientras cocinan o durante el
calentamiento o el enfriamiento.
• Las personas con ropa inflamable como nylon, etc.
deben mantenerse alejadas del horno de pizza
cuando está funcionando.
• No deje la comida desatendida en el horno de pizza.
• En caso de incendio gordo, apague el cilindro de
gas.
• Apague todas las válvulas de gas, incluido el cilindro de
gas, después de su uso.
• Nunca deje los quemadores a fuego alto durante más de
10 minutos a menos que estén cocinados. Si el
quemador emite un silbido cuando se enciende, puede
estar ardiendo en el interior. Apague el quemador, deje
que se enfríe e inténtelo de nuevo.
• No permita la acumulación de gas no quemado.
• Se recomienda usar el aparato en una mesa de
sobremesa incombustible al aire libre. No usar bajo
construcción aérea. Espacio libre mínimo desde el
costado y la parte posterior de la unidad hasta la
construcción combustible: 24" (600 mm) desde los
lados y 24" (600 mm) desde la parte posterior.
• La parte superior del banco de soporte no debe
inclinarse, ya que esto podría causar un grave peligro.
NO
UTILICE ESTE APARATO ANTES DE LEER EL FOLLETO DE INSTRUCCIONES
NO COLOQUE ARTÍCULOS SOBRE O ENCIMA DE ESTE DISPOSITIVO
NO ALMACENE PRODUCTOS QUÍMICOS O MATERIALES INFLAMABLES NI
AEROSOLES CERCA DE ESTE APARATO
NO UTILICE ESTE APARATO EN INTERIORES
NO INCLUYA ESTE DISPOSITIVO
NO ENCIENDA NI OPERE CON LA CUBIERTA PUESTA (CUBIERTA NO INCLUIDA)

4
.
ADVERTENCIA
Un fuerte olor a gas o el silbido del gas indica un
problema grave con su horno de pizza de gas o el
cilindro de gas. No seguir inmediatamente los pasos
enumerados a continuación podría causar lesiones
corporales graves, la muerte o daños a la propiedad.
• Cierre el suministro de gas al horno de pizza a
gas.
• Gire las perillas de control a la posición OFF.
• Apague cualquier llama con un extintor de
incendios de clase B.
• Aléjese del cilindro de gas.
• No intente solucionar el problema usted mismo.
Si el olor continúa o tiene un incendio que no puede
extinguir, llame asu departamento de bomberos. No
llame cerca del cilindro de gas porque su teléfono es
un dispositivo eléctrico y podría crear una chispa que
resulte en un incendio y / o explosión.
NOTA: El flujo normal de gas a través del regulador
y el conjunto de la manguera puede crear un
zumbidod. Un volumen bajo de sonido es
perfectamente normal y no interferirá con el
funcionamiento del horno de pizza. Si el zumbido es
fuerte y excesivo, es posible que deba purgar el aire
de la línea de gas o restablecer el dispositivo de flujo
de exceso de gas del regulador. Este procedimiento de
purga deberealizarse cada vez que se conecte un
nuevo cilindro de gas a su horno de pizza.
OTRAS CONSIDERACIONES
• Los fuertes vientos y las bajas temperaturas pueden
afectar el calentamiento y el rendimiento de su horno
de pizza a gas , así que tenga en cuenta estos
elementos al colocar su horno de pizza al aire libre
para cocinar.
• Nunca use su horno de pizza a gas en un garaje,
porche, cobertizo, pasarela o cualquier otra área
cerrada.
• No obstruya el flujo de aire de ventilación alrededor
de la carcasa del horno de pizza de gas . Este horno
de pizza un gas no está diseñado para ser instalado
en o sobre vehículos recreativos y / o barcos.
CUMPLIMIENTO DE LA INSTALACIÓN
• Este aparato debe instalarse de acuerdo con las
instrucciones de instalación proporcionadas por el
fabricante, las regulaciones locales de instalación de
gas, los códigos de construcción municipales y
cualquier otra regulación legal relevante.
• Lainstalación debe ajustarse a los códigos locales o,
en ausencia de códigos locales, al Código Nacional
de Gas Combustible, ANSI Z223.1/NFPA 54,
Almacenamiento y Manejo de Gases Licuados de
Petróleo, ANSI/NFPA 58; o Código de Instalación de
Gas Natural y Propano, CSA B149.1;
Almacenamiento y manipulación de propano, CSA
B149.2; o la Norma para Vehículos Recreativos,
ANSI A119.2/NFPA 1192; y Código de Rehicle
ecreacional, CSA Z240 vehículos recreativos Series,
según corresponda.

5
INFORMACIÓN DE SEGURIDAD DE CILINDROS
DE GAS
3. Separe el conjunto del regulador de la válvula del
cilindro girando la tuerca de acoplamiento rápido
en sentido contrario a las agujas del reloj.
4. Coloque la tapa antipolvo para la salida de la
válvula del cilindro siempre que el cilindro no esté
en uso. Solo instale el tipo de tapa antipolvo en la
salida de la válvula del cilindro que se proporciona
con la válvula del cilindro. Otro tipo de tapas o
tapones pueden provocar fugas de propano.
REEMPLAZO DE MANGUERAS Y
REGULADORES
En el caso de que surja un problema con la manguera y
el regulador, comuníquese con su proveedor de horno
de pizza para obtener una lista de piezas de repuesto
aprobadas.
ALMACENAMIENTO DE CILINDROS DE GAS
Si el aparato no está en uso, el gas debe apagarse en el
cilindro de alimentación.
No guarde un cilindro de gas LP de repuesto debajo o cerca
de este aparato, nunca llene el cilindro más allá del 80% de
su capacidad, y si no se sigue exactamente, puede ocurrir
un incendio que cause la muerte o lesiones graves.
El almacenamiento de un aparato en interiores sólo está
permitido si el cilindro se desconecta y se retira del aparato.
Guarde el cilindro de gas en un área bien ventilada fuera
del alcance de los niños y no debe almacenarse en un
edificio, garaje o cualquier otra área cerrada.
SEGURIDAD CUANDO SE SOSPECHA FUGA DE
GAS
• Apague el suministro de gas del horno de pizza y
desconecte el regulador del cilindro de gas.
• Limpie cualquier llama abierta y elimine las posibles
fuentes de ignición. Si el olor a gas se mantiene,
comuníquese con su proveedor de gas o con el
departamento de bomberos de inmediato.
• Si el cilindro de gas parece ser la fuente de olor /
fuga, coloque este filtrocon buena ventilación y lejos
de posibles fuentes de ignición.
TIPO DE GAS
Propano (GLP)SOLAMENTE
ADVERTENCIA
• Por favor, mantenga siempre la botella de gas en
posición vertical.
• El tamaño del cilindro de gas LP de 20 libras es de
12.2 pulgadas de diámetro y 17.9 pulgadas de alto.
• Si el aparato no está en uso, el gas debe apagarse en el
cilindro de alimentación.
• El cilindro utilizado debe incluir un collar para
proteger la válvula del cilindro.
• La distancia mínima para el aparato y el tanque de
gasolina de 20 libras está separada por 40 pulgadas.
CONEXIÓN DEL CILINDRO DE GAS PROPANO
LÍQUIDO
1. Para conectar el cilindro de gas propano líquido:
2. La válvula del cilindro debe estar en posición OFF.
3. Asegúrese de que la válvula del quemador esté en
posición OFF.
4. Inspeccione las conexiones de la válvula, el puerto y el
conjunto del regulador. Retire los residuos e inspeccione
la manguera en busca de daños.
5. Cuando conecte el conjunto del regulador a la válvula,
use la mano para apretar la tuerca en el sentido de las
agujas del reloj hasta que se detenga. El uso de una llave
podría dañar la tuerca de acoplamiento rápido y provocar
una situación peligrosa.
6. Abra la válvula del cilindro completamente girando la
válvula en sentido contrario a las agujas del reloj.
7. Antes de encender el horno, use una solución de agua y
jabón para verificar si hay fugas en todas las conexiones.
8. Si se encuentra una fuga, apague la válvula del cilindro
y no use el horno hasta que el distribuidor local de
propano líquido pueda hacer reparaciones.
DESCONEXIÓN DEL CILINDRO DE GAS PROPANO
LÍQUIDO
1. Apague la válvula del quemador del horno y asegúrese
de que el horno esté frío.
2. Apague la válvula del cilindro de propano líquido
girando en el sentido de las agujas del reloj hasta que se
detenga.

6
CONEXIÓN DEL CILINDRO DE GAS PROPANO
LÍQUIDO
Este accesorio de gas es en sentido contrario a las agujas
del reloj. Asegúrese de que el tanque esté completamente
apagado y atornille el regulador lo más lejos posible en
la válvula del tanque de gasolina.
NOTA.:
• El sistema de suministro del cilindro debe estar
dispuesto para la extracción de vapor.
• El cilindro utilizado, si excede la capacidad de
propano de 2.2 lb (1.00 kg), debe incluir un collar
para proteger la válvula del cilindro.
PRUEBAS DE FUGAS
Compruebe si hay fugas de gas la primera vez que
conecte el horno de pizza al cilindro de gas, y también el
tiempo que está reemplazando el cilindro de gas o
desconectando / volviendo a conectar cualquier
accesorio. Inspeccione la manguera antes de cada uso.
Para verificar si hay fugas de gas, encienda el suministro
de gas en el cilindro de gas, pero no encienda los
quemadores dentro del horno de pizza. La manguera de
gas ahora se llenará de gas. Luego vierta agua con jabón
sobre todas las conexiones. Cualquier fuga de gas debe
provocar burbujas en 20 segundos. Si se detecta una fuga
de gas, apriete la conexión. Si la fuga de gas Persiste,
póngase en contacto con su proveedor o lugarde compra.
Como alternativa, puede usar un detector de fugas de
gas, siguiendo las instrucciones del fabricante,
disponible en todos los principales minoristas de
hornos de pizza. Esto proporciona una manera más fácil
de verificar si hay fugas de gas
NO USE NAKED FLAME PARA
LOCALIZAR FUGAS DE GAS.
Sí UNA FUGA PERSISTE, LLAME A UNA
PERSONA AUTORIZADA
1. Agregue agua y jabón a la botella de
spray o agua jabonosa con cepillo
3. Encienda el
cilindro de gas
2. Apague
las válvulas
de gas
5. Si hay fugas ,
aparecerán burbujas
4. Rocíe o aplique
agua jabonosa en
las conexiones de
gas

7
PROCEDIMIENTO DE ILUMINACIÓN
1. Conecte el cilindro de gas a la barbacoa siguiendo
las instrucciones suministradas con el regulador.
2. Gire las perillas de control a la posición 'OFF'.
3. Encienda el suministro de gas en el cilindro o en el
interruptor del regulador siguiendo la conexión del
regulador y las instrucciones de funcionamiento.
Ver if iqu e l a c onexi ón del cil in dro al re gu lado r y la
conexión de entrada de la manguera a la manguera
de barbacoa para detectar fugas con agua jabonosa.
Cualquier fuga se mostrará como burbujas en el
área de la fuga. Si se encuentra una fuga, no use la
barbacoa. Consulte a su proveedor de gas o
barbacoa para obtener asesoramiento.
4. Para encender el quemador, empuje hacia abajo y
gire la perilla de control en sentido contrario a las
agujas del reloj a la posición de 90° (posición
completa rat e). Se escuchará un clic audible, esto
debería encender el quemador. Verifique que el
quemador esté encendido y mantenga la perilla
presionada durante 5 segundos para permitir que el
termopar funcione y mantenga abierto el flujo de
gas. Si el quemador no se ha encendido, repita este
process.
5. Si el quemador no se ha encendido después de dos
intentos, apague el grifo de gas y espere 5 minutos
antes de volver a intentar la secuencia de
encendido.
6. Cuando el quemador se ha encendido, la velocidad
del quemador se puede ajustar empujando hacia
abajo y girando la perilla en sentido contrario a las
agujas del reloj a cualquier posiciónentre la
posición de velocidad completa y baja .
7. Para apagar el horno de pizza, gire el mango de la
válvula del cilindro o el interruptor del regulador a
la posición "OFF" siguiendo las instrucciones del
regulador. Una vez que los quemadores se hayan
apagado, gire las perillas de control a la posición
'OFF'.
APAGAR EL HORNO DE PIZZA
Al apagar el horno de pizza, cierre primero el suministro
de gas del cilindro de gas; esto permitirá que el gas que
queda en la manguera se evapore. Esto solo requerirá
unos segundos. Los quemadores se pueden apagar.
PARA ILUMINAR CON UNA CERILLA
1. Si el quemador no se enciende después de varios
intentos usando la perilla de control, el
quemador puede encenderse con una cerilla.
2. Síya ha intentado encender el quemador con la
perilla de control, espere 5 minutos para que el
gas se disipe.
3. Inserte un fósforo en el soporte de la cerilla,
encienda el fósforo e insértelo a través de la
abertura del horno hasta el quemador.
4. Empuje y gire la perilla de control a HI
lentamente, el quemador debe encenderse
inmediatamente.
5. Si el quemador no se enciende en cuestión de
segundos, apague la perilla de control y espere 5
minutos e inténtelo de nuevo.
CONTROLANDO LAS LLAMAS
Las perillas tienen tres posiciones básicas. Puede alcanzar
cualquier altura de llama entre baja y alta girando la perilla
entre estas posiciones.
Quemador
apagado
Quemador en
alto
Nota: "Blowback" es una situación en la que la llama arde
dentro del quemador, hacia el frente, reconocidapor un fuerte
rugido proveniente del quemador. No es peligroso a menos
que se permita que Persistir. Y esto ocurre, simplemente
apague el quemador, espere unos segundos y luego vuelva a
encenderlo.
Quemador a
fuego bajo

8
MANTENIMIENTO DEL HORNO DE PIZZA
• Mantenga el área del aparato limpia y libre de
materiales combustibles, gasolina y otros vapores y
líquidos inflamables.
• No obstruir el flujo de aire de combustión y
ventilación.
• Mantenga la(s) abertura(s) de ventilación de la
carcasa del cilindro libre y libre de residuos.
• Comprobación visual de las llamas del quemador,
con representaciones pictóricas.
• Aparato de limpieza, incluida la superficie especial,
con los agentes de limpieza recomendados, si es
necesario.
• Revise y limpie los tubos del quemador / venturi en
busca de insectos y nidos de insectos, Un tubo
obstruido puede provocar un incendio debajo del
aparato.
• Guarde el horno de pizza fuera de la luz solar
directa y en el interior donde sea posible y cuando
lo guarde durante largos períodos de tiempo
• No debe exponerse a condiciones climáticas
adversas como nieve, fuertes lluvias y fuertes
vientos.
• Espere a que la pizza se enfríe completamente antes
de moverse.
• La cubierta exterior del horno de pizza puede
desvanecerse con el tiempo y con el uso. Esto no
afectará al rendimiento.
MANTENIMIENTO DE LA TABLA DE HORNEAR
DE PIEDRA
• NO use la piedra sobre una llama abierta
• Evite el cambio extremo de temperatura de la
piedra. NO coloque alimentos congelados sobre una
piedra caliente
• La piedra es frágil y puede romperse si se golpea o
se cae
• La piedra está muy caliente durante el uso y
permanece caliente durante mucho tiempo después
de su uso.
• NO enfríe la piedra con agua cuando la piedra esté
caliente
• Después de limpiar la piedra con agua, seque la
piedra antes de usarla. Esto se puede hacer en un
horno convencional a 60 ° C (140 ° F) durante 2
horas.
INFORMACIÓN IMPORTANTE
• Este producto es solo para uso en exteriores.
• No usar en interiores.
• No utilizar por debajo del nivel del suelo.
• No almacene cilindros de gas por debajo del nivel del
suelo.
• El gas es más pesado que el aire, por lo que si se produce
una fuga, el gas se acumulará a un nivel bajo y podría
encenderse en presencia de una llama o chispa.
• No almacene ni use cilindros de gas en su lado, ya que
esto podría permitir que el gas líquido ingrese a las
tuberías de suministro con graves consecuencias.
• Pruebe las fugas de su horno de pizza antes de cada uso.
Pruebe las conexiones de la manguera cada vez que
vuelva a conectar el cilindro de gas.
• Siempre apague el gas en el cilindro cuando no esté en
uso.
• Abra la puerta del marco para inspeccionar la manguera
antes de cada uso. Si hay evidencia deabrasión o desgaste
excesivo, o si la manguera está cortada, debe
reemplazarse antes de que el horno de pizza se ponga
en funcionamiento.
• Utilice únicamente manguera suministrada por el
fabricante.
Debe tener el cilindro de gas, el regulador y la
manguera correctos para que el horno de pizza
funcione de manera segura y eficiente. El uso de un
cilindro de gas, regulador o manguera incorrectos es
peligroso y anulará la garantía de este producto.

9
Turpone Group Inc.
6832 rue Jarry East, Montreal, Quebec, H1P 1W3
CANADÁ
NOMBRE DEL
PRODUCTO
HORNO DE PIZZA A GAS DE 12 PULGADAS
MODELO NO.
KPO-PZ300
TIPO DE GAS
PROPANO(GLP)
PRESIÓN DEL GAS
2,74 KPa
TASA DE ENTRADA
(PRINCIPAL)
12000BTU/HR
1x cuerpo de horno de pizza
de gas
1x plato de pizza
1x pies redondos HR
1x pies redondos LH
4x M6 x 15 screws
1x M6 x 30 screw
1x pies de apoyo de goma
1x llave Allen
INSTRUCCIONES DE MONTAJE
CONSEJOS DE MONTAJE
• ¡Retire todo el contenido del embalaje y asegúrese de que todas las piezas estén presentes antes de
intentar ensamblar!
• Apriete primero todas las conexiones de los pernos a mano.
• Cuando el horno de pizza esté completamente montado, apretar los tornillos, tuercas y pernos
utilizando una llave y un controlador deRew.
HERRAMIENTAS NECESARIAS
• Destornillador Philips
• Alicates u llave ajustable
Lista de piezas en el embalaje
5024615
Table of contents
Languages:
Popular Kitchen Appliance manuals by other brands

Fritel
Fritel SL 2155 user manual

Panasonic
Panasonic SR-TMJ181 operating instructions

Hamilton Beach
Hamilton Beach 67801 - HealthSmart Juice Extractor user manual

Brentwood Appliances
Brentwood Appliances TS-245 Operating and safety instructions

Cannon
Cannon 10255G Instruction book

Omcan
Omcan CE-CN-KJ-5 instruction manual