Tutti Bambini ByGo User manual

Assembly Instructions
Car seat
ByGo®

Hello,
Congratulations on your new arrival!
We’re so pleased that you have chosen our BYGO® car seat for your baby.
Please take a few moments to read this guide on how to use the BYGO®
correctly so you can rest assured that your little one is safe and secure in
their car seat.
Wishing you the best of luck on your new journey,
The ByGo® Group 0+ car seat offers optimum safety and comfort all in one.
Suitable from birth up to approx. 12 months, the ByGo® features side impact
protection as well as a padded reversible head hugger for total comfort. It also
includes a padded foot cover to provide extra warmth and a retractable hood,
providing protection from the sun wind and rain.
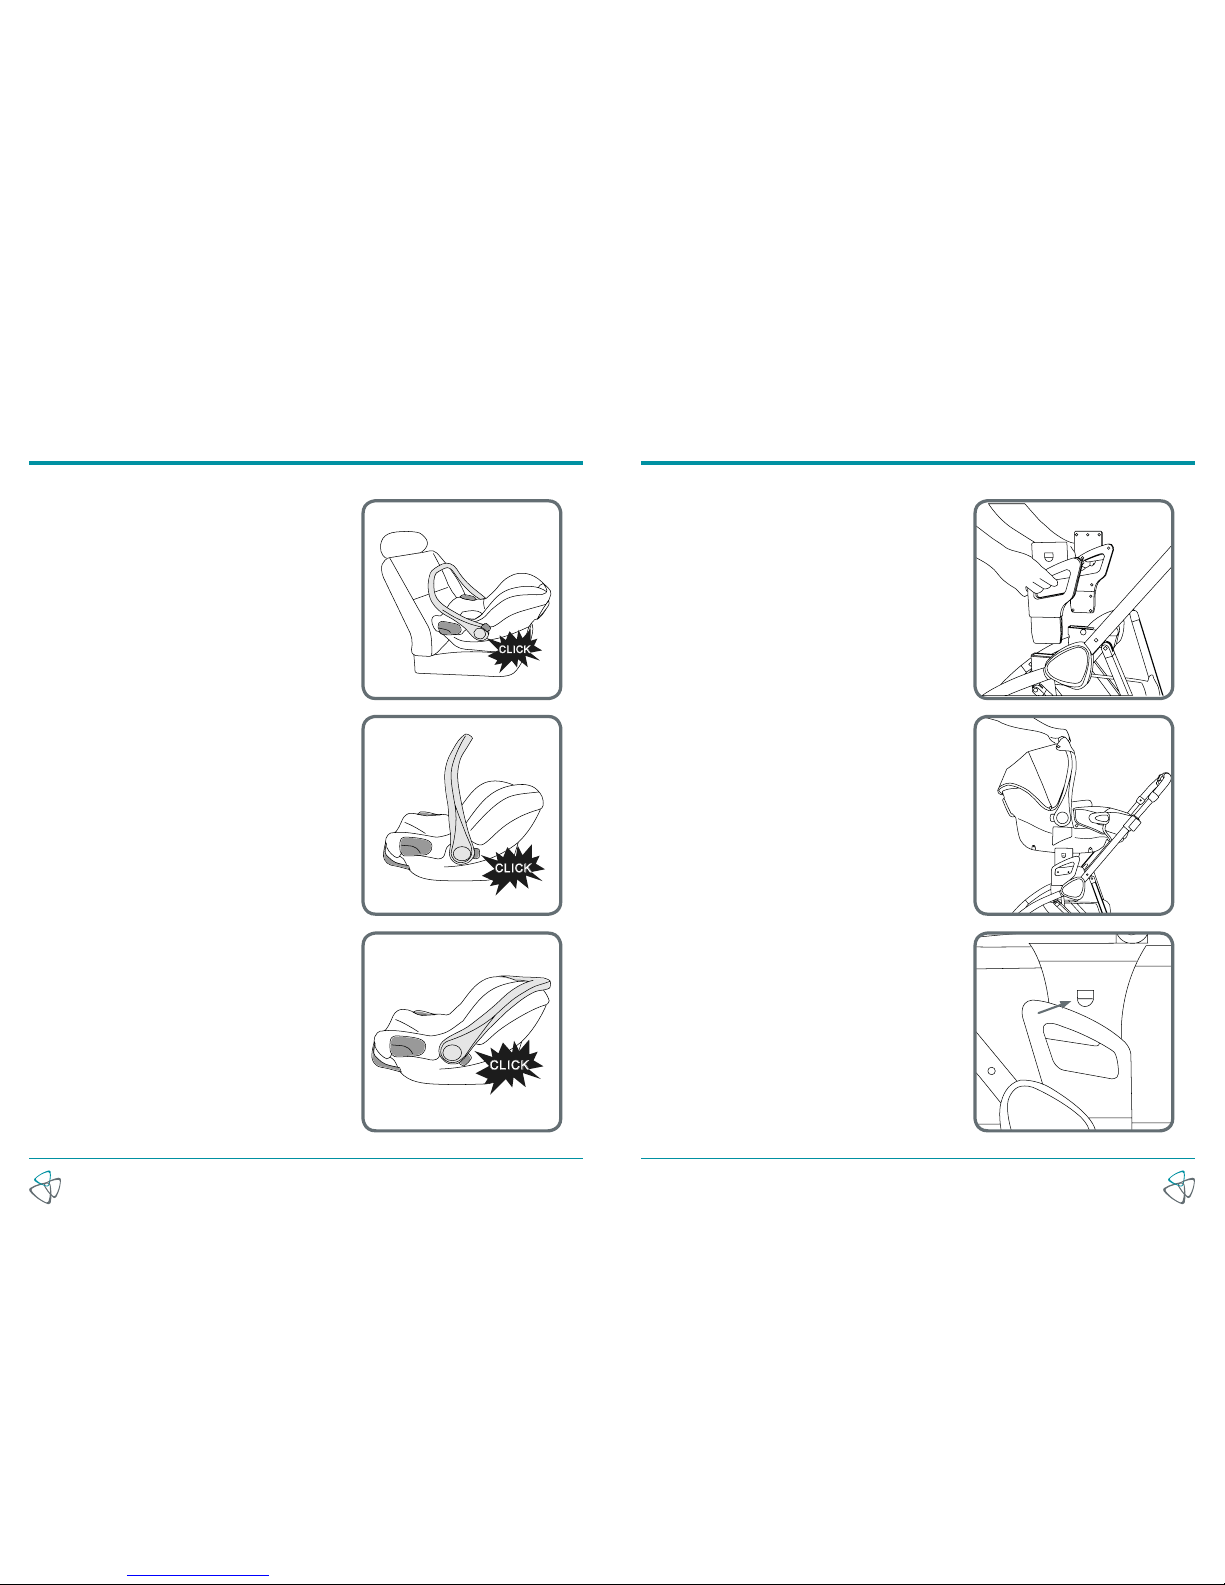
It is extremely easy to install, whether using just a seatbelt or an ISOfix base.
All of the car seat fabrics are machine washable, making it easy to clean off
spills and stains.
ByGo® is available in five different colour ways, allowing you full customisation to
suit your style. It combines perfectly with the ARLO® and KOJI® pushchairs by
Tutti Bambini to create a fully functional travel system.
Features:
• Suitable from birth up to 13kg’s (approx. 12 months)
• ISOfix compatible
• Can also be installed in car with 3-point seat belt
• Soft goods made from a water and oil repellent melange fabric
• Foot cover is lined with a soft marl fabric
• Reversible head hugger & foot cover included
• 3-point safety harness
• Compatible with the ARLO® and KOJI® Pushchairs
• Rain cover included
Tutti Frutti Direct Ltd. Unit 3, 1000 North Circular Road, London, UK, NW2 7JP
t: +44 (0) 208 368 5800
e: [email protected].uk
www.tuttibambini.com
IMPORTANT: RETAIN FOR FUTURE REFERENCE. READ CAREFULLY
To ensure that your car seat is used in accordance with these instructions, please read them fully.
This car seat conforms to ECE 44.04 and is guaranteed for 12 months from the date of purchase
against manufacturing defects. Your child’s safety may be affected if you do not follow these
instructions. This car seat is intended to carry child from birth up to a maximum weight of 13kgs.
WARNING: Please read thoroughly before commencing installation as an incorrect installation could be dangerous.
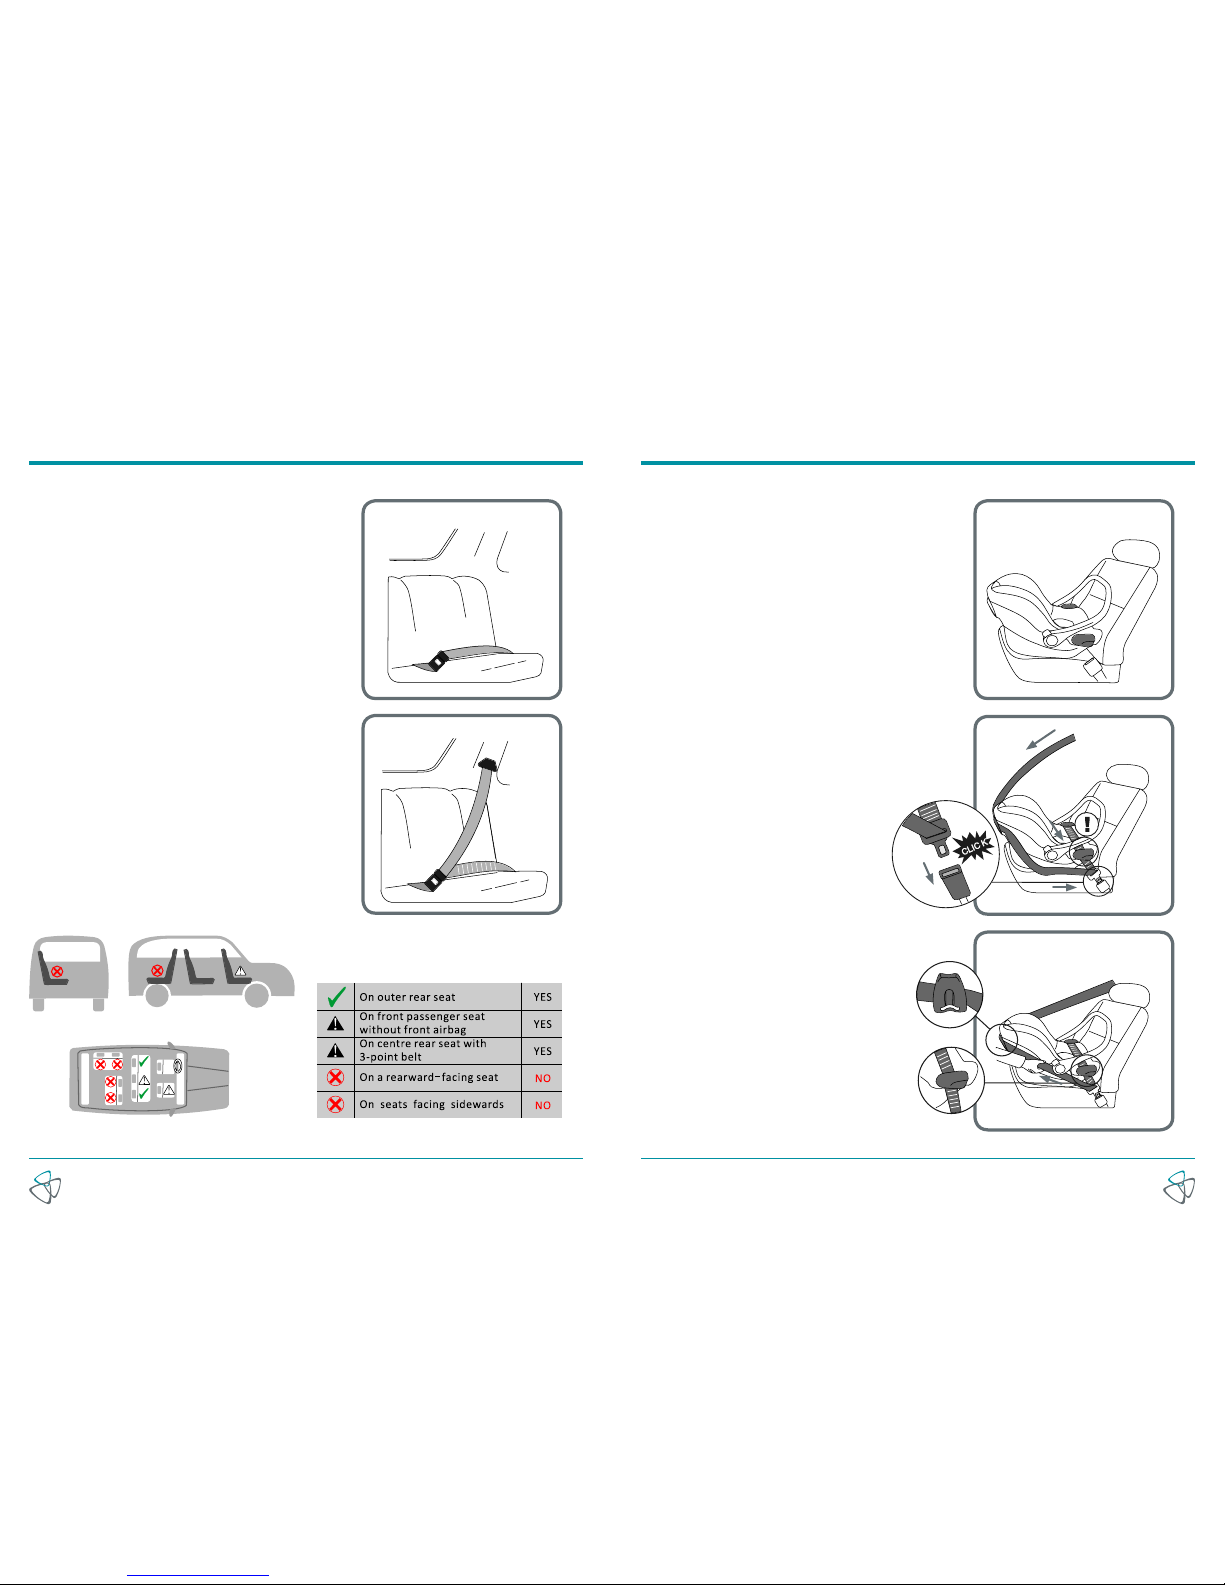
WARNING: Parents should not uner any circumstances use this child restraint on a passenger seat equipped with an
activated airbag. However, if you need to install the seat in the front passenger seat, please ensure that the airbag
is deactivated.
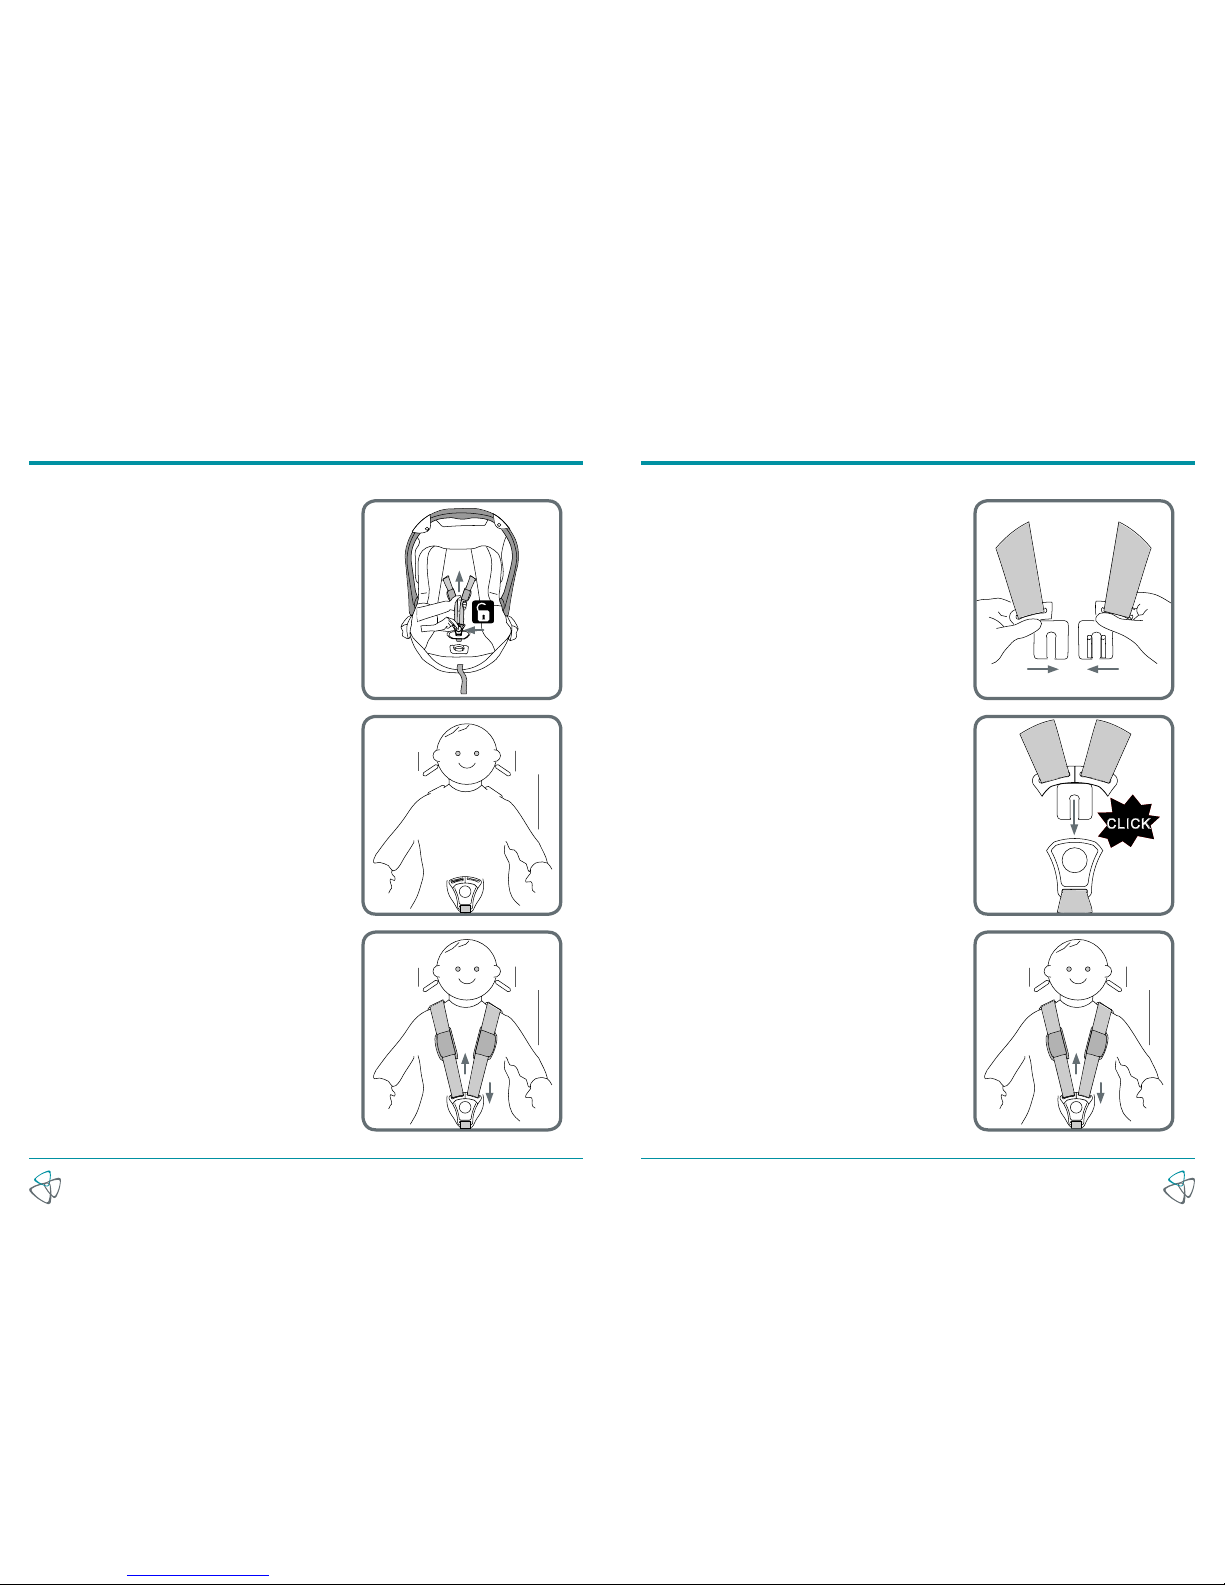
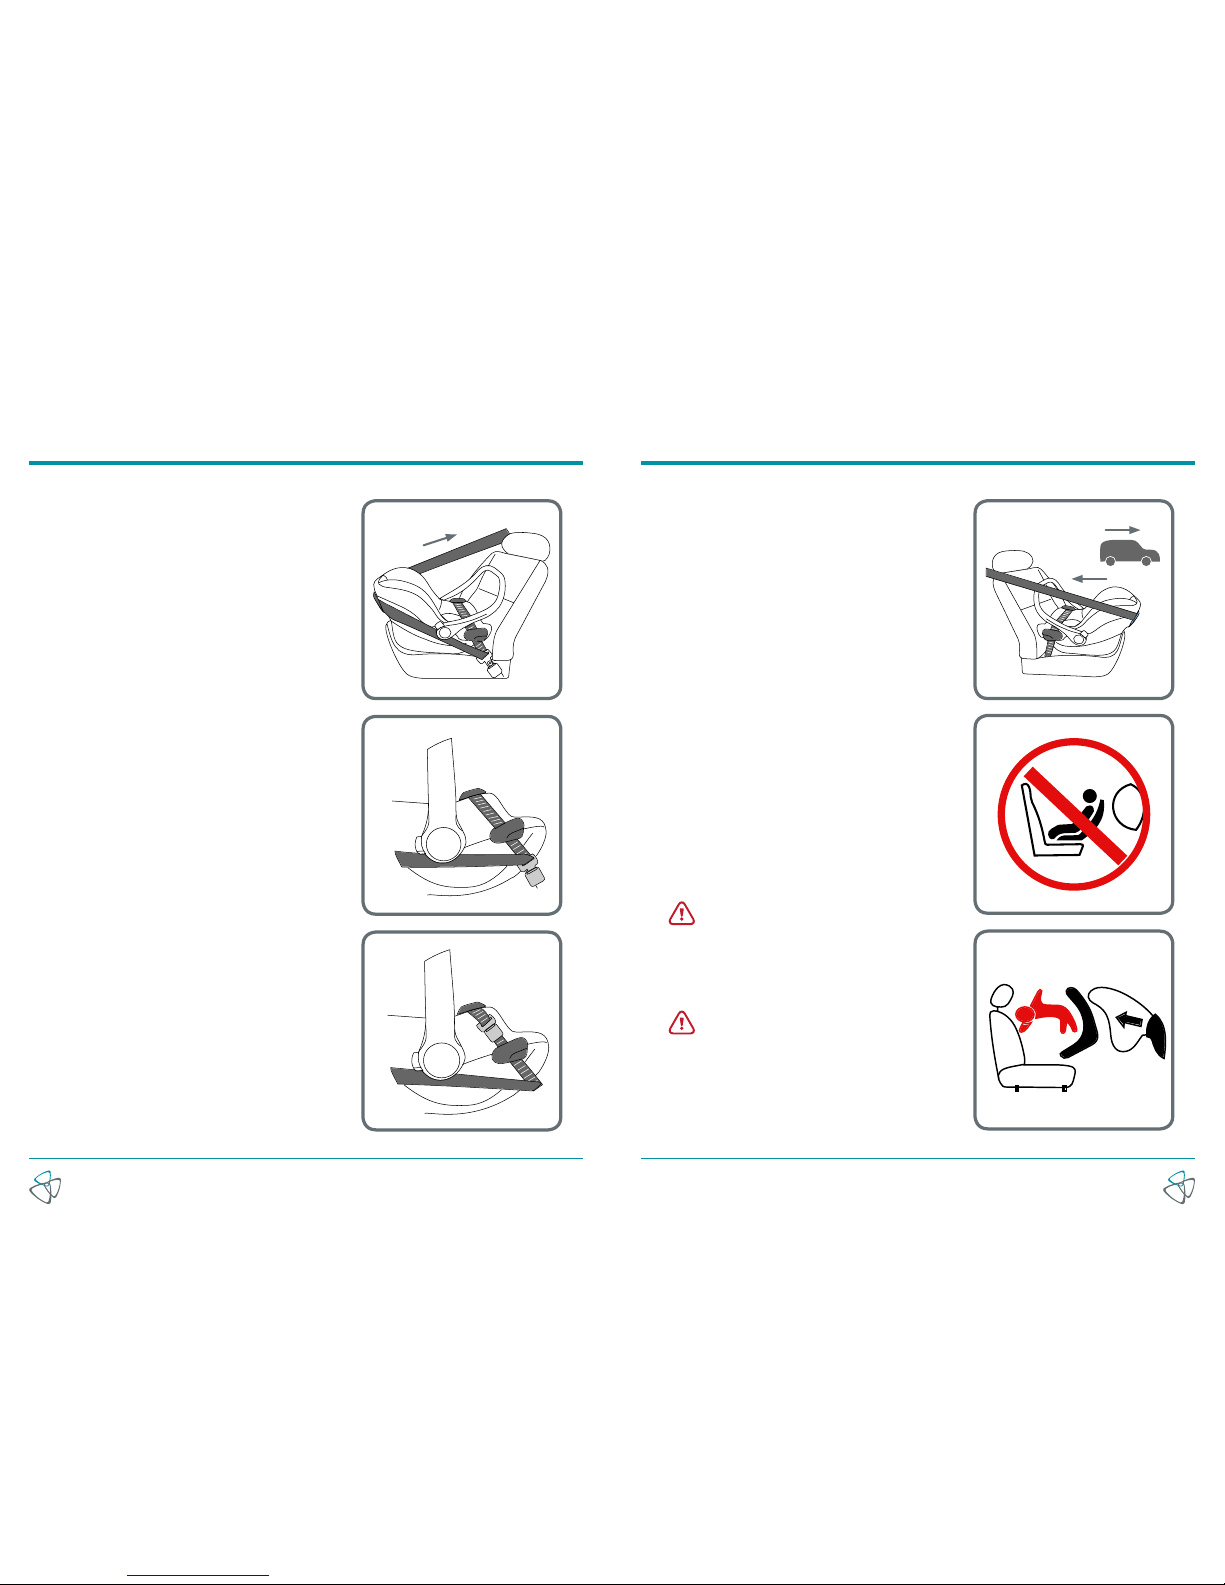
WARNING: The child seat must only be installed in the rearward facing position.
WARNING: Never use the child seat without fastening it into the car as described in these fitting instructions, if the shoulder
height is not ok, please re-install the seat again.
WARNING: It is most imoortant that the seat belt is correctly routed and the child seat tightened down on the upholstery as
firmly as possible to ensure maximum protection, a recommended method is shown in these instructions.
WARNING: Do not add to or modify this product in any way.
WARNING: Never use this product if it has been in an accident, or if it has become badly worn. Periodically inspect the
harness for wear, paying particular attention to attachment points, stitching and adjusting devices.
WARNING: Do not leave a child unattended in the seat at any time.
WARNING! Ensure that no part of the seat or seat belt is trapped in a door or a folding seat. If your car has a folding rear
seat, ensure that it is correctly latched in it’s upright position.
WARNING! Car interiors can become very hot when left standing in direct sunlight, it is therefore recommended that the
child seat, when not in use, is covered by a towel etc. This prevents components, particulalrly those attached to the child
seat, becoming hot and burning the child.
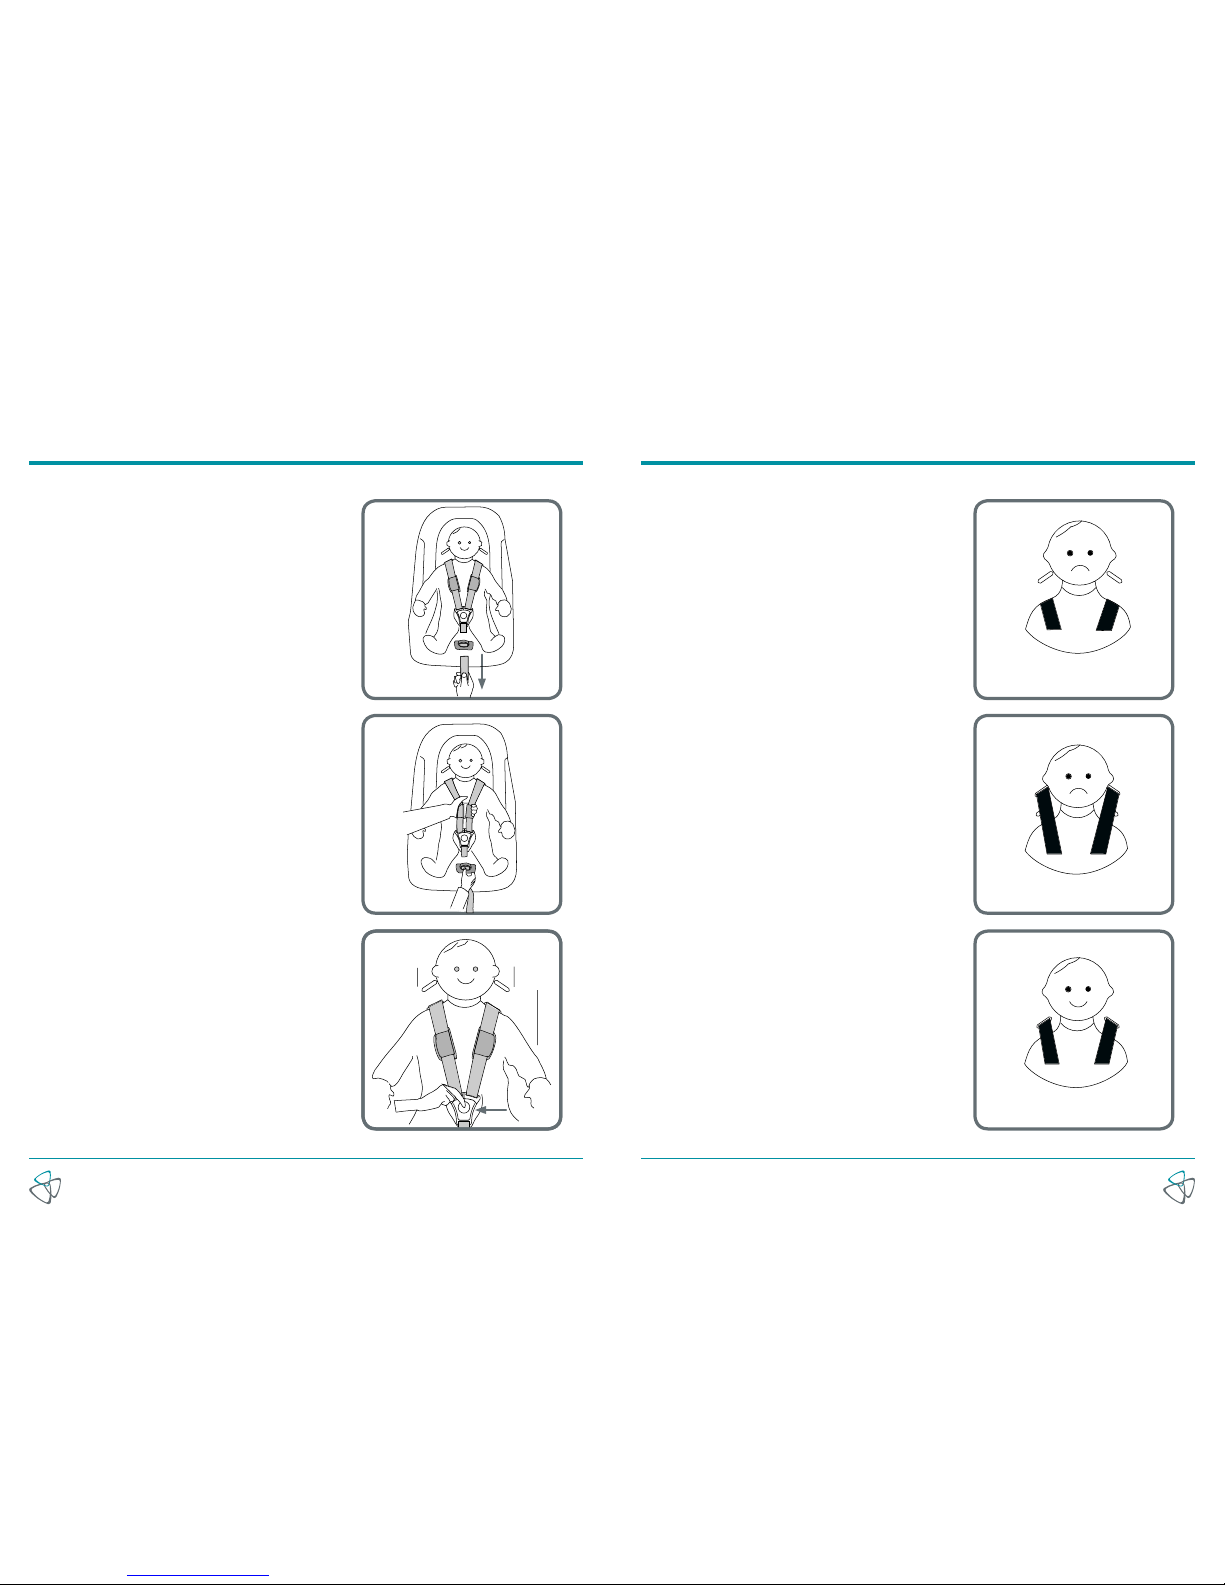
WARNING! In the event of an emergency it is important that the child can be released quickly. This means that the buckle is
not fully tamperproof and therefore your child should be persuaded never to play with the buckle.
WARNING! Luggage and other heavy objects should be secured in the car. Loose objects are liable to cause injury in the
event of an accident.
WARNING! The child seat must not be used without the cover.
WARNING! We use PU and EPS foam under the cover. Do not remove the integral foams, do not push or pull too hard
against the foams.
WARNING! Never place your child seat on a table or work surface, if your child is seated in the seat.
WARNING! This seat can be used for children of 0-13kg in weight and is used in conjuction with a 3 point lap and diagonal
safety belt in the rear-facing position only.
WARNING! When the child seat is not in use, it is recommended that it is fastened into the car with a seat belt to avoid injury
in the event of an accident.
WARNING! In an emergency your child can be released quickly by pressing the red release button on the harness buckle
WARNING! Store this child seat in a safe place when it is not being used. Avoid placing heavy objects on top of it.
WARNING! If you travel with passengers using both the front and rear passenger seats, the lighter occupants should be in
the rear and the heavier occupants in the front of the vehicle.
WARNING! Do not allow your child seat to come into contact with corrosive substances e.g. battery acid.
WARNING! Do not leave the child seat with a child in it on a raised surface, such as a table work top, bed or shopping trolley,
due to the risk of falling.
WARNING! The manufacturer can only gurantee the safety of the seat if it is used by the original owner.
WARNING! We strongly advise against using a second-hand product, as you can never be sure of its history.
WARNING! Always check to make sure the seat fits in your car properly before purchasing it.
WARNING! This seat can not be used as a rocker in house.
WARNING! Do not use this child seat in the home, it has not been designed for home use.
WARNING! Do not use this child seat longer than 5 years, the quality of material may change with ageing.
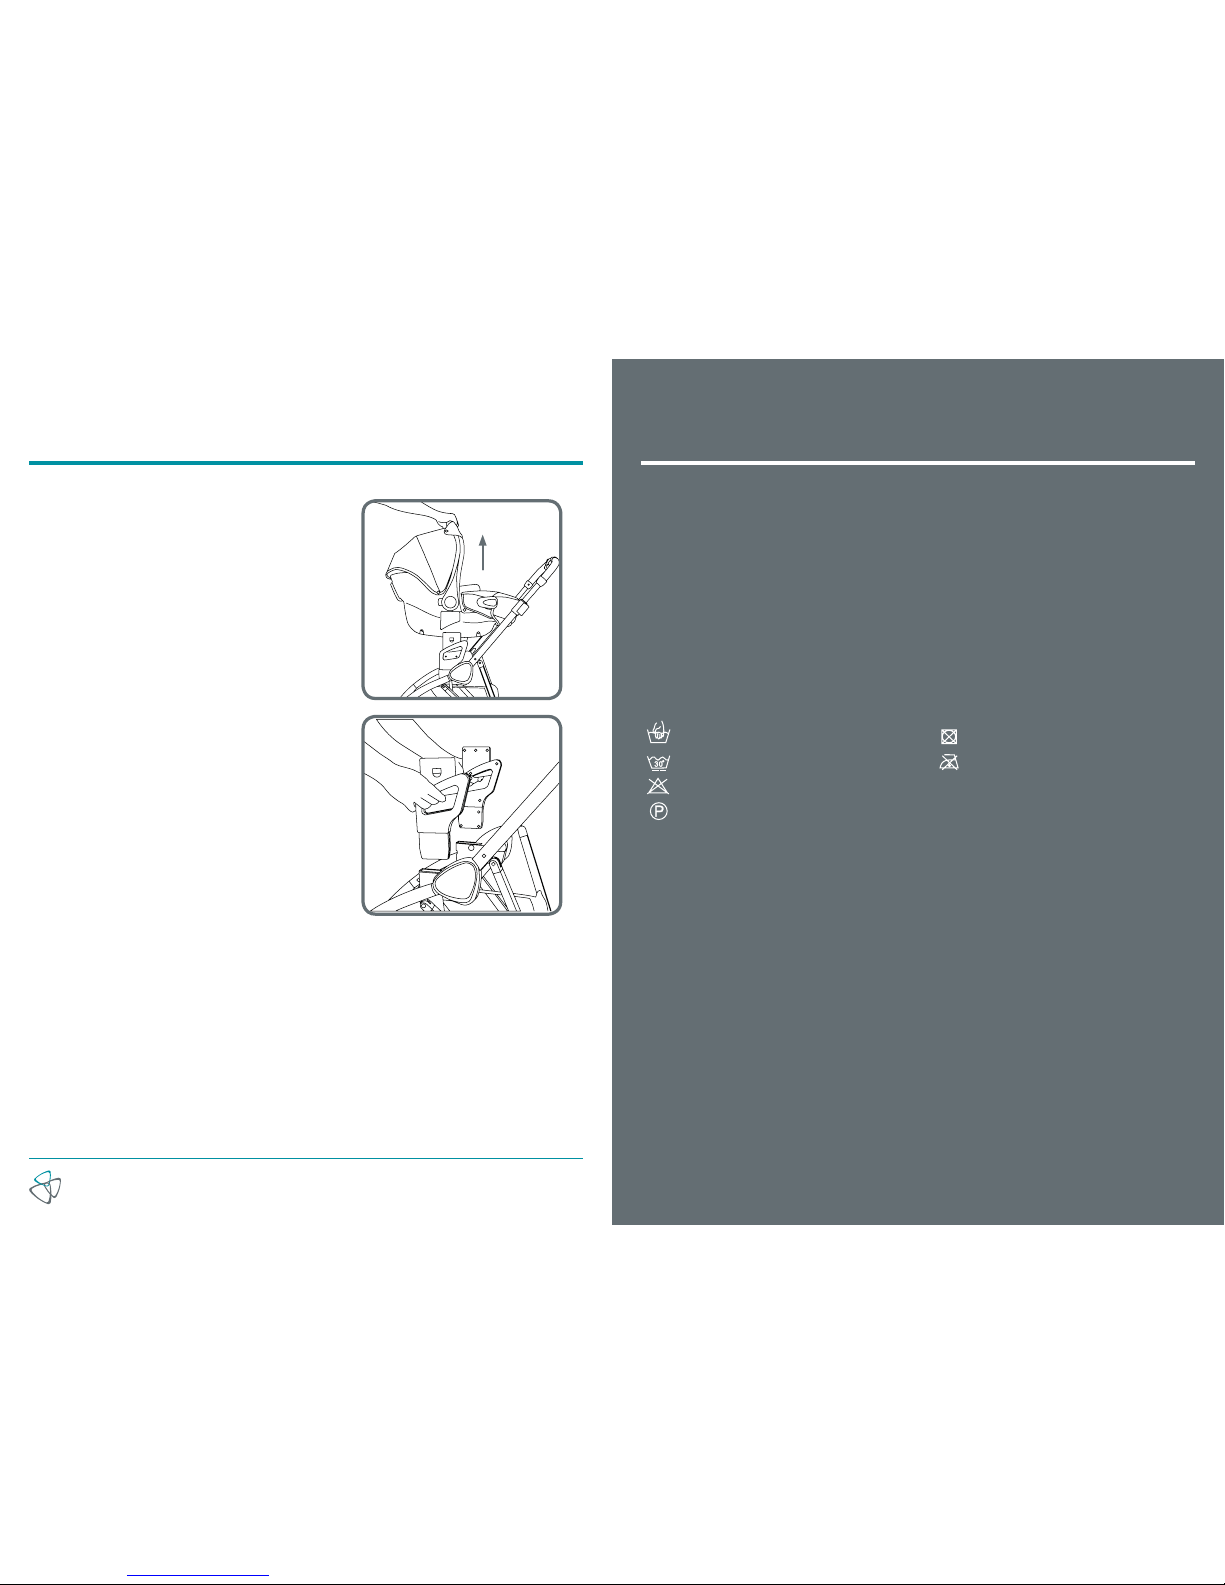
WARNING! Always make sure the seat is properly attached when used on a stroller as a travel system. Failure to attach prop-
erly could result in serious injury or death to your child.
WARNING! When the seat is attached to the chassis of a stroller, the combination should never be lifted up by the car seat.
WARNING! Always remove your child from the seat while making adjustments to the stroller and / or the car seat.
WARNING! Always make sure the carrying handle is in the carrying position before carrying.
WARNING! If any doubt, consult either the child restraint manufacturer or the retailer.
Team Tutti
Conforms to ECE 44.04

Your Bygo® Car Seat
Contents
Adjusting the shoulder straps 6
The harness 7
Correct shoulder height 9
Fitting your car seat 10
Installation 12
Adjusting the handle positions 14
Using with a travel system 15
Care and maintenance 16
Notes 17
1. Red button handle adjuster
2. Metal bar (optional)
3. Harness adjuster strap
4. Harness adjuster
5. Cover
6. Harness buckle
7. Shoulder straps
8. Carry handle
9. Canopy
10. Dark blue diagonal belt guide
11. Shoulder harness slots
12. User guide storage pocket
13. Metal bar (optional)
14. Red switch (optional)
15. Coupler (optional)
16. Light blue lap belt guide
17. PU foam
18. EPS foam
4 5
www.tuttibambini.com www.tuttibambini.com
8
9
7
6
5
4
3
2
17
18
1 13
14
15
14
15
16
WARNING
Do not remove the integral foam..

The Harness
6 7
www.tuttibambini.com www.tuttibambini.com
Adjusting the Shoulder Straps
1. Open the harness Buckle
Press the red release button.
1. Fastening the harness
Slot the two plastic sections of the buckle
connectors together.
Place your baby in the car seat.
Slot the two connectors into the hole in the top
of the buckle until they ‘click’ into place.
Caution: Put the two buckle tongues together
and engage in the harness buckle with an
audible click! click!
Put the shoulder straps over the shoulders
of your baby.
Caution: do not twist or interchange the
shoulder straps.
Always check the harness is correctly locked by pull-
ing above and below the buckle.
Caution: Tighten the straps until they are in contact
with your baby’s body. The hip belt must lie as low as
possible over your baby’s hips.

2. Unfastening the harness
To release the harness, push the red button in the
middle of the harness buckle inwards. You can now lift
your child from the seat; ensure that the buckle con-
nectors do not catch on clothing..
8 9
www.tuttibambini.com www.tuttibambini.com
Correct Shoulder HeightThe Harness
The harness should be adjusted as tightly as possi-
ble without causing discomfort to the child. A loose
harness is dangerous and should be checked each
time that you use the seat. To tighten the harness, pull
down on the adjustment strap untill the harness is the
correct tightness.
Caution: Pull on the adjusting straps until the harness
lies flat and is in contact with your child’s body. Pull
out the adjusting strap straight. There should never be
more than one finger’s width of space between the
shoulder straps and your child’s shoulders.
1. Before the car seat is installed
in the vehicle
The harness has 2 positions. The straps should go in
to the slots at, or nearest slots above the height of the
childs shoulders. To adjust the harness, remove each
strap by passing it through the slots from the front
to the back of the seat; re-route the straps through
the appropriate slots. If the shoulder height is not ok,
please re-install the seat again.
TOO LOW
The harness is loosened by pulling on both straps at
the same time press down on the harness adjuster.
3
7
7
TOO HIGH
CORRECT

10 11
www.tuttibambini.com www.tuttibambini.com
Correct InstallationFitting Your Car Seat
1. The type of approved
seat belt you must have
Your child seat can only be installed rearward facing
using a lap and diagonal seat belt in the front or rear
passenger seat of the car.
Only suitable if the vehicle is fitted with 2-point static, 3
point retractor safety belts, approved to UN/ECE Regu-
lation No. 16 or other equivalent standards.
7
3
Route the lap section of the adult safety belt through
the lap belt guides and fasten it into the buckle until
you hear a ‘click’.
Place the diagonal belt in the diagonal seat belt guide
at the back of the seat
1. Installation of the car seat
Push the child seat facing rearward firmly against the
backrest of the cars seat.
3

12 13
www.tuttibambini.com www.tuttibambini.com
InstallationInstallation
Take out all the slack in the seat belt, ensuring
that there are no twists or kinks in the seat belt.
Warning: Make sure the car safety belt buckle runs in
a straight line and stays below the belt hook. 3
7
1. Ensure the car seat is correctly
installed by checking the following
• The straps of the child safety seat are close to
the body without contstricting the child
• The shoulder straps are adjusted correctly
• The straps are not twisted
• The tongue from the adult seat is engaged
correctly into the buckle from the vehicle
WARNING
In an accident, enormous forces occur. Never try to secure
a child on your lap with the vehicle seat belt or by holding
onto them.
Secure your child in the car seat for every journey.
Always secure the baby seat onto the vehicle seat in a
rearward facing position.
WARNING
An airbag hitting the baby seat can cause serious injury to
your child, possibly resulting in death.
Do not use on a passenger seat with an activated airbag.
However, if you need to install the seat in the front passenger
seat, please ensure that any airbag is deactivated.
For seats with side airbags, pleae observe the instructions in
your owner’s manual.
3

14 15
www.tuttibambini.com www.tuttibambini.com
As a Travel System
Adjusting the Handle Positions
1. Adjusting handle positions
To adjust the handle from one position to another,
pull out both sides of the handle on the swivel
point; rotate the handle forwards or backwards
into the desired position.
The carry handle has 3 positions.
Ensure the handle is straight when carrying
the car seat.
Always ensure that the handle is locked in
position until you hear a ‘click’ and that the
harness is correctly fitted and the buckle
fastened before lifting your car seat.
1. Fitting the car seat to the chassis
First place the car seat adapters (supplied with the
car seat) onto the chassis, with the arrows facing
the direction that you want to place the car seat.
The yellow markers on the adapters should face
inwards.
Then lower the car seat onto the adapters until they
click into place.
2. Removing the car seat from
the chassis
Press the two buttons on the car seat
adapters inwards.

16 www.tuttibambini.com
As a Travel System Care and Maintenance
Cleaning the shell
Use a damp cloth to clean the main body shell.
Cleaning the belt lock and harness
Use only a mild hand soap and warm water. Do not use chemical
cleaners and never attempt to bleach or dye webbing.
Allow to dry naturally.
Cleaning the seat cover
The cover should only be hand washed and follow
instructions when washing.
Warning
Do not use undiluted neutral detergent, gasoline or other organic
solvents to clean the main body. Otherwise damage may be
caused to the main body.
Environment
Keep all plastic packaging materials out of reach of your
child to avoid the risk of suffocation.
For environmental reasons, when you have stopped using this
product, we ask that you dispose of the product in the proper
waste facilities in accordance with local legislation.
Hand wash only
In water below 30˚
Do not use bleach / chlorine
Use only a mild hand soap
Do not dry clean
Do not iron
Lift the car seat upwards from the handle.
The car seat adapters can be removed from the
chassis by squeezing the handles and lifting off.

Notes
19
www.tuttibambini.com
18 www.tuttibambini.com
Notes

www.tuttibambini.com
Join Us
Follow us on Facebook
TuttiBambiniUK
Follow us on Twitter
TuttiBambiniUK
Follow us on Instagram
TuttiBambiniUK
Table of contents
Other Tutti Bambini Car Seat manuals
Popular Car Seat manuals by other brands

Century
Century Next Step Deluxe Series instruction manual

KIDDY
KIDDY SMARTFIX Directions for use

Gilis
Gilis Bebe Stars Booster Cindy user manual

CYBEX gold
CYBEX gold BASE M Short instructions

Peg-Perego
Peg-Perego Viaggio 1 Duo Fix K Instructions for use

Britax
Britax Safe-n-sound BS8100A-020133 Series Instructions for installation & use