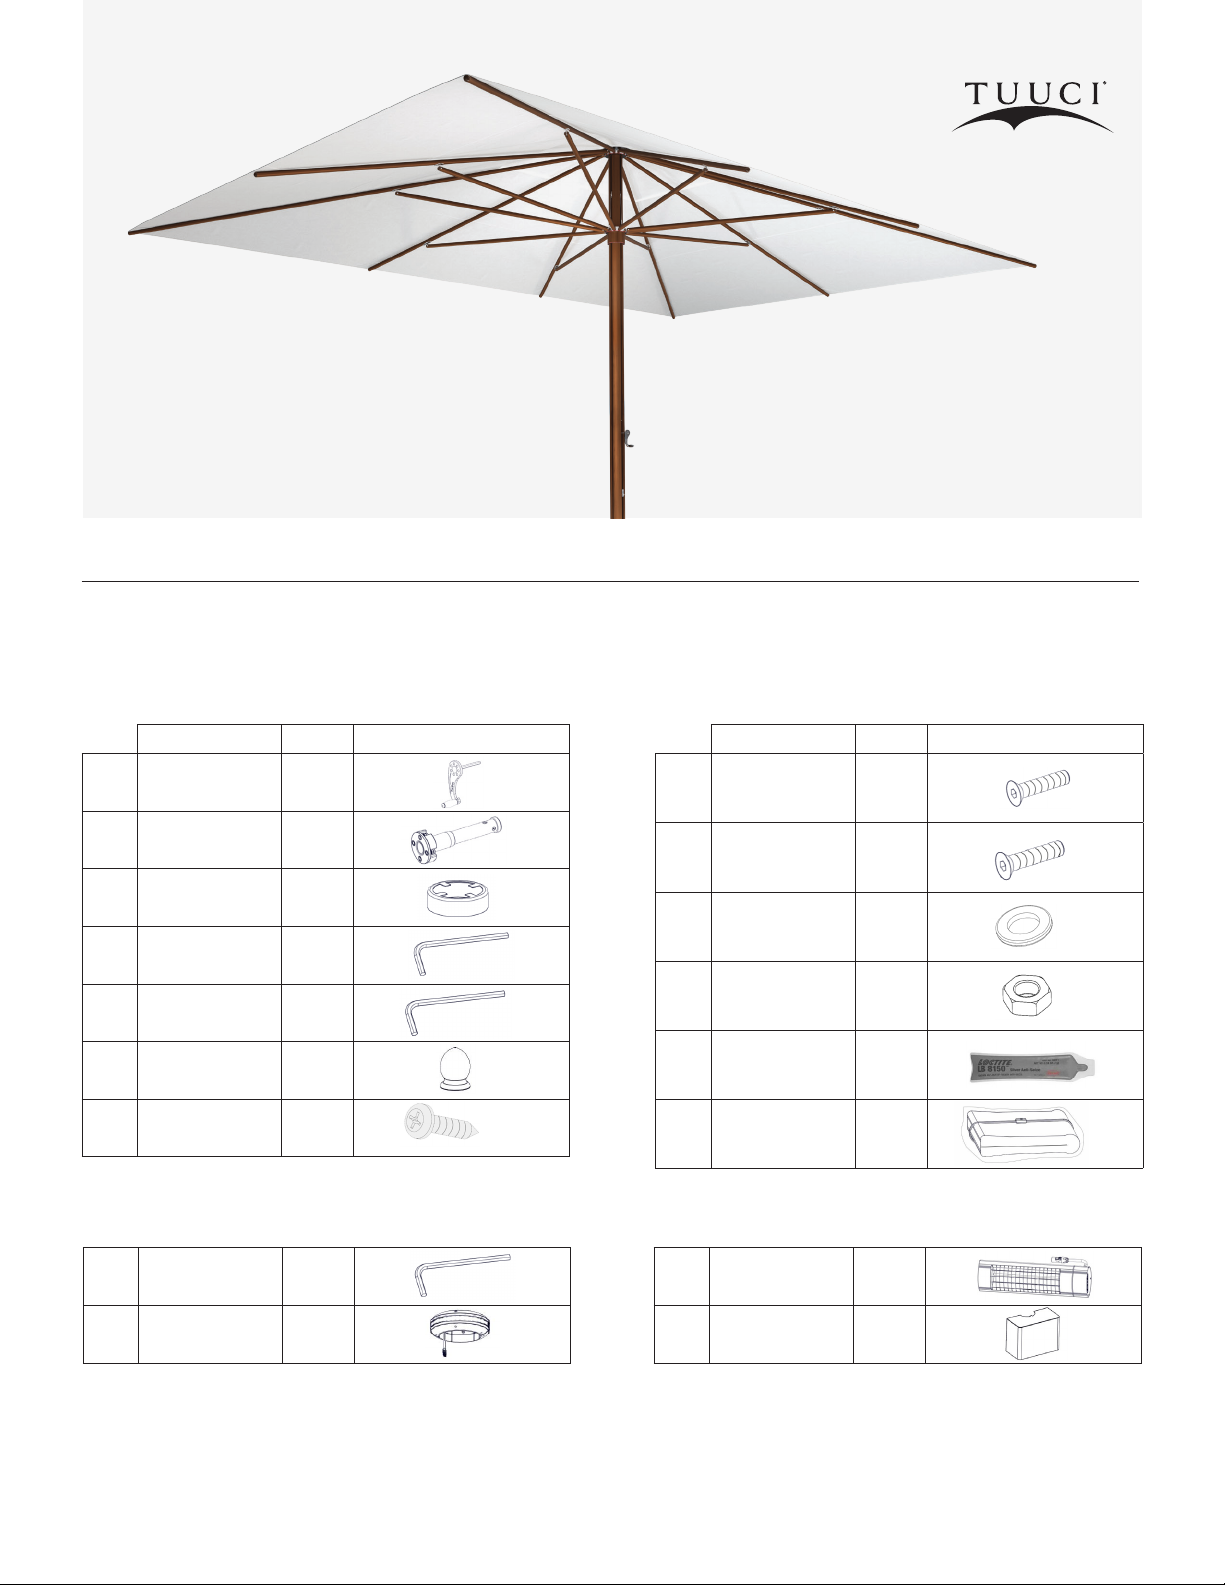
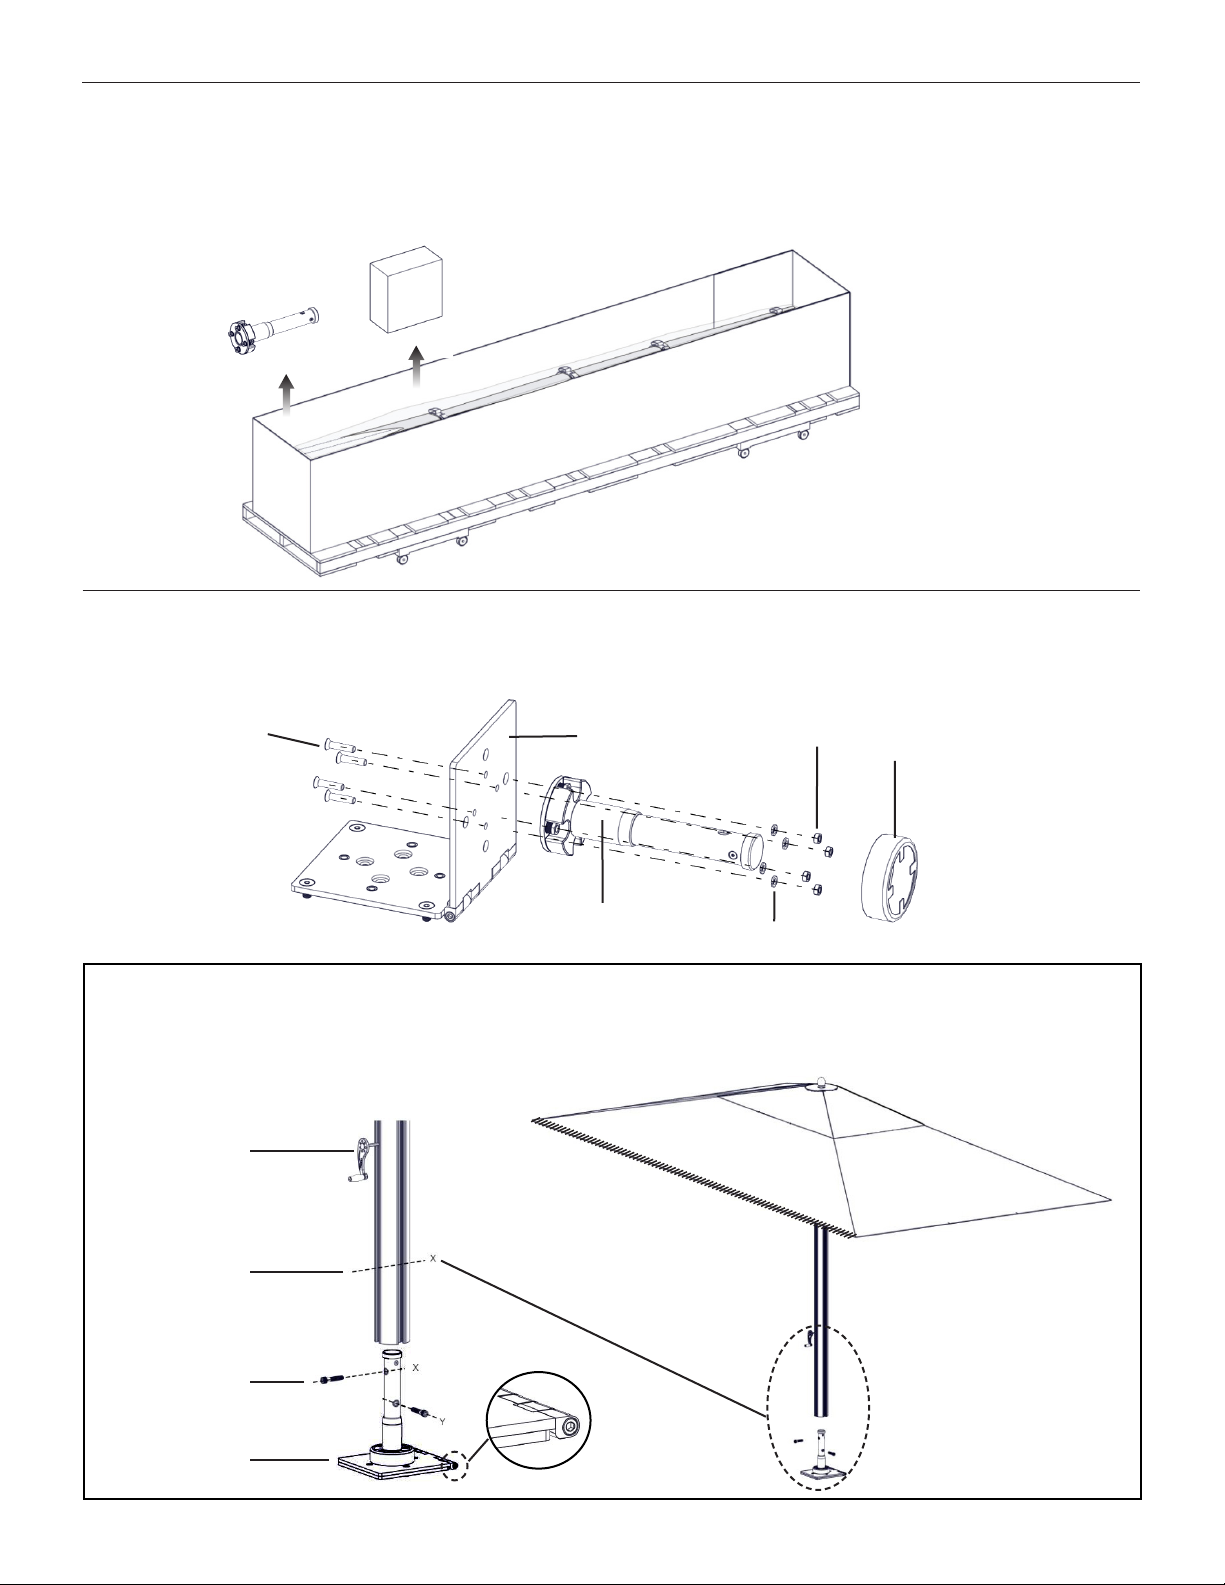
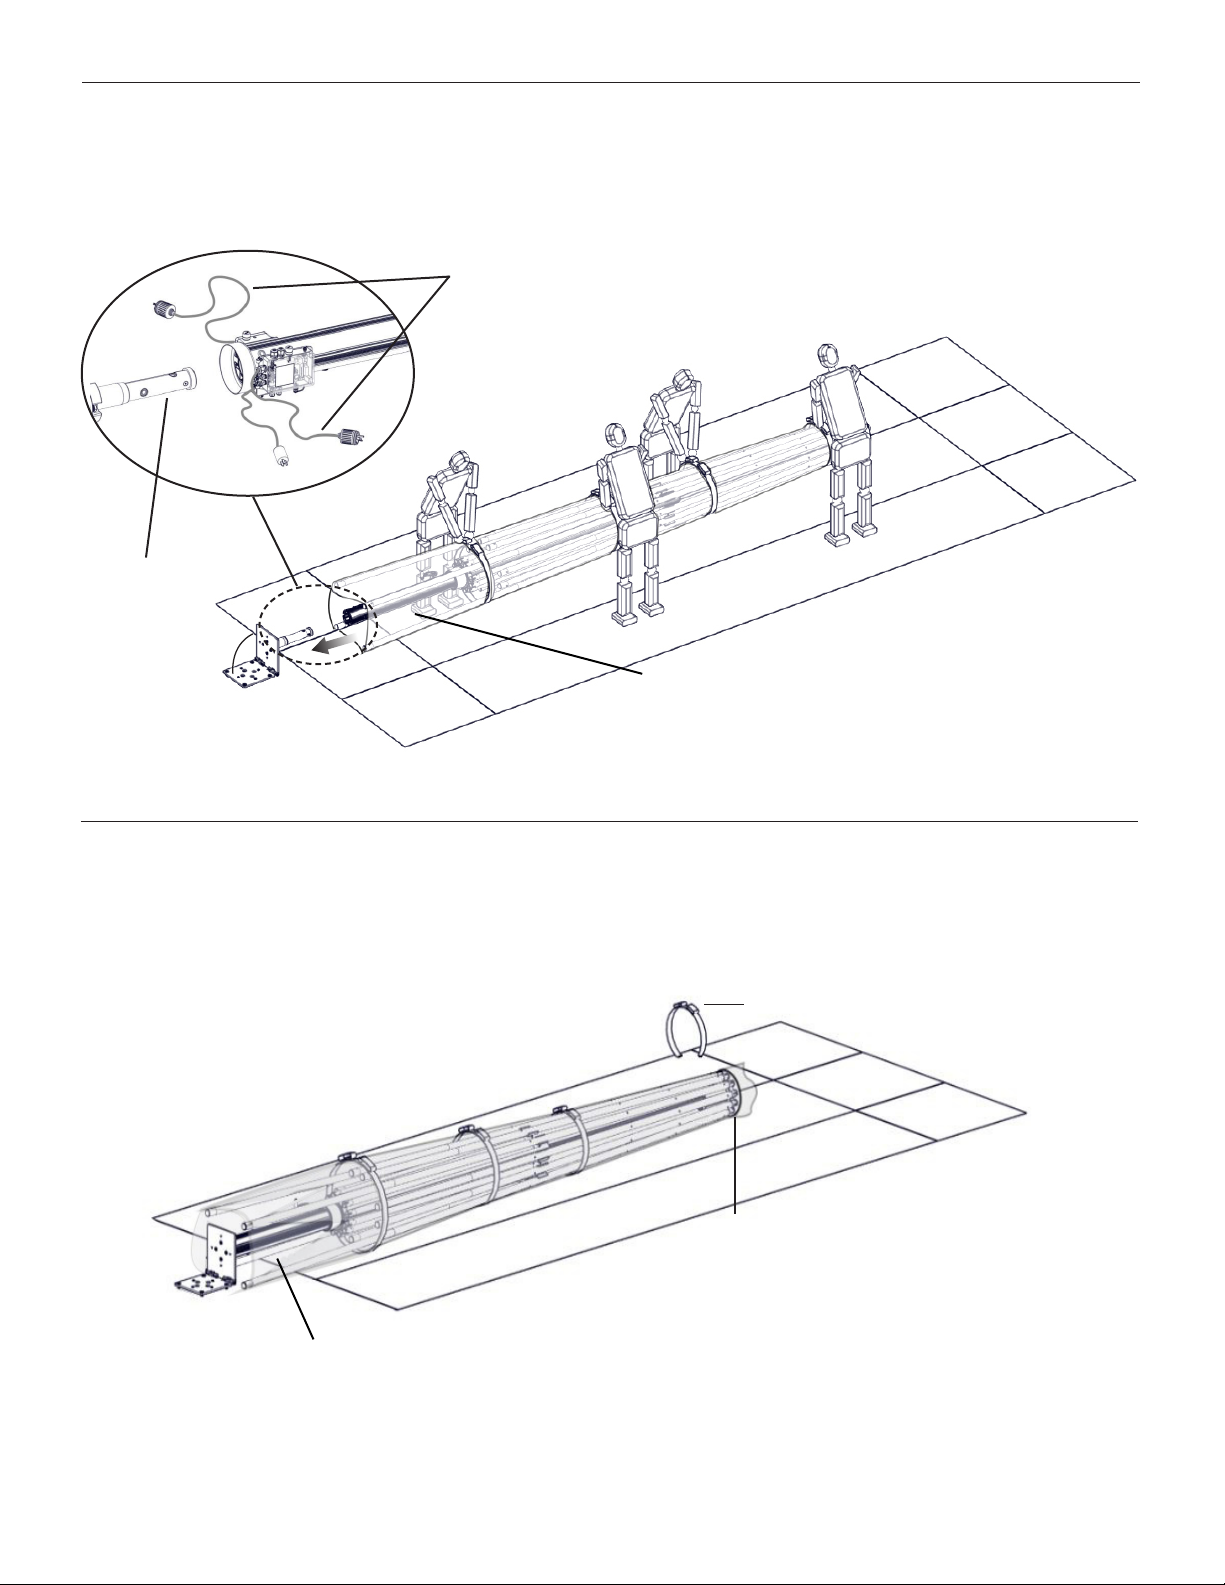
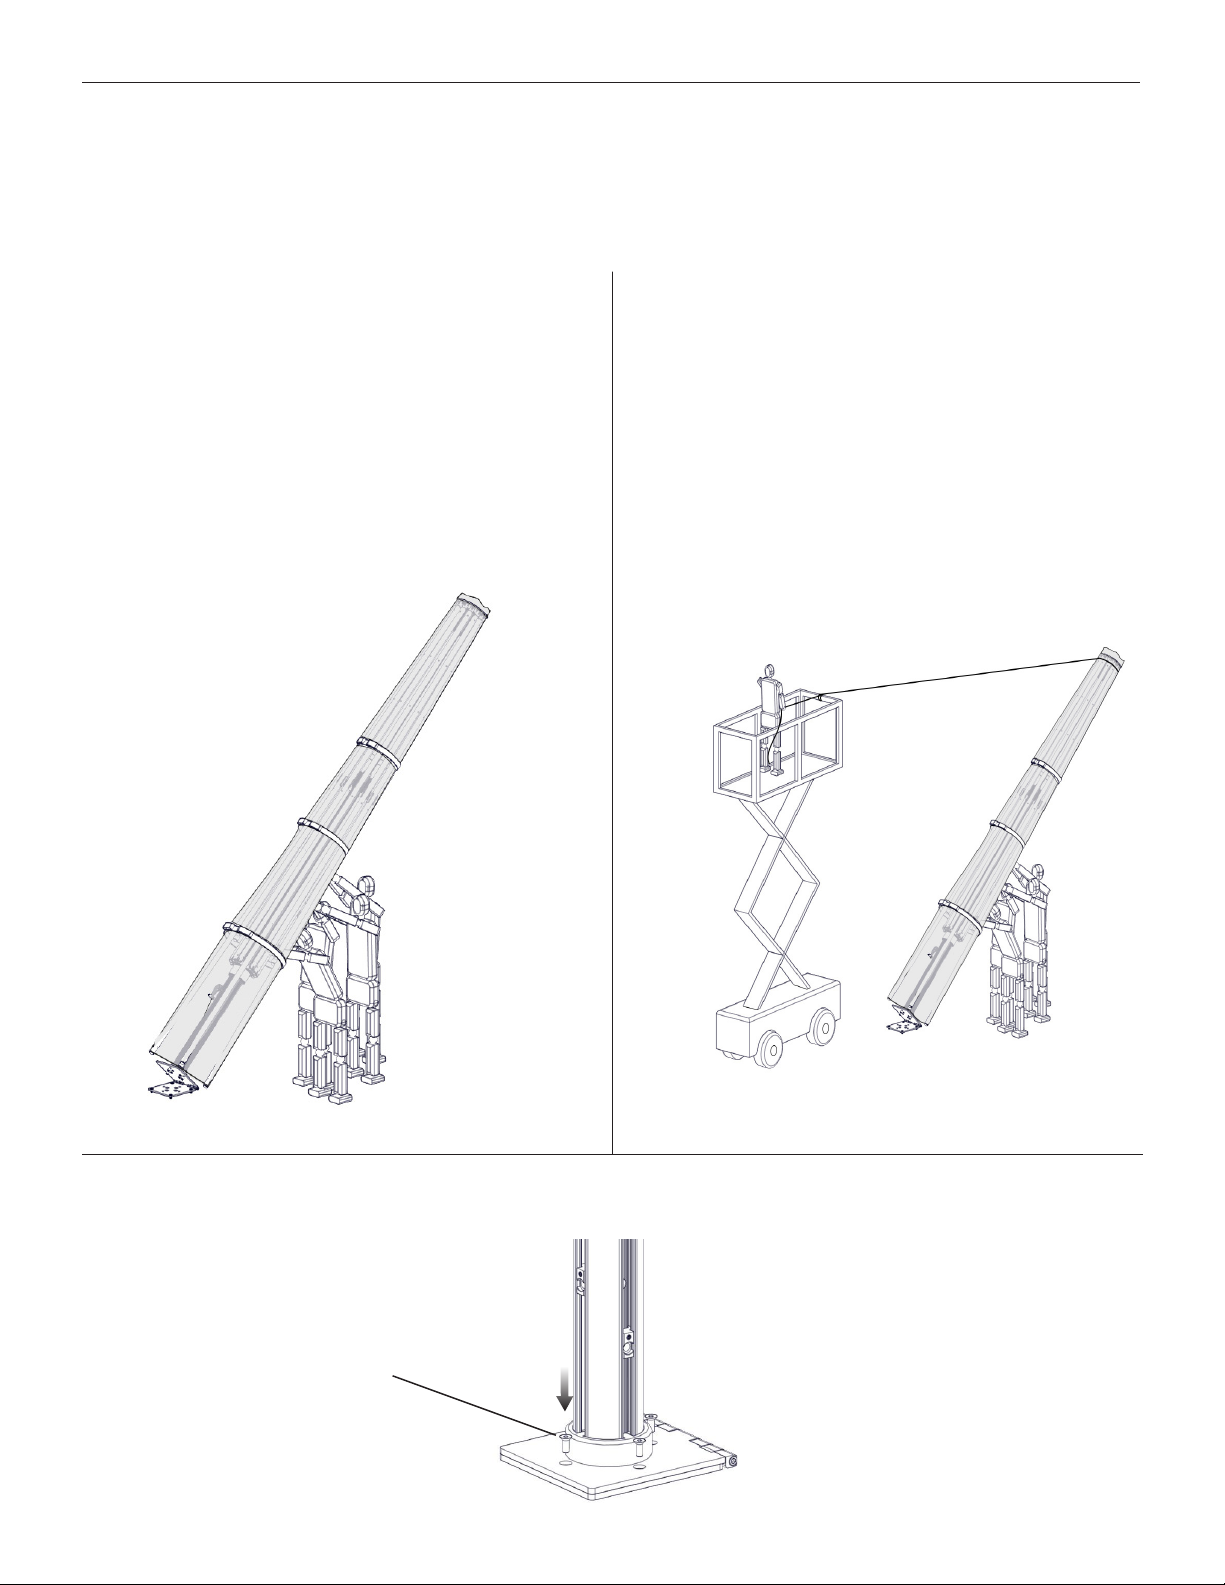
Tuuci OCEAN MASTER MEGA MAX CENTER POST User manual

1
1009234 TUUCI.COM
nAllen Wrench
2.5mm 1
oAmbia LED Light
+ Touch Switch 1
OCEAN MASTER MEGA MAX CENTER POST
HARDWARE AND PARTS INCLUDED IMAGES ARE NOT 1:1 SCALE
INCLUDED ON MODEL WITH LIGHT INCLUDED ON MODEL WITH HEATER
INSTALLATION INSTRUCTIONS
IMPORTANT: THE ANCHOR MUST BE INSTALLED BEFORE MOUNTING THE PARASOL.
TO PROTECT YOU AND YOUR PRODUCT, PLEASE READ THE INSTALLATION INSTRUCTIONS.
DESCRIPTION QTY PART IMAGE
a Crank Handle 1
bBase Stem 1
c Beauty Cover 1
d ⁄" Allen Wrench 1
e ⁄" Allen Wrench 1
f Finial 1
gScrew
#10 x 7/8" 13
DESCRIPTION QTY PART IMAGE
hScrew
⁄-13" x 1-⁄" FHCS 5
iScrew
⁄-13" x 2-⁄" FHCS 5
j Washer, ⁄" 5
k Nut, 1/2-13" 5
l Lubricant 1
m Canopy 1
p Solamagic Heater see WT
q Beauty Cover 2

2
1009234 TUUCI.COM
OCEAN MASTER MEGA MAX CENTER POST
INSTALLATION INSTRUCTIONS
Step 3
Remove the wooden support bars and the box top
Step 1
Ensure the Stainless Steel Hinged Surface Anchor has
been installed and secured correctly to concrete or the
Full Aluma Crete Cube Anchor for the Ocean Master
MEGA MAX Classic before mounting the parasol.
Stainless Steel
Hinged Surface
Anchor
Step 2
Roll the parasol box next to the pre-installed Stainless Steel Hinged Surface Anchor.

3
1009234 TUUCI.COM
OCEAN MASTER MEGA MAX CENTER POST
INSTALLATION INSTRUCTIONS
hardware
box
Step 4
Remove the hardware box and Stainless Steel Security Stem (the stem is inside the parasol mast).
Tip: Remove the security bolt and put it aside to take the stem out of the parasol mast.
Use the ½ Allen wrench provided inside the hardware box to remove the security bolt.
Step 5
Install the stainless steel security stem to the Stainless Steel Hinged Surface Anchor using the hardware provided.
IMPORTANT: The Stainless Steel Hinged Surface Anchor and Stainless Steel Security Stem must be propertly
secured before mounting the parasol.
⁄-13 x 2.25 FHSCS Stainless Steel Hinged
Surface Anchor
Stainless Steel
Security Stem ⁄" lock washer
⁄" nut beauty
cover
FOR RECTANGULAR PARASOLS ONLY:
The Stainless Steel Security Stem top hole must align with the longer side of the parasol. Ensure the stem is
installed with the stem top hole facing in the direction you want the parasol long side facing (as illustrated below).
crank-handle
longer canopy side
stem top-hole
mast top-hole
Stainless Steel Hinged
Surface Anchor
Stainless Steel
Security Stem

4
1009234 TUUCI.COM
OCEAN MASTER MEGA MAX CENTER POST
INSTALLATION INSTRUCTIONS
TIP: USE THE CARDBOARD BOX TO PREVENT DAMAGING THE PARASOL FRAME.
Step 6
Roll the cart to the Stainless Steel Security Stem with the bottom of the mast facing the stem.
Step 8
Cut open the corners to flatten the box.
Step 7
Lift the parasol slightly to release pressure and pull the cart from beneath.
Side View
Top View
bottom of the mast
Stainless Steel Security Stem

5
1009234 TUUCI.COM
OCEAN MASTER MEGA MAX CENTER POST
INSTALLATION INSTRUCTIONS
Stainless Steel
Security Stem
Pivot Stainless Steel
Hinged Surface Anchor
Step 9
Requires 4 to 6 people (depending on size).
Using the transfer straps lift the parasol and slide the parasol mast onto the Stainless Steel Security Stem.
white strap
plastic
plastic
Step 10
Remove the top white strap and carefully cut the plastic at the top of the parasol,
making the bag removal process easier in later steps.
Note: Leave plastic on when mounting
to protect metal frame.
Note: For the electrical parasol, Ensure that electrical cords are not
pinched when inserting the parasol over the security stem.

6
1009234 TUUCI.COM
OCEAN MASTER MEGA MAX CENTER POST
INSTALLATION INSTRUCTIONS
Manual Lift
For sizes:
Slowly lift and push the parasol up until it is upright.
Hold the parasol upright until the base is secured.
Step 11:
TO RAISE THE PARASOL, SELECT THE APPROPRIATE OPTION.
BOTH OPTIONS REQUIRE 4 TO 6 PEOPLE.
Assisted Scissor Lift
For sizes:
Securely strap the top part of the parasol with the
provided rope and attached to the scissor lift.
Lift the parasol approximately 6 feet off the ground.
Then, use the scissor lift to pull and move away from
the Stainless Steel Hinged Surface Anchor until
the parasol is entirely upright.
Hold the parasol upright until the base is secured.
Step 12
Use the provided hardware to secure the Stainless Steel Hinged Surface Anchor.
4x /-13 x 1/"
flat-head socket cap screws
Square Round Rectangular
16.0' 16.0' 14' X 20'
Square Round Rectangular
20.0' 20.0' 16.0' X 24.0'
24.0' 24.0'
IMPORTANT:
IF THE FRAME IS TOO HEAVY AND CONDITIONS
FEEL UNSAFE, CONTINUE WITH THE ASSISTED
SCISSOR LIFT.

7
1009234 TUUCI.COM
OCEAN MASTER MEGA MAX CENTER POST
INSTALLATION INSTRUCTIONS
Step 13
Remove the rope, white straps, and plastic cover.
Step 14
Rotate the parasol frame until the parasol lock hole, and the Stainless Steel Security Stem hole align.
Secure the parasol with the provided 5/8" bolt and add Loctite anti-seize (included with hardware).
IMPORTANT:
This step must be done after the parasol is lifted
into the upright position.
TIP: USE A LADDER OR
LIFT IF NECESSARY.
mast
stem

8
1009234 TUUCI.COM
OCEAN MASTER MEGA MAX CENTER POST
INSTALLATION INSTRUCTIONS
Step 16
Lock the parasol by having the crank inserted and
sliding the button down.
Step 17
Remove protective bubble wrap from each rib.
Step 15
Gently separate each rib from the mast before operating the crank. Install EasyDrive® Crank Lift and turn the crank clock-
wise to open the canopy, remove any remaining packaging material.
TIP: PROP OPEN THE RIBS TO
LOCATE THE CRANK PLACEMENT.

9
1009234 TUUCI.COM
OCEAN MASTER MEGA MAX CENTER POST
INSTALLATION INSTRUCTIONS
IF APPLICABLE: AMBIA LED LIGHT INSTALLATION
Step 1
Connect the wires from the light to
the wires emerging from the mast,
as illustrated below.
Note:
Use electrical tape to secure the connectors
to prevent the wires from disconnecting
inside the pole.
Step 2
Ensure both light halves are mounted, and the
wires are inside the pole.
Insert screws going through the countersunk
hole on the right and then through the
mating hole on the left half.
Step 3
Cut zip tie holding power supply cable on the parasol mast and plug it into an electrical outlet.
connectors
& wires
light
light
screws
countersunk
hole
light switch

10
1009234 TUUCI.COM
OCEAN MASTER MEGA MAX CENTER POST
INSTALLATION INSTRUCTIONS
IF APPLICABLE: TURNING THE AMBIA LED LIGHT ON WITH TOUCH SWITCH
Step 1:
Off Mode
Step 2:
(Dim) Press Upper button
to turn the UPLIGHT on
Step 3:
(Dim) Press again to
increase the light intensity
Step 4:
(Dim) Press once more
for maximum intensity
Step 5:
Press and hold
to turn off
UPLIGHT
DOWNLIGHT
UPLIGHT
DOWNLIGHT
Step 1:
Off Mode
Step 2:
(Dim) Press the
bottom button to turn
the DOWNLIGHT on
Step 3:
(Dim) Press again to
increase the light intensity
Step 4:
(Dim) Press once
more for maximum
intensity
Step 5:
Press and hold
to turn off
LIGHT INTENSITY
OFF LOW MEDIUM HIGH

11
1009234 TUUCI.COM
OCEAN MASTER MEGA MAX CENTER POST
INSTALLATION INSTRUCTIONS
heater switch
BEAUTY COVER PLACEMENT FOR ELECTRICAL PARASOL WITH HEATERS
Position first cover
against covering
heater motor.
hooks
Slide in the hooks to the first half of the
beauty cover that was placed.
Step 1
Mount heaters to rib bracket using
pre-installed screw and nut.
Step 2
Connect heater cables.
rib brackets
IF APPLICABLE: HEATER INSTALLATION

12
1009234 TUUCI.COM
OCEAN MASTER MEGA MAX CENTER POST
INSTALLATION INSTRUCTIONS
CANOPY INSTALLATION
If applicable: install heaters and light before installing the canopy.
Step 1
Remove the plastic cover with the parasol fully opened, carry the canopy to the top of the parasol, use a folding
ladder (recommended 12-foot minimum height), and remove the belt.
plastic cover
belt
finial attachment bolt
canopy
grommet ring
Note: Make sure the correct
side of the canopy is facing up
canopy
Step 3
Climb down the ladder and select the finial in box.
Climb back up the ladder and install the finial once
the canopy grommet ring is on finial attachment
bolt.
finial finial attachment bolt
Step 2
Place the canopy on top by inserting the finial attachment bolt through the canopy grommet ring in the center.
Do no take finial up with canopy to avoid an accident. Go back down and grab finial from hardware box when
canopy is on bolt.

13
1009234 TUUCI.COM
OCEAN MASTER MEGA MAX CENTER POST
INSTALLATION INSTRUCTIONS
CANOPY INSTALLATION CON'T
Step 4
For rectangular parasols, unfold them towards the longer side of the frame.
Step 5
Pull each canopy corner string and align it with each corner rib.
string
corner rib
corner rib
corner rib
corner rib
string
string
string
longer side of frame
canopy
top view

14
1009234 TUUCI.COM
OCEAN MASTER MEGA MAX CENTER POST
INSTALLATION INSTRUCTIONS
CANOPY INSTALLATION CON'T
Step 6
Remove the ladder, close the parasol, and pull
each corner string so the canopy can drop and
open at full length.
strings
Step 7
Use screws #10x7/8" included and fasten the canopy corner
to the frame.
Step 8
Close zipper on each corresponding rib.
screw
#10 x 7/8"
grommet
rib
IMPORTANT:
Close parasol during wind
conditions that exceed the
manufacturer’s specifications.
The canopy must be carefully
folded and secured with
tie straps when not used.
rib
zipper

15
1009234 TUUCI.COM
OCEAN MASTER MEGA MAX CENTER POST
INSTALLATION INSTRUCTIONS
Step 1
Plug your parasol into a 220V receptacle. When the parasol has
been correctly plugged into the power source, the Tuuci logo
on the user control panel will be backlit in white.
Step 2
Press the power button to turn on the parasol. The control panel
will be backlit in red when the power is ON.
Step 3
Press the heater icon button to turn on the heaters. The color will
change from white to blue, signaling that the heaters are ON.
CLOSING PARASOL
STEP 1
Press the heater icon button to turn off the heaters.
After pressing the button, the color will change to white, signaling that the heaters are off.
STEP 2
Press the power button to turn off the parasol.
STEP 3
Once heaters are cooled off, pivot heaters 45
degrees to allow the parasol to fully close.
power on
heater
IF APPLICABLE: TURNING ON HEATERS
NOTE:
Allow 15 minutes for the heaters to cool
down before closing the parasol.
The canopy must be carefully folded and
secured with tie straps when not used.

16
1009234 TUUCI.COM
OCEAN MASTER MEGA MAX CENTER POST
INSTALLATION INSTRUCTIONS
Power Supply:
Main Input
Voltage:
208-240VAC
50/60 Hz
Max. Amps: 13.7 A @220Volts AC
12.6 A @240Volts AC
Max. Watts: 3010 Watts
Specifications for 220V circuits North America version:
120V, 1 phase 60Hz (requires a 15 Amp circuit) parasol comes with a 10ft Power Cord & Plug
(Use with 15A – 125 Volts, NEMA 5-15R Receptacle compatible with NEMA 5-15P Plugs)
208-240V, 2 phases 60Hz (requires a minimum 20 Amp circuit) parasol comes with a
10ft Power Cord & Plug (Use with 20A - 250 Volts, NEMA 6-20R Receptacle
compatible with NEMA 6-20P Plugs)
Europe version:
220-240V, 1 phase 50Hz (requires a minimum 16 Amp circuit) parasol comes with a
10ft Power Cord & Plug (Use with 16A - 250 Volts, Schuko Receptacle compatible with
Schuko 16A - 250 Volts Plug)
warnings & safety instructions
1. Read and understand the owner’s manual before assembling or operating the parasol.
2. Read and understand the warnings posted on the parasol and the components installed on the parasol.
3. Disconnect electrical power to the parasol during inclement weather.
4. There is a fire risk if heaters come into contact with flammable materials or liquids.
5. Keep children away from power cords on or around the parasol.
6. Disconnect power before removing or servicing the parasol.
7. Allow sufficient cooling of heaters before closing the parasol.
8. Do not use this parasol for other than its intended use.
9. Replace warning labels if they become obscured or removed.
10. Make sure the parasol is grounded correctly if electrical devices are installed, such as heaters.
11. Provide adequate space to open and close the parasol without obstructions.
12. Customer’s electrical power source connections, if any, must be installed/connected by a certified electrician. Check local codes for guidance.
13. When closing/opening the parasol, keep your hands and face clear of all pinch points or protruding parasol components.
Emergency shut-down or interrupt Feature:
Press the power button to shut down or interrupt the operation. The red light on the power button will turn off. The
white lights on the heater icon will turn off. Press the power button to turn the parasol back on.
Control panel indicator when the parasol is not level (tipped or tilted on an angle):
The power button will flash in yellow when the parasol is not level. All functions are inactive. The Tuuci logo is not back lit.
When the parasol is level and no longer tipped or tilted, it will return to a powered-down state with the Tuuci logo backlit
in white and all other functions off. Press the power button to turn on the parasol. Then turn on the heaters.
Lock out unauthorized users from turning on or off various features of the parasol:
There is a lock-out feature to prevent unauthorized user access. To turn-on on the lock-out feature, press and hold the
power button for 5 seconds. All functions will maintain their original state of on or off.
To turn-off off the lock-out feature, press and hold the power button for 5 seconds. All functions will maintain their current
state of ON or off. Users will have access again to turn ON-off the various parts.
If the power button is pressed during a lock-out condition, activating the emergency shut-down or interrupt feature, the
heaters will be turned off. All icon button lights will be off, except for the Tuuci logo.
Heater Automatic Turn-Off Safety Feature:
As a safety feature, the heaters on the automated parasol will automatically turn off after 2 hours of operation.
To turn the heaters back on, press the heater icon button.
IF APPLICABLE: HEATERS FEATURES AND FUNCTIONS
Light and (4) Heaters Electrical Specs:
This Umbrella requires one 120V electrical circuit for the light and two 220V electrical circuits (one for every two heaters)
Light and (6) Heaters Electrical Specs:
This Umbrella requires one 120V electrical circuit for the light and three 220V electrical circuits (one for every two heaters)
Power Supply:
Input Voltage 90-305VAC
Input Current 0.6 A / 115VAC
0.3 A / 230VAC
Output Voltage 12 VDC
Output Power 40 Watts
Specifications for 120V circuits
Customers must connect to a protected power source circuit with proper Current Rating "Amps" near the parasol using an above-ground junction box, according to their local
electrical codes and regulations.
Table of contents
Other Tuuci Patio Furniture manuals

Tuuci
Tuuci BAY MASTER MAX User manual

Tuuci
Tuuci Bay Master Shade Pod Quick reference guide

Tuuci
Tuuci 1005116 Quick reference guide

Tuuci
Tuuci Ocean Master Max User manual

Tuuci
Tuuci ocean master MAX Series Quick reference guide

Tuuci
Tuuci Plantation MAX Cantilever Quick reference guide

Tuuci
Tuuci OCEAN MASTER MAX DUAL User manual

Tuuci
Tuuci TILT CANTILEVER Quick reference guide

Tuuci
Tuuci MAX TILT CANTILEVER Quick reference guide

Tuuci
Tuuci OCEAN MASTER MAX series User manual