Twinny Load Swing CK Operating and maintenance manual

Twinny Load® Swing CK
Twinny Load® Compact PA
Montagevoorschrift en gebruiksaanwijzing
Montage- und Gebrauchsanleitung
Installation and use instructions
Instructions de montage et mode d’emploi
EEC e4*79/488*87/354*0029***

Noteer voor uw eigen
administratie:
Type drager:
❏ Traditional C
❏ Traditional CK
❏ Swing CK
❏ Swing FK
❏ Ergo CK
❏ Ergo FE
❏ Quattro
❏ Off-Road
❏
Serienummer:
Aankoopdatum:
Bitte notieren Sie zur eigenen
Erinnerung:
Trägertyp:
❏ Prestige PS
❏ Prestige PA
❏ Compact PA
❏ Compact RP
❏ Prestige ECO
❏ Perfect ECO
❏ Quattro
❏ Off-Road
❏
Serienummer:
Kaufdatum:
For your own administration,
write down the following:
Carrier type:
❏ Traditional C
❏ Traditional CK
❏ Swing CK
❏ Swing FK
❏ Ergo CK
❏ Ergo FE
❏ Quattro
❏ Off-Road
❏❏
Serial number:
Purchase date:
Notez pour votre dossier:
Type du porte-vélos:
❏ Traditional C
❏ Traditional CK
❏ Swing CK
❏ Swing FK
❏ Ergo CK
❏ Ergo FE
❏ Quattro
❏ Off-Road
❏❏
Numéro de série:
Date d’achat:

3
Hartelijk gefeliciteerd met de aanschaf van uw nieuwe Twinny Load®fietsdrager.
U kunt er nu zorgeloos met de auto en fietsen op uit trekken. Gewoon, lekker actief
zijn en nieuwe routes verkennen. We wensen u veel plezier met uw nieuwe fietsdrager.
Wir gratulieren Ihnen zum Kauf Ihres neuen Fahrradträgers von Twinny Load®.
Sie können jetzt unbesorgt mit dem Auto und Ihren Fahrrädern losziehen. Zugleich
sportlich aktiv sein und neue Wege erkunden. Wir wünschen Ihnen viel Spaß mit
Ihrem neuen Fahrradträger.
Congratulations with the purchase of your new Twinny Load®bicycle carrier.
You can now go touring carefree by car and bicycles. Simply staying active and
discovering new routes. Good luck with your new bicycle carrier!
Toutes nos félicitations pour l’achat de votre nouveau porte-vélos Twinny Load®.
Vous pouvez ainsi partir en toute sérénité en balade avec votre voiture tout en
emmenant chaque fois vos vélos avec vous. Une belle façon de rester actif et de
découvrir de nouveaux itinéraires.
Alors, Amusez-vous bien avec votre nouveau porte-vélo!
NLGBF D

26
General
Ball pressure
The type plate of the towing hook indicates the maximum permissible ball pressure.
The total combined weight of the bicycle carrier and bicycles may not be higher
than this ball pressure and in no case may it be higher than 75 kg. The weight of
the Twinny Load®Swing CK is 12.9 kg. You can find the weight of your bicycle in the
supplied booklet or perhaps on the Internet.
Lighting
The lighting of the bicycle carrier is 12V.
Legal requirements
You will find the legal requirements that apply in Europe for the transport of
bicycles on a bicycle carrier at www.twinnyload.com
Quality
All carriers are designed and produced in accordance with the highest quality
standard. Stability, flexibility, ease of use, good driving behaviour and solidity are
of paramount importance for us.
Cleaning
Clean the carrier after use and ensure that it is free from brine and diesel deposit.
Storage
Store the carrier at all times in dry condition.
Accessories
Various accessories are available for your bicycle carrier. For a complete overview
go to www.twinnyload.com or obtain information at the sales address.

27
Components of Twinny Load®Swing CK
- 1x carrier
- 4x wheel rails
- 1x padlock
- 13/7-pole adapter (with 13-pole plug)
- guarantee card
Warnings
- Always degrease the ball of the towing hook before installing the bicycle carrier.
- The bicycle carrier must be assembled according to the installation instructions.
- The carrier and bicycle must be installed according to the use instructions.
- No changes may be made to the product.
- The lighting is intended for a 12V installation.
- After the first kilometres, check the attachment of the bicycle carrier and
bicycles.
- Adjust your speed at speed ramps.
- Never use straps or ropes to fasten your bicycle. These can irreparably damage
the frame of your bicycle.
-
In principle, an electrical bicycle fits on a Twinny Load bicycle carrier. This depends
on the brand and type of electrical bicycle. You will find a fitting table on the
homepage of our website.
- Attention! When the fog rear light remains on constantly after connecting your
bicycle carrier, the socket of the car is not connected in accordance with the DIN.
Have this repaired by your garage.
Before driving, check that:
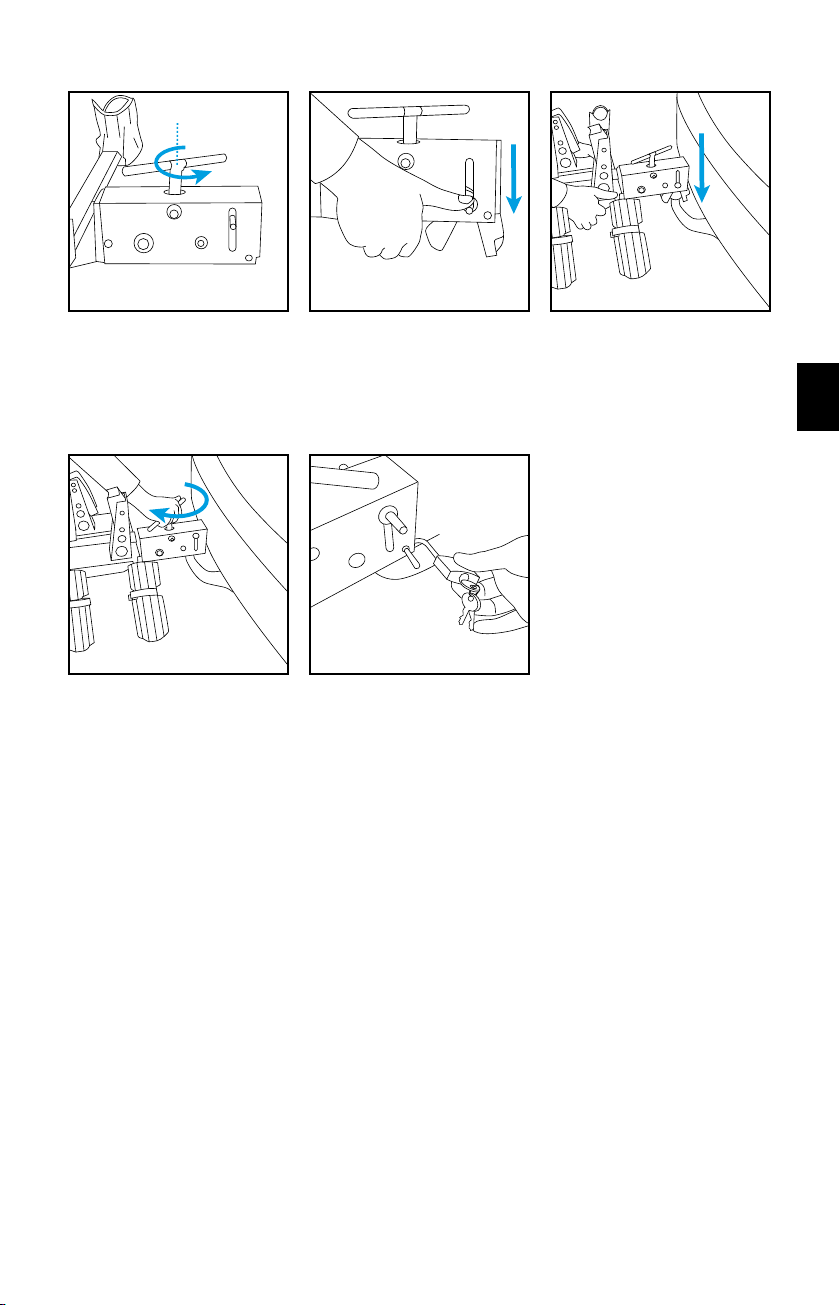
- the bicycle carrier is well attached to the towing hook;
- the lighting on the bicycle carrier functions properly;
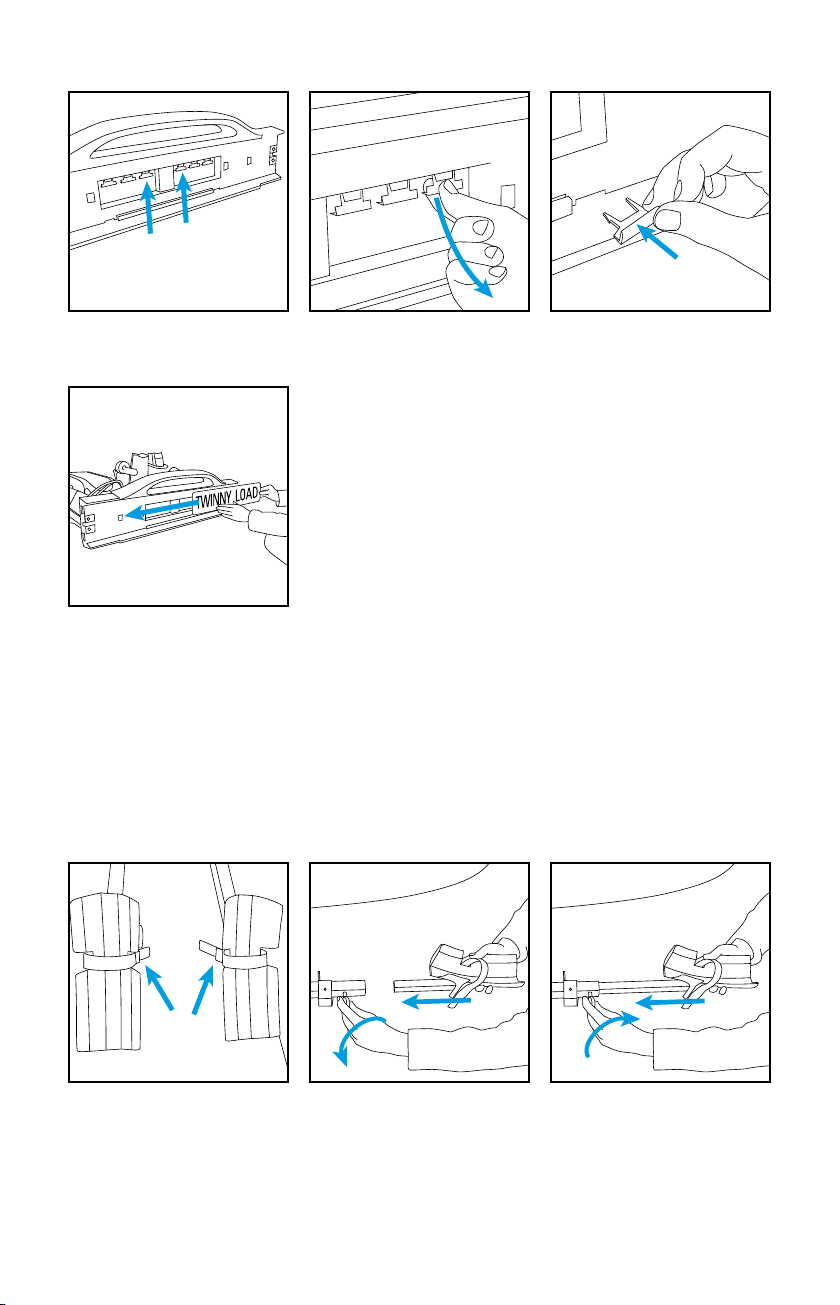
- the two light units are set at the correct width and are clicked into the securing
device;
- no cable is hanging loose;
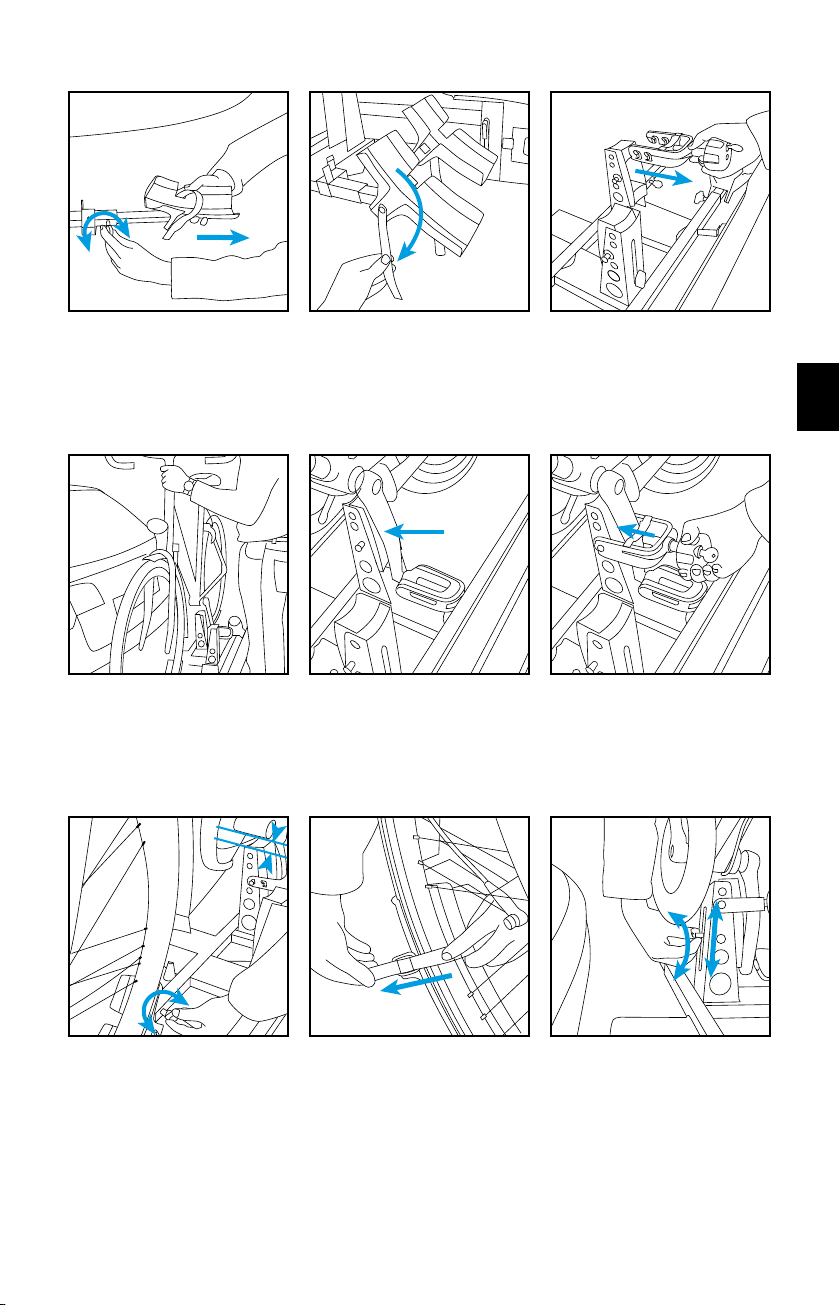
- all wing bolts of the wheel rails are tightened;
- the clamps on the pedal arm of the bicycles are well tightened;
- all wheels have been fixed with the straps;
- the lock of the tilting mechanism is in the hole and blocked;
- no loose items are on the bicycles or bicycle carrier;
- the keys are removed from the locks.
- the fog rear light is in the left light unit.
GB

28
Installation of number plate
30!2%
@#,)#+
Break four lugs out of the light bar and place them in the cut-aways.
Slide the number plate into
the light bar up to the second
stop.
Install the four wheel rails with
the clips inwards.
Installation of wheel rails
Pull on the wing bolt and loosen it until the rail fits into the tube.
Slide in the wheel rail halfway and tighten the wing bolt.
Beware!
Slide short Belgian number plate up to the first stop.
Austrian number plate can be installed without lugs.

29
Open the spindle to such an extent that the clamp pieces can be
pushed downwards with the catch on the side.
-!8
Place the bicycle carrier on
the towing hook and push the
carrier downwards.
Lock the bicycle carrier.Fix it by tightening the spindle
well. In doing so, hold the
bicycle carrier horizontally.
Installation of bicycle carrier
GB

30
Installation of light units
MAXMM
Take the light units out of
the storage position and slide
them into the guide of the light
bar.
The width of your car is listed in the car’s instruction manual.
Width adjustment: press the red
unlocking device and slide the
light units out in steps of 1 cm.
Put away superfluous wiring.
Connect the plug and check
the lighting.
Car width Slide out per side
Up to 1,80 m do not slide out
Up to 1,84 m 2nd click
Up to 1,88 m 4th click
Up to 1,92 m 6th click
Up to 1,96 m 8th click
Up to 2,02 m 11th click (= max)
Place the light units in
the light bar, press the red
unlocking device and slide
them inside.

31
Placing of bicycle
GB
Slide out the wheel rails
halfway and tighten them.
Place the first bicycle in the
wheel rails closest to the car
with the handlebars to the left
and the pedal downwards.
CM
Adjust the wheel rails in such
a way that the bicycle floats
approximately 1 cm above the
holder. Slide out = bicycle up;
slide in = bicycle down.
Remove the clamp from
the holder.
Position the pedal arm in front of the holder. Hook the clamp
over the projecting steel lugs. Do not yet tighten it.
Fasten the straps. Adjust the holder in such a
way that it rests against the
pedal arm and the bicycle is
upright.
Loosen the straps and turn
them downwards.

32
Cont. placing of bicycle
The bicycle touches the lid of the boot: adjust the holder in such way that the bicycle doesn’t
touch the lid of the boot.
The bicycles touch each other: adjust the holders in such way that both bicycles stand obliquely
outwards.
Place the second bicycle with
the handlebars to the right
and the left pedal downwards.
By adjusting the wheel rails in front and back a few cm, the bicycles will tilt slightly and no longer
touch each other.
Extra setting
Tighten the clamp. Lock the clamp.
The bicycles touch each other. The bicycle touches the lid of the boot.
The handlebars touch the saddle of the other bicycle.

33
Tilting back of carrier
Tilting of carrier
Move the bolt upwards to
remove it from the securing
device.
Take hold of the bicycle frame and tilt the bicycle carrier into the
original position. The bolt clicks into the hole. Push the bolt back
into the securing device. Check that the bolt is in the hole and
secured.
Move the bolt towards you and tilt the bicycle carrier calmly
backwards to the rest position.
The pedal arm is too high, the clamp does not fit, the bicycle stand is in the way.
Install the holder one position higher by pulling the securing clip out of the axle and then installing
the axle and support in the higher position and apply the securing clip again.
GB

34
Storage of light unit
@#,)#+
Push in the red unlocking
device and slide the light unit
out of the light bar.
Position the projecting guides
of the light unit in the back of
the light bar.
Push the light unit down into
the clamp.
In case of an improperly installed, backwards tilting towing hook,
the bicycle carrier can be adjusted upwards for maximally 5°.
When adjusting, take hold of a steel part of the carrier and never
the plastic handle.
Tools: allen key 6 mm and spanner 13.
Horizontal adjustment of bicycle carrier

35
Guarantee
On presentation of the guarantee certificate and purchase ticket, Felua-groep gives a seven-year
guarantee on the Twinny Load®bicycle carrier, counting from the date of purchase as listed on the
purchase ticket.
The guarantee consists of free repair or replacement of parts in case of material and construction
errors.
The guarantee is effective after you have activated the guarantee certificate on the Twinny Load
website www.twinnyload.com or via sending the reply card supplied with the guarantee certificate.
Terms and conditions:
- The bicycle carrier must be assembled according to the supplied installation instructions.
- The bicycle carrier must be installed on the car according to the supplied use instructions.
- The bicycles must be placed and fixed on the bicycle carrier according to the supplied use
instructions.
- No changes may be made to the product.
- Any responsibility for personal injury and/or damage to properties and ensuing asset loss that
are caused by improper installation or improper use shall be excluded.
- There shall be no guarantee on defects that are caused by accidents, illegal and incompetent
use of the vehicle or defects of the vehicle on which the bicycle carrier is installed.
- The term of guarantee shall not be extended or renewed due to performance of guarantee
activities.
-
Repair or replacement of the product within the specified term of guarantee shall only be possible
for the original buyer in accordance with the purchase certificate.
- Claims should be submitted at the purchasing address listed on the purchase ticket. The bicycle
carrier, including all supplied components, must be left behind at this address.
- The buyer is responsible for the costs of returning and collecting the product and/or parts at
the purchasing address.
-
The guarantee shall be cancelled if the bicycle carrier has been handled carelessly and improperly
or poorly maintained, such at the discretion of Felua-groep.
- The guarantee shall be cancelled if the serial number has been changed, damaged or removed.
The bicycle carrier must meet the technical specifications.
- The guarantee shall be cancelled if there is no purchase ticket, the ticket has been changed or
is illegible.
- Defects as a result of wear due to normal use, such at the discretion of Felua-groep, shall not
fall under the guarantee.
Disclaimer
The guarantee does not cover materials not installed by Felua-groep. The manufacturer’s liability
pursuant to the agreement is expressly limited to compliance with the guarantee obligations
described in this certificate. Any claim for damages, except those in respect of non-compliance
with guarantee obligations, is excluded. Taking into account the mandatory provisions of law
concerning (product) liability, more rights can never derived with respect to any business or
consequential loss, or (personal) loss of whatever nature, ensuing from defects to the materials
or activities delivered by Felua-groep.
GB

www.twinnyload.com
This manual suits for next models
3
Table of contents
Other Twinny Load Automobile Accessories manuals

Twinny Load
Twinny Load S 20 User manual

Twinny Load
Twinny Load A 11 User manual

Twinny Load
Twinny Load S 31 User manual

Twinny Load
Twinny Load e-Carrier User manual

Twinny Load
Twinny Load A 34 User manual

Twinny Load
Twinny Load A 26 User manual

Twinny Load
Twinny Load A 33 User manual

Twinny Load
Twinny Load A 39 User manual

Twinny Load
Twinny Load A 31 User manual

Twinny Load
Twinny Load A 12 User manual