Twister T2 User manual

TWISTERTRIMMER.COM
USER MANUAL
PN: 21-0122_REV03

TWISTERTRIMMER.COM

TWISTERTRIMMER.COM
TABLE OF CONTENTS
pg | 1
Important Safety Informaon
Machine Overview
Inial Setup
Control Panel Overview
Operaon
Disassembly
Reassembly
Inspecons
Cleaning
Maintenance
Storage
Troubleshoong
Warranty Informaon
Specificaons
Accessories
Contact Us
2
5
8
13
14
16
20
24
27
28
39
40
48
50
52
54

TWISTERTRIMMER.COM
IMPORTANT SAFETY INFORMATION
pg | 2
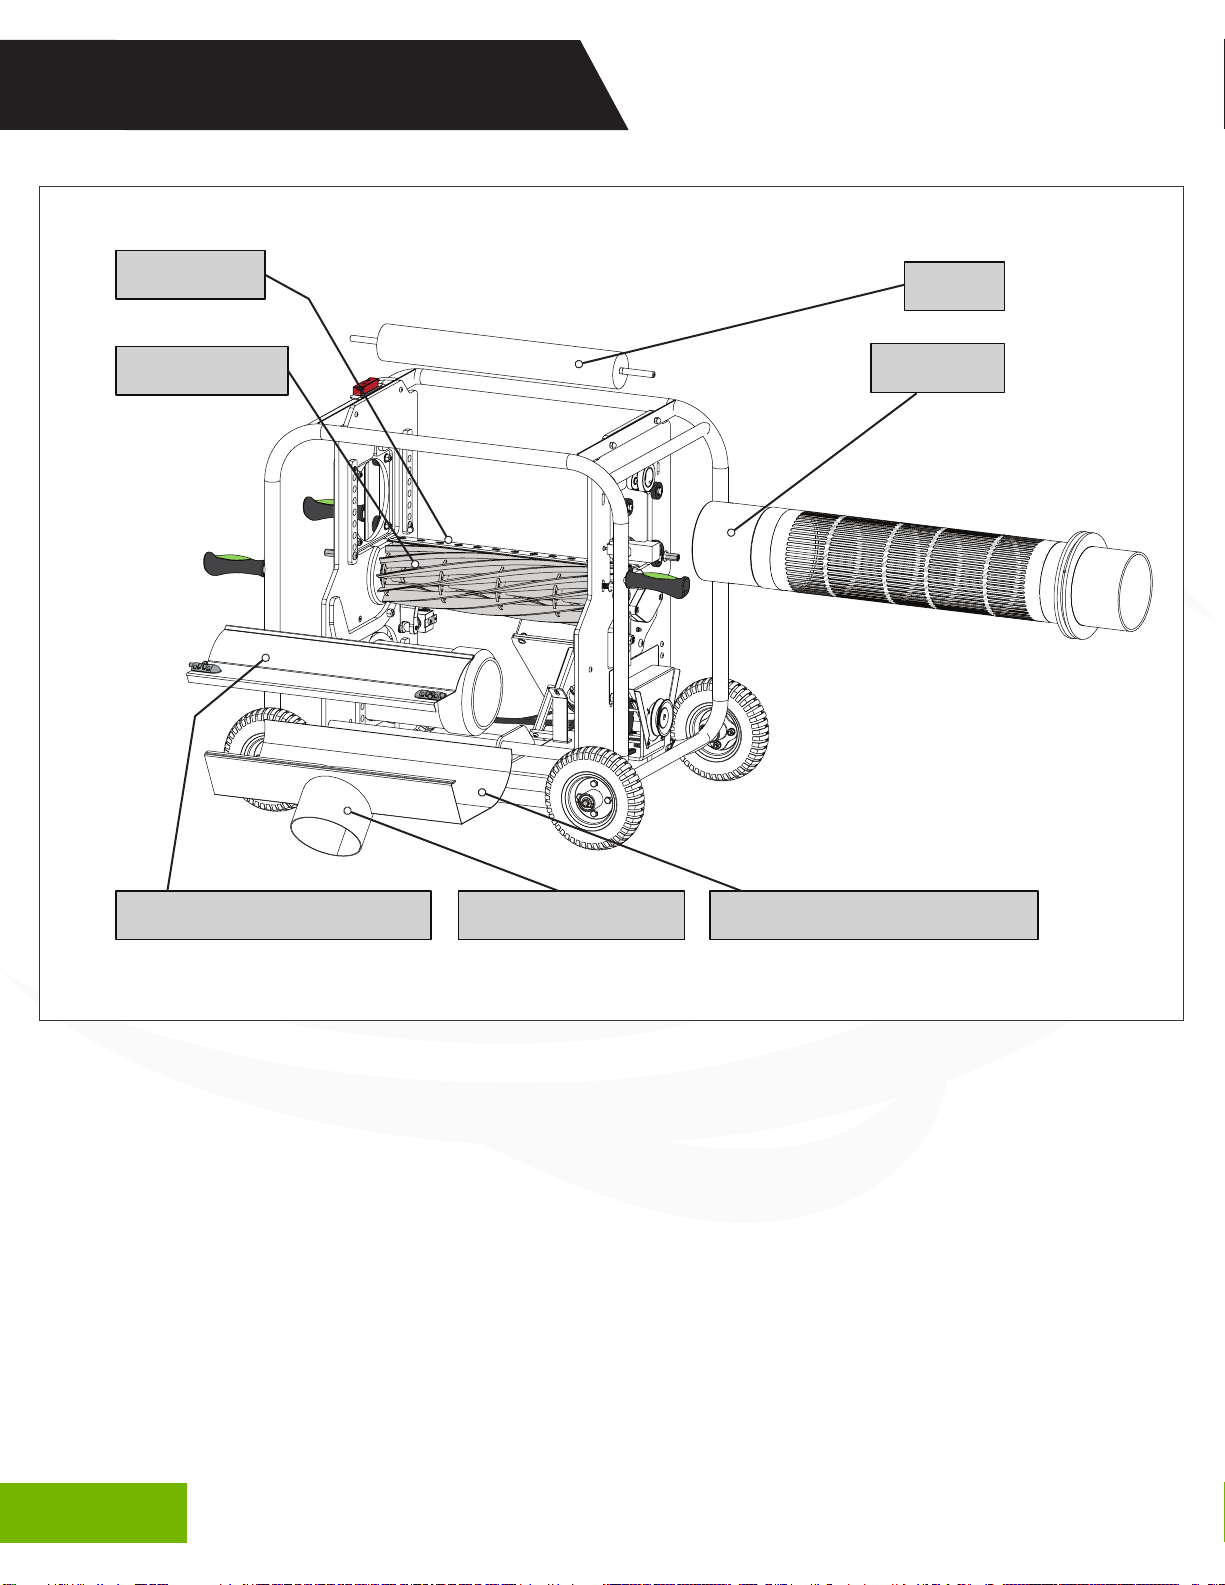
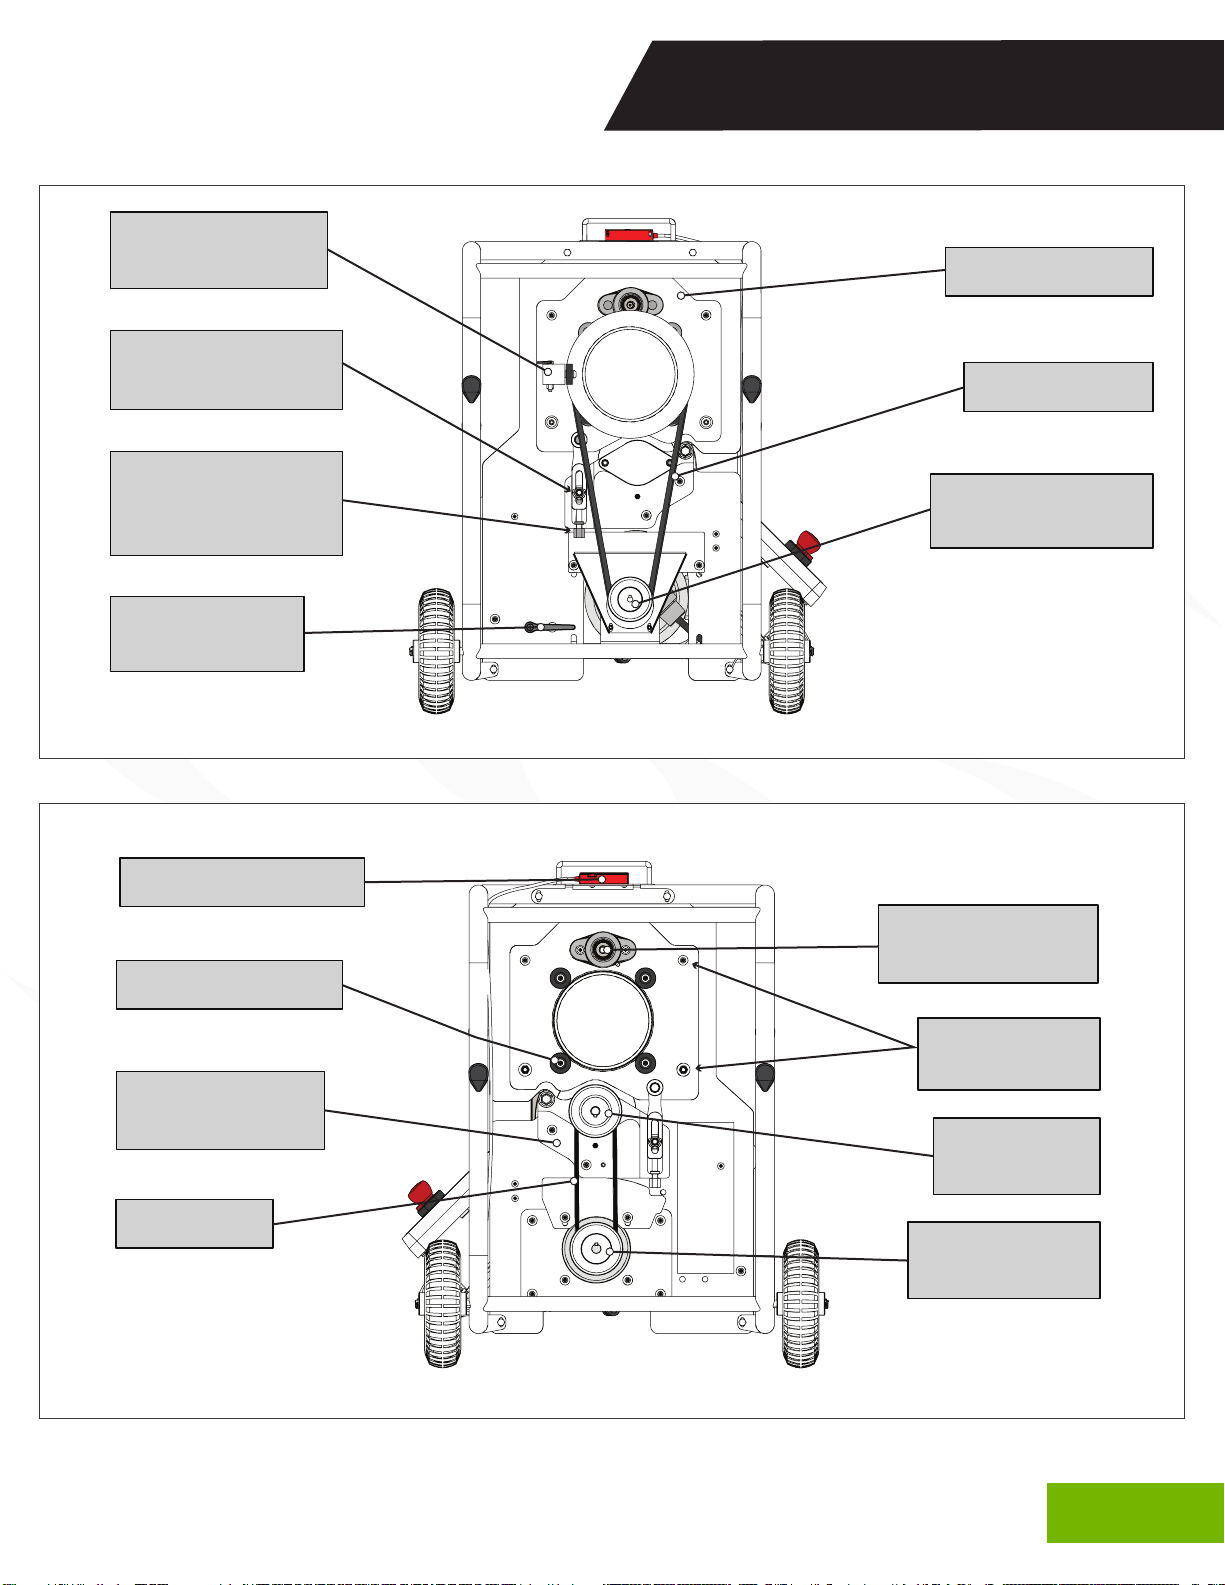
This manual is for the Twister T2 Trimmer. In this manual,
the T2 Trimmer will simply be referred to as the T2.
The T2 is a high-speed cung machine requiring special
safety precauons to be pracced during operaon and
maintenance to reduce the risk of personal injury. Please
read this manual including all important safety informaon,
danger, warning, and cauon signs before using the T2.
Keirton is connually improving all of its products. As a
result, engineering changes are somemes made. If operaon or appearances differ from this
manual, please contact Keirton Technical Support for assistance (for contact details, see page 54).
All first-me users of the T2 should obtain proper instrucon from this manual.
General Safety Information
• Do not move, disassemble, clean, or inspect the T2 while power is connected to the
machine.
• Ensure all protecve covers are installed and hands are clear of the machine before
plugging in the T2.
• Ensure the vacuum hose is connected to the vacuum shroud outlet on the T2 before
connecng the T2 to power.
• Do not reach inside the tumbler while the T2 is plugged in.
• Do not allow water to collect on the ground around the T2. This could cause a
slipping hazard.
• Keep body parts away from moving parts of the T2.
• The T2 is heavy. Never li alone, and always use proper liing technique.
DANGER
!
CARELESS USE OF THE T2 OR
OPERATING IT WITHOUT READING
THE INSTRUCTIONS AND
ACCOMPANYING DANGER,
WARNING, AND CAUTION
NOTICES MAY RESULT IN
SERIOUS OR FATAL INJURY.

TWISTERTRIMMER.COM
IMPORTANT SAFETY INFORMATION
pg | 3
• Substung factory parts with third-party parts may result in bodily harm or damage
to the T2.
• Keep the T2 well venlated to prevent overheang.
• Safety glasses, dust masks, and ear protecon must be worn when operang the T2.
• Do not wear loose clothing or jewellery when operang or conducng maintenance
on the T2.
• Confine long hair when operang or conducng maintenance on the T2.
• Do not operate or conduct maintenance on the T2 while red or under the influence
of drugs, alcohol, or medicaons.
• Do not remove safety labels from the machine. Replace any safety labels if they
become damaged or obscured.
Connection & Electrical Safety Information
• The T2 requires a 120V, 20A (North America) or 230V, 10 A (Europe) circuit breaker.
• The T2 must be used in connecon with a properly grounded receptacle. Refer to the
specificaons (see pages 50-51) to determine the correct electrical requirements.
• Observe all applicable building and electrical codes.
• Do not overload outlets or extension cords as this can result in fire or electric shock.
• Do not use extension cords lower than 12 AWG.
• Do not use extension cords longer than 25 (7.5m).
• To power down the T2, switch off the motors via the control panel before unplugging
the machine.
Operation Safety Information
• Ensure the T2 is fully assembled before operaon.
• Do not operate the T2 without the vacuum hose installed.
• Keep visitors and children a safe distance from the T2.
• Never let the T2 run unaended.

TWISTERTRIMMER.COMpg | 4
IMPORTANT SAFETY INFORMATION
• Only place plant maer in the T2. Do not put foreign objects in the T2. Doing
so may cause bodily harm or damage to the machine.
Maintenance
• Conduct regular maintenance on the T2.
• Ensure the T2 is powered off and the machine is unplugged before conducng any
maintenance, repairs, or cleaning. Never conduct maintenance, repairs, or
cleaning while the T2 is plugged in.
• Do not aempt to service electrical components on the T2 yourself; opening or
removing covers may expose you to dangerous voltage and possible fire or electric
shock.
• Do not aempt service not covered in this manual unless directed by technical
support.
• Some repair or damage will require a qualified service technician who is trained in
machinery maintenance, service, and repair.
• Improper adjustment may result in damage to the machine.
• Replacement parts are specific to the T2 and must only be purchased from an
authorized dealer. Failure to comply may void warranty, cause bodily harm, and/or
damage to the machine.

TWISTERTRIMMER.COM
MACHINE OVERVIEW
pg | 5
Fig. 1
TUMBLER GUARD
TUMBLER BELT COVER
BLADE ADJUSTMENT CLICKER
TUMBLER MOTOR
CONTROL PANEL BLADE MOTOR
BLADE BELT COVER
BLADE ADJUSTMENT CLICKER
BELT COVER SCREWS
BELT COVER SCREWS
HOPPER BOLTS*
*Hopper bolts are located on both sides of the T2.

TWISTERTRIMMER.COM
MACHINE OVERVIEW
pg | 6
BED KNIFE
HELIX BLADE
UPPER VACUUM SHROUD LOWER VACUUM SHROUD
VACUUM OUTLET
TUMBLER
BRUSH
Fig. 2

TWISTERTRIMMER.COM pg | 7
MACHINE OVERVIEW
TUMBLER GUIDE
& PIN
TUMBLER HEIGHT
LOCKNUT
TUMBLER BELT
HANDLE
TUMBLER PLATE
TUMBLER BELT
TUMBLER MOTOR
PULLEY
BRUSH BEARING
FLANGE
BLADE BEARING
PLATE
SAFETY INTERLOCK
TUMBLER ROLLER
HELIX BLADE
PULLEY
BLADE BELT
BLADE MOTOR
PULLEY
TUMBLER HEX
BOLTS
TUMBLER HEIGHT
ADJUSTMENT
BOLT
Fig. 3
Fig. 4

TWISTERTRIMMER.COM
INITIAL SETUP
pg | 8
Step 1: Attach Wheels
1. Slide the axles into the T2 frame (see Fig. 5).
2. Slide the wheels onto the axles (see Fig. 6).
3. Insert the coer pins into the holes at the end of the axles (see Fig. 7).
4. Flip the coer pin loop around the axle to the secure wheels in place (see Fig. 8).
Fig. 6
Fig. 5
Fig. 7 Fig. 8

Step 2: Secure Placement
To most safely operate the T2, the machine should be
placed on Twister Rails. For a list of available rails, see
Accessories on page 52.
1. Set up the T2 rails where the machine will
operate* (see Recommended Placement).
2. Place the T2 on rails and adjust the lt (for
instrucons, see Tilt Guidelines and
the corresponding Twister Rails manual).
3. If using mulple T2s in tandem**, place
them end-to-end in a line (for instrucons,
see the corresponding Twister Rails
manual).
*If the T2 is not being placed on Twister Rails, set up the T2 to
operate on level ground.
**Using mulple T2s in tandem (tumblers end to end) is more efficient than using them in parallel.
THE T2 MUST BE PLACED ON
LEVEL GROUND. MACHINE WILL
ROLL IF PLACED ON SLOPE,
POSSIBLY CAUSING BODILY HARM
AND DAMAGE TO THE MACHINE.
IF NOT USING RAILS, THE T2
MUST BE PLACED ON LEVEL
GROUND. THE MACHINE WILL
ROLL IF PLACED ON SLOPE,
POSSIBLY CAUSING BODILY
HARM AND DAMAGE TO THE
MACHINE.
WARNING
!
RECOMMENDED PLACEMENT
For best and safest operaon, place the T2:
• On level ground • Near an outlet • In a cool environment*
• With enough space to easily access the tumbler inlet and outlet.
*It is highly recommended to operate the T2 in as cold of an environment as possible. Operang the T2 in
colder environments will improve the machine’s performance and significantly reduce build up on the machine.
TWISTERTRIMMER.COM
INITIAL SETUP
pg | 9

TILT GUIDELINES
Increasing the incline of the T2 will decrease the fill level of the tumbler and increase
throughput. For opmal performance, the T2 should be 1/3 full of product at all mes
during operaon. When starng a new product, it is normal to adjust the incline mulple
mes to opmize product throughput.
Step 3: Connect to Vacuum
For a list of available Twister Vacuums, see Accessories on page 53.
1. Set up either the Trim Saver or the Leaf Collector vacuums for operaon (for
instrucon, see the respecve vacuum manual).
2. Aach a hose to the vacuum outlet on the T2 and the vacuum inlet on the Trim
Saver or the Leaf Collector (see Fig. 9. Trim Saver pictured).
3. Screw down the hose clamps.
Fig. 9
TWISTERTRIMMER.COM
INITIAL SETUP
pg | 10

TWISTERTRIMMER.COM
INITIAL SETUP
pg | 11
Step 4: Align Conveyors/Attach Hopper
To safely feed product into the T2 tumbler, Twister Conveyors or a T2 Hopper is required (for a
list of available conveyors and the Twister Hopper, see Accessories on page 52).
If Using Conveyors:
1. Set up the conveyors for operaon (for instrucon, see the corresponding
conveyor manual).
2. Place the QC Conveyor under the T2
outlet* (see Fig. 10).
3. Place the Feed Conveyor inside the
tumbler without the conveyor
touching the tumbler**(see Fig. 11).
*If mulple T2s are connected, place the QC Conveyor under
the last machine’s outlet.
**If mulple T2s are connected, place the Feed Conveyor inside the first machine’s tumbler.
Fig. 10 Fig. 11
CONVEYOR MAY DAMAGE TUMBLER
IF IN CONTACT DURING OPERATION.
TO AVOID POSSIBLE DAMAGE TO
THE TUMBLER, ENSURE THE
TUMBLER AND CONVEYOR ARE
NOT IN CONTACT DURING
OPERATION.
CAUTION
!
INITIAL SETUP

If Using the Hopper:
1. Remove the hopper bolts from one side of the T2 (see Fig. 12).
2. Secure the hopper mount bracket to the raised side of the T2 with screws and
washers (see Fig. 13):
• Use a 1” screw if aaching the hopper to the side of the T2 with the
Safety Interlock.
• Use a 7/8” screw if aaching the hopper to the side of the T2 without
the Safety Interlock.
3. Secure the rest of the hopper to the
hopper mount bracket with bolts and
the hopper twist knob (see Fig. 14).
4. Place a container beneath the T2
outlet to collect product.
Fig. 12 Fig. 13
Fig. 14
TWISTERTRIMMER.COM
INITIAL SETUP
pg | 12

Fig. 15
BLADES ON
BLADES OFF
EMERGENCY STOP
TUMBLER ON
TUMBLER OFF
CONTROL BOX OVERVIEW
TWISTERTRIMMER.COM pg | 13

Step 1: Pre-Operation Checks
The following checks should be completed before each
use of the T2. Before operang, ensure:
1. The following are installed:
a. Belt covers
b. Tumbler guard
c. Vacuum shrouds
d. Vacuum hose.
2. The vacuum hose clamp is ght.
3. If using conveyors: the conveyors are aligned and clear of the spinning tumbler.
Step 2: Power On
1. Connect the T2 to the extension cord
(minimum 12AWG. See connector plug
and extension cord specificaons on
pages 50-51).
2. Plug the extension cord into a socket.
Step 3: Start the Vacuum, Blades,
and Tumbler
1. Turn on the vacuum.
2. Allow the vacuum to reach full speed.
3. Press the blades-on buon to start the blade motor.
4. Allow the blades to reach full speed.
5. Press the tumbler-on buon to start the tumbler motor.
OPERATION
DANGER
!
DO NOT OPERATE THE T2 UNLESS
THE MACHINE IS FULLY
ASSEMBLED AND ALL PRE-
OPERATION CHECKS ARE MADE.
THE EXTENSION CORD MUST BE
RATED 12AWG MINIMUM.
USING AN INAPPROPRIATE
EXTENSION CORD WILL CAUSE
LOSS OF POWER AND
OVERHEATING.
CAUTION
!
TWISTERTRIMMER.COM
pg | 14

Step 4: Feed the T2
1. Begin feeding product using either
the conveyors or the T2 Hopper (see
Running Guidelines).
Step 5: Power Off and Clean
1. Press the tumbler-off buon to turn
off the tumbler.
2. Press the blades-off buon to turn
off the blades.
3. Turn off the vacuum.
4. Unplug the T2 from power.
5. Detach the vacuum from the T2.
6. Clean the T2 (for cleaning instrucons,
see Cleaning on page 27).
.
DANGER
!
DO NOT PLACE HAND IN THE
TUMBLER DURING OPERATION!
• Have 1-4 quality control personnel observing product exing the T2 outlet.
• Feed the machine consistently. Inconsistent feeding will result in inconsistent trimming.
• If using a hopper, feed the T2 with consistent handfuls at consistent intervals.
• If using conveyors, fill the Feed Conveyor to a consistent height.
• Adjust feeding speed to have the same volume of product exing and entering the
machine simultaneously.
• Adjust the T2 to operate with the tumbler 1/3 full (see Tilt Guidelines on page 10).
• If wet trimming, spray the brush every 5 minutes with cold dislled water to reduce
buildup on the tumbler (if dry trimming, there is no need to spray the brush).
• If dry trimming, use a Vacuum Bypass (product number: 23-0255) to reduce
sucon and prevent the T2 holding too much product.
THE T2 MUST BE CLEANED AFTER
EACH USE. IF NOT, RESIDUE WILL
HARDEN, CAUSING REDUCED
PERFORMANCE AND EXTREMELY
DIFFICULT CLEANING.
CAUTION
!
RUNNING GUIDELINES
OPERATION
TWISTERTRIMMER.COM pg | 15

TWISTERTRIMMER.COM
The T2 needs to be disassembled to conduct roune
cleaning, maintenance, and any repairs. Conduct the
following steps in order to disassemble the T2:
Step 1: Remove the Tumbler
Guard
1. Ensure the T2 is unplugged.
2. Li the tumbler guard up and off the
machine (see Fig. 16).
Step 2: Remove the Belt Covers
1. Remove the two tumbler belt cover screws (see Fig. 17).
2. Remove the tumbler belt cover.
3. Repeat steps 1 and 2 on the blade belt cover.
Step 3: Remove the Tumbler Belt and Tumbler
1. Remove the tumbler guide pin (see Fig. 18).
DISASSEMBLY
DANGER
!
THE T2 MUST BE UNPLUGGED
BEFORE DISASSEMBLY.
Fig. 16 Fig. 17
pg | 16

DISASSEMBLY
TWISTERTRIMMER.COM
Fig. 18 Fig. 19
2. Rotate the tumbler guide out (see
Fig. 18).
3. Rotate the tumbler belt handle (see
Fig. 19).
4. Li the tumbler motor pulley (see
Fig. 19).
5. Remove the tumbler belt (see Fig. 20).
6. Remove the tumbler (see Fig. 21).
Fig. 20 Fig. 21
THE TUMBLER IS FRAGILE. REMOVE
CAREFULLY. HANDLE THE TUMBLER
BY ITS END CAPS AND AVOID
THE TUMBLER CONTACTING THE
BLADES.
CAUTION
!
pg | 17

Step 4: Remove the Brush
1. Remove the set screws on both brush bearing flanges (See Fig. 22).
2. Remove the bolts and washers on the brush bearing flange located on the tumbler
belt side of the machine (see Fig. 23).
3. Remove the brush bearing flange on the tumbler belt side of the machine (see
Fig. 23).
4. Remove the brush (see Fig. 24).
DISASSEMBLY
Fig. 22 Fig. 23
Fig. 24
Step 5: Remove the Vacuum
Shrouds
1. Ensure the sucon hose is not
connected to the vacuum outlet.
2. Slide the upper vacuum shroud
latches inward (see Fig. 24).
3. Pull the upper vacuum shroud
straight out (see Fig. 25).
Step 1: Pre-Operation Checks
The following checks should be completed before each
use of the T2. Before operang, ensure:
1. The following are installed:
a. Belt covers
b. Tumbler guard
c. Vacuum shrouds
d. Vacuum hose.
2. The vacuum hose clamp is ght.
3. If using conveyors: the conveyors are aligned and clear of the spinning tumbler.
Step 2: Power On
1. Connect the T2 to the extension cord
(minimum 12AWG. See connector plug
and extension cord specificaons on
pages 50-51).
2. Plug the extension cord into a socket.
Step 3: Start the Vacuum, Blades,
and Tumbler
1. Turn on the vacuum.
2. Allow the vacuum to reach full speed.
3. Press the blades-on buon to start the blade motor.
4. Allow the blades to reach full speed.
5. Press the tumbler-on buon to start the tumbler motor.
TWISTERTRIMMER.COM
pg | 18
Other manuals for T2
3
Table of contents
Other Twister Trimmer manuals