Twister T2 User manual

Twister T2 Trimming Machine
Owners Manual
English : Français : Español

Page 2 www.thetwistermachine.com
This Twister Owners Manual is
divided into the following languages:
English pages 4 - 25
Français pages 26 - 47
Español pages 48 - 69

Page 3

www.thetwistermachine.com
Table of Contents
Important Notice 5
Important Safety Instructions 6
Operation 8
Adjustments 15
Transport 19
General Maintenance 20
Cleaning 21
Specications 22
Troubleshooting 23
Warranty Statement 25

Page 5
English
The Twister is intended for use
on legal aromatic herbs and
hops. Please check all municipal,
provincial/state, and federal laws
and regulations before using the Twister machine.
Keirton Manufacturing Ltd. does not promote or
condone the use of the Twister machine in any way
that may be deemed illegal.
Allow only persons who understand this manual to
operate the Twister machine.
To receive maximum performance and satisfaction
from the Twister machine, it is important that you
read and understand the safety and maintenance
precautions before using the machine. This document
refers to the Twister leaf trimming machine as Twister
machine, machine or unit.
WarningWarning
Important NoticeImportant Notice
Because this machine is a high
speed cutting unit, some special
safety precautions must be
observed to reduce the risk of
personal injury. Careless or improper use may cause
serious or even fatal injury.
Do not lend or rent your machine without the
instruction manual. A rst time operator should
obtain practical instruction before using the machine.

Page 6 www.thetwistermachine.com
READ THESE INSTRUCTIONS
Read all instructions completely before unit
is operated.
KEEP THESE INSTRUCTIONS
Retain instructions for future reference.
HEED ALL WARNINGS
All warnings on the unit and in the
instructions should be adhered to.
FOLLOW ALL INSTRUCTIONS
Follow all instructions completely before unit is operated.
To reduce the risk of re or electric shock, do
not expose this unit to water while plugged in.
Machine must be used with a properly
grounded receptacle.
Refer to the machine labeling to determine correct electrical
requirements. Ensure sucient cable is used to power the machine.
Observe all applicable building and electrical codes.
Do not overload outlets or extension cords as this can result in
re or electric shock.
Maximum cord length should not exceed 50ft/15m. An undersized
cord will cause a drop in line voltage resulting in loss of power
and overheating.
The machine must be unplugged before any protective covers
can be removed.
Do not attempt to service electrical components on this unit
yourself, as opening or removing covers may expose you to
dangerous voltage and possible re or electric shock.
Make certain all protective covers are installed and hands are clear
before plugging in the machine.
Turn o and unplug machine before cleaning.
WarningWarning

Page 7
English
Never put objects into the tumbler that cannot be
processed by the unit. Hard metallic objects that the
operator does not notice can cause extensive damage
and/or bodily harm.
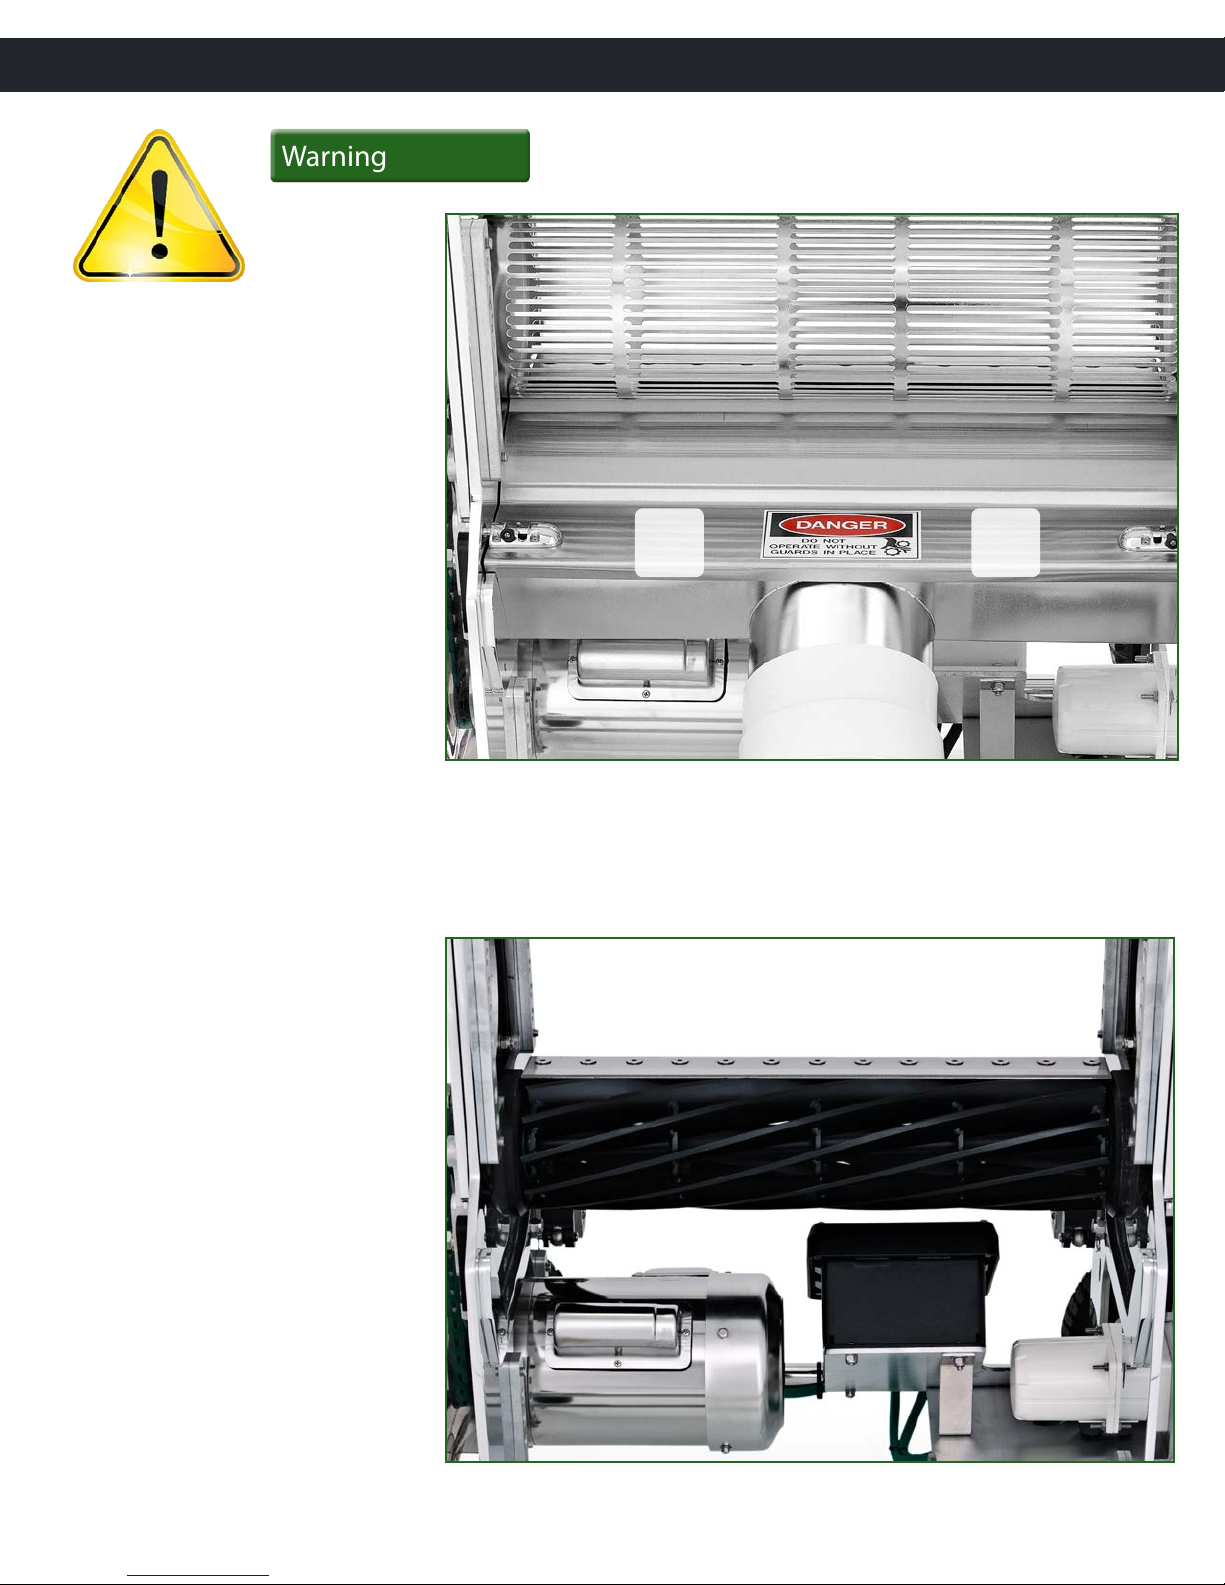
Never plug in the unit with protective shrouds removed.
For safe use of your machine, DO NOT change or modify any part of the
machine or accessories.
Never let the machine run unattended.
Do not attempt service that is not covered in this manual yourself as doing
so may expose you to dangerous voltage or other hazards.
Damage requiring service must be referred to qualied service personnel.
If unit does not operate normally by following operating instructions, adjust
only those controls that are covered in the instructions. Improper adjustment
may result in damage and may require extensive work by qualied service
personnel to restore the unit back to its normal operation.
Replacement parts must be specic to this unit and supplied by the
manufacturer. Unauthorized substitutions may result in re, shock or bodily
harm.
After completion of any service work, ask to ensure safety checks were
performed to determine the unit is in proper operating condition.
Keep unit well ventilated to prevent overheating.
Careless or improper use of this unit may cause serious
or fatal injury.
To reduce the risk of injury, keep body parts away from fast moving parts.
To reduce risk of injury, do not wear loose clothing or jewellery when
operating the machine. Sleeves should be rolled past the elbows and long
hair conned. Do not wear gloves.
To reduce risk of injury, safety glasses must be worn.
WarningWarning
WarningWarning

Page 8 www.thetwistermachine.com
Operation
It cannot be overstated that the Twister is a precision machine. It is essential that it is
operated and cared for with this in mind.
The Twister machine has been adjusted and tested by the manufacturer. However, at
initial startup and at the beginning of each day, check to ensure the blades spin freely
before plugging in the unit.
To do this, the operator must gain access to the blades. This is a very quick and
straightforward task. It is not absolutely necessary to remove the tumbler, however it is
recommended to get a good visual of the blades.
Removing the tumbler
The following should only be done when it is certain the power has
been disconnected.
Start by locating the tumbler guide. Remove the pin and swing the
guide open.
DO NOT operate unit with protective covers removed.
Replace the warning labels if they become obscured or removed.
Do not operate the machine while tired or under the inuence of drugs, alcohol or other
medication.
Keep visitors a safe distance from work area. Keep children away!
Do not reach inside tumbler while machine is plugged in.
Do not allow lubricants or mineral oils to collect on the ground around the machine. This
could cause a slipping hazard for the operator and others.
Engineering Improvements
Keirton Manufacturing Ltd. is continually looking to improve all of its products. As a
result, engineering changes and improvements are sometimes made. If operation or
appearances dier from this manual, please contact your dealer for assistance
WarningWarning
WarningWarning
Figure 1.1 Tumbler
guide closed
Figure 1.2
Tumbler guide open

Page 9
English
Now, locate the easy release handle below the tumbler guide near the bottom
of the unit.
Turn the handle counterclockwise to release. Now squeeze the tumbler belt
together directly below the tumbler.
Simultaneously re-tighten the easy release handle. This eectively takes the
tension o the belt so that it can be removed.
With the belt removed, the tumbler can now be pulled out of the unit.
Be VERY CAREFUL when removing the tumbler. This is a very precise component
of the machine and if dropped or damaged, the machine’s performance will be
greatly reduced, or possibly completely disabled.
With the tumbler removed, the next step is to remove the protective covers.
Figure 1.2
Tumbler guide open
Figure 1.3 Easy release handle

Page 10 www.thetwistermachine.com
Removing Protective
Covers
To access the helix blades, unlatch
(latches labelled 1 and 2 in gure
1.4) the top protective cover and
remove by pulling towards you
while lifting simultaneously.
WARNING! The following should
only be done when it is certain the
power has been disconnected.
WarningWarning
Figure 1.4 Latches 1 and 2
Figure 1.5 Covers Removed
21
To remove the lower cover, ensure
the suction hose is not connected
to the discharge outlet.
Place your hands in the
approximate location where the
latches from the top cover were
located. With even pressure, lift
straight up and begin to rotate
towards the nylon brush.
This now completely exposes the
helix blades.

Page 11
English
Checking the blades
The following should only be done when it is certain the power
has been disconnected. And NEVER slide your ngers down the
edges of the blades lengthwise.
With the protective covers removed, visually check for damage to the helix blades
by slowly spinning the blades by hand. Now ensure the bed knife is free of damage.
WarningWarning
Figure 1.6 Blades
Ensure the blades spin freely. Light contact against the bed knife is normal on a
properly adjusted unit. Due to the design and precision adjustment, the blades receive
a continual-self sharpening action. Light contact is necessary to maintain a sharp
cutting edge. No contact will cause the blades to become dull. The full adjustment
procedure is in the Adjustment section of this manual.
Note: If there is damage to the blades that will not allow smooth
operation, the unit will need to be serviced.
Damage to the blade is very rare on a properly adjusted unit. Typically
rocks, hard metallic objects or poor adjustment is the cause of damaged
blades. These circumstances are not covered under warranty. New
parts must be purchased and installed.
Figure 1.6 Blades

Page 12 www.thetwistermachine.com
Lubrication
Before re-assembly of the machine, it is recommended a Twister
Lube or non-stick cooking spray be applied to several parts of the
unit. Depending on the material being processed, this serves two
purposes: it will limit buildup of material on areas in constant contact,
as well as allow for easy cleaning. The machine is designed to run
without lubricant; however, constant cleaning may be required to
remove leaf buildup.
The following is a list of Approved products and what components
should be coated.
Nylon Brush Twister Lube/Non-stick cooking spray
Knife-bar Twister Lube/Non-stick cooking spray
Helix blades Twister Lube/Non-stick cooking spray
Top protective Twister Lube/Non-stick cooking spray
cover (Inside)
Bottom protective Twister Lube/Non-stick cooking spray
cover (Inside)
Note: The nylon brush may turn a yellowish/
green color from the non-stick cooking spray; this
is normal. It has been demonstrated that liberal
use of the lubricants on the specied areas greatly
improves overall production and cleaning time of
high residue products.
Grease
There are 2 grease ttings that must be greased every 50hrs with
food-grade grease. They are located on either end of the machine
in the blade bearing housing. The belt cover must be removed to
access one of them. See Figure 1.7 for the location of each tting.
Figure 1.7 Grease Fittings

Page 13
English
Once lubrication is complete, the machine is ready for
re-assembly.
Follow the disassemble procedure in the reverse order. When
reinstalling the tumbler belt, allow the weight of the motor to
provide the necessary tension. Make sure to re-tighten the easy
release handle.
Powering up!
Ensure the cord is a maximum length of
50ft/15m. Do not overload electrical outlets.
Failure to comply could result in fire or
electric shock. It is recommended this unit is
connected to a dedicated circuit. Consult a local electrical contractor
for assistance.
Once the tumbler has been reinstalled, test to make sure it spins
freely. 2-3 spins by hand is sucient.
Position the vacuum and connect the hose between the discharge
of the machine and the inlet of the vacuum.
Connect the cord that was supplied or one that meets the
recommended specications of this manual. On a separate circuit,
plug in the vacuum.
Figure 1.8 Completely Disassembled
WarningWarning

Page 14 www.thetwistermachine.com
Ensure hands and objects are clear of the machine and proceed
to begin startup.
Turn on the switch labelled Blades (Figure 1.9) to engage the
blades.
Turn on the switch labelled Tumbler (Figure 1.9) to engage the
tumbler.
Turn on the vacuum.
Note: Keep in mind, the machine will have
specic operating characteristics and noise
qualities. The operator should become familiar
with the machine and listen for abnormal
changes. Concerns should be investigated
before considerable problems occur.
The operator can now proceed to feed the material being
processed into the hopper.
Figure 1.9 Power connection and Switches

Page 15
English
Due to the dierent compositions of the materials being processed,
lubricating and cleaning frequency will vary. Most operators will realize
these needs and adjust accordingly. Ask your dealer for practical
lubricating and cleaning frequency of your specic industry. The
manufacturer recommends cleaning at the end of each day or the
beginning of the next. Buildup is the most obvious sign that there is
need for more attention in this area.
Adjustments
There are very few adjustments that will need to be made on the
machine. The Twister is shipped from the manufacturer adjusted and
tested. Due to the precision of this machine, it is crucial all adjustments
are performed by a competent person.
The following should only be done when it is
certain the power has been disconnected. And
NEVER slide your ngers down the edges of the
blades lengthwise.
Blade adjustment
The dual clicker adjustment arrangement integrated in the unit allows
for a very simple and quick adjustment procedure. The precision of
this design provides the essential control in providing a continual
self-sharpening system.
Removal of the tumbler and protective covers is vital in blade
adjustment. The blades must be completely clean before proceeding.
Locate the two adjustment clickers on the switch side of the unit.
Figure 2.0 Blade adjustment clickers
WarningWarning

Page 16 www.thetwistermachine.com
Note: Adjustment clicks correspond to .0007inch
(.018mm) bed knife movement.
Slowly turn the adjustment clicker clockwise to increase
the space between the helix blade and the bed knife to
allow the thickness of a piece of paper. Repeat on the
opposite side. The helix blade should now spin freely
with zero contact on the bed knife.
Choose a side to start on and insert a piece of newspaper between the
helix blade and the bed knife by slowly rotating the blade forward. Turn
the clicker counterclockwise (on same end of blade) one click at a time.
Continue until the paper is pinched lightly, when inserted from the front,
parallel to bed knife. A slight drag will be felt as the paper is pulled.
Figure 2.1 Paper inserted from the front
Figure 2.2 Paper inserted from the top
Check for light contact at other end of the helix blade using paper and
adjust as required. After adjustment is accomplished, check to see if the
helix blade can pinch paper when inserted from the front.
Now insert paper at a right angle to the bed knife and rotate the blades
to cut paper strips to check blade sharpness. It should be possible to cut
paper with minimum contact between the bed knife and the helix blades.

Page 17
English
Any damage to the blades may make proper adjustment impossible.
Damage will not be corrected by the self- sharpening feature.
Damage must be repaired by an authorized service location.
Once adjustment has been completed, ensure the helix blade spins freely.
There should be a very minimal sound of contact with a slight drag. If the
blades do not spin freely, re-do the adjustment procedure and ensure the
blades and under the bed knife are clean.
Replace the protective covers and tumbler. Proceed to initiate the startup
procedure. A high pitch extremely fast ticking sound should be present. This
is a good indication of a properly adjusted blade assembly.
Tumbler Adjustment
Tumbler adjustment has been set and tested at the factory. Improper
adjustment will lead to damage of the tumbler assembly and scratches in
the Teon coating.
The following should only be done when it is certain
the power has been disconnected.
Factory adjustment has the tumbler set for the closest cut possible. If the
operator chooses to lengthen the cut due to certain product criteria the
easy procedure is as follows.
A 7/32 hex key and a 5/8 wrench are required.
Both ends of the unit will require the same procedure to make the tumbler
level for an even cut.
Refer to Figure 2.3 (page 18)
Begin by loosening the hex bolts labelled 1-4.
Next, loosen the locknut labelled 6.
Turn adjustment bolt labelled 5 clockwise to lower the tumbler and
counterclockwise to raise the tumbler. Once you reach the desired height,
re-tighten in the reverse order.
Always make your nal adjustment of #5 by raising the tumbler. This will
ensure it stays locked in the set position.
Proceed to the opposite side of the machine.
WarningWarning

Page 18 www.thetwistermachine.com
Note: Make sure to test that the
tumbler spins freely by hand before
applying power.
Too close of an adjustment can
cause damage to the tumbler.
Also, remember the vacuum has
very powerful suction; it can pull
very minuscule amounts on the
tumbler causing it to rub.
Figure 2.3 Tumbler adjustment and belt replacement
Note: Ensure all loosened nuts and
bolts are tight before re-powering
machine.
Note: Ensure everything spins
freely before re-powering machine.
Note: Ensure the last adjustment
to #5 is in the counterclockwise
direction.
1
3
6
7
8
10

Page 19
English
Figure 2.3 Tumbler adjustment and belt replacement
2
4
6
5
9
11
Belt Replacement
The blade drive belt has been tested to last a very long
time. However, if for some reason the belt is lost, follow this
procedure.
Remove the hex bolts labelled 7 in gure 2.3. Then loosen
the bolts 8 through 11 in gure 2.3. Now lift the motor and
remove belt. Due to its weight, two persons may be required
to remove the motor. Reverse this procedure to install a new
belt.
Transport
If transporting or moving your machine is necessary, the
following tips may be helpful.
Doors and tight spaces
The unit was designed to t through standard doors; however,
in some situations the width may become a problem. To help
overcome this issue, the wheels can be removed very quickly
by pulling the cotter pin on one side and sliding the axles out.
Tie down
With a chassis similar to a race car, the machine becomes very
easy to move and tie down. There are several locations to
connect straps and tie downs when in transport. Ensure the
machine is suciently secure or damage could result.
Storage
The design and materials of the unit make storage very simple.
And because there are very few corrodible parts, it can be
stored virtually anywhere. With that said, there are a few tips
to ensure you get the most out of the machine for a very long
time. It is a good idea to make sure there is an even coating
of WD-40 on the bed knife and helix blades.
This is especially important if the machine is going to be
stored for extended periods without cleaning. The buildup
of material from previous use will harden, making startup
dicult. Following these steps will ensure smooth startup
on the following use.
Store the machine in a safe dry place. Keep it out of reach of
children and other unauthorized persons.

Page 20 www.thetwistermachine.com
General Maintenance
Depending on the materials being processed the machine will require
dierent maintenance schedules. For the purpose of this manual, it will
be assumed the machine will be put through tough processing conditions.
The following should only be done when it is certain the
power has been disconnected.
Lubrication
The machine should be lubricated with Twister Lube or non-stick cooking
spray every hour.
Grease
The blade bearings must be greased every 50 hrs of use. See Figure 1.7.
Adjustment
The machine should be checked for possible damage to blades once a day.
Adjustments can be made as required. See the Adjustment section of this
manual for details.
Note: Any damage to the blades may make proper
adjustment impossible. Operating the machine with
damaged blades could result in further damage or personal
injury. Damage will not be corrected by the self-sharpening
feature. Damage must be repaired by an authorized service
location or the manufacturer.
Cleaning
A thorough cleaning of the machine, including blades, should be done on
a daily basis. Buildup can cause lack of performance, overheating and hard
startup on future use. Future cleaning also becomes more dicult if the leaf
buildup is given a chance to dry out and harden. Never slide your ngers
down the edge of the blades lengthwise. See the Cleaning section of this
manual for details.
Vacuum maintenance
Change bottom debris bag daily on the vacuum. Clean the top lter using
a vacuum once a day for maximum performance. This lter is the key to
powerful suction. Replacing this lter when air ow seems diminished will
keep performance of the entire system at its fullest. Heavily used vacuums
will require cleaning around the impeller. Be sure to disconnect the vacuum
from its power source before removing the inlet cover. See your dealer for
the proper replacement lter.
WarningWarning
Other manuals for T2
3
Table of contents
Languages:
Other Twister Trimmer manuals