manuals.online logo
Brands
  1. Home
  2. •
  3. Brands
  4. •
  5. Tyco Electronics
  6. •
  7. Crimping Tools
  8. •
  9. Tyco Electronics 90430-1 User manual

Tyco Electronics 90430-1 User manual

Instruction heet
408-9375
LOC B
1
of 4
E
2007 Tyco Electronics Corporation, Harrisburg, PA
All International Rights Reserved
TE logo and Tyco Electronics are trademarks.
*Trademark. Other products, logos, and company names used are the property of their respective owners.
TOOLING A I TANCE CENTER 1-800-722-1111
PRODUCT INFORMATION 1-800-522-6752 This controlled document is subject to change.
For latest revision and Regional Customer ervice,
visit our website at
www.tycoelectronics.com
15 MAY 07 Rev D
H nd Crimping Tool 90430-1
PROPER USE GUIDELINES
CumulativeTraumaDisorderscanresultfromthe prolongeduseofmanually poweredhandtools.Hand toolsareintendedfor occasionaluseandlowvolume
applications. A wide selection of powered application equipment for extended-use, production operations is available.
Figure 1
F
AMP
90430–1
Insulation
Adjustment
Lever
FRONT of TOOL
(Contact ide)
Contact upport
Crimpers
Tool Number
Anvils
CERTI-CRIMP*
Ratchet
1. INTRODUCTION
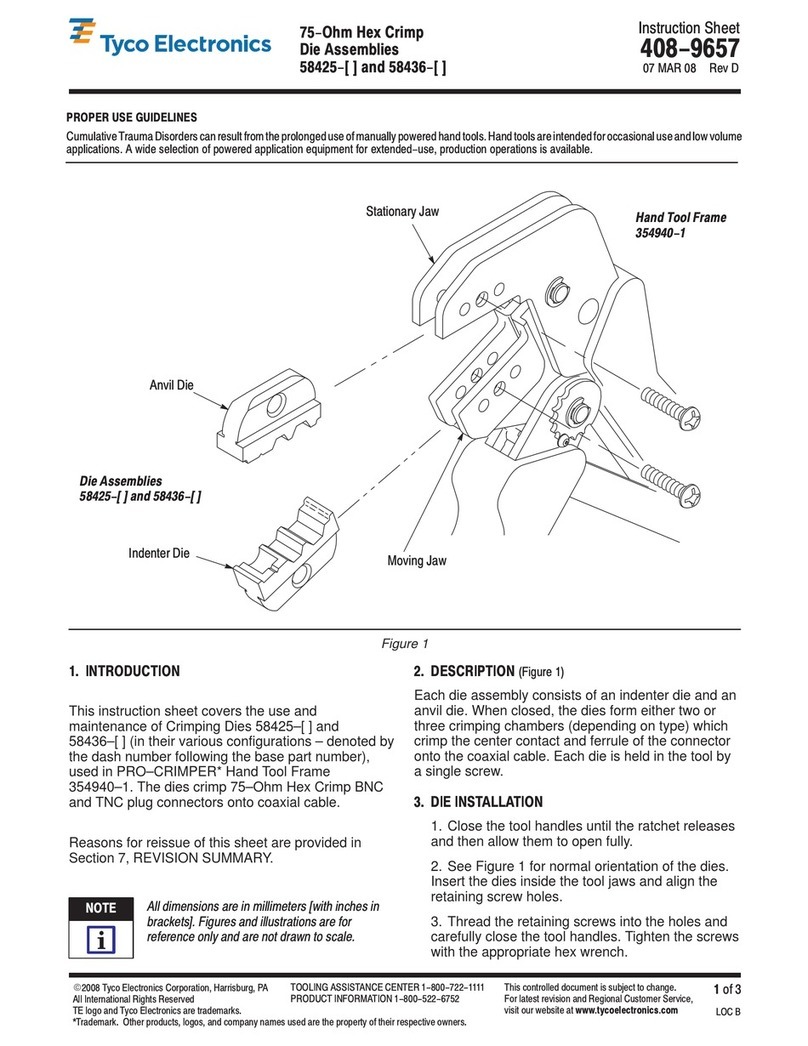
This instruction sheet covers the use of Hand
Crimping Tool 90430–1 which is designed to crimp
High Density 22 DF loose–piece contacts shown in
Figure 2. Read these instructions thoroughly before
using the tool.
Reasons for reissue are provided in Section 6,
REVISION SUMMARY.
All di ensions on this docu ent are in etric
units [with U.S. custo ary units in brackets].
Figures and illustrations are for identification only
and are not drawn to scale.
2. DESCRIPTION
The FRONT OF TOOL, into which the contact is
inserted, has the tool number marked on it (refer to
Figure 1). The BACK OF TOOL (wire side) has the
wire size marked above each crimp section. The tool
features two fixed dies (crimpers), two movable dies
(anvils), two crimp sections with applicable wire–size
markings, a contact support, a locator/wire stop, and
a CERTI–CRIMP ratchet.
The insulation adjustment lever is used to control the
crimp height of the contact insulation barrel. Refer to
Paragraph 4.6, Insulation Crimp Adjustment.
The CERTI–CRIMP ratchet assures full crimping of
the contact. Once engaged, the ratchet will not
release until the handles have FULLY closed.
The cri ping dies botto before the
CERTI-CRIMP ratchet releases. This design
feature assures axi u electrical and tensile
perfor ance of the cri p. Do NOT re-adjust the
ratchet.
The locator/wire stop has two functions. First, it
positions the contact between the crimping dies, and
second, it aids in locating the wire in the contact. In
use, it rests in the locator slot. See Figures 2 and 3.
The contact support prevents the contact from
bending during the crimping procedure.
3. CRIMPING PROCEDURE
Refer to the chart in Figure 2 and select wire of the
specified size and insulation diameter. Strip the wire
to the length indicated. Do NOT cut or nick the wire
strands.
Insulation Barrel
Wire Barrel ocket Contact
(Ref)
houlder of
Contact
Locator
lot
Wire trip Length 4.06 [.160]
WIRE
CONTACT
D
CRIMP SECTION WIRE
SIZE INSUL DIA
CONTACT
D
SIZE MARKING
28-26 0.76-1.02 High Density 26-28
24-22 [.030-.040]
gy
22 DF 22-24
D
For applicable contact part numbers, see Catalog 82068.
Figure 2
NOTE
i
CAUTION
!
408-9375
Hand Cr mp ng Tool 90430-1
Rev
D2
f4 Tyc Electr nics C rp rati n
Figure 3
22–24
26–28
Insert C ntact
Int Fr nt f T l
Insulati n Adjustment Lever
Crimp Secti n
Wire Size
Marking
Stripped
Wire
Back f T l
(Wire Side)
L cat r/
Wire St p
On the BACK of the tool, identify the appropriate
crimp section (according to the wire size markings).
Refer to Figure 3 and proceed as follows:
1. Hold tool so BACK (wire side) is facing you.
2. Make sure ratchet is released by squeezing the
tool handles and allowing them to open FULLY.
3. Insert contact (insulation barrel first) into
FRONT of appropriate crimp section. Position the
contact in crimp section so that locator/wire stop
butts against the shoulder of the contact as shown
in Figure 4.
4. Hold contact in this position and squeeze tool
handles together until insulation anvil starts entry
into insulation crimper. Do NOT deform insulation
barrel or wire barrel.
5. Insert a properly stripped wire into wire barrel of
contact until it stops.
6. Holding wire in place, squeeze tool handles until
ratchet releases.
7. Allow tool handles to open FULLY and remove
crimped contact from tool.
4. MAINTENANCE AND INSPECTION PROCEDURE
Tyco Electronics recommends that a maintenance
and inspection program be performed periodically to
ensure dependable and uniform terminations.
Frequency of inspection depends on:
1. The care, amount of use, and handling of the
hand tool.
2. The presence of abnormal amounts of dust and
dirt.
3. The degree of operator skill.
4. Your own established standards.
The hand tool is inspected before being shipped;
however, Tyco Electronics recommends that the tool
be inspected immediately upon its arrival at your
facility to ensure that the tool has not been damaged
during shipment.
Due to the precision design, it is important that no
parts of these tools be interchanged except those
replacement parts listed in Figure 6.
4.1. Da ly Ma ntenance
1. Remove dust, moisture, and other contaminants
with a clean brush, or a soft, lint–free cloth. Do
NOT use objects that could damage the tool.
2. Make certain that the retaining pins are in place
and that they are secured with retaining rings.
Figure 4
Insulati n Crimp
Adjustment Lever
Back f T l
(Wire Side)
L cat r/
Wire St p
L cat r/Wire St p
Must Rest Against
Sh ulders as Sh wn
Crimping
Dies
Insert
C ntact
int Fr nt
f T l
3. All pins, pivot points, and bearing surfaces
should be protected with a thin coat of any good
SAE No. 20 motor oil. Do not oil excessively.
408-9375
Hand Crimping ool 90430-1
3
of 4Rev
D
Tyco Electron cs Corporat on
4. When the tool is not in use, keep handles closed
to prevent objects from becoming lodged in the
crimping dies. Store the tool in a clean, dry area.
4.2. Lubrication
Lubricate all pins, pivot points, and bearing surfaces
with SAE No. 20 motor oil as follows:
Tools used in daily production – lubricate daily
Tools used daily (occasional) – lubricate weekly
Tools used weekly – lubricate monthly
Wipe excess oil from tool, particularly from crimping
area. Oil transferred from the crimping area onto
certain terminations may affect the electrical
characteristics of an application.
4.3. Periodic Inspection
1. Hand tool should be immersed (handles partially
closed) in a reliable commercial degreasing
compound to remove accumulated dirt, grease,
and foreign matter.
2. Close tool handles until ratchet releases and
then allow them to open freely. If they do not open
quickly and fully, the spring is defective and must
be replaced. See Section 5, REPLACEMENT AND
REPAIR.
3. Inspect head assembly for worn, cracked, or
broken dies. If damage is evident, return the tool
for evaluation and repair. See Section 5,
REPLACEMENT AND REPAIR.
4.4. Crimp Height Inspection
This inspection requires the use of micrometer with a
modified anvil as shown in Figure 5. Tyco Electronics
recommends use of the modified micrometer (Crimp
Height Comparator RS–1019–5LP) which can be
purchased from:
ShearerIndustrialSupplyCo.
717–767–7575 or VALCO
610–691–3205
Proceed as follows:
1. Refer to the chart in Figure 5 and select a
contact and a wire (maximum size) for each crimp
section listed in the chart.
2. Refer to Section 3, CRIMPING PROCEDURE,
and crimp the contact(s) accordingly.
3. Using a crimp height comparator, measure wire
barrel crimp height as shown in Figure 5. If the
crimp height conforms to that shown in the chart,
the tool is considered dimensionally correct. If not,
return the tool for evaluation and repair (refer to
Section 5, REPLACEMENT AND REPAIR).
A"
+0.05 [+.002]
CON AC WIRE SIZE
AWG (MAX)
CRIMP SEC
WIRE SIZE
MARKING DIM. A"
H gh Dens ty 26 26-28 0.69 [.027]
gy
22 DF 22 22-24 0.79 [.031]
Figure 5
For additional information concerning the use of the
crimp height comparator, refer to Instruction Sheet
408–7424.
4.5. CER I-CRIMP Ratchet Inspection
The CERTI–CRIMP ratchet feature on hand tools
should be checked to ensure that the ratchet does not
release prematurely, allowing the crimping dies to
open before they have fully bottomed. Obtain a
0.025–mm [.001–in.] shim that is suitable for checking
the clearance between the bottoming surfaces of the
crimping dies. Proceed as follows:
1. Select the maximum size wire and strip it
according to dimensions listed in Figure 2.
2. Select contact and crimp section corresponding
to the selected wire size (refer to Figure 2).
3. Position the contact and wire between the
crimping dies, as described in Section 3,
CRIMPING PROCEDURE.
4. Hold the wire in place and squeeze the handles
until the CERTI–CRIMP ratchet releases. Hold the
handles in this position, maintaining just enough
tension to keep the dies closed.
5. Check the clearance between the bottoming
surfaces of the crimping dies. If the clearance is
0.025 mm [.001 in.] or less, the ratchet is
satisfactory. If clearance exceeds 0.025 mm
[.001 in.], the ratchet is out of adjustment and must
be repaired. See Section 5, REPLACEMENT AND
REPAIR.
4.6. Insulation Crimp Adjustment
The insulation barrel crimp height is controlled by the
insulation adjustment lever. To determine the proper
setting, test crimp a contact using the setting which
approximates the insulation size (1–small, 2–medium,
3–large). If the crimped insulation barrel is too tight or
too loose, change the setting accordingly. The crimp
should hold the insulation firmly without cutting into it.
408-9375
H nd Crimping Tool 90430-1
R v
D4
of 4 Tyco El ctronics Corporation
5. REPLACEMENT AND REPAIR
Replacement parts are listed in Figure 6. Parts other
than those listed in Figure 6 should be replaced to
ensure quality and reliability of the tool. Order
replacement parts through your Tyco Electronics
Representative, or call 1–800–526–5142, or send a
facsimile of your purchase order to 1–717–986–7605.
For tool repair service or CERTI–CRIMP ratchet
adjustment, return the tool, with a written description
of the problem to:
CUSTOMER SERVICE (38–35)
TYCO ELECTRONICS CORPORATION
P.O. BOX 3608
HARRISBURG, PA 17105–3608
6. REVISION SUMMARY
S
Updated document to corporate requirements
S
Changed Dimension “A” tolerance in Figure 5
12302
[11.9]
19.1 [.75]
63.5 [2.50]
(Clos d)
ITEM PART NUMBER DESCRIPTION QTY
1 21045-3 RING, R taining 4
2 21045-9 RING, R taining 2
Figure 6
F
AMP
90430-1

Other Tyco Electronics Crimping Tools manuals

Tyco Electronics 46121 User manual

Tyco Electronics

Tyco Electronics 46121 User manual

Tyco Electronics PRO-CRIMPER II User manual

Tyco Electronics

Tyco Electronics PRO-CRIMPER II User manual

Tyco Electronics STRATO-THERM 1-46673-0 User manual

Tyco Electronics

Tyco Electronics STRATO-THERM 1-46673-0 User manual

Tyco Electronics PRO-CRIMPER III 58603-1 User manual

Tyco Electronics

Tyco Electronics PRO-CRIMPER III 58603-1 User manual

Tyco Electronics PRO-CRIMPER III User manual

Tyco Electronics

Tyco Electronics PRO-CRIMPER III User manual

Tyco Electronics AMP CERTI-CRIMP II User manual

Tyco Electronics

Tyco Electronics AMP CERTI-CRIMP II User manual

Tyco Electronics PRO-CRIMPER III User manual

Tyco Electronics

Tyco Electronics PRO-CRIMPER III User manual

Tyco Electronics 69067 User manual

Tyco Electronics

Tyco Electronics 69067 User manual

Tyco Electronics PRO-CRIMPER III User manual

Tyco Electronics

Tyco Electronics PRO-CRIMPER III User manual

Tyco Electronics 1490748-1 User manual

Tyco Electronics

Tyco Electronics 1490748-1 User manual

Tyco Electronics 58605-1 User manual

Tyco Electronics

Tyco Electronics 58605-1 User manual

Tyco Electronics 48858-1 User manual

Tyco Electronics

Tyco Electronics 48858-1 User manual

Tyco Electronics 9-1478246-0 User manual

Tyco Electronics

Tyco Electronics 9-1478246-0 User manual

Tyco Electronics PRO-CRIMPER III User manual

Tyco Electronics

Tyco Electronics PRO-CRIMPER III User manual

Tyco Electronics 58532 Series User manual

Tyco Electronics

Tyco Electronics 58532 Series User manual

Tyco Electronics 45449 User manual

Tyco Electronics

Tyco Electronics 45449 User manual

Tyco Electronics 58649-1 User manual

Tyco Electronics

Tyco Electronics 58649-1 User manual

Tyco Electronics 90654-1 User manual

Tyco Electronics

Tyco Electronics 90654-1 User manual

Tyco Electronics PRO-CRIMPER III User manual

Tyco Electronics

Tyco Electronics PRO-CRIMPER III User manual

Tyco Electronics PRO- CRIMPER III User manual

Tyco Electronics

Tyco Electronics PRO- CRIMPER III User manual

Tyco Electronics PRO-CRIMPER III User manual

Tyco Electronics

Tyco Electronics PRO-CRIMPER III User manual

Tyco Electronics 1490749-1 User manual

Tyco Electronics

Tyco Electronics 1490749-1 User manual

Tyco Electronics PRO-CRIMPER III User manual

Tyco Electronics

Tyco Electronics PRO-CRIMPER III User manual

Tyco Electronics 0-0654174-1 User manual

Tyco Electronics

Tyco Electronics 0-0654174-1 User manual

Popular Crimping Tools manuals by other brands

Textron Klauke EKM 60/22CL instructions

Textron

Textron Klauke EKM 60/22CL instructions

molex 207129 Series Specification sheet

molex

molex 207129 Series Specification sheet

HARTING 09 99 000 0656 manual

HARTING

HARTING 09 99 000 0656 manual

Hilti NURON NCR 60 D-22 Original operating instructions

Hilti

Hilti NURON NCR 60 D-22 Original operating instructions

JST WC 530 instruction manual

JST

JST WC 530 instruction manual

molex 63811-5800 Specification sheet

molex

molex 63811-5800 Specification sheet

TE Connectivity 1752786-1 instruction sheet

TE Connectivity

TE Connectivity 1752786-1 instruction sheet

TE Connectivity SDE-SA instruction sheet

TE Connectivity

TE Connectivity SDE-SA instruction sheet

Gates MobileCrimp 4-20 Safety and operating manual

Gates

Gates MobileCrimp 4-20 Safety and operating manual

molex 207129 Series Specification sheet

molex

molex 207129 Series Specification sheet

Greenlee GATOR EK628LX Operation manual

Greenlee

Greenlee GATOR EK628LX Operation manual

molex 63823-8000 manual

molex

molex 63823-8000 manual

Cembre TC025 Operation and maintenance manual

Cembre

Cembre TC025 Operation and maintenance manual

Cembre B1350-CA Operation instructions

Cembre

Cembre B1350-CA Operation instructions

HRS DF65 Series instruction manual

HRS

HRS DF65 Series instruction manual

Staubli PV-CZM Series operating instructions

Staubli

Staubli PV-CZM Series operating instructions

molex 207129 Series Specification sheet

molex

molex 207129 Series Specification sheet

molex 63825-9400 Application Tooling Specification Sheet

molex

molex 63825-9400 Application Tooling Specification Sheet

manuals.online logo
manuals.online logoBrands
  • About & Mission
  • Contact us
  • Privacy Policy
  • Terms and Conditions

Copyright 2025 Manuals.Online. All Rights Reserved.