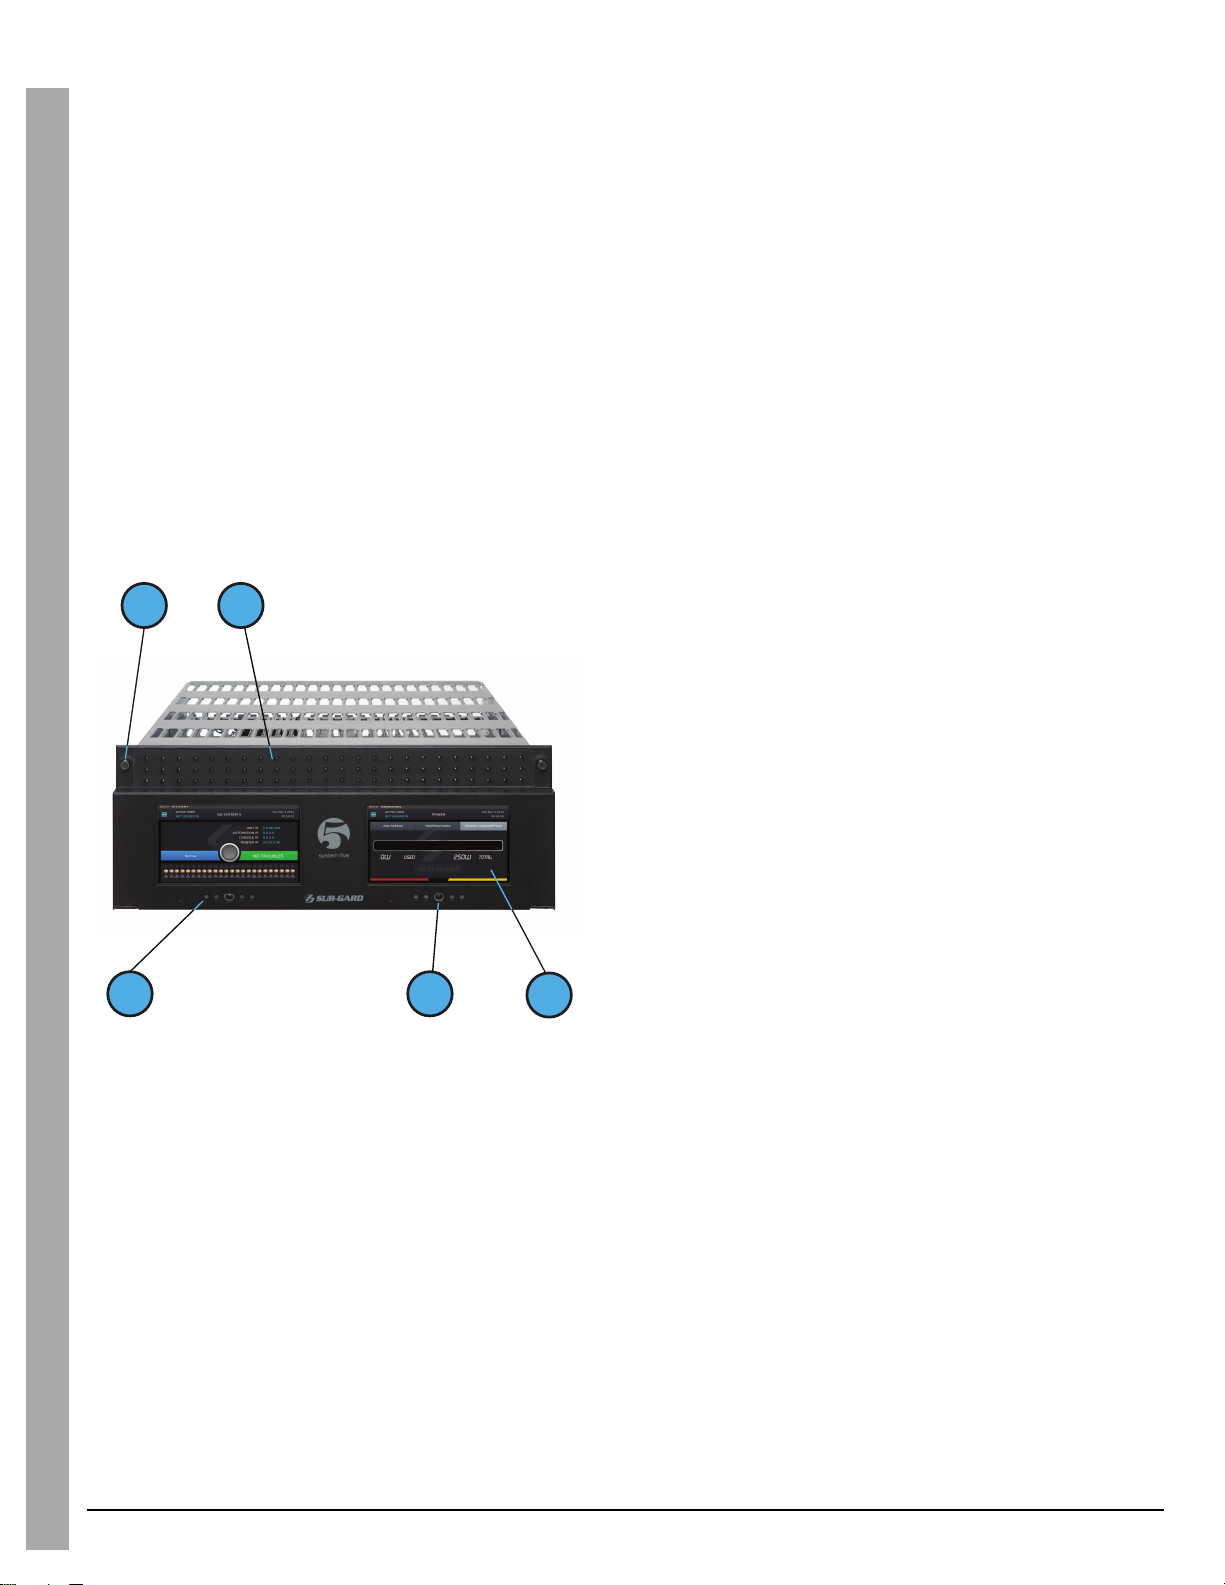
Tyco Security Products Sur-Gard System Five User manual

SG-System 5 v1.0
Operating Manual
NOTE: This manual contains information regarding product use and function, in addition to manufacturer liability and restrictions
pertaining to it. The entire manual should be read carefully.
November 21, 2014:
•Added 3G4000 and 3G4000RF to UL/ULC listed transmitters in section 2.2.1
•Removed “FM approved” from section 2.3.1
•Added warning label to section 3.1 in figures 3-2 and 3-3
•Added “This equipment shall be operated by SERVICE PERSONS only within
RESTRICTED ACCESS LOCATIONS; refer to this Operating Manual for all the
Safety Instructions.” to section 3.1
•Updated SG-SVLFANTR, SG-SVCFANTR and SG-SVSERCAB to SG-S5LFANTR,
SG-S5CFANTR and SG-S5SERCAB throughout manual.

1.0 Table of Contents
- 2 -
1.0 Table of Contents
1.0 Table of Contents 2
2.0 Introduction 6
2.1 SG-System 5 Overview 7
2.1.1 CPM Redundancy 7
2.1.2 Diagrams 7
2.1.3 Description 9
2.1.4 Specifications 9
2.2 System Features 9
2.2.1 SG-System 5 9
2.2.2 Visual Verification 10
2.3 Approvals 10
2.3.1 Industry Approvals 10
2.3.2 UL864 Programming Requirements 11
2.3.3 Printers 11
Serial Printer 11
TCP/IP Printer 12
SG-Systems Console Software System Requirements 12
2.3.4 UL Manual Mode 12
2.3.5 SG-System 5 Power Limited Circuit Separation 12
3.0 Receiver Setup and Operation 14
3.1 SG-System 5 Quick Install Guide 15
3.1.1 Receiver Installation 17
3.1.2 SG-CPM5 LEDs 19
4.0 Hardware Descriptions and Specifications 20
4.1 SG-MLRF5 21
4.1.1 SG-MP5 Midplane 21
4.1.2 SG-S5CFANTR – SG-CPM5 Fan Tray 21
4.1.3 SG-MLRF5-RM – Mounting Rails 22
4.2 SG-CPM5 - Central Processing Module 22
4.2.1 SG-CPM5 LEDs 24
4.2.2 SG-CPM5 I/O Terminal Pin-Outs 25
4.2.2.1 UPS AC Failure – Pin 1 25
4.2.2.2 UPS DC Failure – Pin 3 25
4.2.2.3 Remote ACK – Pin 4 25
4.2.2.4 Buzzer Follow Output – Pin 7 25
4.2.2.5 Trouble Status Output – Pin 9 25
4.2.2.6 Network Status Output – Pin 11 26
4.2.3 SG-CPM5 Setup 26
4.2.3.1 Connecting the SG-CPM5 Fan Cable 26
4.2.3.2 Y-Cable 26
4.2.3.3 RTC Battery 26
4.2.3.4 EMMC Memory 26
4.2.3.5 DDR3 Memory 27
4.2.3.6 SD Card 27
4.2.4 SG-CPM5BATT - RTC Battery 27
4.2.5 SG-S5SERCAB - Y-Cable 28
4.2.5.1 Maximum Connected Cable Length 29
4.2.6 SG-CPM5 Fan Tray Replacement 29
4.2.7 UPS Setup 30
4.2.8 SG-SYS5EBUS Setup 31
4.3 SG-DRL5-IP - IP Line Card 31
4.3.1 SG-DRL5-IP Configurations 32
SG-DRL5-IP STD 32
SG-DRL5-IPF 32
SG-DRL5-IPE 32
4.3.2 SG-DRL5-IP LED Status Indicators 32
4.3.2.1 Network Fault 33
4.3.2.2 Invalid Report Condition 33
4.3.2.3 SG-CPM5 Absent 33
4.3.2.4 Ethernet Interface 33
SG-System 5 Operating Manual

1.0 Table of Contents
- 3 -
4.3.2.5 Supervised Receiver Database 33
4.3.2.6 Profiles 34
4.3.2.7 Rules For Account Table Exceeded Messages 34
4.3.3 SG-DRL-IP Setup 34
4.3.3.1 Line Card Fan Tray Installation 34
4.3.3.2 Paddle Card Installation 35
4.3.3.3 EMMC Memory 35
4.3.3.4 DDR3 Memory 36
4.3.3.5 SD Card 36
4.4 SG-DRL5-IP PAD – SG-DRL5-IP Paddle Card 37
4.5 SG-S5LFANTR – Line Card Fan Tray 37
4.6 SG-PSU5-600 - 600WPower Supply 37
4.6.1 SG-PSU5-600 Installation 38
4.7 SG-UIB5 - User Interface 39
4.7.1 SG-UIB5(LCD) Replacement 39
4.8 SG-SYS5MEM4 - Expandable EMMC 40
4.9 SG-SYS5DDR31 - DDR3 1GB RAM 41
4.10 SD Card 41
5.0 Operation 42
5.1 Basic Operation 43
5.1.1 Connectivity 43
5.1.2 SG-Systems Console Software 43
5.1.2.1 Visual Verification 43
5.1.2.1.1 Connectivity 43
5.1.2.1.2 Functionality 43
5.1.2.1.3 Header File 43
5.1.2.1.4 Unique ID 43
5.1.2.1.5 Automation and Printer messages 43
5.1.2.1.6 ACK 43
5.1.2.1.7 NACK from the Console or Automation Software 43
5.1.2.1.8 NACK from the Receiver 44
5.1.2.1.9 No Response from the Console software 44
5.1.2.1.10 No Response from the Receiver 44
SG-DRL5-IP – Visual Verification 44
SG-CPM5 - SG Visual commands 44
5.1.2.2 Advanced Output Protocol Specification 44
5.2 Printer 44
5.2.1 Introduction 44
5.2.2 TCP/IP 44
5.2.3 Serial 45
5.3 Automation 45
5.3.1 Automation Input/Output 45
5.3.2 Automation Compatibility 45
5.3.3 Automation Protocols 46
5.3.4 Acknowledgment of the Signal 46
5.3.5 COM Responses 46
5.3.6 Automation Absent 46
5.3.7 SIA Internal Status Output 46
5.3.8 Line card Addressing 47
5.4 Operation - LCD User Interface 47
5.4.1 Bootup 47
5.4.2 Calibration 47
5.4.3 Home Screen 48
5.4.3.1 Status Banner 48
5.4.3.2 Type - Unit IP 49
5.4.3.3 Active Mode 49
5.4.3.3.1 SG-TCP 49
5.4.3.3.2 SG- SERIAL 49
5.4.3.3.3 SG-ALL 49
5.4.3.4 Standby Mode 49
5.4.3.5 Manual Mode 49
5.4.3.6 System Trouble 49
5.4.3.6.1 No Troubles 50
5.4.3.6.2 Troubles 50
SG-System 5 Operating Manual

1.0 Table of Contents
- 4 -
5.4.3.6.3 Trouble Screen 50
5.4.3.7 Line Card Banner 50
5.4.3.7.1 Numbering 50
5.4.3.7.2 Icons 50
5.4.3.7.3 Status Color 50
5.4.3.8 IPs 51
5.4.3.8.1 Automation IP 51
5.4.3.8.2 Console IP 51
5.4.3.8.3 Printer IP 51
5.4.3.8.4 Visual IP 51
5.4.3.9 Time and Date 51
5.4.3.10 Active User 51
5.4.3.11 User Defined Message 51
5.4.3.12 ACK Button 51
5.4.3.13 Menu Button 51
5.4.3.14 Home button 51
5.4.4 Logging In 52
5.4.4.1 Login/Options 52
5.4.4.2 Username 52
5.4.4.3 Password 52
5.4.4.4 Default Username and Password 52
5.4.4.5 Keyboard 52
5.4.4.6 Valid Username and Password 53
5.4.4.7 Invalid Username and Password 53
5.4.5 Hardware Diagnostics 54
5.4.5.1 Fan Speed Tab 54
5.4.5.2 Temperatures Tab 54
5.4.5.3 Power Consumption Screen 55
5.4.6 Admin Menu Screen 55
5.4.7 Admin access vs. User access 55
5.4.7.1 CPM options 56
5.4.7.2 View Options 56
5.4.7.3 Change SG-CPM5 Options 57
5.4.7.4 Full Keyboard Options 57
5.4.7.5 Numeric Keyboard Options 58
5.4.7.6 Selectable Options 58
5.4.7.7 Cold Boot SG-CPM5 59
5.4.7.8 Set Date Time 59
5.4.7.9 System Info 60
5.4.7.10 Brightness/Tone 60
5.4.7.11 Reset SG-CPM5 61
5.4.7.12 More Options 61
5.4.7.13 Debug Mode 62
5.4.7.14 Visual Display Test 62
5.4.8 User Menu 63
5.4.8.1 View Options 63
6.0 Options 64
6.1 SG-CPM5 Options 65
6.1.1 SG-CPM5 Options: [0XX] - IP Options 65
6.1.2 SG-CPM5 Options: [1XX] - User Name/Password Options 65
6.1.3 SG-CPM5 Options: [2XX] - System Options 66
6.1.4 SG-CPM5 Options: [3XX] - LCD Options 66
6.1.5 SG-CPM5 Options: [4XX] - Automation Options 66
6.1.6 SG-CPM5 Options: [5XX] - Printer Options 74
6.1.7 SG-CPM5 Options: [6XX] and [7XX] - Troubles 75
6.2 SG-DLR5-IP Options 77
6.2.1 SG-DRL5-IP Options: [1XX] - System Hardware 77
6.2.2 SG-DRL5-IP Options: [2XX] - Signaling Options 79
6.2.3 SG-DRL5-IP Options: [3XX] - System Troubles 79
6.2.4 SG-DRL5-IP Options: [4XX] - System Options 81
6.2.5 Profile Options 88
6.2.5.1 Dynamic Profile Options 88
Appendix A: DEC-HEX-BIN Conversion Chart 89
Appendix B: ASCII Character Chart 90
SG-System 5 Operating Manual

1.0 Table of Contents
- 5 -
Appendix C: TCP/IP Ports 91
SG-CPM5 TCP/IP Ports 91
Appendix D: Events & Messages 92
SG-CPM5 Messages 92
SG-DRL5-IP Messages 95
LCD & Console Trouble List 98
Appendix E: Glossary 100
Warning Please Read Carefully 105
Limited Warranty 105
GENERAL DESCRIPTION of the EQUIPMENT and CLASSIFICATION 105
EULA 106
FCC Compliance Statement 107
Industry Canada 107
R&TTE Declaration of Conformity 107
Trademark 108
SG-System 5 Operating Manual

2.0 Introduction
In This Chapter...
2.1 SG-System 5 Overview 7
2.1.1 CPM Redundancy 7
2.1.2 Diagrams 7
2.1.3 Description 9
2.1.4 Specifications 9
2.2 System Features 9
2.2.1 SG-System 5 9
2.2.2 Visual Verification 10
2.3 Approvals 10
2.3.1 Industry Approvals 10
2.3.2 UL864 Programming Requirements 11
2.3.3 Printers 11
2.3.4 UL Manual Mode 12
2.3.5 SG-System 5 Power Limited Circuit Separation 12

2.0 Introduction
- 7 -
2.1 SG-System 5 Overview
The SG-System 5 is a multi-platform receiver intended for remote monitoring of commercial fire and burglary systems. The SG-System 5 can monitor
up to 24 IP communication line cards (SG-DRL5-IP) to receive and process alarm data in up to 64 pre-programmed profiles per line card. The SG-Sys-
tem 5's real time clock date stamps all received alarm signals which are then transmitted to a central station computer via TCP/IP or RS-232 port; trans-
mitted directly to a printer using the serial printer port and/or TCP/IP; and viewed on the LCD of the front panel while the receiver is in the manual state.
Options can be programmed using a PC with SG-Systems Console or locally using the touchscreen LCD. Each shelf can house up to 24 SG-DRL5-IP
line cards.
2.1.1 CPM Redundancy
The SG-System 5 can be used in a redundant configuration using two SG-CPM5's, where the primary SG-CPM5 backs up to the secondary SG-
CPM5 and vice versa. Under normal conditions, the primary SG-CPM5 is active and outputs all signals to the printer and automation, while the sec-
ondary SG-CPM5 is in standby. If the primary fails, the secondary SG-CPM5 automatically switches to active (within 30 seconds) and starts out-
putting signals to the printer and automation. During the switchover from standby to active, signal reception is not affected because the SG-DRL5-IP is
still able to receive signals. The output to printer and automation is delayed by the length of time required to switch from standby to active.
2.1.2 Diagrams
FIGURE 2-1: SG-System 5 Front with Door Closed
3 4 5
1 2
1. Thumb screws to hold faceplate closed
2. Line card status indicators (top LED is watchdog, middle LED is status and bottom LED is network)
3. SG-CPM5 Status LEDs (from left to right: Console, Trouble, Network, Watchdog, Automation)
4. Quick HOME button
5. 7" resistive touch LCD screen
SG-System 5 Operating Manual

2.0 Introduction
- 8 -
FIGURE 2-2: SG-System 5 FRONT with Door Open
SG-DRL5-IP
Line Cards
Midplane connectors for
bus communications, slot
assignment and power.
SG-System 5 Fan Trays
LCD display cable
(from SG-CPM5) and
display adaptor board.
FIGURE 2-3: SG-System 5 Back
SG-DRL5-IP-PAD (Paddle Cards)
Provide network connection to the
DRL5-IP
SG-CPM5 Interface for Ethernet, serial
ports, USB, I/O ports and display connection
SG-CPM5 fan
Power Supply SG-System 5 midplane
Power supply
tray latch
IEC connection Power supply
thumb screw
SG-CPM5
extraction levers
and thumb screws
SG-System 5 Operating Manual

2.0 Introduction
- 9 -
2.1.3 Description
The basic configuration consists of one 19" rack mounted chassis comprising the following:
lSG-MLRF5 - metal rack of the SG-System 5 with SG-MP5
lSG-PSU5-600 - 600W power supply unit provides power to all modules of the system
lSG-CPM5 - central processing module controls all communication to and from receiver modules and printers
lSG-UIB5 - touch screen user interface
lSG-DRL5-IP - Internet protocol line card
lSG-DRL5-IP PAD - paddle card for SG-DRL5-IP provides network connection
lSG-MLRF5-RM – Rack mount rails
lSG-S5LFANTR – Line card fan tray
lSG-S5CFANTR – SG-CPM5 fan tray
lSG-S5SERCAB – Y cable for serial connection to the SG-CPM5 for automation/printer
lSG_SYS5MEM4 – Removable EMMC memory
lSG_SYS5DDR31 – DDR3 RAM
lSG-CPM5BATT - SG-CPM5 real time clock battery
2.1.4 Specifications
Depth: 27.5" (69.85 cm)
Width: 19" (48.26 cm)
Height: 7" (17.78 cm)
Required Rack Space: 4U
Dimensions
SG-System 5 UL Electrical:
Input Voltage: 100-240 VAC, 50/60Hz.
Input Current: 8A max (RMS) @ 100VAC
Backup Power Supply: External UPS (not supplied)
In a two SG-CPM5 configuration, a redundant SG-PSU5 can be inserted in the second slot. In the
event of a SG-PSU5 failure, the redundant SG-PSU5 automatically assumes operation. These
modules are hot swappable (can be removed/replaced while the system is in operation) if a
working, redundant SG-PSU5 is installed.
Environmental:
Temperature: 0-49°C (32 - 120°F)
Humidity: 93%RH, Non-Condensing
Accounts:
ULC Line Security Levels: A1-A4 (active channels) or P1-P3 (passive channels)
Printers (UL/ULC Listed Installations):
Serial: Seiko DPU-414
DACT Compatible communication formats (ULC Passive channels): SIA, CID
Encryption: AES 128 bit
2.2 System Features
2.2.1 SG-System 5
lReduced size of 4U in height for improved receiver room logistics management
lCMS access to visual verification files through SG-Systems Console
lUpgradeable through the SG-Systems Console
lEnhanced hardware diagnostics via SG-Systems Console
lStatic IP for programming of network protocols
lReal time system status via intuitive user touchscreen interface
lSupports visual verification features for DSC PowerSeries Neo
lMonitor up to 1,474,560 IP communicators (Cellular or Ethernet) with up to 24 IP line cards
lLine card capacity starting at 4,094 IP accounts, upgradable up to 61,440 via licenses
lStandard line card capacity of 512 visual verification, 512 supervised IP accounts, and 3070 unsupervised
lUpgradeable memory to handle extensive future IP account capacity
SG-System 5 Operating Manual

2.0 Introduction
- 10 -
lProvides higher line security than conventional dial up panels with the polling feature
lQuicker transmission since dialing or handshaking is not required
lNetwork trouble detection is displayed on LCD/printer and automation software
lData network polling environment for replacement of an existing DVACS network using a TL-300. Meets the 90-second ULC requirement for
this option
lSIA event descriptors are used when transmitting information to the central station from the control panel through the PCLink connection
lA security function communicates to the central station when a module is removed and replaced
lThe T-LINK accounts table and data encryption keys are stored in the local database
NOTE: The SG-DRL5-IP can only receive data from the following transmitters: TL150, TL250*, TL250DV, TL300*, TL300CF*,
GS3055*, GS3055-I, GS3055-ICF*, GS3060*, TL26X*, GS206X*, TL26XGS*, GS31XX, 3G2060(R)*,TL2603G(R)*, 3G3070*,
3G3070RF*, 3G3070CF*, TL2803G(R)*, 3G2080(R)*, TL280(R)*, 3G4000*, 3G4000RF*
* UL/ULC Listed, x = 0, 5.
2.2.2 Visual Verification
Visual Verification enables the system operator to view images and hear audio captured during an alarm event. The images (JPG) and audio (WAV)
files are sent via Ethernet to the SG-DRL5-IP where they are converted to films (AVI) for viewing on the SG-System 5 Console.
Data such as detector ID, zone ID, film type, file size, number of files in film and event time is available for each Visual Verification event.
2.3 Approvals
2.3.1 Industry Approvals
lUL 1610 Central Station Burglar Alarm Units
lUL 864 Standard for Control Units and Accessories for Fire Alarm Systems
lCAN/ULC-S304-06 Signal Receiving Centre and Premises Burglar Alarm Control Units
lCAN/ULC-S559-04 Equipment for Fire Signal Receiving Centres and Systems
lEN60950-1:2006 Standard for Information Technology Equipment.
lAS/NZS 60950.1:2003 Information Technology Equipment - Safety
lCISPR22 Information Technology Equipment - Radio Disturbance Characteristics - Limits and Methods of Measurements
lEN50130-4 Immunity requirements for components of fire, intruder and social alarm systems
lNIST validation certificate number 2913 for AES 128 bit encryption.
For UL listed installations, the equipment shall be installed in accordance with the requirements of NFPA72, NFPA70, UL827 and the authority having
jurisdiction.
SG-System 5 with SG-DRL5-IP Line Card is ULC listed for active communication channel security level A1 - A4 when used in conjunction with T-
Link TL250, T-Link TL300, TL260, TL260GS, GS2060, 3G2060(R),TL2603G(R), 3G3070(RF)(CF), TL2803G(R), 3G2080(R) and TL280(R) Inter-
net/Intranet and/or GSM-GPRS alarm communicators. For this type of application the supervision and encryption features have to be enabled.
For ULC Installations the equipment shall be installed in accordance with the requirements of ULC-S561 and ULC-S301 Standards and the authority
having jurisdiction. The receiver can be used also in conjunction with ULC listed passive communication systems based on the configuration of the sys-
tems at the protected premises.
SG-System 5 Operating Manual

2.0 Introduction
- 11 -
This product has been approved by the California State of Fire Marshal (CSFM) pur¬suant to section 13144.1 of the California Health and Safety
Code. See CSFM Listing No. 7300-1273:0157 for allowable values and/or conditions for use concerning material presented in this document. The
approval is subject to reexamination, revision and possible cancellation.
2.3.2 UL864 Programming Requirements
NOTE: Users, Installers, Authorities having Juristiction and other involved parties; this product incorporates field programmable soft-
ware. In order for the product to comply with the requirements in the Standard for Control Units and Accessories for Fire Alarms
Systems, UL 864, certain programming features or options must be limited to specific values or not used at all as indicated below.
SG-CPM5 - UL864 Programming Requirements
Opt # Program Option
Permitted in
UL864?
(Y/N)
Possible Settings Settings Permitted
(UL 864)
202 Buzzer N Enabled/Disabled Enabled
411 Heartbeat Timer Y 00-FF Not Allowed 00
601 CPM5 1 Fan Trouble N Enabled/Disabled Enabled
602 CPM5 2 Fan Trouble N Enabled/Disabled Enabled
603 PSU 1 Trouble N Enabled/Disabled Enabled
604 PSU 2 Trouble N Enabled/Disabled Enabled
609 UPS AC 1 Trouble N Enabled/Disabled Enabled
610 UPS AC 2 Trouble N Enabled/Disabled Enabled
611 UPS Battery 1 Trouble N Enabled/Disabled Enabled
612 UPS Battery 2 Trouble N Enabled/Disabled Enabled
615 SG-Serial Automation
Sec 1 Trouble N Enabled/Disabled Enabled
617 Serial CPM 1 Printer 1
Trouble N Enabled/Disabled Enabled
617 Serial CPM1 Printer 1
Trouble N Enabled/Disabled Enabled
618 Serial CPM 2 Printer 1
Trouble N Enabled/Disabled Enabled
619 Serial CPM 1 Printer 2
Trouble N Enabled/Disabled Enabled
620 Serial CPM 2 Printer 2
Trouble N Enabled/Disabled Enabled
621 SG-TCP Automation Pri
- Trouble N Enabled/Disabled Enabled
631 SG-TCP Automation Sec
- 1 Trouble N Enabled/Disabled Enabled
665 TCP Printer Pri - 1
Trouble N Enabled/Disabled Enabled
675 TCP Printer Sec - 1
Trouble N Enabled/Disabled Enabled
SG-DRL5-IP
Opt # Program Option Permitted in UL 864?
(Y/N)
Possible
Settings
Settings Permitted
(UL 864)
221 Transmitter Absent Debounce Time N 5-65535 200
222 Transmitter Restoral Debounce Time N 5-65535 200
301 Transmitter Unencrypted Trouble N Enabled/Disabled Enabled
302 Unknown Account Trouble N Enabled/Disabled Enabled
303 Supervised Accounts Exceeded Trouble N Enabled/Disabled Enabled
2.3.3 Printers
Serial Printer
For UL and ULC Listed applications, the following UL/ULC Listed printer can be used with the SG-System 5:
SG-System 5 Operating Manual

2.0 Introduction
- 12 -
lSeiko DPU-414
TCP/IP Printer
For UL Listed applications, the UL Listed SG-Systems Console Software can be used with the SG-System 5.
NOTE: For ULC Listed applications, the Console Printer application is considered supplemental and is only allowed to be used in con-
junction with a compatible ULC Listed printer.
SG-Systems Console Software System Requirements
Compatible operating systems:
lMicrosoft Windows 2008 Server (32 and 64 bit)
lMicrosoft Windows 7 (32 and 64 bit)
lMicrosoft Windows 8 (32 and 64 bit)
lMicrosoft Windows 8.1 (32 and 64 bit)
NOTE: Requires.NET Framework 3.51.
Hardware requirements:
lIntel Atom CPM @ 1.6GHz and 1 GB of RAM
NOTE: Do NOT use printer cables that have only 1 common ground wire.
2.3.4 UL Manual Mode
For UL Manual mode, each event will activate the internal buzzer to be acknowledged manually. Each event will also be sent automatically to the con-
nected printer.
NOTE: A user must be logged in before acknowledging signals. A logged in user will remain logged in until a new user enters a valid user
name and password or if the SG-CPM5 resets/reboots.
2.3.5 SG-System 5 Power Limited Circuit Separation
FIGURE 2-4: SG-System 5 Power Limited Circuit Separation from Non-Power Limited Circuit Diagram
1
2 3 4 5 7 8 9
6
10
1. Secondary Line Card Ethernet Connections 6. Primary Line Card Ethernet Connections
2. Secondary SG-CPM5 Ethernet Connection 7. Primary SG-CPM5 Ethernet Connection
3. Secondary SG-CPM5 Automation and Printer Port 8. Primary SG-CPM5 Automation and Printer Port
SG-System 5 Operating Manual

2.0 Introduction
- 13 -
4. Secondary SG-PSU5 AC Power Connection (see note) 9. Primary SG-PSU5 AC Power Connection (see note)
5. Secondary SG-CPM5 Display Connection 10. Primary SG-CPM5 Display Connection
NOTE: The power cord needs to be routed ¼ inch away from all other cables coming from or which are part of the SG-System 5.
SG-System 5 Operating Manual

3.0 Receiver Setup and Operation
- 15 -
3.1 SG-System 5 Quick Install Guide
FIGURE 3-1: SG-System 5 Connections (Back)
12
10
1 4
2 3
5
9
6
11
87
1. Primary SG-CPM5 Ethernet Connection
2. Primary SG-CPM5 Automation and Printer Port
3. Primary SG-CPM5 I/O Terminal connections
4. Primary SG-PSU5 AC Power Connection
5. Primary SG-CPM5 Display Connection
6. Line Card Ethernet Connections
7. Line Card USB Connections
8. Secondary SG-CPM5 Display Connection
9. Secondary SG-CPM5 I/O Terminal connections
10. Secondary SG-CPM5 Automation and Printer Port
11. Secondary SG-CPM5 Ethernet Connection
12. Secondary SG-PSU5 AC Power Connection
NOTE: This equipment shall be operated by SERVICE PERSONS only within RESTRICTED ACCESS LOCATIONS; refer to this
Operating Manual for all the Safety Instructions.
NOTE: For equipment used at signal receiving centers and intended to facilitate IP communication (hubs, routers, NID, DSL/cable
modems) 24hr backup power is required.
NOTE: To test the operation of LEDindicators and LCD:
From the LCD, click the menu at the top right>> login/options>>More Options>> Visual indicator test>>yes.
NOTE: When using private, corporate, and high-speed data networks, network access and domain access policies are set to restrict unau-
thorized network access and ‘spoofing’ or ‘denial of service’ attacks. Select an ISP that provides redundant servers/systems,
backup power, routers with firewalls enabled and methods to identify and protect against these types of attacks (‘e.g., ‘spoofing’,
'DoS').
NOTE: Install external devices connected to SG-CPM5 Ethernet, SG-CPM5 automation printer ports and SG-CPM5 I/O terminal con-
nections in the same room as the SG-System 5. Maintain 6.5mm (1/4”) of separation between power limited and non-power limited
circuits. Use power limited, supervised circuits only.
SG-System 5 Operating Manual

3.0 Receiver Setup and Operation
- 16 -
FIGURE 3-2: SG-System 5 Front with Door Open
4
3
1
2
1. Line cards
2. Warning Label
3. Primary display power connection
4. Secondary display power connection
FIGURE 3-3: SG-System 5 Warning Label
WARNING: To reduce the risk of electric shock, the product is provided with a grounding type power supply IEC receptacle. Connect product
using an appropriate IEC cable to a grounded receptacle.
Do not connect to a receptacle controlled by a switch.
lRS-232 Serial Automation Output: Provides serial connection to a local computer running automation software. A null modem serial cable
must be used.
lRS-232 Serial Printer Output: Provides serial connection to a local computer or serial printer. A null modem serial cable must be used.
lEthernet Output 1 GigE: Traditional automation communication is provided via port 1025 on the Ethernet connection. This primary port is a
Sur-Gard standard output and provides Sur-Gard standard automation protocol output.
CAUTION: The Ethernet communication lines must be connected first to an approved (acceptable to the local authorities) type NID (Network Interface
Device) before leaving the premises (e.g., UL installations, UL60950 Listed NID).
NOTE: All external devices should be mounted in the same room as the receiver.
All circuits are power limited except AC input.
Maintain 6.5 mm (1/4") separation between power limited and non-power limited circuits.
All outputs are supervised.
SG-System 5 Operating Manual

3.0 Receiver Setup and Operation
- 17 -
3.1.1 Receiver Installation
Sur-Gard recommends testing the receiver before actual installation. Becoming familiar with the connections and setup of the unit on the workbench
will simplify the final installation.
The following items are required:
l1 IEC power supply cord per SG-PSU5
lPhilips #1 screwdriver
lPhillips #2 screwdriver
l5/16” [or 8mm] nut driver
lDepending on rack mounting:
l8 clip nuts for the 19” rack
l8 screws to fit into the clip nuts
1. Unpack the components for the SG-System 5.
NOTE: Carefully unpack the receiver and inspect for shipping damage. Notify the carrier immediately of any apparent damage.
2. Mount the rails to the 19” rack:
a. Slide the rails together.
b. Insert the clip nuts into the 19” rack 1U apart on the front and the back of the rack, leaving minimum 4U of space from the bottom of
the rail.
c. Place the rails and then secure in place with rack screws (four per rail, two on the front and two on the back).
d. Unfasten the front rail screws and set aside.
FIGURE 3-4: Rail Installation
NOTE: Maximum distance between front and rear rails is 31 inches (78.74 cm)
3. Slide the SG-MLRF5 subrack onto the rails. Caution: This component is heavy and requires two people to lift. Keep fingers clear of rails.
4. Unfasten the thumb screws and open the front plate.
5. Fasten the thumb screw set aside from the rails.
SG-System 5 Operating Manual

3.0 Receiver Setup and Operation
- 18 -
FIGURE 3-5: Securing SG-MLRF5 to Rack
Rail Screw
Rail Screw
6. Install optional secondary LCD:
a. Unscrew the four nuts holding the cover plate.
b. Push the blank plate from the front to remove it.
c. Remove the display cable from its holder in the cover plate.
d. Discard the cover plate.
e. Remove the plastic sheet covering the LCD.
f. Place the LCD onto the front plate.
g. Connect the power cable from the SG-MLRF5 to the LCD (tab up).
h. Attach the display cable.
i. Install the cable holder using the two screws provided. Ensure both the display cable and the LCD power cable are secured.
j. Place the metal shield on top of the LCD.
k. Fasten the ground strap.
l. Screw on all four nuts (do not over-tighten).
7. Insert the fan tray and connect the fan tray wire. Make sure the fan tray is between the two guides. Fasten the thumb screws. Repeat the process
for additional fan trays.
8. Insert all cards, starting with slot 1, in the rack to their appropriate positions. Ensure there are no open slots between cards. Fasten the thumb
screws.
9. Close the front plate and fasten the thumb screws.
10. At the back of the SG-System 5:
a. Insert the SG-CPM5 partially and connect fan (at the back). The SG-CPM5's fan connector tab should be up.
b. Insert the SG-CPM5 completely in the rack. Fasten the thumb screws.
c. Connect the LCD display port cable and a network cable to the SG-CPM5.
d. Insert a paddle card into each slot with a SG-DRL5-IP line card. Fasten the thumb screws.
e. Connect a network cable to each paddle card.
f. Insert the SG-PSU5(s) into the rack and fasten the thumb screw.
g. Connect the main power using a standard computer IEC cable (not supplied).
11. The LCD will power up and display internal troubles (e.g., printer, automation).
12. Press the ACK button and log in (Default: Admin//adminpass).
13. Press the ACK button until all of the initial signals have been acknowledged (ACK button has stopped flashing and the buzzer has been
silenced).
NOTE: Internal diagnostics may require more than one minute during the power up sequence.
SG-System 5 Operating Manual

3.0 Receiver Setup and Operation
- 19 -
3.1.2 SG-CPM5 LEDs
3 4 5
1 2
1. Console Connected (Green) ON = Console connected
OFF = Console disconnected
2. Trouble Status (Orange) ON = Troubles present
OFF = No troubles present
3. Network Status
(around the home button)
Blue = 1Gb/s
Green = 100Mb/s
Orange = 10Mb/s
Red = network absent
4. Watchdog (Blue) Flashing = Normal , Off/On – SG-CPM5 failure
5. Automation (Green)
ON = Automation connected and system is active
Flashing = Automation is connected and system is standby
OFF = Automation disconnected
SG-System 5 Operating Manual

4.0 Hardware Descriptions and Specifications
In this chapter...
4.1 SG-MLRF5 21
4.1.1 SG-MP5 Midplane 21
4.1.2 SG-S5CFANTR – SG-CPM5 Fan Tray 21
4.1.3 SG-MLRF5-RM – Mounting Rails 22
4.2 SG-CPM5 - Central Processing Module 22
4.2.1 SG-CPM5 LEDs 24
4.2.2 SG-CPM5 I/O Terminal Pin-Outs 25
4.2.3 SG-CPM5 Setup 26
4.2.4 SG-CPM5BATT - RTC Battery 27
4.2.5 SG-S5SERCAB - Y-Cable 28
4.2.6 SG-CPM5 Fan Tray Replacement 29
4.2.7 UPS Setup 30
4.2.8 SG-SYS5EBUS Setup 31
4.3 SG-DRL5-IP - IP Line Card 31
4.3.1 SG-DRL5-IP Configurations 32
4.3.2 SG-DRL5-IP LED Status Indicators 32
4.3.3 SG-DRL-IP Setup 34
4.4 SG-DRL5-IP PAD – SG-DRL5-IP Paddle Card 37
4.5 SG-S5LFANTR – Line Card Fan Tray 37
4.6 SG-PSU5-600 - 600WPower Supply 37
4.6.1 SG-PSU5-600 Installation 38
4.7 SG-UIB5 - User Interface 39
4.7.1 SG-UIB5(LCD) Replacement 39
4.8 SG-SYS5MEM4 - Expandable EMMC 40
4.9 SG-SYS5DDR31 - DDR3 1GB RAM 41
4.10 SD Card 41
This manual suits for next models
1
Table of contents