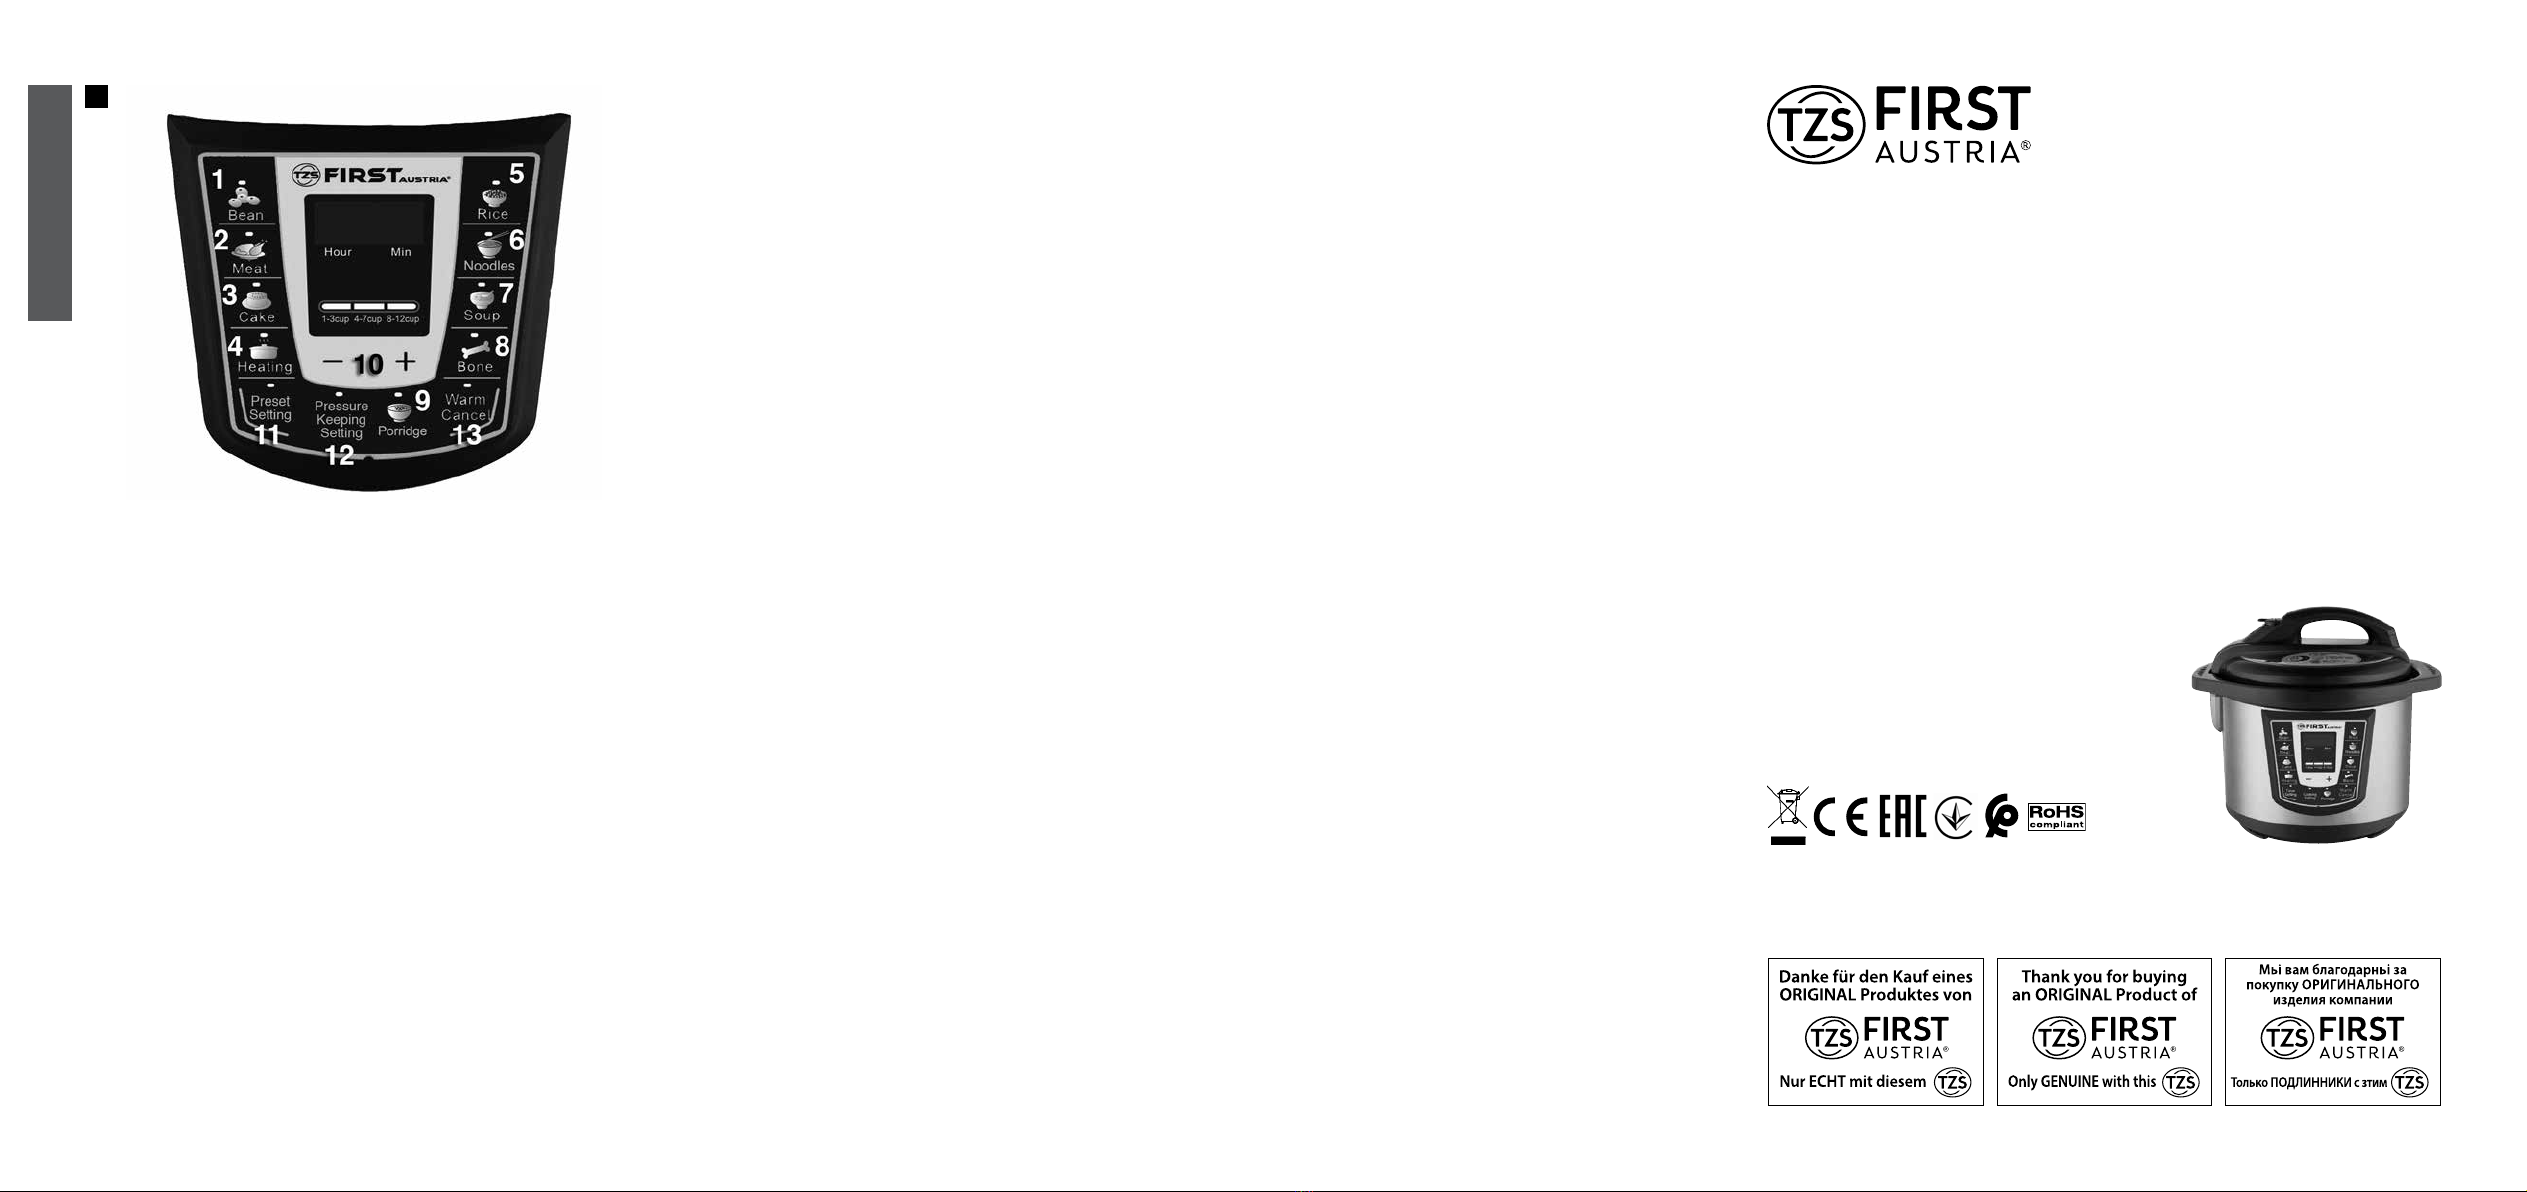
10 11
ITALIANO
ITALIANO
PENTOLA A PRESSIONE ELETTRICA
MANUALE D‘USO
Prima di usare il prodotto leggere il manuale.
CARATTERISTICHE:
Le nostre pentole a pressione elettriche sono un
nuovo tipo di pentole costruite con la tecnologia
più recente; possono essere usate al posto delle
pentole a pressione, delle risottiere e delle pentole
a vapore, pur combinandone tutti i vantaggi. Ogni
famiglia moderna dovrebbe scegliere questo tipo
di pentole. Infatti la temperatura e la pressione
delle stesse è controllata automaticamente
dal computer, ed esse sono contraddistinte da
numerosissime caratteristiche tra cui, struttura
avanzata, design alla moda, sicurezza, opzioni
multifunzionali, semplicità di funzionamento,
risparmio di energia e conservazione delle
proprietà nutritive.
1. Opzioni multifunzionali come cottura normale,
al vapore, stufatura e cottura arrosto
2. Comando automatico dal computer per l‘intera
procedura
3. Possibilità di predenire l‘orario con cottura
ritardata anche di 24 ore
4. Elevata ecienza termica con risparmio
energetico del 60 percento e con risparmio
anche del 40 percento di tempo.
5. Struttura completamente sigillata per
conservare le sostanze nutrienti e il sapore e
per cuocere i cibi mantenendoli morbidi.
6. Rivestimento interno della pentola
antiaderente, facile da pulire.
7. Dispositivi di protezione, tra cui:
a. congurazione di sicurezza per l‘apertura e
la chiusura del coperchio - tale caratteristica
garantisce l‘assenza di pressione se il coperchio
non blocca l‘isolamento termico, mentre il
coperchio è bloccato se all‘interno è presente la
pressione.
b. Congurazione di controllo della pressione
- serve per disattivare automaticamente
l‘alimentazione elettrica e deviare il processo di
mantenimento della pressione se la pressione
interna raggiunge quella desiderata.
c. Congurazione di limitazione pressione - serve
per limitare la pressione rilasciando il vapore
quando la pressione interna supera la pressione
massima di funzionamento perché il comando
di temperatura e pressione non funzionano.
d. Anti-blocco della congurazione di limitazione
pressione - serve per evitare che gli alimenti
ostacolino l‘ago della valvola di sato.
e. Congurazione di rilascio della pressione -
serve per evitare esplosioni consentendo il
rilascio automatico dal bordo del coperchio se
la congurazione di limitazione di pressione
non funziona e la pressione interna raggiunge
la pressione massima di funzionamento.
f. Congurazione di protezione del limite
di temperatura - serve per arrestare
automaticamente il riscaldamento se l‘interno è
vuoto e la pentola è riscaldata oppure se l‘unità
è riscaldata senza la pentola e la temperatura
supera quella prevista.
g. Congurazione di protezione da
sovratemperatura - serve per disattivare
automaticamente l‘alimentazione elettrica
quando la temperatura interna supera quella
limite.
h. Congurazione di sicurezza brevettata anti-
esplosione per la chiusura del coperchio - serve
per garantire l‘accumulo di pressione intera
solo quando il coperchio è bloccato nella
posizione corretta, altrimenti l‘unità scalda
soltanto senza accumulare pressione.
ATTENZIONE SPECIALE:
1. Scelta della funzioni e congurazione del
tempo di mantenimento pressione
Per esempio all‘accensione dell‘alimentazione,
appare RICE.
Se si preferisce MINESTRA, premere POTTAGE,
la spia lampeggerà per 8 volte, si avvia il
funzionamento automatico e la spia POTTAGE
è accesa come anche quella del PRESSURE
KEEPING TIME.
NOTA: l‘orario visualizzato sullo schermo indica
soltanto il tempo di mantenimento della pressione,
non include il tempo di riscaldamento (questo
periodo di tempo dipende dalla quantità e dal tipo
degli alimenti in cottura), per cui il tempo totale di
cottura durerà più a lungo di quello visualizzato.
2. Durante l‘uso
(1) Spostare la valvola di limitazione della
pressione su Sigilla prima dell‘uso.
(2) Non toccare mai il coperchio durante la cottura,
perché è molto caldo.
(3) Selezionare la funzione e attendere che la
spia lampeggi 8 volte; il funzionamento parte
automaticamente.
(4) Non avvicinare le mani a Sato per evitare di
ustionarsi durante il rilascio di vapore.
(5) Tenere l‘unità lontano dalla portata dei
bambini.
(6) Non collegare la spina all‘alimentazione
elettrica prima di aver bloccato il coperchio.
(7) La valvola di limitazione pressione non deve
essere in alcun modo ostacolata.
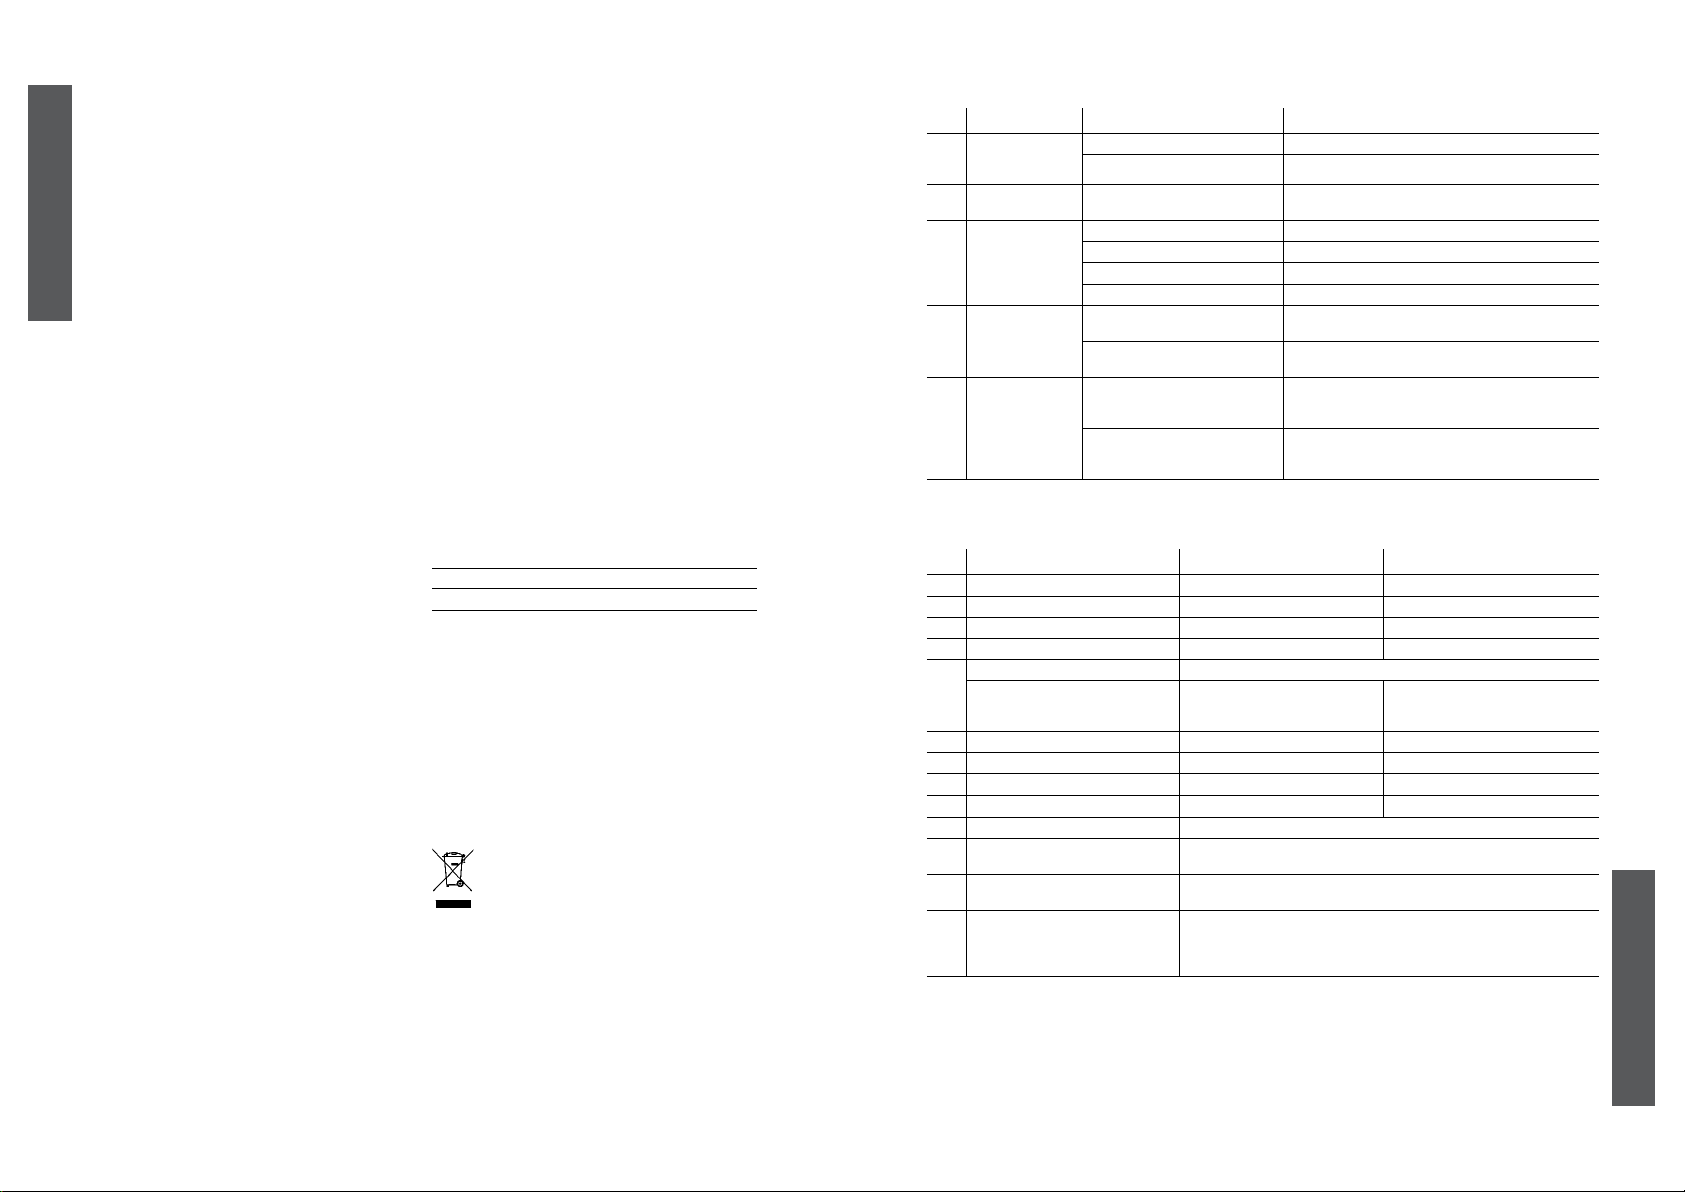
Fig 1 (a+b)
PARTI (Fig A)
1. Maniglia
2. Maniglia coperchio
3. Coperchio
4. Valvola di limitazione pressione
5. Ago della valvola di sato
6. Valvola a galleggiante
7. Galleggiante
8. Pentola interna
9. Isolamento termico
10. Anello intermedio
11. Pannello di controllo
12. Riscaldatore
13. Raccoglitore per la condensa
14. Manico pentola
15. Involucro esterno
16. Covo di alimentazione, spina
17. Base
18. Anello di tenuta della valvola a galleggiante
19. Anti-blocco
20. Anello di tenuta
21. Pulsanti
22. Piastra con appiglio
GUIDA AL FUNZIONAMENTO
1. Aprire il coperchio. Aerrare la maniglia,
ruotare in senso orario no al limite e aprire.
(illustrazione 2 & 3)
2. Disporre gli alimenti e l‘acqua nella pentola
interna. Gli alimenti e l‘acqua non devono
superare i 4/5 del totale, mentre gli alimenti che
tendono a espandersi non devono superare i
2/5. Il limite minimo degli alimenti e dell‘acqua
non deve essere inferiore a 1/5. (illustrazione 4,
5 e 6)
3. Sistemare la pentola interna nell‘isolamento
termico. Innanzitutto, pulire la parte esterna
della pentola interna, la supercie del
riscaldatore e la parte interna dell‘isolamento
termico, quindi sistema la pentola interna
nell‘isolamento termico, controllando che siano
correttamente collegate. (illu. 7)
4. Chiudere il coperchio.
Montare l‘anello di tenuta sul coperchio.
Ruotare l‘anello di tenuta a sinistra e a destra
per sistemarlo correttamente.
Aerrare la maniglia e spingendola in senso
orario, portarla no al limite per bloccarla.
(illustrazione 8 & 9)
5. Installare la valvola di limitazione della
pressione e controllare che il galleggiante sia
in basso (prima di funzionare deve trovarsi in
basso).
6. Accendere. Sul display appare:
Opzione predenite: scegliere funzione RICE.
La spia lampeggia 8 volte quindi l‘unità si
attiva automaticamente e sullo schermo del
display appare il tempo di mantenimento della
pressione.
PULSANTE PRESET SETTING
• Premere il pulsante PRESET SETTING; sul display
appare il tempo predenito e la relativa spia
lampeggia. Premere “+/-” per aumentare o
diminuire. Inizialmente, ogni volta che si preme
si aggiungono o si eliminano 0,5 ore. Quando il
tempo predenito supera le 10 ore, ogni volta
che si preme si aggiunge o si elimina 1 ora. Il
tempo predenito massimo è di 24 ore.
• Al termine della congurazione del tempo,
e dopo aver scelto la funzione tra le opzioni
o dopo aver impostato il mantenimento
pressione per la cottura e dopo che la spia ha
lampeggiato 8 volte, la pentola inizia il conto
alla rovescia e la cottura automatica si avvia al
termine di tale conto.
PULSANTE PRESSURE KEEPING SETTING
• Premere il pulsante PRESSURE KEEPING
SETTING quindi premere“+/-”per aumentare
o diminuire; ogni volta che si preme il tempo
di mantenimento pressione aumenta o
diminuisce di 1 minuto. Il tempo massimo per il
mantenimento pressione è di 99 minuti.
• Dopo aver congurato il tempo di
mantenimento pressione, attendere che
la spia lampeggi 8 volte anché si avvii il
funzionamento automatico.
Quando la pressione all‘interno raggiunge
quella prevista, il tempo di mantenimento della
pressione diminuisce di 1 min.
• La funzione Rice prevede tre scelte a seconda
della capacità.
• Funzione “+/-”, indipendentemente dal fatto
che si scelgano funzioni di cottura predenite o
la funzione di mantenimento della pressione, si
possono premere i pulsanti“+/-”per aumentare
o diminuire il tempo liberamente.
• Premere WARM/CANCEL, per annullare la scelta
della funzione.
• Durante il funzionamento premere WARM/
CANCEL per interrompere il funzionamento
stesso.
Qualsiasi funzione può passare
automaticamente a mantieni caldo al termine
del funzionamento. Il tempo massimo per il
mantenimento del calore è di 24 ore.
• Scollegare la spina.
Aerrare la maniglia, ruotare in senso orario
no al limite e aprire. (illustrazione 2 e 3) i cibi
sono pronti per essere serviti.