U-Line H-9286 User manual

PAGE 1 OF 41 0321 IH-9286
WINDOW AIR
CONDITIONER
1-800-295-5510
uline.com
πH-9286, H-9287
H-9288
SAFETY
NOTE: The power supply cord with this air
conditioner contains a current detection
device designed to reduce risk of fire. If power
supply cord is damaged, it cannot be repaired.
It must be replaced with a cord from the
product manufacturer.
WARNING: Do not store or use gasoline or other
flammable vapors and liquids in the vicinity
of this or any other appliance. Read product
labels for flammability and other warnings.
WARNING: Avoid fire hazard or electric shock.
Do not use an extension cord or an adaptor
plug. Do not remove any prong from the power
cord.
WARNING: Do not cut, remove or bypass
grounding prong.
WARNING: To reduce the risk of fire, electric
shock or injury to people when using air
conditioner, follow basic precautions,
including:
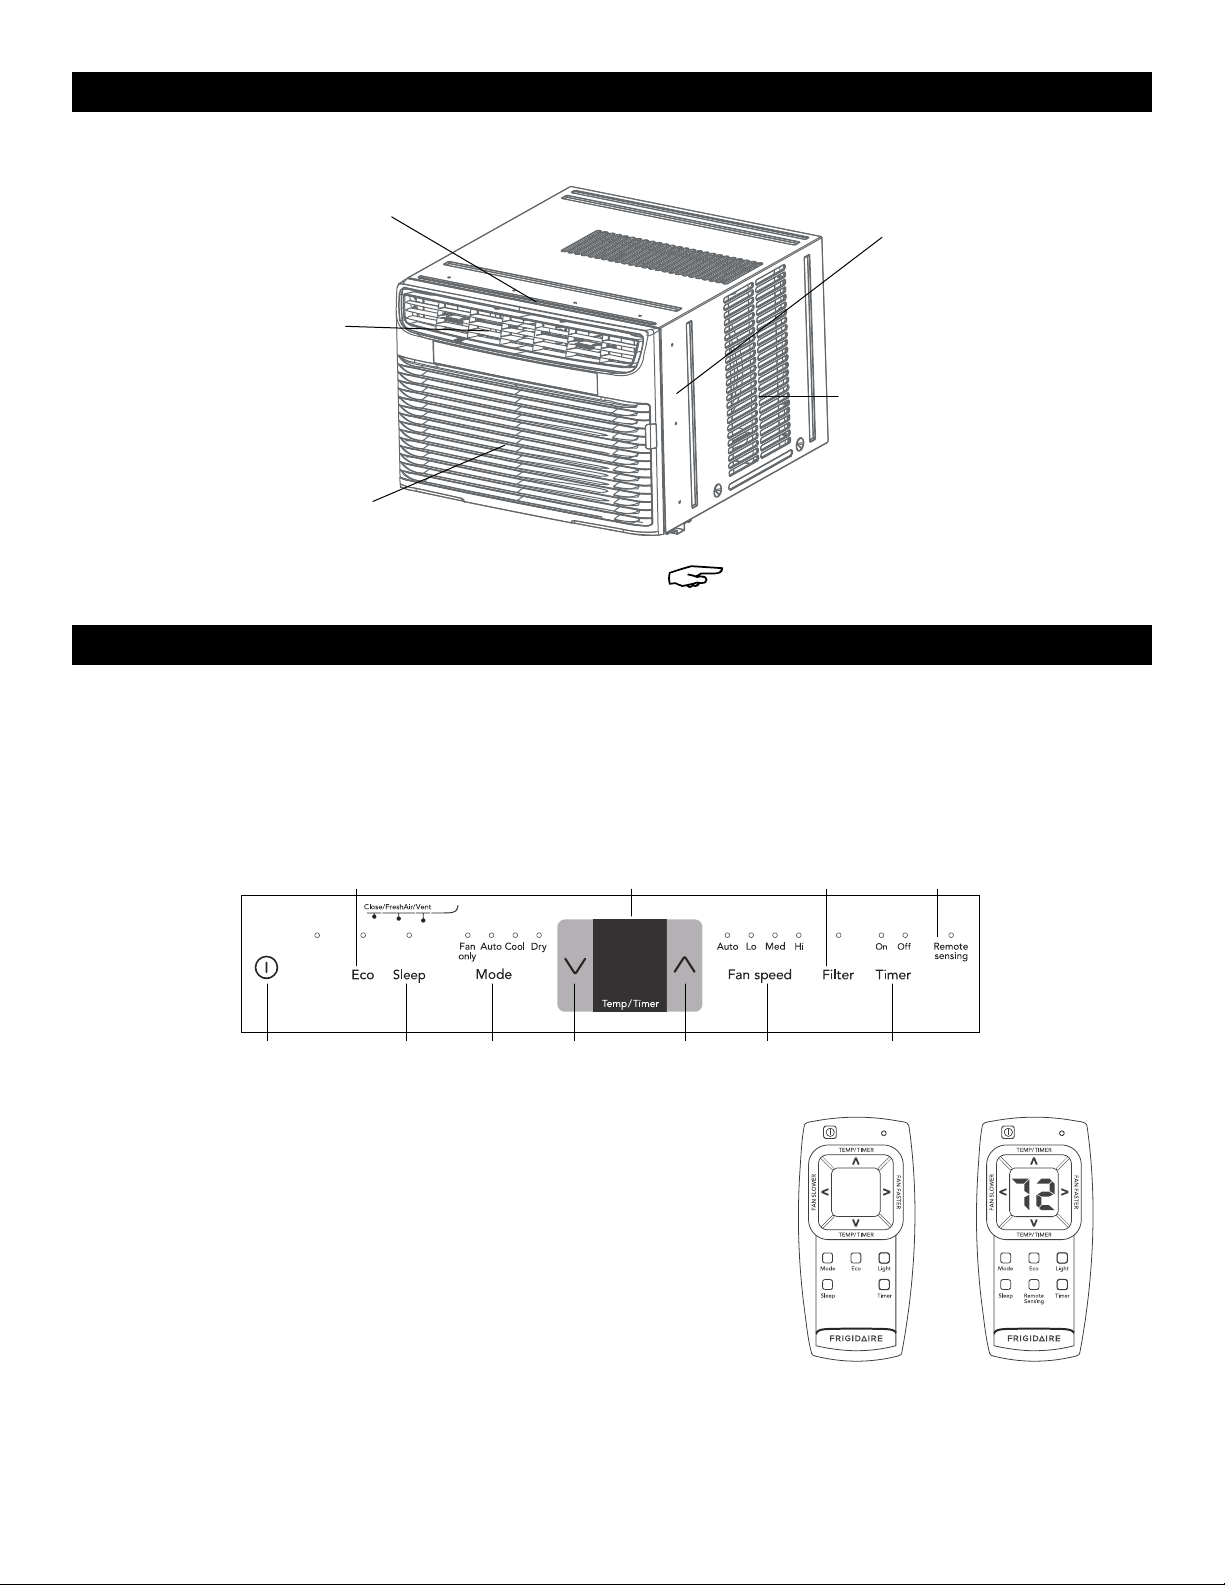
• Ensure electrical service is adequate for the model.
This information can be found on the serial plate,
which is located on the side of the cabinet and
behind the grille.
• If air conditioner is installed in a window, clean both
sides of glass window first. If window is a triple-track
type with a screen panel included, remove the
screen completely before installation.
• Ensure unit has been securely and correctly installed
according to separate installation instructions
provided with this manual. Save these instructions for
future use in removing or reinstalling this unit.
• When handling air conditioner, be careful to avoid
cuts from sharp metal fins on front and rear coils.
NOTE: Complete electrical rating of unit is
stated on serial plate. Refer to rating when
checking electrical requirements.
IMPORTANT: Ensure unit is properly grounded to
minimize shock and fire hazards.
IMPORTANT: Air conditioner must be used
in a properly grounded wall receptacle. If
wall receptacle is not adequately grounded
or protected by a time delay fuse or circuit
breaker, have a qualified electrician install the
proper receptacle.
IMPORTANT: Do not run air conditioner without
outside protective cover in place. This could
result in mechanical damage within the air
conditioner.
• This air conditioner contains no user-serviceable
parts. Always call authorized servicer for repairs.
• Do not insert or place fingers or objects into air
discharge area in front of unit.
• Do not start or stop air conditioner by unplugging
power cord or turning off power at the electrical box.
• Do not cut or damage power cord.
• If power cord is damaged, it should only be
replaced by an authorized servicer.
• In the event of a malfunction (sparks, burning smell,
etc.), immediately stop the operation, disconnect
the power cord and call an authorized servicer.
• Do not operate air conditioner with wet hands.
• Do not pull on power cord.
• Do not drink any water that is drained from air
conditioner.
• Provide ventilation per installation instructions.
Para Español, vea páginas 14-27.
Pour le français, consulter les pages 28-41.

PAGE 2 OF 41 0321 IH-9286
SAFETY CONTINUED
• Do not direct airflow at fireplaces or other heat-
related sources. This could cause flare-ups or make
units run excessively.
• Do not climb on or place objects on outdoor part of
the unit.
• Do not hang objects off the unit.
• Do not place containers with liquids on the unit.
• Turn off air conditioner at the power source when it
will not be used for an extended period of time.
• Periodically check the condition of the unit's
installation accessories for any damage.
• Do not apply heavy pressure to the radiator fins of
the unit.
• Operate unit with air filter in place.
• Do not block or cover intake grille, discharge area
or outlet ports.
• Ensure that any electrical equipment is one yard
away from unit.
• Do not use or store flammable gases near unit.
• Do not touch the metal parts of the unit when
removing the filter. Injuries can occur when handling
sharp, metal edges.
• Do not use water to clean inside air conditioner.
Exposure to water can destroy insulation, leading to
possible electric shock.
• When cleaning unit, first ensure power and circuit
breaker are turned off.
NOTE: Read this section before attempting to
operate air conditioner. Unit must be upright
for one hour prior to operating.
To test power supply cord:
• Plug in the air conditioner.
• Power supply cord will have two
buttons on plug head. Press the
TEST button. User will notice a
click as the RESET button pops
out. (See Figure 1)
• Press the RESET button. User will
again notice a click as the
button engages. (See Figure 1)
• The power supply cord is now
supplying electricity to the unit,
also indicated by a light on the
plug head.
NOTE: Do not use power supply cord to turn on
or off unit.
NOTE: Always ensure RESET button is pushed in
for correct operation.
NOTE: Power supply cord must be replaced if
it fails to reset when either the TEST button is
pushed, or it cannot be reset.
NOTE: If power supply cord is damaged, it
cannot be repaired.
Symbols displayed on unit:
WARNING: Appliance uses flammable
refrigerant. If refrigerant is leaked
and exposed to an external ignition
source, there is risk of fire.
CAUTION: These instructions should be
read carefully.
CAUTION: Service personnel should
handle this equipment with reference
to installation manual.
CAUTION: Information is available
such as these instructions or
installation manual.
Figure 1

PAGE 3 OF 41 0321 IH-9286
SAFETY CONTINUED
WARNING FOR FLAMMABLE REFRIGERANT:
• Do not accelerate defrosting process or cleaning.
• Store appliance in a room without continuously
operating ignition sources (open flames, an
operating gas appliance, etc.) close to the
appliance.
• Do not pierce or burn.
• Be aware that refrigerants may not contain an odor.
• Observe compliance with national gas regulations.
• Keep ventilation openings clear of obstruction.
• Store unit to prevent mechanical damage from
occurring.
• Store appliance in a well-ventilated area where
room size corresponds to room area as specified for
operation.
• Any person involved with working on or breaking
into a refrigerant circuit should hold a current valid
certificate from an industry-accredited assessment
authority.
• Only perform servicing as recommended by
equipment manufacturer. Carry out maintenance
and repair, requiring assistance of other skilled
personnel, under the supervision of the person
competent in the use of flammable refrigerants.
• Do not modify length of power cord or use an
extension cord to power unit.
• Do not share a single outlet with other electrical
appliances. Improper power supply can cause fire
or electric shock.
• Follow instructions carefully to handle, install, clear
and service air conditioner to avoid any damage
or hazard. Flammable Refrigerant R32 is used within
air conditioner. When maintaining or disposing the
air conditioner, recover the refrigerant (R32 or R290)
properly and do not discharge to air directly.
• Any open fire or device like a switch that may
generate spark/arcing should not be around
air conditioner to avoid causing ignition of the
flammable refrigerant used. Carefully store or
maintain unit to prevent mechanical damage from
occurring.
• This appliance is not intended for use by people
(including children) with reduced physical, sensory
or mental capabilities or lack of experience and
knowledge, unless they have been given supervision
or instruction concerning use of the appliance by a
person responsible for their safety.
• Supervise children to ensure they do not play with
the appliance.
• If supply cord is damaged, it must be replaced by
manufacturer, its service agent or similarly qualified
people in order to avoid hazard.
• Install appliance in accordance with national wiring
regulations.
PACKAGING
Remove all packaging from inside carton, along with
any inserts placed in side louvers. (See Figure 2) Packaging Inserts
Figure 2

PAGE 4 OF 41 0321 IH-9286
SOUNDS
FEATURES
High-Pitched Chatter: High-efficiency
compressors may have a high-pitched
chatter during cooling cycle.
Gurgle/Hiss: "Gurgling" or "hissing"
noise may be heard due to
refrigerant passing through
evaporator during normal operation.
Sound of Rushing Air: This may
be heard at front of unit.
Vibration: Unit may vibrate and
make noise because of poor wall
or window construction.
Pinging or Swishing: Droplets of
water hitting condenser during
normal operation may cause
"pinging" or "swishing" sounds.
NOTE: Do not try to drill any holes on base pan
to eliminate normal sounds. It will void warranty.
ELECTRONIC CONTROL
Before beginning, become familiar with control panel
and remote shown below and all its functions. Follow
symbol for desired functions. Unit can be controlled by
touchpad alone or with remote.
ECO Feature
Displays
Temperature/Timer
ON/OFF Sleep
Feature
Standard
Remote With Display and
Remote Sensing
Button
Mode
Setting Temperature/Timer
Adjust Fan
Speed Activates
Timer
Check Filter
Reset Button Remote Temp Sensing
Indicator (some models)
LIGHT FEATURE:
The display and all LED indicators on control panel of unit can be turned
off by pressing the "Light" button on remote control. If any other button of
control panel and remote control is pressed after that, unit will beep to
indicate it works. The corresponding direction of pressing specific button,
display and LED indicators will illuminate accordingly, but they will turn off
again in five seconds if no further operation. Press the "Light" button again
or unplug unit to cancel setting.
BATTERY:
AAA Warning: Do not mix old and new batteries. Do not mix alkaline,
standard (carbon-zinc) or rechargeable (nickel-cadmium) batteries.

PAGE 5 OF 41 0321 IH-9286
OPERATION
Unit will run in Cool mode with Eco feature and Auto fan speed setting when used for first time. With Eco feature, when
room temperature is below set temperature, fan will continue to run for three minutes after compressor shuts off. Fan
cycles on for two minutes at 10-minute intervals until room temperature is above set temperature, at which time
compressor turns on again. Eco feature can be activated or deactivated by pressing Eco button, but it is invalid in
Fan only mode.
This mode is a fixed combination of Cool mode and Auto fan speed setting. User cannot select Fan speed manually
in this mode.
Fan remains on with compressor cycling on and off when room temperature is reached.
ON/OFF
Power Button
Press Mode Button
and Choose Auto
Press Mode Button
and Choose Cool
TO TURN ON UNIT:
TO USE AUTO MODE FEATURE:
TO USE COOL MODE FEATURE:
USER WILL SEE:
USER WILL SEE:
USER WILL SEE:

PAGE 6 OF 41 0321 IH-9286
OPERATION CONTINUED
Tap or hold up or down button until desired temperature is seen on display. Temperature will be maintained
automatically anywhere between 62°F and 86°F. For display to read actual room temperature, see "TO USE FAN ONLY
MODE FEATURE" section on page 7.
The fan speed can be selected among four settings: Auto, Lo (Low), Med (Medium) and Hi (High), unless unit runs in
Auto or Dry mode or the Sleep feature is activated.
Fan starts at low speed and adjusts to a proper speed according to what room temperature dictates. For example,
if room does not get too warm, it will stay at the slowest speed. If room temperature rises quickly, such as from a door
being opened, it will automatically go to the highest speed. The fan speeds will readjust back to the slowest speed
as the room returns to original set temperature.
Press ( ) to Raise
Press ( ) to Lower
Press to Select
Press Fan Button and
Choose Auto
TO CHANGE TEMPERATURE SETTING:
TO ADJUST FAN SPEEDS:
TO USE AUTO FAN FEATURE:
USER WILL SEE:
USER WILL SEE:
USER WILL SEE:

PAGE 7 OF 41 0321 IH-9286
OPERATION CONTINUED
Use this function only when cooling is not desired, such as for room air circulation or to exhaust stale air on some
models. Remember to open the vent during this function, but keep it closed during cooling for maximum cooling
efficiency. Choose any fan speed.
During this function, the display will show the actual room temperature, not the set temperature as in cool mode.
In this mode, air conditioner will work like a dehumidifier, but it will cool the room down. Temperature can be
adjusted between 62°F and 86°F, and fan speed will be held at "Lo."
Unit will select Auto Fan speed automatically, and the selected temperature will increase by 2°F 30 minutes after
mode is selected. Temperature will then increase by another 2°F after an additional 30 minutes. New temperature will
be maintained for seven hours before it returns to the originally selected temperature. This ends Sleep mode, and unit
will continue to operate as originally programmed. Sleep mode can be canceled at any time during operation by
again pressing "Sleep," "Fan speed" or "Mode" button.
Press Mode Button and
Choose Fan Only
Press Mode Button
and Choose Dry
Press Sleep
Button
TO USE FAN ONLY MODE FEATURE:
TO USE DRY MODE FEATURE:
TO USE SLEEP FEATURE:
USER WILL SEE:
USER WILL SEE:
USER WILL SEE:

PAGE 8 OF 41 0321 IH-9286
OPERATION CONTINUED
This feature is a reminder to clean the air filter. LED light will illuminate after 250 hours of operation. To reset after
cleaning the filter, press the "Filter" button and the light will turn off.
To delay stop (or start), press the "Timer" button when unit is power-on/power-off, and "Timer Off"/"Timer On" will
illuminate. To adjust timer setting, tap or hold the up arrow ( ) or the down arrow ( ) to change delay timer at
0.5 hour increments, up to 10 hours, then at one-hour increments, up to 24 hours. The setting will be confirmed
automatically in five seconds and control will count down the time (8, 7.5, 7, etc.) remaining, and all other settings
will stay the same as they were before the timer setting is confirmed until stop (or start). Setting combination of "delay
stop delay start" or "delay start delay stop" is workable. Both "Timer Off" and "Timer On" will illuminate then. Timer
setting can be canceled by either pressing and holding Timer button for two seconds or pressing power button at
any time to turn off unit directly.
Press Filter
Reset Button
Press Up/Down
Buttons Press Timer
Button
CHECK FILTER FEATURE:
TIMER DELAY STOP/START FEATURE:
USER WILL SEE:
USER WILL SEE HOW MUCH TIME IS CHOSEN:

PAGE 9 OF 41 0321 IH-9286
OPERATION CONTINUED
Press Remote
Sensing Button
Remote Sensing
Indicator
REMOTE SENSING FEATURE:
NOTE: Unit display shows temperature.
NOTE: Remote display is actual temperature at remote control only.
This feature can be activated from the remote control only. Unit must be in a cooling mode. To activate Remote
sensing feature, point remote control toward unit and press "Remote sensing" button. Use " " or " " buttons to set
desired temperature at remote. Set temperature will only be displayed on unit itself. Light on unit control will illuminate
to indicate it receives signal. Light on remote control will pulse each time it sends signal. lt will periodically send this
signal until the feature is deactivated by pressing "Remote sensing" button again. lf unit does not receive Remote
sensing signal during any seven-minute interval, the Remote sensing feature will halt until the unit receives signal from
remote control again. Display on remote control indicates temperature at remote only.
NOTE: Remote sensing function can be terminated either by pressing Remote sensing button again or
main power button on unit.
FAULT CODES:
TO CHANGE TEMPERATURE DISPLAY: USER WILL SEE:
Press and Hold Up and Down Buttons
Together for Three Seconds
If the display reads "AS," a sensor has failed. Contact
Uline Customer Service at 1-800-295-5510.
NOTE: The control is capable of displaying
temperature in Fahrenheit or Celsius.

PAGE 10 OF 41 0321 IH-9286
TO TURN OFF UNIT: USER WILL SEE:
OPERATION CONTINUED
Press ON/OFF Button
• The "Cool" circuit has an automatic three-minute
time delayed start if unit is turned off and on quickly.
This prevents overheating of compressor and
possible circuit breaker tripping. Fan will continue to
run during this time.
• Control will maintain set temperature within 2°F,
between 62°F and 86°F.
• There is a two-second delay for compressor shutting
down when selecting "Fan only." This is to cover the
possibility of having to roll through to select another
mode.
• After power outage, unit will memorize last setting
and return unit to same setting once power is
restored.
AIR DIRECTIONAL LOUVERS
These control air flow direction. Air conditioner has
louver type described below. (See Figure 3)
SLIDER TYPE
The louvers will allow user to direct air flow up/down and
left/right throughout room. Drag adjuster tablet until
desired left/right direction is obtained. Pivot horizontal
louvers until desired up/down direction is obtained.
(See Figure 3)
FRESH AIR VENT CONTROL
• Recirculate inside air – vent closed. (See Figure 4)
• Draw fresh air into room – vent open. (See Figure 5)
• Exchange air from room – vent open. (See Figure 5)
Adjuster Table
(6-Way)
Figure 3
Figure 4
Figure 5

PAGE 11 OF 41 0321 IH-9286
MAINTENANCE
Clean air conditioner occasionally to keep it looking
new. Unplug unit before cleaning to prevent shock or
fire hazards.
AIR FILTER CLEANING
Check air filter at least once a month to see if cleaning
is necessary. Trapped particles in filter can build up and
cause an accumulation of frost on cooling coils.
• Open front panel, grasp filter by center and pull up
and out. (See Figure 7)
• Wash filter using liquid dishwashing detergent and
warm water. Rinse filter thoroughly. Gently shake
excess water from filter. Ensure filter is thoroughly dry
before replacing.
• Instead of washing, user can vacuum filter.
• Push vent handle to vent closed position (where
applicable).
NOTE: When replacing the air filter after
cleaning, make sure the tabs on the air filter
are on top and placed outward. (See Figure 7)
CABINET CLEANING
• Unplug air conditioner to prevent shock or fire
hazard. Cabinet and front may be dusted with
oil-free cloth or washed with a cloth dampened in
solution of warm water and mild liquid dishwashing
detergent. Rinse thoroughly and wipe dry.
• Never use harsh cleaners, wax or polish on cabinet
front.
• Wring excess water from cloth before wiping around
controls. Excess water in or around the controls may
cause damage to air conditioner.
• Plug in air conditioner.
WINTER STORAGE
If planning to store air conditioner during winter, remove
it carefully from window. Cover it with plastic or return it
to original carton.
ENERGY SAVING
• Do not block airflow inside with blinds, curtains or
furniture or outside with shrubs, enclosures or other
buildings.
• The capacity of air conditioner must fit room size for
efficient and satisfactory operation.
• Install air conditioner on shady side of home.
Window that faces north is best because it is shaded
most of day.
• Close fireplace damper, floor and wall registers so
cool air does not escape up chimney and into duct
work.
• Keep blinds and drapes on other windows closed
during sunniest part of day.
• Clean air filter.
• Proper insulation and weather stripping in home will
help keep warm air out and cool air in.
• External house shading with trees, plants or awnings
will help reduce air conditioner's work load.
• Operate heat-producing appliances such as ranges,
washers, dryers and dishwashers during the coolest
part of day.
Figure 7
Tabs
Air Filter

PAGE 12 OF 41 0321 IH-9286
OPERATING ISSUE CAUSES RECOMMENDATIONS
Air conditioner will not
operate.
Wall plug disconnected.
Plug Current Device tripped.
House fuse blown or circuit breaker
tripped.
Control is off.
Push plug firmly into wall outlet.
Press the RESET button.
Replace fuse with time delay type or reset
circuit breaker.
Turn control on and set to desired setting.
Air from unit does not
feel cold enough.
Room temperature below 62°F.
Temperature sensing element touching
cold coil, located behind air filter.
Compressor shut off by changing
modes.
Cooling may not occur until room
temperature rises above 62°F.
Straighten away from coil.
Reset to a lower temperature.
Wait approximately 3 minutes and listen for
compressor to restart when set in the Cool
mode.
Air conditioner cooling
but room is too warm.
Ice forming on cooling
coil behind decorative
front.
Outdoor temperature below 62°F.
Air filter may be dirty.
Temperature is set too low for night-
time cooling.
To defrost the coil, set Fan only mode
Clean filter. Refer to Maintenance section.
To defrost, set to Fan only mode.
To defrost the coil, set to Fan Only mode.
Then, set temperature to a higher setting.
Air conditioner cooling
but room is too warm.
No ice is forming on
cooling coil behind
decorative front.
Dirty air filter. Air is restricted.
Temperature is set too high.
Air directional louvers positioned
improperly.
Front of unit is blocked by drapes,
blinds, furniture, etc., restricting air
distribution.
Doors, windows, registers, etc. are
open, allowing cool air to escape.
Unit recently turned on in hot room.
Clean air filter. Refer to Maintenance
section.
Set temperature to a lower setting.
Position louvers for better air distribution.
Clear blockage in front of unit.
Close doors, windows, registers, etc.
Allow additional time to remove "stored
heat" from walls, ceiling, floor and furniture.
Air conditioner turns on
and off rapidly.
Dirty air filter. Air is restricted.
Outside temperature extremely hot.
Clean air filter.
Set Fan speed to a faster setting to bring air
through cooling coils more frequently.
Noise when unit is
cooling.
Air movement sound.
Window vibration.
This is normal. If too loud, set to lower Fan
setting.
Poor installation. Refer to installation
instructions or check with installer.
TROUBLESHOOTING

PAGE 13 OF 41 0321 IH-9286
TROUBLESHOOTING CONTINUED
OPERATING ISSUE CAUSES RECOMMENDATIONS
Water dripping inside
when unit is cooling.
Improper installation. Tilt air conditioner slightly to the outside to
allow water drainage. Refer to installation
instructions or check with installer.
Water dripping outside
when unit is cooling.
Unit removing large quantity of
moisture from humid room.
This is normal during excessively humid
days.
Remote sensing
deactivating
prematurely (some
models).
Remote control not located within
range.
Remote control signal obstructed.
Place remote control within 20 feet and 120°
radius of the front of the unit
Remove obstruction.
Room is too cold. Set temperature too low.
Remote sensing activated (on some
models) and remote control located in
hot spot.
lncrease set temperature.
Relocate remote control or deactivate
Remote sensing.
1
-800-295-551
0
uline.com

PAGE 14 OF 41 0321 IH-9286
800-295-5510
uline.mx
AIRE ACONDICIONADO
DE VENTANA
πH-9286, H-9287
H-9288
SEGURIDAD
NOTA: El cable eléctrico de este aire
acondicionado contiene un dispositivo de
detección de corriente diseñado para reducir el
riesgo de incendio. Si el cable eléctrico se daña,
no se puede reparar. Se debe reemplazar con
un cable del fabricante del producto.
ADVERTENCIA: No almacene ni use gasolina u
otros vapores y líquidos inflamables cerca de
este o cualquier otro aparato. Lea las etiquetas
del producto para saber sobre la inflamabilidad
y otras advertencias.
ADVERTENCIA: Evite el riesgo de incendio o
descarga eléctrica. No utilice ninguna extensión
ni un adaptador del enchufe. No quite ninguna
clavija del cable.
ADVERTENCIA: No corte, quite o puentee el
enchufe de conexión a tierra.
ADVERTENCIA: Para reducir el riesgo de incendio,
descarga eléctrica o lesiones a personas
al utilizar este aire acondicionado, siga las
precauciones básicas, que incluyen:
• Asegúrese de que el servicio eléctrico sea adecuado
para el modelo. Esta información se puede encontrar
en la placa de serie, que se encuentra en el lateral
del gabinete y detrás de la rejilla.
• Si se instala el aire acondicionado en una ventana,
primero limpie ambos lados del vidrio. Si la ventana
es del tipo de triple vía con un panel de pantalla
incluido, retire la pantalla por completo antes de que
se instale.
• Asegúrese de que la unidad se haya instalado
de manera segura y correcta de acuerdo con las
instrucciones de instalación por separado que se
proporcionan junto con este manual. Guarde estas
instrucciones para usarlas en el futuro al retirar o
reinstalar esta unidad.
• Al manipular la unidad, tenga cuidado y evite
cortarse con las aletas afilados de metal en las
bobinas delantera y posterior.
NOTA: La clasificación eléctrica completa de la
unidad se indica en la placa de serie. Consulte
la clasificación al verificar los requisitos
eléctricos.
IMPORTANTE: Asegúrese de que la unidad esté
conectada a tierra adecuadamente para
minimizar los riesgos de descargas e incendios.
IMPORTANTE: El aire acondicionado debe
usarse en un tomacorriente de pared con
conexión a tierra. Si el tomacorriente de la
pared no está adecuadamente conectado
a tierra o protegido por un fusible de retardo
o cortacircuitos, deje que un electricista
calificado instale el tomacorriente adecuado.
IMPORTANTE: No encienda el aire
acondicionado sin la cubierta protectora
exterior. Esto puede dañar la mecánica interna
del aire acondicionado.
• Este aire acondicionado no contiene piezas que el
usuario pueda reparar. Llame siempre a un técnico
autorizado para realizar las reparaciones.
• No introduzca ni coloque los dedos u objetos en el
área de descarga de aire en la parte frontal de la
unidad.
• No encienda ni apague el aire acondicionado
desenchufando el cable eléctrico o deteniendo la
corriente de la caja eléctrica.
• No corte ni dañe el cable eléctrico.
• Si se daña el cable eléctrico, solo un técnico
autorizado lo debe reemplazar.
• En caso de un mal funcionamiento (chispas, olor a
quemado, etc.), inmediatamente apague la unidad,
desconecte el cable eléctrico y llame a un técnico
autorizado.
• No opere el aire acondicionado con las manos
mojadas.
• No lo desconecte jalando del cable.
• No beba agua que se haya drenado del aire
acondicionado.

PAGE 15 OF 41 0321 IH-9286
CONTINUACIÓN DE SEGURIDAD
• Proporcione ventilación según las instrucciones de
instalación.
• No apunte el flujo de aire hacia chimeneas u otras
fuentes de calor. Esto podría causar estallidos o
hacer funcionar las unidades en exceso.
• No se suba ni coloque objetos en la parte exterior de
la unidad.
• No cuelgue objetos de la unidad.
• No coloque recipientes con líquido sobre la unidad.
• Apague el aire acondicionado desde la fuente de
alimentación cuando no se vaya a usar durante un
periodo prolongado.
• Revise periódicamente el estado de los accesorios
de instalación de la unidad para detectar cualquier
daño.
• No presione mucho las aletas del radiador de la
unidad.
• Opere la unidad con el filtro de aire en su lugar.
• No bloquee ni cubra la rejilla de entrada, el área de
descarga o los puertos de salida.
• Asegúrese de que cualquier equipo eléctrico esté a
un metro de distancia de la unidad.
• No utilice ni almacene gases inflamables cerca de la
unidad.
• No toque las partes metálicas de la unidad al retirar
el filtro. Se puede lesionar al manipular bordes
metálicos afilados.
• No utilice agua para limpiar el interior del aire
acondicionado. La exposición al agua puede
destruir el aislante y provocar una posible descarga
eléctrica.
• Cuando limpie la unidad, primero asegúrese de que
la energía y el cortacircuitos estén apagados.
NOTA: Lea esta sección antes de intentar
operar el aire acondicionado. La unidad debe
estar en forma vertical durante una hora antes
de utilizarla.
Para probar el cable eléctrico:
• Enchufe el aire acondicionado.
• El cable eléctrico tendrá dos
botones en el cabezal del
enchufe. Presione el botón
"TEST" (PRUEBA). El usuario notará
un clic cuando el botón "RESET"
(REINICIAR) salte.
(Vea Diagrama 1)
• Presione el botón "RESET". El
usuario notará un clic de
nuevo cuando el botón se
active. (Vea Diagrama 1)
• El cable eléctrico ahora
suministra electricidad a la unidad, lo que también
se indica por una luz en el cabezal del enchufe.
NOTA: No utilice el cable eléctrico para
encender o apagar la unidad.
NOTA: Asegúrese siempre de que el
botón "RESET" esté presionado para un
funcionamiento correcto.
NOTA: El cable eléctrico se debe reemplazar si
no se restablece al presionar el botón "TEST" o
si no se puede reiniciar.
NOTA: Si el cable eléctrico se daña, no se
puede reparar.
Los símbolos que aparecen en la unidad:
ADVERTENCIA: El aparato utiliza
refrigerante inflamable. Si el
refrigerante se fuga y se expone a
una fuente de ignición externa, hay
riesgo de incendio.
PRECAUCIÓN: Estas instrucciones se
deben leer con atención.
PRECAUCIÓN: El personal de servicio
debe manejar este equipo con
el manual de instalación como
referencia.
PRECAUCIÓN: Hay información
disponible, como estas instrucciones
o el manual de instalación.
Diagrama 1

PAGE 16 OF 41 0321 IH-9286
CONTINUACIÓN DE SEGURIDAD
ADVERTENCIA DE REFRIGERANTE INFLAMABLE:
• No acelere el proceso de descongelación o
limpieza.
• Almacene el aparato en una habitación sin fuentes
de ignición en funcionamiento continuo (llama
al descubierto, un electrodoméstico de gas en
funcionamiento, etc.) cerca de la unidad.
• No lo perfore ni queme.
• Tenga presente que no siempre los refrigerantes
tienen olor.
• Observe el cumplimiento de las regulaciones
nacionales de gas.
• Mantenga las aberturas de ventilación libres de
obstrucciones.
• Almacene la unidad para evitar que ocurran daños
mecánicos.
• Almacene el aparato en un área bien ventilada
donde el tamaño de la habitación corresponda al
área de la habitación como se especifica para su
funcionamiento.
• Cualquier persona involucrada en reparar o
acceder a un circuito de refrigerante debe tener
un certificado válido actual de una autoridad de
evaluación acreditada por la industria.
• Solo repare según lo recomendado por el
fabricante del equipo. Realice el mantenimiento
y la reparación con la asistencia de otro técnico
calificado, bajo la supervisión de una persona
competente en el uso de refrigerantes inflamables.
• No modifique el largo del cable eléctrico ni utilice
una extensión para alimentar la unidad.
• No comparta un solo tomacorriente con otros
aparatos eléctricos. Una fuente de alimentación
inadecuada puede provocar incendios o
descargas eléctricas.
• Siga cuidadosamente las instrucciones para
manejar, instalar, limpiar y reparar el aire
acondicionado para evitar daños o peligros. El
Refrigerante Inflamable R32 se utiliza dentro del
aire acondicionado. Al mantener o desechar el
aire acondicionado, recupere el refrigerante (R32 o
R290) adecuadamente y no lo libere directamente
al aire.
• Cualquier llama al descubierto o dispositivo
como un interruptor que pueda generar chispas
o arcos eléctricos no debe estar alrededor del
aire acondicionado para evitar que se encienda
el refrigerante inflamable usado. Almacene o
mantenga con cuidado la unidad para evitar que
ocurran daños mecánicos.
• Este aparato no está diseñado para que lo utilicen
personas (incluyendo niños) con capacidades
físicas, sensoriales o mentales reducidas o con
falta de experiencia y conocimiento, a menos que
hayan recibido supervisión o instrucciones sobre el
uso del aparato por una persona responsable de su
seguridad.
• Supervise a los niños para asegurarse de que no
jueguen con el aparato.
• Si se daña el cable, el fabricante, su agente de
servicios o personas cualificadas de forma similar
debe reemplazarlo para evitar peligro.
• Instale el aparato de acuerdo con las regulaciones
nacionales de cableado.
EMPAQUE
Retire todo el empaque dentro de la caja, junto con
cualquier inserto colocado en las rejillas laterales.
(Vea Diagrama 2)
Insertos de Empaque
Diagrama 2

PAGE 17 OF 41 0321 IH-9286
SONIDOS
FUNCIONES
Sonido Agudo: Los compresores de alta
eficiencia pueden tener un sonido agudo
durante el ciclo de enfriamiento.
Barboteo/Silbido: Es posible que
se escuche un barboteo o silbido
debido al refrigerante que pasa a
través del evaporador durante el
funcionamiento normal.
Sonido de Aire Corriendo: Es
posible que se escuche esto en
la parte frontal de la unidad.
Vibración: La unidad puede
vibrar y hacer ruido debido a
una construcción deficiente de la
pared o la ventana.
Sonido Metálico o Silbido: Gotas de
agua que golpean el condensador
durante el funcionamiento normal
pueden causar sonidos metálicos o
silbidos.
NOTA: No intente perforar ningún orificio en la
bandeja de la base para eliminar los sonidos
normales. Anulará la garantía.
CONTROL ELECTRÓNICO
Antes de comenzar, familiarícese con el panel de control
y el control remoto que se muestran a continuación y
todas sus funciones. Siga el símbolo
para las funciones deseadas. La unidad se puede
controlar con solo un panel táctil o con control remoto.
Función ECO
Muestra
Temperatura y Temporizador
ENCENDIDO/APAGADO Función de
Reposo
Control Remoto
Estándar Con Pantalla
y Botón de
Detección
Remota
Configuración
de Modo Configuración de
Temperatura y
Temporizador
Velocidad
del Ventilador Activa el
Temporizador
Botón de Reinicio de
Revisión del Filtro
Indicador de Detección
de Temperatura Remota
(algunos modelos)
FUNCIÓN DE LUZ:
La pantalla y todos los indicadores LED en el panel de control de la
unidad se pueden apagar presionando el botón "Light" (Luz) en el control
remoto. Si se presiona cualquier otro botón del panel de control o del
control remoto después de eso, la unidad emitirá un sonido para indicar
que está funcionando. La dirección correspondiente de presionar el
botón específico, la pantalla y los indicadores LED se iluminarán en
consecuencia, pero se apagarán nuevamente en cinco segundos si no se
realizan más operaciones. Presiona el botón "Light" nuevamente
o desenchufe la unidad para cancelar la configuración.
BATERÍA:
Advertencia AAA: No combine baterías viejas con nuevas. No mezcle
baterías alcalinas, estándar (carbono-zinc) o recargables (níquel-cadmio)

PAGE 18 OF 41 0321 IH-9286
FUNCIONAMIENTO
La unidad funcionará en modo de "Cool" (Frío) con la función Eco y la configuración de velocidad del ventilador "Auto"
(Automático) cuando se use por primera vez. Con la función Eco, cuando la temperatura ambiente está por debajo
de la temperatura establecida, el ventilador continuará funcionando durante tres minutos después de que se apague
el compresor. El ventilador se enciende durante dos minutos a intervalos de 10 minutos hasta que la temperatura
ambiente esté por encima de la temperatura establecida, momento en el que el compresor se enciende nuevamente.
La función Eco se puede activar o desactivar presionando el botón Eco, pero no es válida en el modo de "Fan only"
(Solo ventilador).
Este modo es una combinación fija del modo "Cool" y la configuración de velocidad del ventilador automático. El
usuario no puede seleccionar la velocidad del "Fan" (Ventilador) manualmente en este modo.
El ventilador permanece funcionando con el compresor encendiéndose y apagándose cuando se alcanza la
temperatura ambiente.
Botón de ENCENDIDO/
APAGADO
Presione el botón "Mode"
(Modo) y Elija "Auto"
Presione el botón
"Mode " y Elija "Cool"
PARA ENCENDER LA UNIDAD:
PARA USAR LA FUNCIÓN DE
MODO AUTOMÁTICO
PARA USAR LA FUNCIÓN DE MODO "COOL"
EL USUARIO VERÁ:
EL USUARIO VERÁ:
EL USUARIO VERÁ:

PAGE 19 OF 41 0321 IH-9286
CONTINUACIÓN DE FUNCIONAMIENTO
Toque o mantenga presionado el botón hacia arriba o hacia abajo hasta que aparezca la temperatura deseada
en la pantalla. La temperatura se mantendrá automáticamente entre 17°C y 30°C (62°F y 86°F). Para que la pantalla
lea la temperatura real de la habitación, consulte la sección "PARA USAR LA FUNCIÓN DE MODO "FAN ONLY" en la
página 20.
La velocidad del ventilador se puede seleccionar entre cuatro configuraciones: Auto, "Lo" (Baja), "Med" (Media) y "Hi"
(Alta), a menos que la unidad funcione en modo Auto o "Dry" (Seco) o se active la función "Sleep" (Reposo).
El ventilador inicia a baja velocidad y se establece a una velocidad adecuada según la temperatura ambiente.
Por ejemplo, si la habitación no se calienta demasiado, se mantendrá en la velocidad más lenta. Si la temperatura
ambiente aumenta rápido, como cuando se abre una puerta, se configurará automáticamente a la velocidad más
alta. Las velocidades del ventilador se configurarán a la velocidad más lenta a medida que la habitación vuelva a
la temperatura establecida originalmente.
Presione ( ) para Subir
Presione ( ) para Bajar
Presione para Seleccionar
Presione el botón "Fan"
(Ventilador) Elija "Auto"
PARA CAMBIAR LA CONFIGURACIÓN
DE LA TEMPERATURA:
PARA CONFIGURAR LAS
VELOCIDADES DEL VENTILADOR:
PARA USAR LA FUNCIÓN DE "AUTO
FAN" (VENTILADOR AUTOMÁTICO)
EL USUARIO VERÁ:
EL USUARIO VERÁ:
EL USUARIO VERÁ:

PAGE 20 OF 41 0321 IH-9286
CONTINUACIÓN DE FUNCIONAMIENTO
Utilice esta función solo cuando no desee enfriar, como para circular el aire de la habitación o para expulsar el aire
estancado en algunos modelos. Recuerde abrir la ventila durante esta función, pero manténgala cerrada cuando
esté enfriando para una máxima eficiencia de enfriamiento. Elija cualquier velocidad del ventilador.
Durante esta función, la pantalla mostrará la temperatura real de la habitación, no la temperatura establecida
como en el modo frío.
En este modo, el aire acondicionado funcionará como un deshumidificador, pero enfriará la habitación. La
temperatura se puede configurar entre 17°C y 30°C (62°F y 86°F) y la velocidad del ventilador se mantendrá en "Lo".
La unidad seleccionará automáticamente la velocidad del "Auto Fan" y la temperatura seleccionada aumentará
-16°C (2°F) 30 minutos después de elegir el modo. La temperatura aumentará otros -16°C (2°F) después de 30
minutos adicionales. La nueva temperatura se mantendrá durante siete horas antes de que vuelva a la temperatura
seleccionada originalmente. Esto finaliza el modo "Sleep" y la unidad seguirá funcionando como se programó
originalmente. El modo "Sleep" se puede cancelar en cualquier momento durante la operación presionando
nuevamente el botón "Sleep", "Fan speed" o "Mode".
Presione el botón "Mode" y
Elija "Fan Only"
Presione el botón de
"Mode" y Elija "Dry"
Presione el
botón "Sleep"
PARA USAR LA FUNCIÓN DE
MODO "FAN ONLY"
PARA USAR LA FUNCION DE
MODO "DRY" (SECO)
PARA USAR LA FUNCION DE "SLEEP" (REPOSO):
EL USUARIO VERÁ:
EL USUARIO VERÁ:
EL USUARIO VERÁ:
This manual suits for next models
2
Table of contents
Languages:
Other U-Line Air Conditioner manuals
Popular Air Conditioner manuals by other brands

DeLonghi
DeLonghi Pinguino PAC 160 Use and maintenance manual

Mitsubishi Electric
Mitsubishi Electric Mr.Slim MUZ-FE09NA Service manual

Bard
Bard WA605 installation instructions

Pentair
Pentair Raychem IceStop Installation and operation manual

Bard
Bard W48A23 installation instructions

Bryant
Bryant 451 installation instructions