U.S. Products TORRENT Operating instructions

TORRENT®
HARD SURFACE CLEANER
revised 11/13 FORM NO. 56041839
IMPROPER USE OF THE MACHINE WILL VOID THE WARRANTY
1. DANGER: High pressure may cause sever injury. Always wear safety glasses.
NEVER direct the spray towards yourself, other people, or pets.
2. Never allow the spray to remain fixed in one spot.
3. Before each use, remove the spray tool from the hose, and check to make sure the
spray nozzle is securely tightened in the tool. A loose nozzle could fly off during use.
4. If a leak occurs at the hose, IMMEDIATELY turn the machine off. Replace the hose
before restarting.
5. Always use a defoamer to prevent vacuum motor damage when foaming occurs.
6. Keep the machine from rain in snow, extremes in temperatures, and store it in a
heated location. Use the machine indoors. Do not use outdoors.
7. NEVER adjust the pump above 1200 psi.
CAUTION: DO NOT OPERATE MACHINE UNTIL YOU HAVE READ
ALL SECTIONS OF THIS INSTRUCTION MANUAL
MODELS: TORRENT, 56380561
A-English
B-Español
C-Français
INFORMATION AND
OPERATING
INSTRUCTIONS
INFORMACIÓN E
INSTRUCCIONES DE USO
INFORMATION ET
DIRECTIVES
D’UTILISATION

IMPORTANT SAFETY INSTRUCTIONS
This machine is only suitable for commercial use, for example in hotels, schools, hospitals, factories, shops, and offices other than
normal residential housekeeping purposes.
When using any electrical appliance, basic precautions should always be followed, including the following:
NOTE: Read all instructions before using this machine.
WARNING!
To reduce the risk of fire, electric shock, or injury:
Never adjust the pump pressure above 1200 psi.•
Do not leave the machine unattended when it is plugged in. Unplug the unit from the outlet when not in use and before•
servicing.
To avoid electric shock, do not expose to rain or snow. Store, and use, indoors.•
Do not allow to be used as a toy. Close attention is necessary when used near children.•
Use only as described in this manual. Use only the manufacturer’s recommended attachments.•
Do not use with damaged cord or plug. If the machine is not working as it should, has been dropped, damaged, left outdoors•
or dropped into water, return it to a service center.
Do not pull by the cord, use the cord as a handle, close a door on the cord, or pull the cord around sharp edges or corners.•
Do not run the machine over the cord. Keep the cord away from heated surfaces. To unplug, grasp the plug, not the cord.
Do not handle the plug, the cord or the machine with wet hands.•
Extension cords must be 12/3 and no longer than 50 feet. Replace the cord or unplug immediately if the ground prong•
becomes damaged.
Do not put any object into openings. Do not use with any opening blocked; keep free of dust, lint, hair, and anything that•
may reduce air flow.
Keep loose clothing, hair, fingers, and all parts of body away from openings and moving parts.•
Do not pick up anything that is burning or smoking, such as cigarettes, matches, or hot ashes, or any health endangering•
dusts. Do not use to pick up flammable or combustible liquids such as gasoline or use in areas where they may be present.
Turn off all controls before unplugging.•
Connect to a properly grounded outlet only.•
Liquid ejected at the spray nozzle could be dangerous as a result of its temperature, pressure, and/or chemical content.•
•
KEEP THESE INSTRUCTIONS
WARNING!
The Products sold with this Manual contain or may contain chemicals that are known to certain governments (such as the State of California, as
identified in its Proposition 65 Regulatory Warning Law) to cause cancer, birth defects or other reproductive harm. In certain locations (including
the State of California) purchasers of these Products that place them in service at an employment job site or a publicly accessible space are
required by regulation to make certain notices, warnings or disclosures regarding the chemicals that are or may be contained in the Products at or
about such work sites. It is the purchaser’s responsibility to know the content of, and to comply with, any laws and regulations relating to the use
of these Products in such environments. The Manufacturer disclaims any responsibility to advise purchasers of any specific requirements that may
be applicable to the use of the Products in such environments.
revised 1/12
A - 2 TORRENT - 56041839 1/12
INSTRUCTIONS FOR USEA - ENGLISH

INSPECTION:
Carefully unpack and inspect your TORRENT for shipping damage. Each machine is tested and inspected before shipping. Any shipping damage
is the responsibility of the carrier. You should notify the carrier immediately if you notice damage to the box or to the machine or parts.
CLEANING SOLUTIONS:
Select a proper pre-spray for the surface to be cleaned, and apply the pre-spray. Use a neutral pH rinse or detergent (5 to 10 pH) in the Torrent to
prevent premature wear of the pump, seals, and other components. Damage caused by the use of improper or strong chemicals is not covered by
warranty. Powders are not recommended.
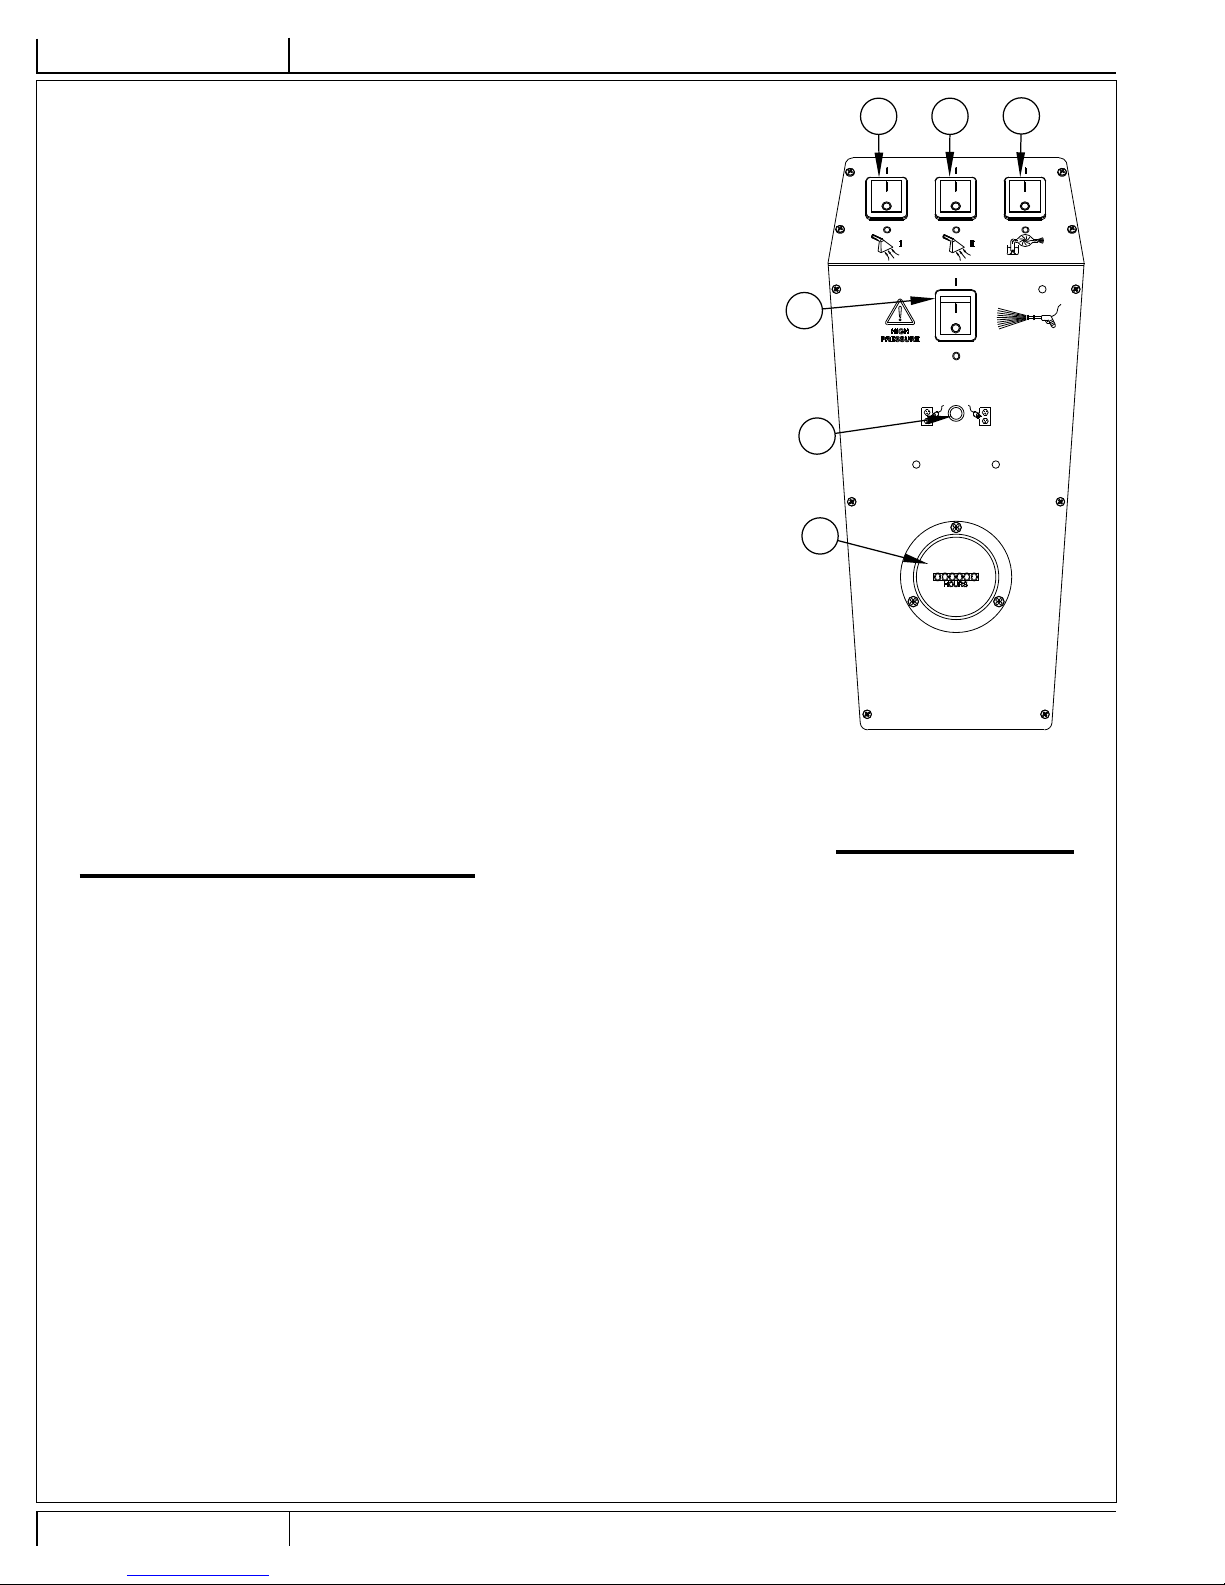
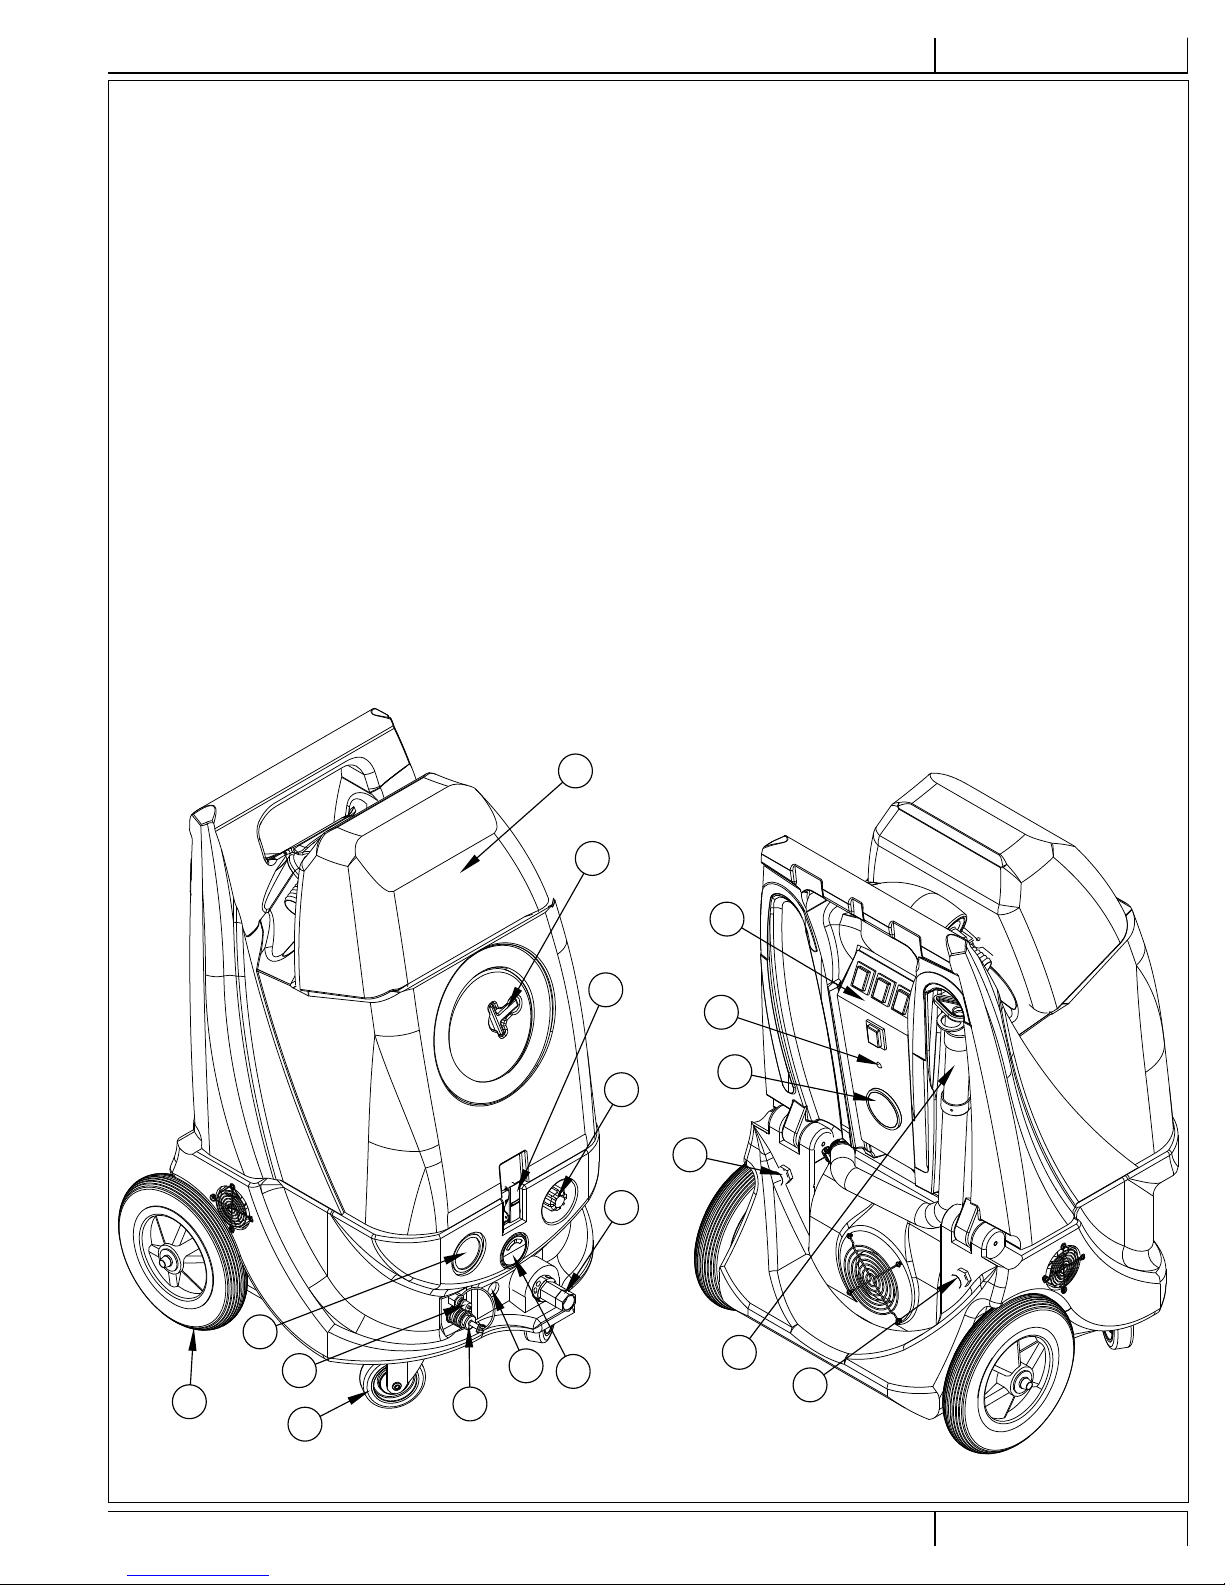
MAINTENANCE:
For optimum performance, flush the machine with clear water at the end of each working day. Once a month, minimum, run a flushing compound
through the machine to break up any mineral or chemical build-up that may have formed.
Your Torrent is supplied with an HT Technology Triplex Plunger Pump, specifically designed to handle rigorous duty cycles and high temperatures.
Seal life is expected to be 3000 hours.
This pump has an oil-bath crankcase, and a sight gauge is provided so you can view the oil level through a small opening in the front of the base
compartment, directly below the ammeter gauge. The proper fill level is shown by a red dot. Oil changes are recommended every 300 hours, and
on new machines an initial oil change is recommended at fifty hours. Use SAE-15W-40 oil. See PUMP MAINTAINENCE for more information.
Note that the hoses above the fill port are on quick disconnects to simplify service.
Vacuum motors typically require brush replacement between 500 - 1000 hours.
Clean the body with an all purpose detergent, and protect it with an automobile interior polish. Lubricate the wheels, castors, and quick
disconnects with an all-purpose silicone spray.
Record the serial number and model of your new extractor here:
(and be sure to register your purchase to active your warranty -- go to www.usproducts.com)
Serial Number: __________________ Model: TORRENT, 56380561
Purchase Date:_____________
Write the name and phone number of your distributor:
____________________________________________________________________
____________________________________________________________________
120VAC GROUNDING INSTRUCTIONS
This appliance must be grounded. If it should electrically malfunction, grounding provides a path of least resistance for electric current to reduce
the risk of electric shock. This appliance is equipped with a cord having an equipment-grounding conductor and grounding plug. The plug must be
plugged into an appropriate outlet that is properly installed and grounded in accordance with all local codes and ordinances.
DANGER!
Improper connection of the equipment-grounding conductor can result in a risk of electric shock. Check with a qualified electrician or
service person if you are in doubt as to whether the outlet is properly grounded. Do not modify the plug provided with the appliance. If
it will not fit the outlet, have a proper outlet installed by a qualified electrician.
This appliance is for use on a nominal 120-volt circuit, and has a grounding plug that looks like the plug illustrated in Figure 1 below. A temporary
adapter illustrated in Figures 2 and 3 may be used to connect this plug to a 2-pole receptacle as shown in Figure 2 if a properly grounded outlet is
not available. The temporary adapter should be used only until a properly grounded outlet (Figure 1) can be installed by a qualified electrician. The
green-colored rigid ear, tab, or the like extending from the adapter must be connected to a permanent ground such as a properly grounded outlet
box cover. Whenever the adapter is used, it must be held in place by a metal screw. Grounding adapters are not approved for use in Canada.
Replace the plug if the grounding pin is damaged or broken.
The Green (or Green/Yellow) wire in the cord is the grounding wire. When replacing a plug, this wire must be attached to the grounding pin only.
Extension cords connected to this machine should be 12 gauge, three-wire cords with three-prong plugs and outlets. DO NOT use extension cords
more than 50 feet (15 m) long.
PLEASE NOTE: FOR NORTH AMERICA ONLY
Grounding Pin
Tab for Grounding Screw
Adapter
Adapter
Metal Screw
FIGURE 1 FIGURE 2 FIGURE 3
Grounded Outlet Box
Grounded Outlet
revised 1/12
1/12 A - 356041839 - TORRENT
ENGLISH - AINSTRUCTIONS FOR USE

FIGURE 1
1 2 3
4
5
6
FRONT PANEL: (REFER TO FIGURE 2)
7 Pressure Gauge: Measures outlet pressure of high pressure pump in pounds per square inch (psi).
8 Ammeter: Allows precise adjustment of the pump outlet pressure without overloading the pump motor. Proper adjustment for maximum
pressure is at the break line between green and yellow.
NOTE: Since voltage can vary from one power outlet to another, setting the pressure adjustment based on amp draw will extend the life of
the motor by keeping the current within the correct range.
9 Pressure Adjustment Knob – Adjusts outlet pressure between 400 – 1200 psi. Note: you must trigger the tool and spray to see adjustment
of pressure. Clockwise increases and counterclockwise decreases pressure. Let the pump run for about one minute, then adjust the pump
using the ammeter for maximum pressure (set at the break line between green and yellow). For lower pressure, down to 400 psi, simply turn
the knob counterclockwise - while spraying - and watch the pressure gauge.
10 High Pressure Quick Disconnect – Attachment for high pressure solution line.
11 Auto-Dump Hose Fitting – Male garden hose fitting to attach dump hose.
12 Direct Feed-Hose Fitting – Female garden hose fitting to attach the direct water feed-hose. The feed hose has a chemical siphon system
and backflow preventer at the faucet end of hose.
13 Oil Level View Port - Allows viewing of the pump oil level sight-gauge.
14 Vacuum Motor Cover
15 Recovery Tank Lid
16 Latch
17 Castor
18 Wheel
19 Switch Plate
20 Dual Cord Sensor Light
21 Hour Meter
22 Power Cord
revised 1/12
SWITCH PLATE CONTROLS: (REFER TO FIGURE 1)
1 Vacuum I Switch: Turns on/off vacuum motor I.
2 Vacuum II Switch: Turns on/off vacuum motor II.
3 Dump Pump Switch: Turns on/off dump pump. Float switch on recovery tank automatically turns
the pump on when the solution level in the tank reaches a pre-set level AND the switch is on the
ON position.
4 High Pressure Pump Switch: Turns on/off the high pressure (400-1200 psi) pump.
5 Dual Cord Sensor Light: The green light will turn on only when the two power cords are plugged
into separate circuits.
6 Hour Meter: Keeps track of the overall time the pump has been in use.
A - 4 TORRENT - 56041839 1/12
INSTRUCTIONS FOR USEA - ENGLISH

FIGURE 2
14
15
16
9
12
8
13
11
17
7
18
19
20
21
23
22
22
10
RECOVERY TANK: (REFER TO FIGURE 2)
Pre-Filter: 800 micron polyester mesh bag with quick-change cord lock. This filter hangs inside the tank from the recovery hose inlet
piping. Check the pre-filter before operation and clean as required.
Stainless Steel Filter: 50-mesh filter screws into base of recovery tank. Inspect daily and clean as needed.
Float Valve: Located on the back wall in recovery tank, it automatically controls dump pump when switch is in ON position. Before
each use, inspect the float to ensure it is in the proper
position and clear of debris that would interfere with free operation.
23 Recovery Tank Dump Hose: Located on the rear of the recovery tank. Use this hose to manually drain the remaining recovered solution
from the tank and during tank cleaning.
revised 1/12
1/12 A - 556041839 - TORRENT
ENGLISH - AINSTRUCTIONS FOR USE
This manual suits for next models
1
Table of contents
Languages:
Other U.S. Products Ultrasonic Jewelry Cleaner manuals