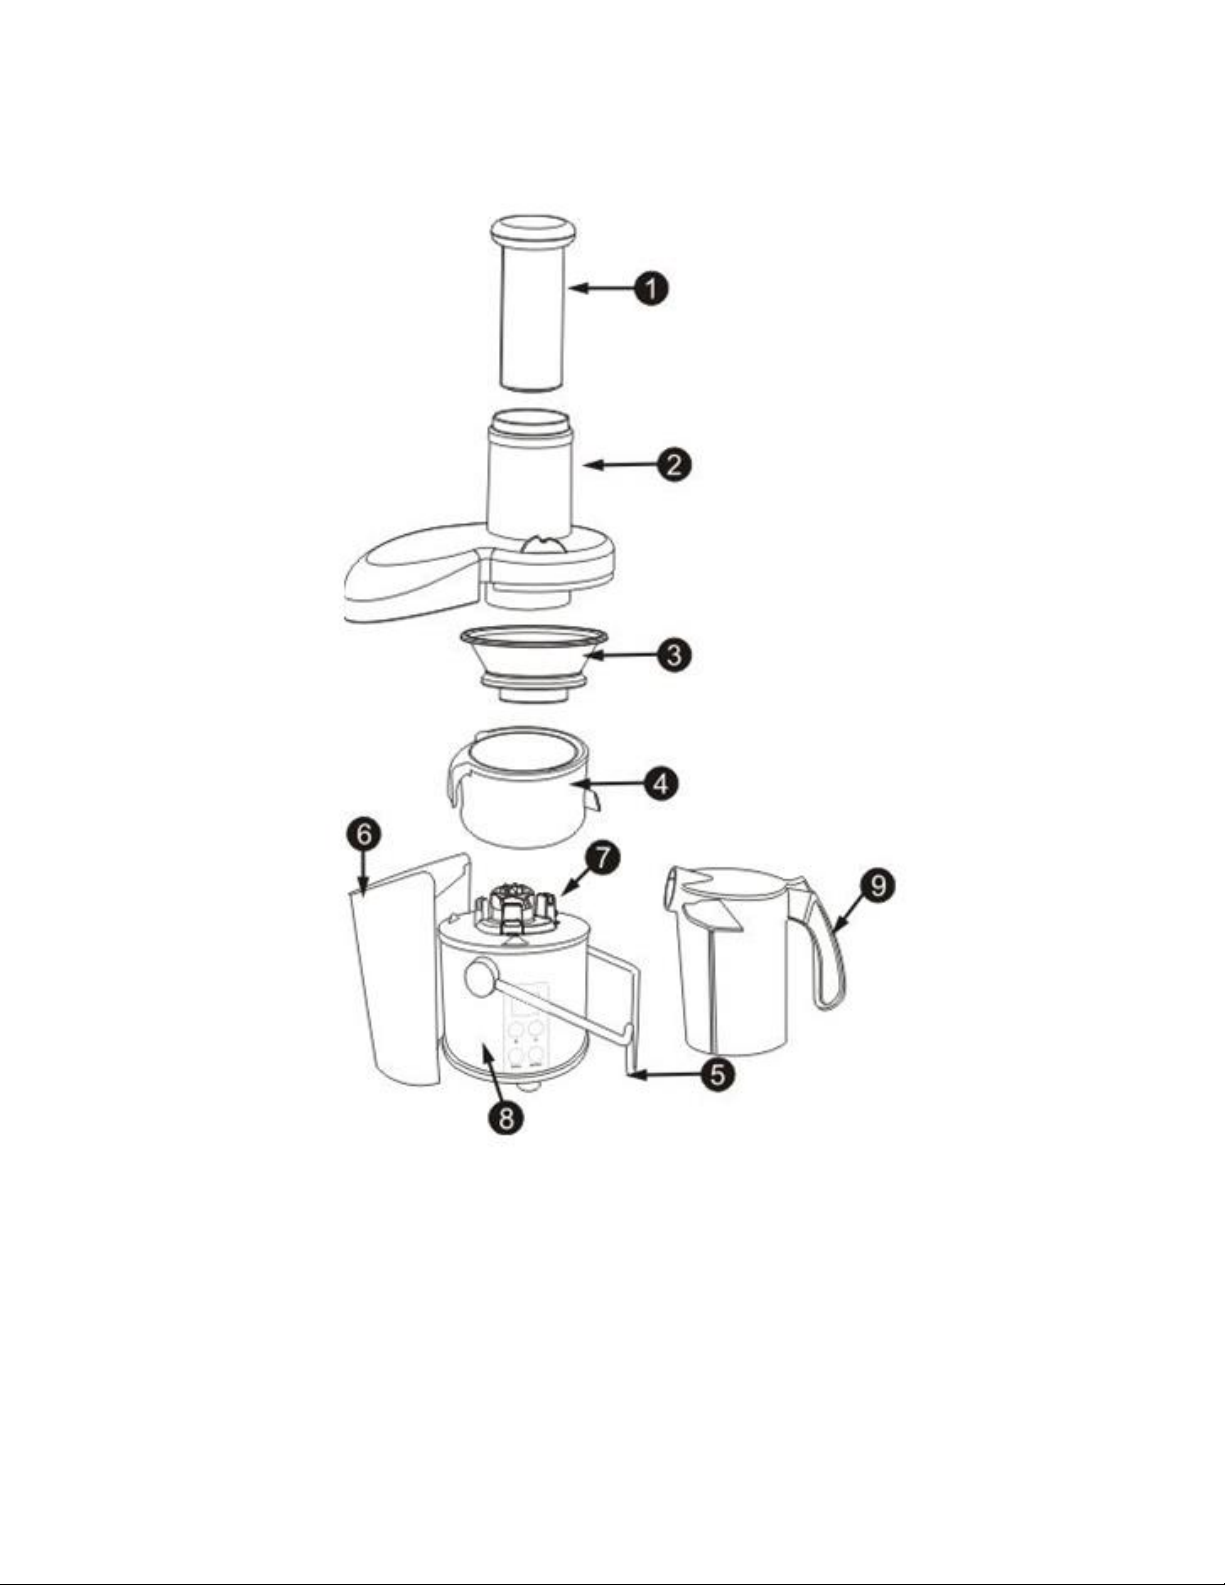
UBER APPLIANCE UB-CJE User manual

Centrifugal Juice Extractor
Model: UB-CJE
Please read all instructions carefully before using

2
Contents
Main Components Diagram.............................................................3
Important Safeguards and Information............................................4
Assembly of Juice Extractor ............................................................6
Disassembly of Juice Extractor........................................................7
Juicing.............................................................................................8
Speed Settings................................................................................9
Juicing Tips, Tricks and Recipes...................................................10

3
Main Components Diagram
1. Pushing bar 6. Pulp container
2. Transparent cover 7. Rotor
3. Juicing net 8. Juicer base
4. Middle ring and spout 9. Juice jug
5. Safety lock

4
Important Safeguards and Information
1. Read all instructions and view all diagrams before attempting to use this
machine.
2. To protect against risks of shock, do not immerse cord, plug, or motor
base in water or any other liquids.
3. This appliance is not intended for use by children. Close adult supervision
is necessary when the appliance is used in the presence of children. Do
not allow children to operate the appliance under any circumstances.
4. Always ensure that the appliance is turned OFF and UNPLUGGED for
the outlet when not in use, before assembling or di-assembling any
components and before cleaning.
5. Always minimize and avoid any contact with moving parts. Keep fingers
clear of feed chute.
6. Never attempt to push food by hand, always use the provided pushing bar
to push the food into the juicing chamber.
7. Always ensure that the juice extractor is properly and completely
assembled before turning the motor on. The safety arm is there to ensure
that the unit is fully assembled correctly. If the locking arm is not locking,
or is difficult to lock, please disassemble and re-assemble the unit
properly. The unit will not turn on without the lock latching in the proper
position. Never release the safety arm while the machine is in operation.
8. Never operate the Juice Extractor without the pulp container in place.
9. If food becomes lodges in the juicing chamber, use the pushing bar to
dislodge the food. If this method is not possible, turn off the motor, unplug
the cord from the outlet, and dissemble the juicer to remove the lodged
food.

5
10. Be sure to turn off the machine and unplug it after each use of the Juice
Extractor. When Juice Extractor is not in use, be sure to stow away in a
safe and dry place, out of the reach of children.
11. Never operate any appliance with a damaged cord or plug, or after any
appliance malfunctions, drops or damages. Always be sure to inspect the
juicer before and after each use to ensure the integrity of the unit.
12. The use of attachments that are not recommended or sold by the
appliance manufacturer may cause fire, electric shock or injury. The use
of any add-ons not manufactured and sold by the original manufacturer
will void any warranties.
13. This appliance is not designed or intended for use outdoors.
14. Never let the cord hang over the edge of a table or counter top, or touch
any hot surfaces including stoves and tabletop cookers.
15. Never leave the Juice Extractor unattended while it is operating.
16. The juicing net inside of the juicing chamber is extremely sharp, handle
carefully. Do not touch any of the small cutting blades in the base of the
stainless steel juicing net.
17. Keep hair, clothing and jewelry, as well as spatulas and any other kitchen
utensils away from the feeding chute during operation to prevent any
sever injury or damage from occurring to the operator or appliance.
18. Do not use the machine if any of the rotating parts or pieces are
damaged.
19. Always use the Juice Extractor on a dry, level surface.
20. Any maintenance other than cleaning shall be performed by the
manufacturer or an authorized service center.
21. To reduce risk of personal injury and/or damage to the appliance, do not
use bent, dented of otherwise damaged strainer basket.

6
Assembly of Juice Extractor
BEFORE FIRST USE: After unpacking the Juice Extractor from the packaging, be sure to wash
all components with warm soapy water, with the exception of the motor base. Rinse and dry
components immediately. Never immerse the motor base in water or other liquids. To clean the
motor base, wipe with a damp sponge.
1. Place strainer bowl on top of the motor base, and ensure that the bowl locks
in place. Carefully place the stainless steel strainer basket inside of the
strainer bowl. Ensure that the strainer bowl latches into position firmly.
2. Place the juicer cover over the strainer bowl, positioning the feed chute
over the strainer basket and lower it into position.
3. Raise the locking arm over the juicer cover until it latches into place.
4. Place the pulp container into position by tilting the position slightly to align
it properly with the juicer cover.
5. Place the juicing jug under the juice spout, ensuring proper contact
between the spout and the juicer jug to avoid any juice spills.
6. Slide the pushing rod down the feed chute by aligning the groove in the
food pusher with the small ridge on the inside of the top of the feed.
7. To minimize cleanup time, place a plastic bag inside of the pulp container
to collect the pulp.

7
Disassembly of Juice Extractor
1. Place strainer bowl on top of the motor base, and ensure that the bowl locks in place.
Carefully place the stainless steel strainer basket inside of the strainer bowl. Ensure that
the strainer bowl latches into position firmly.
2. Place the juicer cover over the strainer bowl, positioning the feed chute over the strainer
basket and lower it into position.
3. Raise the locking arm over the juicer cover until it latches into place.
4. Place the pulp container into position by tilting the position slightly to align it properly with
the juicer cover.
5. Place the juicing jug under the juice spout, ensuring proper contact between the spout
and the juicer jug to avoid any juice spills.
6. Slide the pushing rod down the feed chute by aligning the groove in the food pusher with
the small ridge on the inside of the top of the feed.
7. To minimize cleanup time, place a plastic bag inside of the pulp container to collect the
pulp.

8
Juicing
1. Before using, please confirm the button switch of the main machine is OFF, in this way, in case
assembly is not completed, starting the main machine can be avoided, so unnecessary damage for
persons or property is avoided.
2. Turn on the machine and let it stand for 5 seconds. IF any un-usual sounds are
noticed or the machine behaves un-normally, turn of the machine and inspect for
improper assembly. If issues persist, turn off the machine and get in contact with the
Manufacturer and/or a certified repairs group.
3. Place fruits into the chute and gently guide the food down using the pushing rod. To
extract the most amount of juice, push the food pusher down slowly.
4. Juice will begin flowing into the juice juicing jug and separated pulp will accumulate in the
pulp container. Pulp container may be emptied during juicing by turning the machine OFF
and carefully removing the pulp container. Be sure to re-place the empty pulp container in
its position before continuing juicing. Never allow the pulp container to overfill as it may
hinder the performance of the appliance and even cause damage.
NOTE:
LACERATION HAZARD: Never use fingers to push the food down the feed chute or to
clear the feed chute. Always use the food pusher provided.
TIP: Wash all fruits and vegetables before juicing. Fruits and vegetables with a thicker
skin such as oranges, melons or mangos should be peeled before placing into the chute
to minimize impact on juicer operation and juice flavor. Fruits with large seeds should be
pitted before juicing.

9
Speed Settings
1. Connect the power. The screen will show 3 as the default speed. Also the number and the speed name
will flicker at the same time.
2. Press the ON/OFF key after the machine has been well assembled. When the number and the speed
name on the screen turn from flickering to lighting continually, the machine starts working. Press the
ON/OFF key again, the machine stops working and the number and the speed name will flicker again.
3. Press the [+] [-] key to accelerate or decelerate the speed. The highest speed is 4 and the lowest is 1.
4. When you need instant higher speed, press the Pulse key.
Speed
Speed Name
Rotational Speed (RPM)
1
LOW
7000
2
MEDIUM
8800
3
HIGH
10200
4
EXTRA BOOST
12000

10
Juicing Tips, Tricks and Recipes
STORING AND HANDELING FRUITS AND VEGTABLES:
-Always make sure to wash fruits and vegetables to help enhance the flavor of the juice by removing
any dirt or residue that may have been on the food.
-Always use fresh fruits and vegetables for juicing.
-Refrigerate fruits and vegetables prior to juicing to enjoy the juice cold immediately after juicing.
USING THE PULP:
-The remaining pulp from juicing the fruits or vegetables contains a multitude of nutrients necessary for
a healthy lifestyle and can be used in many ways. It is advised that pulp be used the same day of
juicing.
-The left over pulp can be used in multiple recipes. Pulp can also be used to thicken soups or
casseroles. Many recipes utilizing left over pulp can be found online.
-Pulp can also be a great fertilizer for home gardens.
FUN AND EASY RECIPES:
The following drinks yield a single serving of 6-10 ounces:
Eye-Opener: Fire-Bomb:
2 carrots 1 medium tomato
1 apple ½ jalapeno pepper
1 pealed tangerine ½ cucumber
Apple-Raz: Orchard:
2 apples 2 apples
¼ cup blueberries 2 pears
1 pealed orange
Table of contents
Other UBER APPLIANCE Kitchen Appliance manuals