Uberhaus SALTO 70845013 User manual

Customer Service / Service à la clientèle : 1-866-206-0888
C
"SALTO" SHOWER
Operators’ Manual
DOUCHE "SALTO"
Guide de l'utilisateur
Model / Modèle : Shower door 70845013-14-15-16
Shower base 70845010-11-17-12
Our Customer service staff is available to help you. For help with product assembly, to report damaged or missing
parts, or for any other information about this product, please call our toll-free number.
SAVE THIS MANUAL
Keep this manual and the original sales invoice in a safe, dry place for future reference.
Notre personnel du service à la clientèle est disponible pour vous aider. Pour obtenir de l’aide pour le montage de
votre produit, pour signaler des pièces endommagées ou manquantes, ou pour toute autre information à propos de
ce produit, veuillez composer notre numéro sans frais.
CONSERVEZ CE GUIDE
Conservez ce guide avec la facture d'origine dans un endroit sûr et sec pour référence future.

TABLE OF CONTENTS
General instructions.............................................................1
Before you begin..................................................................1
Hardware part list.................................................................3
Plumbing components & shower base installation..............4
Installing wall channels ......................................................5-6
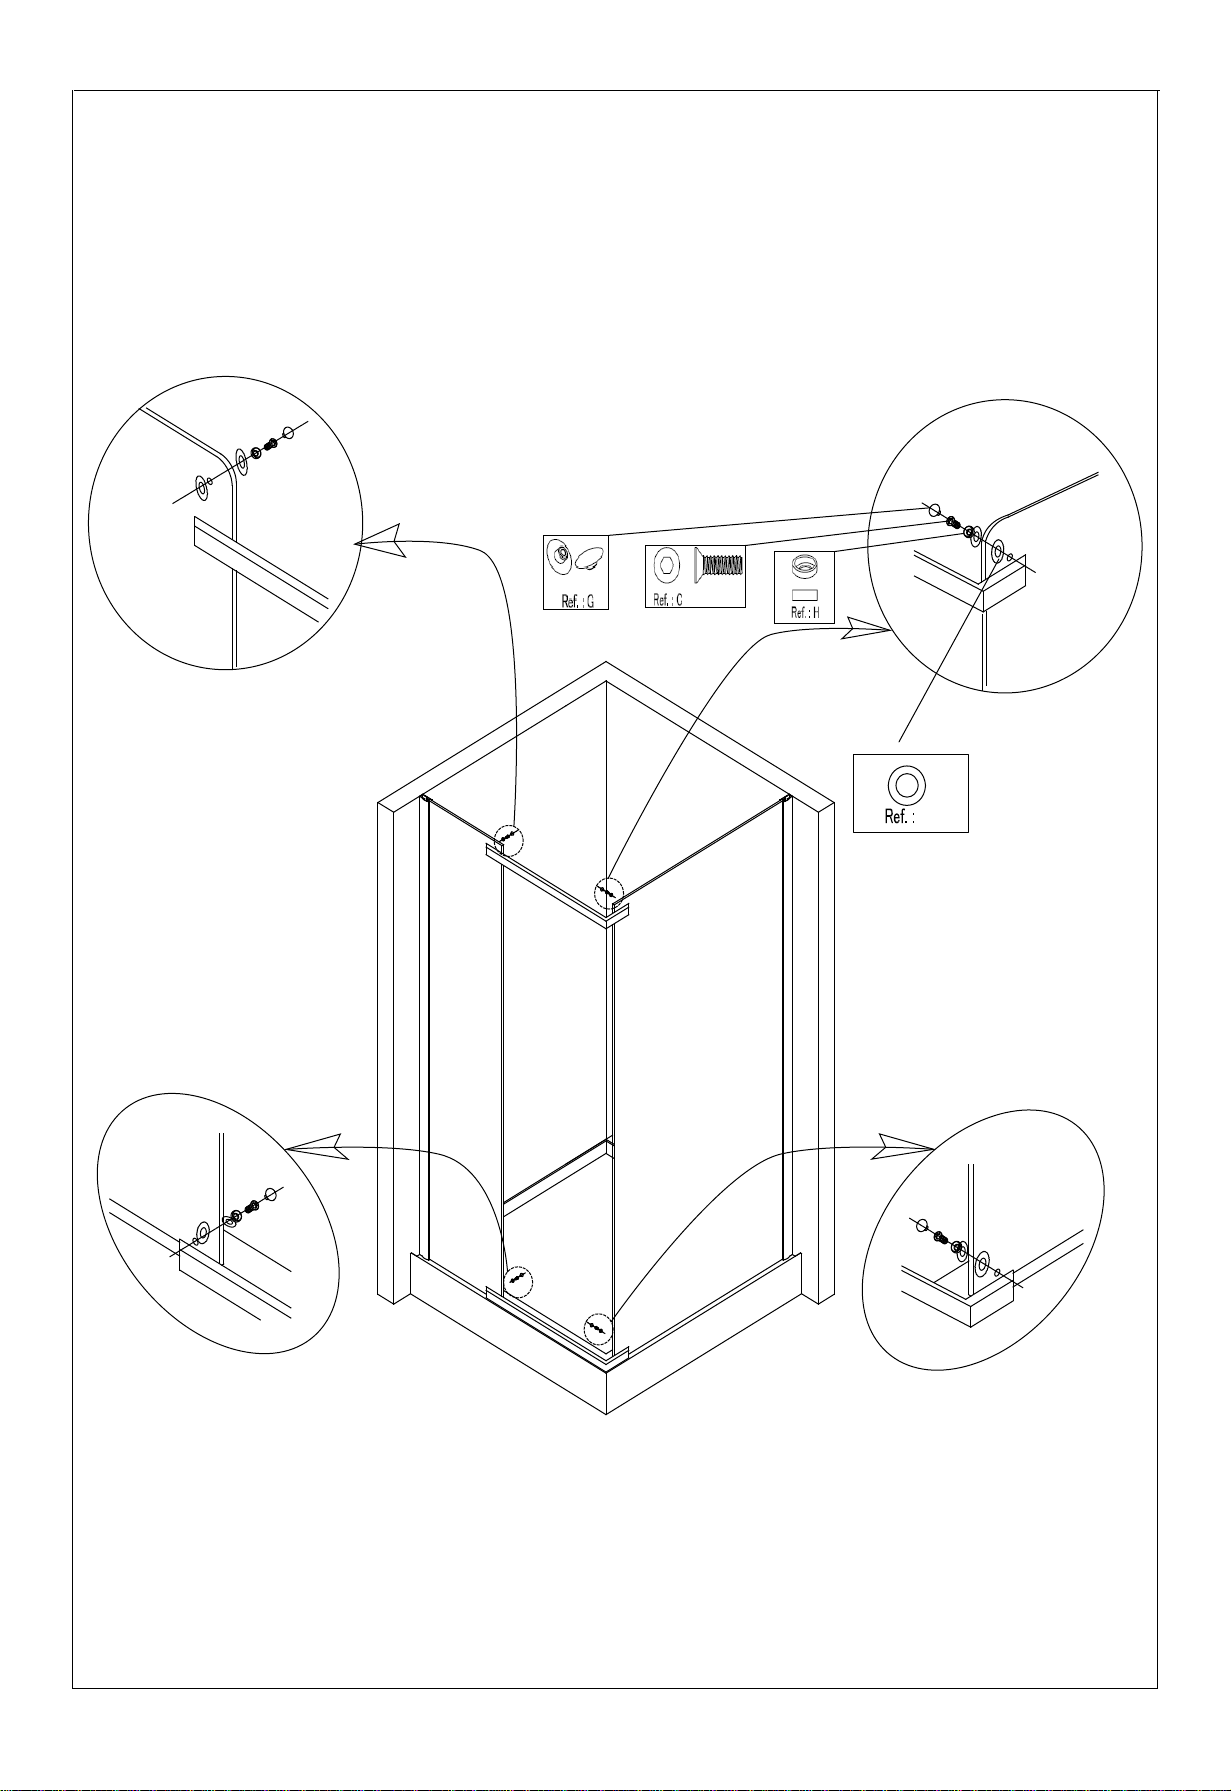
Installing fixed glass panels................................................7-8-9-10
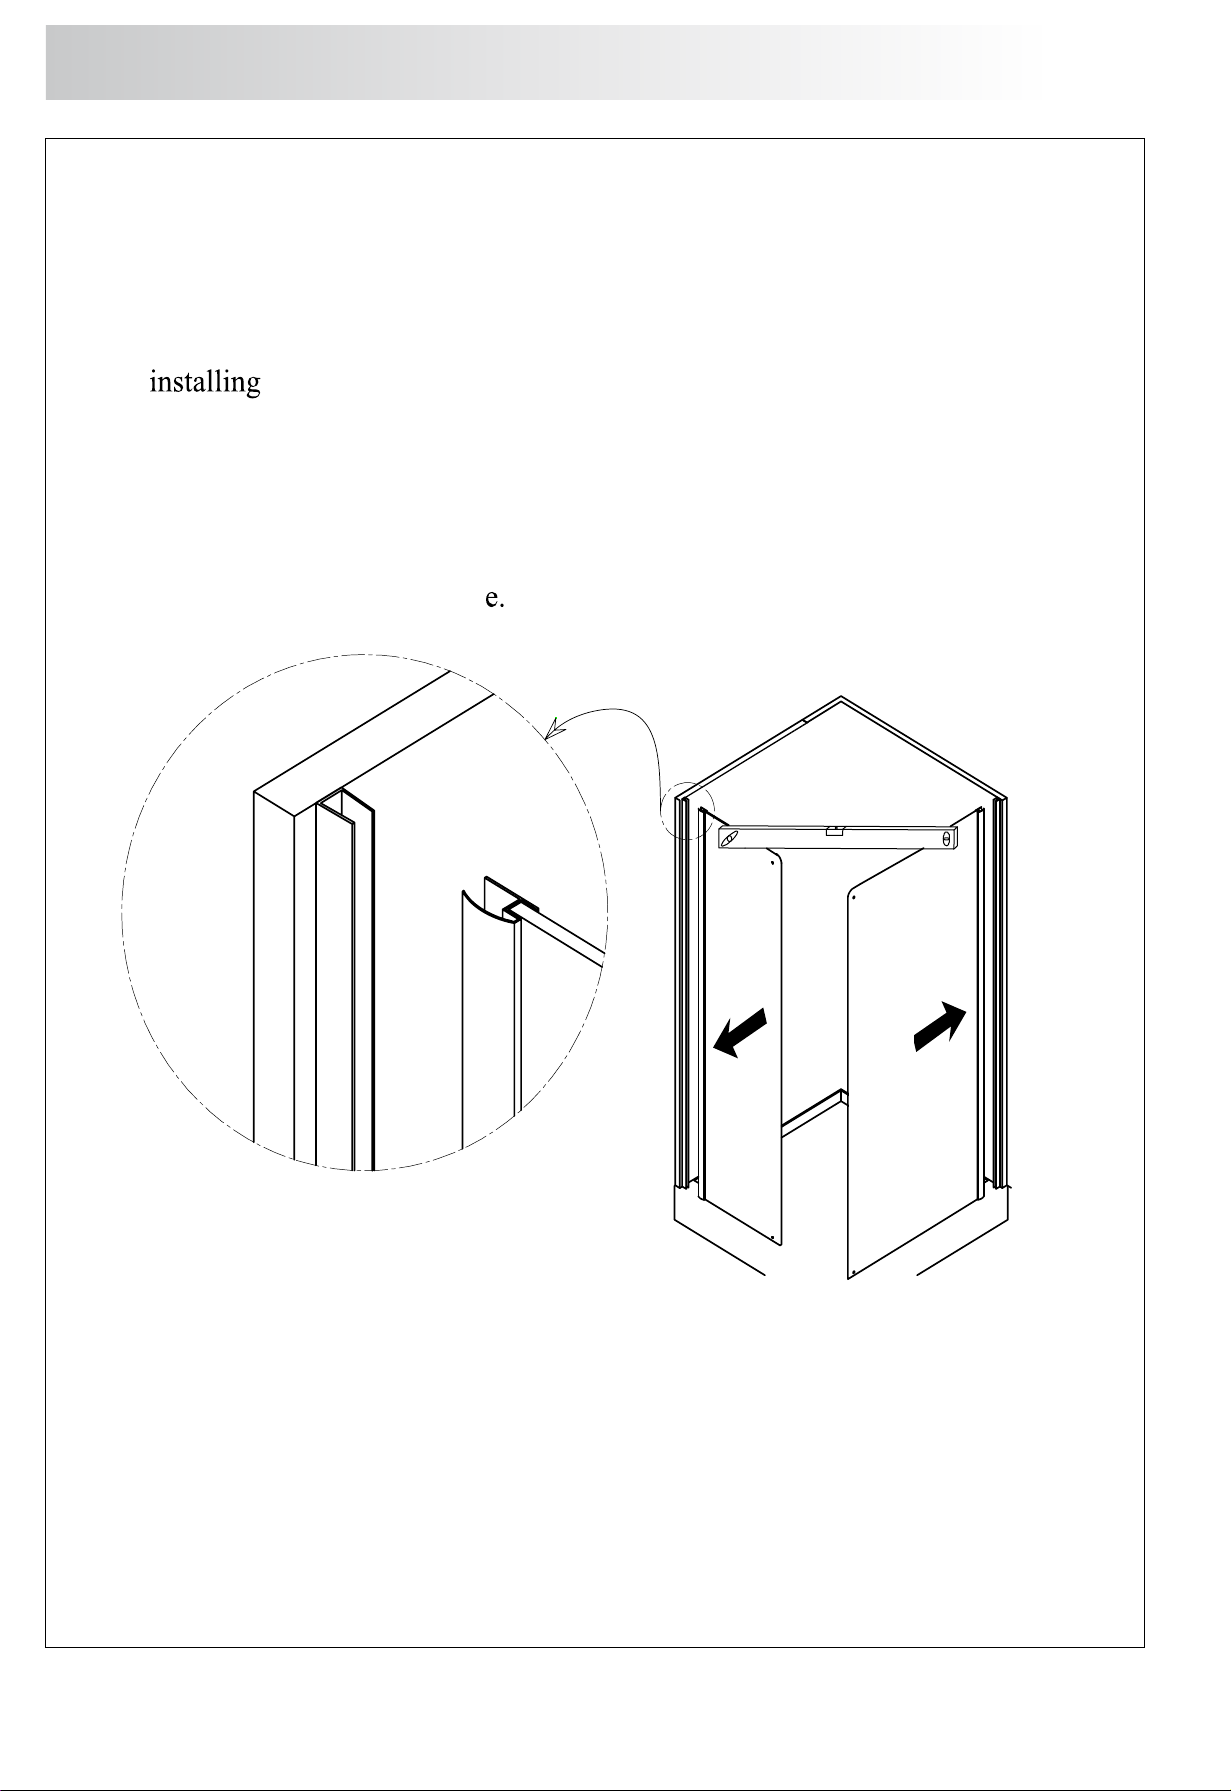
Installing moving shower panels.........................................11-12
Caulking..............................................................................13
Warranty..............................................................................14
General instructions
1. Please take a few minutes to review this manual before you start installation.
2. If you encounter any installation or performance problems, don’t hesitate to contact us.
CUSTOMER SERVICE : 1-866-206-0888 WWW. MECANAIR. NET
Important
You will need at least two people to install this unit properly.
Before you begin:
All plumbing installations should be done by a licensed professional plumber/ installer.
Observe all local plumbing and building codes when installing this shower.
We are not responsible for any damage to the unit or personal property caused by
improper installation. Not following warnings and instructions will void your warranty
and cause a risk of water damage.
Carefully remove product from packaging and keep packaging until installation is
complete.
Inspect all parts for damage; if there is damage to the unit prior to installation,
please contact Customer service.
Install the shower on a floor that is level and able to accommodate the weight of
the unit and an occupant.
Please consult local building codes and compliance standards prior to installation
and ensure conformity.
1
Shower parts........................................................................2

4A
4B
4A
6
7
8
1
9
3
2
1
5
11
11
11
' -
Bottom -Drip Seal- Left
Bottom -Drip Seal- Right
Shower parts
Shower
Base
2
Sku:70845010-11-17-12
(Sold separately)
4B
10
10

8
22X8M
wercS
Ref DESCRIPTION Qty.
1Wall Channel 2
2
Sationary Panel - Left 1
3Bottom Drip Seal 1
4A Bottom Drip Seal - Left 1
4B Bottom Drip Seal - Right 1
5
Shower Base 70845010-11-17-12 (Sold separately) 1
6
2
7
2
lenaProoDssalGediS8 1
9
1
10
lenaProoDssalG
1
11 2
Door Handle
Glass Clamp
AST4x30 Truss Head Screw 8
wercSgnillirD-fleS01x2.4TS
B6
C
F
M8 Screw Washer 8
G
M8 Screw Cover 8
H
6
J M8 Plastic Washer 16
K
6
M
N
Expansion Sleeve 8
DRILL SILICONE
PENCIL
TAPE MEASURE
REVIRDWERCS MALLET
LEVEL
Door Pull Bar
Magnetic Door Seal Strips
Cover A for ST4.2 x10 Self-Drilling Screw
Cover B for ST4.2 x10 Self- Drilling Screw
MASONRY, 1/4’’ET, 1/8 DRILL BITS PRECISION KNIFE
3
Hardware part list
Tools and materials required (Not included)
M8 x 22 Plastic Sleeve 4
Ref : I
ICover for Clamp Screw 2
Ref : M
Ref DESCRIPTION Qty.

It is very important to sure that the base is level and properly supported.
WARNING!
Your bathroom's floor and walls must be leveled and square for an optimal installation.
Please note: The base should be installed on cement.
4
Plumbing components & shower base installation
Cut the box in the same size as the shower base and place cutout over base for protection.
Put some water into the base to test the base
and make sure there are no leaks in the plumbing.
Ensure that all raw plumbing has been prepared before installing the shower.
Attention: in a new construction, the shower base should be intalled before installing the tiles.
Tile Drywall
Shower base
About
25-30 mm
SIDE SECTION VIEW
1. Base installation

5
Draw line to mark channel
location with a pencil.
Make sure toleave 1/2” space
on the edge of shower base
when installing.
2A. Wall channels installation preparation
2. Installing wall channels
Note: Use a level to make sure the position of wall channels.

'
6
Φ
Remove wall channels and drill holes at each mounting hole location.
Repeat on the other side.
After drilling, insert wall anchors.
Replace wall channels and secure to walls with ST4X30 truss head screws(Ref:A).
Repeat on the other side.
2B. Installing wall channels
6
Ref: M

3. Installing fixed glass panel
When installing glass panels, make sure that you have a firm grip on the glass.
Insert the back of glass panel into the wall channels as shown.
Repeat on the other side.
When the glass panels,
make sure that bent channels are on the outside of the shower.
NOTE: If glass panels have a pattern,
the pattern should go on the outsid
Use a level to make sure the two pieces glass are installed perfectly horizontally.

LEFT-SIDE HINGES Pivot block mounting holes on left
Pivot block mounting holes on right RIGHT-SIDE HINGES
8
3B. Installing hinges and door pull bar
First decide whether you want the door to open on the right (hinges on the left side)
or open on the left (hinges on the right side).
Please note: For information purposes, the shower illustrated throughout
this manual has hinges on the left side.

J
Push screw though hole in cup-end of snap cap washer, then tighten screw.
Caps may require a light tapping.
NOTE:Install snap caps only once the shower installation is completed.
9

.
Φ3.2
Φ3.2
Φ3.2
Make sure that the shower enclosure is sitting flat and
even on the base.
Drilling holes through each of the six holes in the wall panels
and into the wall channels.
3C. Reinforcing installation of stationery panels
10
Fix the position connect with wall panels
and wall channels

4B. Installing moving shower panels
13
12
12
Please note: Use the allen key to install
hinges on the glass door.
Please note:Keep a firm grip on the glass door during
the installation, until door is recured on its hinges
4A. Installing door hinges
11
4. Installing moving shower panels

15MM
4C. Installing door strips
12

WARNING!
Silicone sealer must be only applied on the outside of the shower to prevent leaks.
Allow silicone to dry 48 hours.
Caulking
13

Warranty
Shower
Clear tempered glass door: 70845013-14-15-16 3 years
Shower base: 70845010-11-17-12 3 years
Following the conditions and the terms described below, RONA guarantees that the product is in
conformity with its specifications and at the moment of the sale, the product is free from vice
and/or manufacturing defects. Broken parts will be replaced free of charge for a period of three(3)
years following the purchase date. This warranty excludes any expenses related to transportation,
installation and /or uninstallation and freight or handling charges.
The present warranty does not cover defects or damages resulting from an Act of God, accident,
catastrophe, misuse, negligence, improper installation, addition or removal of components,
intensive temperature variation, exposures to chemicals and/or abrasives of any kind, or stains
caused by different types of water such as hard, ferrous or alkaline water.
RONA cannot be held responsible for the direct or indirect damage caused or resulting from
fortuitous occurrences, from the expenses, sundries, labour, waste of time, material or any other
cost related to the application or the replacement of the product or one of its components.
The warranty will be void if the product is installed despite any conspicuous defects that could
have been found during a preliminary inspection.
Maintenance and prevention
RONA recommends the use of wet cloth and soft soap for the maintenance of surfaces. The use
of gritting products, scrapers, brushes or any other object that can damage the surface of the
product is forbidden and will void the present warranty.
Should you have any problems with your product, please do not return it to the store. Call
Mecanair customer service directly at 1-866-206-0888 or visit their website at www.mecanair.net.
A proof of purchase (original sales receipt) from the original purchaser of the product must be
provided with any warranty claim.
Warranty
This manual suits for next models
7
Table of contents
Popular Shower Cabin manuals by other brands

BATH DELUXE
BATH DELUXE DETROIT SQUARE LOW TRAY installation guide

Kohler Mira
Kohler Mira Indigo E44W01-GA Fitting instructions

Kohler
Kohler ARICA K-705250 installation instructions

VINNOVA
VINNOVA Tafaala 316034-WR-BG Installation instruction

Kinedo
Kinedo EDEN 2 R80 installation instructions

TdA
TdA New Speedy Angolo manual