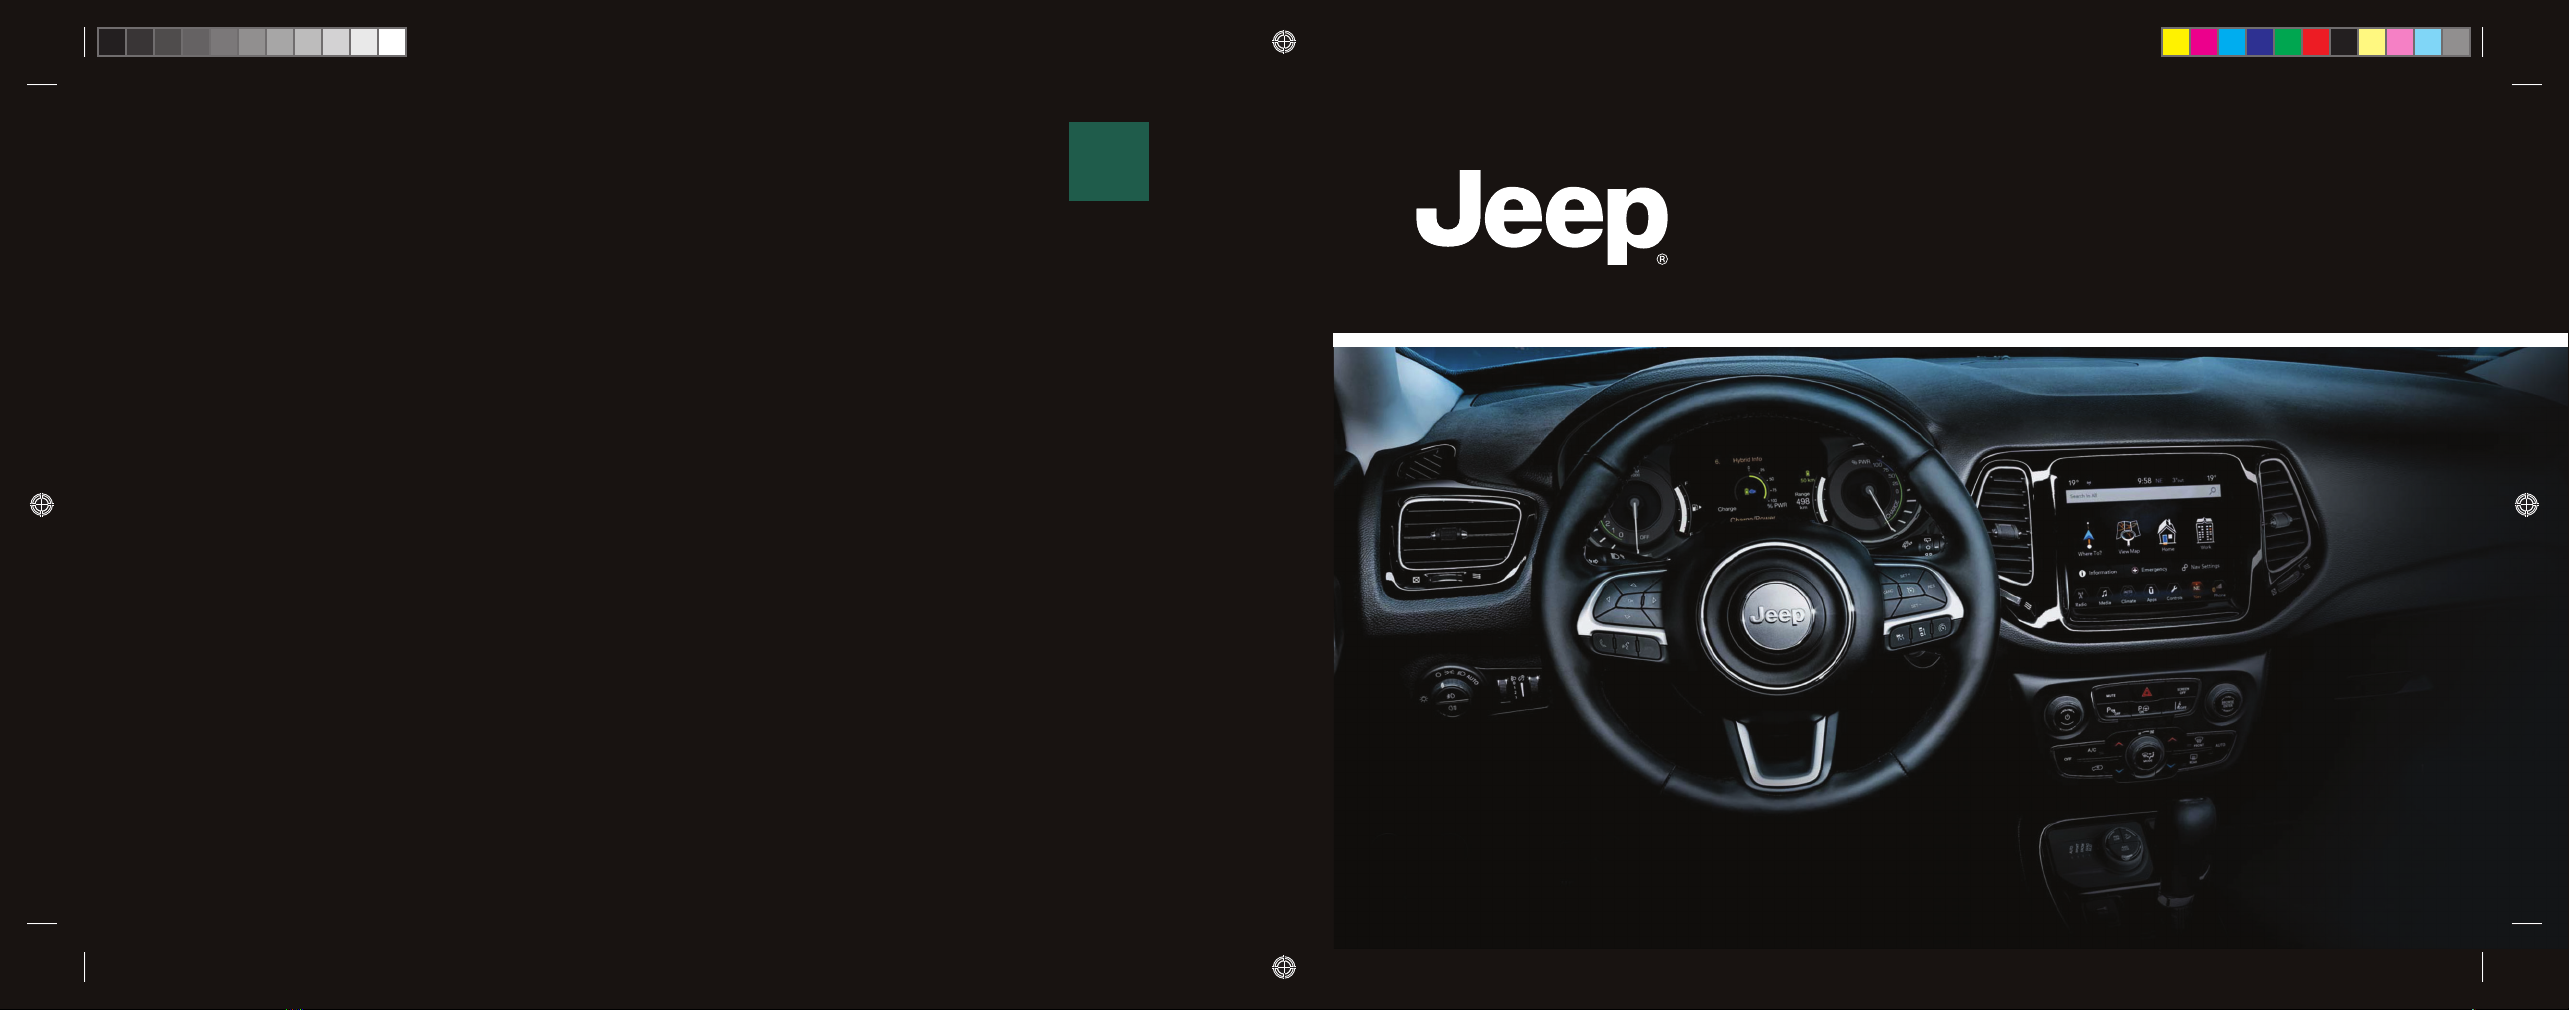
Uconnect 7 HD LIVE User manual

Uconnect™ 7” HD LIVE
ENGLISH
All data contained in this publication is purely indicative.
FCA Italy S.p.A. can modify the specifications of the vehicle models described in this publication at any time,
for technical or marketing purposes.
For further information, please contact a Jeep Dealership.
COMPASS

1
Uconnect™7” HD LIVE
PRESENTATION ........................ 5
TIPS, CONTROLS AND
GENERAL INFORMATION......... 6
TIPS............................................ 6
MULTIMEDIA DEVICES:
SUPPORTED AUDIO
FILES AND FORMATS ................ 6
NOTES ON TRADEMARKS......... 7
EXTERNAL AUDIO
SOURCES .................................. 7
ANTI-THEFT PROTECTION ........ 8
GPS RECEPTION (Global
Positioning System)..................... 8
SOUND SYSTEM........................ 8
IMPORTANT NOTES .................. 9
QUICK REFERENCE
GUIDE ....................................... 10
CONTROLS .............................. 10
CONTROLS ON THE
STEERING WHEEL .................. 13
DESCRIPTION .......................... 13
CONTROLS ON
STEERING WHEEL
SUMMARY TABLE.................... 14
CONTROLS BEHIND THE
STEERING WHEEL ................... 15
SWITCHING THE SYSTEM
ON/ OFF................................... 16
RADIO (TUNER) MODE............. 16
RADIO MODE SELECTION ....... 16
SELECTING A
FREQUENCY BAND ................. 16
DISPLAYED INFORMATION...... 16
RADIO STATION
SELECTION .............................. 17
PREVIOUS / NEXT RADIO
STATION SEARCH .................. 18
PREVIOUS / NEXT RADIO
STATION FAST SEARCH.......... 18
AM/FM RADIO STATION
TUNING .................................... 18
SETTING THE PRESETS .......... 19
AUDIO ...................................... 19
MEDIA MODE........................... 22
AUDIO SOURCE
SELECTION .............................. 22
DISPLAYED INFORMATION...... 22
CHANGE TRACK
(next/previous) .......................... 23
FAST FORWARD/REWIND
THROUGH TRACKS ................. 23
SELECT TRACK
(Tracks)..................................... 23
TRACK INFORMATION
DISPLAY................................... 24
SHUFFLE.................................. 24
REPEAT.................................... 24
Bluetooth®SOURCE ............... 24
PAIRING A Bluetooth®
AUDIO DEVICE ........................ 24
USB SOURCE........................... 25
REAR USB PORT ..................... 25
AUX SOURCE........................... 26
TRIP COMPUTER .................... 26
PHONE MODE.......................... 27
PHONE MODE
ACTIVATION ............................. 27
MAIN FUNCTIONS.................... 27
DISPLAYED INFORMATION...... 28
PAIRING A MOBILE
PHONE..................................... 28
CONTENTS

2
Uconnect™7” HD LIVE
STORING NAMES/
NUMBERS IN THE
MOBILE PHONE
PHONEBOOK........................... 29
CONNECTING/
DISCONNECTING A
MOBILE PHONE OR
Bluetooth®AUDIO DEVICE ....... 29
DELETING A MOBILE
PHONE OR Bluetooth®
AUDIO DEVICE ........................ 30
SETTING A MOBILE
PHONE OR Bluetooth®
AUDIO DEVICE AS
FAVOURITE .............................. 30
TRANSMISSION
OF PHONE DATA
(PHONEBOOK AND
RECENT CALLS) ...................... 31
DELETION OF PHONE
DATA (PHONEBOOK AND
RECENT CALLS) ...................... 31
MAKING A PHONE CALL ......... 31
CALL BROWSING .................... 32
BROWSING FAVOURITES ........ 33
MANAGING AN
INCOMING CALL...................... 33
MAKING A SECOND
PHONE CALL ........................... 34
MANAGING TWO PHONE
CALLS ...................................... 34
REDIAL ..................................... 34
CONTINUING A PHONE
CALL ........................................ 34
ACTIVATION /
DEACTIVATION OF THE
MICROPHONE ......................... 34
TRANSFERRING A CALL.......... 35
SIRI EYES FREE ....................... 35
TEXT MESSAGE READER ........ 37
TEXT MESSAGE OPTIONS....... 37
BROWSING TEXT..................... 38
DO NOT DISTURB
FUNCTION................................ 38
Uconnect™ MODE ................. 38
Apple CarPlay AND Android
Auto .......................................... 39
Android Auto APP SETUP......... 39
SETTING UP THE Apple
CarPlay APP ............................. 40
INTERACTION .......................... 40
NAVIGATION ............................ 41
"AUTOSHOW
SMARTPHONE DISPLAY
ON CONNECTION"
SETTING................................... 41
CLOSING THE Apple
CarPlay AND Android
Auto APPS................................ 41
SETTINGS................................. 42
CONNECTED SERVICES -
UCONNECT SERVICES ........... 47
GENERAL DISCLAIMER ........... 48
DEACTIVATION OF
GEOLOCATION MODE ............. 50
UPDATING THE SYSTEM ......... 50
DEACTIVATING
UCONNECT SERVICES ............ 50
CLIMATE CONTROL
SYSTEM.................................... 51
VOICE COMMANDS ................ 52
USE OF THE VOICE
COMMANDS ............................ 52
USE OF STEERING
WHEEL CONTROLS
TO ACTIVATE VOICE
COMMANDS ............................ 53
VOICE SESSION STATUS......... 53
MULTIPLE CHOICE .................. 54
GLOBAL VOICE
COMMANDS ............................ 54
PHONE VOICE
COMMANDS ............................ 54

3
Uconnect™7” HD LIVE
RADIO AM/FM/DAB
VOICE COMMANDS ................. 56
MEDIA VOICE
COMMANDS ............................ 57
CUSTOMER SERVICE
NUMBER LIST.......................... 59

4
Uconnect™7” HD LIVE
Page left intentionally blank

5
Uconnect™7” HD LIVE
PRESENTATION
The vehicle is equipped with an infotainment system designed according to the specific characteristics of the passenger
compartment, with a customized design that matches the dashboard style.
The system is installed in an ergonomic position for the driver and passenger and the controls can be quickly identified from
the graphics on the front panel making the device easy to use.
To increase protection against theft, the system has a protection system which only allows it to be used on the car in which it
was originally fitted.
The instructions for use are given below and we recommend you read them carefully and always keep them to hand (for
example, in the glove compartment).
Enjoy reading. Happy motoring!
All data contained in this publication are purely indicative. FCA Italy S.p.A. can modify the specifications of the object
described in this publication at any time, for technical or marketing purposes.
For further information, contact a Jeep Dealership.

6
Uconnect™7” HD LIVE
TIPS, CONTROLS
AND GENERAL
INFORMATION
TIPS
Road safety
Learn how to use the various system
functions before setting off.
Read the instructions for the system
carefully before setting off.
1) 2)
Reception conditions
Reception conditions change
constantly while driving. Reception
may be interfered with by the
presence of mountains, buildings or
bridges, especially when you are far
away from the broadcaster.
IMPORTANT The volume may be
increased when receiving traffic
bulletins.
Care and maintenance
1) 2)
Observe the following precautions to
ensure the system is fully operational:
the display lens should not come
into contact with pointed or rigid
objects which could damage its
surface; use a soft, dry anti-static
cloth to clean and do not press.
do not use alcohol, petrol and
derived products them to clean
the display lens and make sure
that the Uconnect™ system is
switched off during cleaning.
prevent any liquid from entering
the system: this could damage it
beyond repair.
Important notes
In the event of an anomaly, the system
must only be checked and repaired by
a Jeep Dealership.
If the temperature is particularly low,
the display may take a while to reach
optimum brightness.
If the car is stopped for a while and
the outside temperature is very high,
the system may go into "thermal
protection" mode, suspending
operation until the radio temperature
returns to acceptable levels.
MULTIMEDIA DEVICES:
SUPPORTED AUDIO
FILES AND FORMATS
For the USB source the system can
play files with the following extensions
and formats:
.MP3 (32 – 320Kbps);
.WAV (8/16 bit, 8-48 kHz);
.WMA (5 – 320Kbps) mono and
stereo (must be lossless);
.AAC (8 – 96KHz) mono and
stereo;
.M4A (8 – 96KHz) mono and
stereo;
.M4B (8 – 96KHz) mono and
stereo;
.MP4 (8 – 96KHz) mono and
stereo.
For all sources, the system can also
play the following Playlist formats:
.M3U
.WPL

7
Uconnect™7” HD LIVE
For devices that support the MTP
(Media Transfer Protocol), the system
can play back all file and playlist
extensions and formats supported by
the device itself.
NOTE It makes no difference whether
the suffixes are written in capital or
small letters.
NOTE It is recommended to load
only unprotected music files, with
supported extensions. If the external
audio device has other formats (e.g.
.exe, .cab, .inf, etc.) problems might
arise during playing of tracks.
IMPORTANT Some multimedia player
devices may not be compatible with
the Uconnect™ system.
Only use devices (e.g. USB flash
drives) from safe sources on the car.
Devices from unknown sources could
contain software infected by viruses
which, if installed on the car, could
increase the vulnerability of the car's
electric/electronic systems to hacking.
NOTES ON
TRADEMARKS
iPod, iTunes and iPhone are registered
trademarks of Apple Inc.
All the other trademarks belong to
their respective owners.
Apple is not responsible for the
operation of this device and of its
conformity with the safety rules and
standards.
The radio equipment supplied with the
vehicle complies with the 2014/53/
EU directive. For further information
visit the
http://www.mopar.eu/owner or
http://aftersales.fiat.com/elum/
websites.
EXTERNAL AUDIO
SOURCES
Other electronic devices (e.g. PDA,
etc.) can be used on the car.
Some of them may cause
electromagnetic interference however.
Disconnect these devices if the
system performance worsens.
NOTE The system supports only
FAT32 and EX FAT formatted USB
devices. The system does not support
devices with a capacity higher than
64GB.
NOTE The system does not support
USB hubs connected to the USB
port of the vehicle. Connect your
multimedia device directly to the USB
port, using the specific connection
cable for the device if necessary.

8
Uconnect™7” HD LIVE
ANTI-THEFT
PROTECTION
The system is equipped with an
anti-theft protection system based
on the exchange of information with
the electronic control unit (Body
Computer) on the vehicle.
This guarantees maximum security
and prevents the system from being
used on other cars in the event of
theft. In case of need, contact a Jeep
Dealership.
GPS RECEPTION (Global
Positioning System)
The GPS is a satellite system which
provides worldwide information
about time and position. The GPS
is exclusively controlled by the
government of the United States of
America, the only body responsible
for the availability and accuracy of this
system.
The operation of this navigation
system can be influenced by any
change made to the availability and
precision of the GPS or by specific
environmental conditions.
When navigation is started for the
first time, the system may require
several minutes to determine the
GPS position and display the current
position on the map. Afterwards the
position will be found much more
quickly (usually a few seconds are
needed).
The presence of big buildings (or
similar obstacles) may sometimes
interfere with the GPS signal
reception.
SOUND SYSTEM
Basic level sound system
2 x front tweeters
2 x front door midwoofers
2 x rear doors fullrange speakers
HI-FI sound system
(where provided)
10 x speakers:
1 x centerfill speaker on
dashboard
2 x front tweeters
2 x front door midwoofers
2 x rear door tweeters
2 x rear door midwoofers
1 x sub-woofer in the boot
1 x 12-channel amplifier in the
boot

9
Uconnect™7” HD LIVE
IMPORTANT NOTES
Look at the screen only and when it
is necessary and safe. If you need to
look at the screen for a long time, pull
over to a safe place so as not to be
distracted while driving.
Immediately stop using the system
in the event of a fault. Otherwise the
system might be damaged.
Contact a Jeep Dealership as soon as
possible to have the system repaired.
IMPORTANT
1) Follow the safety rules here below:
otherwise serious injuries may occur to
the occupants or the system may be
damaged.
2) If the volume is too loud this can be
dangerous. Adjust the volume so that you
can still hear background noises (e.g.
horns, ambulances, police vehicles, etc.).
WARNING
1) Only clean the front panel and the
display with a soft, clean, dry, anti-static
cloth. Cleaning and polishing products
may damage the surface. Do not use
alcohol or similar products to clean the
control panel or the display.
2) Do not use the display as a base for
supports with suction pads or adhesives
for external navigators or smartphones or
similar devices.

10
Uconnect™7” HD LIVE
QUICK REFERENCE GUIDE
CONTROLS
1 5520405D

11
Uconnect™7” HD LIVE
GRAPHIC BUTTONS ON DISPLAY
graphic button Functions Mode
Radio Access to the Radio mode Press graphic button
Media Source selection: USB, AUX (where provided), Bluetooth®Press graphic button
Phone Access to the Phone mode Press graphic button
Apps
Press graphic button Access to additional functions (display of
Time, Compass, Outside temperature, Media Player and App/
Services in the car)
Press graphic button
Compass Viewing compass information Press graphic button
Settings Access the settings menu Press graphic button
Audio Access the Audio settings menu Press graphic button
Climate Access the Climate control settings menu Press graphic button

12
Uconnect™7” HD LIVE
CONTROLS ON DASHBOARD
Button Functions Mode
/ VOLUME
On/off Short button press
Volume adjustment Left/right rotation of knob
SCREEN OFF Display on/off Short button press
MUTE Volume activation/deactivation (Mute/Pause) Short button press
TUNE SCROLL /
BROWSE ENTER
Confirmation of the option displayed
Browsing list opening (Radio mode and Media mode) Short button press
Scroll the list or tune to a Radio station
Display the list of stations (Radio mode)
Scroll the contents of the sources (Media mode)
Change track for Media source
Change radio station (Radio mode)
Left/right rotation of knob

13
Uconnect™7” HD LIVE
CONTROLS ON THE STEERING WHEEL
(where provided)
DESCRIPTION
The controls for the main system functions are present on the steering wheel to make control easier.
The activation of the function selected is controlled, in some cases, by how long the button is pressed (short or long press)
as described in the table below.
2 5520526D

14
Uconnect™7” HD LIVE
CONTROLS ON STEERING WHEEL SUMMARY TABLE
Button Interaction
Acceptance of incoming call
Acceptance of the second incoming call and putting the active call on hold
Display on the instrument panel of the list of the last 10 calls and favourite phone numbers (only with call
browsing active)
Activation of voice recognition
Interruption of the voice message in order to give a new voice command
Interruption of voice recognition
Rejection of incoming call
Ending of call in progress
Exit the display view on the instrument panel of the last calls (only with call browsing active)
/Short press (Phone mode): selection, on the instrument panel display, of the last calls/text messages (only
with call browsing active)

15
Uconnect™7” HD LIVE
CONTROLS BEHIND THE STEERING WHEEL
Buttons Interaction
Button 1 (steering wheel left side)
Upper button Brief button press: search for next radio station or selection of USB next track
Long button press: scan of higher frequencies until released/fast forward of USB track
Central button With each press it scrolls through sources AM, FM, USB, AUX (where provided).
Only the available sources will be selected.
Lower button Brief button press: search for next radio station or select USB previous track
Long button press: scan of lower frequencies until released/ fast forward of USB track
Button 2 (steering wheel right side)
Upper button
Increasing volume
Brief button press: single volume increase
Long button press: fast volume increase
Central button Activation/deactivation of Mute function
Lower button
Decreasing volume
Brief button press: single volume decrease
Long button press: fast volume decrease

16
Uconnect™7” HD LIVE
SWITCHING THE
SYSTEM ON/ OFF
RADIO (TUNER) MODE
The system is switched on/off by
pressing the (ON/OFF) button/
knob.
Turn the button/knob clockwise
to increase the radio volume or
anticlockwise to decrease it.
The system is equipped with the
following tuners: AM, FM and DAB (for
versions/markets, where provided).
RADIO MODE
SELECTION
Press the "Radio" graphic button
on the display to activate the Radio
mode.
The different tuning modes (AM/
FM/DAB) can be selected with the
corresponding graphic button on the
display fig.3. Each tuning mode can
have a specific set of presets.
3 J0A3000
SELECTING A
FREQUENCY BAND
Briefly press the "AM" graphic button
to switch to the AM band.
Briefly press the "FM" graphic button
to switch to the FM band.
Briefly press the "DAB" graphic button
to switch to the DAB band.
DISPLAYED
INFORMATION
After the desired radio station is
selected, the following information is
shown on the display:
At the top: the list of radio stations
stored (preset) is displayed; the station
currently playing is highlighted.
At the centre: the name of station
being listened too is displayed.
On the left side: view the "AM",
"FM", "DAB" (where provided)
graphic buttons to select the desired
frequency band are displayed (the
graphic button corresponding to the
selected band is highlighted);
On the right: display of the following
buttons:
"Info": additional information on
the source being listened to.

17
Uconnect™7” HD LIVE
At the bottom: display of the
following buttons:
"Browse": list of the radio stations
available;
/ : previous/next radio
station selection;
"Tune" : manual radio station
tuning;
"Audio": access to the "Audio
Settings" screen.
RADIO STATION
SELECTION
To search for the desired radio station:
press the or button on the
display;
press the or control on the
steering wheel;
turn the TUNE SCROLL button/
knob
"Browse"
Pressing the "Browse" graphic button
accesses the screen where the "All"
fig.4 graphic button is selected,
and that displays the list of all the
saved radio stations in the selected
frequency band. The corresponding
"Genre" is shown next each radio
station.
4 J0A3001
The "ABC" graphic button can be
used to skip to the letter required in
each list.
The "Refresh List" graphic button
requests an update of the radio
station list: the update may last from a
few seconds to about two minutes.
The "Presets" graphic button shows a
list of preset stations and allows you
to delete them.
Press the or button to scroll and
search for radio stations within the list
To return to the main frequency band
selection screen, manually press the
"X" or button.

18
Uconnect™7” HD LIVE
PREVIOUS / NEXT RADIO
STATION SEARCH
Briefly press buttons or on the
display: when the button is released
the previous or the next radio station
is displayed.
When searching forwards, if the
system reaches the end of the band,
it will automatically stop on the station
where the search has started from.
PREVIOUS / NEXT RADIO
STATION FAST SEARCH
Hold down buttons or on the
display to start the fast search: when
the button is released, the first tunable
radio station can be heard.
When searching forwards, if the
system reaches the end of the band,
it will automatically stop on the station
where the search has started from.
AM/FM RADIO
STATION TUNING
Use the "Tune" graphic button to
select a radio station directly.
Press the "Tune" graphic button
on the display, then select the first
number of the desired radio station
fig.5.
Direct tune
FM: 107.50 MHz 10:10
3
107.50
OK
28˚est.
6
9
2
5
8
0
1
4
7
5 J0A3002
The graphic keyboard helps you select
only the frequencies that can be tuned
by disabling the digits that you cannot
use.
In this mode, use the and buttons
to fine-tune the frequency.
To delete an incorrect number (and
enter the correct station number)
press the (Delete) graphic button.
After the last digit of the station is
entered, the "Direct Tune" screen is
closed and the system tunes to the
selected station automatically.
The screen automatically disappears
after a few seconds.
Exiting the "Direct Tune" screen
Press the "X" (Exit) or "Radio" graphic
button on the display to return to the
main system screen.

19
Uconnect™7” HD LIVE
SETTING THE PRESETS
Presets are available in all system
modes and are activated by touching
one of the preset buttons located in
the upper area of the display.
If you are tuned to a radio station that
you wish to store, press and hold the
graphic button on the display which
corresponds to the desired preset or
until an acoustic warning is heard.
Six radio stations are displayed at the
top of the display.
Press the and buttons to pass
from the first bank of six stored
stations (presets) to the second bank.
Pressing the "Browse" graphic button
accesses the screen that displays the
list of all the saved radio stations in the
selected frequency band. To scroll and
search for radio stations within the list,
press the or button.
AUDIO
To access the "Audio" menu press the
Audio" graphic button located at the
bottom of the display.
Pressing the "Audio" graphic button
automatically accesses the "Settings"
menu from which it is possible to
make the desired adjustments.
The following adjustments can be
carried out using the "Audio" menu:
"Balance & Fade" (left/right
and front/rear audio balance
adjustment)
"Equalizer" (where provided)
"Speed Adj Volume" (speed-
dependent automatic volume
control)
"Loudness" (where provided) "AUX
Volume Offset" (only active if an
AUX device is inserted) (where
provided)
"AutoPlay"
"Auto-On Radio"
"Radio Off upon opening"
To exit the "Audio" menu, press the
or "X" (Exit) graphic button.
Balance & Fade
Press the "Balance & Fade" graphic
button to balance the sound from the
front and rear seat speakers.
Press the or button to adjust the
balance of the front and rear speakers
fig.6.
6 J0A3003
Press the or buttons to adjust the
balance of the speakers on the left
and the right side.
The adjustment is also possible by
moving the symbol on the right side
of the display upwards/downwards/to
the left/to the right.
Table of contents
Popular Automobile Accessories manuals by other brands

SAN HIMA
SAN HIMA SH-TMLC79-8418-SLI user manual

iBeam
iBeam TE-DGH Removal and Installation Instructions

aFe Power
aFe Power 77-42008 instruction manual

Omron Automotive Electronics Korea Co.
Omron Automotive Electronics Korea Co. OKA-206W user manual

Ultra-tow
Ultra-tow 48118 owner's manual

Maakbaas
Maakbaas 0x001 instruction manual