Uctronics K0073 User manual

Smart Robot Car Kit
Quick Start Guide
Model: K0073

Smart Robot Car Kit
User Guide

M2*4 micro servoscrews
2 bars
M2*10 screws round head
4 bars
PTZ self-tapping screws
4 bars
M2 nuts
4 pieces
M3*12 screws round head
2 bars
5 Pin line tracking module cable
1 piece
4 Pin ultrasonic module cable
1 piece
Fixing tool
1 set
Line tracking module
1 piece
Camera module
1 piece
18650 Battery charge r
1 piece
18650 Battery
2 pieces
M3 nuts
2 pieces
Ultrasonic bracket
1 piece
Servo accessory
2 set
Pan/Tilt/Zoom
1 set
M3 nuts
2 pieces
Battery container
1 piece
Motor drive board
1 piece
M3*5*4 countersunk
headscrews
2 bars
Packing list
M3*30 screws round head
8 bars
M2.5*6 screws round head
4 bars
Chassis
1 piece
Ultrasonic module
1 piece
Deceleration DC motor
4 pieces
Servo
2 pieces
Wheel
4 pieces
Fastener
8 pieces
M3*30 socket screws
2 bars
M3*6 socket screws
2 bars
M3 nuts
2 pieces
M2.5 nuts
4 pieces
M3 nuts
8 pieces
M3*6 screws round head
2 bars
M2.5*25 socket screws
4 bars
M2.5*11 socket screws
4 bars
For Ultrasonic sensor For Line tracking moduleFor Battery container For DC motors
For Raspberry Pi and Driver board
For Pan-and-Tilt Servo
Smart Robot Car Kit
User Guide
15 Pin FPC cable
1 piece
CD
1 piece
SD
1 piece

1DC motors installation
Step 1: Place the DC motor in the position
marked on the chassis
Step 2: Install the DC motor
*8 x M3*30 round head screws
4 x DC motors
8 x M3 nuts
1 x Chassis
8 x T-type fasteners
For example, the Front L and Front R marks should
be matched between the motor and chassis
*
Smart Robot Car Kit
User Guide

After you complete the first 2 steps, your robot car should
look like this:
Smart Robot Car Kit
User Guide
Step 3: Repeat the steps above, until 4 motors are all installed.

2 Wheels installation
*4 x Wheels
Smart Robot Car Kit
User Guide
After a successful motors and wheels installation, your robot
car should look like this (from the down side of the chassis):

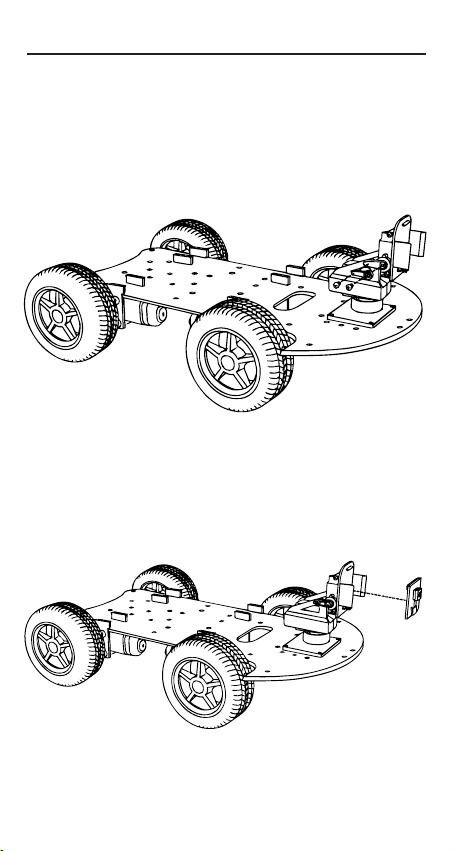
3Pan and Tilt servos installation
Step 1: Mount the Pan servo accessory
1 x Servo
1 x Servo accessory
1 x Pan and Tilt accessory
1 x M2*4 round head screw
2 x PTZ self-tapping screws
*
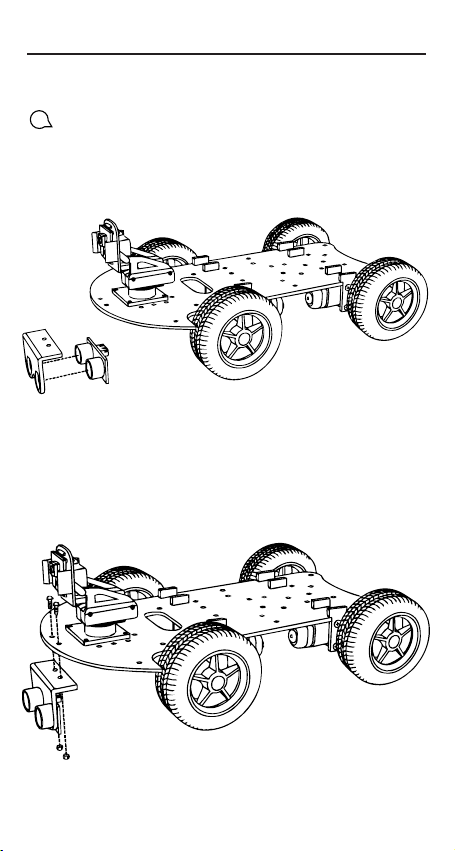
Step 2: Mount the Pan servo
4 x M2 nuts
4 x M2*10 round head screws
*
Smart Robot Car Kit
User Guide
*Flip the chassis over from the last step and find the
center position of the servo before mounting
NOTE: Servo accessories do not fit as perfectly with the screw as
nuts, and you might need to screw harder.

Step 3: Mount the accessory of the Tilt servo
2 x Pan and Tilt brackets
2 x Pan and Tilt accessory screws
*
Step 4: Mount the tilt servo and the camera module holder
1 x Servo accessory
1 x Pan and Tilt bracket
2 x PTZ self-tapping screws
*
Find the center position of the servo before mounting
*
Smart Robot Car Kit
User Guide

Step 5: Mount the servo and camera holder
1 x Servo accessory
1 x M2*4 round head screw
*
Step 6: Mount the camera module
1 x Camera module
*
Note the orientation of the Camera Module
*
Smart Robot Car Kit
User Guide

4Ultrasonic Module installation
Step 1: Mount the ultrasonic sensor to its plastic holder
*1 x Holder for HC-SR04 Ultrasonic Module
1 x HC-SR04 Ultrasonic Module
Step 2: Mount the ultrasonic module to the chassis
2 x M3 nuts
2 x M3*12 round head screws
*
Smart Robot Car Kit
User Guide
You can adjust the direction of the Pan-Tilt servo to the left and
right to better install the nuts of the ultrasonic module and line
follower

5 Mount the Line tracking module
2 x M3 nuts
1 x Line Tracking module
2 x M3*30 socket screws
2 x M3*6 round head screws
*
Smart Robot Car Kit
User Guide

6 Install Raspberry Pi and Driver Controller board
4 x M2.5 nuts
1 x Raspberry Pi
4 x M2.5*25 socket screws
*
1 x Camera with cable
*
Step 2: Install FPC cable
Smart Robot Car Kit
User Guide
Step 1: Install Raspberry Pi Motherboard
* Note: Pi is not included, bring your own Pi for this
step. You might need to flip the chassis over to better
install the nuts.
* Note: The ribbon has already been installed on the
camera end, and you only need to install its Pi end.
Make sure the silver connector face the HDMI port. If
you have not installed a Pi camera before, we
suggest you to watch some online video tutorials first.

Step 3: Install driver controller board
4 x M2.5*11 socket screws
4 x M2.5*6 round head screws
1 x Motor drive expansion board
*
Smart Robot Car Kit
User Guide
After you install the Raspberry Pi motherboard, ribbon cable, and
the driver expansion board, you robot car should look like this:

7Battery container installation
2 x M3 nuts
1 x Battery container
2 x M3*6 socket screws
2 x M3*5*4 countersunk head screws
*
Step 1: Install the Battery container
Step 2: Insert two 18650 batteries
Smart Robot Car Kit
User Guide
2 x 18650 batteries
*

Tracking module wiring
9
*20cm 5-Pin cable
Ultrasonic module wiring
8
*20cm 4-Pin cable
Smart Robot Car Kit
User Guide

Pan and Tilt servos wiring
10
Connect the cables in the orientation shown in the illustration
below. Note the positions of the yellow and brown wires
*
Battery container wiring
11
Smart Robot Car Kit
User Guide

DC motors wiring
12
J2 connector for Front DC motors
J1 connector for Rear DC motors
Camera module wiring
13
Note the orientation of the FPC cable
*
Smart Robot Car Kit
User Guide

1.The example sketch and library
2.Mobile APP to control the car
3.User Manual in PDF version
4.Working modes demo
5.And more
1.Prefer an online and updated version
2.Do not have a CD reader
3.Find the CD defective or missing
1.Troubleshooting
2.User experience sharing
3.And more
Dear Customer:
Thanks for using the UCTRONICS Smart Robot Car Kit
K0073 for Raspberry Pi. You can contact us at the email
address below. Please don't hesitate to let us know if
you need any support from us. We love helping our
customers learn and play with our products.
Contact us:
Customer support: [email protected]
Business: [email protected]
Tel: +86 025 84271192
Web: http://www.uctronics.com/contacts/
Smart Robot Car Kit
User Guide
After you finish all steps above, you can go from hardware
to software part.
Just insert the SD card that comes with this kit and
boot the Pi up, then connect your phone to the
"UCTRONICS" access point using the password
"12345678".
Now you can control the car with our mobile APP
"RobotCarKit" available at Google Play and AppStore.
For anything else of this robot car, you can check the CD
that comes with the kit or visit our Wiki page :
https://www.uctronics.com/wiki/index.php?title=K0073
The CD should include:
If you:
You can go to the Wiki link above with addition content of
Other Uctronics Motorized Toy Car manuals
Popular Motorized Toy Car manuals by other brands

Kyosho
Kyosho V-oneS III instruction manual

HPI Racing
HPI Racing TROPHY 3.5 instruction manual

Kyosho
Kyosho PureTen EP Alpha3 4WD series instruction manual

Kinroad
Kinroad XT150GK-8 owner's manual

GM-Racing
GM-Racing Radicator Nitro-RTR instruction manual

Time for Machine
Time for Machine Sandstorm Cruiser Assembly manual